Time For Fun

9/19/20 Top Rocker at 613 Avenue Create!

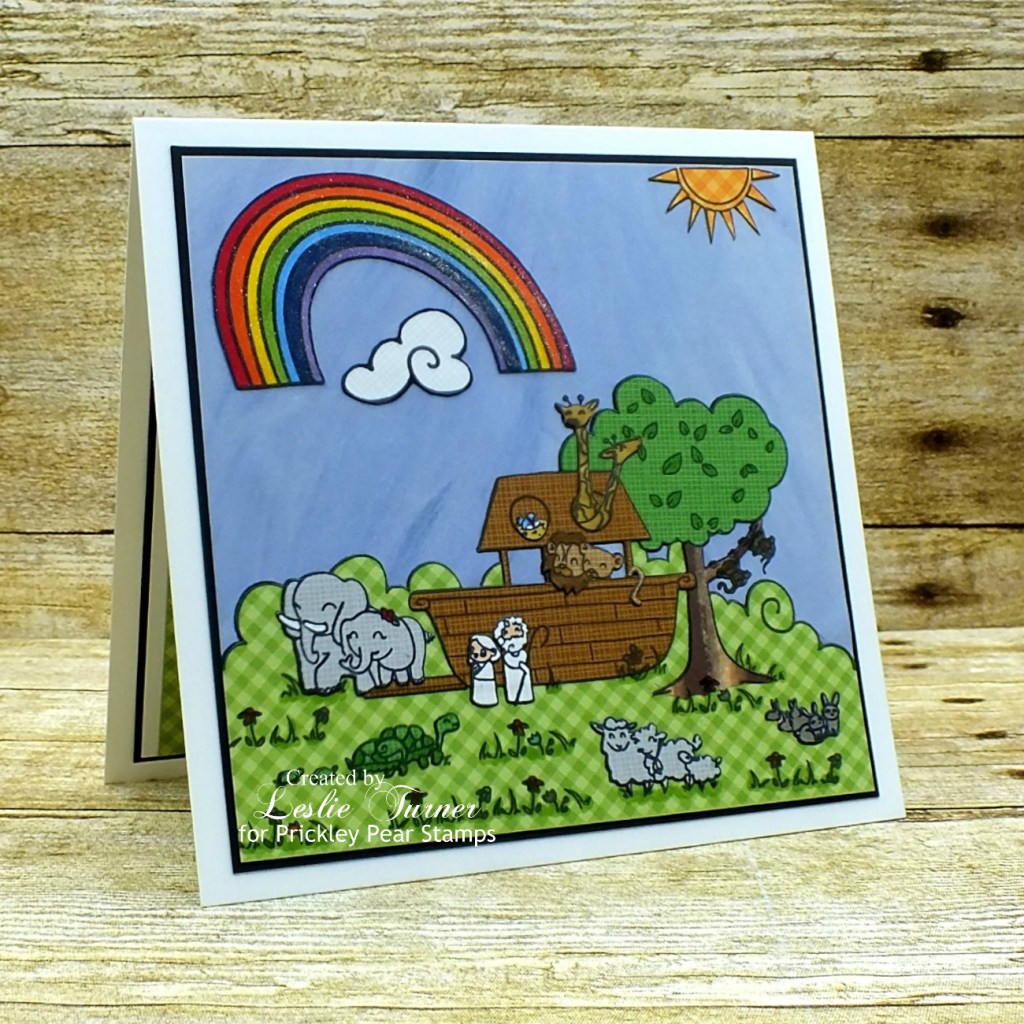
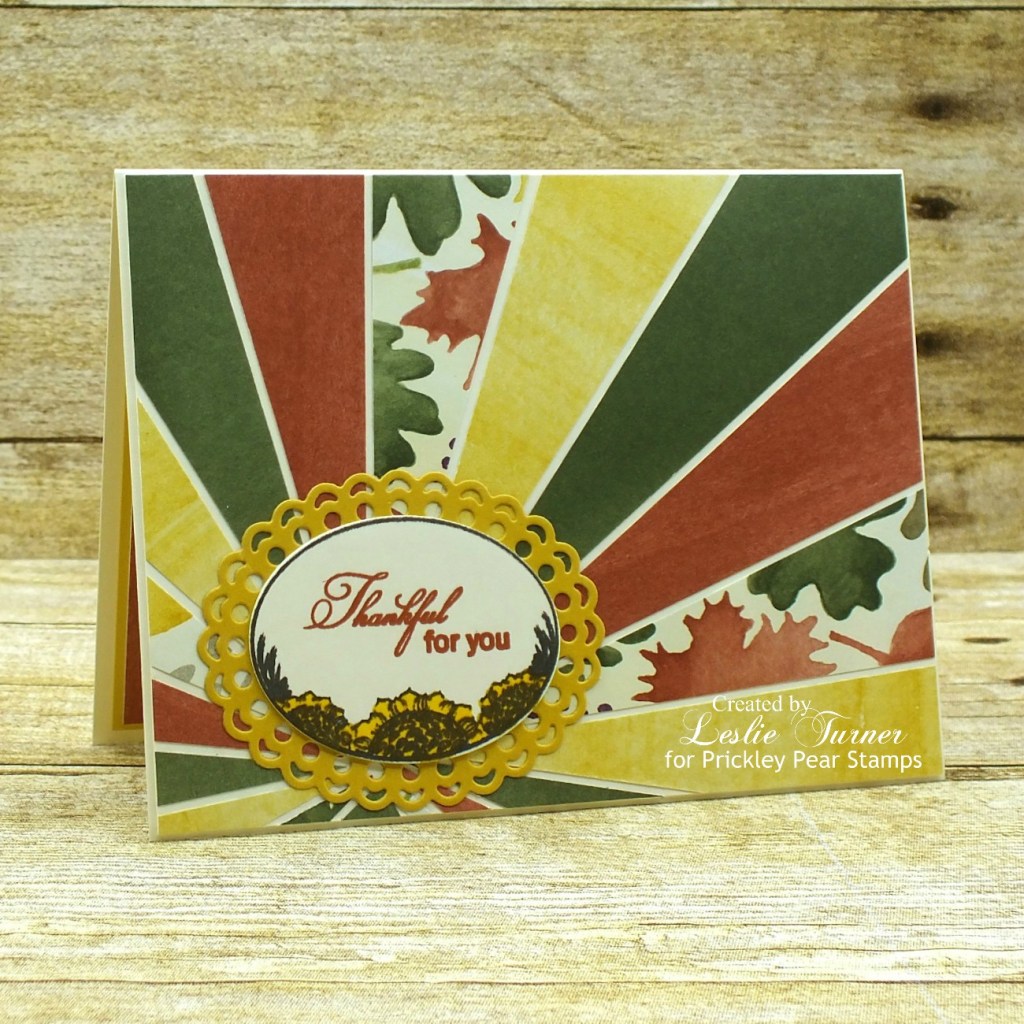
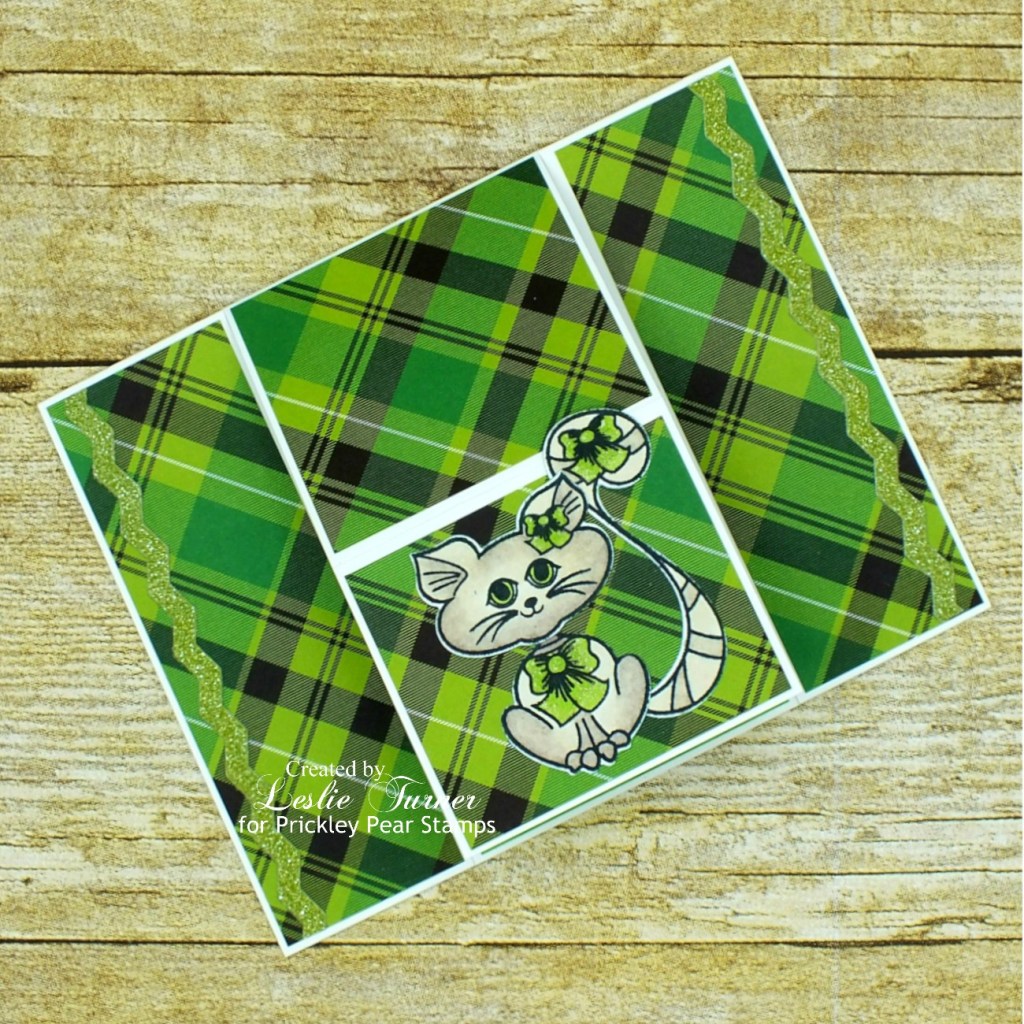
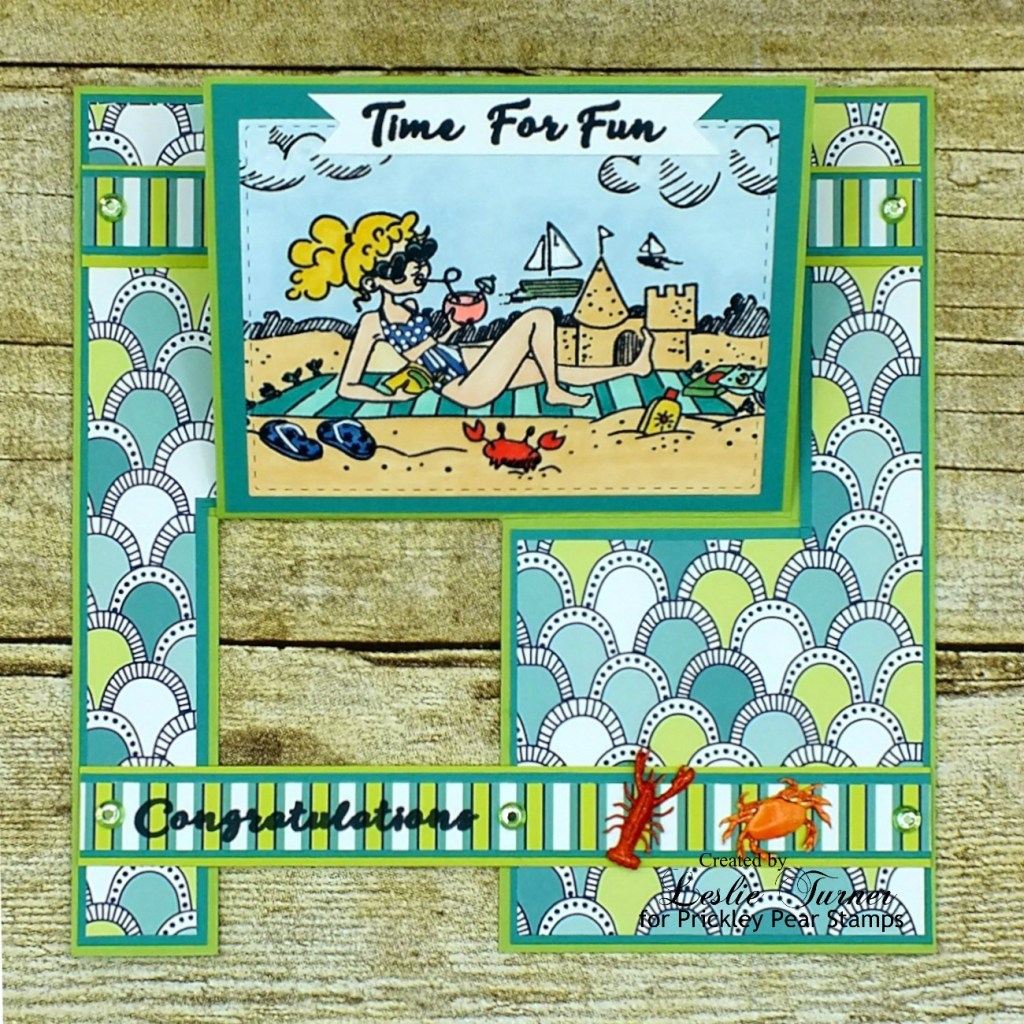
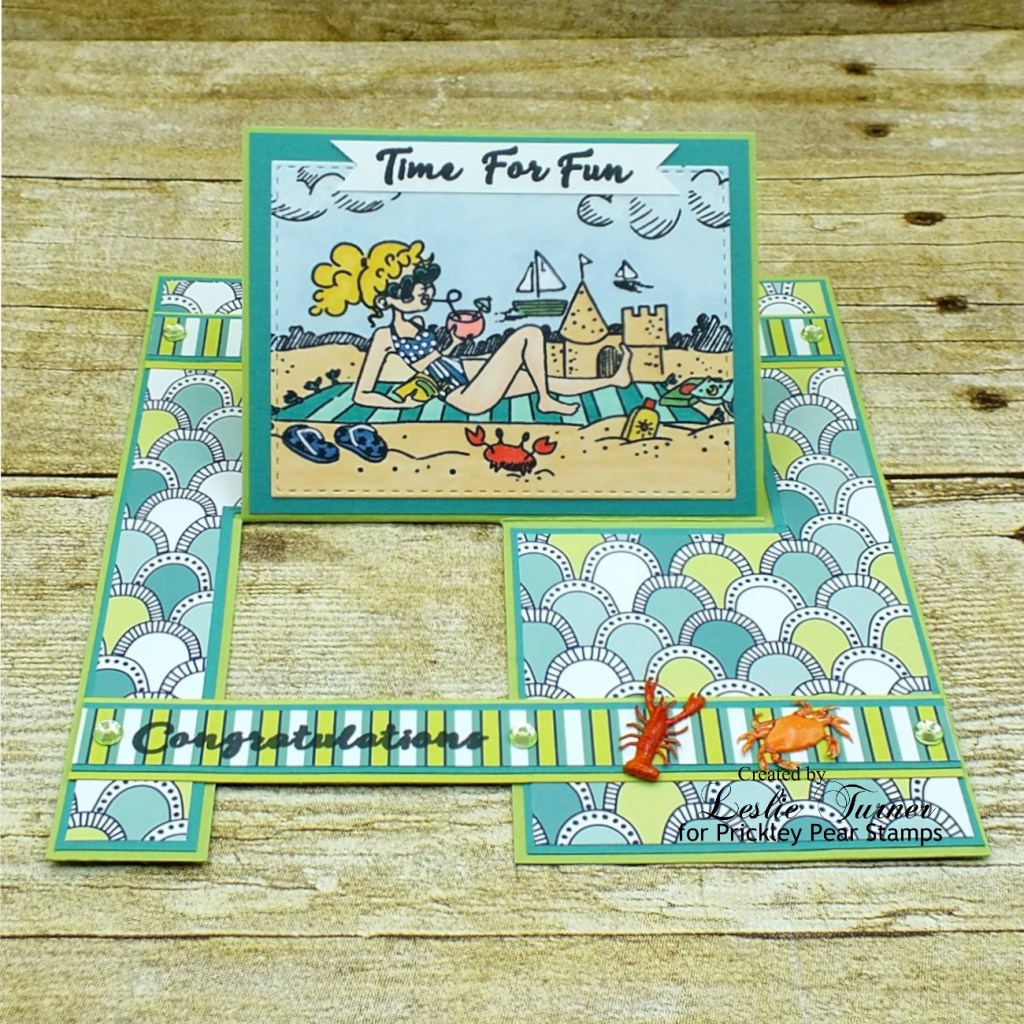
Hi friends! Today is a sad day in American history as we remember all those who lost their lives on 9/11/2001 when America suffered a most horrific terrorist attack on the Twin Towers. May God continue to bless those families who lost loved ones. On a lighter and happier note, I’ve popped in this morning to share a sample I created for Prickley Pear Stamps. Do you remember the ‘impossible card’ that swept the craft world a few years ago? Yep, I made a few of them – they are fun and super easy! I turned this one into a retirement card using the awesome Play Day on the Beach stamp set! I have to admit that I’m in full-on retirement mode since my official retirement date is in a few weeks! ;)

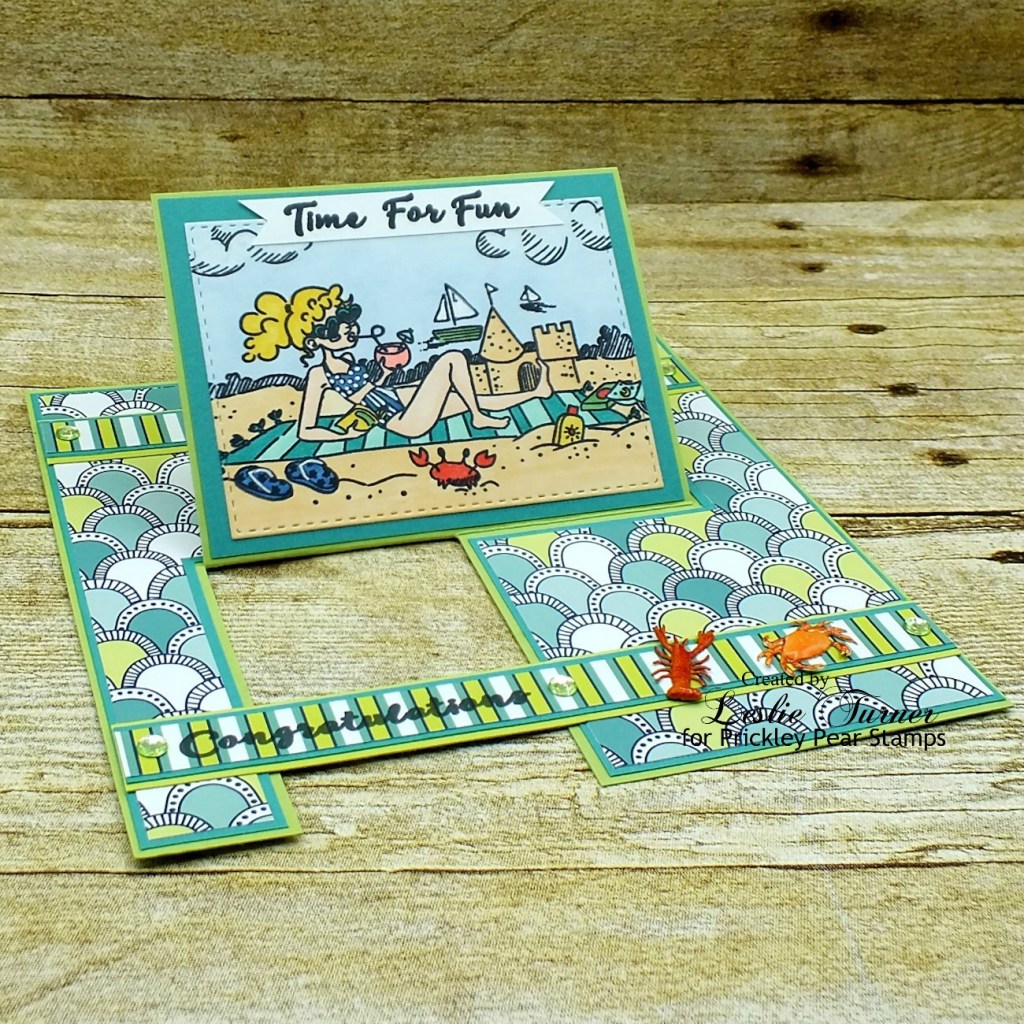
I cut the card base from light green cardstock and the layers from a textured teal cardstock to compliment the colors in the patterned paper. I stamped the image, colored it with Nuvo alcohol markers and cut it with a stitched rectangle die. I stamped the top sentiment on a scrap piece of white cardstock, trimmed it and flagged the ends with a small square punch. I cut the horizontal strips from a coordinating patterned paper and then the layers from the teal and light green cardstock. I stamped ‘Congratulations’ on the left end of the bottom strip, and added light green gemstones on the strips along with crab and lobster brads to tie in the beach theme.

And one more peek… this is such an interesting design that is super simple but packs a great punch!

Sharing in the following challenges:
1. 613 Avenue Create: September Anything Goes w/ optional Charm
2. A Perfect Time To Craft Open Challenge: #9-2020 – Anything Goes
3. Jan’s Digi Stamps Challenges: September Anything Goes
4. Moving Along With The Times: #122 – Create A Scene
5. Not Just Card Challenges: September Anything Goes
6. Scrapping4fun Challenges: #175 – Anything Goes
7. Time Out Challenges: #170 – Adventurous

Products used:
Cardstock/Paper: Stampin’ Up Lemon Lime Twist cardstock, Marco’s Kachina Grass Cloth cardstock, Dare 2B Artzy Modern Bliss patterned paper
Stamps: Prickley Pear Stamps Play Day on the Beach stamp set
Ink: Memento Tuxedo Black ink; Spectrum Noir alcohol marker- FS7; Nuvo alcohol markers- 425, 429, 360, 369, 413, 389, 451, 377, 477; Sakura White Gelly Roll pen
Dies/Punches: Memory Box Stitched Rectangle Layers die, EK Success 3/4″ square punch (to flag sentiment strip)
Accessories:  Tombow Mono permanent adhesive, Bearly Art precision craft glue, MISTI stamp tool, Gemini Junior, Eyelet Outlet Crab & Lobster Brads, Ranger distress collage medium, Darice green gemstones

I hope you’ve enjoyed this project! Be sure to check out all the awesome stamps and dies at Prickley Pear Stamps! If you’d like to save 10% on anything on the site when you shop at Prickley Pear Stamps, use the coupon code LESLIE10 at checkout! And be sure to ‘like’ and ‘follow’ the Prickley Pear Stamps Facebook page to keep up with news and sales, and join Prickley Pear Pals (the fan group) for lots of fun crafty ideas and to share your creativity! And finally, we’d love to see you visit the Prickley Pear Stamps blog that’s in the process of being revived and become a Follower! Hope to see you there! Thanks so much for stopping by today – we’ll see you next time! ;)

Scrappy hugs,
lesliesig

love much & laugh often

9/19/20 Top Rocker at 613 Avenue Create!

Hello again! I hope you’re having a great day! I’ve popped back in to share another sample I created for the Prickley Pear Stamps showcase on Hochanda last week. I used the Gears 2 clear stamp set along with the Steampunk Gears and Mini Gears die sets to create this awesome steampunk card. I have to say that this herringbone background is a super fun technique and I’ll definitely be doing this again! It’s time-consuming but SO worth it!

Once the herringbone background was complete and layered on textured brown cardstock, I adhered it to the card base. I stamped the sentiment in brown ink, trimmed it and layered it on the brown textured cardstock.

I die cut a bunch of gears, covered them with Versamark and then with various colors of ‘metal’ embossing powders, then arranged them in layers on the card front, gluing them down as I went. I then tucked the sentiment in underneath and adhered it.

I created a smaller thinner herringbone panel which I layered on the textured brown cardstock and used to embellish the inside panel. I stamped the sentiment and layered that panel on the textured brown cardstock as well.

And one more peek… totally loving this card! And I’m not even a steampunk fan! The herringbone background really sets off the embossed gears, don’t you think?!

Here’s a screenshot I grabbed while Alex was holding this card up for the viewers to see which I thought I’d share! ;)

Sharing in the following challenges:
1. 613 Avenue Create: September Anything Goes w/ optional Charm
2. A Perfect Time To Craft Open Challenge: #9-2020 – Anything Goes
3. Jan’s Digi Stamps Challenges: September Anything Goes

Products used:
Cardstock/Paper: Neenah Classic Crest Baronial Ivory cardstock, Darice brown textured cardstock, Polly’s Paper Studio assorted patterned papers
Stamps: Prickley Pear Stamps Gears 2 clear stamp set
Ink: Versamark, Ranger ground espresso archival ink
Dies/Punches: Prickley Pear Stamps Steampunk Gears and Mini Gears die sets
Accessories:  Bearly Art precision craft glue, ScraPerfect Best Glue Ever, MISTI stamp tool, Gemini Junior; Ranger Black, Liquid Platinum and super fine detail Gold embossing powders; Milwaukee heat tool

I hope you’ve enjoyed this project! Be sure to check out all the awesome stamps and dies at Prickley Pear Stamps! If you’d like to save 10% on anything on the site when you shop at Prickley Pear Stamps, use the coupon code LESLIE10 at checkout! And be sure to ‘like’ and ‘follow’ the Prickley Pear Stamps Facebook page to keep up with news and sales, and join Prickley Pear Pals (the fan group) for lots of fun crafty ideas and to share your creativity! Hope to see you there! Thanks so much for stopping by today – we’ll see you next time! ;)

Scrappy hugs,
lesliesig

Happy Holidays

Happy Hump Day, my friends! I mentioned yesterday that the Prickley Pear Stamps showcase on Hochanda was last week so I’m sharing some of the samples I created for the show!

I used the Birdcage Winter 2 clear stamp set and the Birdcage die for this pretty slimline Christmas card in traditional red and green, featuring three circular frames with a bird on a branch in the center of each. I really enjoyed creating this card!

I cut a white slimline card base along with three 3″ square pieces of red glitter paper and adhered them to the card base. I cut three stitched mini scallop frames and two narrow strips of green embossed paper. I stamped three branches in green ink and three birds in red ink on white cardstock, and die cut the branches with a circle die and the birds with the corresponding bird die.

I adhered the circular branch die cuts behind the frames and adhered one to the center of each red glitter paper square. I adhered the narrow green embossed paper strips to the seams where the glitter paper squares meet. I popped each bird up on a foam square and adhered one to each branch, and then added tiny dots of Rouge Perfect Pearls. The final touch was stamping the sentiment in red ink on white cardstock, trimming it and flagging the ends, and adhering it to the center circle.

I embellished the inside panel with leftover pieces of the red glitter paper and the green embossed paper, added a die cut sentiment, and layered the panel on red cardstock.

And one more peek… so loving how this turned out!

As I was watching the show, I took a screenshot of each project while Alex was holding them up for the viewers to see, so I’ll be sharing those with each post. ;)

Sharing in the following challenges:
1. 2 Crafty Critter Crazies: #42 – Anything Goes
2. A Perfect Time To Craft Open Challenge: #9-2020 – Anything Goes
3. Jan’s Digi Stamps Challenges: September Anything Goes
4. Sparkles Christmas Challenge: #116 – Festive Things With Wings

Cardstock/Paper: Neenah Classic Crest Solar White cardstock, American Crafts Rouge cardstock, American Crafts Christmas 6×6 paper pad, Kaiser Craft Letters To Santa 6-1/2” paper pad
Stamps: Prickley Pear Stamps Birdcage Winter 2 stamp set
Ink: Stampin’ Up Always Artichoke and Real Red ink
Dies/Punches: Prickley Pear Stamps Birdcage die set, Memory Box Stitched Circle Layers die, My Favorite Things Die-namics Stitched Mini Scallop Circle STAX die, Sizzix Holiday Words: Script die
Accessories: Tombow Mono permanent adhesive, Bearly Art precision craft glue, Gemini Junior, Ranger Rouge Perfect Pearls

I hope you’ve enjoyed this project! Be sure to check out all the awesome stamps and dies at Prickley Pear Stamps! If you’d like to save 10% on anything on the site when you shop at Prickley Pear Stamps, use the coupon code LESLIE10 at checkout! And be sure to ‘like’ and ‘follow’ the Prickley Pear Stamps Facebook page to keep up with news and sales, and join Prickley Pear Pals (the fan group) for lots of fun crafty ideas and to share your creativity! Hope to see you there! Thanks so much for stopping by today – we’ll see you next time! ;)

Scrappy hugs,
lesliesig

Noah’s Ark

Howdy peeps! Top of the morning to you! I’ve popped in this morning to share a sample I created for Prickley Pear Stamps using the new Noah’s Ark stamp set! OMGoodness, this is THE most fun stamp set to play with – there are so many adorable elements! I haven’t done paper piecing in a while and thought this would be a fun stamp set to do that with! Lots of fussy cutting but definitely well worth it! ;)

Paper piecing is such a fun technique especially when creating a scene! I had a large time going through patterned paper finding just the right patterns to use for all the elements! I did accent a few of the animals with alcohol markers, and used a shimmer pen on the rainbow to add a bit of shimmer.

I embellished the inside panel with some of the green plaid paper used on the front and a thin strip of black cardstock, stamped the greeting and layered the panel on black cardstock.

And one more look… I’m absolutely tickled with how this turned out!

Sharing in the following challenges:
1. 2 Crafty Critter Crazies: #42 – Anything Goes
2. 613 Avenue Create: September Anything Goes w/ optional Charm
3. Jan’s Digi Stamps Challenges: September Anything Goes
4. Lemon Shortbread Challenge Blog: #128 – Anything Goes
5. Moving Along With The Times: #122 – Create A Scene

Products used:
Cardstock/Paper: Neenah Classic Crest Solar White cardstock, Papertrey Ink True Black cardstock, Doodlebug Design gingham-linen rainbow petite prints, The Paper Studio Entirely Textures 2 12×12 paper pad
Stamps: Prickley Pear Stamps Noah’s Ark clear stamp set
Ink: Memento Tuxedo Black ink (pad and marker), Sakura White Gelly Roll pen, clear Wink of Stella, Spectrum Noir FS7; Nuvo alcohol markers- 497, 412, 431, 427, 439, 393, 466, 405, 379, 479
Accessories: Bearly Art precision craft glue, Tombow Mono permanent adhesive, MISTI stamp tool

I hope you’ve enjoyed this project! Be sure to check out all the awesome stamps and dies at Prickley Pear Stamps! If you’d like to save 10% on anything on the site when you shop at Prickley Pear Stamps, use the coupon code LESLIE10 at checkout! And be sure to ‘like’ and ‘follow’ the Prickley Pear Stamps Facebook page to keep up with news and sales, and join Prickley Pear Pals (the fan group) for lots of fun crafty ideas and to share your creativity! Hope to see you there! Thanks so much for stopping by today – we’ll see you next time! ;)

Scrappy hugs,
lesliesig

Thankful for you

Howdy, everybody! As I mentioned earlier today, the Prickley Pear Stamps showcase on Hochanda was last week so I’m sharing another sample I created for the show! I used the Scalloped Oval 2-Fall clear stamp set along with the Scalloped Oval Die and Scallop Oval Nesting Dies to create this Fall-themed card.

I cut a landscape A2 top-folding card base from ivory cardstock, then created a starburst background with an assortment of Fall papers. I stamped and die cut the oval, colored the sunflowers and layered it on a yellow Scalloped Oval die cut.

I embellished the inside panel with leftover scraps of some of the papers used on the front, stamped the sentiment and layered the panel on yellow cardstock.

And one more peek… absolutely loving how this turned out! Fall is my favorite season so this was right up my alley! And I love the starburst background!

As I was watching the show, I took a screenshot of each project while Alex was holding them up for the viewers to see, and thought I’d share the corresponding screenshot with each post. ;)

Sharing in the following challenges:
1. A Perfect Time To Craft Open Challenge: #9-2020 – Anything Goes
2. Classic Design Challenge: #9 – Anything Goes
3. Creative Moments; #198 – Anything Goes
4. Lil Patch of Crafty Friends: #141 – Anything Goes

Products used:
Cardstock/Paper: Neenah Classic Crest Baronial Ivory cardstock, Stampin’ Up Crushed Curry and Daffodil Delight cardstock, Stampin’ Up Color Me Autumn DSP
Stamps: Prickley Pear Stamps Scalloped Oval 2-Fall clear stamp set
Ink: Ranger ground espresso archival ink, Nuvo alcohol marker 404, Stampin’ Up Cajun Craze ink,
Dies/Punches: Prickley Pear Stamps Scalloped Oval Die and Scallop Oval Nesting Dies
Accessories: Tombow Mono permanent adhesive, Bearly Art precision craft glue, MISTI stamp tool, Gemini Junior

I hope you’ve enjoyed this project! Be sure to check out all the awesome stamps and dies at Prickley Pear Stamps! If you’d like to save 10% on anything on the site when you shop at Prickley Pear Stamps, use the coupon code LESLIE10 at checkout! And be sure to ‘like’ and ‘follow’ the Prickley Pear Stamps Facebook page to keep up with news and sales, and join Prickley Pear Pals (the fan group) for lots of fun crafty ideas and to share your creativity! Hope to see you there! Thanks so much for stopping by today – we’ll see you next time! ;)

Scrappy hugs,
lesliesig

What size should a slimline really be?

Hi friends! I hope you are having a great day! I’ve jumped on the slimline wagon and have made several slimline cards. But before I made the first one, I did some research online to learn as much about them as I could.

The slimline card was originally designed to fit into a #10 business envelope which measures 9-1/2″ x 4-1/8″. The most common size slimline card being made is 8-1/2″ x 3-1/2″ which is a bit small, in my opinion, for the #10 envelope. I personally have a ‘thing’ about an envelope swallowing a card.

I’m somewhat of a rebel so I decided to create my own dimensions – and I make mine 9″ x 3-3/4″ which fits perfectly into a #10 business envelope and allows for layers and ‘normal’ embellishments that aren’t off-the-charts huge.

I’m just wondering how others feel about the size. Does anyone else agree that the envelope being 1″ longer and 5/8″ wider than the card is weird? Or am I weird, lol?!

I’m curious about what other crafters think, so let’s do a poll! ;)

Meowy Christmas

Hi friends! I’ve popped in to share another sample I created for Prickley Pear Stamps! I’m having the best time playing with these amazing stamps and dies, and I have several samples to share in between the Hochanda samples. This is an adorable center panel easel card featuring the Build A Cat 2 clear stamp set and the coordinating Build A Cat die set. We are ‘crazy cat people’ so any opportunity I get to create a cat card, especially a Christmas cat card, I’m on it!

I’ve had the instructions for this center panel easel card in my tutorial folder for quite some time and I’ve made a few of them over the years. I paired plaid and glitter papers from a fun 6×6 Christmas paper pad with some matching green cardstock. I colored the kitty’s bows green to match the card and I used a rather lonely border die in my stash that doesn’t get much use to create the glittery rick-rack die cuts on the sides, and a couple circle punches for the stamped sentiment.

Here’s an angled view so you can see the simple but cool construction. ;)

And one more peek… lying flat and ready to stuff into an envelope. Loving how this turned out!

Sharing in the following challenges:
1. 2 Crafty Critter Crazies: #42 – Anything Goes
2. Classic Design Challenge: #9 – Anything Goes
3. Creative Moments; #198 – Anything Goes
4. Lil Patch of Crafty Friends: #141 – Anything Goes

Products used:
Cardstock/Paper: CutCardStock Granny Smith cardstock, American Crafts Christmas 6×6 paper pad, American Crafts Cricket glitter paper
Stamps: Prickley Pear Stamps Build A Cat 2 clear stamp set
Ink: Memento Tuxedo Black ink; Nuvo alcohol markers- 412, 495, 497, 400; Sakura Clear Star Gelly Roll pen
Dies/Punches: Prickley Pear Stamps Build A Cat die set, Sizzix Borders die, Stmapin’ Up 1-1/4″ and 1-3/8″ circle punches
Accessories:  Bearly Art precision craft glue, Tombow Mono permanent adhesive, MISTI stamp tool, Gemini Junior

I hope you’ve enjoyed this project! Be sure to check out all the awesome stamps and dies at Prickley Pear Stamps! If you’d like to save 10% on anything on the site when you shop at Prickley Pear Stamps, use the coupon code LESLIE10 at checkout! And be sure to ‘like’ and ‘follow’ the Prickley Pear Stamps Facebook page to keep up with news and sales, and join Prickley Pear Pals (the fan group) for lots of fun crafty ideas and to share your creativity! Hope to see you there! Thanks so much for stopping by today – we’ll see you next time! ;)

Scrappy hugs,
lesliesig

home tweet home

9/19/20 Top Rocker at 613 Avenue Create!

Hi friends! A very Happy Tuesday to you! The Prickley Pear Stamps showcase on Hochanda was last week so I’m ready to start sharing some of the samples I created for the show! There are a few so I plan to spread them out over the next couple weeks. Hochanda is a UK-based crafts, hobbies and arts TV channel which frequently showcases products made and sold in the USA, so this is truly an honor! As I was watching the show, I took a screenshot of each project while Alex was holding them up for the viewers to see, and thought I’d share the corresponding screenshot with each post. ;)

I used the Birdcage clear stamp set along with the Birdcage die set for this new home card which features a layered gold foil birdcage with a stamped bird inside and a pretty pink bow.

I created a standard A2 top-folding white card base. I love to round one bottom corner to add interest to my cards. I chose two pretty coordinating patterned papers to create the background panel and added a gold foil strip at the line where the papers meet. I die cut three birdcages from white cardstock and one from gold foil, and layered them on top of one another to create a dimensional element. I stamped and die cut the bird which I affixed behind the birdcage just prior to adhering it to a light pink stitched oval die cut. I stamped the sentiment and trimmed it to fit the area at the base of the birdcage, then added a pink and white dotted bow and some Sprinkles in the lower left and upper right corners.

I embellished the inside panel with scraps of the patterned paper used on the front along with a narrow strip of gold foil cardstock, added a layered die cut sentiment, and layered the panel on the light pink cardstock.

And one more peek… so loving how this turned out!

Sharing in the following challenges:
1. 613 Avenue Create: September Anything Goes w/ optional Charm
2. Classic Design Challenge: #9 – Anything Goes
3. Creative Moments; #198 – Anything Goes
4. Lil Patch of Crafty Friends: #141 – Anything Goes

Cardstock/Paper: Neenah Classic Crest Solar White cardstock, Hygloss gold foil cardstock, Stampin’ Up Powder Pink cardstock, Colorbok Mint Julep designer paper
Stamps: Prickley Pear Stamps Birdcage stamp set
Ink: Memento Tuxedo Black ink
Dies/Punches: Prickley Pear Stamps Birdcage die set, Memory Box Stitched Oval Layers die, Sizzix Celebration Words: Script die
Accessories: Tombow Mono permanent adhesive, Bearly Art precision craft glue, MISTI stamping tool, Gemini Junior, pink dotted ribbon scrap, Doodlebug Design Sprinkles- Tangerine Assortment

I hope you’ve enjoyed this project! Be sure to check out all the awesome stamps and dies at Prickley Pear Stamps! If you’d like to save 10% on anything on the site when you shop at Prickley Pear Stamps, use the coupon code LESLIE10 at checkout! And be sure to ‘like’ and ‘follow’ the Prickley Pear Stamps Facebook page to keep up with news and sales, and join Prickley Pear Pals (the fan group) for lots of fun crafty ideas and to share your creativity! Hope to see you there! Thanks so much for stopping by today – we’ll see you next time! ;)

Scrappy hugs,
lesliesig

Funky Birds Handbag

9/30/20 Best Technique Winner at Classic Design Challenge Blog!
9/30/20 Spotlight Winner at A Perfect Time To Craft Open Challenge!

Hi everyone! It’s Saturday and I’m thrilled to be back on the Eyelet Outlet blog today with another awesome DT inspiration project! I’ve been playing with my purse die set again and this time created a gift bag featuring some very fun washi tape, bling and a large paper flower from Eyelet Outlet – just in time for a summer or beach wedding or an anniversary! How fun would it be to tuck a gift card or cash into this little purse?!

For the front and back of the purse base, I covered the cardstock with Funky Birds Washi Tape and die cut the pieces. I then cut all the rest of the purse pieces from tweed cardstock and the rings from gold foil cardstock, and assembled the handles. I assembled the purse base and added White Pearl Bling Strips across the washi tape seams on the front and back, then attached the handles and the other purse pieces. I attached the three Paper Flower layers with an Amber 6mm Jewel Brad w/Gold Edge and affixed the flower to the front of the purse.

Here’s a shot of the back of the purse. I’m so loving how this turned out! I think it’s time to admit that I’ve become a paper purse addict, lol!

Sharing in the following challenges:
1. A Perfect Time To Craft Open Challenge: #9-2020 – Anything Goes
2. Classic Design Challenge: #9 – Anything Goes
3. Crafty Calendar Challenge: September Anything Goes
4. Crafty Catz Challenge: #517 – Anything Goes w/ optional Not A Square
5. Crafty Gals Corner: #210 – Summer Fun
6. Let’s Craft and Create: #163 – Anything Goes w/ optional Best Friends
7. Time Out Challenges: #169 – Season (Summer)
8. Try it on Tuesday: Neat and Tidy
9. Tuesday Throwdown: #465 – Anything Goes
10. Word Art Wednesday: Weeks #454/455 – Anything Goes
11. Your Scrapbook Place: September Anything Goes

Eyelet Outlet products used:
Funky Birds Washi Tape
Pearl Bling Strips- White
6mm Jewel Brads w/Gold Edge- Amber
Paper Flowers

Other products used:
Cardstock/Paper: Neenah Classic Crest Solar White cardstock, Canvas Corp Tweed cardstock, Hygloss Gold Foil cardstock, Yupo paper
Dies/Punches: Concord & 9th Everyday Purse die set
Accessories:  Bearly Art precision craft glue, Gemini Junior

I hope you’ve enjoyed today’s project! Be sure to check out all the fun goodies at Eyelet Outlet! I can already see you drooling, lol! Be sure to ‘like’ and ‘follow’ Eyelet Outlet Facebook Page to keep up with news and sales! Thanks so much for stopping by today – we’ll see you next time! ;)

Scrappy hugs,
lesliesig

Hello

9/10/20 Top 3 at Cardz 4 Galz!
9/22/20 Top 5 at Try It On Tuesday!

Hi everyone! Can you believe we’re headed into September already?! I keep saying it’ll be Christmas before we know it… and you know I’m right! Our new CutCardStock DT term starts today and I’m stoked to be back on the CutCardStock blog with an awesome DT inspiration project featuring Curious Metallic Gold Leaf and CCS Gold Glitter cardstock! Affiliate links are used in this post at no cost to you. I really appreciate your support! I created a note card – and this is not your ordinary note card! This note card features a gold starburst background!

I sure had fun with this! I created an A2 size top-folding card base from Classic Crest Baronial Ivory cardstock along with an extra panel for the front and two panels for the inside. I cut strips between 3″ and 5″ long from CCS Gold Glitter cardstock and Curious Metallic Gold Leaf cardstock. The width of the strips for this background can be 1/2″, 3/4″ or 1″ depending on the size of your card. I used 3/4″ wide strips for this note card. I cut each strip in half diagonally, from top right down to bottom left.

Adhering the strips to the panel is absolutely the most fun part of this card! I started at about 10 o’clock and worked my way around the panel in a counter-clockwise fashion, leaving a very thin border between the strips. I then die cut a stitched oval to cover the ends, adhered a die cut sentiment to the oval, and trimmed the right side of the oval even with the right side of the panel. I adhered the panel to the card base and added a few tiny gold flat-back pearls.

I embellished the inside panel with leftover strips of the gold glitter and the gold leaf cardstock, then layered the panel onto another ivory panel for some tone-on-tone interest. I adhered the panel to the inside of the card base and left it blank to write a custom message.

And one more peek… sure am loving how this turned out! So elegant!

Sharing in the following challenges:
1. A Perfect Time To Craft Open Challenge: #9-2020 – Anything Goes
2. Cardz 4 Galz: #129 – Just Saying Hello
3. Classic Design Challenge: #9 – Anything Goes
4. The Crafter’s Cafe: #250 – Anything Goes
5. Try it on Tuesday: Neat and Tidy
6. Word Art Wednesday: Weeks #454/455 – Anything Goes
7. Your Scrapbook Place: September Anything Goes

CutCardStock products used:
Classic Crest Baronial Ivory 80# cardstock
CCS Gold Glitter 74# cardstock
Curious Metallic Gold Leaf 92# cardstock

Other products used:
Dies/Punches: Memory Box Stitched Oval Layers die, Gemini Opulent Swirls die set
Accessories:  Tombow Mono permanent adhesive, Bearly Art precision craft glue, Gemini Junior, Flourish with a Bling Antique Gold flat-back pearls

I hope you’ve enjoyed today’s project and you’re inspired to get crafty! Be sure to check out all the awesome cardstock and other goodies at CutCardStock (adhesives, labels, stickers, pens, watercolors and ribbon to name a few). And head on over to the CutCardStock Facebook Page for more inspiration! Thanks so much for stopping by today – we’ll see you next time!

Scrappy hugs,
lesliesig