You are Fabulous

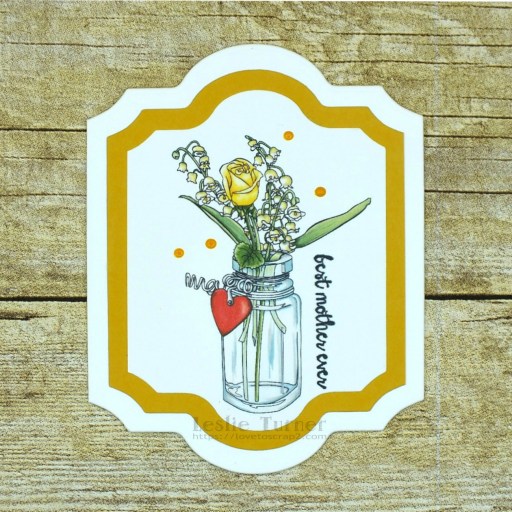
Hey everybody! I hope you’re having a fantastic weekend! You know where I am, lol! ;) Affiliate links are used in this post at no cost to you – I really appreciate your support! I was dubbed a 2021 Front Porch Gang Master Rocker (along with quite a few others) by the lovely Chana, owner of 613 Avenue Create, which is an honor bestowed upon those who often made the Top Rocker list in 2021! We were offered a guest design gig and I chose the month of February, so here I am! The challenge this month is Anything Goes with an optional twist of My Whimsical Valentine. I dug into my digital image stash and found a precolored image and sentiment from Mo’s Digital Pencil and created this super adorable Valentine! This image is called Fabulous – and yes, she is fabulous and just the cutest little thing ever!

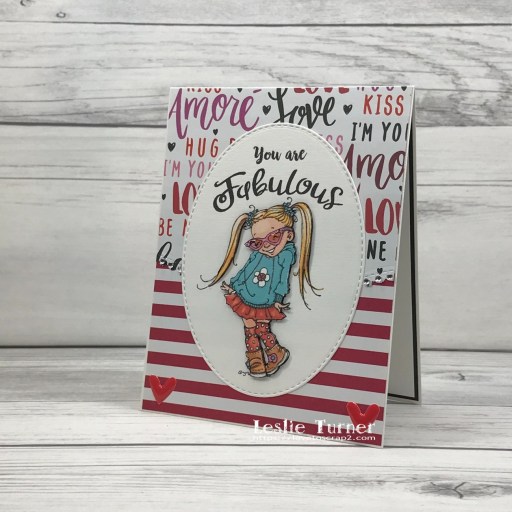
I cut a standard A2 top-folding card base from CutCardStock Basis 110# White cardstock along with layering panels from two coordinating patterned papers from The Paper Studio Four Seasons and Everything In Between -2- paper pad. Using the My Favorite Things Stitched Scallop Basic Edges Die-namics, I cut one of the patterned papers off just below the half-way point and adhered them together and then to the card base. I printed the image twice on CutCardStock Basis 80# White cardstock and cut one of them with a Memory Box Stitched Oval Layers die. I fussy cut the second image, ran a black marker around the outside edge, and layered it on top of the die cut image with foam squares for a little dimension. I added Ranger Glossy Accents to her glasses for some interest. I adhered the die cut to the card front, and added some clear bling and enamel hearts to finish it off.

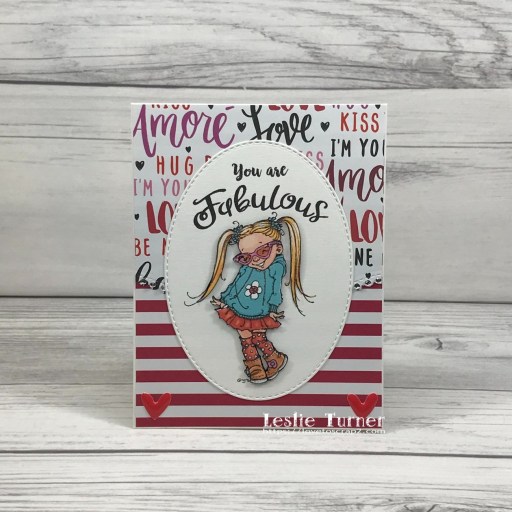
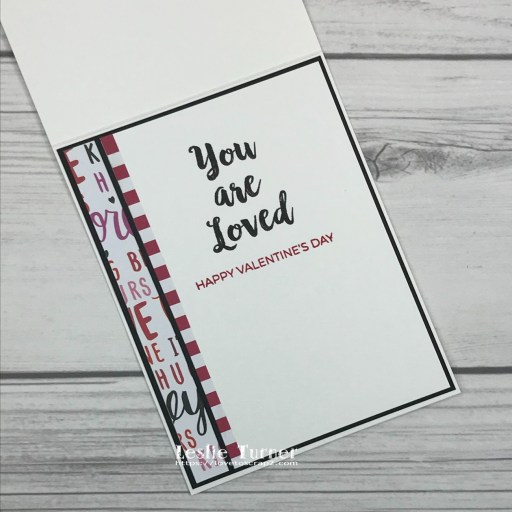
I printed the inside sentiment on CutCardStock Basis 80# White cardstock, trimmed it, and embellished it with leftover strips of the patterned paper used on the front along with a very thin strip of CutCardStock Pop-Tone Black Licorice cardstock. I stamped an additional Valentine sentiment in red ink and layered the panel on the black cardstock.

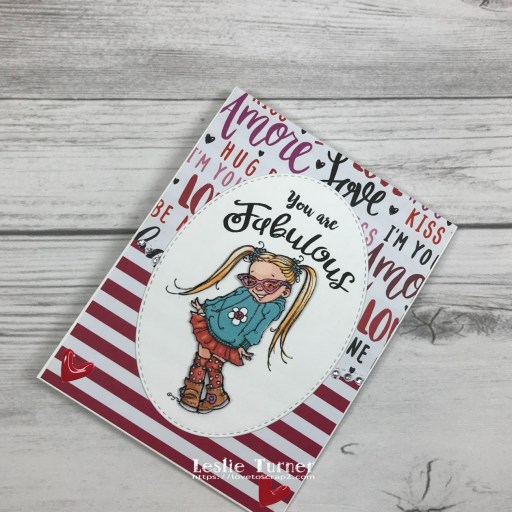
And one more peek… such an adorable image! I don’t use digital images very often anymore but I couldn’t resist this one! ;)

Sharing in the following challenges:
1. A Perfect Time To Craft Open Challenge: #02-2022 – February Anything Goes
2. Classic Design Challenge: February #2 – Anything Goes
3. Crafting Happiness Challenges: #120 – Anything Goes
4. Di’s Digi Challenge: Use Red and/or Pink
5. Make the Cards Challenge: #47 – Make a Valentine
6. Moving Along With The Times: #139 – Love/Anniversary/Wedding
7. Paperbabe Stamps: #160 – Anything Goes
8. QKR Stampede: #437 – Anything Goes
9. Through The Craft Room Door: February Anything Goes
10. Wednesday’s Creative Inspirations Challenge Blog: February With Love

Products used:
Cardstock/Paper: CutCardStock Basis 110# White cardstock, CutCardStock Basis 80# White cardstock, CutCardStock Pop-Tone Black Licorice cardstock, The Paper Studio Four Seasons and Everything In Between -2- paper pad
Stamps: Mo’s Digital Pencil Fabulous digital image and You are loved digital sentiment, Trinity Stamps A Sentiment For (Almost) Everything stamp set
Ink: Memento Tuxedo Black marker, Catherine Pooler Rockin’ Red ink
Dies/Punches: Memory Box Stitched Oval Layers, My Favorite Things Stitched Scallop Basic Edges Die-namics
Accessories: Tonic Studios 12″ Guillotine Paper Trimmer, Tombow Mono Adhesive, Ranger Glossy Accents, Scrapbook Adhesives 3D Foam Squares Variety Pack, Flourish with a Bling clear gemstones, Eyelet Outlet Enamel Hearts

I hope you’ve enjoyed seeing this whimsical Valentine and will link up with us this month! Thanks so much for stopping by today – we’ll see you next time! ;)

Scrappy hugs,

Happy Valentine’s Day Birdhouse Box Card

3/5/22 Top 3 at Crafty Calendar Challenge!
3/28/22 DT Favorite at A Perfect Time To Craft Open Challenge!

Hey everybody! I’m back on this fine Saturday morning with my second project share for the CutCardStock My Sweet Valentine Blog Hop going on today and tomorrow! Be sure to hop along with us for a chance to win a $40 CutCardStock gift card! Affiliate links are used in this post at no cost to you – I really appreciate your support! I’ve been having the best time playing with my Scan N Cut and thoroughly enjoyed creating the two Valentines from our amazing Basis cardstock for the hop. As mentioned in my last post, I’m showcasing both cards separately so I can enter them into some challenges. I am a fun fold geek and box cards run right there at the top of my favorite list! This card features lots of hearts in various forms and sizes, an adorable birdhouse adorned with red bling, embossed panels, and two of the cutest love birds ever perched in front of their house behind a white picket fence!

I cut all the pieces from Basis 80# Red cardstock, Basis 80# Pink cardstock, Basis 80# Black cardstock, Basis 80# White cardstock and Basis 80# Gold cardstock. Picking out the colors of cardstock is always fun when creating with the Scan N Cut, but I always look forward to the assembly the most! And the sentiment on the front of this card was also printed with the Scan N Cut using the draw feature which I’ve used several times and have grown to love!

Here’s a shot from a different angle. The back (which I didn’t photograph) is completely blank with plenty of room to write a custom message and sign.

And one more peek of the card folded flat for mailing. Another super cute box card that I’m totally in love with!

Sharing in the following challenges:
1. A Perfect Time To Craft Open Challenge: #2-2022 – Anything Goes
2. Aud Sentiments Challenge Blog: #291 – Love Sentiment
3. Classic Design Challenge: February #2 – Anything Goes
4. Crafting Happiness Challenges: #120 – February Anything Goes
5. Crafty Calendar Challenge: February Anything Goes
6. Crafty Catz: #581 – Anything Goes w/ optional twist of Anything But Square
7. Critter Crazy Challenges: #59 – Anything Goes with a Featured Critter
8. Di’s Digi Challenge: Use Red and/or Pink
9. International Art & Soul: #126 – All About Love/Hearts
10. Let’s Craft and Create: #180 – Anything Goes + From The Heart
11. Make The Cards Challenge: #47 – Create a Valentine
12. Moving Along With The Times: #139 – Love/Anniversary/Wedding
13. Wednesday’s Creative Inspirations Challenge Blog: February With Love

CutCardStock products used:
Basis 80# Red cardstock
Basis 80# Pink cardstock
Basis 80# Black cardstock
Basis 80# White cardstock
Basis 80# Gold cardstock

Other products used:
Dies/Punches/Cut Files: Simply Crafty SVGs Valentine Birdhouse Box Card cut file
Accessories: Brother Scan N Cut, Bearly Art precision craft glue, Martha Stewart Scoring Board, Cuttlebug Swiss Dots Embossing Folder, Big Shot, Eyelet Outlet Red Jewel Bling

I hope you’ve enjoyed today’s project and you’re inspired to get crafty! Be sure to check out all the awesome cardstock and other goodies at CutCardStock (adhesives, labels, stickers, pens, watercolors and ribbon to name a few). And head on over to the CutCardStock Facebook Page for more inspiration! Thanks so much for stopping by today – we’ll see you next time!

Scrappy hugs,

Be Mine Love Truck Box Card

2/11/22 Top 3 Winner at Alphabet Challenge Blog!

Hi everyone! Happy Saturday! I hope you have something fun planned this weekend… but if you don’t, let me suggest that you hop along with us in the CutCardStock My Sweet Valentine Blog Hop going on today and tomorrow for a chance to win a $40 CutCardStock gift card! Affiliate links are used in this post at no cost to you – I really appreciate your support! I’m stoked to be participating in the hop showcasing two absolutely adorable box cards created with our amazing Basis cardstock and I’ve popped in to share my first project. I’m posting both cards separately so I can enter them into some challenges. Box cards are at the top of my all-time favorite list of fun folds and this one has several really cute features – metallic silver elements, stamped side and back panels, embossed tires, and lots of hearts (some adorned with red gemstones).

I cut all the pieces from Basis 80# Red cardstock, Basis 80# Pink cardstock, Basis 80# Black cardstock, Basis 80# White cardstock and Stardream Metallic Silver cardstock. To me, the real fun is assembling the box cards, and this one was no different! And I have to tell you that I was SO intimidated by the draw feature on my Scan N Cut that I’ve never (you read that right… never) used it in the 6+ years I’ve been using a Scan N Cut. Not sure what happened, but the process just clicked in my brain – I’ve used it several times now and love it!

There’s a panel on the back with a stamped sentiment and room for a signature.

And one more peek of the card folded flat for mailing. I’m so smitten with this card – it turned out so stinkin’ cute I can’t stand it!

Sharing in the following challenges:
1. A Perfect Time To Craft Open Challenge: #2-2022 – Anything Goes
2. Alphabet Challenge Blog: V is for Vehicle
3. Aud Sentiments Challenge Blog: #291 – Love Sentiment
4. Classic Design Challenge: February #2 – Anything Goes
5. Crafting Happiness Challenges: #120 – February Anything Goes
6. Crafty Calendar Challenge: February Anything Goes
7. Crafty Catz: #581 – Anything Goes w/ optional twist of Anything But Square
8. Creative Creases Challenge: #25 – Anything Goes with a Fun Fold
9. Di’s Digi Challenge: Use Red and/or Pink
10. International Art & Soul: #126 – All About Love/Hearts
11. Let’s Craft and Create: #180 – Anything Goes + From The Heart
12. Make The Cards Challenge: #47 – Create a Valentine
13. Moving Along With The Times: #139 – Love/Anniversary/Wedding
14. Wednesday’s Creative Inspirations Challenge Blog: February With Love

CutCardStock products used:
Basis 80# Red cardstock
Basis 80# Pink cardstock
Basis 80# Black cardstock
Basis 80# White cardstock

Other products used:
Stamps: Blockheads Paper Arts Backgrounds for All Occasions stamp set, Hero Arts Year Round Messages stamp set
Ink: Catherine Pooler Samba and Rockin’ Red inks
Dies/Punches/Cut Files: Simply Crafty SVGs Love Truck Box Card cut file
Accessories: Brother Scan N Cut, Bearly Art precision craft glue, Darice Chevon Embossing Folder, Scrapbook Adhesives 3D Foam Squares Variety Pack, Eyelet Outlet Red Jewel Bling

I hope you’ve enjoyed today’s project and you’re inspired to get crafty! Be sure to check out all the awesome cardstock and other goodies at CutCardStock (adhesives, labels, stickers, pens, watercolors and ribbon to name a few). And head on over to the CutCardStock Facebook Page for more inspiration! Thanks so much for stopping by today – we’ll see you next time!

Scrappy hugs,

Box Cards for CutCardStock My Sweet Valentine Blog Hop!

Hi friends! A big giant WELCOME to the CutCardStock’s My Sweet Valentine Blog Hop going on this weekend (February 5th and 6th), starting at 7:00 AM Central Time today and ending at 11:55 PM Central Time tomorrow! Affiliate links are used in this post at no cost to you. I really appreciate your support! This is going to be loads of fun with lots of crafty Valentine inspiration, so COME HOP WITH US!

AND there is a $40 CutCardStock gift card up for grabs! Woo-hoo!

The winner will be randomly selected via number generator and announced on Monday, February 7th, on the CutCardstock blog and Facebook page! To be eligible for the $40 gift card, you must comment at each stop along the hop (good for ONE gift card entry) or upload a Valentine’s Day/Love/Friendship project using CutCardStock products (good for TWO gift card entries). We would absolutely LOVE IT if you link up a project with us, PLUS it will increase your chances to win the gift card! ;)

=  =  =  =  =  =  =  =  =  =  =  =  =  =  =  =

Now, let me side-track you for a minute or three to share my two Valentine box cards which I’m showcasing separately on my blog so I can enter them in some challenges. Both of these cards feature a variety of colors in the Basis cardstock line, both were cut with my Scan N Cut, and both have front sentiments printed with my Scan N Cut using the draw feature. I absolutely love Basis cardstock and use it in nearly all of my projects. First up is my Be Mine Love Truck Box Card (click the link to go a separate blog post for more details and photos).

Here is a super quick tutorial showing you my process for making this box card. Cut all the pieces from Basis 80# Red cardstock, Basis 80# Pink cardstock, Basis 80# Black cardstock, Basis 80# White cardstock and Stardream Metallic Silver cardstock.

Stamp a harlequin background design on the back and side panels. Emboss a chevron design on the tires.

Print the front sentiment using the draw feature on the Scan N Cut, assemble and add red gemstones. Super cute and loads of Valentine fun! ;)

CutCardStock products used:
Basis 80# Red cardstock
Basis 80# Pink cardstock
Basis 80# Black cardstock
Basis 80# White cardstock
Stardream Metallic Silver cardstock

Other products used:
Stamps: Blockheads Paper Arts Backgrounds for All Occasions stamp set, Hero Arts Year Round Messages stamp set
Ink: Catherine Pooler Samba and Rockin’ Red inks
Dies/Punches/Cut Files: Simply Crafty SVGs Love Truck Box Card cut file
Accessories: Brother Scan N Cut, Bearly Art precision craft glue, Darice Chevon Embossing Folder, Scrapbook Adhesives 3D Foam Squares Variety Pack, Eyelet Outlet Red Jewel Bling

=  =  =  =  =  =  =  =  =  =  =  =  =  =  =  =

And next up is my Happy Valentine’s Day Birdhouse Box Card (click the link to go a separate blog post for more details and photos).

Here is a quick tutorial showing you my process for making this box card. Cut all the pieces from Basis 80# Red cardstock, Basis 80# Pink cardstock, Basis 80# Black cardstock, Basis 80# White cardstock and Basis 80# Gold cardstock.

Add some texture to the panels with a swiss dots embossing folder. Score vertical lines down the birdhouse with a scoring board for a little texture there as well.

Print the front sentiment using the draw feature on the Scan N Cut, assemble and add red gemstones to the roof. Another super cute Valentine box card on the books!

CutCardStock products used:
Basis 80# Red cardstock
Basis 80# Pink cardstock
Basis 80# Black cardstock
Basis 80# White cardstock
Basis 80# Gold cardstock

Other products used:
Dies/Punches/Cut Files: Simply Crafty SVGs Valentine Birdhouse Box Card cut file
Accessories: Brother Scan N Cut, Bearly Art precision craft glue, Martha Stewart Scoring Board, Cuttlebug Swiss Dots Embossing Folder, Big Shot, Eyelet Outlet Red Jewel Bling

=  =  =  =  =  =  =  =  =  =  =  =  =  =  =  =

Okay, let’s get back to the hop! Here is the complete list of stops:

Cutcardstock
Janet A
Judy VZ
Maureen
Leslie –>you’re here!<–
Teri
Niki
CutCardstock – C’mon, you know you want to link up! The linky tool is at the end of the post on the CutCardstock blog so that’s where you’ll want to head to link up your project – each upload is worth two entries for the gift card! Two entries per person!

You should have arrived here from Maureen’s blog and your next stop is Teri’s blog. I hope you are enjoying the hop and seeing all the fun Valentine projects! If you get lost along the way or if you landed here in the middle of the hop somehow and want to join in the fun, be sure to head on over to the CutCardstock blog to read all the details and start from the beginning!

In closing, I hope you’ve enjoyed seeing my Valentine box cards and you’re inspired to get crafty AND hop with us AND link up a Valentine’s Day/Love/Friendship project! Be sure to check out all the awesome cardstock and other goodies at CutCardStock (adhesives, labels, stickers, pens, watercolors and ribbon to name a few). And head on over to the CutCardStock Facebook Page for lots of crafty inspiration! Thanks so much for stopping by today – we’ll see you next time!

Scrappy hugs,

Happy Valentine’s Day

3/3/22 Winner at Aud Sentiments Challenge Blog!

Hi everyone! A very Happy Saturday to you – I hope you’ve had a great week! Affiliate links are used in this post at no cost to you – I really appreciate your support! I’m stoked to be back on the Eyelet Outlet blog today with another awesome DT inspiration project! I created a groovy love card for Valentine’s Day that really reveals the hippie in me! I created this super fun card with my Scan N Cut and it features our White Daisy Brads, Color Daisy Brads and Pink Enamel Hearts. I dry embossed each letter with a different embossing folder which adds such fun texture!

I cut all the pieces from CutCardStock Amaranth, Basis Magenta, Basis Green, and Pop-Tone Cotton Candy cardstock, and Neenah Classic Crest 80# Solar White cardstock. The fun part is always the assembly, and I added a White Daisy Brad and several Color Daisy Brads to the letters, and a Pink Enamel Heart to the layered heart in the center of the large flower. I stamped the sentiment from Hero Arts Year Round Messages stamp set in Catherine Pooler Pucker Up ink, trimmed it, and adhered it to the bottom right.

I cut the inside panels from Neenah Classic Crest 80# Solar White cardstock and CutCardStock Amaranth cardstock, and rounded the corners. I stamped the sentiment from the Sparkle N Sprinkle Disco Fever stamp set in the Catherine Pooler Pucker Up ink, and added a die cut heart from my embellishment bowl that was left over from another project.

And one more look… love, love, love how this turned out! FLOWER POWER! Such a fun Valentine!

Sharing in the following challenges:
1. A Perfect Time To Craft Open Challenge: #2-2022 – Anything Goes
2. Aud Sentiments Challenge Blog: #291 – Love Sentiment
3. Classic Design Challenge: February #2 – Anything Goes
4. Crafting Happiness Challenges: #120 – February Anything Goes
5. Crafty Calendar Challenge: February Anything Goes
6. Crafty Catz: #581 – Anything Goes w/ optional twist of Anything But Square
7. International Art & Soul: #126 – All About Love/Hearts
8. Let’s Craft and Create: #180 – Anything Goes + From The Heart
9. Make The Cards Challenge: #47 – Create a Valentine

Eyelet Outlet products used:
White Daisy Brads
Color Daisy Brads
Pink Enamel Hearts

Other products used:
Cardstock/Paper: CutCardStock Basis Magenta, Amaranth, Basis Green, Pop-Tone Cotton Candy cardstock, Neenah Classic Crest 80# Solar White cardstock
Stamps: Hero Arts Year Round Messages stamp set, Sparkle N Sprinkle Disco Fever stamp set
Ink: Catherine Pooler Pucker Up ink
Dies/Punches/Cut Files: My Scrap Chick 60s Love Card cut file, Kadomaru Pro corner rounder
Accessories: Brother Scan N Cut, Tonic Studios 12″ Guillotine Paper Trimmer, Lifestyle Crafts Polka Dots embossing folder, Cuttlebug Swiss Dots embossing folder, Darice Chevron and Wire Fence embossing folders, Big Shot, Bearly Art precision craft glue, MISTI stamp tool

I hope you’ve enjoyed today’s project! Be sure to check out all the fun goodies at Eyelet Outlet! I can already see you drooling, lol! Be sure to ‘like’ and ‘follow’ Eyelet Outlet Facebook Page to keep up with news and sales, and while you’re at it, join the Eyelet Outlet Fans Facebook group for lots of creative inspiration! Thanks so much for stopping by today – we’ll see you next time! ;)

Scrappy hugs,

Alcohol Inked Phone Stand

Hey, everybody! I hope you’re having a fantastic week and staying warm! We love our chilly weather and all I can say is brrrrr… it was 7 degrees when we got up this morning! I’m thrilled to be back on the Clear Scraps blog today with another awesome DT inspiration project! If you are a regular reader of my blog, you know that I’ve been having lots of fun creating alcohol ink backgrounds. Well I took the alcohol ink one step further and inked this Regular Acrylic Phone Stand! OMGosh, this was fun and so easy – acrylic really takes the inks well! And, as I do with my regular alcohol ink backgrounds (usually on vellum), I pressed gold foil onto the ink when it was just about dry to get some pretty veining.

I started by removing the protective film from one side of both of the phone stand pieces. I dropped Cranberry, Poppyfield, Watermelon, Sunset orange, Honeycomb, Sandal, Peach Bellini, Sunshine Yellow and Lemonade alcohol inks onto the surface of each acrylic piece. I added more ink to different areas and when I was happy with the coverage, I set them aside to dry. When they were almost dry, I pressed gold foil onto multiple areas, leaving small bits of the foil. The veining really pops on these colors. When they were completely dry, I painted the edges of both pieces with gold acrylic paint. When that was dry, I removed the protective film from the back of both pieces and covered them with gold cardstock and assembled the stand. The finishing touch was adding red enamel dots.

Here’s a shot of the back.

And one more angled view… I absolutely love how this turned out! A project that’s both beautiful and practical!

Sharing in the following challenges:
1. A Perfect Time To Craft Open Challenge: #2-2022 – Anything Goes
2. Classic Design Challenge: February #2 – Anything Goes
3. Crafting Happiness Challenges: #120 – February Anything Goes
4. Crafts Galore Encore Challenge Blog: #96 – Anything Goes
5. The Corrosive Challenge Blog: #1 January 2022 – Anything Goes

Clear Scraps products used:
Regular Acrylic Phone Stand

Other products used:
Cardstock/Paper: CutCardStock Curious Metallic Gold Leaf cardstock
Ink: Ranger alcohol inks- Cranberry, Poppyfield, Watermelon, Sunset orange, Honeycomb, Sandal, Peach Bellini, Sunshine Yellow, Lemonade
Accessories: Spellbinders Glimmer Gold Foil, craft knife, Xyron 510, Liquitex gold acrylic paint, YNS Red Gumdrops

I hope you’ve enjoyed today’s project and you’re inspired to get those craft supplies out to play! Be sure to check out all the amazing acrylic, wood and chipboard goodies at Clear Scraps… OMGoodness, you won’t be disappointed! And head on over to the Clear Scraps Facebook Page for lots of inspiration! And while you’re at it, join the Clear Scraps Facebook Creative Group to connect with other Clear Scraps fans! Thanks so much for stopping by today – we’ll see you next time!

Scrappy hugs,

Dangle Fringe Earrings

Hey everybody! Happy Hump Day! I have something really fun to share with you today… something a little out of the ordinary! Affiliate links are used in this post at no cost to you – I really appreciate your support! I made a super cool pair of dangle fringe earrings! I used to make jewelry on a regular basis back about ten years ago but it took a back seat to my paper crafting. I die cut two of the six pieces needed for this pair of earrings several months ago and those pieces have been sitting on my craft table all this time. So I finished them up last week and I’m glad I did because I love how they turned out! I have plans for several more pairs, so stay tuned!

Using the Taylored Expressions Designer Dangles – Fringe dies, I cut the two fringed pieces for each earring from Taylored Expressions Craft Leather – Faux Suede and the diamond shapes from CutCardStock Stardream Metallic Silver cardstock. I used a small amount of Bearly Arts precision craft glue between each of the layers to hold everything in place and then added the sterling silver eeBeads rings and earring wires which I had in my stash. The finishing touch was adding several dots of Nuvo Liquid Mercury Crystal Drops.

And one more peek… I so love these! They are ‘me’ to a T and were super easy to make!

Sharing in the following challenges:
1. A Perfect Time To Craft Open Challenge: #2-2022 – Anything Goes
2. Classic Design Challenge: February #2 – Anything Goes
3. Crafting Happiness Challenges: #120 – February Anything Goes
4. Crafts Galore Encore Challenge Blog: #96 – Anything Goes
5. The Corrosive Challenge Blog: #1 January 2022 – Anything Goes

Products used:
Cardstock/Paper: CutCardStock Stardream Metallic Silver cardstock
Dies/Punches: Taylored Expressions Designer Dangles – Fringe dies
Accessories: Big Shot, Taylored Expressions Craft Leather – Faux Suede, Bearly Art precision craft glue, eeBeads earring wires and rings, Nuvo Liquid Mercury Crystal Drops

I hope you’ve enjoyed seeing this pair of cool dangle fringe earrings! Thanks so much for stopping by today – we’ll see you next time! ;)

Scrappy hugs,

best mother ever

Hey everybody! A very Happy Tuesday to you! Hope you had a great weekend and did something fun! Affiliate links are used in this post at no cost to you – I really appreciate your support! Today would have been my parents’ 74th wedding anniversary and my oldest sister was born nine months and four days later, lol! Happy anniversary in Heaven, Mom and Dad! I’m sure you are celebrating! Now on to my card… one of my projects was dubbed a Featured Creation over at Scrapping4fun Challenges a couple months ago and I was invited to guest design in an upcoming challenge, so here I am sharing my GD inspiration project for Challenge 209 – Anything Goes! We have a hardware store here in our little town that sells everything but the kitchen sink (lol), and the owner commissions me to make Mother’s Day cards every year and they sell like hotcakes! I created this card with a precolored image from Jan’s Digi Stamps Lily of the Valley set.

Using the Crafter’s Companion Ruth Create-A-Card die set, I cut the card base from Neenah Classic Crest 110# Solar White cardstock along with a slightly smaller layering panel from Stampin’ Up Crushed Curry cardstock. I printed the image on Neenah Classic Linen 80# Solar White cardstock and cut it with a smaller die in the set, adhered them together and then to the card base. Using the Stampin’ Up And Many More stamp set, I stamped the sentiment horizontally in black ink, and then added a few dots of English Mustard Crystal Drops to finish the card front.

Using the same Crafter’s Companion Ruth Create-A-Card die set, I die cut the inside panels from Neenah Classic Crest 80# Solar White cardstock and Stampin’ Up Crushed Curry, and adhered them together. I stamped the inside sentiment from the Stampin’ Up Grateful Bunch stamp set in black ink and adhered the piece to the inside of the card base.

And one more look… I just love Jan’s Digi Stamps images, and the precolored ones are gorgeous and make perfect cards!

Sharing in the following challenges:
1. A Perfect Time To Craft Open Challenge: #2-2022 – Anything Goes
2. Classic Design Challenge: February #2 – Anything Goes
3. Crafting Happiness Challenges: #120 – February Anything Goes
4. Crafts Galore Encore Challenge Blog: #96 – Anything Goes
5. QKR Stampede: #437 – Anything Goes

Products used:
Cardstock/Paper: Neenah Classic Crest 110# Solar White cardstock, Neenah Classic Linen 80# Solar White cardstock, Stampin’ Up Crushed Curry cardstock
Stamps: Stampin’ Up And Many More and Grateful Bunch stamp sets
Ink: Memento Tuxedo Black ink
Dies/Punches: Crafter’s Companion Ruth Create-A-Card die set
Accessories: Tonic Studios 12″ Guillotine Paper Trimmer, Gemini Junior, MISTI stamp tool, Tombow Mono permanent adhesive, Nuvo English Mustard Crystal Drops

I hope you’ve enjoyed seeing this card and will link up an Anything Goes project over at Scrapping4fun Challenges this time! Thanks so much for stopping by today – we’ll see you next time! ;)

Scrappy hugs,