The smell of Christmas goodies

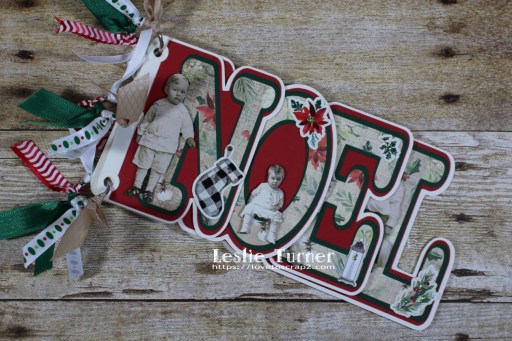
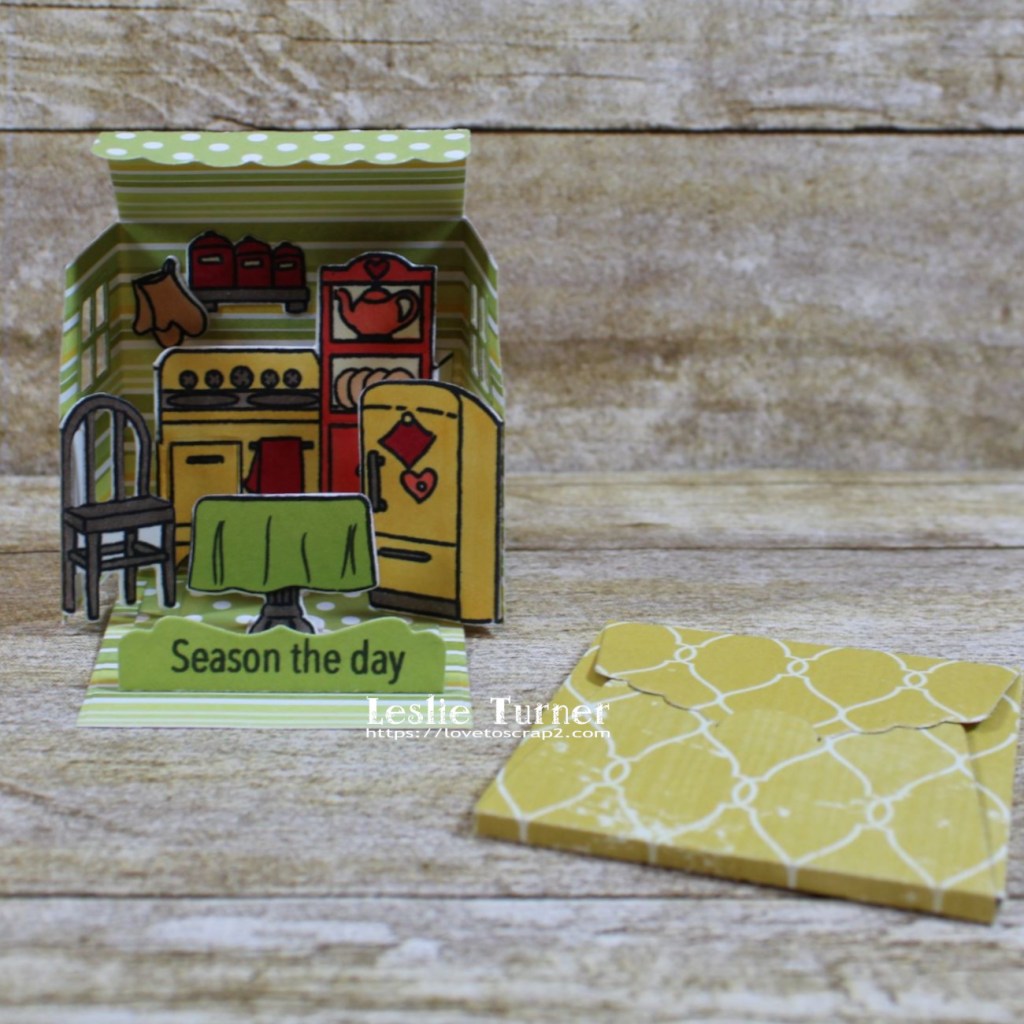
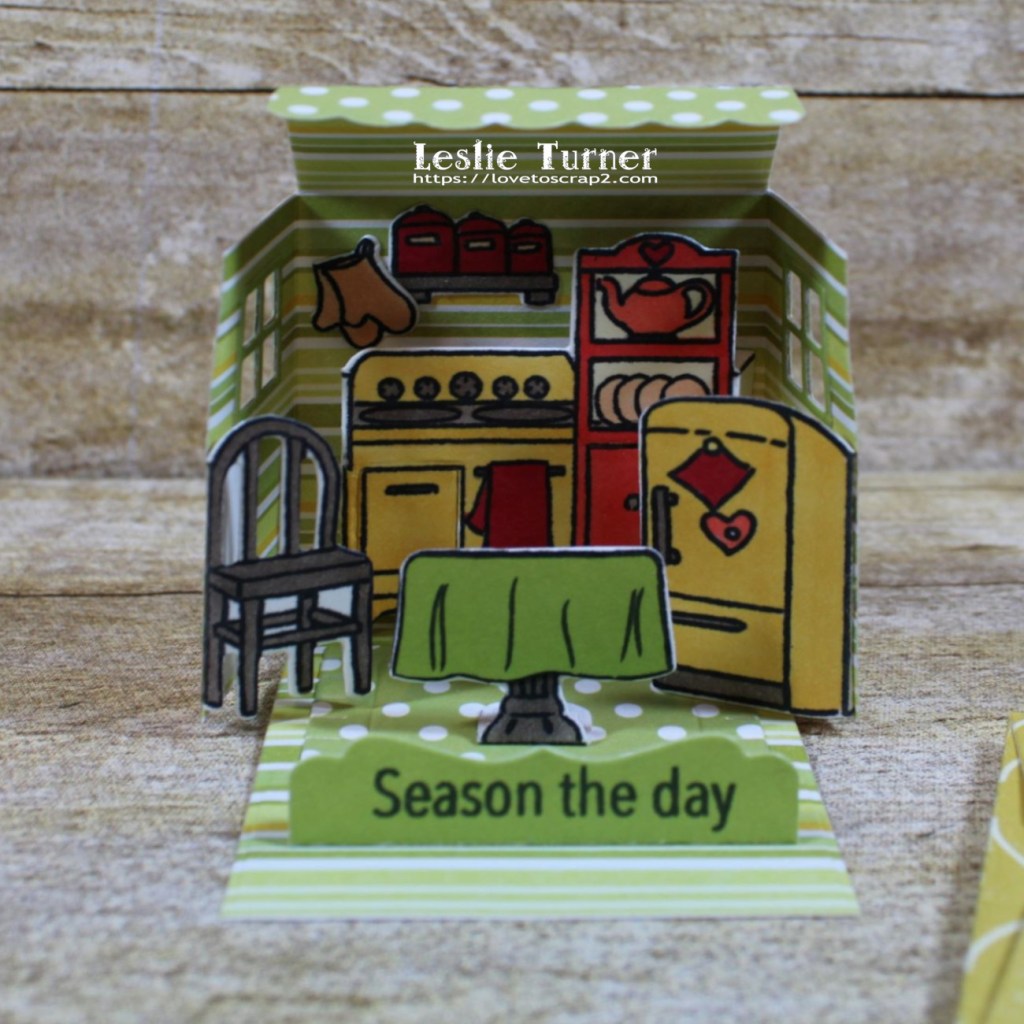
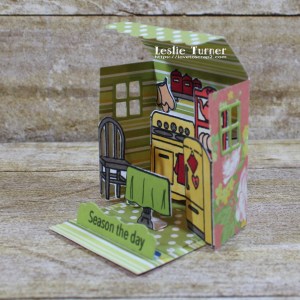
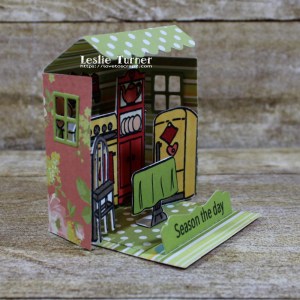
Ahoy, Mateys… okay, this is my last post for today. I don’t particularly like having to write so many blog posts (with interruptions from the hubs and cats) but I do enjoy sharing my projects! Affiliate links are used in this post at no cost to you. I really appreciate your support! This adorable apron box card is for The Outlawz Festive Fridays Challenge where the themes to choose from are Christmas, Thinking of You, Anything Goes or Congratulations, and I chose the Christmas theme this time. Isn’t this apron just the cutest?!

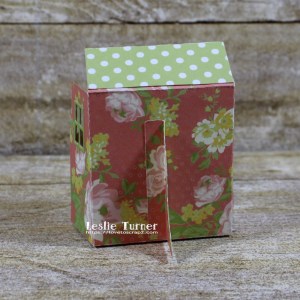
I cut the pieces for the box card from CutCardStock Basis Red cardstock, CutCardStock Basis Brown cardstock, CutCardStock Basis Teal cardstock, Neenah Classic Crest Baronial Ivory cardstock, and The Paper Studio Four Seasons and Everything In Between -2- paper pad, and assembled the card.

I typed the sentiment in brown font, trimmed it and layered it on brown cardstock. I found it handwritten in my stuff and I don’t know who to credit; I’m sure I found it online at some point and thought it was cute, so I jotted it down. It’s perfect for this box card!

And one more look… this is so stinkin’ cute, I can’t stand it! It’s already slated to go to a dear someone who loves to cook! ;)

Products used:
Cardstock/Paper: CutCardStock Basis Red cardstock, CutCardStock Basis Brown cardstock, CutCardStock Basis Teal cardstock, Neenah Classic Crest Baronial Ivory cardstock, The Paper Studio Four Seasons and Everything In Between -2- paper pad
Dies/Punches: My Scrap Chick Christmas Apron Box Card cut file
Accessories: Bearly Art precision craft glue, narrow red/white gingham ribbon from stash

I hope you’ve enjoyed this project and will come over and join in all the fun at The Outlawz Challenges! Lots of fun going on! Thanks so much for stopping by today – we’ll see you next time! ;)

Scrappy hugs,
lesliesig

Festive Noel Word Book

Hey everybody! I’m back with another project for The Outlawz Challenges, and this was truly a fun one to create! My Scan N Cut doesn’t get used nearly enough since I stepped down from the Simply Crafty SVGs DT last year, and I sure enjoy myself every single time I crank her up! Affiliate links are used in this post at no cost to you. I really appreciate your support! This adorable Noel word book is for The Outlawz Twisted Thursday Challenge where the challenges are always Anything Goes with a twist (as the name suggests), and the twist this time is Christmas in July! I used Carta Bella Christmas papers and elements, Tim’s Paper Dolls, and an assortment of die cuts for photos and journaling.

I cut the main book pages from CutCardStock Basis 110# Natural cardstock. Next I cut the page layers from CutCardStock Basis Green cardstock, CutCardStock Basis Red cardstock, CutCardStock Basis Light Brown cardstock, and Carta Bella Christmas Collection papers, and assembled the book. I created hole reinforcements using 1/2″ and 1/4″ circle punches and adhered them to each page, and then added the rings. I decorated each page with Tim Holtz Paper Dolls and Carta Bella Christmas Collection elements, adding tiny iridescent gemstones for a little bling (some colored with alcohol markers). I cut an assortment of die cut shapes for photos and journaling from Neenah Classic Crest Baronial Ivory cardstock, CutCardStock Pop-Tone Gumdrop Green, and CutCardStock Basis Dark Red cardstock. The final step was adding ribbon strips to the rings.

And one more peek… love how this turned out! Without being ‘over-done’ there’s lots of room to document the Christmas holiday!

Add a title

Products used:
Cardstock/Paper: CutCardStock Basis 110# Natural cardstock, CutCardStock Basis Green cardstock, CutCardStock Basis Red cardstock, CutCardStock Basis Light Brown cardstock, Neenah Classic Crest Baronial Ivory cardstock, CutCardStock Pop-Tone Gumdrop Green, CutCardStock Basis Dark Red cardstock, Carta Bella Christmas Collection Kit
Ink: Nuvo alcohol marker collections- Sunshine Yellow, Woodland Greens, Fair Skin Tones
Dies/Punches: My Scrap Chick Noel Word Book cut file, Stampin’ Up 1/2″ and 1/4″ Circle Punches, Memory Box Stitched Oval Layers, Memory Box Stitched Circle Layers, Memory Box Stitched Rectangle Layers, My Favorite Things Stitched Square STAX Die-namics, My Favorite Things Stitched Rectangle STAX Die-namics, My Favorite Things Stitched Mini Scallop Square STAX Die-namics, My Favorite Things Stitched Mini Scallop Oval STAX Die-namics, My Favorite Things Stitched Mini Scallop Circle STAX Die-namics, Spellbinders Postage Stamps dies
Accessories: Brother Scan N Cut, Bearly Art precision craft glue, Tim Holtz Paper Dolls, Darice tiny iridescent gemstones, Really Reasonable Ribbon Christmas Celebrations and Diamond Satin Vintage Ribbon Assortments

I hope you’ve enjoyed this project and will come over and join in all the fun at The Outlawz Challenges! Lots of fun going on! Thanks so much for stopping by today – we’ll see you next time! ;)

Scrappy hugs,
lesliesig

Growing Up vs Growing Old

Hey y’all, I’m baaaack! Today is the day for entering projects into The Outlawz Challenges before several of them end! I think that refers to ‘the skin of my teeth’ lol! The projects have been made but I’ve had a lot going on and haven’t really been entering many challenges lately. I need to fix that! Affiliate links are used in this post at no cost to you. I really appreciate your support! I’m entering this adorable easel card into The Outlawz Monday Greetings Challenge where the theme is to Add Spots or Stripes. I think I’m covered with the spots! Well, I’m not covered with spots but my card is, lol! #insertcheesycornygrin

I cut all the required pieces from CutCardStock Basis Green cardstock, CutCardStock Pop-Tone Jellybean Green cardstock, CutCardStock Pop-Tone Gumdrop Green cardstock, American Crafts Key Lime cardstock, CutCardStock Basis Magenta cardstock, CutCardStock Granny Smith cardstock, CutCardStock Basis Pink cardstock, CutCardStock Basis Gold cardstock, Colorbok Pink cardstock, Neenah Classic Crest Solar White cardstock, Colorbok yellow and pink Seeing Dots cardstock.

I stamped the sentiment from The Cat’s Pajamas Sassy Birthday stamp set in Catherine Pooler Lime Rickey ink.

And one more look, closed and ready to mail… how fun is this?! I’m absolutely loving how this turned out!

Products used:
Cardstock/Paper: CutCardStock Basis Green cardstock, CutCardStock Pop-Tone Jellybean Green cardstock, CutCardStock Pop-Tone Gumdrop Green cardstock, American Crafts Key Lime cardstock, CutCardStock Basis Magenta cardstock, CutCardStock Granny Smith cardstock, CutCardStock Basis Pink cardstock, CutCardStock Basis Gold cardstock, Colorbok Pink cardstock, Neenah Classic Crest Solar White cardstock, Colorbok yellow and pink Seeing Dots cardstock
Stamps: The Cat’s Pajamas Sassy Birthday stamp set
Ink: Catherine Pooler Lime Rickey ink
Dies/Punches: My Scrap Chick Blooming Layers Easel Card
Accessories: Brother Scan N Cut, Bearly Art precision craft glue, Scotch 3M Foam Tape

I hope you’ve enjoyed this project and will come over and join in all the fun at The Outlawz Challenges! Lots of fun going on! Thanks so much for stopping by today – we’ll see you next time! ;)

Scrappy hugs,
lesliesig

Cycle-Riding Santa!

Hi friends! Hope you’re having a great week! We’re on the downside to the weekend and time is zooming by! Affiliate links are used in this post at no cost to you. I really appreciate your support! I’ve popped in this morning to share a project I’m entering into The Outlawz Sunday Songs & Rhymes Challenge where SheepSki Designs is sponsoring and the theme is the song or rhyme “The Open Road.” My inspiration came literally from the word ‘travel’ so I decided to share a cycle-riding Santa box card that I made with my Scan N Cut. What a hoot! He’s definitely ridin’ in for the challenge, lol!

I sure do love me some box cards and made quite a few for a variety of occasions while I had my Scan N Cut out several weeks ago. I cut the pieces for this one from CutCardStock Basis Dark Red cardstock, CutCardStock Basis Red cardstock, CutcardStock Basis Black cardstock, CutCardStock Basis Light Brown cardstock, Neenah Classic Crest Solar White cardstock, Neenah Classic Crest Baronial Ivory cardstock scrap, and Hygloss Silver Foil cardstock.

I cut the sentiment panel on the back from CutCardStock Basis Green cardstock and Neenah Classic Crest Solar White cardstock, and stamped the sentiment from The Project Bin Mid Century Christmas stamp set. So perfect!

And one more look… so smitten with this one! He’s so stinkin’ cute I can’t stand it! The best part about box cards is they fold flat for mailing!

Products used:
Cardstock/Paper: CutCardStock Basis Dark Red cardstock, CutCardStock Basis Red cardstock, CutcardStock Basis Black cardstock, CutCardStock Basis Light Brown cardstock, Neenah Classic Crest Solar White cardstock, Neenah Classic Crest Baronial Ivory cardstock scrap, Hygloss Silver Foil cardstock, CutCardStock Basis Green cardstock
Stamps: The Project Bin Mid Century Christmas stamp set
Ink: Memento Cottage Ivy ink
Dies/Punches: My Scrap Chick Gnome Cycle cut file
Accessories: Brother Scan N Cut, Bearly Art precision craft glue, MISTI stamp tool

I hope you’ve enjoyed this project and will come over and join in all the fun at The Outlawz Challenges! Lots of fun going on! Thanks so much for stopping by today – we’ll see you next time! ;)

Scrappy hugs,
lesliesig

‘thanks’ pinwheel card

Hi everyone! A very Happy Tuesday to you – here’s hoping it’s not too hot where you are! We have little to no humidity out here in Colorado so the hot and cold temps are a little easier to tolerate. But I won’t lie… I’m SO ready for Fall and Winter! I’m stoked to be back on the CutCardStock blog today with an awesome DT inspiration project featuring gorgeous silver cardstock which is on sale this month. I paired the silver with black cardstock and some very cool chalkboard cardstock (which is also on sale). Be sure to grab some silver cardstock while it’s on sale though, as it would make a wonderful addition to your cardstock stash! Affiliate links are used in this post at no cost to you. I really appreciate your support! I created a fun ‘thanks’ pinwheel card. I finally got around to making my first pinwheel card a couple months ago and I couldn’t believe how easy and fast it worked up – and couldn’t wait to make another one!

I cut a square top-folding card base from Neenah Classic Crest Solar White 110# cardstock along with a layering panel from CutCardStock Stardream Metallic 105# Silver cardstock which I adhered to the card base, four squares for the pinwheel and a narrow embellishing strip for the bottom of the front panel. I also punched two 3/4″ circles and four 1/2″ circles which I layered to create the element in the center of the pinwheel. Next, I cut four floral squares for the pinwheel and two strips for the bottom of the front panel from the We R Memory Keepers Chalkboard 6×6 paper pad. And finally I cut eight slightly larger squares from CutCardStock Basis Black cardstock to layer beneath the chalkboard and silver squares. I adhered the squares together to form the pinwheel and affixed the punched circles in the center, then adhered the two chalkboard strips and the narrow silver embellishing strip to the bottom. Using the CUTplorations Skinny Sentiments, I die cut the sentiment from CutCardStock Basis Black cardstock and CutCardStock Stardream Metallic 105# Silver cardstock and adhered it at the bottom on the right side of the strips.

I cut the inside panel from Neenah Classic Crest Solar White 80# cardstock and embellished it with chalkboard strips and a narrow silver cardstock strip, added a stamped and die cut sentiment (using the Waffle Flower Sentiment Additions stamp set with coordinating Waffle Flower Sentiment Additions die set) and layered the panel on silver cardstock.

And one more peek… so loving how this turned out! Pinwheel cards are so much fun, and the right cardstock will definitely do them justice! ;)

CutCardStock products used:
Neenah Classic Crest Solar White 110# and 80# cardstock
CutCardStock Stardream Metallic 105# Silver cardstock
CutCardStock Basis Black cardstock
We R Memory Keepers Chalkboard 6×6 paper pad

Other products used:
Stamps: Waffle Flower Sentiment Additions stamp set
Ink: Delicata Silvery Shimmer ink
Dies/Punches: Stampin’ Up 3/4″ and 1/2″ Circle Punches, CUTplorations Skinny Sentiments, Waffle Flower Sentiment Additions die set
Accessories: Tonic Studios 12″ Guillotine Paper Trimmer, Gemini Junior, MISTI stamp tool, Bearly Arts precision craft glue

I hope you’ve enjoyed today’s project and you’re inspired to get crafty! Be sure to check out all the awesome cardstock and other goodies at CutCardStock (adhesives, labels, stickers, pens, watercolors and ribbon to name a few). And head on over to the CutCardStock Facebook Page for more inspiration! Thanks so much for stopping by today – we’ll see you next time!

Scrappy hugs,
lesliesig

Relax… unwind

Hi everyone! Another Saturday has rolled around and we are that much closer to Christmas! Yaaaaay, my favorite time of year! We literally have just a couple months of hot weather out here in Colorado (that’s why we moved here) so we’re looking forward to some cooler temps coming! We have very little humidity so the hot and cold temps are much easier to tolerate. I’m happy to be back on the Eyelet Outlet blog today with another awesome DT inspiration project! I created a beach card featuring some of the new Flip Flop Brads that hit the store a few days ago… they are so cool! And of course, I had to pair them with a Sun Brad and a Seagull Brad along with Wide Sky Washi Tape and the Water Washi Tape to complete the beach scene!

Beach scenes are so much fun to create with washi tape and brads, and of course torn kraft cardstock for the sand, and makes for a super simple no-fuss design. I cut a standard A2 size top-folding card base from Neenah Classic Crest 110# Solar White cardstock along with a panel cut from Neenah Classic Crest 80# Solar White cardstock which I covered with Wide Sky Washi Tape and Water Washi Tape and rounded all four corners. I added torn strips of CutCardStock 80# Sandcastle cardstock for the sand along with a Sun Brad and a Seagull Brad. Using the Dare 2B Artzy Flip Flops Stamp Set, I stamped the Adirondack chair in Teal Zeal ink on CutCardStock Stardream Metallic Lagoon cardstock and while it was still wet, I sprinkled some Ranger Clear embossing powder over it and hit it with the heat tool. Remember I mentioned a while back the clear embossing powder in my stash that I apparently dumped some white embossing powder into because it now embosses with white specks in it?! Well, this is it… and I cannot bring myself to throw it away because it looks so freaking cool! I cut the Adirondack chair with the coordinating Dare 2B Artzy Flip Flop & Adirondack Chair Die and added it to my scene. I added the Flip Flop Brads and stamped the sentiment from the Dare 2B Artzy Flip Flops Stamp Set in Jet Black StazOn ink to complete the front of the card.

I cut the inside panel from Neenah Classic Crest 80# Solar White cardstock along with a layering panel and embellishing strip from CutCardStock Stardream Metallic Lagoon cardstock, and a wider embellishing strip from CutCardStock 80# Sandcastle cardstock. I adhered the strips, rounded all four corners and stamped another sentiment from the Dare 2B Artzy Flip Flops Stamp Set in Teal Zeal ink, then layered the panel on the lagoon cardstock.

And one more look… so smitten with this card! The sky and water washi tape along with this assortment of brads makes the best beach cards!

Eyelet Outlet products used:
Wide Sky Washi Tape
Water Washi Tape
Flip Flop Brads
Seagull Brads
Sun & Cloud Brads

Other products used:
Cardstock/Paper: Neenah Classic Crest 110# and 80# Solar White cardstock, CutCardStock 80# Sandcastle cardstock, CutCardStock Stardream Metallic Lagoon cardstock
Stamps: Dare 2B Artzy Flip Flops Stamp Set
Ink: Memento Teal Zeal ink, StazOn Jet Black ink
Dies/Punches: Dare 2B Artzy Flip Flop & Adirondack Chair Dies, Kadomaru Pro corner rounder
Accessories: Tonic Studios 12″ Guillotine Paper Trimmer, Ranger Clear embossing powder, Hero Arts White Embossing Powder, Milwaukee heat tool, Big Shot, Tombow Mono permanent adhesive, Bearly Art precision craft glue, MISTI stamp tool

I hope you’ve enjoyed today’s project! Be sure to check out all the fun goodies at Eyelet Outlet! I know you’ll love what you see! Be sure to ‘like’ and ‘follow’ Eyelet Outlet Facebook Page to keep up with news and sales, and while you’re at it, join the Eyelet Outlet Fans Facebook group for lots of creative inspiration! Thanks so much for stopping by today – we’ll see you next time! ;)

Scrappy hugs,
lesliesig

Friends are flowers

Hi friends! I hope your week is going well and you’re staying healthy and creative! Absolutely no complaints here – I’ve gotten a lot of studio time in lately which makes me happy! Affiliate links are used in this post at no cost to you. I really appreciate your support! I’m thrilled to share my first project as a Trinity Stamps Ambassador! We haven’t gotten our official assignments yet but have been given the go-ahead to share whatever projects we want to create until the assignments roll in. So I created a pretty front step card (you know how I LOVE this fold!) featuring the Friends are Flowers stamp set and the coordinating Friends are Flowers die set! I sure do love me some gnomes and I’ve added several of their most adorable gnome stamps and dies to my stash!

I stamped the image from the Friends are Flowers stamp set on Neenah Classic Crest Solar White cardstock, colored it with alcohol markers and cut it with the coordinating Friends are Flowers die set. I adhered the die cut image to a white stitched oval die cut, adding shimmer to the butterfly and popping it up on an Adhesive Foam Circle. I cut a slightly larger stitched oval from CutCardStock Pop Tone Wild Cherry cardstock and adhered it beneath the white oval. I cut the card base from Neenah Classic Crest Solar White cardstock and panels from CutCardStock Pop Tone Wild Cherry cardstock and yellow and white dotted cardstock, and assembled the card. I stamped the sentiment on Solar White cardstock, cut it with the coordinating die, and adhered it to the bottom of the card front.

I cut the back panel from Neenah Classic Crest Solar White cardstock and embellished it with strips of yellow dotted and CutCardStock Pop Tone Wild Cherry cardstock, stamped the sentiment from the Succulent Banner stamp set and layered the panel on the red cardstock.

And one more look… I absolutely love this stamp set! Such a cute guy! ;)

Trinity Stamps products used:
Friends are Flowers stamp set
Friends are Flowers die set
Succulent Banner stamp set

Other products used:
Cardstock/Paper: Neenah Classic Crest Solar White cardstock, CutCardStock Pop Tone Wild Cherry cardstock, Colorbok Seeing Dots yellow cardstock
Ink: Memento Tuxedo Black ink; Nuvo alcohol markers- Rich Reds Collection, Fragrant Oranges Collections, Sunshine Yellows Collection, Organic Greens Collection, Irish Clover Collection, Woodland Greens Collection, Marina Blues Collection, Indigo Ink Collection, Palma Violets Collection, Flamingo Pinks Collection, Natural Browns Collection, Fair Skin Tones Collection, Ombre Collection; Sakura Clear Star Gelly Roll pen
Dies/Punches: Memory Box Stitched Oval Layers
Accessories: Tonic Studios 12″ Guillotine Paper Trimmer, MISTI stamp tool, Gemini Junior, Bearly Art precision craft glue, Darice Double-Sided Adhesive Foam Circles

I hope you’ve enjoyed today’s project and you’re inspired to get those craft supplies out to play! Be sure to check out all the amazing stamps, dies and other goodies at Trinity Stamps! And head on over to the Trinity Stamps Facebook Page for loads of inspiration! And while you’re at it, join the Trinity Stamps Facebook community group to connect with other Trinity Stamps fans! Thanks so much for stopping by today – we’ll see you next time!

Scrappy hugs,
lesliesig

‘Season The Day’ matchbook

Hi friends! I’ve popped in this morning to share another matchbook I created – this one is a kitchen scene and is earmarked for my daughter who loves to cook! Affiliate links are used in this post at no cost to you. I really appreciate your support! I mentioned a while back when I was sharing the other little matchbooks I was making that I had bought four of the Art Impressions matchbook die sets and I’m finally getting around to sharing the fourth one. I’m entering this one in The Outlawz Festive Fridays Challenge and have chosen the ‘Anything Goes’ theme. These are so stinkin’ fun, I can’t stand it! There are two more that I need to get to add to my collection, so stay tuned!

I used double-sided patterned paper from Polly’s Paper Studio for the matchbook base. I stamped all the kitchen elements on Neenah Classic Crest 80# Solar White cardstock, colored them with alcohol markers, and cut them with the coordinating dies. I just love all the detail on the kitchen elements! Bonnie Krebs does an amazing job designing these!

Here are shots going around the outside and a shot of the itty bitty envelope.

Products used:
Cardstock/Paper: Neenah Classic Crest Solar White cardstock, Polly’s Paper Studio double-sided patterned paper
Stamps: Art Impressions Matchbook Kitchen Set stamps
Ink: Memento Tuxedo Black ink; Nuvo alcohol marker collections- Coral Reef, Rich Reds, Fragrant Oranges, Fair Skin Tones, Pebble Beach
Dies/Punches: Art Impressions Matchbook Die Template, Matchbook Kitchen Set dies, and Matchbook Envelope Die
Accessories: Tonic Studios 12″ Guillotine Paper Trimmer, Gemini Junior, MISTI stamp tool, Bearly Art precision craft glue

I hope you’ve enjoyed seeing this matchbook! Thanks so much for stopping by today – we’ll see you next time! ;)

Scrappy hugs,
lesliesig

HB2U explosion card

Hey everybody, I’m baaaaack! I have one more project to share this morning – my sister’s birthday card! I don’t believe she reads my blog, so I think we’re safe! Affiliate links are used in this post at no cost to you. I really appreciate your support! I got the new We R Memory Keepers Explosion Card Punch Board a couple months ago and used it to make my son’s Father’s Day card which he absolutely LOVED (and got his girls with it, lol), and decided to make another one for my sister’s birthday coming up. I intended to make a video of this one exploding but sealed it up without thinking. But… I’m going to make one for my daughter soon and will do a video on that one, so stay tuned! I am entering this explosion card into The Outlawz Monday Greetings Challenge where the theme is to Add Sparkle, which I’ve accomplished with the Brutus Monroe Glitterstock!

I created the box base from Neenah Classic Crest 80# Solar White cardstock and adhered panels cut from animal print cardstock as well as thin strips of orange Glitterstock. Using Waffle Flower Wide Alpha Dies and Waffle Flower Bold Alpha Dies, I cut the sentiment from CutCardStock Basis 80# Dark Orange cardstock and Papertrey Ink Dark Chocolate cardstock and layered them for a shadow effect. I created the card tray from Neenah Classic Crest 80# Solar White cardstock as well, and adhered strips of the animal print cardstock and a very thin strip of the orange Glitterstock across the top. I stamped ‘pull here’ (included with the punch board) at the top of the card tray, and the ‘from us’ sentiment from the Waffle Flower Sentiment Additions stamp set across the bottom in Catherine Pooler Mandarin Spice ink. The confetti consists of a variety of hearts and stars punched from the white, dark brown and orange Glitterstock. The punch board actually punches the hearts (WRMK thinks of everything, lol) and I used an itty bitty star punch from my stash.

I created an envelope with the same punch board from CutCardStock Basis 80# Dark Orange cardstock, stamped ‘hold here’ at the bottom on the back side in Catherine Pooler Icing On The Cake ink, and added a strip of the animal print cardstock to the bottom front.

And one more peek… SQUEAL! So loving this punch board and I see many more of these fun cards in my future! You really do need to see a video to see the full effect of the explosion, lol!

Products used:
Cardstock/Paper: Neenah Classic Crest 80# Solar White cardstock, CutCardStock Basis 80# Dark Orange cardstock, Papertrey Ink Dark Chocolate cardstock, Brutus Monroe Color Companion Glitterstock, American Crafts Animal Print 6×6 cardstock pad
Stamps: Waffle Flower Sentiment Additions stamp set
Ink: Catherine Pooler Mandarin Spice and Icing On The Cake inks
Dies/Punches: Waffle Flower Wide Alpha Dies, Waffle Flower Bold Alpha Dies, Stampin’ Up Itty Bitty Star Punch
Accessories: Tonic Studios 12″ Guillotine Paper Trimmer, Bearly Art precision craft glue, We R Memory Keepers Explosion Card Punch Board, Gemini Junior, MISTI stamp tool

I hope you’ve enjoyed this project and will come over and join in all the fun at The Outlawz Challenges! Lots of fun going on! Thanks so much for stopping by today – we’ll see you next time! ;)

Scrappy hugs,
lesliesig

enjoy the little things ATC

Hi peeps! Happy Hump Day! I’ve popped in quickly this morning before a busy day starts in my studio to share a project created for the June Freebie/Progressive Challenge over at The Outlawz! Affiliate links are used in this post at no cost to you. I really appreciate your support! If you know me, you know that I absolutely LOVE artist trading cards/coins/cubes so I created an artist trading card for the July Freebie/Progressive Challenge over at The Outlawz using the Red Panda digital image gifted to us from Fabrika Fantasy. Isn’t she a beauty?!

I printed the image on Neenah Classic Crest 80# Solar White cardstock, trimmed it and layered it on CutCardStock Pop-Tone 65# Black Licorice cardstock, and then adhered it to a Neenah Classic Crest 110# Solar White cardstock ATC blank. I trimmed a Brutus Monroe Sweet Sayings Conversation Clippings sentiment and adhered it to the bottom right of the ATC. The finishing touch was adding a little bit of shimmer to the flowers.

And one more look… love me some ATCs and this one will make an excellent addition to my growing collection!

Products used:
Cardstock/Paper: Neenah Classic Crest 80# and 110# Solar White cardstock, CutCardStock Pop-Tone 65# Black Licorice cardstock
Stamps: Fabrika Fantasy Red Panda digital image
Ink: Nuvo alcohol markers- Coral Reef Collection, Fragrant Oranges Collection, Organic Greens Collection, Natural Browns Collection, Honey Amber Collection, Fair Skin Collection, and Ombre Collection; Assorted Paper Mate Flair medium point markers, Sakura White Gelly Roll pen, Sakura Clear Star Gelly Roll pen
Dies/Punches: Accessories: Tonic Studios 12″ Guillotine Paper Trimmer, Bearly Art precision craft glue, Brutus Monroe Sweet Sayings Conversation Clippings

I hope you’ve enjoyed seeing this artist trading card and will come over and join in all the fun at The Outlawz Challenges! Lots of fun going on! Thanks so much for stopping by today – we’ll see you next time! ;)

Scrappy hugs,
lesliesig