hello Sunshine

Hello, my crafty friends! Hope you’re having a good week so far! This month’s Anything Goes With Dies Challenge! I’m happy to share another cat card in my ‘awesome’ series! These are right up my alley – hubby and I have eight feline fur babies and we couldn’t love them more!

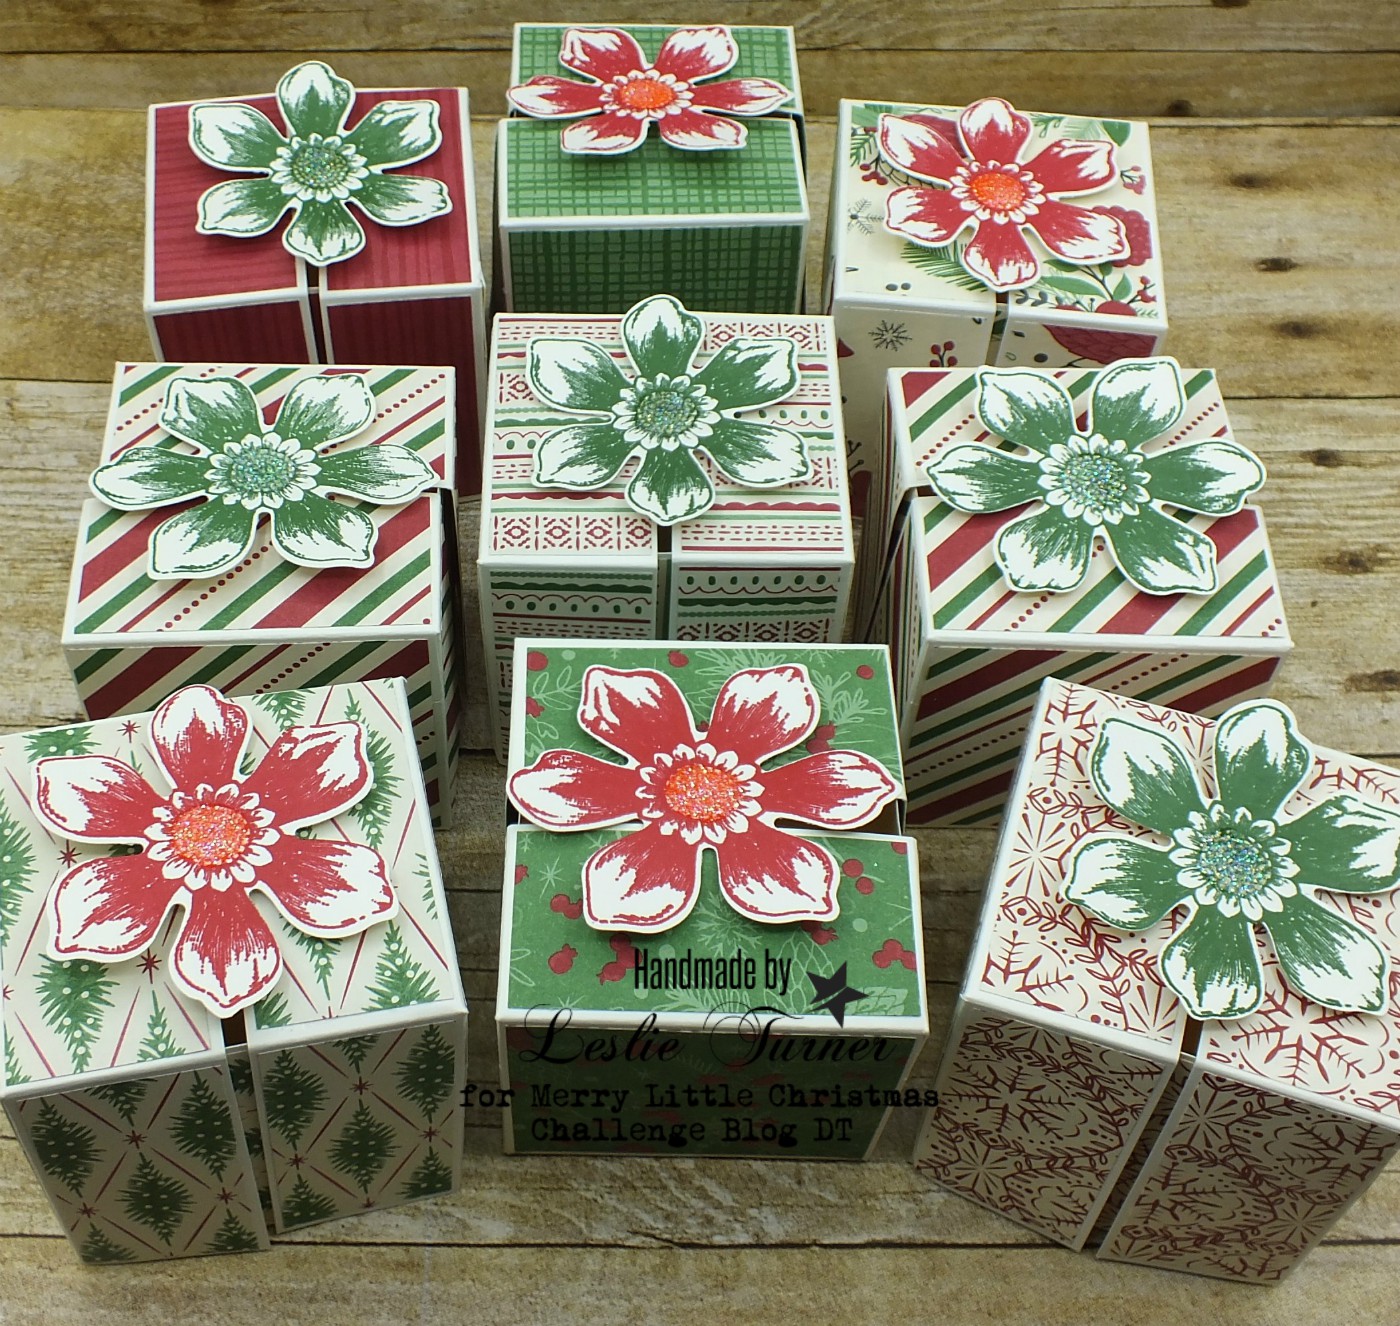
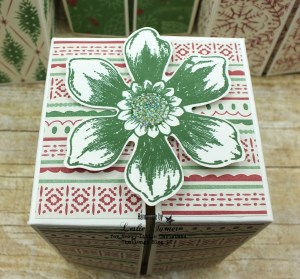
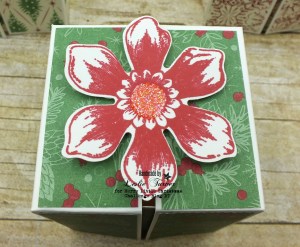
This CAS design is so playful and fun, and super easy to mass produce to create a set of six or eight to give as a gift. So stay tuned… you’ll be seeing a few more in different colors AND a gift box!

2018_1229005a

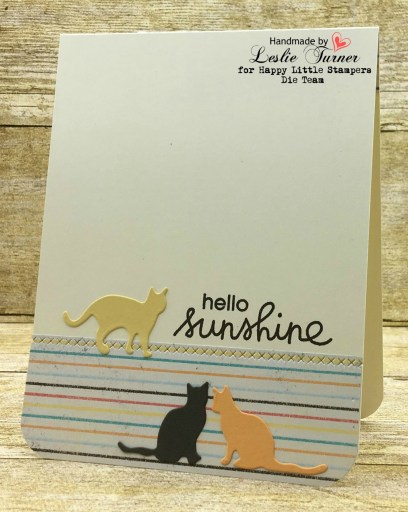
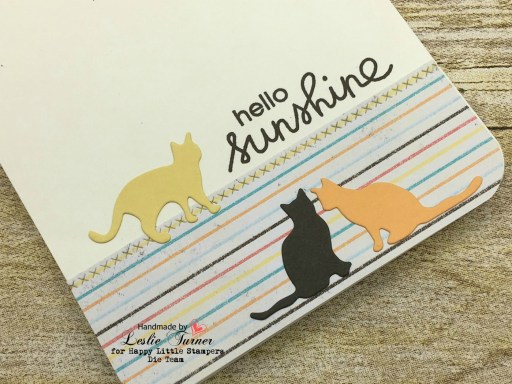
I cut a strip of striped paper and adhered it to the card base, rounded both lower corners and then ran it through the Big Shot with a criss-cross border die. I used my new favorite set of cat dies to cut some kitties from different colors of cardstock and placed them on the front of the card, and then stamped the sentiment.

2018_1229006a

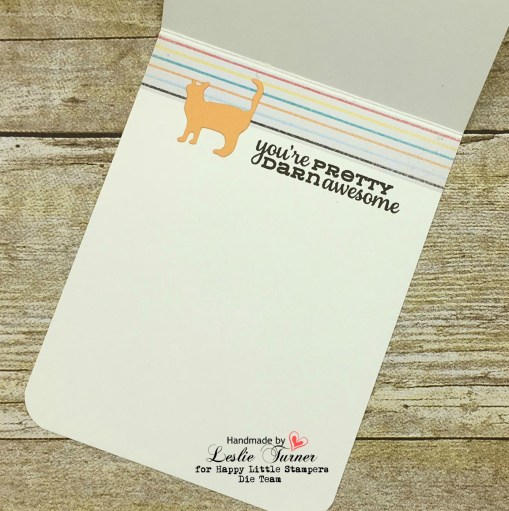
I decorated the inside with a strip of the striped paper and another kitty die cut, and then stamped the sentiment.

2018_1229007a

One more look… super happy with this design. Sure do love the kitties!

2018_1229008a

Products used:
Cardstock/Paper: Stampin’ Up Very Vanilla thick cardstock, Stampin’ Up Peekaboo Peach and So Saffron cardstock, GKD Charcoal Brown cardstock scrap, Stampin’ Up Cupcakes & Carousels DSP Stack
Stamps: Paper Smooches Summer Lovin’ and Lovely Thoughts stamp sets
Ink: Stampin’ Up Early Espresso ink
Dies/Punches: Impression Obsession Cats die set, Lawn Fawn Stitched Borders die
Accessories:  Fiskars Corner Rounder, Tim Holtz Stamp Platform

I hope you’ve enjoyed today’s project and will link up a project using dies in our challenge this month! We can’t wait to see what you create! Thanks so much for stopping by today – we’ll see you next time! ;)

Scrappy hugs,
lesliesig

Vintage Trunk Cards (set of 2)

Hi everyone! Say whaaaat?! We’re a week into May already! Today is my post day on the Simply Crafty SVGs Blog and I’m excited to share my DT inspiration project with you, a set of cards created with the Simply Crafty SVGs Classic Car Trunk Card Set cut file. I was thinking masculine and feminine – one of each – that could be used for birthday or friendship. And of course, you can tell immediately which is which, lol!

2019_03230014a

LOVE this classic car trunk design and it’s so fitting for a guy! And the inked light teal cardstock is perfect! I’m always so proud to create with Sandy’s designs because they are always spot-on and realistic. She thinks of everything with regard to the elements, and all you have to do is cut and assemble! ;)

2019_0323006a

I used a variety of cardstock. I cut the card base and license plate from thick white, the car body, trunk and fenders from light teal (which I inked), the rear window from gray, the lights from red and black, and the bumper from metallic silver. I pulled out a couple stamp sets in my stash that contained the exact sentiments I wanted to use on the trunk lid and the license plate, and then again on the inside!


And how about this vintage van… aka hippie van from my day?! OMG, I’m in love! I stamped flowers and peace signs all over it to make it girlie and feminine just like I would have painted it if I had been lucky enough to own one back in the day!

2019_03230010a

I cut these pieces on my Scan N Cut at the same time as the pieces for the other classic car card, using a heavy light green cardstock for the base, medium green for the van body and rear elements, gray for the windows, red for the lights, black for the tires, and metallic silver for the bumper. And once again, I found the perfect stamp set to use for the sentiment on the license plate and the inside sentiment!

I’m so smitten with both of these cards and can’t wait to send them to just the right people! ;)

Products used:
Cardstock/Paper: Stampin’ Up thick Whisper White cardstock, Stampin’ Up Pool Party, Real Red, Smoky Slate and Basic Black cardstock, GKD Jelly Bean Green and Applemint cardstock, Marco’s Venicelux Silver Metallic cardstock
Stamps: Dare 2B Artzy Classic Dad stamp set, CAS-ual Fridays Stamps Heartflet Sayings stamp set, Stampin Up Beautiful Ride stamp set
Ink: Stampin’ Up Pool Party ink, Stampin’ Up Lovely Lipstick, Blueberry Bushel, Pineapple Punch, Call Me Clover and Grapefruit Grove ink, Memento Tuxedo Black and Grape Jelly ink
Dies/Punches: Simply Crafty SVGs Classic Car Trunk Card Set cut file
Accessories:  Tim Holtz stamp platform

I hope you’ve enjoyed today’s projects! Be sure to check out all the fun cut files in the Simply Crafty SVGs store – you’ll have so much fun! And there are tons of freebies to get started! Thanks so much for stopping by today – we’ll see you next time! ;)

Scrappy hugs,
lesliesig

thanks note card

Hi everyone! Happy Tuesday – sure seems like the weekends go by awfully fast! Whaddaya think?! It’s time for another fun challenge over Stinkin’ Inkers and I’m thrilled to share my DT inspiration project for the All Tied Up challenge! We’d love to see your project with twine, ribbon, fibers, etc. I created a pretty thanks note card featuring some twine for the challenge theme along with a strip of pretty floral cardstock, a couple die cuts and some flat-back pearls.

2019_0317009a

This was a simple and fun card to make, and could easily be mass-produced to create four or six to go into a set, as everybody needs thank you cards in their stash! I embellished the butterfly body with Crystal Drops and then added yellow Baby Beads while it was still wet.

2019_03170010a

I decorated the inside panel with a piece of the floral cardstock used on the front, and left the panel blank to write a custom message.

2019_0324001a

And one more look… I l-o-v-e how this turned out!

2019_03170011a

Products used:
Cardstock/Paper: GKD Dark Chocolate cardstock, Stampin’ Up So Saffron cardstock, The Paper Studio Mirabelle cardstock
Dies/Punches: Stampin’ Up Butterflies thinlits dies, Simon Says Stamp thanks die
Accessories:  Stampin’ Up Crushed Curry twine, Darice dark brown Foamies foam, Nuvo dark walnut Crystal Drops, Queen & Co. yellow Toppings-Baby Beads, Hero Arts yellow flat-back pearls

I hope you’ve enjoyed today’s project and will link something up with us this month that has twine, ribbon, fibers, etc.! We can’t wait to see what you create! Thanks so much for stopping by – we’ll see you next time! ;)

Scrappy hugs,
lesliesig

hello my friend

Hi everyone! The weekends sure do fly by – I hope you had a good one! This month’s ATC Challenge is live over at Happy Little Stampers and I’m excited to share my DT inspiration project with you today! The theme for our May ATC Challenge is Hello and we’d love to see what you create for our challenge this month!

I created a coin this month, using a Fiskars 2-1/2″ round punch and two layers of thick Whisper White cardstock to create the coin base. I adhered two pieces of pretty coordinating patterned paper together and punched a circle to create the background.

2019_0310004a

I used my favorite ‘hello’ die and cut two thick cardstock layers (which I adhered together) along with one layer from a third piece of the coordinating patterned papers that I adhered on top.

2019_0310005a

I stamped the sentiment across the bottom in black ink and embossed it in clear embossing powder, and then adhered the layered die cut at an angle just above it. I added some gold sequins to complete the coin. Love, love, love!

2019_0310006a

Products used:
Cardstock/Paper: Stampin’ Up thick Very Vanilla cardstock, Stampin’ Up Moonlight DSP stack
Stamps: Stampin’ Up Hello stamp set
Ink: Versamark
Dies/Punches: Mama Elephant hello script die
Accessories:  Fiskars 2-1/2″ circle punch, Tim Holtz stamp platform, Sweet Stamps black embossing powder, Pretty Pink Posh Sunshine Glow sequins

I hope you’ve enjoyed today’s project and will link up an ATC with us this month! We’d love to see what you create – either a card or a coin! Thanks so much for stopping by today – we’ll see you next time! ;)

Scrappy hugs,
lesliesig

Just Because

Hello, my crafty peeps! Happy Hump Day to you! A new challenge launched this morning over at Love To Scrap Challenge Blog and I’m stoked to share my DT inspiration project for LTCCB #34 – May Anything Goes! I created a project with lots of green (which just happens to be my favorite color) – an adorable friendship card featuring papers, digital image and sentiments from Polkadoodles.

Leslie

I colored the image with Prismacolor pencils and layered her on a stitched rectangle die cut. I added a lacy die cut, a narrow strip of gold mirror cardstock and some bling from my stash.

2019_0309005a

I decorated in the inside with leftover strips of paper and cardstock used on the front, and added a sentiment.

2019_0309006a2019_0309007a

And one final look… loving how this turned out. What an adorable image!

2019_0309008a

Products used:
Cardstock/Paper: Stampin’ Up thick and regular Very Vanilla cardstock, Stampin’ Up Always Artichoke cardstock; Marco’s Gold Mirror cardstock; papers from Polkadoodles Belle Papillon Big Kahuna Download Bundle and Winnie Sugar Sprinkles Paper Heaven 2 Bundle
Stamps: Winnie Sugar Sprinkles Springtime digital stamp
Ink: Spectrum Noir Crystal Clear Sparkle overlay marker
Dies/Punches: My Favorite Things Stitched Rectangle STAX die, Crafter’s Companion Die’sire Art Deco Edge die
Accessories:  Prismacolor pencils, Darice clear rhinestones, YNS green Glitter Gumdrops

I hope you’ve enjoyed this project and will link up an ‘anything goes’ project with us this month! We can’t wait to see what you’re working on! Thanks so much for stopping by today – we’ll see you next time!

Scrappy hugs,
lesliesig


unleash your inner sparkle

Hi everyone! Happy Hump Day! A new challenge is live this morning over at Love to Scrap Challenge Blog and I’m proud to share my DT inspiration project for LTSCB #121 – Anything Goes! We’re being sponsored this month by the awesome and wonderful CAS-ual Fridays Stamps so come on over and play for a chance to win a prize! I used the Be A Unicorn stamp set to create a magical birthday card featuring an adorable pink plaid paper-pieced unicorn! ;)

2018_0330001a

I paper pieced the unicorn and cut it with an oval stitched scallop die. I created the pink criss cross die cut and the silver glitter doily die cut. I layered the pink background paper on silver foil cardstock and then adhered all the pieces. I stamped the sentiment on white cardstock and cut it with a stitched rectangle die. I finished the front with some pink sequins for some extra-added sparkle. ;)

2018_0330002a

I embellished the inside with leftover strips of pink paper and glitter cardstock used on the front, and stamped the magical birthday sentiment.

2018_0330003a

And here’s one more look… I’m loving how this turned out! What an adorable stamp set!

2018_0330004a

Products used:
Cardstock/Paper: Stampin’ Up thick and regular Whisper White cardstock, Stampin’ Up Silver Foil Sheet, GKD Bubblegum Pink cardstock, Doodlebug Design x6x gingham-linen and dot-grid-daisy-stripe Rainbow Petite Prints papers, DCWV Glitzy Glitter cardstock
Stamps: CAS-ual Fridays Stamps Be A Unicorn stamp set
Ink: Memento Tuxedo Black ink
Dies/Punches: Paper Smooches Criss Cross die, My Favorite Things Die-namics Stitched Mini Scallop Oval STAX die, Cheery Lynn Designs Italian Flourish die, My Favorite Things Die-namics Stitched Rectangle STAX die
Accessories:  Tim Holtz stamp platform, Darice Foamies white foam Pretty Pink Posh Strawberry Burst sequins

I hope you’ve enjoyed today’s project and will link up an ‘anything goes’ project with us this month! And be sure to check out all the fun goodies at CAS-ual Fridays Stamps – you’ll be in heaven! Thanks so much for stopping by today and we’ll see you again soon!

Scrappy hugs,
lesliesig

faith wall hanging

Hello, my crafty peeps! Happy Hump Day! The May challenge launched this morning over at Mix It Up Challenge Blog and I’m super stoked to share my DT inspiration project for MIUCB #25 – Anything Goes + Mixed Media! Remember, our challenges are always Anything Goes and we offer an optional technique twist each month to inspire you! This month our twist is mixed media and we’d love to see you create a project using more than two kinds of media. I created a faith wall hanging for my studio to remind me to have a little faith on a daily basis… and I SO enjoyed creating this!

2019_0421005a

I started with a 6 x 6 gesso board that I painted with black Gesso, then used a couple stencils with translucent paste and a spatula, and let it dry thoroughly. Then I rubbed some acrylic paint lightly over the stenciled areas with my finger tip, and let that dry. Meanwhile, I dug deep into my stash and brought out a variety of elements to use – a zipper, key, sequins, gears, flowers, ribbon, glass vial that I filled with beads, a dragonfly charm and a flashcard. Then I sprayed and spritzed ink, and the fun began… laying everything out and adhering all the elements in place. It was awesome watching it transform, lol!

Here are a few close-ups…


And here’s one more look… really loving how this turned out. I sure do love me some purple! Can you tell?! ;)

2019_04210010a

Products used:
Ink: Dr. Ph. Martin Violet india ink
Accessories:  6 x 6 Gesso Board, Black Gesso, Tim Holtz Gothic stencil, The Crafter’s Workshop Mini Harlequin stencil, DreamWeaver Translucent Paste; Liquitex Deep Violet, Cobalt Blue and Silver acrylic paint; Liquitex Matte Gel, variety of Wild Orchid Crafts flowers, dragonfly charm, key brad, Indygo Junction zipper, Pretty Pink Posh Lavendar Moon sequins, Queen & Co. Baby Beads; Tim Holtz Idea-ology Corked Vial, Flashcards and Swivel Clip; Hobby Lobby Woodpile Gears, Marvy Uchida silver DecoColor paint marker, Prairie Bird Boutique wrinkled ribbon

I hope you’ve enjoyed this wall hanging and will link up an ‘anything goes’ project with us this month! Although the technique twist of mixed media is not required to play, we’d love to see a mixed media project using more than two kinds of media! Thanks so much for stopping by and we’ll see you again soon! ;)

Scrappy hugs,
lesliesig

Small Split-Top Treat Boxes

Hi everyone! Happy Hump Day and it’s May 1st! A new challenge is live over at Merry Little Christmas Challenge Blog and I’m happy to share my DT inspiration project for MLCCB #10 – May Anything Christmas Goes! I created a fun set of nine small split-top treat boxes. My inspiration came from an older YouTube tutorial here done by my friend, Dawn. I used Stampin’ Up cardstock, paper, stamp, ink and flower punch.

DSCF4610

I did these assembly line fashion, by cutting the bases first and then all the patterned paper pieces. I stamped the flowers, punched them out, coated the centers with Glossy Accents and added glitter.  I popped the flowers up on dimensional foam pads on one side so the boxes could easily be opened.

DSCF4612

Here are close-ups of the flowers. They turned out so pretty!

And here’s one final look at the group from overhead… love how these turned out!

DSCF4611

Products used:
Cardstock/Paper: Stampin’ Up Very Vanilla cardstock, Stampin’ Up This Christmas Specialty DSP
Stamps: Stampin’ Up Beautiful Bunch stamp set
Ink: Stampin’ Up Garden Green and Real Red ink
Dies/Punches: Stampin’ Up Fun Flower Punch
Accessories:  Tim Holtz Stamp Positioner, Glossy Accents, Stampin’ Up Dazzling Diamonds Glitter

I hope you’ve enjoyed today’s project and will link up a Christmas project with us this month! It’s never too early to start! Thanks so much for stopping by today and we’ll see you again real soon! ;)

Scrappy hugs,
lesliesig

Happy Mother’s Day

Hi everyone! I hope you’ve had a good week and have something fun planned this weekend! I’m happy to report that I’m once again a guest designer for Scrapping4fun Challenges and I’m happy to share my GD project for Challenge #139 – Ladies! We’d love to see your girly project for Mother’s Day, daughter, granddaughter, etc., so come on over and play!

2019_0414001a

I created a pretty Mother’s Day card for a special friend using an adorable clip art digital print from PWP, leftover from my time as a designer with them. I used a couple patterned papers along with pink and black cardstock for layering. The front sentiment is computer-generated. The final touch was the addition of a few pink star, heart and plain sequins.

2019_0414002a

I decorated the inside panel with leftover strips of cardstock and paper used on the front, and then stamped the sentiment in pink ink.

2019_0414003a

One more look… really loving how this turned out! Such an adorable image!

2019_0414004a

Products used:
Cardstock/Paper: Stampin’ Up thick and regular Very Vanilla Cardstock, Stampin’ Up Share What you Love Specialty DSP, The Paper Cut Black cardstock, GKD Bubblegum Pink cardstock
Stamps: Paper Wings Productions Spring Flowers Clip Art Sheet, Dare 2B Artzy Flowers for Mom stamp set
Ink: Stampin’ Up Rose Red ink
Accessories:  Stampin’ Up sequins

I hope you’ve enjoyed this card and will come link up with us over at Scrapping4fun Challenges! We’d love to see your ‘ladies’ project! Thanks so much for stopping by today – we’ll see you next time!

Scrappy hugs,
lesliesig

Ephemoire Dream Team!

Squeal! The Ephemoire Dream Team has been announced and I’m one of ’em! How awesome is that?!


So stoked to be creating with some of the coolest digital printables around – collage sheets, digital papers (absolutely beautiful digital papers), journal kits, clip art and mixed media printables! And the print quality is amazing!

Be sure to check out all the awesome printables at the Ephemoire Etsy Shop, and while you’re at it, head on over to the Ephemoire Facebook Page for tons of inspiration!

Thanks for stopping by – we’ll see you again soon!

Scrappy hugs,
lesliesig