7/12/22 Featured at Little Red Wagon!
8/12/22 Top 3 at Winter Wonderland Challenge Blog!
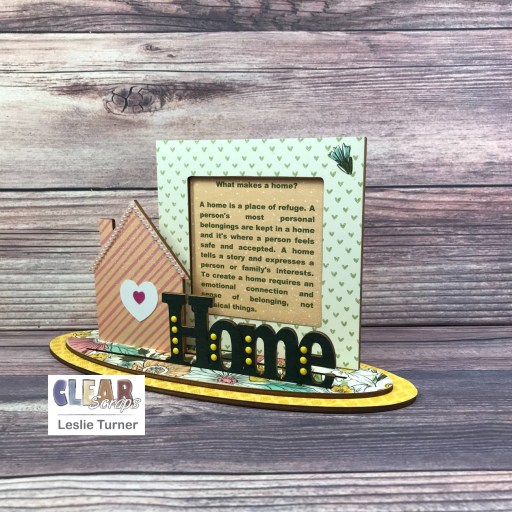
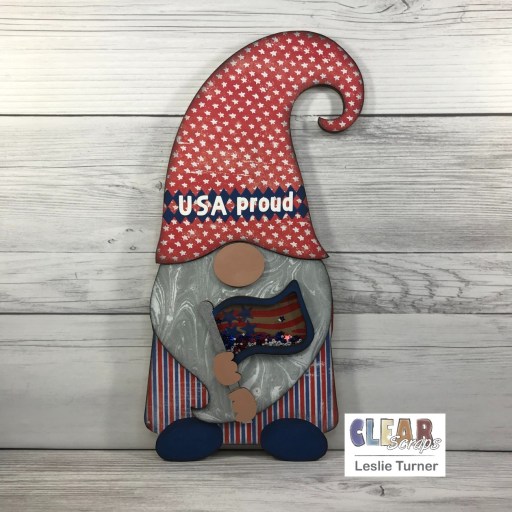
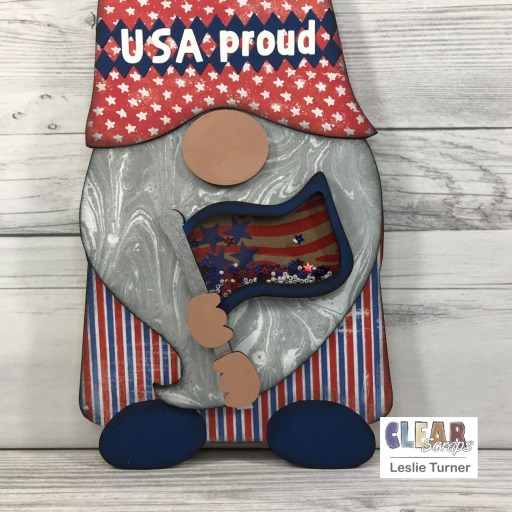
Hey, everybody! Happy Hump Day! I hope you’re having a great week! I’m thrilled to be back on the Clear Scraps blog today with another awesome DT inspiration project! I created a super fun gnome-themed Christmas home decor piece featuring the Medium House DIY Pallet Shape and Mini Shaker Gnome! The pallet shapes and mini shakers are so much fun to play with!

I covered the three sections of the Medium House DIY Pallet Shape with coordinating Christmas patterned papers, inked the edges of the sections with white pigment ink, and added a 3mm pink pearl bling strip to the roof outline. I stamped a sentiment in green ink and die cut it with a sentiment strip die, and adhered it to the roof section.
Next, I die cut two trees from dark aqua cardstock and adhered the outlines to the left of the house. I die cut the two trees once more from light aqua cardstock and adhered the negative space pieces on the tree outlines on the house.

Turning my attention to the Mini Shaker Gnome, I colored his hat and robe with alcohol markers and sponged white pigment ink on his beard. I added accents to his beard with an alcohol marker, added accents to his hat with an acrylic paint pen, and covered his shoes with light aqua cardstock. I assembled the shaker from the bottom up, adhering the two bottom chipboard forms and then adding 3mm clear droplets to the shaker compartments. I adhered the acrylic divider (with the protective film removed from both sides) and then adhered the front chipboard form. I clamped the shaker for about 10-15 minutes to be sure the layers adhered well, and adhered the gnome beside the trees.
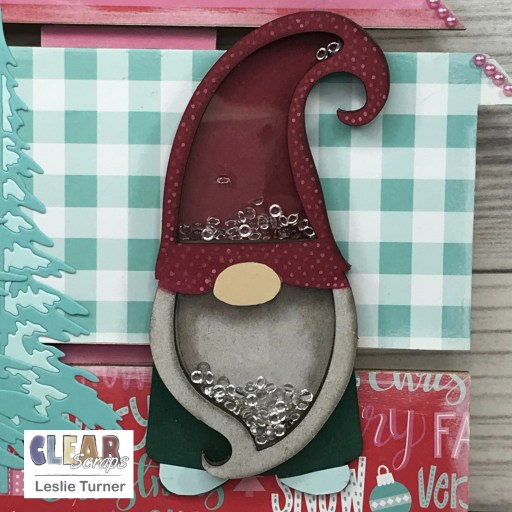
And one more look… loving how this turned out! You all know how much I love gnomes and how much I love Christmas, and this piece really makes me happy! ;)

Sharing in the following challenges:
1. 613 Avenue Create: #202207 – Anything Goes w/ optional Black & White (no twist)
2. A Perfect Time To Craft: #7-2022 – Anything Goes
3. A Place To Start: #072022 – Anything Goes w/ optional Balloons and Flowers (no twist)
4. Christmas Craft Creations: June Challenge – Trees
5. Classic Design Challenge: July #7 – Anything Goes
6. Crafting Happiness Challenges: #125 – Anything Goes Always
7. Jan’s Digi Stamps Challenge: July Anything Goes
8. Lil Patch of Crafty Friends: #185 – Anything Goes
9. Little Red Wagon: #661 – Christmas in July
10. Winter Wonderland Challenge Blog: From Our Gnome To Yours
Clear Scraps products used:
Medium House DIY Pallet Shape
Mini Shaker Gnome
Other products used:
Cardstock/Paper: CutCardStock Sandcastle, Basis Aqua, and Pop Tone Sno Cone cardstock; Neenah Classic Crest Solar White cardstock, The Paper Studio Four Seasons and Everything in Between -2- paper pad
Stamps: Stampingbella Festive Gnome Sentiments stamp set
Ink/Paint: Hero Arts Unicorn ink, Catherine Pooler Daydream ink; Arteza alcohol markers- R35, RP04, BG35, NG08; pink acrylic paint pen
Dies/Punches: Sizzix Woodlands Thinlits, My Favorite Things Essential Fishtail Sentiment Strips Die-namics
Accessories: Bearly Art precision craft glue, brayer, MISTI stamp tool, Big Shot, Kat Scrappiness 3mm Sparkling Clear Droplets, Eyelet Outlet 3mm pink pearl bling strip
I hope you’ve enjoyed today’s project and you’re inspired to get those craft supplies out to play! Be sure to check out all the amazing acrylic, wood and chipboard goodies at Clear Scraps… OMGoodness, you won’t be disappointed! And head on over to the Clear Scraps Facebook Page for lots of inspiration! And while you’re at it, join the Clear Scraps Facebook Creative Group to connect with other Clear Scraps fans! Thanks so much for stopping by today – we’ll see you next time!
Scrappy hugs,