happy birthday to you

Hi friends! Happy Thursday! We’re another day closer to Friday so that’s a big YAY for all my working friends! I’m back this morning with another Splitcoast Stampers Dirty Dozen DT inspiration project featuring some gorgeous patterned papers and die cuts and a fabulous fun fold called a reverse easel card! I’ve had these instructions in my tutorial folder for quite some time and have never made one so I thought it was time to try it out! I love how it turned out!
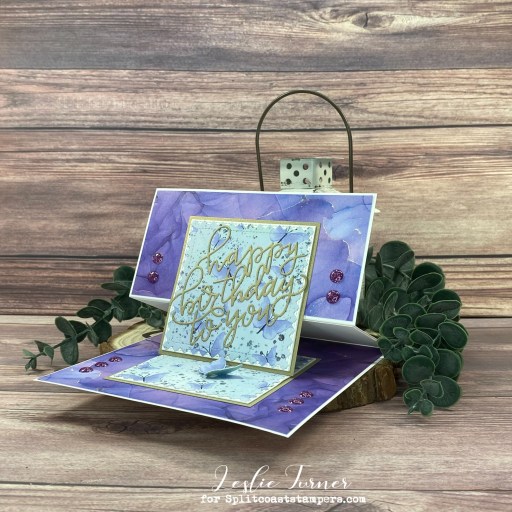
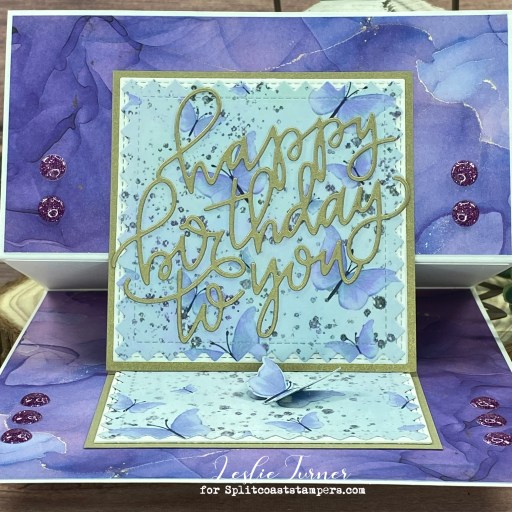
I cut the card base from CutCardStock Basis 80# White 12×12 cardstock along with embellishing panels from Craft Consortium Ink Drops-Vivid 6×6 paper pad. I used the My Favorite Things Double Stitched Square STAX to die cut two squares which I layered on slightly larger squares cut from CutCardStock Curious Metallic Gold Leaf cardstock.
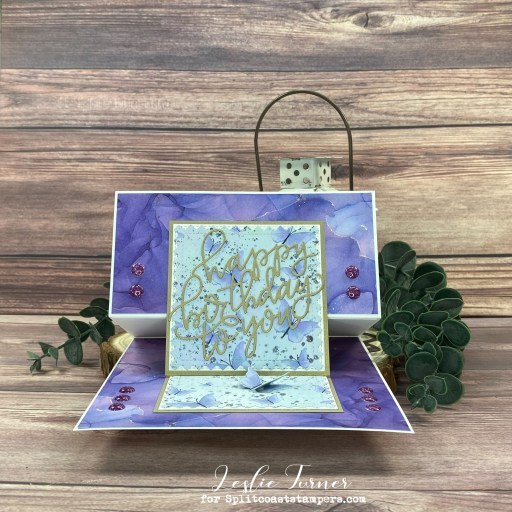
I used the My Favorite Things Stitched Pinking Edge Square STAX to cut panels from a pretty butterfly print in the Kraft & Creativity Showering Nature 12×12 paper pack. I fussy cut a butterfly and adhered it to a Basis White cardstock scrap for stability, and adhered it to the base for an easel stop. I added the sentiment die cut from Gold Leaf cardstock using the My Favorite Things Swirly Birthday die. The finishing touch was adding several YNS Purple Glitter Gumdrops.
Sharing in the following challenges:
1. A Perfect Time To Craft Open Challenge: August #8-2023 – Anything Goes
2. Classic Design Challenge: August #8 – Anything Goes
3. Crafts Galore Encore Challenge Blog: #114 – August Anything Goes

Affiliate links are used in this post at no cost to you – I really appreciate your support! 

Products used:
CARDSTOCK/PAPER: CutCardStock Basis 110# White 12×12 and Curious Metallic Gold Leaf cardstock, Kraft & Creativity Showering Nature 12×12 paper pack, Craft Consortium Ink Drops-Vivid 6×6 paper pad
DIES/PUNCHES: My Favorite Things Stitched Pinking Edge Square STAX, Double Stitched Square STAX and Swirly Birthday Die
ACCESSORIES: Tonic Studios 12″ Guillotine Paper Trimmer, Tape Runner, Art Glitter Dries Clear adhesive, Big Shot, YNS Purple Glitter Gumdrops

I hope you’ve enjoyed seeing this project and will consider joining the Splitcoast Stampers Fan Club which costs less than $25 for an entire year! There are tons of member perks (like seeing all the Dirty Dozen DT’s inspiration projects each month) in addition to access to all the other free content on the Splitcoast Stampers website. Be sure to check it out! The subscription is seriously awesome! Thanks for stopping by today – we’ll see you again soon!

Scrappy hugs,

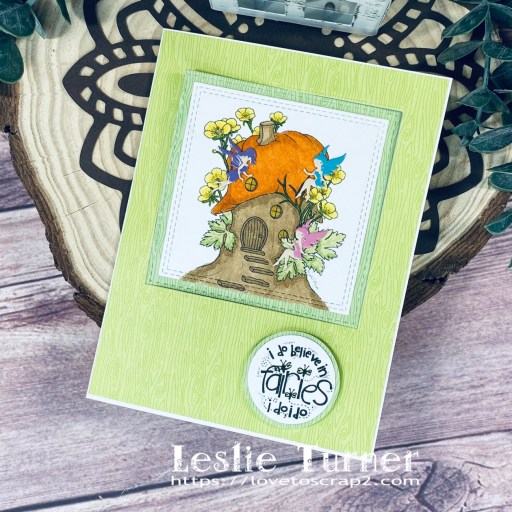
I do believe in fairies

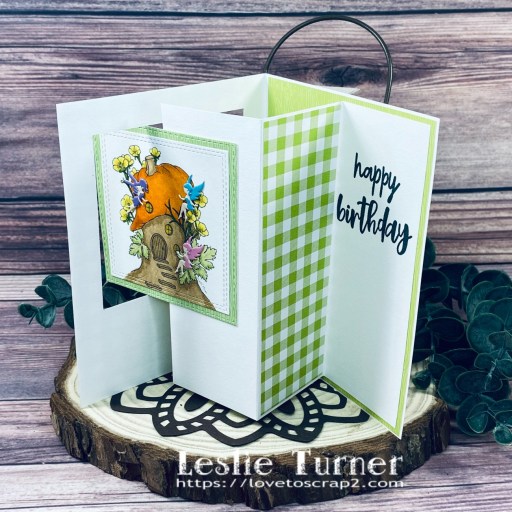
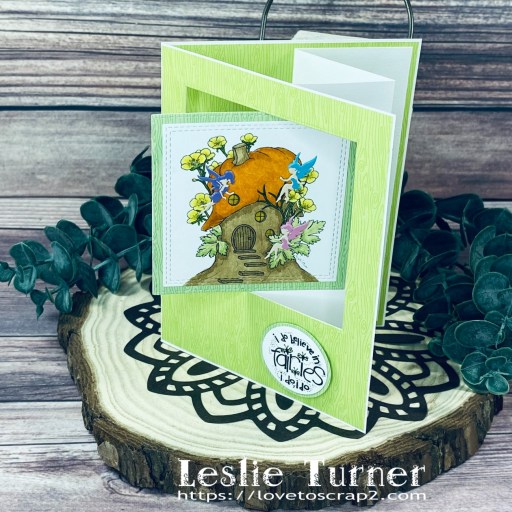
Hi friends! I hope you’re having a great week! It’s so hard to believe we’re a couple days into the month of August already! I’ve been saying for years that once my sister’s birthday hits on the 8th, Christmas is here in no time! I’m delighted to share that I’m once again guest designing for Penny’s Paper-Crafty Challenge Blog! One of my projects scored a win at Penny’s back in mid-June so I was invited to join in Challenge #552! SheepSki Designs is our sponsor this time, so be sure to come on over and play! I was gifted the adorable Buttercup Cottage digital image for this challenge and created a swing flap fun fold with a fairy theme. I totally love how this turned out!

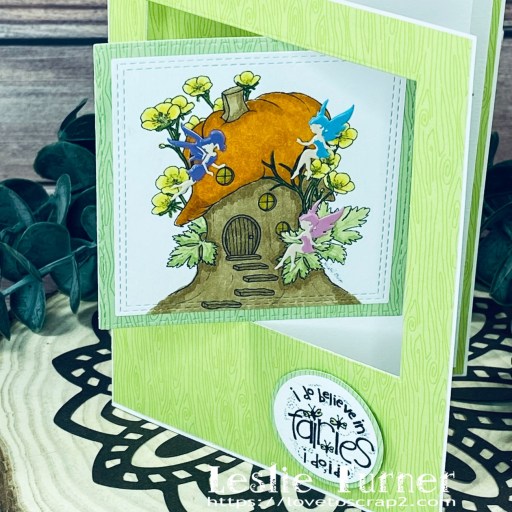
I cut the card base from CutCardStock Basis 80# White cardstock along with layering panels from coordinating prints in the Doodlebug Design Buffalo Check-Woodgrain Rainbow Petite Prints 6×6 paper pad. I printed the SheepSki Designs Buttercup Cottage digital image and an old Melonheadz Fairies digital sentiment on Basis White cardstock and colored the image with alcohol markers and a Faber Castell artist pitt pen.

I cut the image with a My Favorite Things Double Stitched Square STAX, added three Eyelet Outlet Fairy Brads, and layered it on a square cut from a darker green patterned paper with a Keep It Simple Stitched Squares Nested Die. I punched out the digital sentiment with a Stampin’ Up 1-1/4″ circle punch and layered it on a slightly larger circle punched from a darker green patterned paper with a Stampin’ Up 1-3/8″ circle punch, popped up on Stampin’ Up Dimensionals.

I layered a coordinating buffalo check patterned paper on the inside and stamped a sentiment in Memento Tuxedo Black ink from the Keep It Simple Birthday sentiment stamp set. The final photo shows the card folded flat for mailing. A ‘fun’ fold, for sure! ;)

Sharing in the following challenges:
1. A Perfect Time To Craft Open Challenge: August #8-2023 – Anything Goes
2. Classic Design Challenge: August #8 – Anything Goes
3. Crafts Galore Encore Challenge Blog: #114 – August Anything Goes
4. Wednesday’s Creative Inspirations Challenge Blog: August Challenge – Fairies!

Affiliate links are used in this post at no cost to you – I really appreciate your support! 

Products used:
CARDSTOCK/PAPER: CutCardStock Basis 80# White cardstock, Doodlebug Design Buffalo Check-Woodgrain Rainbow Petite Prints 6×6 paper pad
STAMPS: SheepSki Designs Buttercup Cottage digital image, Melonheadz Fairies digital sentiment, Keep It Simple Birthday sentiment stamp set
INK: Arteza alcohol markers- YG16/17, Y03/16, YR12/14, BR64/74; Faber Castell May Green Pitt Artist pen, Memento Tuxedo Black ink
DIES/PUNCHES: My Favorite Things Double Stitched Square STAX, Keep It Simple Stitched Squares Nested Dies, Stampin’ Up 1-1/4″ and 1-3/8″ circle punches
ACCESSORIES: Tonic Studios 12″ Guillotine Paper Trimmer, Bearly Art precision craft glue, MISTI stamp tool, Big Shot, Eyelet Outlet Fairy Brads, Stampin’ Up Dimensionals

I hope you’ve enjoyed seeing this project and will link up with us this fortnight! Thanks so much for stopping by today – we’ll see you next time! ;)

Scrappy hugs,

Sun Squad

Hey everybody! How are you holding up in this heat?! Even though it’s pretty warm here in southwestern Colorado, we don’t feel the heat quite like most other central and coastal states because we don’t have as much humidity. That’s definitely a good thing! I’m thrilled to share another ScrapbookingStore DT inspiration project with you this morning created with the amazing July 2023 Scrapbook Kit with Upgrades. I’m so digging this collection of awesome papers, stickers, frames and tags, and adhesive brads! The fact that every single paper and element coordinates with all the others makes it that much more fun to create with! I made a mini slimline step card (my tutorial for this fun fold is HERE) showcasing the papers and stickers as well as items in the upgrades!

I cut the card base using my Fiskars 12″ SureCut paper trimmer and Neenah Classic Crest 80# Solar White cardstock. I cut layers from two coordinating papers in the kit as well as a length of crocheted lace from my stash. I chose the focal element from the Frames & Tags in the upgrades, and then added several stickers from the sticker sheet which I popped up on foam strips. The finishing touch was adding two adhesive brads from the upgrades.

I cut the back panel from 80# Solar White cardstock as well and embellished it with a sticker from the sticker sheet. I’ve also included a side shot so you can see the cool construction of this step card! So fun!

Sharing in the following challenges:
1. A Perfect Time To Craft Open Challenge: July #7-2023 – Anything Goes
2. Classic Design Challenge: July #7 – Anything Goes
3. Shopping Our Stash: SOS501 – No Stamping Allowed

Affiliate links are used in this post at no cost to you – I really appreciate your support!

ScrapbookingStore products used:
July 2023 Scrapbook Kit with Upgrades

Other products used:
CARDSTOCK/PAPER: Neenah Classic Crest 80# Solar White cardstock
ACCESSORIES: Tonic Studios 12″ Guillotine Paper Trimmer, Fiskars 12″ SureCut Paper Trimmer, Tombow Mono Dots adhesive, Bearly Art precision craft glue, crocheted lace from stash, 1/2″ double-sided foam strip

I hope you’ve enjoyed today’s project and you’re thinking about all the fun you could have with this month’s kit… you really ought to think about joining the Subscription Club! Be sure to Follow us on Facebook, Instagram, Pinterest and YouTube for lots of crafty inspiration! And if you do decide to join the Subscription Club, join our ScrapbookingStore Club Member Group on Facebook for more inspiration and to share your projects! Thanks so much for stopping by today – we’ll see you next time!

Scrappy hugs,

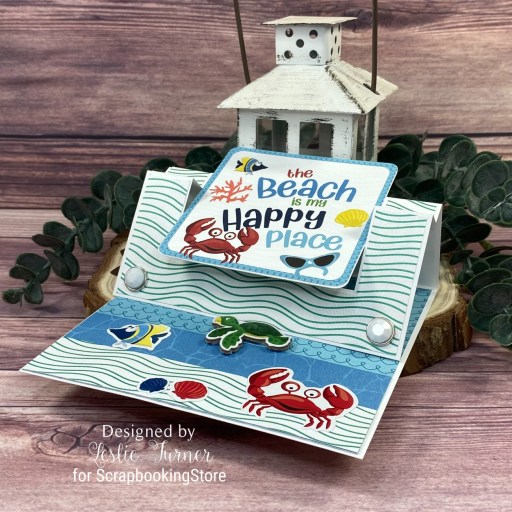
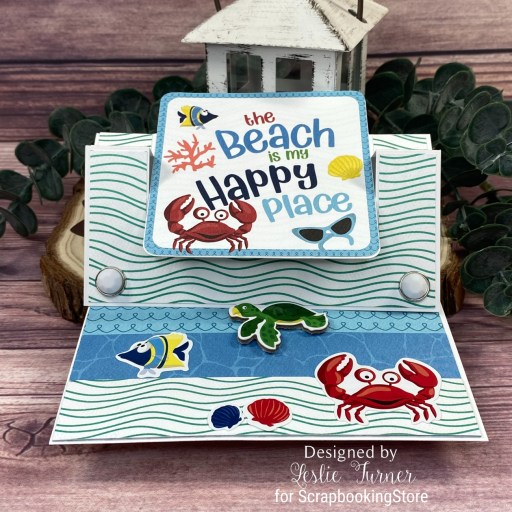
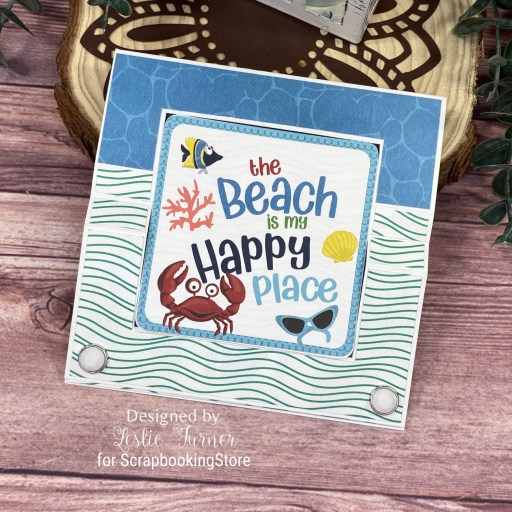
the Beach is my Happy Place

Howdy peeps! Happy Thursday – we’re one day closer to the weekend! I’m happy to be back to share another ScrapbookingStore DT inspiration project with you today created with the amazing July 2023 Scrapbook Kit with Upgrades. The papers and stickers in this collection are so fun, and they are great for creating beach-themed fun folds! I created this swing easel card using papers and stickers along with a chipboard element and adhesive brads from the upgrades, and it’s full of waves and critters! It can’t get any more fun than this!

I cut the card base using my Fiskars 12″ SureCut paper trimmer and Neenah Classic Crest 80# Solar White cardstock. I cut layers and an embellishing strip from several coordinating papers in the kit. I trimmed a journaling card from the kit for the focal element and added several stickers from the sticker sheet and the turtle chipboard element from the adhesive brads in the upgrades. The finishing touch was adding two white adhesive brads.

And one final view of the card folded flat for mailing!

Sharing in the following challenges:
1. A Perfect Time To Craft Open Challenge: July #7-2023 – Anything Goes
2. Classic Design Challenge: July #7 – Anything Goes
3. My Time To Craft: #512 – Summertime Water Play
4. Shopping Our Stash: SOS501 – No Stamping Allowed

Affiliate links are used in this post at no cost to you – I really appreciate your support!

ScrapbookingStore products used:
July 2023 Scrapbook Kit with Upgrades

Other products used:
CARDSTOCK/PAPER: Neenah Classic Crest 80# Solar White cardstock
DIES/PUNCHES: Kadomaru Pro Corner Rounder
ACCESSORIES: Tonic Studios 12″ Guillotine Paper Trimmer, Fiskars 12″ SureCut Paper Trimmer, Tombow Mono Dots adhesive, Bearly Art precision craft glue

I hope you’ve enjoyed today’s project and you’re thinking about all the fun you could have with this month’s kit… you really ought to think about joining the Subscription Club! Be sure to Follow us on Facebook, Instagram, Pinterest and YouTube for lots of crafty inspiration! And if you do decide to join the Subscription Club, join our ScrapbookingStore Club Member Group on Facebook for more inspiration and to share your projects! Thanks so much for stopping by today – we’ll see you next time!

Scrappy hugs,

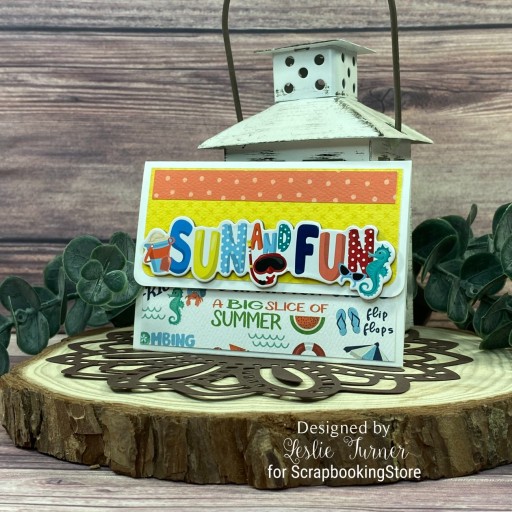
Sun and Fun GC Holder

Hey everybody! I hope you’re having a great week! I’m delighted to be back to share another ScrapbookingStore DT inspiration project with you today created with the July 2023 Scrapbook Kit with Upgrades. I’m totally loving this collection with all the coordinating and fun summery papers and elements! I created a gift card holder using coordinating papers along with items from the upgrades! Who wouldn’t love to receive this to use for a beach party?!

I cut the gift card holder base from Neenah Classic Crest 80# Solar White cardstock along with layering panels and an embellishing strip from coordinating papers in the kit. I rounded the bottom corners on the front flap and chose a large sentiment from the adhesive brads in the upgrades. The finishing touch was adding a small disc magnet for the closure which I adhered with Ranger Distress Collage Medium.

I adhered a tag from the tags & frames in the upgrades for the inside sentiment which completed the gift card holder.

Sharing in the following challenges:
1. A Perfect Time To Craft Open Challenge: July #7-2023 – Anything Goes
2. Classic Design Challenge: July #7 – Anything Goes
3. My Time To Craft: #512 – Summertime Water Play

Affiliate links are used in this post at no cost to you – I really appreciate your support!

ScrapbookingStore products used:
July 2023 Scrapbook Kit with Upgrades

Other products used:
CARDSTOCK/PAPER: Neenah Classic Crest 80# Solar White cardstock
DIES/PUNCHES: Kadomaru Pro Corner Rounder
ACCESSORIES: Tonic Studios 12″ Guillotine Paper Trimmer, Tombow Mono Dots adhesive, Bearly Art precision craft glue, Ranger Distress Collage Medium

I hope you’ve enjoyed today’s project and you’re thinking about all the fun you could have with this month’s kit… you really ought to think about joining the Subscription Club! Be sure to Follow us on Facebook, Instagram, Pinterest and YouTube for lots of crafty inspiration! And if you do decide to join the Subscription Club, join our ScrapbookingStore Club Member Group on Facebook for more inspiration and to share your projects! Thanks so much for stopping by today – we’ll see you next time!

Scrappy hugs,

Just Chillin’

Hi everyone! I hope you aren’t melting, lol! After the wicked cold winter we had, I guess I shouldn’t be surprised about the simmering hot summer we’re having! But dang it, Mother Nature… give us a break! It’s time to start sharing ScrapbookingStore DT inspiration projects created with the amazing July 2023 Scrapbook Kit with Upgrades. OMGoodness, another summer collection that’s absolutely awesome! I created a fun twisted gate fold using papers and stickers along with chipboard and adhesive brads from the upgrades!

I cut the card base from Neenah Classic Crest 80# Solar White cardstock along with layering panels from two coordinating patterned papers in the collection. I chose a chipboard phrase from the upgrades for the focal element and layered it on an additional print. The finishing touch was adding two adhesive brads.

I cut the inside panel from 80# Solar White cardstock and embellished it with a strip of the patterned paper used on the front with the chipboard, and added a couple stickers from the sticker sheet.

Sharing in the following challenges:
1. A Perfect Time To Craft Open Challenge: July #7-2023 – Anything Goes
2. Classic Design Challenge: July #7 – Anything Goes

Affiliate links are used in this post at no cost to you – I really appreciate your support!

ScrapbookingStore products used:
July 2023 Scrapbook Kit with Upgrades

Other products used:
CARDSTOCK/PAPER: Neenah Classic Crest 80# Solar White cardstock
DIES/PUNCHES: Kadomaru Pro Corner Rounder
ACCESSORIES: Tonic Studios 12″ Guillotine Paper Trimmer, Tombow Mono Dots adhesive, Bearly Art precision craft glue

I hope you’ve enjoyed today’s project and you’re thinking about all the fun you could have with this month’s kit… you really ought to think about joining the Subscription Club! Be sure to Follow us on Facebook, Instagram, Pinterest and YouTube for lots of crafty inspiration! And if you do decide to join the Subscription Club, join our ScrapbookingStore Club Member Group on Facebook for more inspiration and to share your projects! Thanks so much for stopping by today – we’ll see you next time!

Scrappy hugs,

Ho Ho Ho Corner Fold

Hey everybody! Happy Monday! Are the weeks flying by, or is it just me?! Bahahaha… I know it’s not just me! I’m up on the Prickley Pear Stamps blog today with another inspiration project featuring the cute-as-a-button Santa and Rudolph stamps and dies! This corner fold is part of our design team’s ‘Christmas in July’ showcase and is truly one of the easiest fun folds I’ve made that stands for display. I’ve made quite a few of them over the years in roughly an A2 size but I tweaked the measurements a bit and made this one in my mini slimline size of 3-1/2″ x 6″.  

I cut the card base from CutCardStock Cougar Smooth 80# White cardstock and layering panels from a patterned paper in the Echo Park A Perfect Christmas Collection Kit. I stamped the sentiment and Santa image from the Prickley Pear Stamps Santa and Rudolph stamp set in Memento Tuxedo Black ink on the Cougar Smooth White, colored the image with alcohol markers and Bic Mark-It fine point markers, and cut it with the coordinating Prickley Pear Stamps Santa and Rudolph die set. Using the Keep It Simple Stitched Rectangles Nested Dies, I die cut a rectangle from Cougar White and then cut a slightly larger rectangle (using the paper trimmer) from CutCardStock Pop Tone Jellybean Green cardstock to create the focal panel.

Sharing in the following challenges:
1. A Perfect Time To Craft Open Challenge: July #7-2023 – Anything Goes
2. Classic Design Challenge: July #7 – Anything Goes

Affiliate links are used in this post at no cost to you – I really appreciate your support!

Prickley Pear Stamps products used:
Santa and Rudolph stamp set
Santa and Rudolph die set

Other products used:
CARDSTOCK/PAPER: CutCardStock Cougar Smooth 80# White and Pop Tone Jellybean Green cardstock, Echo Park A Perfect Christmas Collection Kit
INK: Memento Tuxedo Black ink; Arteza alcohol markers- RP09, BR28; Bic Mark-It fine point markers- Rambunctious Red, Pink Flamingo, Tiki Hut Tan and Cloud Nine Grey; Pentel Slicci Gold pen
DIES/PUNCHES: Keep It Simple Stitched Rectangles Nested Dies, Fiskars 1-1/2″ Circle Punch
ACCESSORIES: Tonic Studios 12″ Guillotine Paper Trimmer, Bearly Art precision craft glue, MISTI stamp tool, Big Shot, clear iridescent gemstones

I hope you’ve enjoyed this project! Be sure to check out all the awesome stamps and dies at Prickley Pear Stamps! Save 10% on anything on the site when you shop at Prickley Pear Stamps by using coupon code LESLIE10 at checkout! And be sure to ‘like’ and ‘follow’ the Prickley Pear Stamps Facebook page to keep up with news and sales, and join Prickley Pear Pals (the fan group) for lots of fun crafty ideas and to share your creativity! And finally, we’d love to see you visit the Prickley Pear Stamps blog and become a Follower! Hope to see you there! Thanks so much for stopping by today – we’ll see you next time! ;)

Scrappy hugs,

Birthday Girl fun fold

Howdy peeps! Happy Saturday – I hope you have something fun planned this weekend! I’ve popped in this morning to share another Splitcoast Stampers Dirty Dozen DT inspiration project! Half down, half to go! ;) I was inspired to try a diamond origami fold that was showcased in an older Splitcoast Stampers tutorial HERE. Definitely a unique fold that I so enjoyed making!

I created the card base from a full 12×12 sheet of patterned paper in the Colorbok Mint Julep Designer paper pad. I used CutCardStock Flamingo cardstock to embellish the front and middle layers. I stamped the t-shirt from the Stampin’ Up Custom Tee stamp set in Memento Tuxedo Black ink on a coordinating print in the same paper pad and cut it with the coordinating Stampin’ Up T-Shirt Builder Framelits. I colored the collar and added Stampendous pink Dot Sparklers for the buttons. Next, I stamped the front sentiment on CutCardStock Basis 80# White cardstock in black ink and cut it with the coordinating die.

I stamped a sentiment on the middle layer from the same Stampin’ Up Custom Tee stamp set in black ink and embellished the panel with several more Stampendous pink Dot Sparklers. Finally, I embellished the inside panel with a strip of another coordinating patterned paper in the Colorbok Mint Julep Designer Paper and stamped a sentiment from the Stampin’ Up birthday Blossoms stamp set in Catherine Pooler Polished ink.

Here are sequential shots of the card opening up. Love how this turned out!

Sharing in the following challenges:
1. A Perfect Time To Craft Open Challenge: July #7-2023 – Anything Goes
2. A Place To Start: July 2023 – Anything Goes w/ optional Life is a Beach (no twist)
3. Classic Design Challenge: July #7 – Anything Goes

Affiliate links are used in this post at no cost to you – I really appreciate your support! 

Products used:
CARDSTOCK/PAPER: CutCardStock Basis 80# White and Flamingo cardstock, Colorbok Mint Julep Designer Paper
STAMPS: Stampin’ Up Custom Tee and Birthday Blossoms stamp sets
INK: Memento Tuxedo Black ink; light pink and yellow Sharpie Ultra Fine Point markers; Arteza R24 alcohol marker, Catherine Pooler Polished ink
DIES/PUNCHES: Stampin’ Up T-Shirt Builder Framelits
ACCESSORIES: Tonic Studios 12″ Guillotine Paper Trimmer, Tombow Mono permanent adhesive, Art Glitter Dries Clear adhesive, MISTI stamp tool, Big Shot, Stampendous pink Dot Sparklers, tiny disc magnet, Ranger distress collage medium, Scrapbook Adhesives 3D Foam Squares Variety Pack (small white)

I hope you’ve enjoyed seeing this project and will consider joining the Splitcoast Stampers Fan Club which costs less than $25 for an entire year! There are tons of member perks (like seeing all the Dirty Dozen DT’s inspiration projects each month) in addition to access to all the other free content on the Splitcoast Stampers website. Be sure to check it out! The subscription is seriously awesome! Thanks for stopping by today – we’ll see you again soon!

Scrappy hugs,
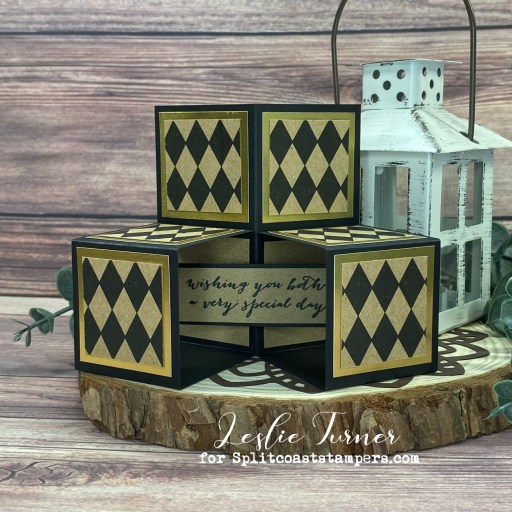
Wedding Congrats Triple Cube

7/20/23 Top 3 at Penny’s Paper-Crafting Challenge Blog!

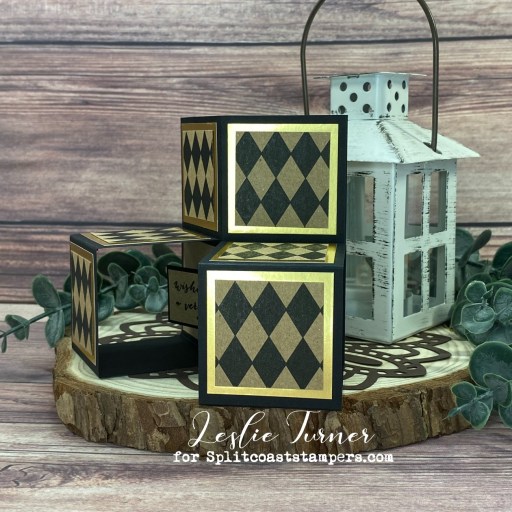
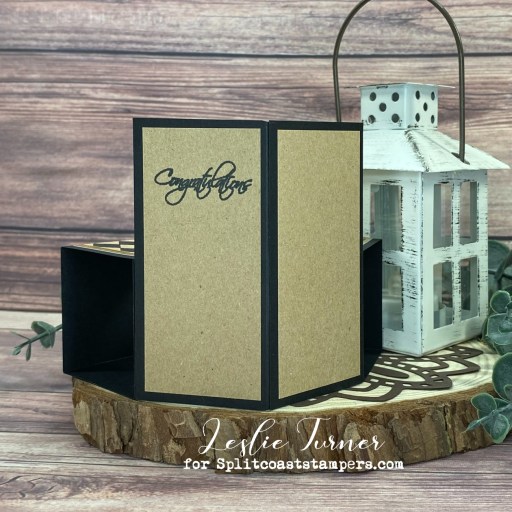
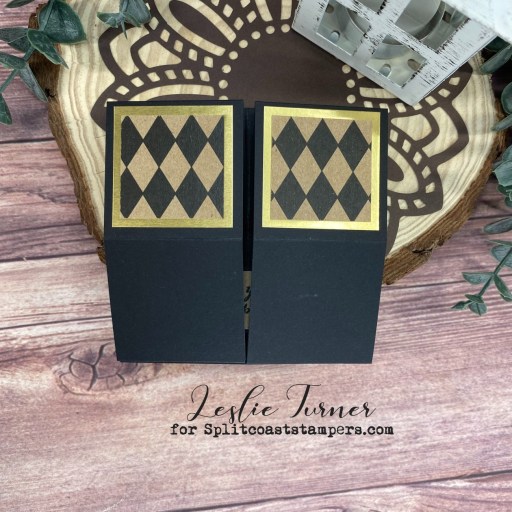
Hey everybody! I hope all my American friends had a nice long July 4th weekend! I’ve popped in this morning to share another inspiration project for Splitcoast Stampers Dirty Dozen DT! The triple cube has become one of my favorite fun folds to create, and this one in black and kraft with a pop of gold just knocks my socks off! Love how it turned out!

I cut the card base from CutCardStock Basis Black cardstock along with squares from CutCardStock Bright Gold Foil and Canvas Corp Black & Kraft Paper Collection. I cut the sentiment panel and back layering panels from CutCardStock Brown Bag Kraft paper. I stamped the front sentiment from the Stampin’ Up For The New Two stamp set in Memento Tuxedo Black ink.

I stamped the back sentiment from the Prickley Pear Stamps Scalloped Oval 4-Floral stamp set in Memento Tuxedo Black ink. I’ve also included a shot of the card folded flat for mailing. This is definitely a fun one!

Sharing in the following challenges:
1. 613 Avenue Create: July 2023 – Anything Goes w/ optional Nautical (no twist)
2. A Perfect Time To Craft Open Challenge: July #7-2023 – Anything Goes
3. Classic Design Challenge: July #7 – Anything Goes
4. Penny’s Paper-Crafty Challenge Blog: #550 – Anything Goes with Paper

Affiliate links are used in this post at no cost to you – I really appreciate your support! 

Products used:
CARDSTOCK/PAPER: CutCardStock Basis Black cardstock, Bright Gold Foil cardstock, and Brown Bag Kraft paper; Canvas Corp Black & Kraft Paper Collection
STAMPS: Stampin’ Up For The New Two stamp set, Prickley Pear Stamps Scalloped Oval 4-Floral stamp set
INK: Memento Tuxedo Black ink
ACCESSORIES: Tonic Studios 12″ Guillotine Paper Trimmer, Tombow Mono permanent adhesive, Art Glitter Dries Clear adhesive, MISTI stamp tool

I hope you’ve enjoyed seeing this project and will consider joining the Splitcoast Stampers Fan Club which costs less than $25 for an entire year! There are tons of member perks (like seeing all the Dirty Dozen DT’s inspiration projects each month) in addition to access to all the other free content on the Splitcoast Stampers website. Be sure to check it out! The subscription is seriously awesome! Thanks for stopping by today – we’ll see you again soon!

Scrappy hugs,
Warm Winter Wishes

7/13/23 Top Pick at Cardz 4 Galz!

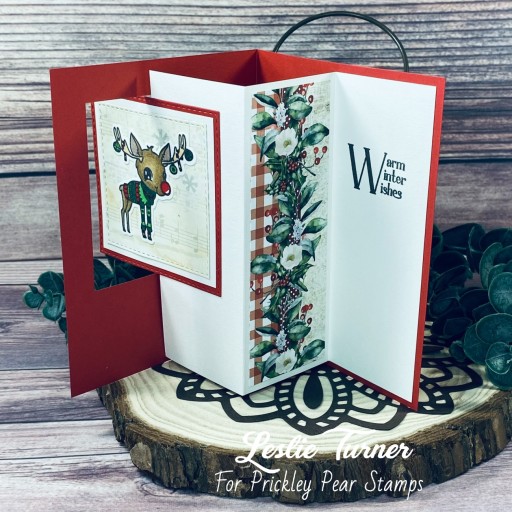
Hey everybody! Happy Tuesday and Happy Independence Day to America! I’m up on the Prickley Pear Stamps blog today with an inspiration project featuring the most adorable Santa and Rudolph stamps and dies! The Prickley Pear Stamps design team is doing ‘Christmas in July’ and I thought these would be perfect! I caught a glimpse of this swing flap fun fold on Facebook and made one. I enjoyed it so much that I made another one for a guest gig next month! I love it and it might just be my new favorite!

I cut the card base from CutCardStock Basis Red cardstock along with layering panels from CutCardStock Basis Natural and a print in the Hot Off The Press Christmas Memories 6×6 double sided paper pack. I stamped the deer image from the Prickley Pear Stamps Santa and Rudolph stamp set in Memento Espresso Truffle ink on Basis Natural cardstock, colored it with alcohol markers and cut it with the coordinating Prickley Pear Stamps Santa and Rudolph die.

Using Keep It Simple Stitched Squares Nested Dies, I die cut a square from the red cardstock and a smaller one from the patterned paper, and stamped snow and snowflakes (from the same stamp set) on the smaller one in Catherine Pooler Tranquil ink. I adhered the layers together and then stamped the sentiment in brown ink at the bottom beneath the focal panel.

I layered a coordinating print from the Hot Off The Press Christmas Memories paper pack on the inside and stamped another sentiment from the Prickley Pear Stamps Santa and Rudolph stamp set in Memento Espresso Truffle ink. The final photo shows the card folded flat for mailing. OMGosh, I love this!

Sharing in the following challenges:
1. 613 Avenue Create: July 2023 – Anything Goes w/ optional Nautical (no twist)
2. A Perfect Time To Craft Open Challenge: July #7-2023 – Anything Goes
3. Cardz 4 Galz: #202 – More Than One Fold
4. Classic Design Challenge: July #7 – Anything Goes
5. Crafts Galore Encore Challenge Blog: #113 – July Anything Goes
6. Inkspirational Challenges: #293 – Word Prompt Christmas in July
7. Jan’s Digi Stamps Challenge: July Anything Goes

Affiliate links are used in this post at no cost to you – I really appreciate your support!

Prickley Pear Stamps products used:
Santa and Rudolph stamp set
Santa and Rudolph die set

Other products used:
CARDSTOCK/PAPER: CutCardStock Basis Red and Basis Natural cardstock, Hot Off The Press Christmas Memories 6×6 double sided papers
INK: Memento Espresso Truffle ink; Arteza alcohol markers- BR66/74/84/95, GS09; Sharpie Ultra Fine Point markers- red, light green, medium green; Sakura White Gelly Roll pen, Catherine Pooler Tranquil ink
DIES/PUNCHES: Keep It Simple Stitched Squares Nested Dies
ACCESSORIES: Tonic Studios 12″ Guillotine Paper Trimmer, Bearly Art precision craft glue, MISTI stamp tool, Big Shot

I hope you’ve enjoyed this project! Be sure to check out all the awesome stamps and dies at Prickley Pear Stamps! Save 10% on anything on the site when you shop at Prickley Pear Stamps by using coupon code LESLIE10 at checkout! And be sure to ‘like’ and ‘follow’ the Prickley Pear Stamps Facebook page to keep up with news and sales, and join Prickley Pear Pals (the fan group) for lots of fun crafty ideas and to share your creativity! And finally, we’d love to see you visit the Prickley Pear Stamps blog and become a Follower! Hope to see you there! Thanks so much for stopping by today – we’ll see you next time! ;)

Scrappy hugs,