Hitched

Hi everyone! Happy Saturday – I hope you have something fun planned this weekend! I have an awesome CutCardStock DT inspiration project to share with you today featuring quite a variety of cardstock! I had a play with my Scan N Cut and created a fun wedding truck box card in mainly purple but with a pop of silver, red and green. I absolutely love box cards and I really enjoyed putting this one together!

Using my Scan N Cut, I cut the card base and box layers from Curious Metallic Violette, the windshield and mirrors from Dolphin Gray, the hearts from Pop Tone Grape Jelly and Red Wagon, the bumper from Bright Silver Foil, the wedding rings and diamond from Bright Silver Foil and Silk Glitter Opulent Opal, the flower and leaves from Red Wagon and Pop Tone Jellybean Green, the tail lights from Red Wagon, the tires from Pop Tone Black Licorice and the sentiment letters from Silk Glitter Opulent Opal cardstock. As I always say, the fun part is the assembly!

I added a sentiment to the back of the card which wasn’t part of the cut file. Using the My Favorite Things Stitched Rectangle STAX, I die cut a rectangle from Neenah Classic Crest Solar White cardstock. I stamped a sentiment from the Stampin’ Up Happy & Heartfelt stamp set in Catherine Poole Queen For A Day ink.

Here are two additional shots of the card – one angled and one folded flat for mailing.

Sharing in the following challenges:
1. A Perfect Time To Craft Open Challenge: May #4-2023 – Anything Goes
2. A Place To Start: May 2023 – Anything Goes w/ optional And Another Thing (no twist)
3. Classic Design Challenge: May #5 – Anything Goes
4. Crafty Calendar Challenge: May Challenge – Anything But Square
5. Jan’s Digi Stamps Challenge: May Anything Goes

Affiliate links are used in this post at no cost to you – I really appreciate your support!

CutCardStock products used:
Curious Metallic Violette cardstock
Pop Tone Grape Jelly cardstock
Pop Tone Jellybean Green cardstock
Pop Tone Black Licorice cardstock
Dolphin Gray cardstock
Red Wagon cardstock
Bright Silver Foil cardstock
Silk Glitter Opulent Opal cardstock
Neenah Classic Crest Solar White cardstock

Other products used:
Stamps: Stampin’ Up Happy & Heartfelt stamp set
Ink: Catherine Pooler Queen For A Day ink
Dies/Punches: My Scrap Chick Wedding Truck Box Card cut file, My Favorite Things Stitched Rectangle STAX
Accessories: Brother Scan N Cut, Art Glitter Dries Clear adhesive, MISTI stamp tool, Big Shot, 1″ double-sided foam strip

I hope you’ve enjoyed today’s project and you’re inspired to get crafty! Be sure to check out all the awesome cardstock and other goodies at CutCardStock (adhesives, labels, stickers, pens, watercolors and ribbon to name a few). And head on over to the CutCardStock Facebook Page and for more inspiration! Also, be sure to join our Creating with Card Stock Facebook Group for even more crafty inspiration! Thanks so much for stopping by today – we’ll see you next time!

Scrappy hugs,

Pajama Party Checklist

Hey everybody! Well another week has rolled around and we’re back to Saturday, which definitely isn’t a bad thing for those who work! And in another couple days, we’ll see May 1st! I’m telling ya… it’ll be Christmas again before we know it! I’m thrilled to be back with another Keep It Simple DT inspiration project to share that I created with papers and ephemera from the new Pajama Party Collection! I just love, love, love this collection! I created an adorable split flap card featuring a pajama party checklist! How stinkin’ cute is that?!

I cut a standard A2 size card base from Neenah Classic Crest 80# Solar White cardstock and then cut a portion out to create the split flap. I adhered panels cut from a cute pattern in the Pajama Party 6×9 Collection Pack and then created the focal element from a card in the Pajama Party Cards & Ephemera Die Cut Pieces which I layered on panels cut from papers in the Pajama Party 6×9 Cardstock Pack. I added a couple narrow strips cut from Solar White cardstock and affixed a row of Back To Basics White Enamel Dots on each.

For the inside, I adhered a panel cut from a purple patterned paper from the Pajama Party 6×9 Cardstock Pack and embellished it with die cuts from the Pajama Party Cards & Ephemera Die Cut Pieces. I adhered a Solar White panel at the bottom to be used for a short message and/or signature. Super easy and fun design!

Keep It Simple products used:
Pajama Party 6×9 Collection Pack
Pajama Party 6×9 Cardstock Pack
Pajama Party Cards & Ephemera Die Cut Pieces
Back To Basics White Enamel Dots

Affiliate links are used in this post at no cost to you – I really appreciate your support!

Other products used:
Cardstock/Paper: Neenah Classic Crest 80# Solar White
Accessories: Tonic Studios 12″ Guillotine Paper Trimmer, Art Glitter Dries Clear adhesive, Tombow Mono permanent adhesive

I hope you’ve loved seeing this project as much as I loved creating it, and you’re inspired to get crafty! Be sure to check out ALL the fun goodies in the Keep It Simple store such as paper, stamps, die cuts, ephemera, washi tape and enamel dots to name just a few! You’ll go cray-cray! Be sure to Follow us on Facebook, Instagram, and Pinterest for lots of crafty inspiration! Thanks so much for stopping by today – we’ll see you next time!

Scrappy hugs,

plant – grow – bloom

Hey everybody! I hope you’re having a great week! I’m thrilled to be back with another Keep It Simple DT inspiration project created with papers, stamps and dies in the new Bunny Season Collection! This is one of quite a few projects created while we had no internet and I was able to share them on social media but not blog them, so here I am! This super cute center easel card is so easy and I don’t even have to look at my instructions anymore because I’ve made so many of them over the years!

I cut the center easel card base from Neenah Classic Crest 110# Solar White cardstock and covered the panels with papers from the Bunny Season 6×9 Collection Pack and Bunny Season 6×9 Cardstock Pack. I stamped the picket fence from the Bunny Season Love Grows Here Collection Stamps twice in Memento Rich Cocoa ink and colored them with alcohol markers. I cut them with Bunny Season Love Grows Here Outline Dies and attached them to both sides of the easel.

I stamped the focal sentiment from the Bunny Season Spring Sentiments Stamps on Solar White cardstock in Memento Rich Cocoa ink, trimmed it and attached it to the easel. I stamped several flowers from the Bunny Season Love Grows Here Collection Stamps and colored them with Sharpie Ultra Fine Point markers. I cut them with the Bunny Season Love Grows Here Outline Dies and adhered them along the bottom of the card. I created a ‘stop’ for the easel and added several Back To Basics Clear Enamel Dots which completed the card.

And the best thing about this card is that folds flat for mailing!

Keep It Simple products used:
Bunny Season 6×9 Collection Pack
Bunny Season 6×9 Cardstock Pack
Bunny Season Love Grows Here Collection Stamps
Bunny Season Love Grows Here Outline Dies
Bunny Season Spring Sentiments Stamps
Back To Basics Clear Enamel Dots

Affiliate links are used in this post at no cost to you – I really appreciate your support!

Other products used:
Cardstock/Paper: Neenah Classic Crest 110# and 80# Solar White cardstock
Ink: Memento Rich Cocoa ink; Arteza alcohol markers- BR64/74, GS09; Sharpie Ultra Fine Point Markers- blue, yellow, light green, medium green, pink, salmon
Accessories: Tonic Studios 12″ Guillotine Paper Trimmer, Tombow Mono permanent adhesive, Art Glitter Dries Clear adhesive, MISTI stamping tool, Big Shot

I hope you’ve loved seeing this project as much as I loved creating it, and you’re inspired to get crafty! Be sure to check out ALL the fun goodies in the Keep It Simple store such as paper, stamps, die cuts, ephemera, washi tape and enamel dots to name just a few! You’ll go cray-cray! Be sure to Follow us on Facebook, Instagram, and Pinterest for lots of crafty inspiration! Thanks so much for stopping by today – we’ll see you next time!

Scrappy hugs,

A Simple Life

Hi everyone! I hope you’re having a good day so far! I’m delighted to be back to share another ScrapbookingStore DT inspiration project created with the amazing April 2023 Scrapbook Kit with Upgrades! The coordinating papers, stickers and upgrades in this month’s kit are pretty awesome. You know I love me some fun folds and I created a front flap card featuring paper, stickers and upgrades from this collection. I love how it turned out!

I cut a standard A2 size panel from Neenah Classic Crest 110# Solar White cardstock along with a smaller panel with a scored flap from 80# Solar White cardstock and adhered them together. I covered the panels with two coordinating papers from the kit, and added a variety of die cuts from the upgrades and stickers from the sticker sheet in collage fashion to the front flap. I also added a sentiment sticker from the sticker sheet popped up on two Darice double-sided foam strips and two Eyelet Outlet black enamel dots.

I cut the inside panel (visible from beneath the flap) from 80# Solar White cardstock, and added a sentiment and coordinating scalloped edge element from the sticker sheet and layered the panel on CutCardStock Pop Tone Black Licorice cardstock.

Affiliate links are used in this post at no cost to you – I really appreciate your support!

ScrapbookingStore products used:
April 2023 Scrapbook Kit with Upgrades

Other products used:
Cardstock/Paper: Neenah Classic Crest 110# and 80# Solar White cardstock, CutCardStock Pop Tone Black Licorice cardstock
Accessories: Tonic Studios 12″ Guillotine Paper Trimmer, Art Glitter Dries Clear adhesive, Scotch Advanced Tape Glider, MISTI stamping tool, Big Shot, Eyelet Outlet black enamel dots, Darice double-sided adhesive strips

I hope you’ve enjoyed today’s project and you’re thinking about all the fun you could have with this month’s kit… you really ought to think about joining the Subscription Club! Be sure to Follow us on Facebook, Instagram, Pinterest and YouTube for lots of crafty inspiration! And if you do decide to join the Subscription Club, join our ScrapbookingStore Club Member Group on Facebook for more inspiration and to share your projects! Thanks so much for stopping by today – we’ll see you next time!

Scrappy hugs,

Dream Crazy Big

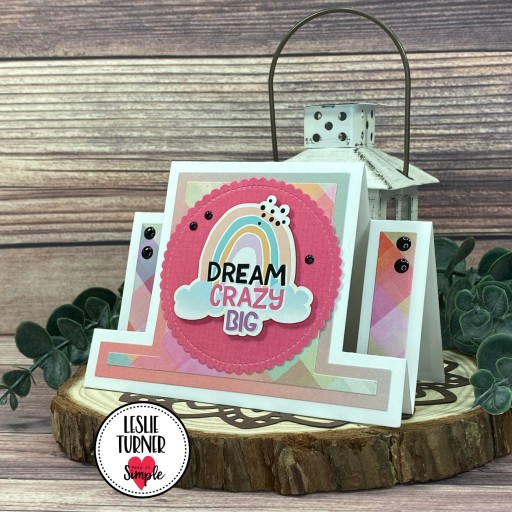
Hey everybody! Happy Sunday! I hope you’re enjoying some beautiful weather this weekend! We are finally seeing some higher temps during the day although it still gets a bit chilly at night. I’m stoked to be back with another Keep It Simple DT inspiration project to share today created with the super adorable new Pajama Party Collection! O.M.G. You haven’t seen CUTE until you’ve seen these products! I created a super cute step card using a variety of products in the collection which I paired with cardstock and dies in my stash!

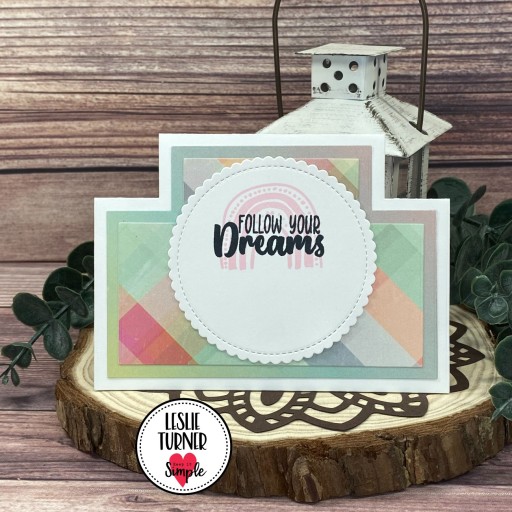
Using the Creative Craft Products High Center Stepper Card die set, I cut the step card base from Neenah Classic Crest Solar White cardstock along with layers from papers in the Pajama Party 6×9 Collection Pack and Pajama Party 6×9 Cardstock Pack. Next, I die cut a stitched mini scallop circle for the front from a pretty pink paper in the Pajama Party 6×9 Cardstock Pack and a second one for the back from Solar White cardstock using the My Favorite Things Mini Scallop Circle STAX. I chose a rainbow element from the Pajama Party Cards & Ephemera Die Cut Pieces and popped it up on the front with double-sided adhesive foam strips. The finishing touch was adding several Back To Basics Black Enamel Dots.

On the back circle die cut, I stamped a rainbow in Ranger spun sugar distress ink and a sentiment in Memento Tuxedo Black ink (both from the Pajama Party Stamp Set) which completed the card.

And here’s one more angled shot so you can see how cool the construction is! I love step cards, and dies make them so easy!

Keep It Simple products used:
Pajama Party 6×9 Collection Pack
Pajama Party 6×9 Cardstock Pack
Pajama Party Cards & Ephemera Die Cut Pieces
Pajama Party Stamp Set
Back to Basics Black Enamel Dots

Affiliate links are used in this post at no cost to you – I really appreciate your support!

Other products used:
Cardstock/Paper: Neenah Classic Crest 80# Solar White cardstock
Ink: Ranger spun sugar distress ink, Memento Tuxedo Black ink
Dies/Punches: Creative Craft Products High Center Stepper Card die set, My Favorite Things Mini Scallop Circle STAX
Accessories: Tonic Studios 12″ Guillotine Paper Trimmer, Tombow Mono permanent adhesive, MISTI stamping tool, Big Shot, double-sided adhesive foam strips

I hope you’ve loved seeing this project as much as I loved creating it, and you’re inspired to get crafty! Be sure to check out ALL the fun goodies in the Keep It Simple store such as paper, stamps, die cuts, ephemera, washi tape and enamel dots to name just a few! You’ll go cray-cray! Be sure to Follow us on Facebook, Instagram, and Pinterest for lots of crafty inspiration! Thanks so much for stopping by today – we’ll see you next time!

Scrappy hugs,

Spring Bendi Card

Howdy peeps! I hope you’re having a great weekend! In my quest to finally blog a handful of projects created while our internet was down, I have another ScrapbookingStore DT inspiration project created with the March 2023 Scrapbook Kit with Upgrades. The variety of the patterned papers and coordinating stickers in the March kit is amazing. As you know, I’m a fun fold fanatic so I created a Spring-themed bendi card from patterned papers and stickers from the collection!

Using the Hot Off The Press Bendi Card Cutting Dies, I die cut the bendi card base pieces from a pretty pink plaid paper in the kit and adhered the panels to each side.

I embellished the panels with stickers from the sticker sheet, Doodlebug Design Lily White Doodle Twine, an Eyelet Outlet mini butterfly brad and several small clear Darice gemstones. This project was so easy, it practically made itself, lol! ;)

Affiliate links are used in this post at no cost to you – I really appreciate your support!

ScrapbookingStore products used:
March 2023 Scrapbook Kit with Upgrades

Other products used:
Cardstock/Paper: Neenah Classic Crest 80# Solar White cardstock
Dies/Punches: Hot Off The Press Bendi Card Cutting Dies
Accessories: Tonic Studios 12” Guillotine Paper Trimmer, Art Glitter Dries Clear adhesive, Big Shot, Doodlebug Design Lily White Doodle Twine, Eyelet Outlet mini butterfly brad, Darice small clear gemstones

I hope you’ve enjoyed today’s project and you’re thinking about all the fun you could have with this kit… you really ought to think about joining the Subscription Club! Be sure to Follow us on Facebook, Instagram, Pinterest and YouTube for lots of crafty inspiration! And if you do decide to join the Subscription Club, join our ScrapbookingStore Club Member Group on Facebook for more inspiration and to share your projects! Thanks so much for stopping by today – we’ll see you next time!

Scrappy hugs,

You are my sunshine

Howdy peeps! Well, it’s nearly the end of March and we are still having some pretty chilly weather out here in southwestern Colorado! I’m up on the Prickley Pear Stamps blog today with a fun fold (you know how I love fun folds!) featuring the You Are My Sunshine stamp set that was just released as part of the Celestial Collection! This stamp set is so stinkin’ cute, I can’t stand it! I had a lot of fun creating this hidden message slider card with it!

I cut the standard A2 size flat card base from Neenah Classic Crest 110# Solar White cardstock along with the slider mechanism from 80# Solar White cardstock (using my Fiskars 12″ SureCut Paper Trimmer). I then cut several panels from coordinating prints in the Keep It Simple Clementine Collection Pack. I stamped the image from the You Are My Sunshine stamp set in Memento Tuxedo Black ink, colored it with alcohol markers and fussy cut it. I adhered it to a scalloped square die cut (cut with the My Favorite Things Mini Scallop Square STAX) angled into a diamond shape. I fashioned a loop from green Hemptique Earthy Pastel crafting cord for the pull tab.

I stamped the sentiment (hidden message) on the panel inside the slider and added an Eyelet Outlet 4mm pink pearl strip to the bottom of the slider, which completed the project.

Affiliate links are used in this post at no cost to you – I really appreciate your support!

Prickley Pear Stamps products used:
You Are My Sunshine stamp set

Other products used:
Cardstock/Paper: Neenah Classic Crest 110# and 80# Solar White cardstock, Keep It Simple Clementine Collection Pack
Ink: Memento Tuxedo Black ink; Arteza alcohol markers- R21/25, Y12, BG54,YG15, G31
Dies/Punches: Stampin’ Up 1″ circle punch, Kadomaru Pro Corner Rounder, My Favorite Things Mini Scallop Square STAX, small hole punch
Accessories: Tonic Studios 12″ Guillotine Paper Trimmer, Fiskars 12″ SureCut Paper Trimmer, Tombow Mono permanent adhesive, Art Glitter Dries Clear adhesive, 1/4″ double-sided foam strips, MISTI stamp tool, Big Shot, Eyelet Outlet 4mm pink pearl strip, Hemptique Earthy Pastel crafting cord

I hope you’ve enjoyed this project! Be sure to check out all the awesome stamps and dies at Prickley Pear Stamps! Save 10% on anything on the site when you shop at Prickley Pear Stamps by using coupon code LESLIE10 at checkout! And be sure to ‘like’ and ‘follow’ the Prickley Pear Stamps Facebook page to keep up with news and sales, and join Prickley Pear Pals (the fan group) for lots of fun crafty ideas and to share your creativity! And finally, we’d love to see you visit the Prickley Pear Stamps blog and become a Follower! Hope to see you there! Thanks so much for stopping by today – we’ll see you next time! ;)

Scrappy hugs,

Wildly chase your dreams

Hey everybody! Happy Thursday – I hope you’re having a great week! This day is very special every year – it’s my sister’s birthday and she would have been 69 today. She’s been gone a number of years and I still miss her terribly. On a brighter note, I’m up on the Prickley Pear Stamps blog today with an inspiration project featuring the new Rainbow Dreams stamp set that was released yesterday! This stamp set is part of the amazing Celestial Collection, so stay tuned for more inspiration to come! You know how I love fun folds, and this one is an interlocking gatefold! I’ve made a few of these in the past and yes, they are quite fun!

I cut a standard A2 size landscape gatefold card base from Neenah Classic Crest 110# Solar White cardstock along with patterned paper layering panels from the Keep It Simple Lilac 12×12 Collection Pack. I cut two frames from CutCardStock Bright Silver Foil using two Spellbinders A2 Matting Basics A & B dies and adhered them together for a little extra stability. I stamped the rainbow on two layered die cut rectangles (also from the Spellbinders die sets) cut from Solar White cardstock, and colored the rainbow with Kirarina Wink markers and the clouds with an alcohol marker.

I stamped the sentiment on a scrap piece of Solar White cardstock, colored it with a purple Ultra Fine Point Sharpie marker and trimmed it. I popped the sentiment up on double-sided foam strips, and added two Eyelet Outlet Enamel Hearts along with 3mm White Pearl Strips around the silver foil frame, which completed the project.

Affiliate links are used in this post at no cost to you – I really appreciate your support!

Prickley Pear Stamps products used:
Rainbow Dreams stamp set

Other products used:
Cardstock/Paper: Neenah Classic Crest 110# and 80# Solar White cardstock, CutCardStock Bright Silver Foil cardstock, Keep It Simple Lilac 12×12 Collection Pack
Ink: Memento Tuxedo Black ink; Kirarina Wink markers- Baby Pink, Orange, Lemon Yellow, Lime Green, Aqua Blue and Violet; purple Sharpie Ultra Fine Point marker; GB08 Arteza alcohol marker; Copic multi-liner 0.3 black pen
Dies/Punches: Spellbinders A2 Matting Basics A & B dies
Accessories: Tonic Studios 12″ Guillotine Paper Trimmer, Tombow Mono permanent adhesive, Art Glitter Dries Clear adhesive, MISTI stamp tool, Big Shot, double-sided foam strips, Eyelet Outlet 3mm White Pearl Strip and Enamel Hearts

I hope you’ve enjoyed this project! Be sure to check out all the awesome stamps and dies at Prickley Pear Stamps! Save 10% on anything on the site when you shop at Prickley Pear Stamps by using coupon code LESLIE10 at checkout! And be sure to ‘like’ and ‘follow’ the Prickley Pear Stamps Facebook page to keep up with news and sales, and join Prickley Pear Pals (the fan group) for lots of fun crafty ideas and to share your creativity! And finally, we’d love to see you visit the Prickley Pear Stamps blog and become a Follower! Hope to see you there! Thanks so much for stopping by today – we’ll see you next time! ;)

Scrappy hugs,

For You gate fold

Hello friends! I hope you’re having a great weekend and you’re doing something fun! We’ve been waking up to one-digit temps and we still have a couple feet of snow on the ground, so our fun is indoors where it’s warm and cozy! I’m excited to be back with another ScrapbookingStore DT inspiration project created with the amazing February 2023 Scrapbook Kit with Upgrades! I love the pages of journaling cards in this collection (with a variety of sizes) and created another fun fold featuring a larger one with some coordinating papers.

I cut the gate fold card base from Neenah Classic Crest 80# Solar White cardstock along with layering panels from CutCardStock Amaranth cardstock and a patterned paper in the kit. I die cut the journaling card from the kit with a My Favorite Things Mini Scallop Rectangle STAX die and layered it on a rectangle panel cut from CutCardStock Basis Green cardstock and a slightly larger mini scallop rectangle die cut from the Amaranth cardstock. I added a sentiment sticker from the sticker sheet which completed the card front.

I cut the inside panel from Solar White cardstock and embellished it with strips of the patterned paper from the kit and Basis Green cardstock used on the front. I layered the panel on Basis Green and again on Amaranth cardstock, and added another sticker from the sticker sheet.

Sharing in the following challenges:
1. A Place To Start: February 2023 – Anything Goes w/ optional Pick a Palette (no twist)
2. Classic Design Challenge: February 2023 #2 – Anything Goes
3. Crafting Happiness Challenges: #139 – Love
4. QKR Stampede: #461 – Anything Goes

Affiliate links are used in this post at no cost to you – I really appreciate your support!

ScrapbookingStore products used:
February 2023 Scrapbook Kit with Upgrades

Other products used:
Cardstock/Paper: Neenah Classic Crest 80# Solar White cardstock, CutCardStock Amaranth and Basis Green cardstock
Dies/Punches: My Favorite Things Stitched Mini Scallop Rectangle STAX
Accessories: Tonic Studios 12″ Guillotine Paper Trimmer, Art Glitter Dries Clear adhesive, Tombow Mono permanent adhesive, Big Shot

I hope you’ve enjoyed today’s project and you’re thinking about all the fun you could have with this month’s kit… you really ought to think about joining the Subscription Club! Be sure to Follow us on Facebook, Instagram, Pinterest and YouTube for lots of crafty inspiration! And if you do decide to join the Subscription Club, join our ScrapbookingStore Club Member Group on Facebook for more inspiration and to share your projects! Thanks so much for stopping by today – we’ll see you next time!

Scrappy hugs,

hugs & kisses

2/28/23 Best Technique Winner at Classic Design Challenge Blog!

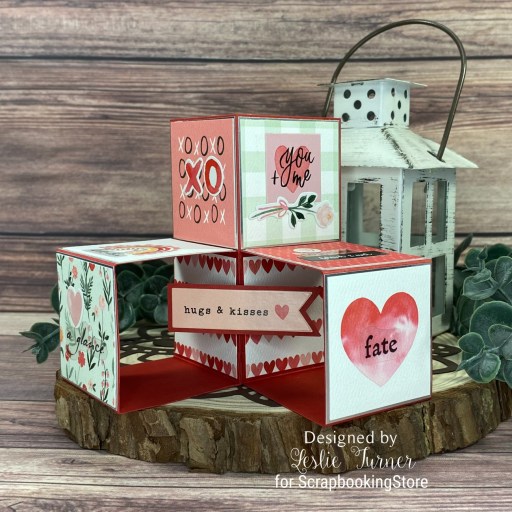
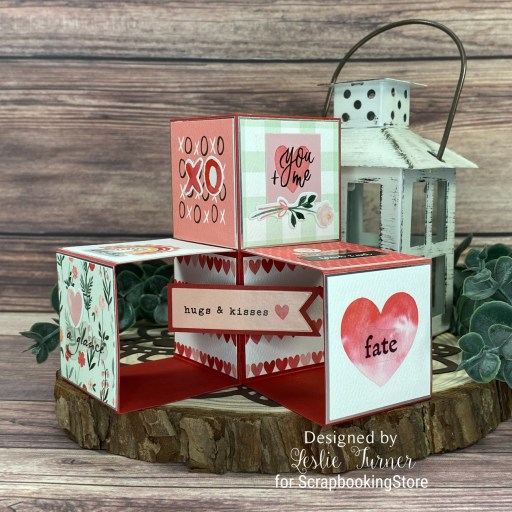
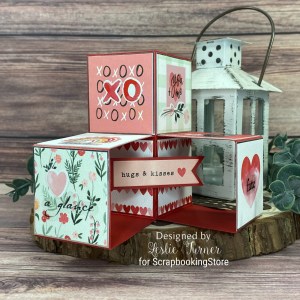
Hey everybody! Happy Saturday! I’m thrilled to be back with another ScrapbookingStore DT inspiration project created with the amazing February 2023 Scrapbook Kit with Upgrades! I’m loving all these double-sided papers and the best part about kits is that the stickers and upgrades coordinate so well with the papers. All the matchy-matchy work is done for you! I’ve created a triple cube Valentine with lots of romantic innuendos! I really love this fun fold!

I cut the card base from CutCardStock Basis Red cardstock along with square panels from CutCardStock Bright Silver Foil and page of small journal cards in the kit. I added stickers from the sticker sheet and clear stickers from the upgrades.

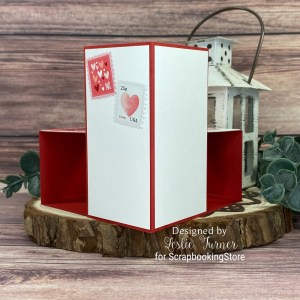
Here’s another angled shot and a look at the back with plenty of room for a custom message and signature. And it folds flat for mailing!

Sharing in the following challenges:
1. 613 Avenue Create: February 2023 Anything Goes w/ optional Use Red for Anything But a Heart (no twist)
2. Classic Design Challenge: February 2023 #2 – Anything Goes
3. Crafting Happiness Challenges: #139 – Love
4. Crafty Friends Challenge: #164 – Love/Romance
5. Crafty Gals Corner: #240 – Add a Heart
6. Once Upon a Time Challenge Blog: #7 – My Heart

Affiliate links are used in this post at no cost to you – I really appreciate your support!

ScrapbookingStore products used:
February 2023 Scrapbook Kit with Upgrades

Other products used:
Cardstock/Paper: CutCardStock Basis Red and Bright Silver Foil cardstock, Neenah Classic Crest 80# Solar White cardstock
Accessories: Tonic Studios 12″ Guillotine Paper Trimmer, Art Glitter Dries Clear adhesive

I hope you’ve enjoyed today’s project and you’re thinking about all the fun you could have with this month’s kit… you really ought to think about joining the Subscription Club! Be sure to Follow us on Facebook, Instagram, Pinterest and YouTube for lots of crafty inspiration! And if you do decide to join the Subscription Club, join our ScrapbookingStore Club Member Group on Facebook for more inspiration and to share your projects! Thanks so much for stopping by today – we’ll see you next time!

Scrappy hugs,