The World is Your Oyster

Hey everybody! Happy Saturday! I hope your weather isn’t too awfully bad where you are! I’ve been playing with Keep It Simple goodies again and have another inspirational fun fold to share with you created with an assortment of products the Clementine Bundle. Have I mentioned how truly awesome this bundle is?! I can’t get enough of it! It contains everything you could possibly need to create a huge variety of cards, ATCs, 3-D projects, or whatever your heart desires. My card today is a diagonal joy fold and it’s the first one like this I’ve ever made. I’ve made diagonal folds and joy folds over the years, but never one like this! And I love it!

I cut the A2 size diagonal card base and layering panels from CutCardStock Basis 80# Natural and Curious Metallic Gold Leaf cardstock, along with coordinating papers from both the Keep It Simple Clementine Flip Sides 12×12 Paper Pack and Clementine Collection 12×12 Paper Pack. I adhered all the layers in place and embellished the panels with Clementine Adhesive Buttons and a Puffy Sticker.

I embellished the inside panel with a sticker from the 12×12 Sticker Sheet which completed the card. Here are shots of the card opening up. So fun!

Sharing in the following challenges:
1. 613 Avenue Create: February 2023 Anything Goes w/ optional Use Red for Anything But a Heart (playing twist)
2. Classic Design Challenge: February 2023 #2 – Anything Goes
3. Penny’s Paper-Crafty Challenges: #540 – Anything Goes with Paper

Affiliate links are used in this post at no cost to you – I really appreciate your support! 

Products used:
Cardstock/Paper: CutCardStock Basis 80# Natural and Curious Metallic Gold Leaf cardstock
Accessories: Tonic Studios 12″ Guillotine Paper Trimmer, Bearly Art precision craft glue; Keep It Simple Clementine Bundle: Flip Sides 12×12 Paper Pack, Clementine Collection 12×12 Paper Pack, Adhesive Buttons, Puffy Stickers, and 12×12 Sticker Sheet

I hope you’ve enjoyed seeing this project and you’re inspired to get crafty! Thanks so much for stopping by today – we’ll see you next time! ;)

Scrappy hugs,

I love clean

2/24/23 Top 3 Winner at Alphabet Challenge Blog!

Hey everybody! Happy Sunday! It’s almost the middle of February already – time sure is flying by! I’m stoked to be back with another Keep It Simple DT inspiration project to share with you today! I so love the Household Chore Gnomes Collection – these guys are so cool and you know how I love me some gnomes! ;) I created a center step card featuring items from the Die Cut Pieces and Gnome Collection Pack 6×6 Double Sided Cardstock, along with the Back to Basics Royal Collection Pack 6×6 Double-Sided Cardstock and Royal Enamel Dots.

I die cut the easel card base from Neenah Classic Crest 110# Solar White cardstock and the layering panels from the Gnome Collection Pack 6×6 Double-Sided Cardstock. I selected a light blue cardstock from the Royal Collection Pack 6×6 Double-Sided Cardstock which I tore to create a puddle of water. Then I added the gnome, cleaning supplies and sentiment from the Die Cut Pieces, and added some Royal Enamel Dots. I tied a blue twine bow on the sentiment which completed the card front.

For the back, I die cut layering panels from Neenah Classic Crest 80# Solar White cardstock and the Gnome Collection Pack, then fussy cut the sentiment from a card in the Die Cut Pieces. Isn’t that sentiment a hoot?! Love how this turned out!

Sharing in the following challenges:
1. 613 Avenue Create: February 2023 – Anything Goes w/ optional Use Red for Anything But a Heart 
2. A Place To Start: February 2023 – Anything Goes w/ optional Pick A Palette
3. Alphabet Challenge Blog: W is for Water
4. Classic Design Challenge: February 2023 #2 – Anything Goes
5. Creative Creases Challenges: #50 – Anything Goes with a Fun Fold
6. Jan’s Digi Challenges: February 2023 – Anything Goes
7. Lil Patch of Crafty Friends Challenge: #199 – Anything Goes
8. Simon Says Wednesday Challenge: Fun With Dies
9. Wednesday’s Creative Inspirations Challenge Blog: February Anything Goes

Keep It Simple products used:
Household Chore Gnome Collection Pack 6×6 Double Sided Cardstock
Back to Basics Royal Collection Pack 6×6 Double-Sided Cardstock
Household Chore Gnome Die Cut Pieces
Back to Basics Royal Enamel Dots

Affiliate links are used in this post at no cost to you – I really appreciate your support!

Other products used:
Cardstock/Paper: Neenah Classic Crest 110# and 80# Solar White cardstock
Dies/Punches: Creative Craft Products High Center Stepper Card die set
Accessories: Tonic Studios 12″ Guillotine Paper Trimmer, Bearly Art precision craft glue, Big Shot, Studios Blackbird blue twine, Darice Double-Sided Adhesive Foam Strips

I hope you’ve loved seeing this project as much as I loved creating it, and you’re inspired to get crafty! Be sure to check out ALL the fun goodies in the Keep It Simple store such as paper, stamps, die cuts, ephemera, washi tape and enamel dots to name just a few! You’ll go nuts! Be sure to Follow us on Facebook, Instagram, and Pinterest for lots of crafty inspiration! Thanks so much for stopping by today – we’ll see you next time!

Scrappy hugs,

Happy Holidays

2/12/23 CAS Weekly Favorite at Splitcoast Stampers!

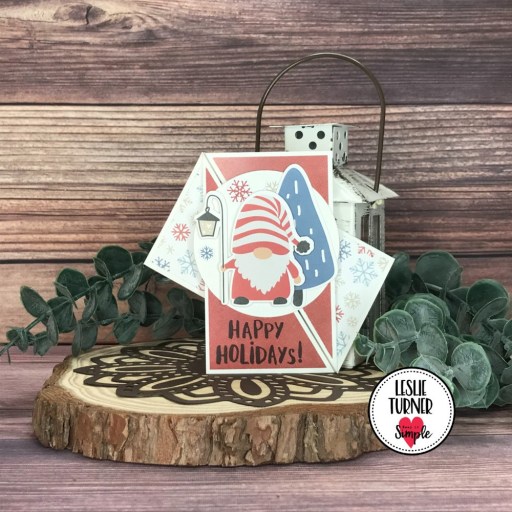
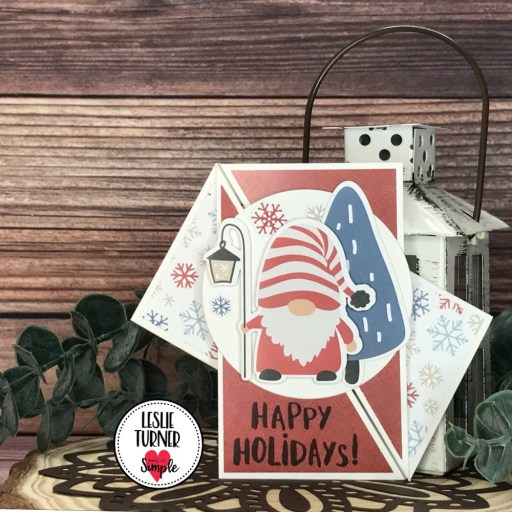
Hey everybody! Happy Tuesday! I’m delighted to share another Keep It Simple DT inspiration project with you today! You know I love me some fun folds, and I’ve created a twisted gate fold featuring a variety of products from the Scandinavian Christmas collection! I used papers from the 6×9 Cardstock Pack and 6×9 Collection Pack, Gnomes Die Cut Pieces and Gnomes Stamps! You know I love gnomes, too! ;)

I cut the card base from CutCardStock Basis White cardstock and layering panels from papers in the 6×9 Cardstock Pack and 6×9 Collection Pack. I die cut a circle using a Spellbinders Classic Circles die to use as the base for the focal element that I created with die cuts from the Gnomes Die Cut Pieces. I stamped a sentiment from the Gnomes Stamps in Memento Tuxedo Black ink.

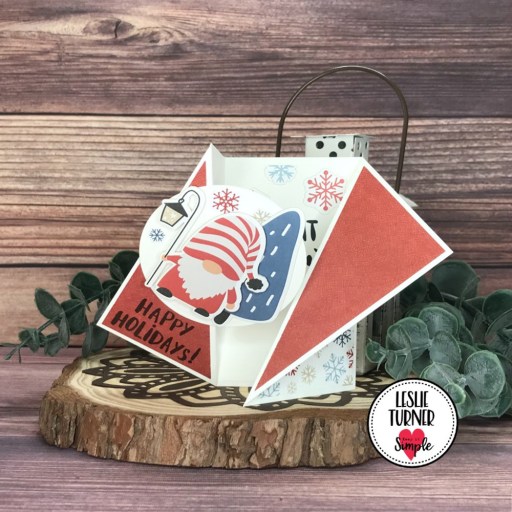
Here’s a shot of the card partly opened.

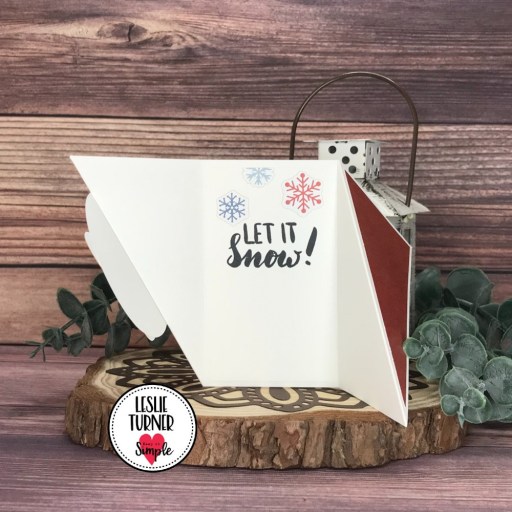
I stamped another sentiment on the inside from the Gnomes Stamps in black ink and added some snowflake die cuts from the Gnomes Die Cut Pieces.

Sharing in the following challenges:
1. 613 Avenue Create: February 2023 – Anything Goes w/ optional Use Red for Anything But a Heart (playing twist)
2. Classic Design Challenge: February 2023 #2 – Anything Goes
3. Creative Creases Challenges: #50 – Anything Goes with a Fun Fold
4. Jan’s Digi Challenges: February 2023 – Anything Goes
5. QKR Stampede: #460 – Anything Goes

Keep It Simple products used:
Scandinavian Christmas 6×9 Cardstock Pack
Scandinavian Christmas 6×9 Collection Pack
Gnomes Die Cut Pieces
Gnomes Stamps

Affiliate links are used in this post at no cost to you – I really appreciate your support!

Other products used:
Cardstock/Paper: CutCardStock Basis 80# White cardstock
Ink: Memento Tuxedo Black ink
Dies/Punches: Spellbinders Classic Circles Large dies
Accessories: Tonic Studios 12″ Guillotine Paper Trimmer, Bearly Art precision craft glue, MISTI stamping tool, Big Shot, Stampin’ Up Mini Dimensionals

I hope you’ve loved seeing this project as much as I loved creating it, and you’re inspired to get crafty! Be sure to check out ALL the fun goodies in the Keep It Simple store such as paper, stamps, die cuts, ephemera, washi tape and enamel dots to name just a few! You’ll go crazy! Be sure to Follow us on Facebook, Instagram, and Pinterest for lots of crafty inspiration! Thanks so much for stopping by today – we’ll see you next time!

Scrappy hugs,

You are perfect

Hey everybody! I hope you’re having a wonderful weekend! Yesterday was pretty amazing here in southwestern Colorado – it was in the 40s and the sun was out all day melting some of the snow! I believe today will be another gorgeous day! I have a pretty half flap inspirational card to share created with an assortment of products from the Keep It Simple Clementine Bundle! I’m SO in love with this bundle – it has two paper packs (one with a die cut chipboard sheet), sticker sheet, puffy stickers, pearls rhinestones, buttons, enamel shapes and washi tape – enough crafty goodies to create a huge array of projects! Seriously, you need to check it out!

I cut a standard A2 size half flap card base from Neenah Classic Crest 80# Solar White cardstock along with an assortment of strips and panels from papers in the Keep It Simple Clementine Collection 12×12 Paper Pack, Flip Sides 12×12 Paper Pack. I embellished the panels with die cuts from the Die Cut Printed Chipboard, stickers from the 12×12 Sticker Sheet, a Puffy Sticker and Rhinestones.

I cut the inside panel from CutCardStock Stardream Metallic Aquamarine cardstock and added a sticker from the 12×12 Sticker Sheet which completed the card.

Sharing in the following challenges:
1. Classic Design Challenge: February 2023 #2 – Anything Goes
2. Crafts Galore Encore Challenge Blog: #108 – Anything Goes
3. Creative Creases Challenges: #50 – Anything Goes with a Fun Fold
4. QKR Stampede: #460 – Anything Goes

Affiliate links are used in this post at no cost to you – I really appreciate your support! 

Products used:
Cardstock/Paper: Neenah Classic Crest 80# Solar White cardstock, CutCardStock Stardream Metallic Aquamarine cardstock
Accessories: Tonic Studios 12″ Guillotine Paper Trimmer, Fiskars 12 ” SureCut Paper Trimmer, Bearly Art precision craft glue; Keep It Simple Clementine Bundle: Clementine Collection 12×12 Paper Pack, Flip Sides 12×12 Paper Pack with Die Cut Printed Chipboard, 12×12 Sticker Sheet, Puffy Stickers and Rhinestones

I hope you’ve enjoyed seeing this half flap fold! Thanks so much for stopping by today – we’ll see you next time! ;)

Scrappy hugs,

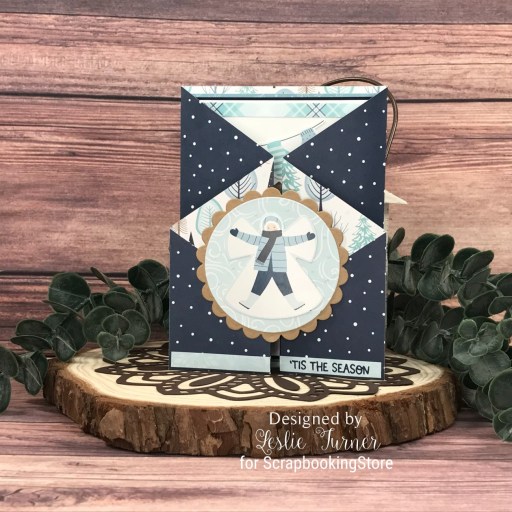
‘Tis the Season fun fold

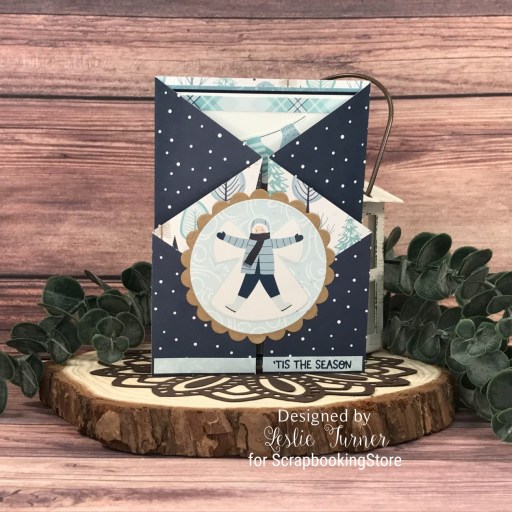
Hey everybody! Happy Thursday – it’s almost the weekend and I hope you have something fun planned! I’m back this morning with another ScrapbookingStore DT inspiration project created with the amazing 2023 Scrapbook Kit with Upgrades! I love the versatility of the double-sided papers in this kit – so many wonderful patterns for so many projects! I’ve grown especially fond of the double gatefold lately, so that’s the direction I took for this project. And who doesn’t love an adorable snow angel?!

I cut the double gatefold card base from a double-sided paper in the kit. Using the Spellbinders Standard Circles Small and Classic Scalloped Circles Small dies, I cut the element for the card front from a patterned paper in the kit and CutCardStock Twine cardstock and adhered a snow angel sticker from the sticker sheet to it. I adhered patterned paper strips to the bottom of the card front and stamped the sentiment from the Taylored Expressions Winter Wishes stamp set in Catherine Pooler Juniper Mist ink.

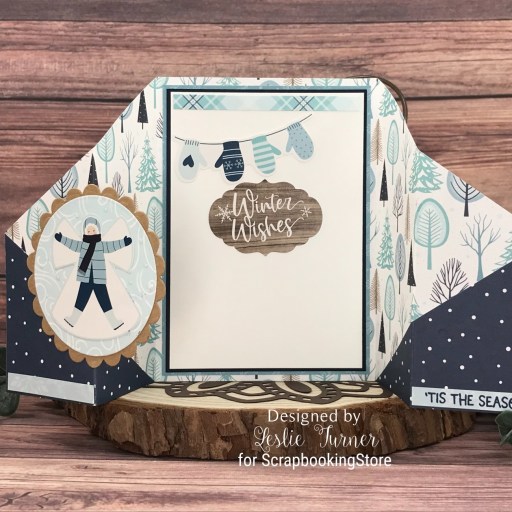
I cut the inside panel from Basis White and embellished it with a patterned paper strip and a mitten sticker and a sentiment sticker from the sticker sheet. I layered the panel on Basis Navy and an additional patterned paper from the kit. Lol, I didn’t notice until this very minute that the angle of this photo elongated the circular element on the front… sorry about that! :|

Sharing in the following challenges:
1. Classic Design Challenge: February 2023 #2 – Anything Goes
2. Scrapping4fun Challenges: #220 – Anything Goes
3. Wednesday’s Creative Inspirations Challenge Blog: February Anything Goes

Affiliate links are used in this post at no cost to you – I really appreciate your support!

ScrapbookingStore products used:
January 2023 Scrapbook Kit with Upgrades

Other products used:
Cardstock/Paper: CutCardStock Basis White, Basis Navy and Twine cardstock
Stamps: Taylored Expressions Winter Wishes stamp set
Ink: Catherine Pooler Juniper Mist ink
Dies/Punches: Spellbinders Standard Circles Small and Classic Scalloped Circles Small dies
Accessories: Tonic Studios 12″ Guillotine Paper Trimmer, Tape Runner, Art Glitter Dries Clear adhesive, MISTI stamping tool, Big Shot, Nuvo White Blizzard Glitter Drops

I hope you’ve enjoyed today’s project and you’re thinking about all the fun you could have with this month’s kit… you really ought to think about joining the Subscription Club! Be sure to Follow us on Facebook, Instagram, Pinterest and YouTube for lots of crafty inspiration! And if you do decide to join the Subscription Club, join our ScrapbookingStore Club Member Group on Facebook for more inspiration and to share your projects! Thanks so much for stopping by today – we’ll see you next time!

Scrappy hugs,

Chandler Purse with Latch Card Notelets

2/3/23 Rising Star at A Place To Start!

Hey everybody! I hope you’re having a great week so far! I’m having a hard time wrapping my head around the fact that January is almost over! I have another ScrapbookingStore DT inspiration project to share with you today created with the amazing January 2023 Scrapbook Kit with Upgrades! I’m in love with all the Winter-themed patterned papers and coordinating stickers in this month’s kit. You know how I love me some paper purses so I made a Chandler that contains a set of six latch card thank you notelets using a variety of patterned papers and stickers. I’ve made a few of these using the Bearly Arts tutorial HERE if you’re interested.

I cut the Chandler purse base, handle and strap closure from CutCardStock Basis Navy cardstock and layering panels from a snowflake pattern in this month’s kit. I adhered a large snowflake from the sticker sheet to a scrap piece of navy cardstock, fussy cut around it leaving a thin border, and then attached it to the end of the strap closure. I then adhered a small disc magnet with Ranger Distress Collage Medium to keep the purse closed.

I created a set of six latch cards from Solar White cardstock, Basis Navy cardstock and a variety of patterned papers in the kit. For each card, I stamped the ‘thanks’ sentiment from the Keep It Simple Thank You Sentiments stamp set in Catherine Pooler Juniper Mist ink on Solar White cardstock and cut it with a Spellbinders Classic Ovals Small die. Using the Spellbinders Classic Scalloped Ovals Large and Small dies, I cut two slightly larger scallops from Basis Navy and Solar White cardstock and adhered them together. This element created the ‘latch’ on each card.

I stamped the same sentiment (also from the Keep It Simple Thank You Sentiments stamp set) in Catherine Pooler Juniper Mist ink on the inside of each card and embellished each one with a coordinating sticker from the sticker sheet.

Sharing in the following challenges:
1. A Place To Start: January 2023 Anything Goes
2. Try it on Tuesday: Winter Blues
3. World Wide Open Design Team Challenge: #1 – January Anything Goes

Affiliate links are used in this post at no cost to you – I really appreciate your support!

ScrapbookingStore products used:
January 2023 Scrapbook Kit with Upgrades

Other products used:
Cardstock/Paper: Neenah Classic Crest 110# and 80# Solar White cardstock, CutCardStock Basis Navy cardstock
Stamps: Keep It Simple Thank You Sentiments stamp set
Ink: Catherine Pooler Juniper Mist ink
Dies/Punches: Spellbinders Classic Ovals Small die and Scalloped Ovals Large and Small dies
Accessories: Tonic Studios 12″ Guillotine Paper Trimmer, Art Glitter Dries Clear adhesive, MISTI stamping tool, Big Shot, Darice iridescent gemstones, small disc magnet, Ranger Distress Collage Medium, Bearly Art Chandler tutorial

I hope you’ve enjoyed today’s project and you’re thinking about all the fun you could have with this month’s kit… you really ought to think about joining the Subscription Club! Be sure to Follow us on Facebook, Instagram, Pinterest and YouTube for lots of crafty inspiration! And if you do decide to join the Subscription Club, join our ScrapbookingStore Club Member Group on Facebook for more inspiration and to share your projects! Thanks so much for stopping by today – we’ll see you next time!

Scrappy hugs,

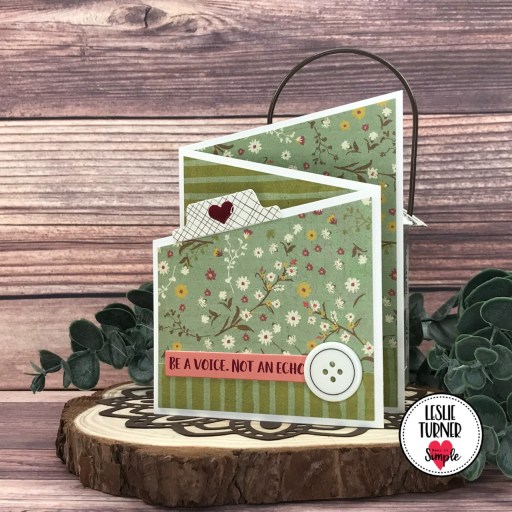
Be A Voice. Not An Echo.

2/3/23 Top 3 at Crafty Catz!
2/3/23 Rising Star at A Place To Start!

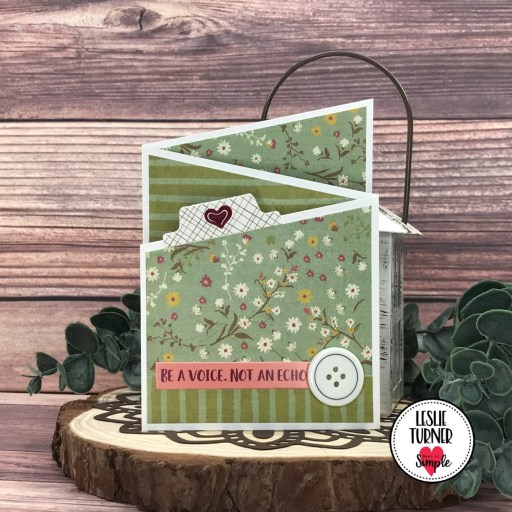
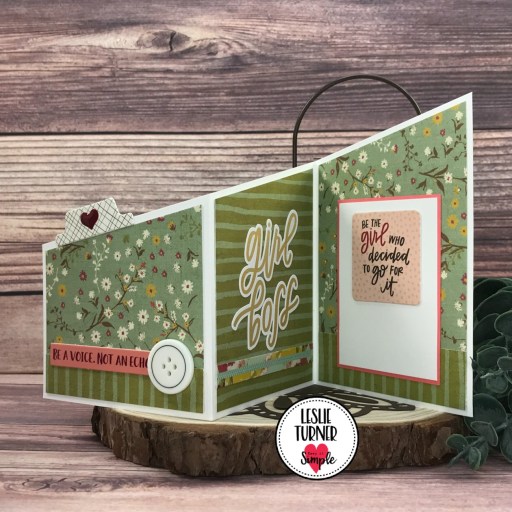
Hey everybody! I hope you’re having a beautiful weekend! We woke up to about 14 degrees this morning and we still have about 18″ of snow on the ground around our cabin – two feet in some areas. But that’s okay because the sun is out and it’s going to be a gorgeous day with a high of about 34 degrees. I have a pretty inspirational fun fold to share today created with an assortment of products from the Keep It Simple Clementine Bundle! This bundle is definitely a must-have for your crafty stash – it has everything you need to create amazing projects! My card is a zig-zag fold, it’s one of my favorite folds and it’s super easy!

I cut the zig-zag card base from CutCardStock 110# Basis White along with layering panels from coordinating prints in the Keep It Simple Flip Sides 12×12 Paper Pack.

I embellished each section with paper scraps, die cuts from the Die Cut Printed Chipboard, stickers from the 12×12 Sticker Sheet, and Adhesive Buttons and Enamel Shapes. I added a signature panel cut from CutCardStock Flamingo and Neenah Classic Crest Solar White which completed the card.

Sharing in the following challenges:
1. A Place To Start: January 2023 Anything Goes
2. Crafty Catz: #622 – Anything Goes w/ optional twist of 3 Favorite Colors (no twist)

Affiliate links are used in this post at no cost to you – I really appreciate your support! 

Products used:
Cardstock/Paper: CutCardStock 110# Basis White and Flamingo cardstock, Neenah Classic Crest 80# Solar White cardstock
Accessories: Tonic Studios 12″ Guillotine Paper Trimmer, Bearly Art precision craft glue; Keep It Simple Clementine Bundle: Flip Sides 12×12 Paper Pack with Die Cut Printed Chipboard, 12×12 Sticker Sheet, Adhesive Buttons and Enamel Shapes

I hope you’ve enjoyed seeing this project and you’re inspired to get crafty this weekend! Thanks so much for stopping by today – we’ll see you next time! ;)

Scrappy hugs,

Another Year Older

2/6/23 Top Sprout at A Place To Start!
2/3/23 Rising Star at A Place To Start!

Hey everybody! Happy Friday – I hope you’ve had a great week! I have an awesome CutCardStock DT inspiration project to share with you today featuring our Basis Gray, Dolphin Gray and Pop Tone Black Licorice which I paired with some Echo Park double-sided paper in my stash! This is one of my most favorite stamp sets because it always makes an awesome masculine card! Plus it’s a tunnel card with a pop-up sentiment on the inside! I’ve made quite a few tunnel cards over the years but have never made one quite like this, and it was rather fun!

I cut a standard A2 size side-folding card base and small rectangular panel from Basis Gray cardstock. I ran the smaller panel through the Big Shot with a Darice Diamond Plate embossing folder. I stamped the motorcycle on a scrap piece of Dolphin Gray cardstock, cut it with the coordinating die, and layered it on three additional die cuts for dimension. I stamped the sentiment from The Project Bin Wild Thing stamp set in Memento Tuxedo Black ink and added several Darice tiny gray gemstones.

The inside consists of two layering panels. Using my Fiskars 12″ SureCut paper trimmer, I cut two horizontal lines into the Dolphin Gray layer to create the pop-up mechanism. I stamped another sentiment from the same Wild Thing stamp set in black ink, trimmed it and layered it, then adhered it to the left side of the pop-up mechanism. I die cut a circle into the Echo Park plaid paper and a slightly smaller circle into a square piece of Pop Tone Black Licorice which I adhered behind the aperture in the plaid paper, leaving a small border visible. The final step for the inside was adhering the plaid panel in place, making sure the sentiment flap was through the aperture before applying adhesive.

Sharing in the following challenges:
1. A Place To Start: January 2023 Anything Goes
2. Crafty Catz: #622 – Anything Goes w/ optional twist of 3 Favorite Colors (no twist)
3. Jan’s Digi Stamps Challenge: January 2023 Anything Goes
4. World Wide Open Design Team Challenge: #1 – January Anything Goes

Affiliate links are used in this post at no cost to you – I really appreciate your support!

CutCardStock products used:
Basis Gray cardstock
Dolphin Gray cardstock
Pop Tone Black Licorice cardstock

Other products used:
Paper: Echo Park Farmhouse Kitchen double-sided paper
Stamps: The Project Bin Wild Thing stamps
Ink: Memento Tuxedo Black ink
Dies/Punches: Spellbinders Standard Circles Large and Small, The Project Bin Wild Thing dies
Accessories: Tonic Studios 12″ Guillotine Paper Trimmer, Fiskars 12″ SureCut Paper Trimmer, Art Glitter Dries Clear adhesive, Tape Runner, MISTI stamp tool, Darice Diamond Plate embossing folder, Big Shot, Darice tiny gray gemstones

I hope you’ve enjoyed today’s project and you’re inspired to get crafty! Be sure to check out all the awesome cardstock and other goodies at CutCardStock (adhesives, labels, stickers, pens, watercolors and ribbon to name a few). And head on over to the CutCardStock Facebook Page for more inspiration! Thanks so much for stopping by today – we’ll see you next time!

Scrappy hugs,

Happy Anniversary Vintage TV Box Card

1/7/23 Top Rocker at 613 Avenue Create!
1/14/23 DT Favorite Winner and Best Technique Winner at World Wide Open Design Team Challenge Blog!
1/31/23 Best Technique Winner at Classic Design Challenge Blog!
2/28/23 January DT Favorite Winner at A Perfect Time To Craft!

Hey everybody! Are you as amazed as I am at how quickly 2023 got here?! Dang! Our new challenge is live this morning over at Love To Craft Challenge Blog and I’m super stoked to share my DT inspiration project for LTCCB #72 – Anything Goes! The hubs and I are vintage (LOL) so I created a fun vintage TV box card for our anniversary using the SVG Cuts Vintage TV Box Card cut file. The photo I used was taken on one of our first dates to a motorcycle club meeting… look how young we were! And, it goes without saying that avocado and orange are some of the best vintage colors around! Bahahaha!

Using my Scan N Cut, I cut the box card base from Cardstock Warehouse Brown Box 100# cardstock, the decorative elements and trim from CutCardStock Pop Tone Jellybean Green and Pebbles Inc. Basics 6×6 paper pad, and the antenna from CutCardStock Bright Silver Foil cardstock.

Like I always say, the most fun is the assembly. I used the Cuttlebug Swiss Dots Embossing Folder for the speaker cover and Eyelet Outlet orange 8mm Cut Jewels for the knobs. ;)

I stamped the sentiment from The Cat’s Pajamas Simply Stacked Sentiments stamp set in Memento Tuxedo Black ink on the back panel which completed the card.

Sharing in the following challenges:
1. 613 Avenue Create: #202301 – January Anything Goes
2. A Perfect Time To Craft: #1-2023 – Anything Goes
3. Classic Design Challenge: January 2023 #1 – Anything Goes
4. Crafting Happiness Challenges: #138 – Celebrations (anniversary)
5. Crafts Galore Encore Challenge Blog: #107 – January Anything Goes
6. World Wide Open Design Team Challenge: #12 – December Anything Goes

Affiliate links are used in this post at no cost to you – I really appreciate your support! 

Products used:
Cardstock/Paper: Cardstock Warehouse Brown Box 100# cardstock, CutCardStock Pop Tone Jellybean Green and Bright Silver Foil cardstock, Pebbles Inc. Basics 6×6 paper pad
Stamps: The Cat’s Pajamas Simply Stacked Sentiments stamp set
Ink: Memento Tuxedo Black ink
Dies/Punches/Cut Files: SVG Cuts Vintage TV Box Card cut file
Accessories: Brother Scan N Cut, Bearly Art precision craft glue, MISTI stamp tool, Cuttlebug Swiss Dots Embossing Folder, Eyelet Outlet orange 8mm Cut Jewels

I hope you’ve enjoyed seeing this project and will link up with us this time! We’d love to see what you’re working on! Thanks so much for stopping by today – we’ll see you next time! ;)

Scrappy hugs,

Christmas Quilt Card

Hey everybody! Are you ready for the round jolly guy in the red suit to make his appearance tomorrow evening?! He’s coming whether you’re ready or not, lol! I’m thrilled to be back to share another ScrapbookingStore DT inspiration project with you today, created with the amazing December 2022 Scrapbook Kit with Upgrades! I like everything in this month’s kit, from the pretty patterned papers to the variety of stickers. I consider myself a fun fold ‘fiend’ and thought a side fold card featuring a Christmas quilt was in order. I used the snowflake, festive floral and modern stripe and dot patterned papers in this month’s collection along with some stickers from the sticker sheet.

I cut the side fold card base from Neenah Classic Crest 110# Solar White cardstock and adhered the left panel. Using the My Favorite Things Quilt Square Cover-Up die, I die cut the quilt five times (three times with the patterned papers from the kit and two more times with CutCardStock Red Wagon and Scottish Highlands Green cardstock). Using various pieces from each of the cuts, I assembled the quilt and adhered it to the card front. I added a sentiment sticker from the sticker sheet and adhered a rectangular panel cut from the Red Wagon cardstock to the left side which I embellished with metallic gold thread and another sticker from the sticker sheet.

I cut the inside panel from 80# Solar White cardstock and embellished it with strips of the festive floral patterned paper and CutCardStock Red Wagon cardstock used on the front. I stamped the sentiment in Catherine Pooler Grass Skirt ink and layered the panel on CutCardStock Scottish Highlands Green cardstock.

Affiliate links are used in this post at no cost to you – I really appreciate your support!

ScrapbookingStore products used:
December 2022 Scrapbook Kit with Upgrades

Other products used:
Cardstock/Paper: Neenah Classic Crest 110# and 80# Solar White cardstock, CutCardStock Red Wagon and Scottish Highlands Green cardstock
Stamps: Stampin’ Up Versatile Christmas stamp set
Ink: Catherine Pooler Grass Skirt ink
Dies/Punches: My Favorite Things Quilt Square Cover-Up Die, EK Success Flag Punch (to notch the side panel where I wrapped the gold metallic thread)
Accessories: Tonic Studios 12″ Guillotine Paper Trimmer, Bearly Art precision craft glue, MISTI stamping tool, Big Shot, Coats metallic gold sewing thread, Stampin’ Up Mini Dimensionals

I hope you’ve enjoyed today’s project and you’re thinking about all the fun you could have with this month’s kit… you really ought to think about joining the Subscription Club! Be sure to Follow us on Facebook, Instagram, Pinterest and YouTube for lots of crafty inspiration! And if you do decide to join the Subscription Club, join our ScrapbookingStore Club Member Group on Facebook for more inspiration and to share your projects! Thanks so much for stopping by today – we’ll see you next time!

Scrappy hugs,