Congratulations Coin Purse GC Holder

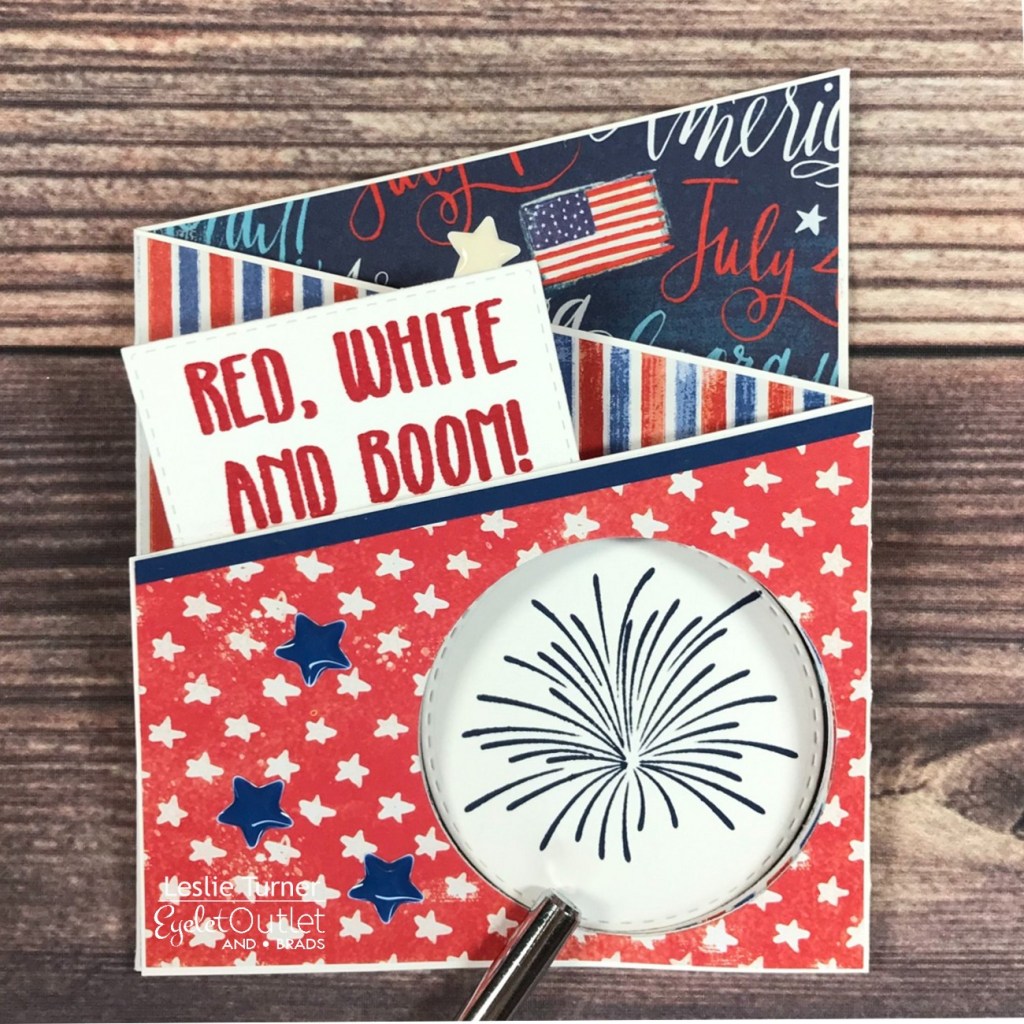
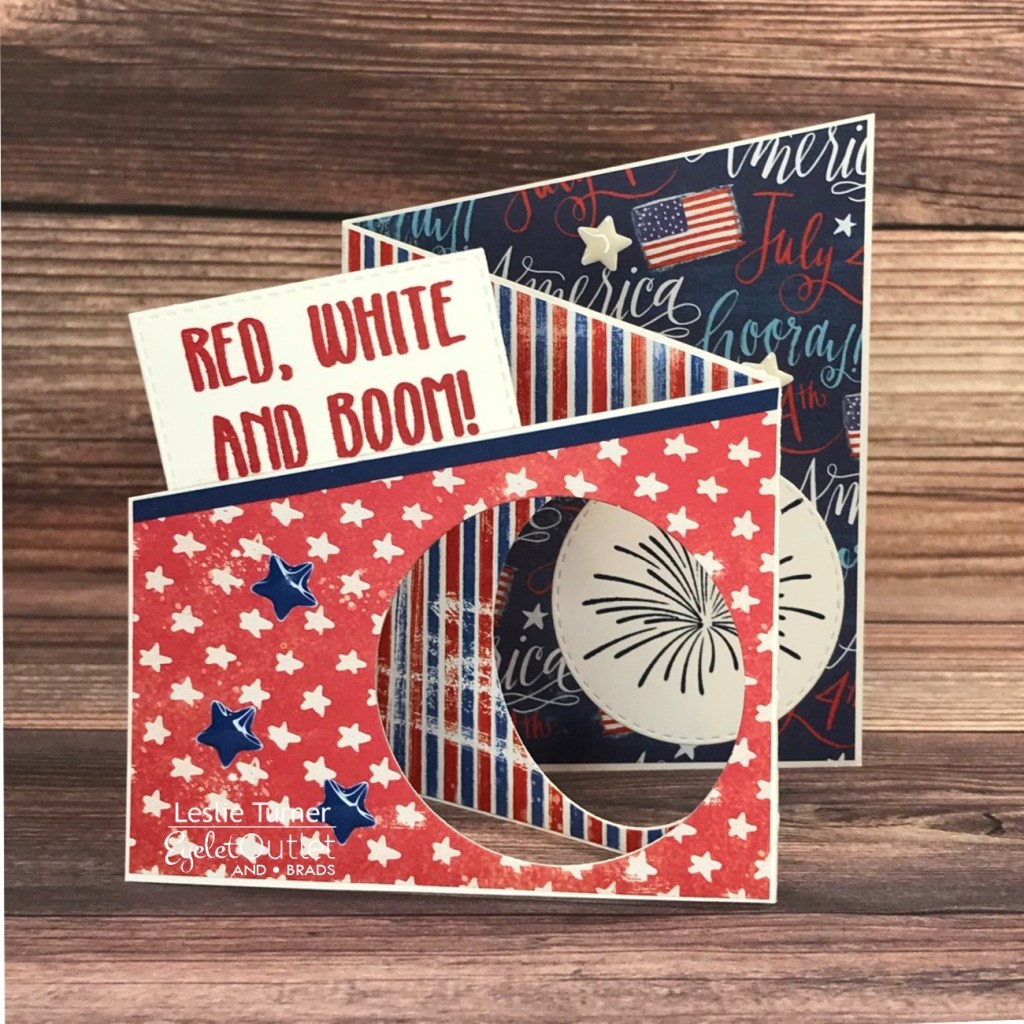
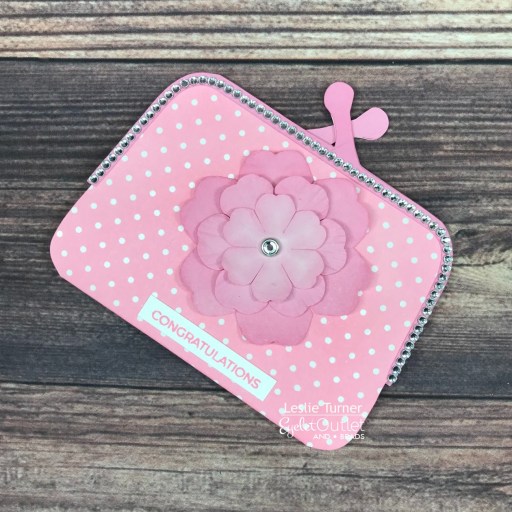
Hi everyone! A very Happy Saturday to you – I hope you’ve had a great week! It’s almost the end of January and this month has flown by! Affiliate links are used in this post at no cost to you – I really appreciate your support! I’m stoked to be back on the Eyelet Outlet blog today with another awesome DT inspiration project! I’ve been having so much with my Scan N Cut and created this graduation coin purse gift card holder which features a Light Pink Paper Flower, Clear Jewel Bling Strips and a Silver Edge Clear Jewel Brad. I’ve had this cut file in my arsenal for many years and have made quite a few of these. This one is a little different in that I added pockets to the inside – one holds a little graduation card and the other pocket will hold a gift card.

I cut the base from a dotted ink-resist paper and inked it with Ranger spun sugar distress ink and then with Catherine Pooler It’s A Girl ink to darken it up just a bit. I cut the coin purse frames with clasps from CutCardStock Pop-Tone Cotton Candy cardstock and adhered them to the base. I adhered a Light Pink Paper Flower with a Silver Edge Clear Jewel Brad to the center front, and then added Clear Jewel Bling Strip around the front edge of the coin purse frame. I stamped a sentiment from the Trinity Stamps A Sentiment For (Almost) Everything stamp set in pink ink, trimmed it and adhered it beneath the flower.

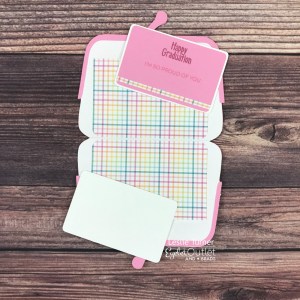
I cut the inside pockets from a plaid patterned paper and punched half-circles in the tops before adhering them. I created a card to slip into one of the pockets cut from CutCardStock Pop-Tone Cotton Candy cardstock and Neenah Classic Crest 110# Solar White cardstock. I rounded the corners, stamped a sentiment in pink inks using the Hero Arts Year Round Messages stamp set and Trinity Stamps A Sentiment For (Almost) Everything stamp set, and adhered the panels together. The white card at the bottom of the photo on the right represents a gift card. This is such a fun project and the coin purse can be made for literally any occasion in any color scheme!

Sharing in the following challenges:
1. Crafty Catz: #580 – Anything Goes w/optional Add Flowers
2. The Corrosive Challenge Blog: #1-January 2022 – Anything Goes
3. Through the Purple Haze: #188 – Anything Goes
4. Wednesday’s Creative Inspirations Challenge Blog: January Anything Goes

Eyelet Outlet products used:
Light Pink Paper Flower
Clear Jewel Bling Strips
Silver Edge Clear Jewel Brad

Other products used:
Cardstock/Paper: CutCardStock Pop-Tone Cotton Candy cardstock, Neenah Classic Crest 110# Solar White cardstock, Stampin’ Up Irresistibly Yours Specialty DSP, My Favorite Things Sweet Celebration 6×6 paper pad
Stamps: Trinity Stamps A Sentiment For (Almost) Everything stamp set, Hero Arts Year Round Messages stamp set
Ink: Ranger spun sugar distress ink, Catherine Pooler It’s A Girl and Rose Petals inks
Dies/Punches/Cut Files: Silhouette Coin Purse cut file, Kadomaru Pro Corner Rounder, Stampin’ Up 1″ Circle Punch
Accessories: Brother Scan N Cut, Tonic Studios 12″ Guillotine Paper Trimmer, MISTI Stamp tool, Bearly Art precision craft glue

I hope you’ve enjoyed today’s project! Be sure to check out all the fun goodies at Eyelet Outlet! I can already see you drooling, lol! Be sure to ‘like’ and ‘follow’ Eyelet Outlet Facebook Page to keep up with news and sales, and while you’re at it, join the Eyelet Outlet Fans Facebook group for lots of creative inspiration! Thanks so much for stopping by today – we’ll see you next time! ;)

Scrappy hugs,

Warm Hands, Warm Hearts.

Hi everybody! Hope your week is going well – it’s almost Friday! Affiliate links are used in this post at no cost to you – I really appreciate your support! I’ve popped in this morning with a clean and simple card I created to enter into Inkspirational Challenges where the prompt for the current challenge is Cozy! I love playing there and the challenge prompt this time reminded me of the awesome STAMPlorations Warm Hands Warm Hearts stamp set and coordinating Warm Hands Warm Hearts die set I have in my stash! I have been pretty serious so far this new year about using stamps and dies in my stash that have either never been used or have only been used once. This set is one of those that I’ve only used once and I was happy to bring it out for another play!

I cut a standard A2 size top-folding card base from Neenah Classic Crest 110# Solar White cardstock and rounded the bottom right corner. I stamped two mittens from the Warm Hands Warm Hearts stamp set in blue ink on a scrap piece of 110# Solar White cardstock, colored them with alcohol markers, and cut them with the coordinating Warm Hands Warm Hearts die set. I stamped the sentiment in the bottom right corner in the same blue ink, and adhered the left mitten flat on the card base and popped the right mitten up on 3-D foam squares. The finishing touch was the addition of several snowflake sequins.

I stamped the inside sentiment from the same Warm Hands Warm Hearts stamp set in blue ink which completed the card.

And one more peek… so loving how this turned out! And I can almost say that it’s a one-layer card in addition to being CAS! LOL!

Sharing in the following challenges:
1. Addicted to Stamps and More: #421 – Make Your Mark
2. Classic Design Challenge: January 2022-#1 – Anything Goes
3. Crafting Happiness Challenges: #119 – Anything Goes
4. Inspirational Challenges: #257 – Cozy

5. Penny’s Paper-Crafty Challenge Blog: #513 – Anything Goes with Paper
6. STAMPlorations Never-Ending Anything Goes Challenge
7. Wednesday’s Creative Inspirations Challenge Blog: January Anything Goes

Products used:
Cardstock/Paper: Neenah Classic Crest 110# Solar White cardstock
Stamps: STAMPlorations Warm Hands Warm Hearts stamp set
Ink: Catherine Pooler Juniper Mist ink; Arteza alcohol markers- B17/18
Dies/Punches: STAMPlorations Warm Hands Warm Hearts die set
Accessories: We R Memory Keepers Large Guillotine Paper Trimmer, Bearly Art precision craft glue, Scrapbook Adhesives 3D Foam Squares Variety Pack, Eyelet Outlet Snowflake Sequins, Trinity Pick Up Stick

I hope you’ve enjoyed seeing this ‘Cozy’ clean and simple card! Thanks so much for stopping by today – we’ll see you next time! ;)

Scrappy hugs,

My Favorite Recipes

Hey, everybody! Well, it’s Thursday so that means we’ve surpassed another Hump Day and are on the downslide to the weekend! I’m thrilled to be back on the Clear Scraps blog today with another awesome DT inspiration project! I used the Slimline Acrylic Tab Album to create a mini collection of my favorite recipes – two each of Dessert, Meat, Veggie, Side and Soup/Stew. I have to say that the hardest part was picking out the few recipes that would fit in this album because I have a bunch of favorites lol!

I printed the recipes on 32# copy paper, and printed the 2″ square finished recipe images on glossy photo paper and cut them with a square die. I covered all the album pages with patterned papers from The Paper Studio Tattered and Worn 12 x 12 paper pad after removing the protective film on both sides of each tabbed page. I inked the edges of each page with walnut stain distress ink and then roughed them up with the Large Sanding Stick for an old worn-out vintage feel.

I stamped the page contents on each tab in brown ink using my stamp press, adhered the recipes to each page, and affixed foiled photo corners on the corners of each photo. I embellished the front and back covers and all the pages with Carta Bella and Echo Park patterned paper strips and stickers. I also used thick alphabet letters for the word ‘Recipes’ on the front cover, put the album together with binding rings, and added ribbon scraps to each ring to complete the album.

Here are close-up shots. Really loving how this turned out! Such a fun project!

Sharing in the following challenges:
1. Classic Design Challenge: January 2022-#1 – Anything Goes
2. Crafting Happiness Challenges: #119 – Anything Goes
3. Fab ‘n’ Funky Challenges: #543 – 2 or More Patterned Papers
4. Sparkles Monthly Challenges: #148 – Use Ribbon, Raffia or Twine
5. Wednesday’s Creative Inspirations Challenge Blog: January Anything Goes

Clear Scraps products used:
Slimline Acrylic Tab Album
Large Sanding Stick

Other products used:
Cardstock/Paper: Carta Bella Country Kitchen Collection Kit, Echo Park Farmhouse Kitchen Collection Kit, The Paper Studio Tattered and Worn 12 x 12 paper pad, HP 8.5 x 11 glossy photo paper, HP 32# copy paper
Stamps: Stampin’ Up Labeler Alphabet stamp set
Ink: Ranger walnut stain distress ink, Catherine Poole Icing on the Cake ink
Dies/Punches: Spellbinders Classic Squares Small die, Crop-A-Dile Big Bite
Accessories: We R Memory Keepers Large Guillotine Paper Trimmer, Tape Runner Retractable Adhesive, Fiskars stamp press, Project Life Golden Photo Corner, Amy Tangerine die cut heart, Eyelet Outlet Pink Enamel Heart, American Crafts Newsprint Thickers alphabet letters, 7 Gypsies Binding Rings, Really Reasonable Ribbon ribbon scraps, Ranger Distress Collage Medium Matte

I hope you’ve enjoyed today’s project and you’re inspired to get those craft supplies out to play! Be sure to check out all the amazing acrylic, wood and chipboard goodies at Clear Scraps… OMGoodness, you won’t be disappointed! And head on over to the Clear Scraps Facebook Page for lots of inspiration! And while you’re at it, join the Clear Scraps Facebook Creative Group to connect with other Clear Scraps fans! Thanks so much for stopping by today – we’ll see you next time!

Scrappy hugs,

Red, White and Boom! fun fold

2/3/22 Top 3 at Penny’s Paper-Crafting Challenge Blog!

Hi everyone! A very Happy Saturday to you – I hope you’ve had a great week! Affiliate links are used in this post at no cost to you – I really appreciate your support! I’m thrilled to be back on the Eyelet Outlet blog today with another awesome DT inspiration project! I created a 4th of July card featuring our Flag & Hat Brads and Patriotic Enamel Stars! You know me and fun folds… I ran across my own zig-zag template while I was looking through my tutorial files for something else, and decided it would be perfect for this card! I went one step further on this one and die cut two round apertures to see the fireworks through, which I thought was a fun touch!

I cut the card base from Neenah Classic Crest Solar White 110# cardstock, two narrow embellishing strips from CutCardStock Basis Blue cardstock, and layering panels from assorted coordinated patriotic papers. Using a Memory Box Stitched Circle Layers die, I die cut circular apertures into the first and second sections. I stamped the fireworks on one of the negative space circular die cuts and adhered it to the third section to be seen through the apertures. I stamped the main sentiment in red ink on Neenah Classic Crest Solar White 80# cardstock, cut it with a Memory Box Stitched Rectangle Layers die and adhered it along the top of the first section.

I used our blue and white Patriotic Enamel Stars to embellish all three inside sections. I affixed a hat from our Flag & Hat Brads to the second section adjacent to another stamped sentiment.

I cut the back panel from Neenah Classic Crest 80# Solar White cardstock and embellished it with a scrap from one of the patterned papers used on the front along with a narrow strip of CutCardStock Basis Blue cardstock. I stamped the sentiment in red ink, added a flag from our Flag & Hat Brads and some Patriotic Enamel Stars, and layered the panel on the blue cardstock.

And one more look… so smitten with this design! I totally love the enamel stars used with the hat and flag brads!

Sharing in the following challenges:
1. A Perfect Time To Craft Open Challenge: January #1-2022 – Anything Goes
2. Classic Design Challenge: January 2022-#1 – Anything Goes
3. Crafting Happiness Challenges: #119 – Anything Goes
4. Creative Creases: #24 – Anything Goes with a Fun Fold
5. Fab ‘n’ Funky Challenges: #543 – 2 or More Patterned Papers
6. Little Red Wagon: #637 – Make It Open
7. Penny’s Paper-Crafty Challenge Blog: #513 – Anything Goes with Paper
8. Wednesday’s Creative Inspirations Challenge Blog: January Anything Goes

Eyelet Outlet products used:
Flag & Hat Brads
Enamel Stars – Patriotic

Other products used:
Cardstock/Paper: Neenah Classic Crest 110# and 80# Solar White cardstock, CutCardStock Basis Blue cardstock, The Paper Studio Four Seasons and Everything in Between -2- paper pad
Stamps: The Project Bin Red, White & Boom! stamp set
Ink: Catherine Pooler Rockin’ Red and Juniper Mist inks
Dies/Punches: Memory Box Stitched Rectangle Layers, Memory Box Stitched Circle Layers
Accessories: Tonic Studios 12″ Guillotine Paper Trimmer, Bearly Art precision craft glue, MISTI stamp tool, Big Shot

I hope you’ve enjoyed today’s project! Be sure to check out all the fun goodies at Eyelet Outlet! I can already see you drooling, lol! Be sure to ‘like’ and ‘follow’ Eyelet Outlet Facebook Page to keep up with news and sales, and while you’re at it, join the Eyelet Outlet Fans Facebook group for lots of creative inspiration! Thanks so much for stopping by today – we’ll see you next time! ;)

Scrappy hugs,

Embellishment Bowls & Serving Trays, Oh My!

Hi everyone! A very Happy Thursday to you all! Where has this week gone?! It was just Monday afternoon a minute ago, lol! ;) Affiliate links are used in this post at no cost to you – I really appreciate your support! I’ve popped in this morning to share an awesome Tape Runner DT inspiration project! I created a set of two embellishment bowls and two serving trays for my studio with my Scan N Cut, and all the tabs and panels were adhered with Retractable Tape Runner.

I cut the bases for the bowls and trays from CutCardStock Curious Metallic Night cardstock and the panels for each from Crafter’s Companion Verity Rose 6×6 luxury paper pad. The construction was super simple, and as mentioned above, I adhered all the tabs and panels with Retractable Tape Runner. This is a good strong adhesive – and perfect for this type of project.

These bowls are great for small die cut pieces and the trays are great for dies or ephemera. I think, as crafters, we all can identify with losing stuff we’re working with, and having these in my studio is a huge stress-reliever because I don’t have to search for MIA items! This is the second set of bowls I’ve made but the first set of trays, and I sure do love them. On a side note, I guess it’s time to admit that I’ve moved a table into my studio where my Scan N Cut now lives – so I cut whatever file I want whenever I want. I mentioned several weeks ago that this is the longest it’s been out of the cabinet since I’ve owned it so I figured I might just as well make that a permanent situation! Here’s another peek at the sets. Loving how they turned out!

Sharing in the following challenges:
1. A Perfect Time To Craft Open Challenge: January #1-2022 – Anything Goes
2. Classic Design Challenge: January 2022-#1 – Anything Goes
3. Crafting Happiness Challenges: #119 – Anything Goes
4. Penny’s Paper-Crafty Challenge Blog: #513 – Anything Goes with Paper
5. Wednesday’s Creative Inspirations Challenge Blog: January Anything Goes

Tape Runner products used:
Retractable Tape Runner

Other products used:
Cardstock/Paper: CutCardStock Curious Metallic Night cardstock, Crafter’s Companion Verity Rose 6×6 luxury paper pad
Dies/Punches/Cut Files: Simply Crafty SVGs Embellishment Bowl and Serving Trays cut files
Accessories: Brother Scan N Cut

I hope you’ve enjoyed today’s project and you’re inspired to get your craft on! Be sure to check out the ah-mazing Tape Runner, Retractable Tape Runner and Highlight Tape Runner at TapeRunner.com! Be sure to Follow us on Facebook and Instagram! Thanks so much for stopping by today – we’ll see you next time!

Scrappy hugs,

Birthday Bouquet Card

Happy Wednesday, everybody! I hope you’re having a great week and you’re not working too hard! Affiliate links are used in this post at no cost to you – I really appreciate your support! I’m delighted to be back on the CutCardStock blog today with an awesome DT inspiration project featuring more of our Astrobrights cardstock that’s on sale this month! Be sure to stock up – the colors in this line are so bright and vibrant and would look really good in your stash! I used Re-Entry Red, Pulsar Pink, Planetary Purple, Lunar Blue, and Solar Yellow for my project which I paired with my studio staple Neenah Classic Crest Solar White and Pop-Tone Gumdrop Green cardstock.

I cut the card base pieces from Neenah Classic Crest Solar White 80# cardstock and the scalloped doily from vellum; the flowers from Astrobrights Re-Entry Red cardstock, Astrobrights Pulsar Pink cardstock, Astrobrights Planetary Purple cardstock, Astrobrights Lunar Blue cardstock and Astrobrights Solar Yellow cardstock; and the leaves from Pop-Tone Gumdrop Green cardstock. I assembled the flowers first and adhered a clear gemstone to the center of each.

I arranged the doily, leaves and flowers on the top portion of the base, and once I was happy with the placement, I adhered them. I threaded red Offray ribbon through the slots on the center portion of the insert, stamped the sentiment in red ink on the insert, and adhered just the center portion.

And one more look… all folded up and ready to mail. Such a fun project that would be a good one to involve kids or grandkids!

Sharing in the following challenges:
1. A Perfect Time To Craft Open Challenge: #1-2022 – Anything Goes
2. Alphabet Challenge Blog: U is for Unequal (big and small flowers)
3. Classic Design Challenge: January 2022 #1 – Anything Goes
4. Crafting Happiness Challenges: #119 – Anything Goes
5. Crafty Calendar Challenge: January Anything Goes
6. Crafty Catz: #578 – Anything Goes w/ optional Checks or Plaids (no twist)
7. Creative Creases Challenges: #23 – Anything Goes with a Fun Fold
8. Lil Patch of Crafty Friends: #174 – Anything Goes
9. My Time To Craft Challenge Blog: #473 – Floral
10. Sparkles Monthly Challenge: #148 – Use Ribbon, Raffia or Twine
11. The Creative Crafters: #48 – Anything Goes
12. Wednesday’s Creative Inspirations Challenge Blog: January Anything Goes
13. World Wide Open Design Team Monthly Challenge: #01-January 2022 – Anything Goes

CutCardStock products used:
Neenah Classic Crest Solar White 80# cardstock
Astrobrights Re-Entry Red cardstock
Astrobrights Pulsar Pink cardstock
Astrobrights Planetary Purple cardstock
Astrobrights Lunar Blue cardstock
Astrobrights Solar Yellow cardstock
Pop-Tone Gumdrop Green cardstock

Other products used:
Stamps: Lawn Fawn Happy Happy Happy stamp set
Ink: Catherine Pooler Rockin’ Red ink
Dies/Punches/Cut Files: Scan N Cut Canvas Bouquet Birthday Card cut file
Accessories: Tonic Studios 12″ Guillotine Paper Trimmer, vellum, Bearly Art precision craft glue, Flourish with a Bling clear gemstones, red Offray ribbon

I hope you’ve enjoyed today’s project and you’re inspired to get crafty! Be sure to check out all the awesome cardstock and other goodies at CutCardStock (adhesives, labels, stickers, pens, watercolors and ribbon to name a few). And head on over to the CutCardStock Facebook Page for more inspiration! Thanks so much for stopping by today – we’ll see you next time!

Scrappy hugs,

Summer Waves Flip Flop

Hey everybody! A very Happy Tuesday to you – I hope your week is off to a great start! Affiliate links are used in this post at no cost to you – I really appreciate your support! I’ve been having the best time playing with alcohol inks and I created this flip flop for my growing (albeit ‘slow growing’ here lately, lol) paper shoe collection! I used my own flip flop template HERE. Alcohol ink backgrounds are so addictive… I go for long periods without playing with alcohol inks and then when I get them out to play, I can’t stop! Stay tuned for more pretty backgrounds coming your way! ;)

I cut a panel from Core’dinations 65# vellum and created the background with Ranger Cool Peri, Purple Twilight, Eggplant, Aqua, and Sailboat Blue alcohol inks along with a few drops of Ranger Alcohol Blending Solution. Just before the panel was dry, I pressed a piece of Spellbinders Silver Glimmer Hot Foil onto it which left small bits of the silver foil. I always let my alcohol ink backgrounds dry for at least 24 hours before working with them. I used my Xyron 510 to add the inked panel to a Neenah Classic Crest 110# Solar White cardstock panel, and then hand-cut the flip flop base and straps from the inked panel. I assembled the flip flop and created a two-layer decorative embellishment using the Stampin’ Up Swirly Bird stamp set with Catherine Pooler Serenade ink, cut with the Stampin’ Up Swirly Scribbles Thinlits from silver metallic foil cardstock.

Here’s a peek at the sole created with the Stampin’ Up Cable Knit Textured Impressions embossing folder. I love giving the soles of my flip flops some life, lol! ;)

And one more look… I’m smitten with this one! Loving how this turned out and wishing I had a pair just like it in real life! ;)

Sharing in the following challenges:
1. A Perfect Time To Craft Open Challenge: #1-2022 – Anything Goes
2. Classic Design Challenge: January 2022 #1 – Anything Goes
3. Crafting Happiness Challenges: #119 – Anything Goes
4. Crafty Calendar Challenge: January Anything Goes
5. Crafty Catz: #578 – Anything Goes w/ optional Checks or Plaids (no twist)
6. Lil Patch of Crafty Friends: #174 – Anything Goes
7. River of Creativity: #9 – Anything Goes
8. The Creative Crafters: #48 – Anything Goes
9. Wednesday’s Creative Inspirations Challenge Blog: January Anything Goes
10. World Wide Open Design Team Monthly Challenge: #01-January 2022 – Anything Goes

Products used:
Cardstock/Paper: Core’dinations 65# vellum, Neenah Classic Crest 110# Solar White cardstock, Hygloss Silver Metallic Foil cardstock
Stamps: Stampin’ Up Swirly Bird stamp set
Ink: Ranger alcohol inks- Cool Peri, Purple Twilight, Eggplant, Aqua, and Sailboat Blue; Catherine Pooler Serenade ink
Dies/Punches: Stampin’ Up Swirly Scribbles Thinlits
Accessories: We R Memory Keepers Large Guillotine Paper Trimmer, Ranger Alcohol Blending Solution, Spellbinders Silver Glimmer Hot Foil, Xyron 510, MISTI stamp tool, Big Shot, Bearly Art precision craft glue, Stampin’ Up Cable Knit Textured Impressions embossing folder

I hope you’ve enjoyed seeing this flip flop! If you use my template, I’d love to see your creativity! Thanks so much for stopping by today – we’ll see you next time! ;)

Scrappy hugs,

I Heart Summer accordion album

Hey, everybody! Happy Monday – hope you had a great weekend and your week ahead will be fabulous! We have something awesome to look forward to – our new internet service provider will be installing a little later this morning and we’ll finally have faster internet! Woo-hoo! I’m thrilled to be back on the Clear Scraps blog today with another awesome DT inspiration project! I created a very colorful Summer accordion album featuring our Blank Wood Card as the cover. This was a lot of fun!

I painted the cover with green chalk paint and lightly sanded vertically and horizontally on it to create a very subtle cross-hatch design. I used some awesome patterned papers, ribbon, and tons of embellishments, die cuts, and elements throughout. Most of the pages contain flat photo/journaling areas but I did create one pocket with a pull-out card on the last page.

Sharing in the following challenges:
1. A Perfect Time To Craft Open Challenge: #1-2022 – Anything Goes
2. Classic Design Challenge: January 2022 #1 – Anything Goes
3. Crafting Happiness Challenges: #119 – Anything Goes
4. Crafty Calendar Challenge: January Anything Goes
5. Crafty Catz: #578 – Anything Goes w/ optional Checks or Plaids (no twist)
6. Let’s Craft and Create: #149 – Anything Goes + Something New (more new patterned paper :)
7. Lil Patch of Crafty Friends: #174 – Anything Goes
8. Lil Red Wagon: #636 – Pick Patterned Paper
9. River of Creativity: #9 – Anything Goes
10. Sparkles Monthly Challenges: #148 – Use Ribbon, Raffia or Twine
11. Wednesday’s Creative Inspirations Challenge Blog: January Anything Goes
12. World Wide Open Design Team Monthly Challenge: #01-January 2022 – Anything Goes

Clear Scraps products used:
Blank Wood Card

Other products used:
Cardstock/Paper: Stamp Anniething Summer Tropics 6×6 double-sided papers
Dies/Punches: Sizzix Dotted Ovals and Dotted Rectangles; Cottage Cutz Double-Stitched Ovals; Memory Box Stitched Circle Layers and Stitched Heart Layers; CUTplorations Stitched Tags Nesting Dies, Stampin’ Up 3/4″ circle punch, Kadomaru Pro corner rounder, Stampin’ Up Banner Triple Punch
Accessories: Tonic Studios 12″ Guillotine Paper Trimmer, Tim Holtz 8.5″ Guillotine Paper Trimmer; Eyelet Outlet Enamel Arrows, Clear Bling Strip, Sunglasses Brads, Flip Flop Brads, Sun/Cloud Brads and Beach Umbrella Brads; Creative Memories Part Time Collection Enamel Dots, Fantastico Collection Enamel Hearts, Carta Bella Summer Sticker Sheets, Simple Stories Sunkissed Collection Elements, Hemptique red crafting cord, Really Reasonable Ribbon Satin Swiss Dots, Folkart Spanish Moss chalk paint, Scrapbook Adhesives thin 3-D Foam Squares

I hope you’ve enjoyed today’s project and you’re inspired to get those craft supplies out to play! Be sure to check out all the amazing acrylic, wood and chipboard goodies at Clear Scraps… OMGoodness, you won’t be disappointed! And head on over to the Clear Scraps Facebook Page for lots of inspiration! And while you’re at it, join the Clear Scraps Facebook Creative Group to connect with other Clear Scraps fans! Thanks so much for stopping by today – we’ll see you next time!

Scrappy hugs,

I Love Fall

Hi everyone! A very Happy Saturday to you – I hope you’ve had a great week! Affiliate links are used in this post at no cost to you – I really appreciate your support! I’m stoked to be back on the Eyelet Outlet blog today with another awesome DT inspiration project! Mini slimlines (in 3-1/2″ x 6″ size that are legal to mail) are my new favorite kind of card to make these days, and I created a gorgeous Fall card featuring our Pumpkin Brads, Leaf Brads and Orange Pearl Bling! I got some new double-sided patterned paper packs that I’ve been itching to use! Plus, if you know me very well, then you know that I typically don’t stick to seasonal crafting… I’m all over the place and create whatever pops into my head! It’s Winter, so what’s wrong with a Fall card, I ask?! ;)

I cut a side-folding mini slim card base from Neenah Classic Crest Baronial Ivory cardstock along with layering panels from CutCardStock Pop-Tone Tangy Orange cardstock and Stamp Anniething Autumn Life 6×6 double-sided papers. I used a corner punch on the two layering panels and adhered them together. I cut wide embellishing strips from Neenah Classic Crest Baronial Ivory cardstock and CutCardStock Pop-Tone Tangy Orange cardstock, layered them together and adhered them horizontally across the front of the card, and adhered the panel to the card front. Using the My Favorite Things Wonky Stitched Circle STAX Die-namics, I die cut an element for the front on which I stamped the sentiment from The Project Bin New Leaf stamp set in brown ink, added Pumpkin Brads and Leaf Brads, and adhered it to the card front. To finish it off, I added some Orange Pearl Bling.

I cut the inside panel from Neenah Classic Crest Baronial Ivory cardstock and punched the corners with the corner punch. I stamped the sentiment (from the same TPB stamp set) in brown and orange inks, and layered it on CutCardStock Pop-Tone Tangy Orange cardstock.

And one more look… these pumpkin and leaf brads sure do make a gorgeous Fall card and are some of my favorites in the store!

Sharing in the following challenges:
1. 613 Avenue Create: #202201 – January Anything Goes
2. A Place to Start: #012022 – January Anything Goes
3. Ally’s Angels: #54 – Anything Goes
4. Aud Sentiments Challenge Blog: #290 – Anything Goes + A Sentiment
5. Crafting Happiness Challenges: #119 – January Anything Goes
6. Di’s Digi Challenge: Try/Use Something New (new patterned paper)
7. Jan’s Digi Challenge: January Anything Goes
8. Let’s Craft and Create: #179 – Anything Goes + Something New (new patterned paper)
9. Lil Red Wagon: #636 – Pick Patterned Paper
10. Paperbabe Stamps: #159 – Anything Goes
11. Stamping Sensations: January challenge: Anything Goes with Stamping w/ option Add a Die (playing twist)
12. Wednesday’s Creative Inspirations Challenge Blog: January Anything Goes

Eyelet Outlet products used:
Pumpkin Brads
Leaf Brads
Pearl Bling Multi Size Orange

Other products used:
Cardstock/Paper: Neenah Classic Crest Baronial Ivory cardstock, CutCardStock Pop-Tone Tangy Orange cardstock, Stamp Anniething Autumn Life 6×6 double-sided papers
Stamps: The Project Bin New Leaf stamp set
Ink: Catherine Poole Icing On The Cake and Mandarin Spice inks
Dies/Punches: Tonic Corner Punch, My Favorite Things Wonky Stitched Circle STAX Die-namics
Accessories: Tonic Studios 12″ Guillotine Paper Trimmer, MISTI stamp tool, Big Shot, Bearly Art precision craft glue

I hope you’ve enjoyed today’s project! Be sure to check out all the fun goodies at Eyelet Outlet! I can already see you drooling, lol! Be sure to ‘like’ and ‘follow’ Eyelet Outlet Facebook Page to keep up with news and sales, and while you’re at it, join the Eyelet Outlet Fans Facebook group for lots of creative inspiration! Thanks so much for stopping by today – we’ll see you next time! ;)

Scrappy hugs,

For Someone Special

1/23/22 Top Rocker at 613 Avenue Create!
1/31/22 Top 3 Winner at Your Scrapbook Place!

Hi friends! Happy Friday – I hope you’re having a wonderful week! We’re two weeks into January already… yikes! Affiliate links are used in this post at no cost to you – I really appreciate your support! One of my projects was a top pick over at Cut It Up Challenges at the end of December and I was invited to guest design in an upcoming challenge so here I am sharing my GD inspiration project for Challenge – 243 Anything Goes which is a super adorable crayon box card! I am such a fiend when it comes to awesome cut files and putting these fun projects together! I was on an SVG design team for 2-1/2 years and since stepping down almost two years ago, I’ve really missed it! I seem to be getting my Scan N Cut out of the cabinet for crafty plays more and more often these days, lol!

I cut the pieces from CutCardStock Basis Gold, Basis Green, Basis Orange, Basis Red, Basis Navy, Pop-Tone Grape Jelly, Bonsai Green and Camomile cardstock, Neenah Classic Crest Solar White cardstock, and American Crafts Marine cardstock. I stamped the sentiment from Prickley Pear Stamps Truck stamp set in green ink on the tag for the front.

I absolutely love putting these kinds of projects together! Box cards are among my all-favorites, and this one was particularly fun! I stamped the sentiment from the Lawn Fawn Color My World stamp set in green ink on the panel for the back.

And one more look… I’m just totally smitten! So happy to have scored the guest gig at Cut It Up Challenges where I was able to share this!

Sharing in the following challenges:
1. 613 Avenue Create: #202201 – January Anything Goes
2. A Place to Start: #012022 – January Anything Goes
3. Ally’s Angels: #54 – Anything Goes
4. Aud Sentiments Challenge Blog: #290 – Anything Goes + A Sentiment
5. Crafting Happiness Challenges: #119 – January Anything Goes
6. Creative Creases Challenges: #23 – Anything Goes with a Fun Fold
7. Jan’s Digi Challenge: January Anything Goes
8. Wednesday’s Creative Inspirations Challenge Blog: January Anything Goes
9. Your Scrapbook Place: January Anything Goes

Products used:
Cardstock/Paper: CutCardStock Basis Gold, Basis Green, Basis Orange, Basis Red, Basis Navy, Pop-Tone Grape Jelly, Bonsai Green and Camomile cardstock; Neenah Classic Crest Solar White cardstock, American Crafts Marine cardstock
Stamps: Prickley Pear Stamps Truck stamp set, Lawn Fawn Color My World stamp set
Ink: Memento Cottage Ivy ink
Dies/Punches: My Scrap Chick Crayon Box Card cut file
Accessories: Brother Scan N Cut, MISTI stamp tool, Bearly Art precision craft glue

I hope you’ve enjoyed seeing this super cute box card! Come on over and link up a project that includes a die cut! Thanks so much for stopping by today – we’ll see you next time! ;)

Scrappy hugs,