Just letting everybody know that I decided (yesterday) NOT to close my four challenge blogs in 2022, so be sure to visit them tomorrow morning at 4:00 AM Mountain Time for new challenges!
It’s been a whirlwind 24 hours getting them ready for the new year after I told everybody I was closing them, lol! I hate it when I change my other mind!
But I’ve made some major changes to the challenge structures to make things easier for Tina and I, and new blog themes are planned for later this afternoon when the current challenges are over, so be sure to visit if you are regular players!
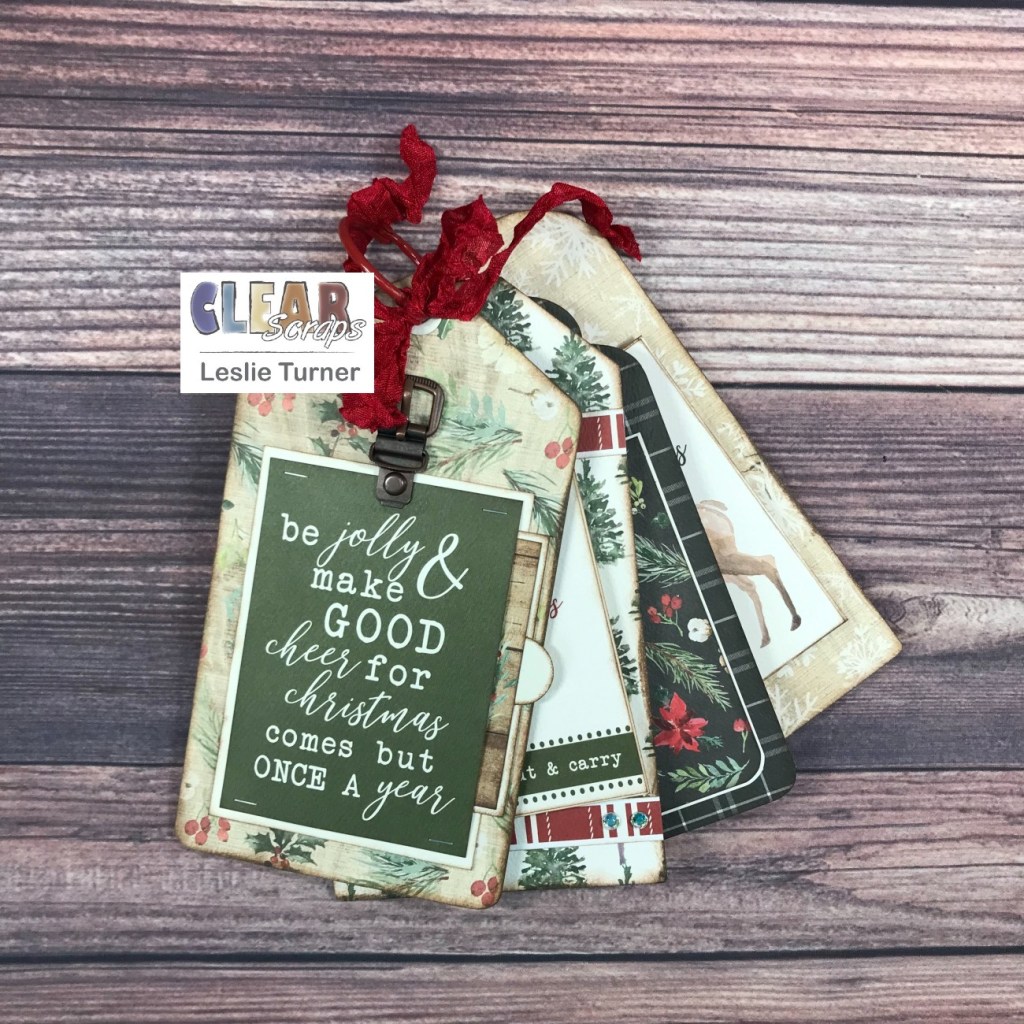
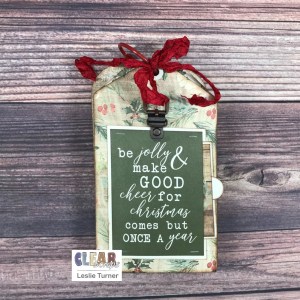
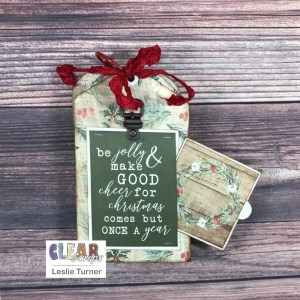
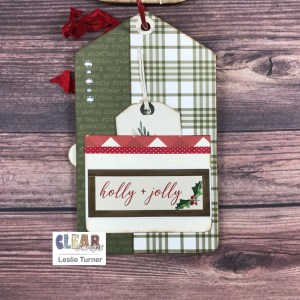
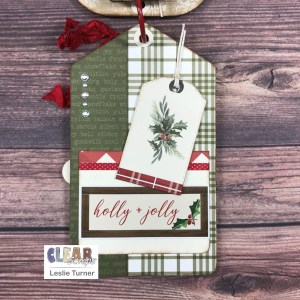
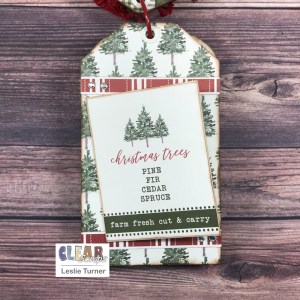
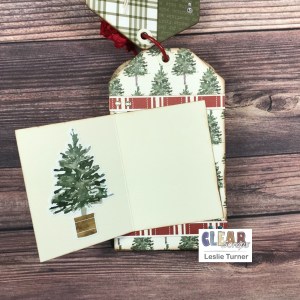
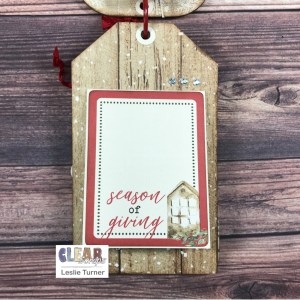
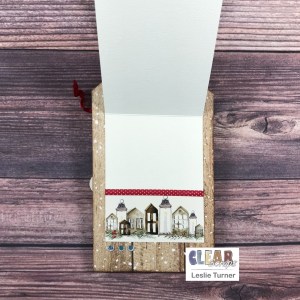
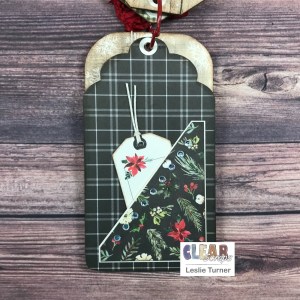
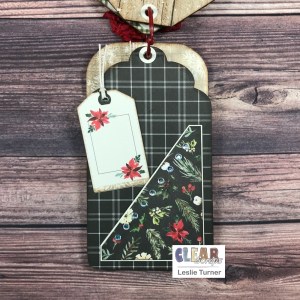
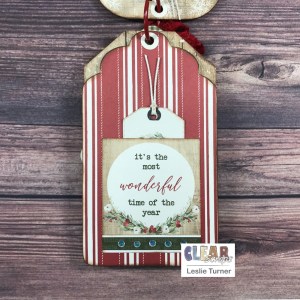
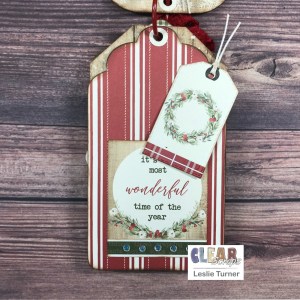
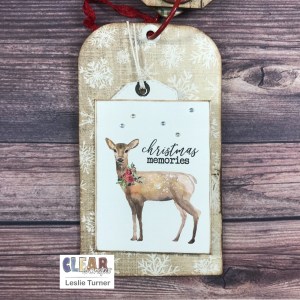
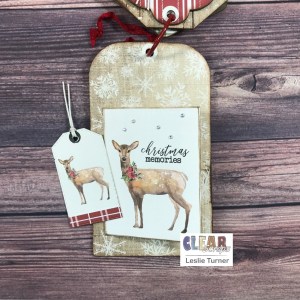
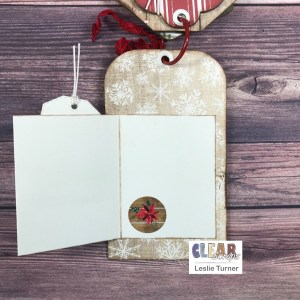
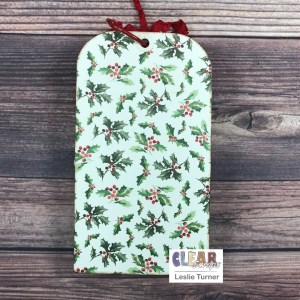
Hey, everybody! Happy Hump Day – I hope you’re having a great week and it’s not too cold where you are! I’m thrilled to be back on the Clear Scraps blog today with another awesome DT inspiration project! I hope you had a wonderful Christmas – it’s so hard to believe that it has come and gone! We had an absolutely beautiful Christmas and the real truth is that it’ll be here again before we know it! I have one last Christmas project for the year to share featuring our Chipboard Tag Album that has plenty of room for documenting those Christmas memories. You’ll be seeing more Christmas projects from me in the upcoming months because Christmas is my favorite holiday and I create holiday cards and projects all year long!
I covered the front and back sides of the four tags with Christmas papers, inked the edges and embellished each side with coordinating ephemera and stickers. There are pockets with pull-out cards and tags as well as folders that open outward and upward… lots of open space for photos and journaling! This was a super fun project!
Other products used: Cardstock/Paper: CutCardStock Royal Sundance Felt Natural cardstock, Carta Bella Christmas Collection Kit Ink: Ingvild Bolme Knotted Wood chalk ink edger Dies/Punches: CUTplorations Stitched Tags Nesting Dies, Stampin’ Up 1/4″ and 1/2″ circle punches, Kadomaru Pro corner rounder Accessories: Tonic Studios 12″ Guillotine Paper Trimmer, Bearly Art precision craft glue, Tim Holtz tiny attacher, Ranger distress collage medium, Tim Holtz Idea-ology Buckle, Hemptique bamboo crafting cord, Stampin’ Up dotted red skinny washi tape, Prairie Bird Boutique red wrinkled ribbon, Canvas Corp red binding ring, Darice iridescent gemstones
I hope you’ve enjoyed today’s project and you’re inspired to get those craft supplies out to play! Be sure to check out all the amazing acrylic, wood and chipboard goodies at Clear Scraps… OMGoodness, you won’t be disappointed! And head on over to the Clear Scraps Facebook Page for lots of inspiration! And while you’re at it, join the Clear Scraps Facebook Creative Group to connect with other Clear Scraps fans! Thanks so much for stopping by today – we’ll see you next time!
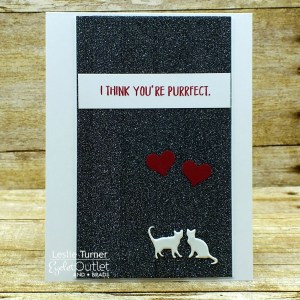
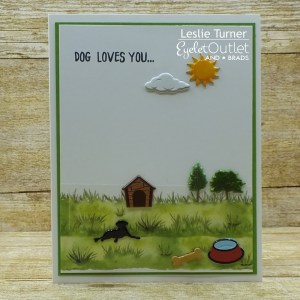
Hey everybody! A very Happy Saturday and Merry Christmas to you! This year sure has flown by! I’m thrilled to be back on the Eyelet Outlet blog today sharing my three favorite Valentine/Love projects created with our amazing products! This is another one of those different kind of posts where all three of these projects have already been showcased on my blog – and very similar to my post in late November when I shared my three favorite Holiday projects. Looks like this will be a fun tradition!
If you are a regular reader of my blog, you know that Ed and I are Crazy Cat People and we rescue kittens and cats (current count is 18 – we have 11 inside and 7 more ferals/semi-ferals outside). That said, two of my three favorite cards in this post are cat-themed! The third is dog-themed, lol – we truthfully love all kinds of animals – and I really couldn’t list these three in any kind of ‘favorite’ order! My first fav is this awesome kitty card which I created in one of my favorite color combos of black and white with a pop of red. I paired our Cat Brads with our Glitter Black Washi Tape to create this purrfect Valentine or anniversary card!
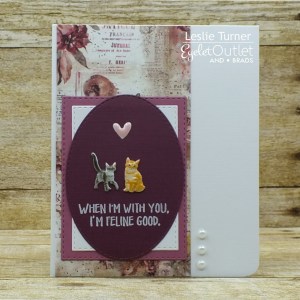
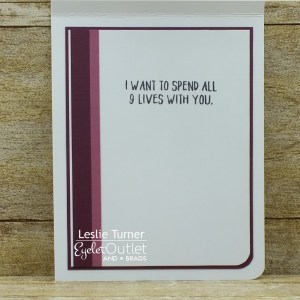
And my third fav is this super cute ‘feline good’ card which I created in a rose and burgundy color combo and features our Fox & Flowers Wide Washi Tape on the background. I also used our Feline Brads which I paired with a Pink Enamel Heart and White Pearl Bling. As you can tell, this inside sentiment is one of my favorites and gets used a lot! ;)
I hope you’ve enjoyed today’s post, even though it’s a little bit different from my normal posts! Be sure to check out all the fun goodies at Eyelet Outlet and be sure to ‘like’ and ‘follow’ Eyelet Outlet Facebook Page to keep up with news and sales! And while you’re at it, join the Eyelet Outlet Fans Facebook group for lots of creative inspiration! Thanks so much for stopping by today – we’ll see you next time! ;)
12/29/21 Rising Star at A Place To Start! 12/31/21 Top Pick at Cut It Up! 1/1/22 Top Pick at Crafting Happiness Challenges! 1/7/22 Top 3 at International Art & Soul!
Hi friends! It’s Christmas Eve and I hope you’ve had an awesome week and you’re ready for jolly St. Nick to arrive! I’m still shaking my head at how fast this year has flown by! Affiliate links are used in this post at no cost to you – I really appreciate your support! I won a challenge over at Creative Creases Challenge a couple weeks ago and the lovely Debbie invited me to guest design, so I’ve created a pretty fun fold Christmas wallet as my GD project for Creative Creases Challenge #22 that launched this morning. This is my own design and it’s super easy to create, and the sky is the limit as far as theme and decoration! I chose Christmas because I had Concord & 9th stamps and dies I’ve been wanting to use since I bought them a couple months ago… you know how that goes, lol! ;)
I cut layering panels from Stampin’ Up This Christmas Specialty DSP along with narrow embellishing strips from CutCardStock Pop-Tone Gumdrop Green cardstock and adhered them to the inside of the wallet. I cut a 6-1/8″ x 2-5/8″ card (which I left blank to hand-write a sentiment) that I tucked into one of the pockets.
And one more look… this is such a fun project that I really enjoyed making! If you use my template to create a wallet, I sure would love to see pics!
I hope you’ve enjoyed seeing my Christmas wallet and you’ll link up a fun fold with Debbie this fortnight over at Creative Creases Challenge! Thanks so much for stopping by today – we’ll see you next time! ;)
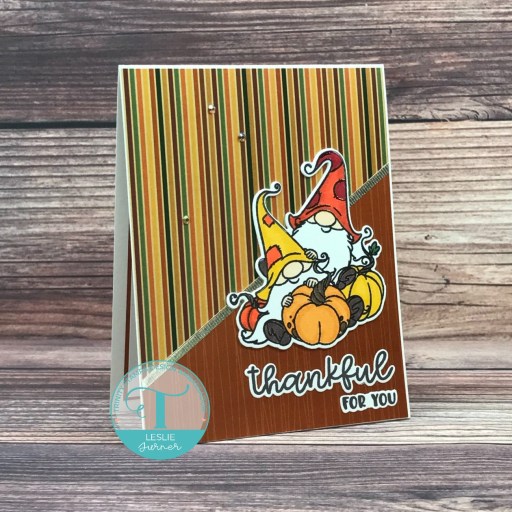
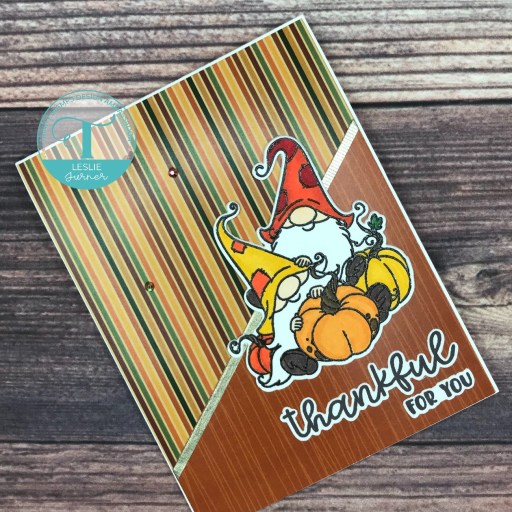
Hey everybody! Just shaking my head at the speed December is blowing by! We’ll very soon be welcoming a new year! Affiliate links are used in this post at no cost to you – I really appreciate your support! I have an adorable Trinity Stamps Ambassador inspiration project to share today that I created with the Thankful for You stamp set and coordinating Thankful for You die set! Our Ambassador term is coming to an end on December 31st so this last project is a symbolic thank you to Trinity Stamps for having me (and the rest of the Ambassadors) along for the last six months! I’ve thoroughly enjoyed myself!
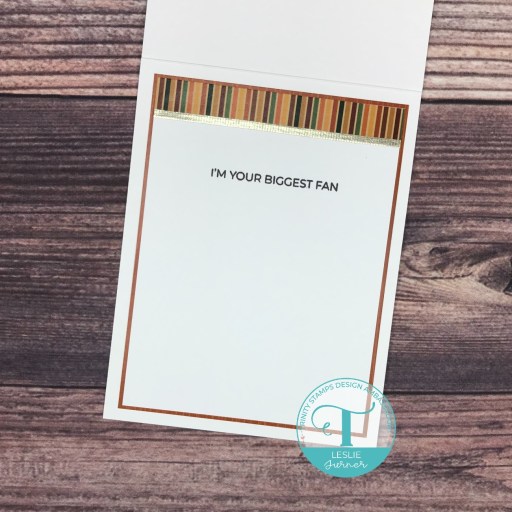
I cut a standard A2 size top-folding card base from CutCardStock Basis White 110# cardstock and layering panels of of the Stamp Anniething Autumn Life 6×6 double-sided papers which I cut at an angle and adhered to the card base with a strip of gold skinny washi tape at the seam. I stamped the focal image from the Thankful for You stamp set in brown ink on CutCardStock Basis White 80# cardstock, stamped again in Versamark and heat embossed with Hero Arts clear embossing powder. I colored the image with alcohol markers and cut it with the coordinating Thankful for You die set. I adhered the image to three additional plain die cuts for a little dimension, and then adhered it to the card front. I added several gemstones from the Topaz Twinkle Embellishment Mix to complete the front.
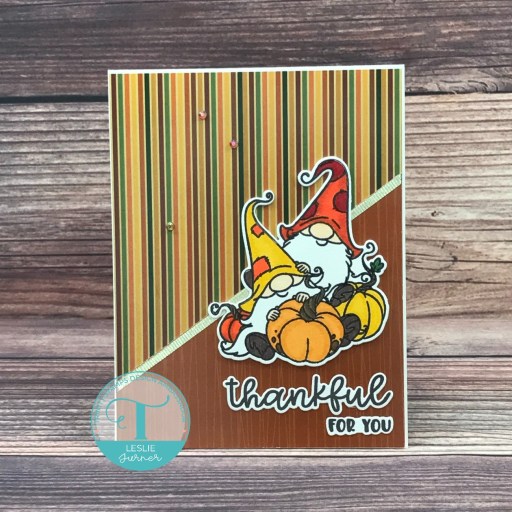
I cut the inside panel from CutCardStock Basis White 80# cardstock and embellished it with a strip of leftover patterned paper used on the front and a strip of the gold skinny washi tape. I stamped the sentiment from the Summertime Sentiments stamp set in brown ink and layered the panel on another piece of patterned paper.
And one more look… I’m so smitten with how this turned out, even though it is a Fall-themed card and it’s Winter here, lol! It was primarily the sentiment that I was after and it definitely works!
I hope you’ve enjoyed today’s project and you’re inspired to get those craft supplies out to play! Be sure to check out all the amazing stamps, dies and other goodies at Trinity Stamps! And head on over to the Trinity Stamps Facebook Page for loads of inspiration! And while you’re at it, join the Trinity Stamps Facebook community group to connect with other Trinity Stamps fans! Thanks so much for stopping by today – we’ll see you next time!
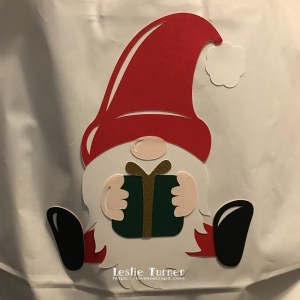
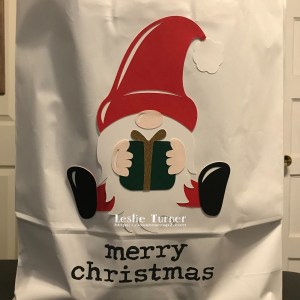
Hi friends! Well, tomorrow night is THE night… the night that jolly St. Nick will be here! Wishing you all a very Merry Christmas and a prosperous New Year! Affiliate links are used in this post at no cost to you – I really appreciate your support! I’ve popped in this morning to share a couple large gift bags decorated with Bearly Art Santa Gnome cut files. If you have an electronic die cutting machine and you’ve never seen their cut files, you need to check them out! They’ve got some really cute ones! Ed and I joined a large group of friends this past Sunday for a delicious Christmas meal (pasta bar, salad, garlic bread and dessert) and a delightful White Elephant game. We took our White Elephant gifts in large gift bags that I decorated with these adorable Santa Gnomes. They were a hit, as you can imagine!
I cut all the pieces from CutCardStock Basis Black, Basis Blue, Basis Green, Basis Soft Pink, Gold Glitter, Silver Glitter cardstock, Neenah Classic Crest Solar White cardstock, Colorbok Red cardstock. I assembled the Gnome Santas and adhered them to the large gift bags. Using the Tim Holtz Idea-ology type lower cling foam stamps, I stamped ‘merry christmas’ in Catherine Pooler Midnight ink on the white bag and in StazOn Cotton White ink on the black bag. I LOVE foam stamps and I only have two sets (both are Tim’s) and they stamp with such an awesome impression, the first time! Of course, it helps to have juicy ink pads! ;) I love how these turned out!
I hope you loved seeing these adorable Santa Gnomes as much as I enjoyed putting them together for these gift bags! Thanks so much for stopping by today – we’ll see you next time! ;)
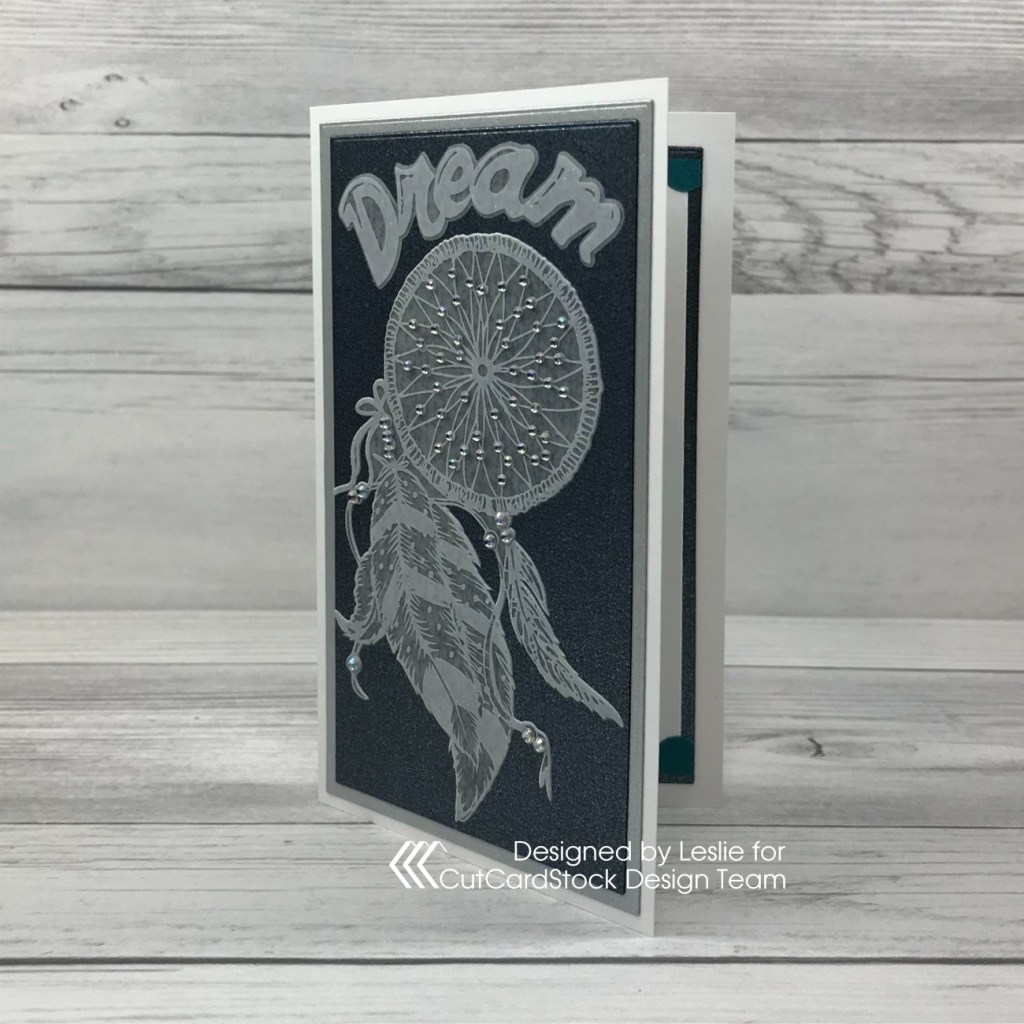
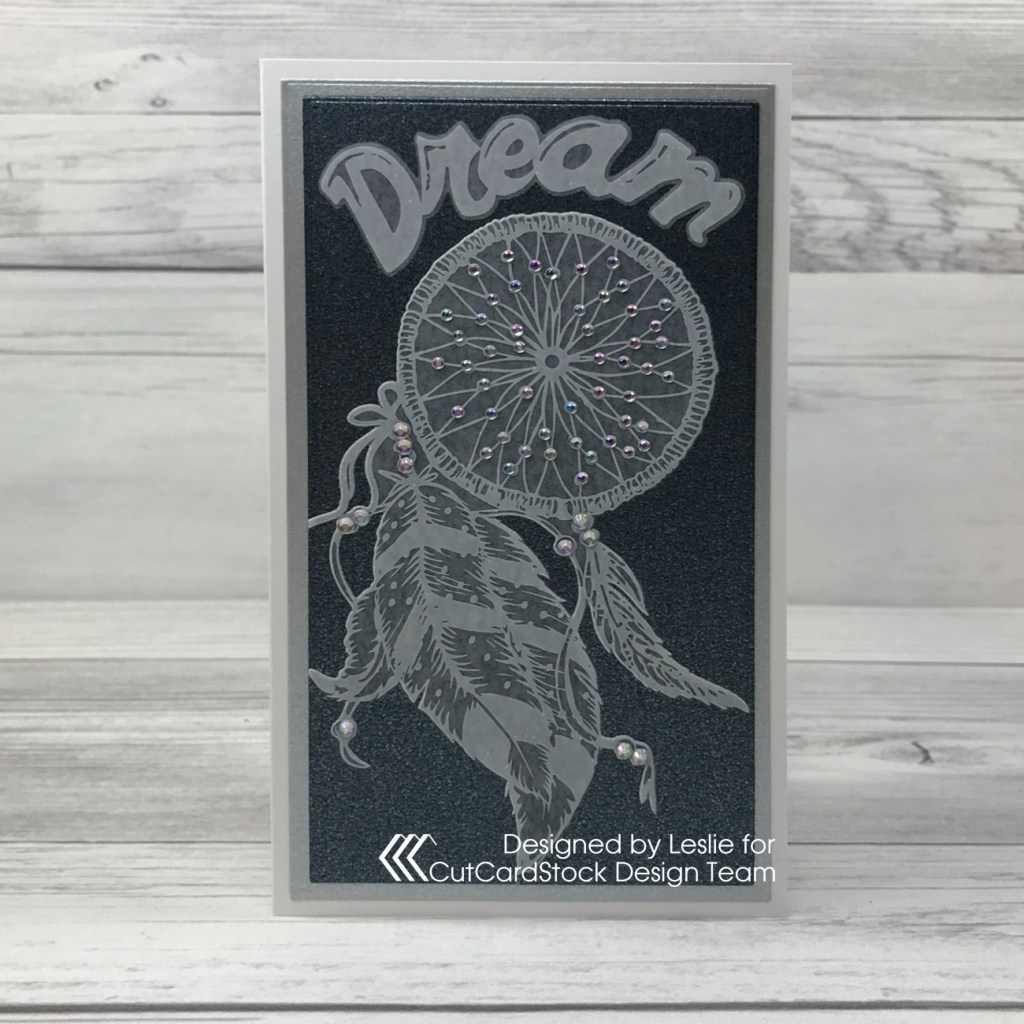
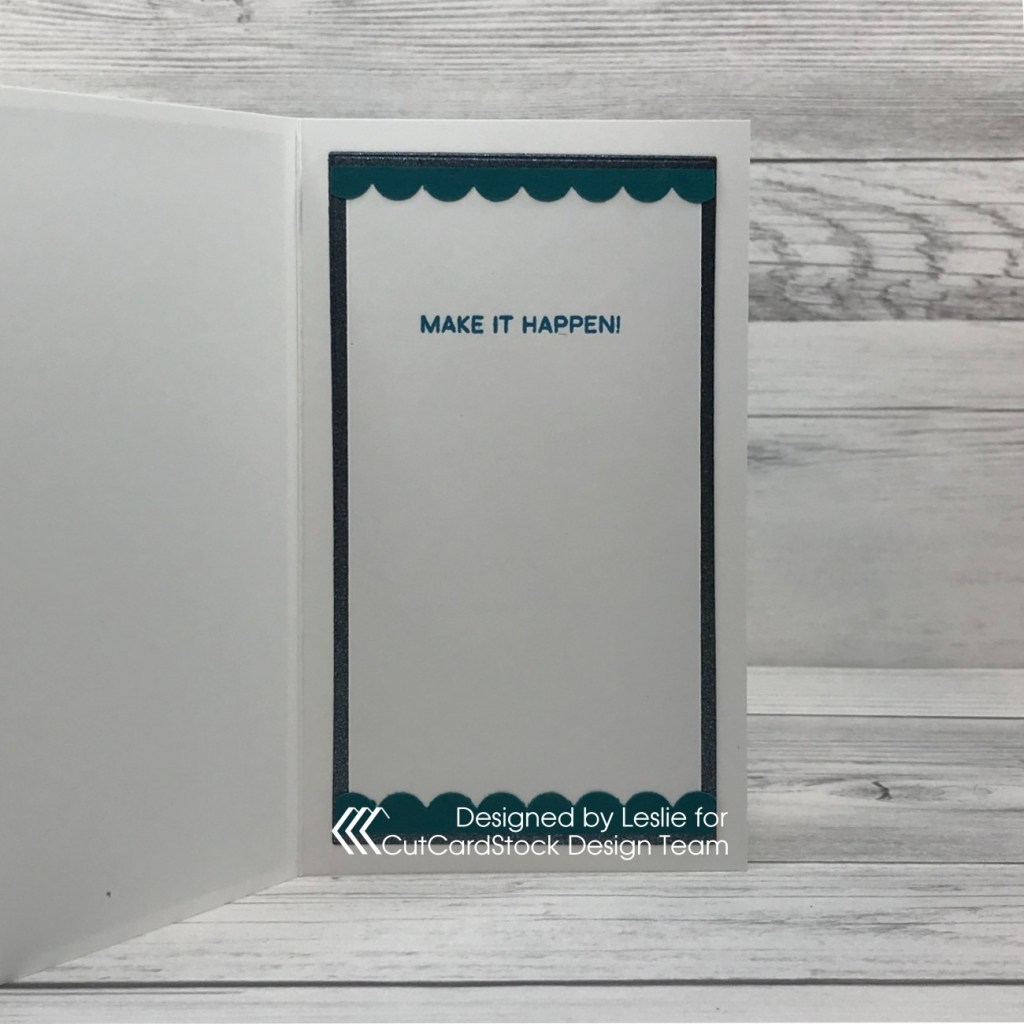
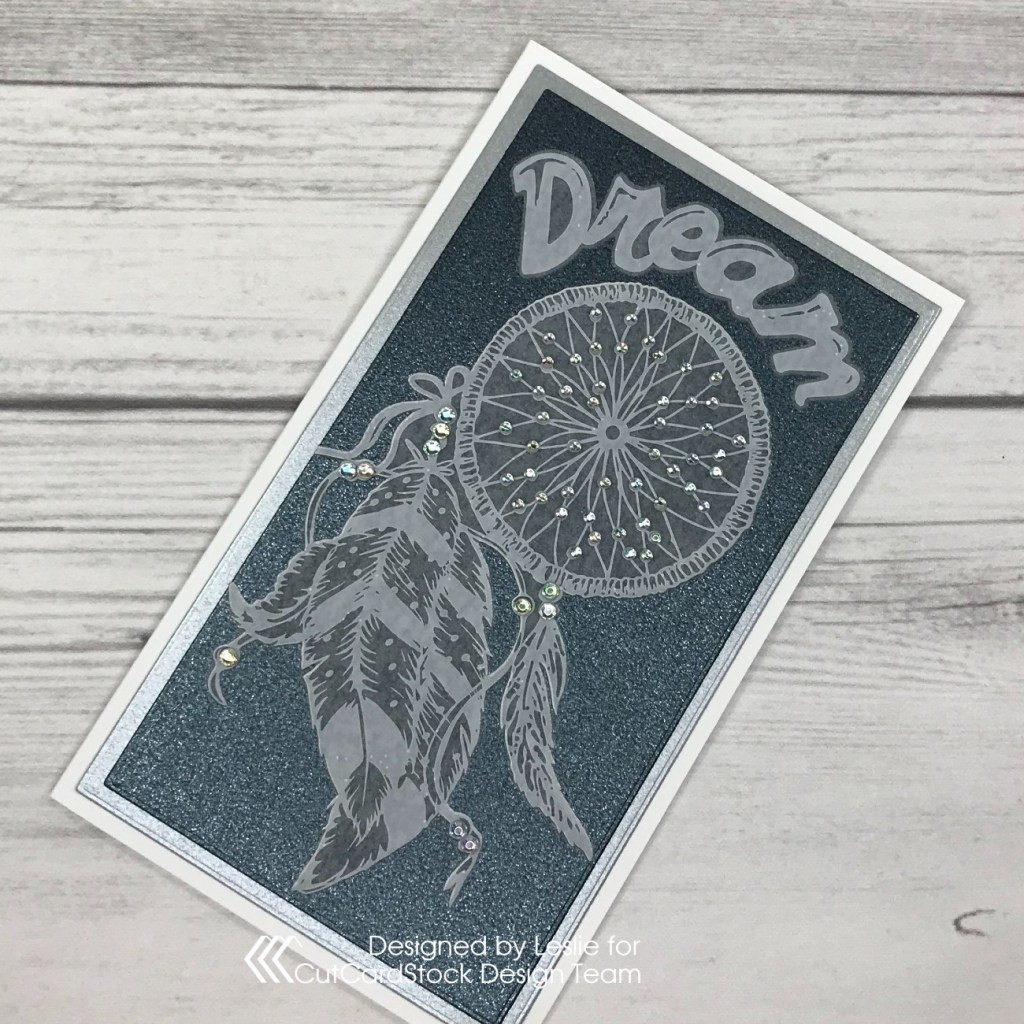
Hi everybody! A big ol’ Happy Huuuump Day to you! Hope you’re having a fabulous week! Affiliate links are used in this post at no cost to you – I really appreciate your support! I’m stoked to be back on the CutCardStock blog today with an awesome DT inspiration project featuring more of our Stardream Metallic cardstock that’s on sale this month so be sure to stock up! This is some amazing cardstock that will do your projects proud! I used Stardream Metallic Neptune cardstock and Stardream Metallic Silver cardstock which I paired with Basis Teal cardstock for some scallop detail on the inside of the card. The Neptune cardstock is a deep, deep teal color that’s almost black – and it’s shimmery and just gorgeous.
I cut a mini slimline card base (have I mentioned lately how much I love this size card?!) from Neenah Classic Crest Solar White 80# cardstock along with layering panels from Stardream Metallic Neptune cardstock and Stardream Metallic Silver cardstock using the Waffle Flower Mini Slimline Layers Dies, which I adhered together and then to the card base. I found this glassware sticker at a Dollar Tree store that I visited last month while one of our kitties was at the vet getting a lion shave (yep, our Loki looks super cool!) and I had several hours to kill. I’ve never seen this type of sticker before but I imagined this dream catcher would look great on a card, and it does! Needless to say, I bought several of these glassware stickers in different themes to make more cards later on. ;) To complete the card front, I added a bunch of iridescent gemstones to the dream catcher. Lots of sparkle going on!
And one more peek… totally loving how this card turned out! I’m in love with this Stardream Metallic Neptune cardstock! I’ve had it in my stash for a while and this is the first time I’ve used it.
I hope you’ve enjoyed today’s project and you’re inspired to get crafty! Be sure to check out all the awesome cardstock and other goodies at CutCardStock (adhesives, labels, stickers, pens, watercolors and ribbon to name a few). And head on over to the CutCardStock Facebook Page for more inspiration! Thanks so much for stopping by today – we’ll see you next time!
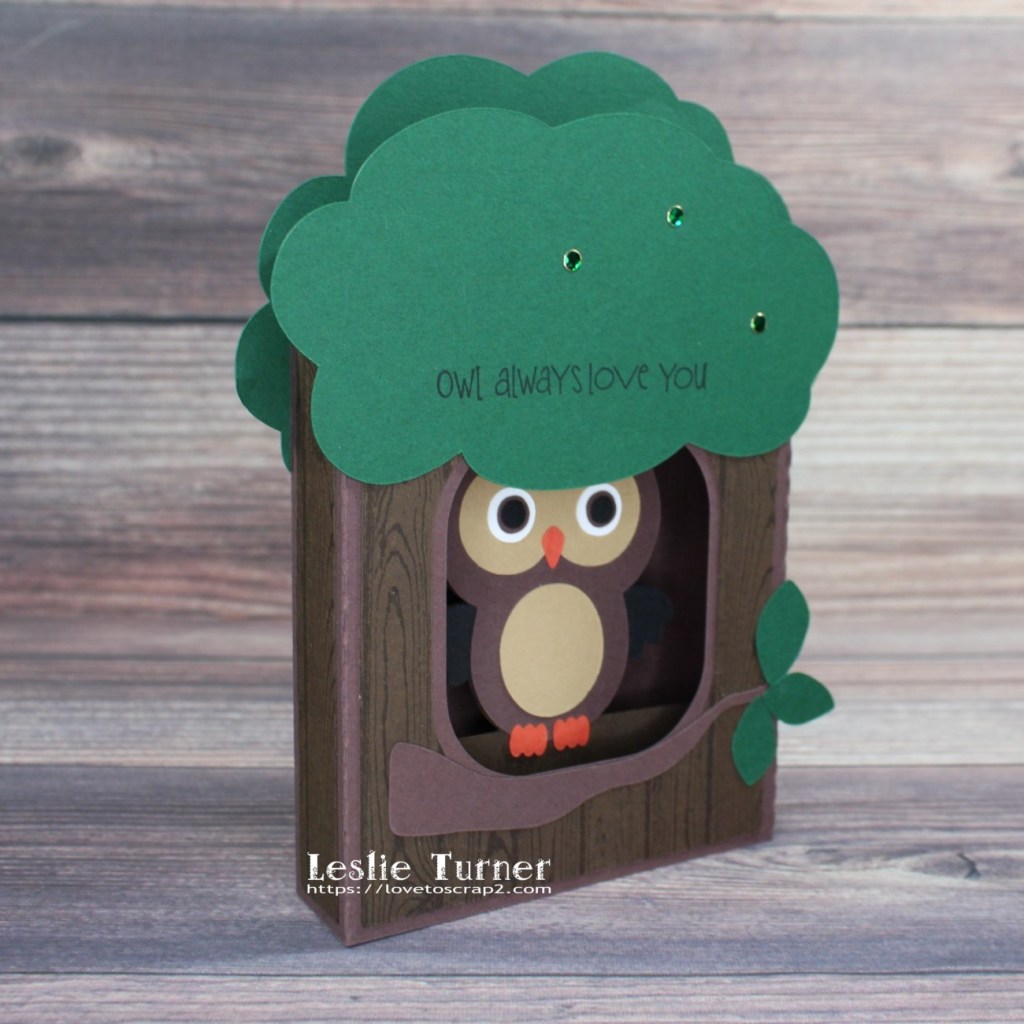
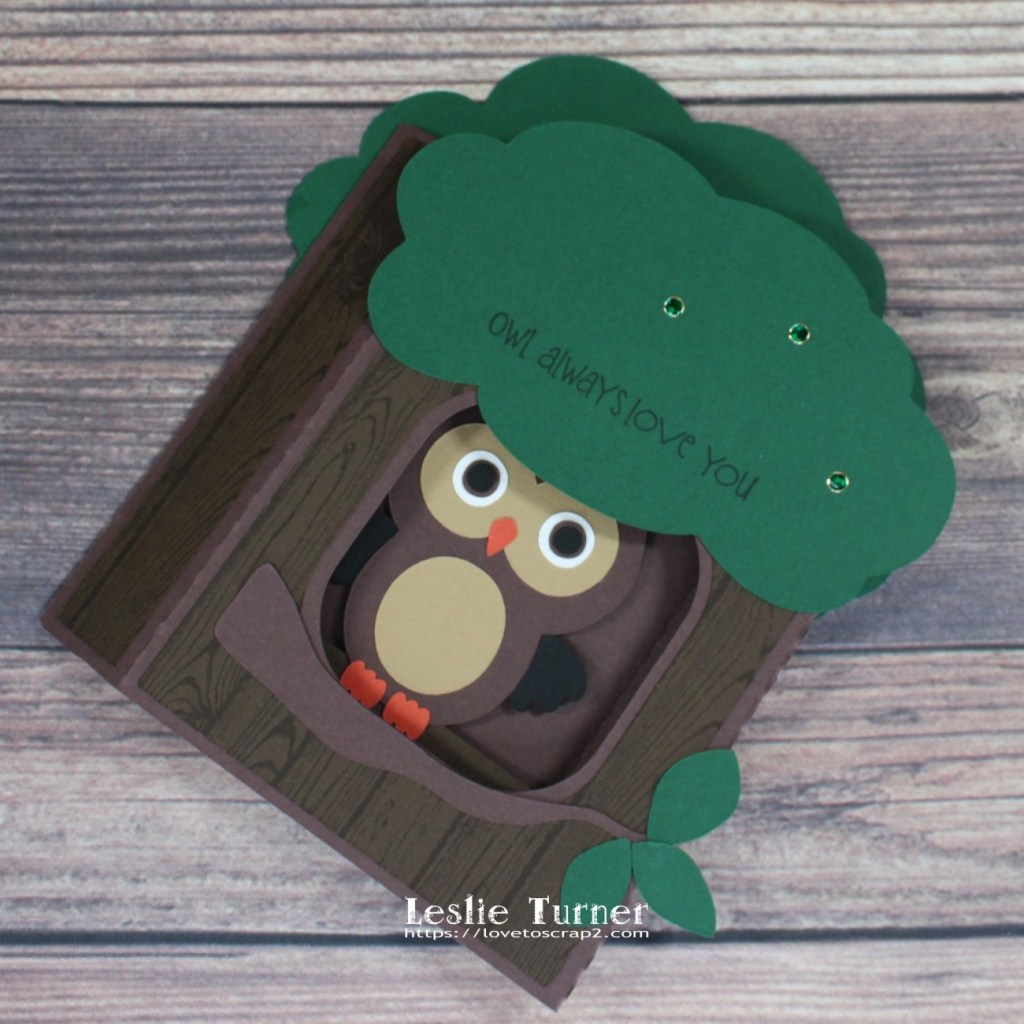
Hey everybody! Top of the morning to you! I hope you’re having a great week! Affiliate links are used in this post at no cost to you – I really appreciate your support! I shared a box card that we sent to our youngest grandson yesterday, so today I’m sharing an another box card that we sent to our youngest granddaughter at the same time. This adorable Owl Box Card is another one from My Scrap Chick and turned out so stinkin’ cute with the little owl peeking out of the hole in the tree! And of course, I lucked out having the perfect stamp set to use!
I assembled the card, stamped the sentiment in black ink using the Taylored Expressions Hoot Hoot Hooray stamp set, and added a few green Dot Sparklers using the Trinity Pick-Up Stick.
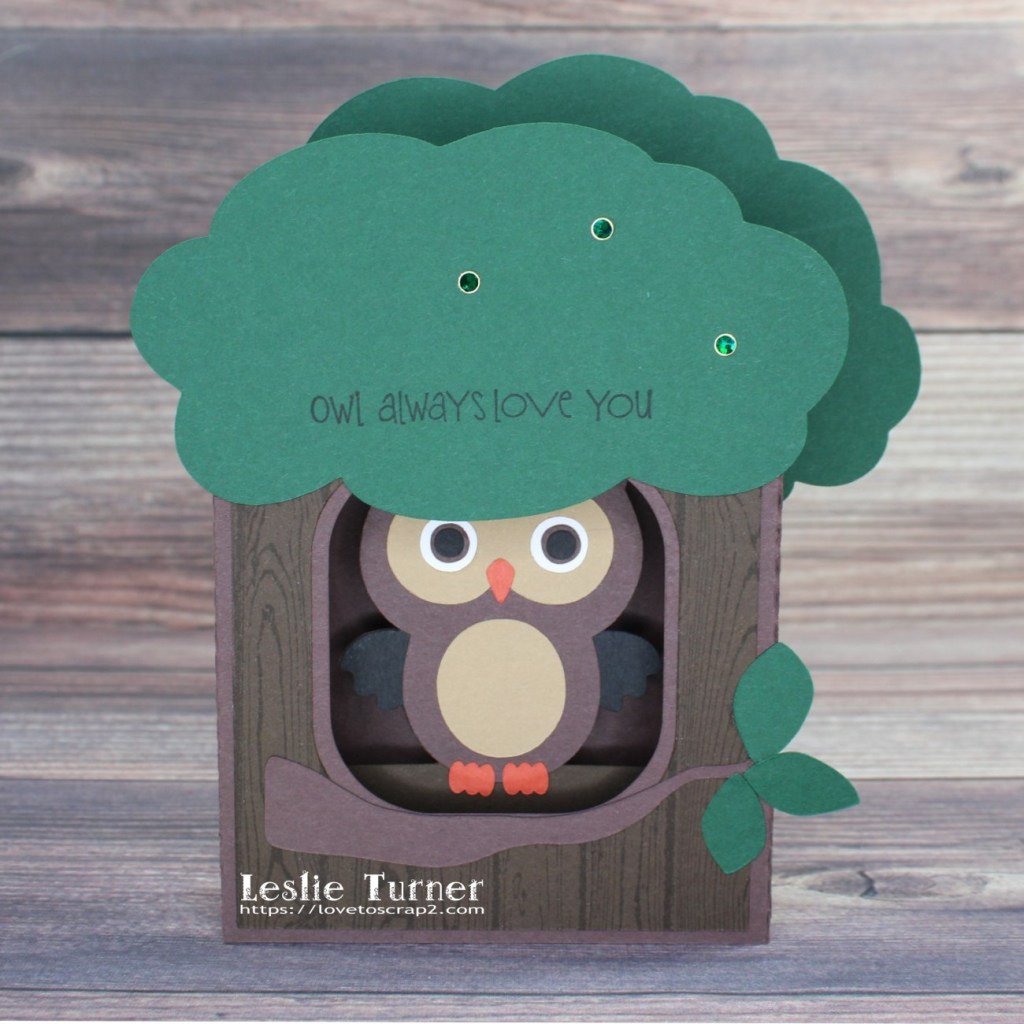
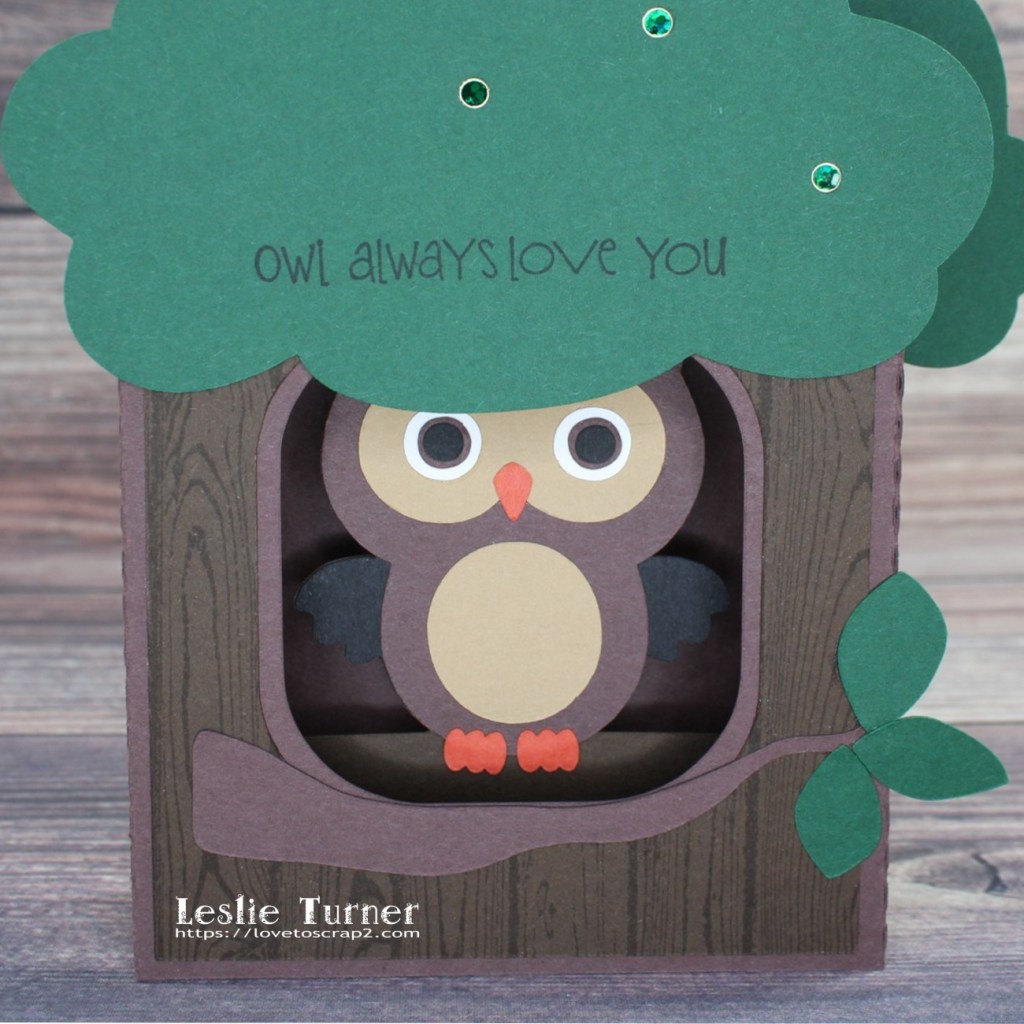
Here are a couple more angled shots.
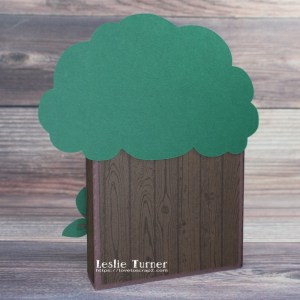
And one more peek… folded flat for mailing. Box cards are just all-around fun, and the fact that they fold flat for mailing is a bonus!
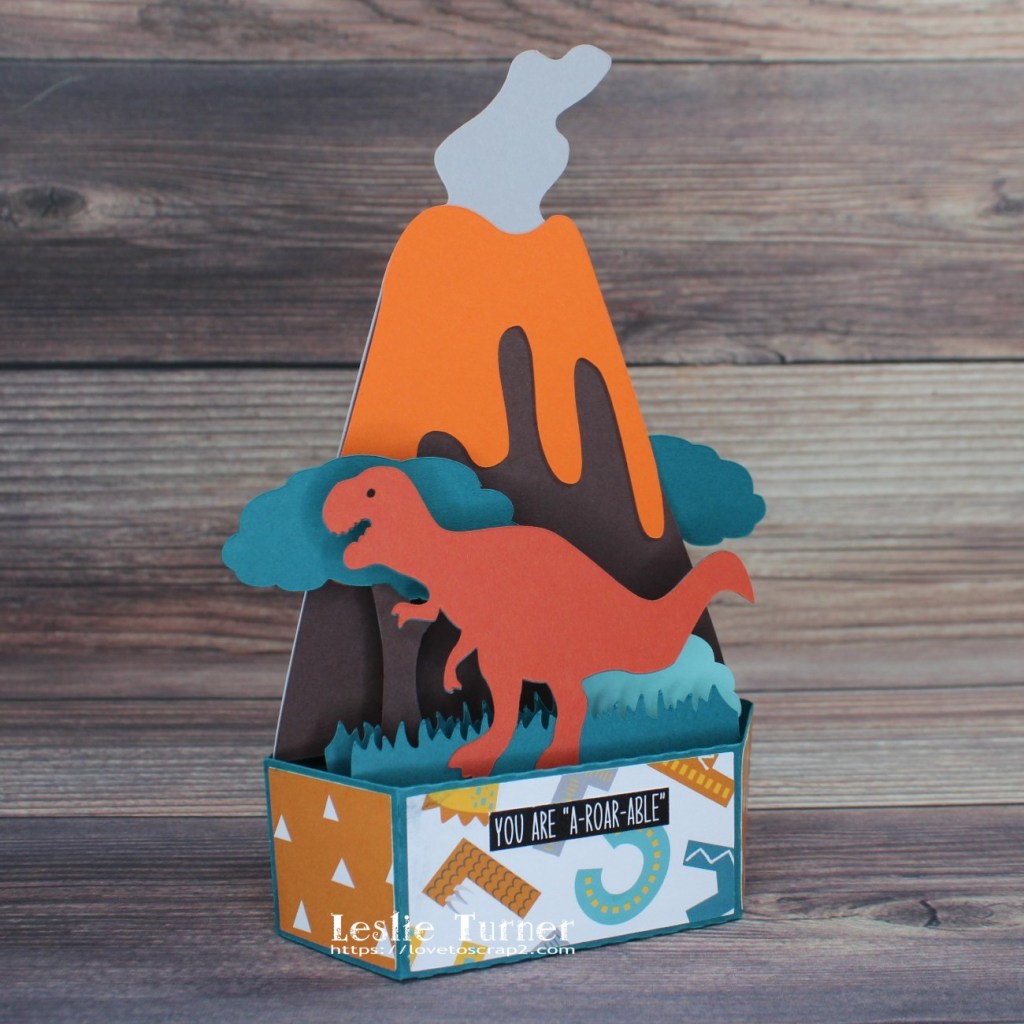
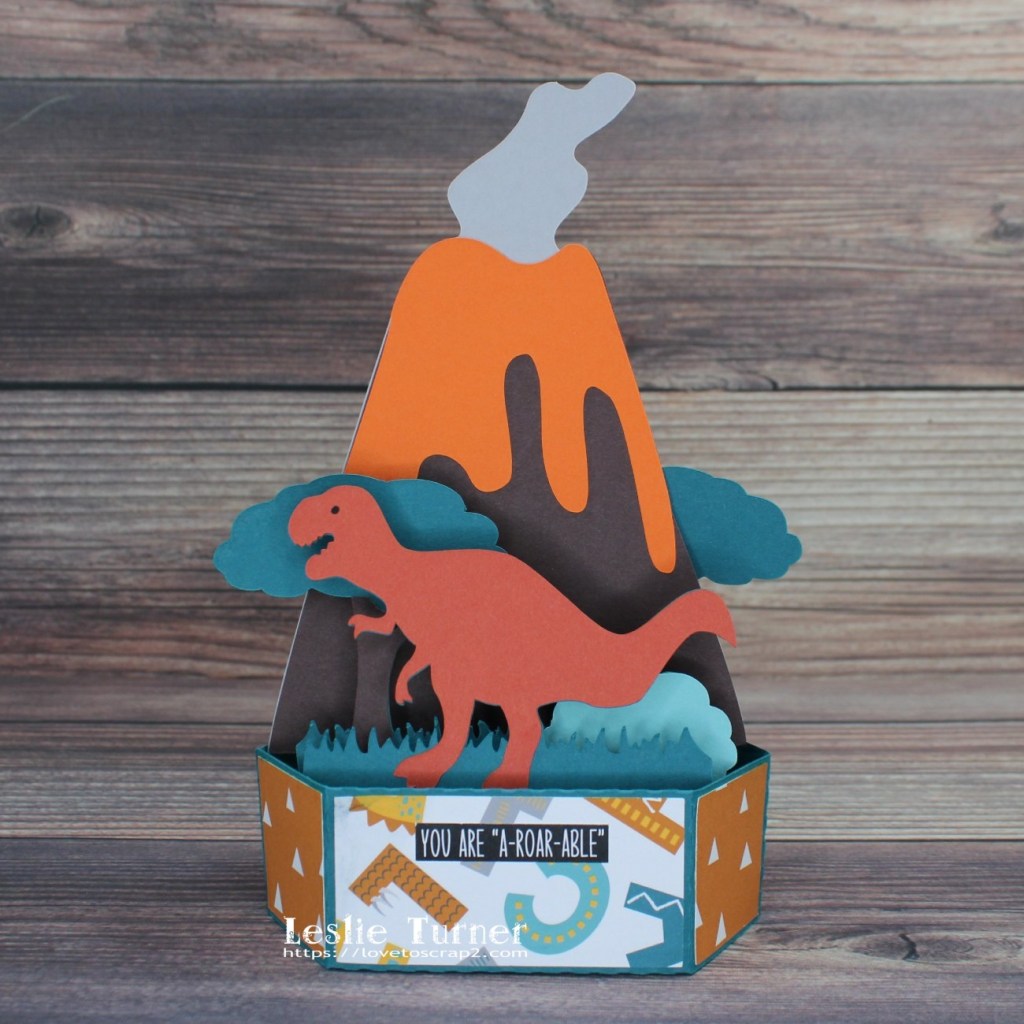
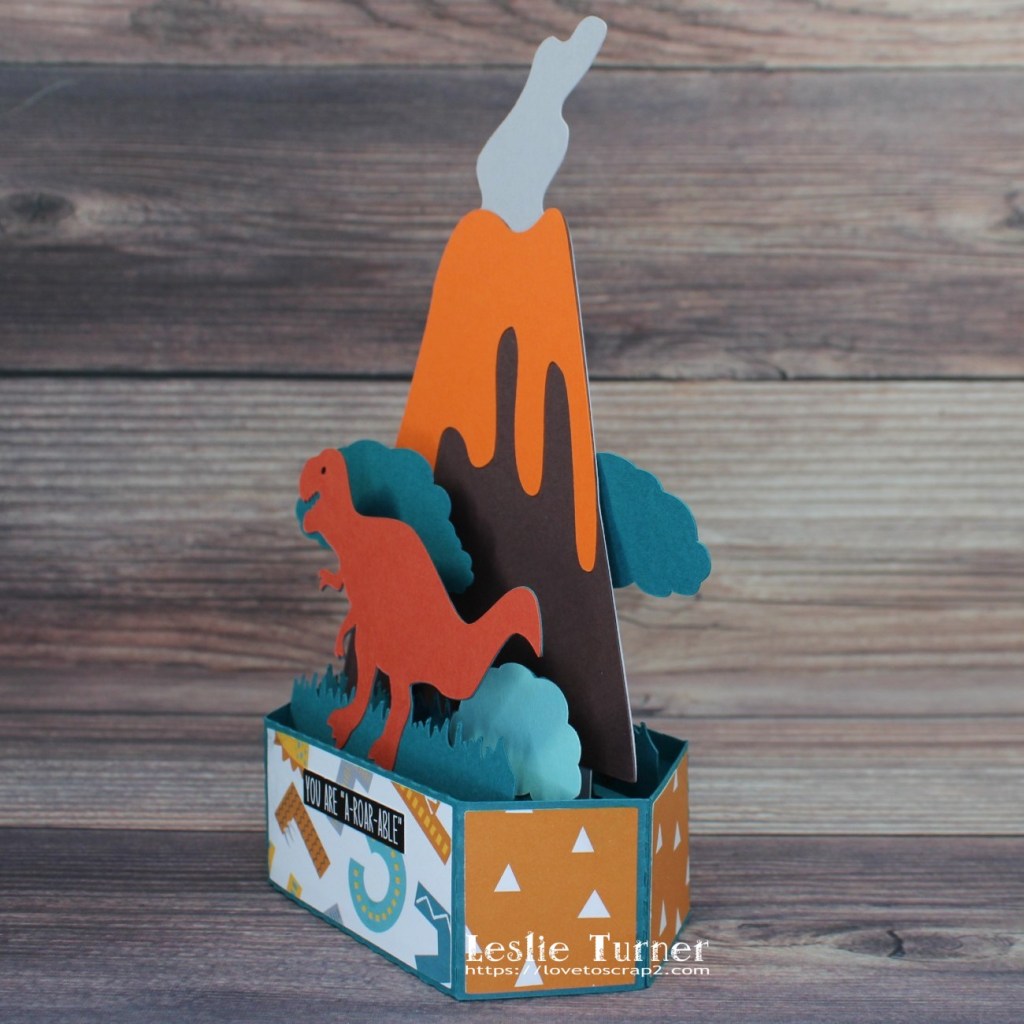
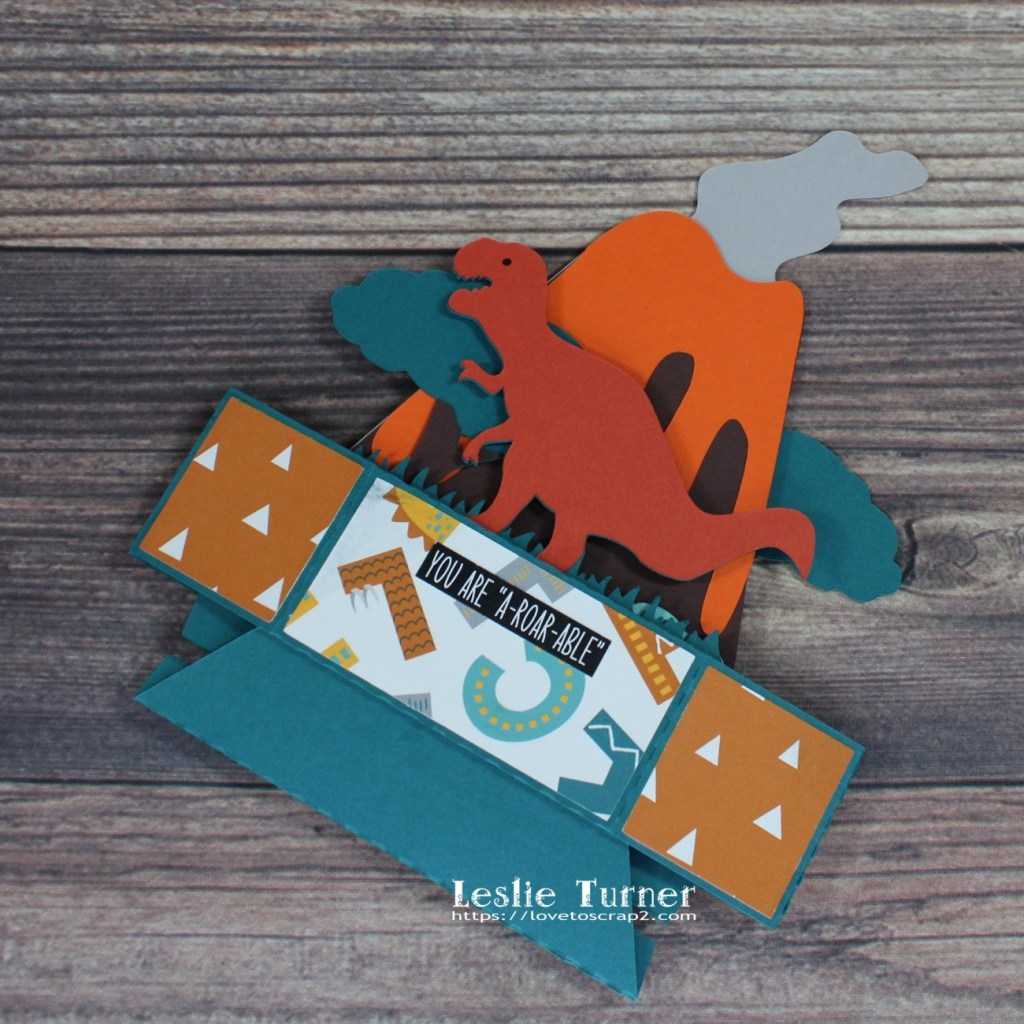
Hi everybody! Wishing you all a terrific Tuesday! Only four more sleeps… and yes, you know what I’m talking about, lol! Affiliate links are used in this post at no cost to you – I really appreciate your support! I’ve stopped in today to share a T-Rex pop-up card that I created for our youngest grandboy a couple months ago. But first of all, I’m sure you’ve noticed that my blog looks a little different this morning! I love change (which is in direct contradiction to my Libra personality) and have been eyeballing a different WordPress theme for a couple months now and decided that this morning was launch time! I love it because it’s so clean and crisp! Okay, back to this adorable card that I created with a cut file from My Scrap Chick. I know I’ve mentioned before how fun it is assembling 3-D projects and watching them come to life!
I cut all the pieces from CutCardStock Basis Teal, Basis Aqua, Basis Orange, Basis Brown, Dolphin, and Pop-Tone Tangy Orange cardstock. I had no dinosaur patterned paper so I found the Design Bundles Digital Dinosaur Friends Pattern Pack online which I cut the layering panels from. I assembled the card and added the sentiment from Brutus Monroe Conversation Clippings Prehistoric Party.
Here’s an angled shot.
And one more peek… folded flat for mailing. I absolutely love how this turned out!
12/21/21 Featured Project at Little Red Wagon! 12/27/21 Featured Creation at Scrapping4fun Challenges! 12/28/21 Top Rocker at 613 Avenue Create! 1/2/22 Winner at 613 Avenue Create! 1/4/22 Top Pick at Jan’s Digi Stamps Challenges! 1/13/22 Shoutout at River of Creativity! 1/14/22 Best Technique Winner at World Wide Open Design Team Monthly Challenge!
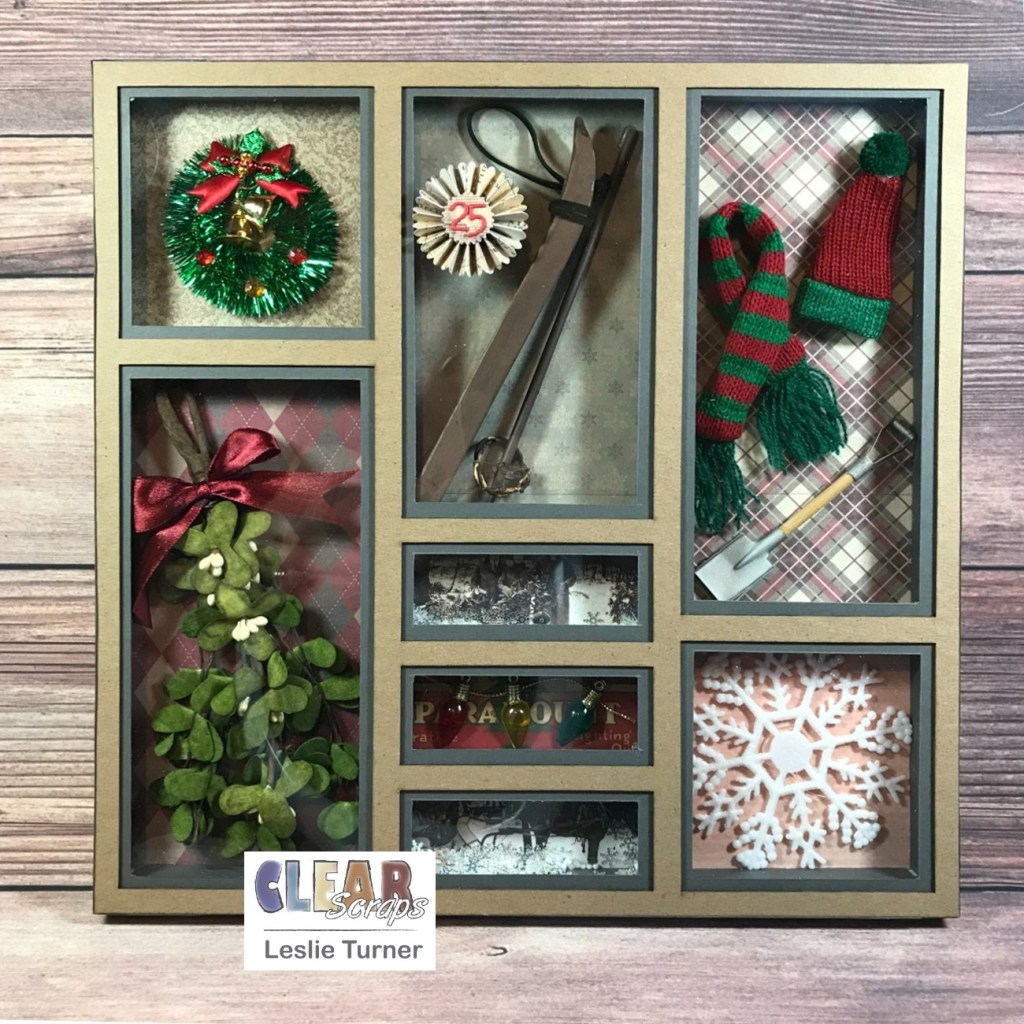
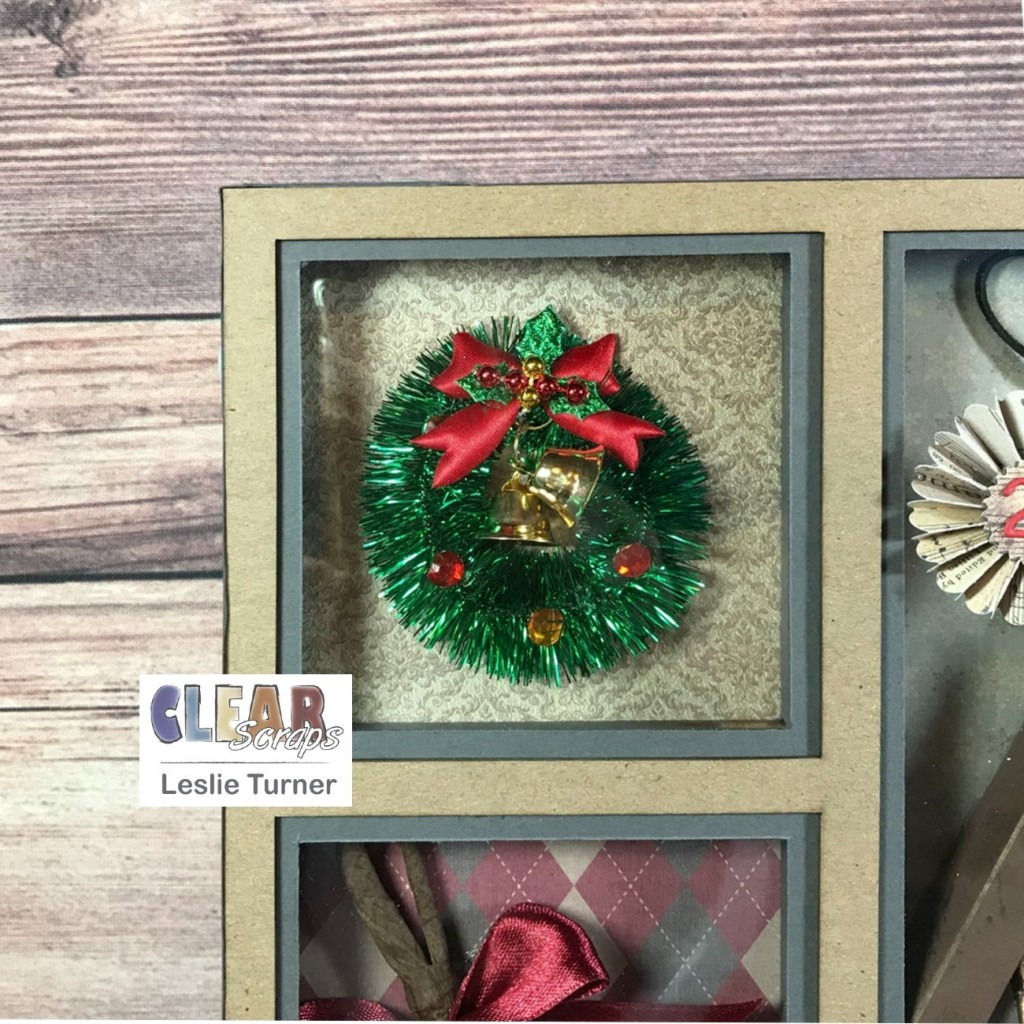
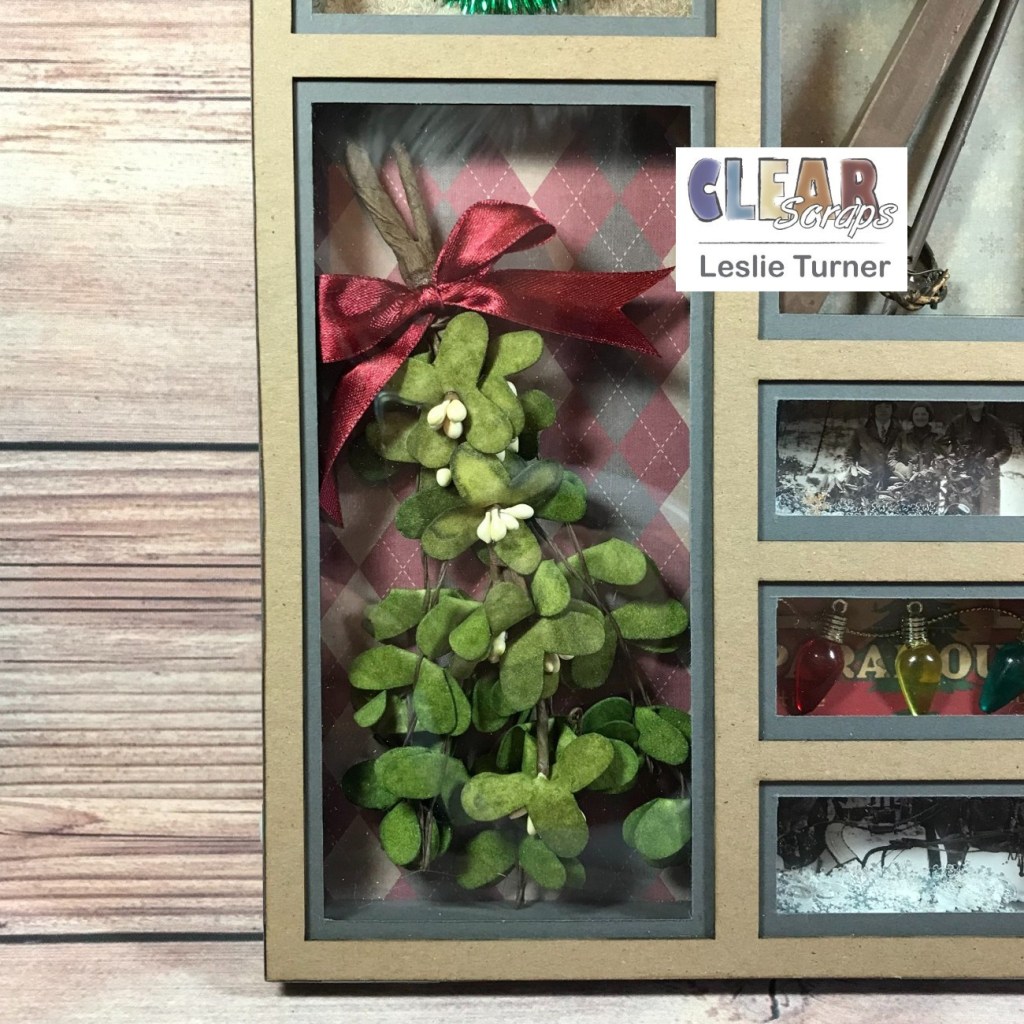
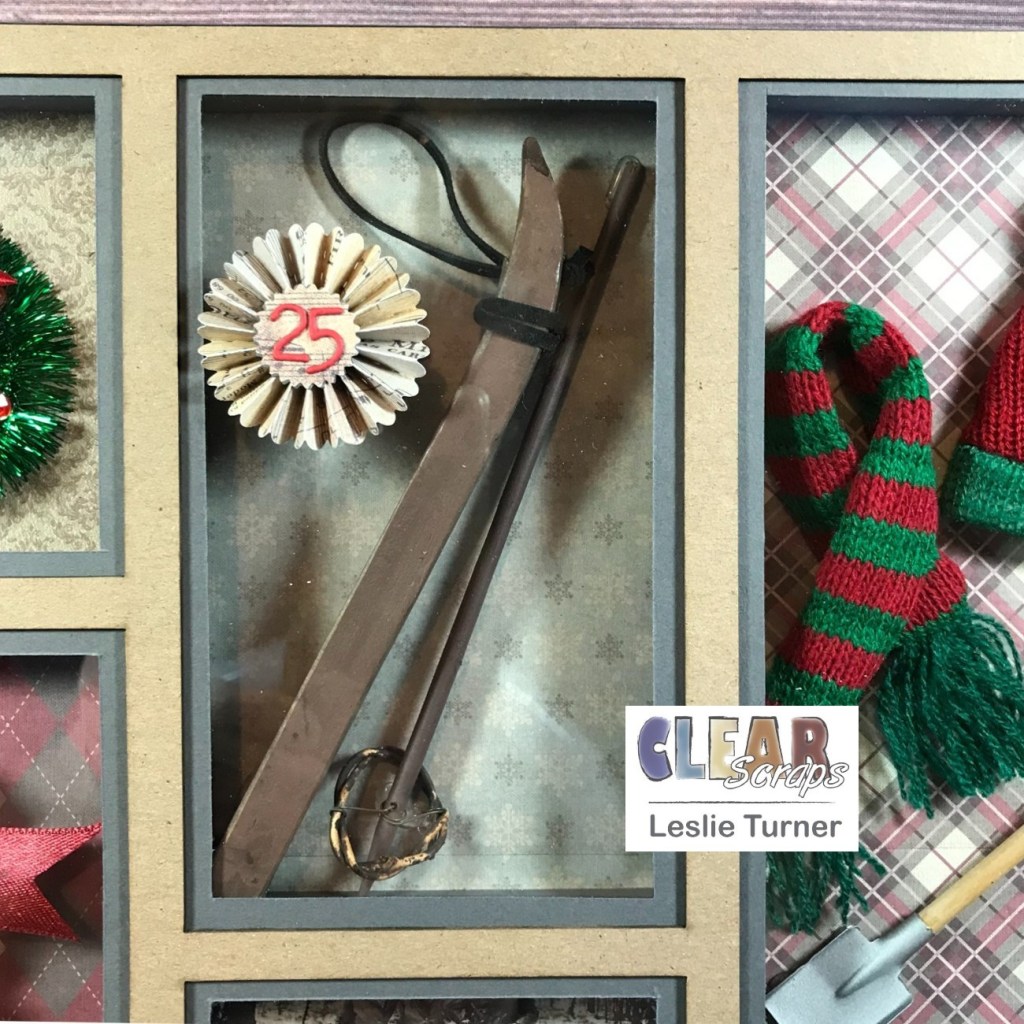
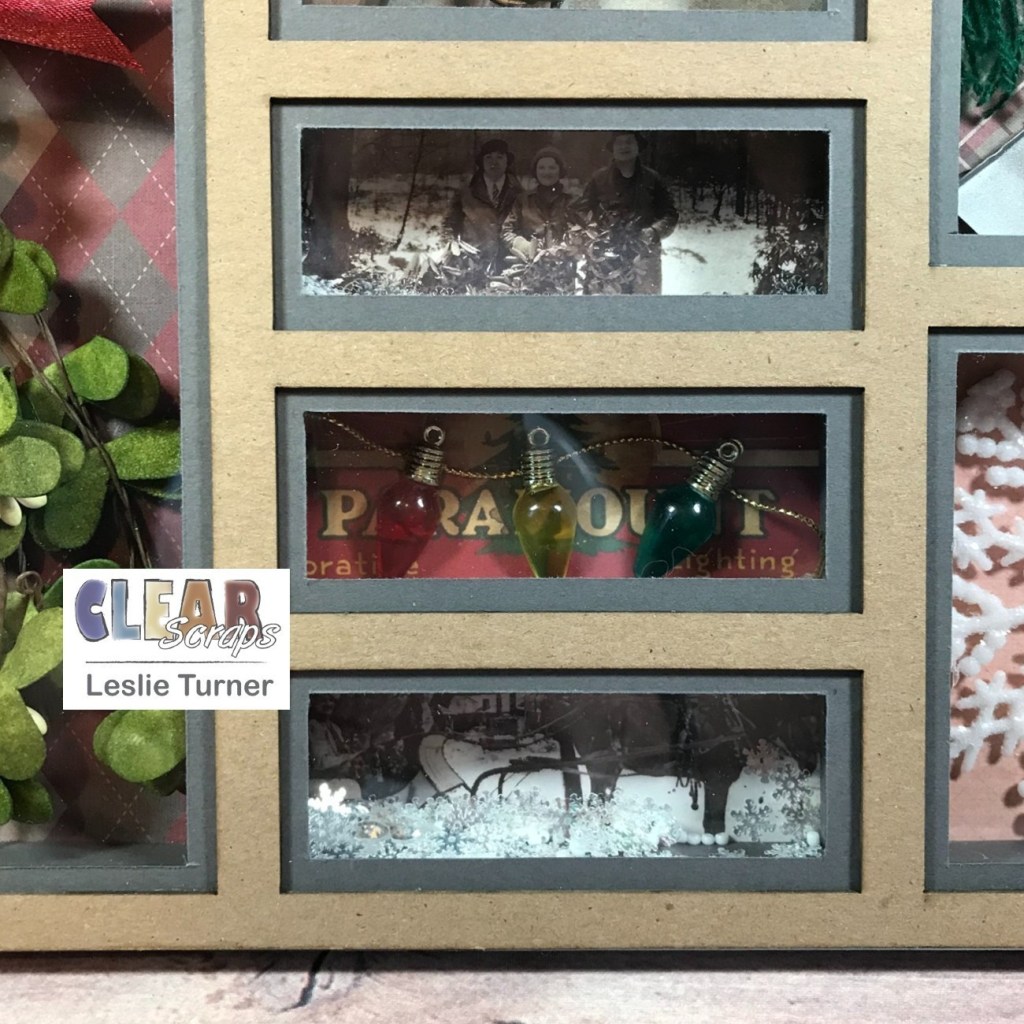
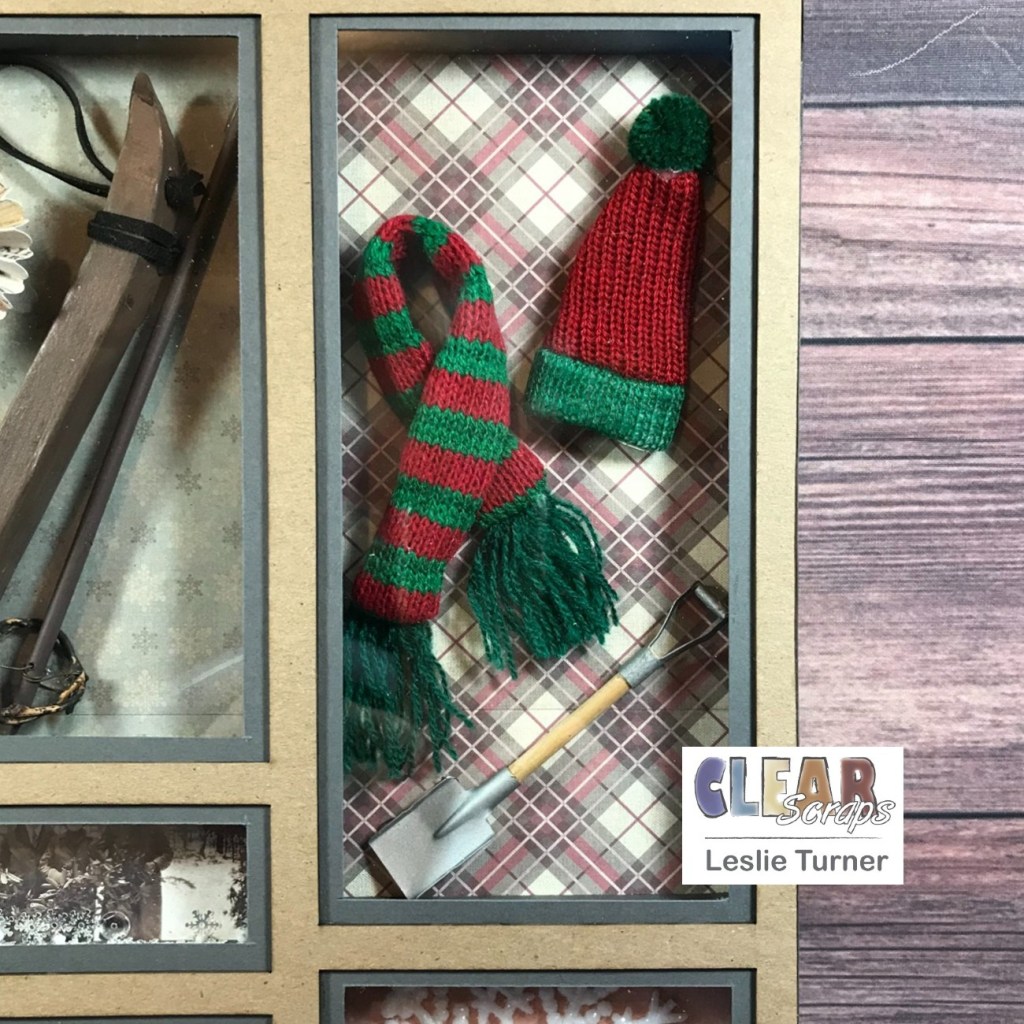
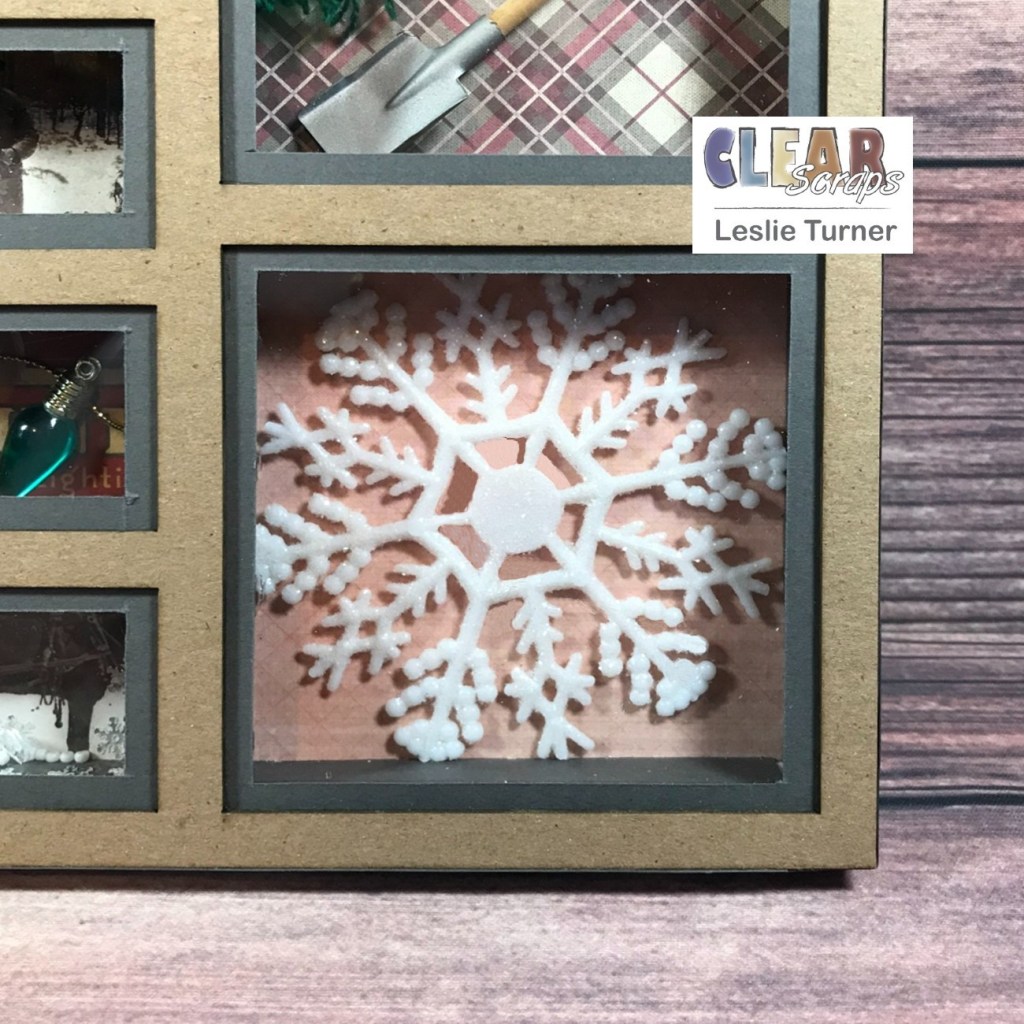
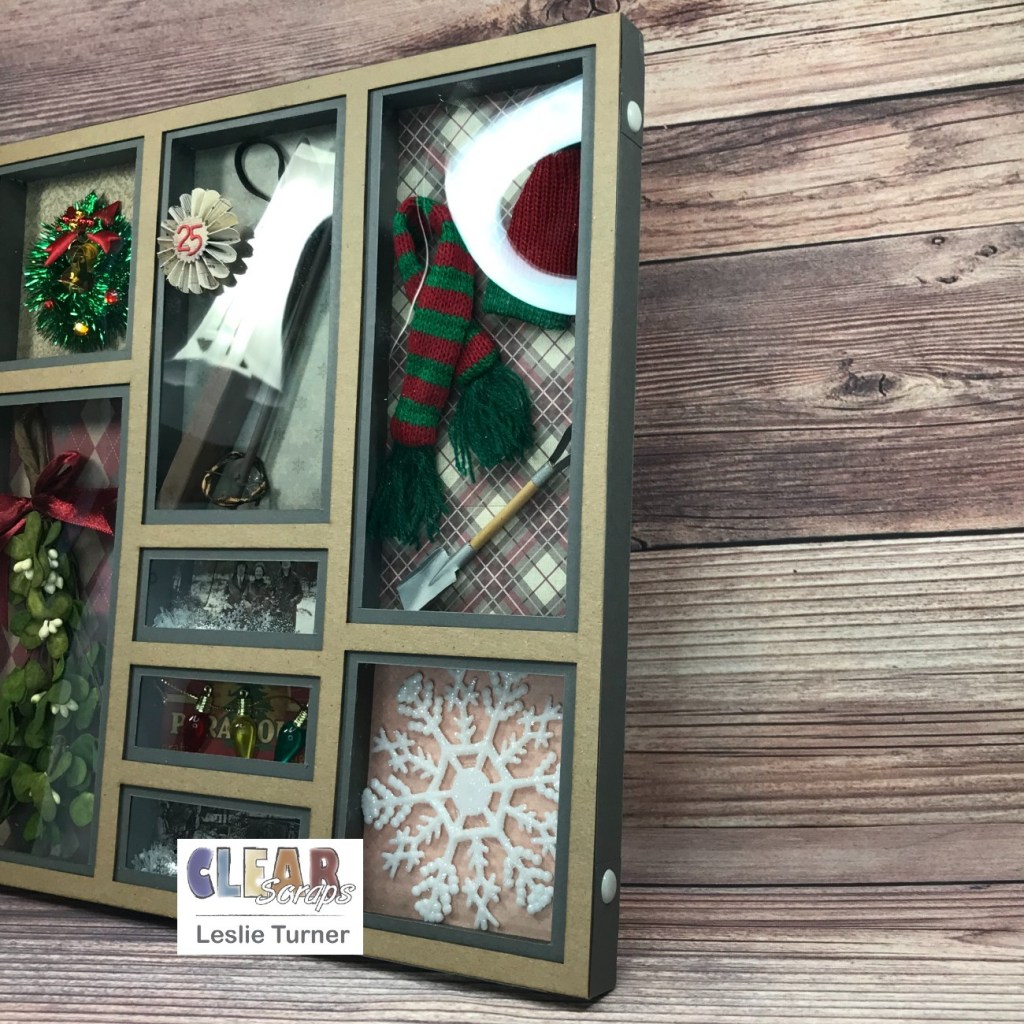
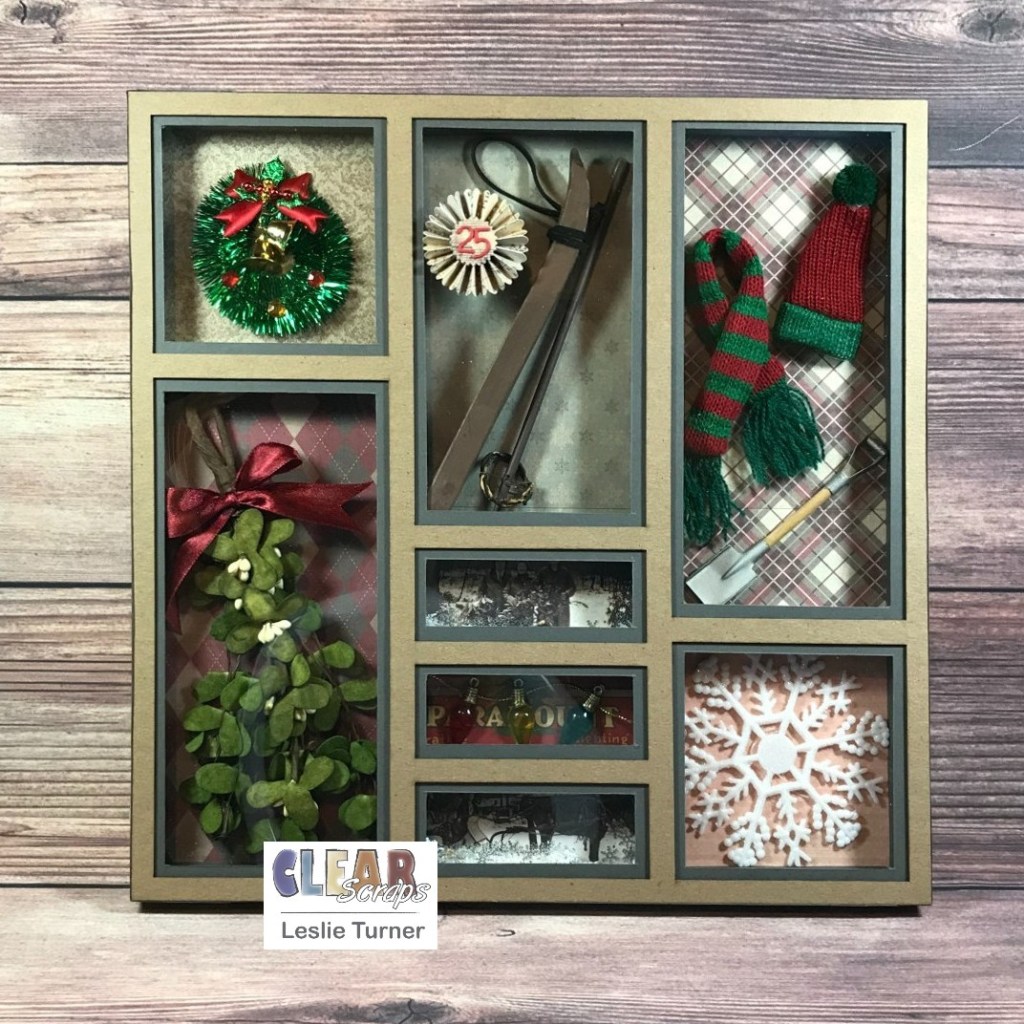
Hey, everybody! Welcome to another Monday closer to Christmas… it’s almost here! I hope you have all your Christmas crafting done or at least close to being done! I’m stoked to be back on the Clear Scraps blog today with another awesome DT inspiration project! I created a shadowbox from our Small Rectangle Printer Tray Frame, and I can’t tell you how much fun this was! I added several strips of double-sided adhesive foam tape between each of the chipboard layers so the compartments were deep enough to accommodate the vintage Christmas elements. I bought all of these fun vintage items (wreath, mistletoe, wood ski and pole, Christmas lights, scarf and hat, shovel, and snowflake) several years ago along with a different kind of shadowbox, and the shadowbox turned out to be too small, so everything just sat in my stash… until now!
Using one of the chipboard layers as a template, I adhered different colors and patterns of vintage Christmas paper, a couple vintage photos and a piece of ephemera to the chipboard back, to be seen through the apertures from each compartment. I then separated the compartments by adding several strips of foam tape down and across the interior sections and around the outside edges, added a chipboard layer, and then added several more foam tape strips to the interior sections and around the outside edges. I repeated the process with the second chipboard layer and more foam tape strips.
I adhered strips of gray cardstock around the inside perimeter of each compartment for a clean finished look, and then adhered the vintage Christmas elements into the compartments with a hot glue gun, adding sequins and seed beads to the two compartments containing the vintage photos. I adhered the acrylic divider to the front after removing the protective film from the underside, and then turned my attention to the third chipboard layer.
I cut a frame for each aperture on the third chipboard layer so that about 1/8″ of gray cardstock shows around the opening and adhered them to the back side of the chipboard layer, and then adhered it to the front after removing the protective film from the front side of the acrylic divider. I adhered strips of gray cardstock with gray enamel dots around the outside edge to conceal the foam tape strips, chipboard layers and acrylic divider. To finish the shadowbox, I adhered a rosette to the front that I die cut from patterned paper and embellished with die cut numbers. Here are close-ups of each compartment:
And one more peek… I’m absolutely in love with this project! SO happy with how it turned out! These printer tray frames are so versatile and the sky is the limit with what you can create with them! <3
Other products used: Cardstock/Paper: CutCardStock Basis Gray cardstock, CutCardStock Basis Red cardstock, Crafter’s Companion Vintage Christmas Collection paper pad Dies/Punches: Sizzix Alphanumeric Tiny Type Lower Thinlits, Sizzix/Tim Holtz Alterations Mini Paper Rosette strip die Accessories: Tonic Studios 12″ Guillotine Paper Trimmer, Fiskars 12″ SureCut Paper Trimmer, Scotch 3M foam tape, Bearly Art precision craft glue, vintage Christmas items from stash (wreath, mistletoe, wood ski and pole, Christmas lights, scarf and hat, shovel, and snowflake), Tim Holtz Festive Ephemera Pack, GKD gold cord, Eyelet Outlet Snowflake Sequins, Eyelet Outlet Gray Enamel Dots, Neat & Tangled Sequins, Pretty Pink Posh Marshmallow Seed Beads, hot glue gun
I hope you’ve enjoyed today’s project and you’re inspired to get those craft supplies out to play! Be sure to check out all the amazing acrylic, wood and chipboard goodies at Clear Scraps… OMGoodness, you won’t be disappointed! And head on over to the Clear Scraps Facebook Page for lots of inspiration! And while you’re at it, join the Clear Scraps Facebook Creative Group to connect with other Clear Scraps fans! Thanks so much for stopping by today – we’ll see you next time!