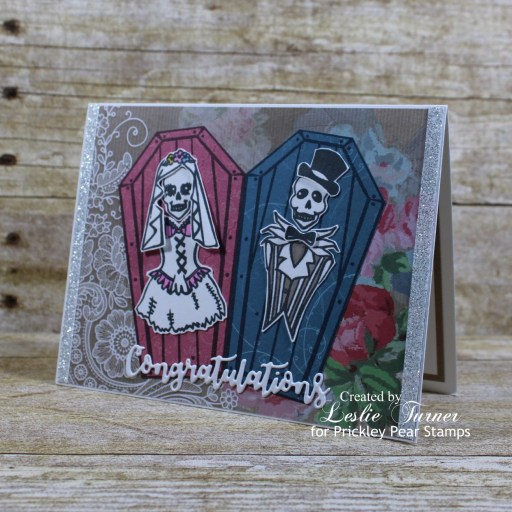
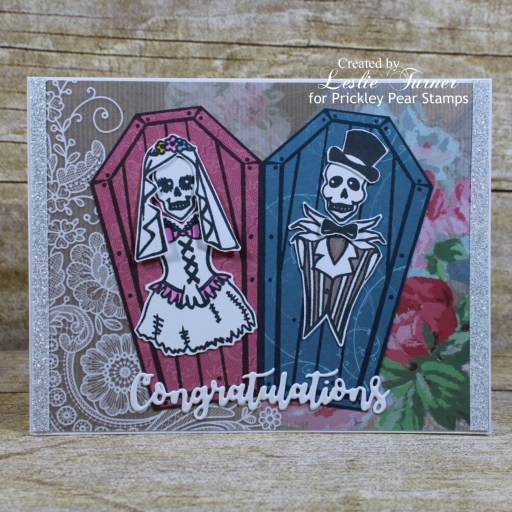
Hi friends! Happy Tuesday – I hope you’re having a wonderful week! I’ve had to go in and tweak this post, as I found it in my drafts… that’s what happens when a person has way too much going on, lol! But I AM getting caught up and it’s a good feeling! Affiliate links are used in this post at no cost to you. I really appreciate your support! I’ve popped in to share another sample I created for Prickley Pear Stamps! Just in time for Halloween, this fun wedding congrats card features the Dancing Skeleton and Scalloped Oval stamp sets!
I cut a standard A2 size top-folding landscape card base from Neenah Classic Crest Solar White 110# cardstock along with a layering panel from the oh-so-pretty Crafter’s Companion Floral Delight 6×6 paper pad which I adhered to the card base. I added a strip of Holiday Colors White Glitter Tape down each side. I stamped the coffin from the Dancing Skeleton stamp set on pink and blue prints from the same Floral Delight paper pad and fussy cut them. I stamped the skellys and their clothing (also from the Dancing Skeleton stamp set) on Neenah Classic Crest Solar White 80# cardstock, fussy cut the pieces, and added just a pop of color with alcohol markers on each. I placed them in their respective coffins and adhered them to the front card panel along with a die cut sentiment.
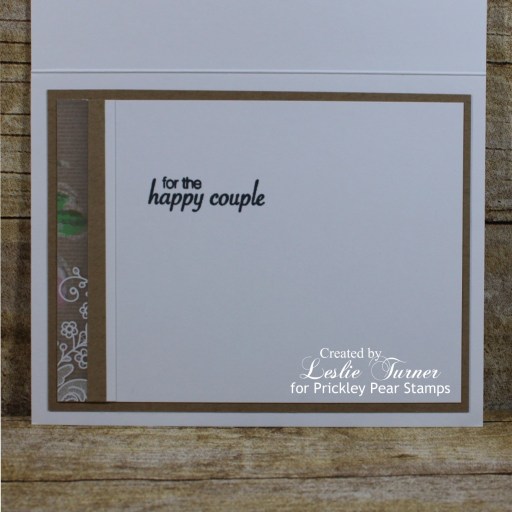
I cut the inside panel from Neenah Classic Crest 80# Solar White cardstock and embellished it with a strip of the Floral Delight paper, kraft and white cardstock, stamped the sentiment from the Scalloped Oval stamp set in black ink and layered the panel on kraft cardstock.
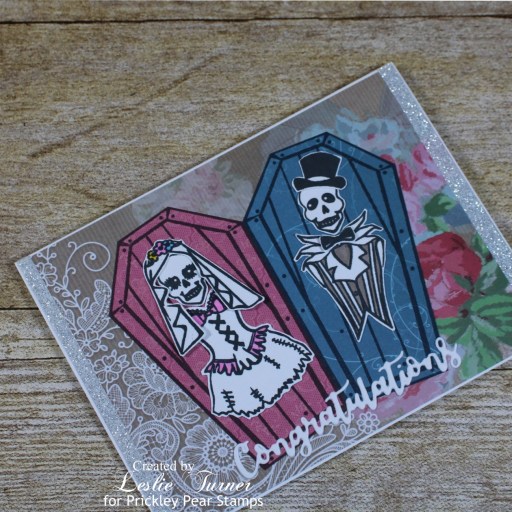
And one more peek… super happy with how this turned out! Love these skellys in their bride and groom garb! ;)
Prickley Pear Stamps products used: Dancing Skeleton stamp set Scalloped Oval stamp set
I hope you’ve enjoyed this project! Be sure to check out all the awesome stamps and dies at Prickley Pear Stamps! If you’d like to save 10% on anything on the site when you shop at Prickley Pear Stamps, use the coupon code LESLIE10 at checkout! And be sure to ‘like’ and ‘follow’ the Prickley Pear Stamps Facebook page to keep up with news and sales, and join Prickley Pear Pals (the fan group) for lots of fun crafty ideas and to share your creativity! And finally, we’d love to see you visit the Prickley Pear Stamps blog that’s in the process of being revived and become a Follower! Hope to see you there! Thanks so much for stopping by today – we’ll see you next time! ;)
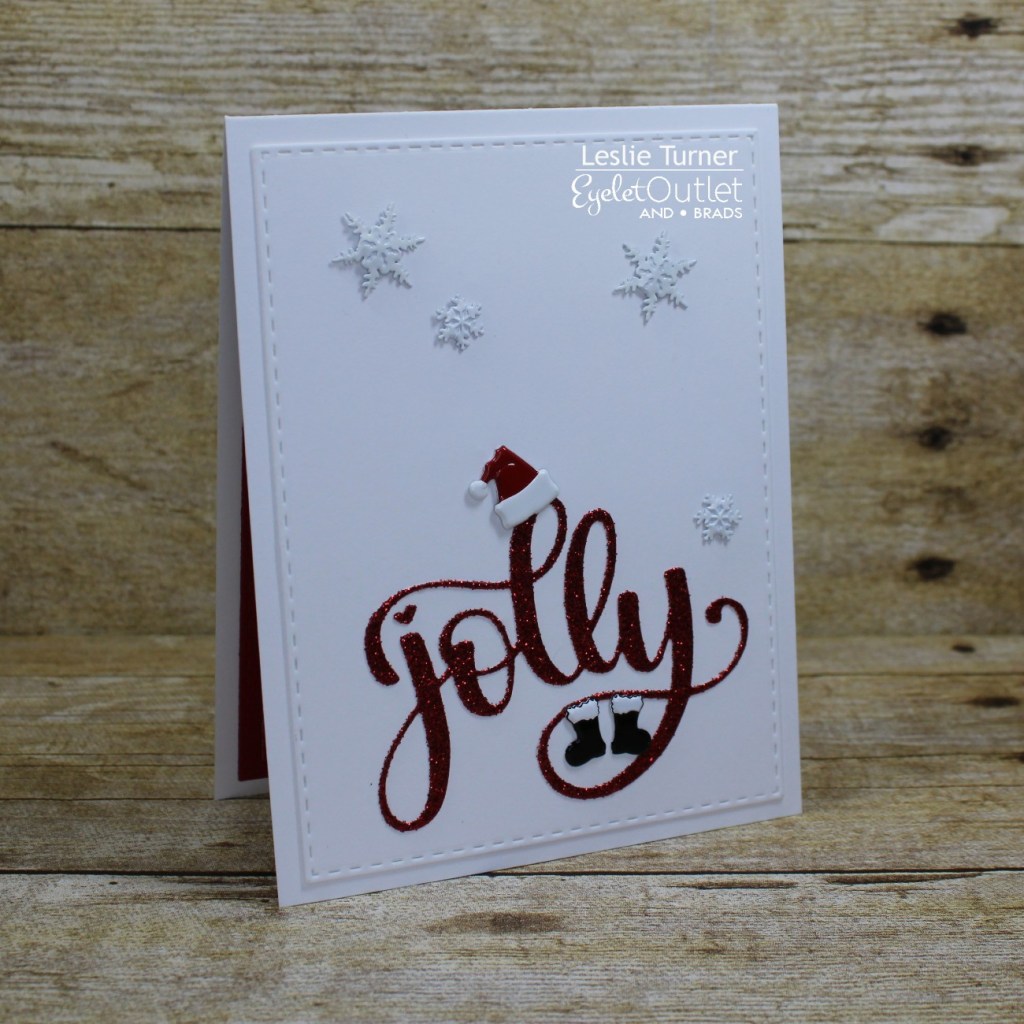
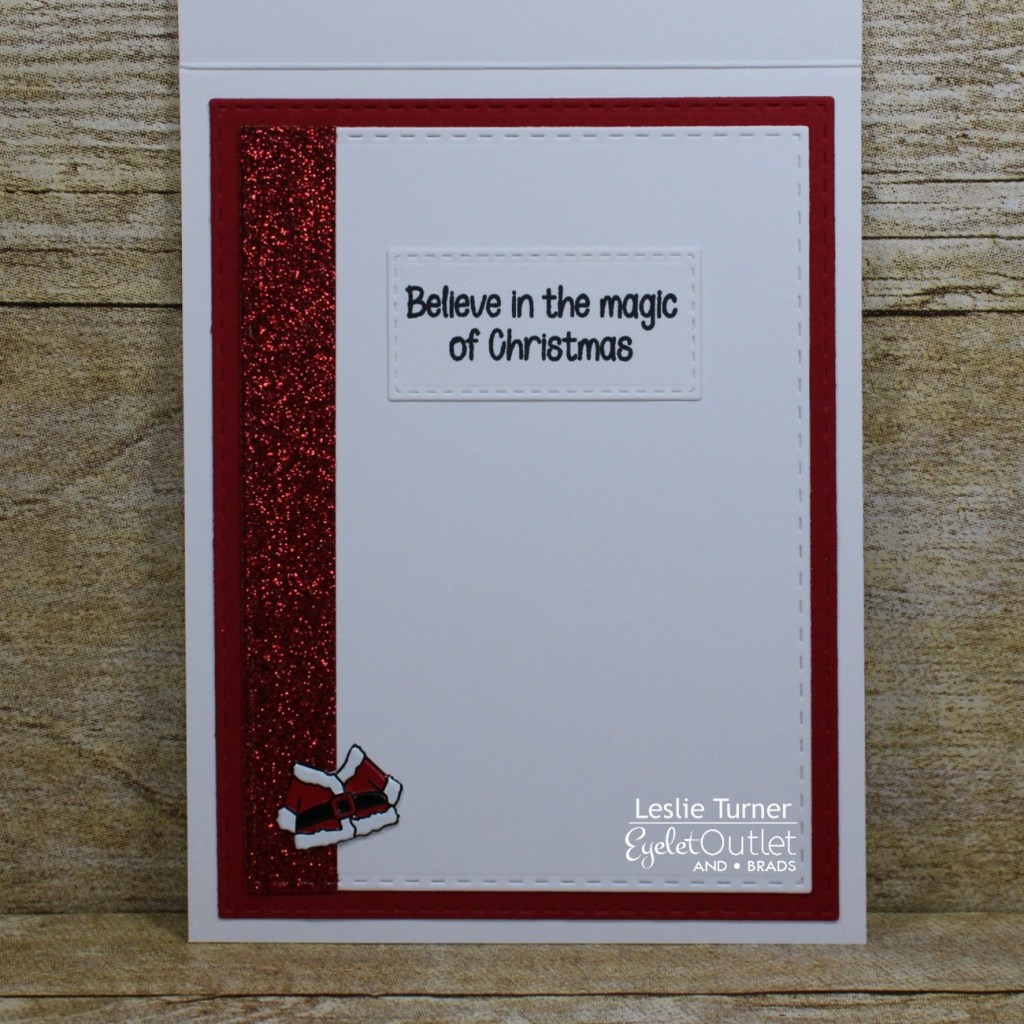
Hi everyone! A very Happy Saturday to you – I hope you’ve had a great week! We’ve had another busy week with doctor appointments for both Ed and I, and I’m feverishly playing catch-up, lol! Affiliate links are used in this post at no cost to you. I really appreciate your support! I’m stoked to be back on the Eyelet Outlet blog today with another awesome DT inspiration project! I created a festive and fun CAS Christmas card featuring our Santa Hat Brads, Santa Suit Brads and Snowflake Brads!
I hope you’ve enjoyed today’s project! Be sure to check out all the fun goodies at Eyelet Outlet! I can already see you drooling, lol! Be sure to ‘like’ and ‘follow’ Eyelet Outlet Facebook Page to keep up with news and sales, and while you’re at it, join the Eyelet Outlet Fans Facebook group for lots of creative inspiration! Thanks so much for stopping by today – we’ll see you next time! ;)
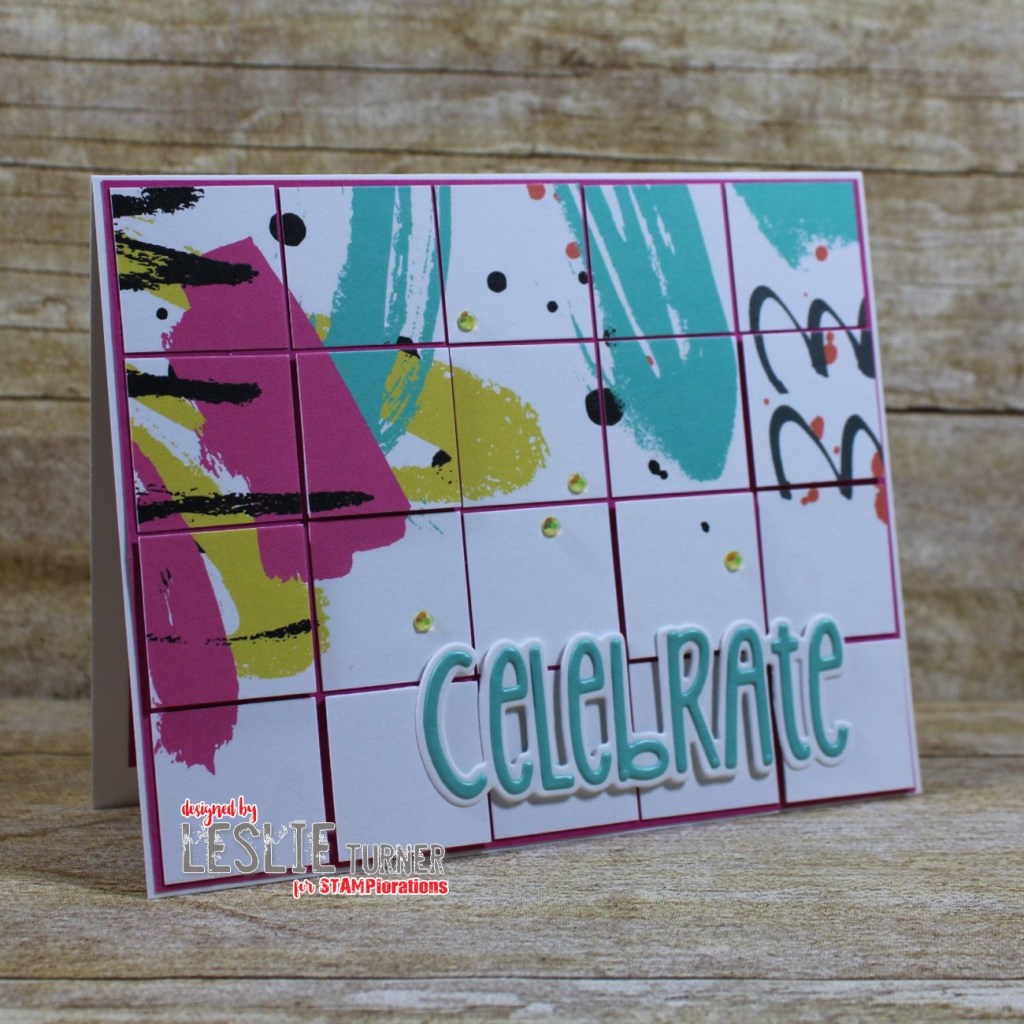
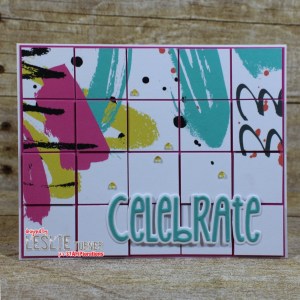
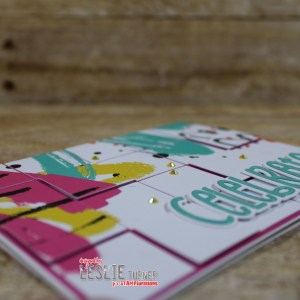
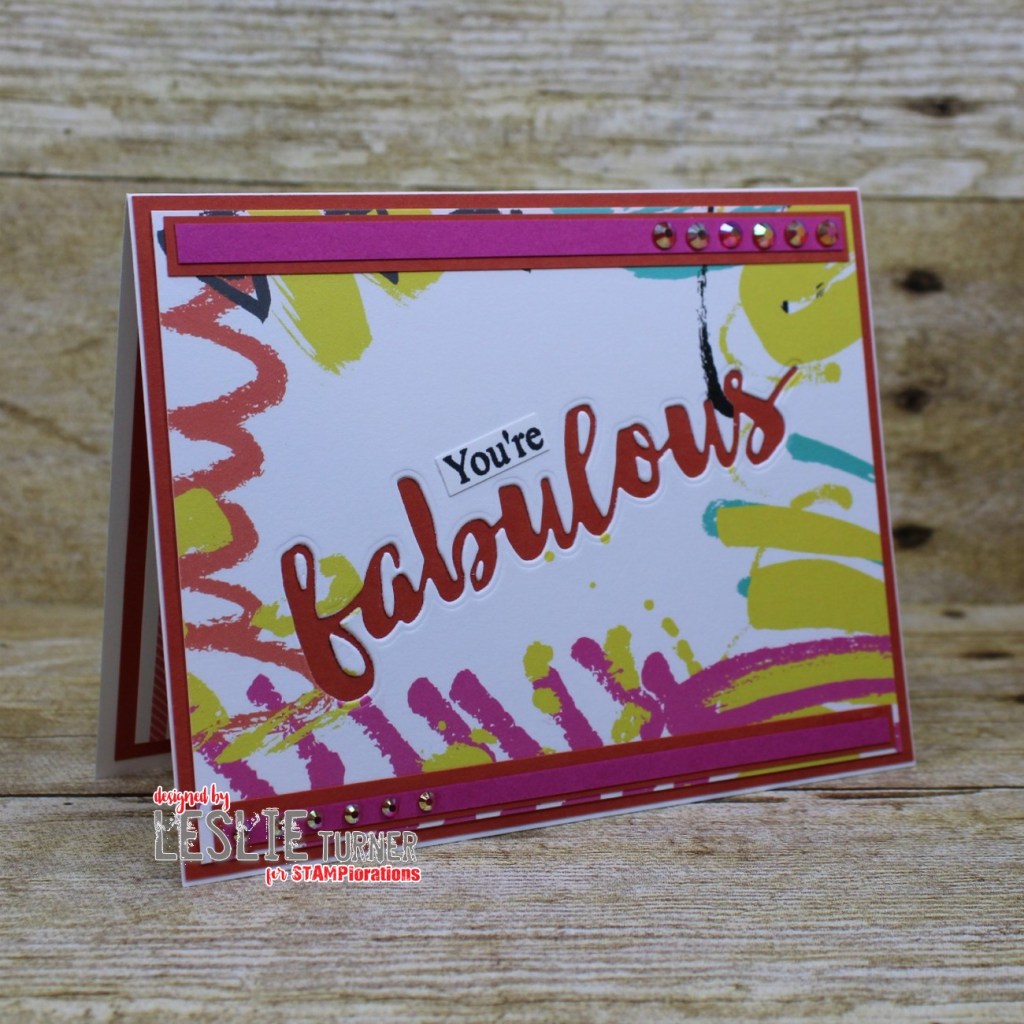
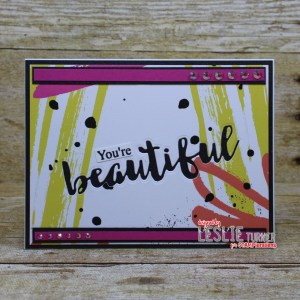
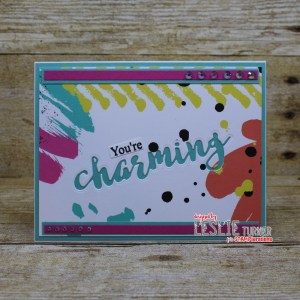
Hi everybody! I hope you’re having a fabulous weekend and you’re doing something fun! I’m thrilled to be showcasing three more projects created with some of the amazing Paper Goods over at STAMPlorations! I absolutely love these products and I’m having the best time ever! Affiliate links are used in this post at no cost to you. I really appreciate your support! For this STAMPlorations feature I have created three card projects using the Artsy Abstract A2 Quick Card Fronts available in the Paper Goods section of the store. These card fronts are so beautiful, and although I created all cards, these can be used to create just about any kind of paper project. My first project is a birthday tile card featuring the Artsy Abstract A2 Quick Card Fronts with several raised tiles and a die cut Skinny Sentiment.
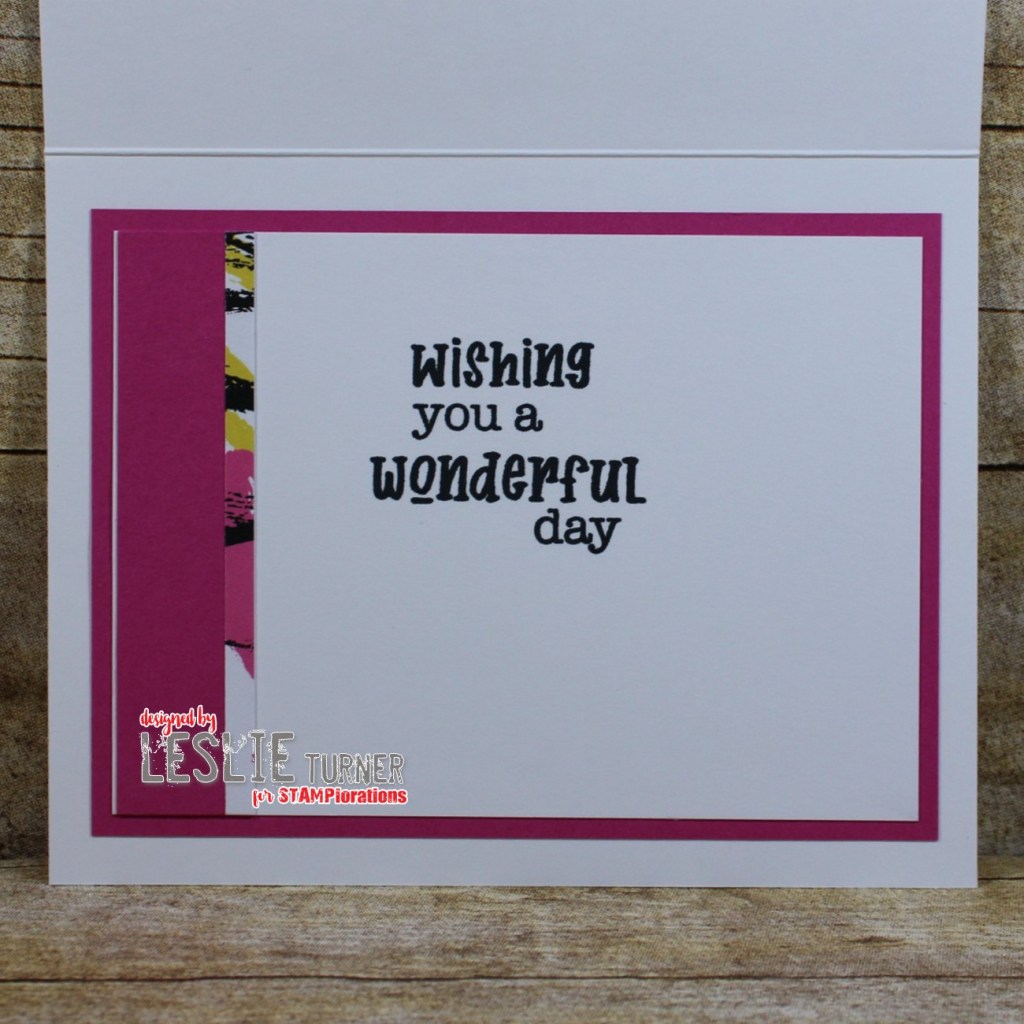
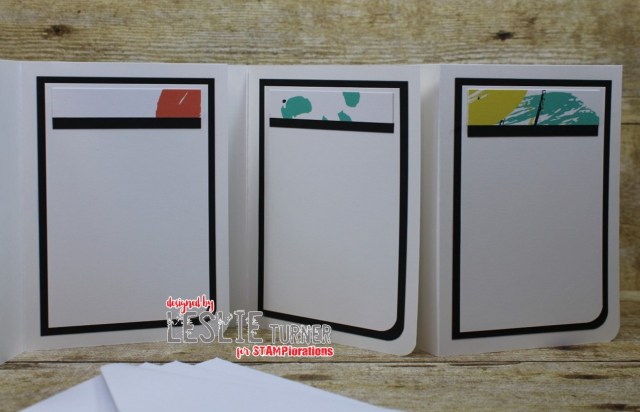
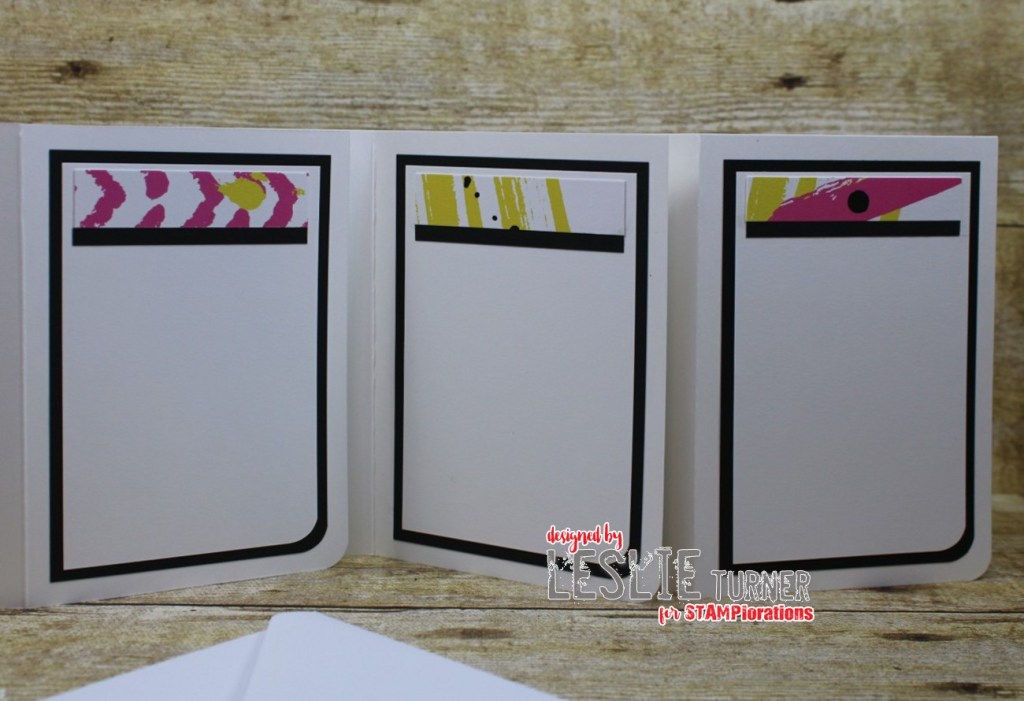
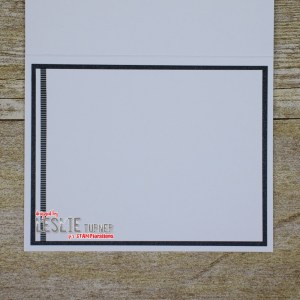
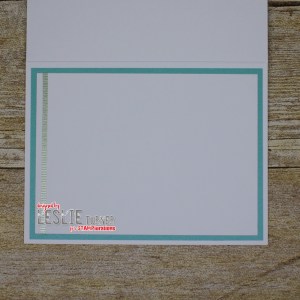
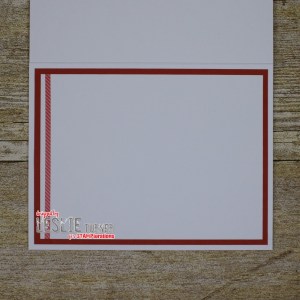
My second project is a set of six 3.5″ x 5″ motivational notelets also featuring the Artsy Abstract A2 Quick Card Fronts with computer-generated vertical sentiments reading Encourage, Believe, Dream, Create, Inspire and Imagine. I cut the card bases from Neenah Classic Crest 80# Solar White cardstock along with layering panels from CutCardStock Royal Sundance Linen Eclipse Black cardstock, and rounded the bottom right corner of each. I layered panels cut from the Artsy Abstract A2 Quick Card Fronts onto the black linen panels and adhered them to the front of the card bases. I cut black linen banners for each card, flagged one end with the square punch, and adhered one vertically to each card front. I printed the Encourage, Believe, Dream, Create, Inspire and Imagine sentiments on the computer, trimmed them and adhered one to each card front. I added black gemstones to complete the card fronts. I embellished the inside panels with leftover pieces of the Artsy Abstract A2 Quick Card Fronts and strips of CutCardStock Pop-Tone Black Licorice cardstock, and layered the panels on the black licorice cardstock. Since these are notelets, I left the inside of each of these blank to write a custom message.
I hope you’ve enjoyed these projects and you’re inspired to get crafty! Be sure to check out all the amazing paper goods, stamps, dies, stencils, digis and other crafty goodies at the STAMPlorations main, outlet and digital stores! Use code STAMPGIRLLESLIE for a 20% discount on your orders in the store (with unlimited uses)! And there is A LOT going on over at the STAMPlorations blog – tons of creative inspiration, tutorials, promotions and giveaways – all month long! If you’ve never visited, you are definitely in for a good time! When you do visit, be sure to leave comments on the posts! Every month Shery draws seven random winners from all the posts published during the month, so the more posts you comment on, the more chances you have to win! And be sure to Follow STAMPlorations on Facebook, Instagram and Pinterest for more creative inspiration! Thanks so much for stopping by today – we’ll see you next time! ;)
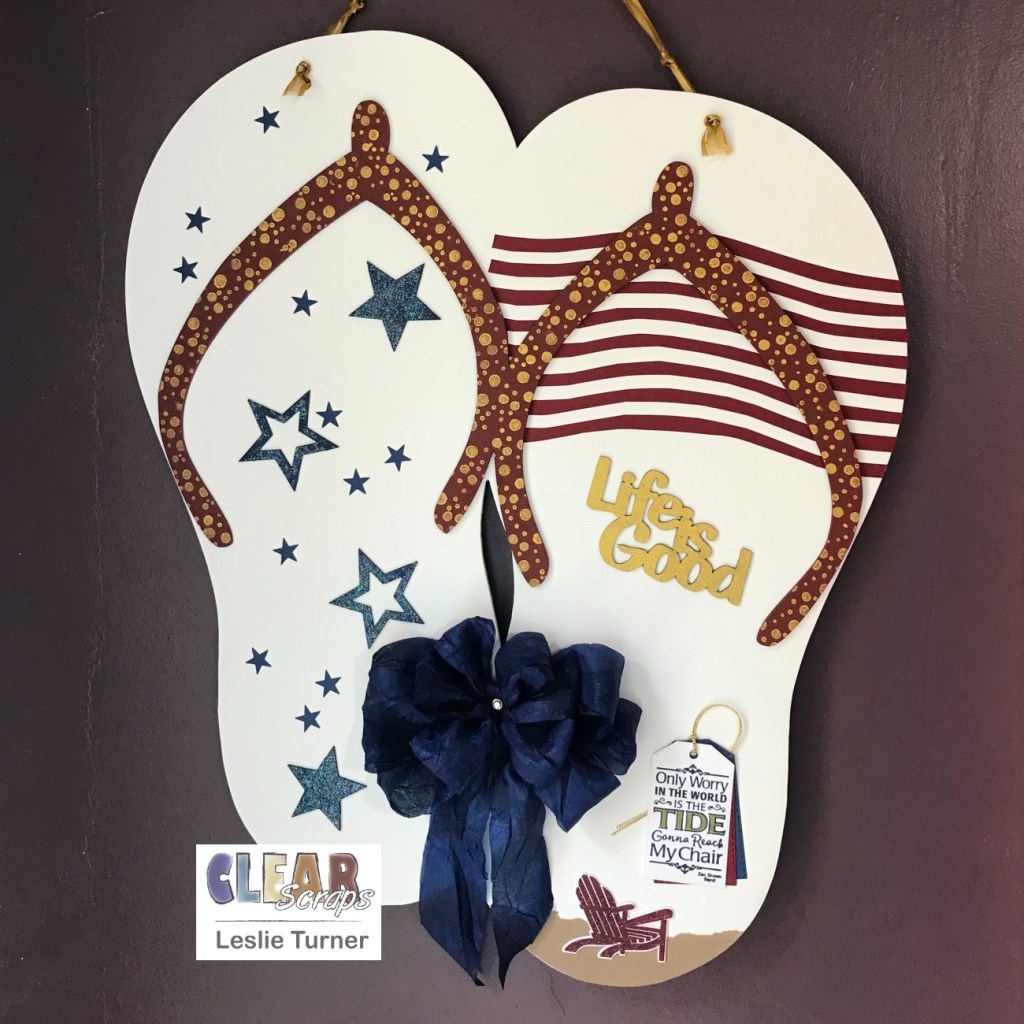
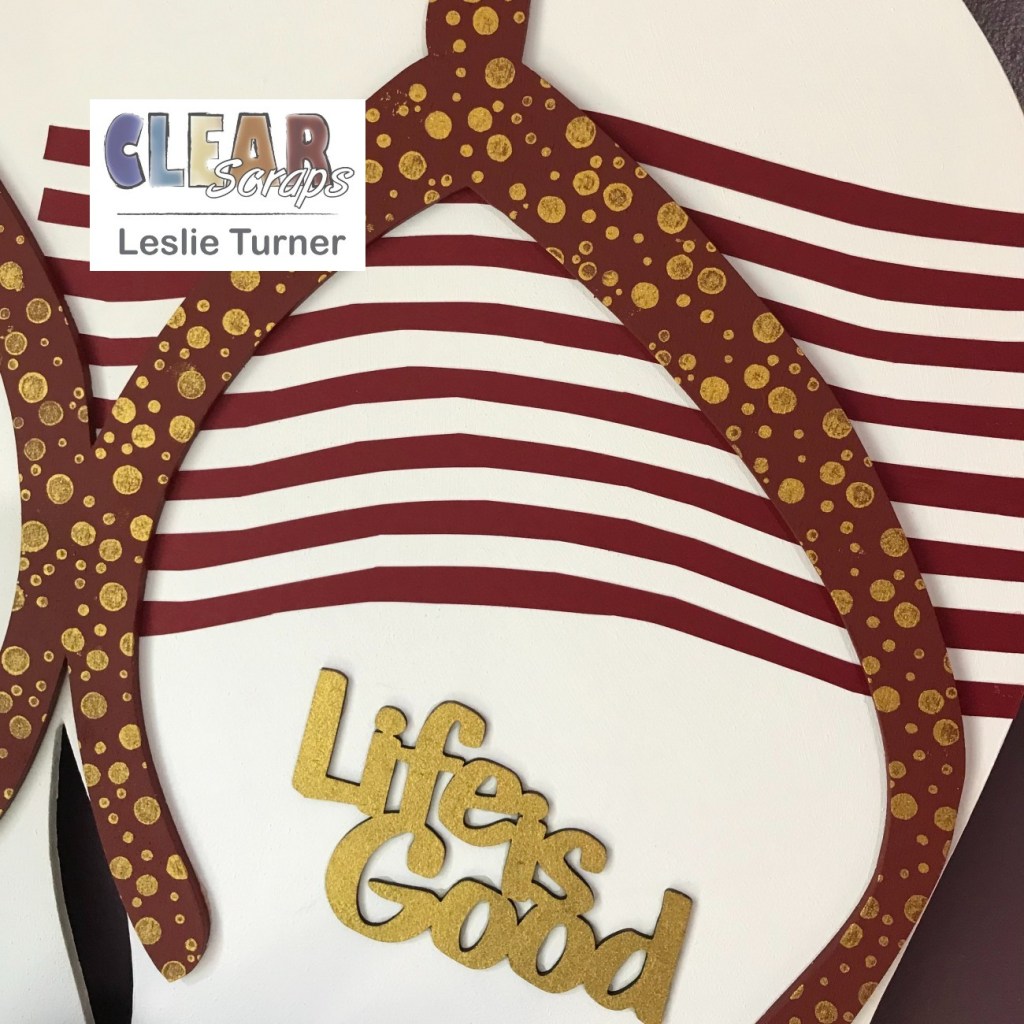
Happy Thursday, everybody! I hope you’re having a fabulous week! I’m thrilled to be back on the Clear Scraps blog today with another cool DT inspiration project! I love Americana and I have a super awesome long-time friend who lives and breathes ‘beach’ so when I saw this amazing pair of giant birch flip flops in the Clear Scraps store, the wheels started turning! Stars and stripes, an Adirondack chair and beach sand, and this project came to life!
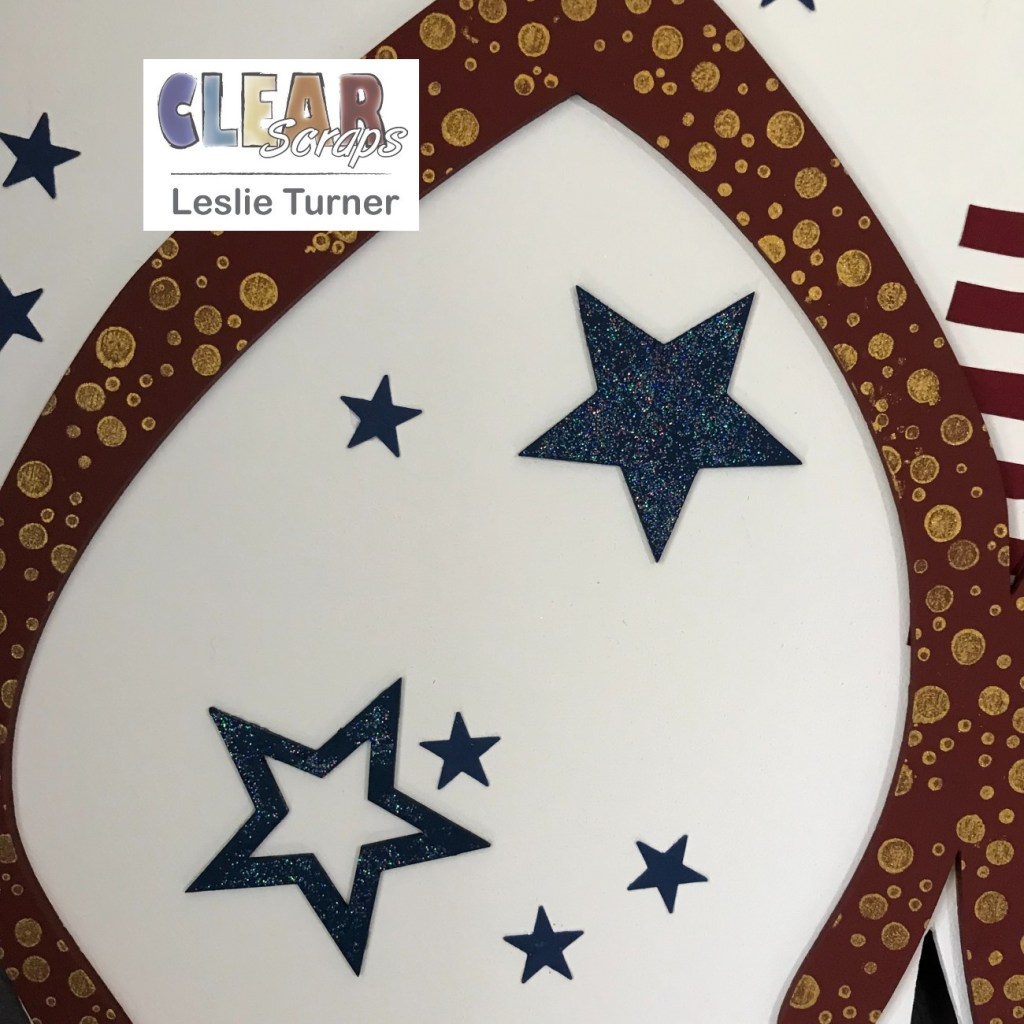
I painted the XL Wood Flip Flops base with white chalk paint and the straps with red chalk paint (two coats each) and let them dry. I stamped dots all over the straps in gold ink and set them aside to dry. I painted Multi Stars Chipboard Embellishments with two coats of blue chalk paint and sprinkled clear glitter on them while still wet. Once they were dry, I adhered them to the entire length of the left flip flop along with quite a few tiny stars punched from blue cardstock. I hand-cut stripes from red cardstock and adhered them to the right flip flop along with the Life Is Good Chipboard Word Title that I inked with gold ink to match the dots on the straps.
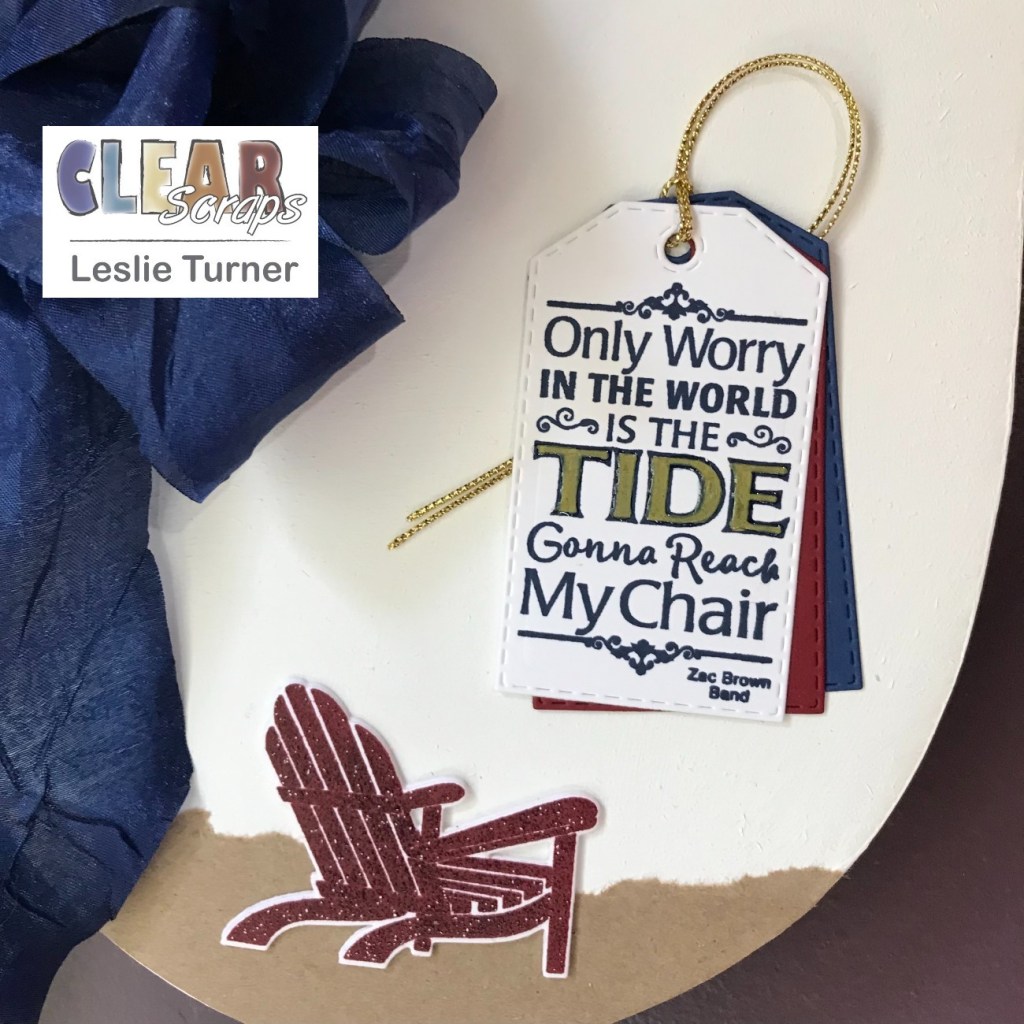
I embellished the bottom of the right flip flop with a stamped and layered tag tied with gold string, along with a stamped, embossed and die cut Adirondack chair and some beach sand fashioned from torn kraft paper.
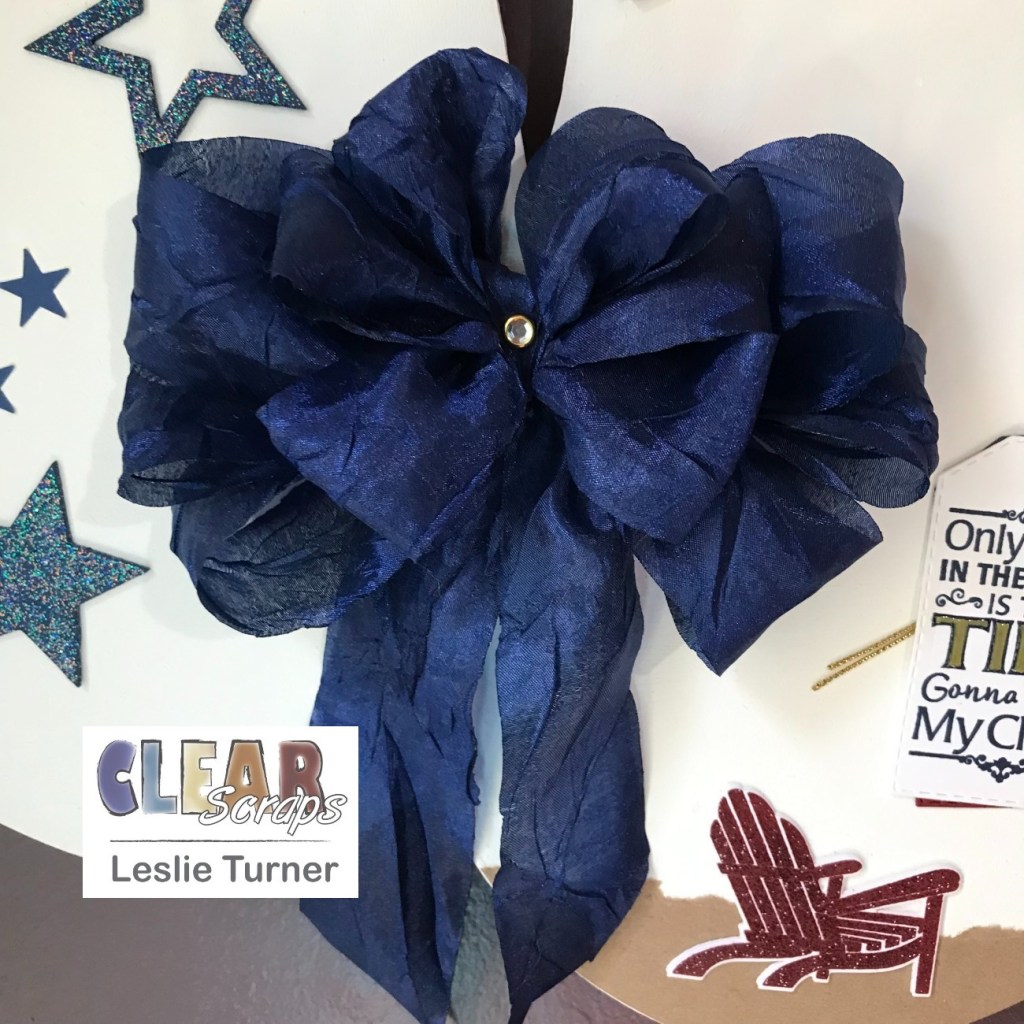
The finishing touch was a large multi-looped bow fashioned from wide navy ribbon with a jewel brad embellishment in the center.
Other products used: Cardstock/Paper: Neenah Classic Crest Solar White cardstock, CutCardStock Basis Blue cardstock, CutCardStock Basis Dark Red cardstock, CutCardStock Brown Bag Kraft paper Stamps: Altenew Happy Dreams stamp set, Dare 2B Artzy Flip Flops stamp set Ink/Paint: Folkart White Adirondack, Nautical and Tuscan Red Chalk Paint, Delicata Golden Glitz ink, Catherine Pooler Cranberry Fizz and Juniper Mist ink, American Crafts Gold Metallic Marker Dies/Punches: CUTplorations Stitched Tags nesting dies, Dare 2B Artzy Flip Flops die set, Stampin’ Up Itty Bitty Star punch Accessories: Big Shot, MISTI stamp tool, Bearly Art precision craft glue, Ranger Distress Collage Medium, Glossy Accents, Ranger Clear Embossing Powder, Stampin’ Up Dazzling Diamonds Glitter, Eyelet Outlet Clear Jewel Gold Rim Brad, Zutter Bow-It-All v2.0, Really Reasonable Ribbon Gold Metallic String and Navy Silk Crush Ribbon, gold ribbon from stash
I hope you’ve enjoyed today’s project and you’re inspired to get those craft supplies out to play! Be sure to check out all the amazing acrylic, wood and chipboard goodies at Clear Scraps… OMGoodness, you won’t be disappointed! And head on over to the Clear Scraps Facebook Page for lots of inspiration! And while you’re at it, join the Clear Scraps FacebookCreative Group to connect with other Clear Scraps fans! Thanks so much for stopping by today – we’ll see you next time!
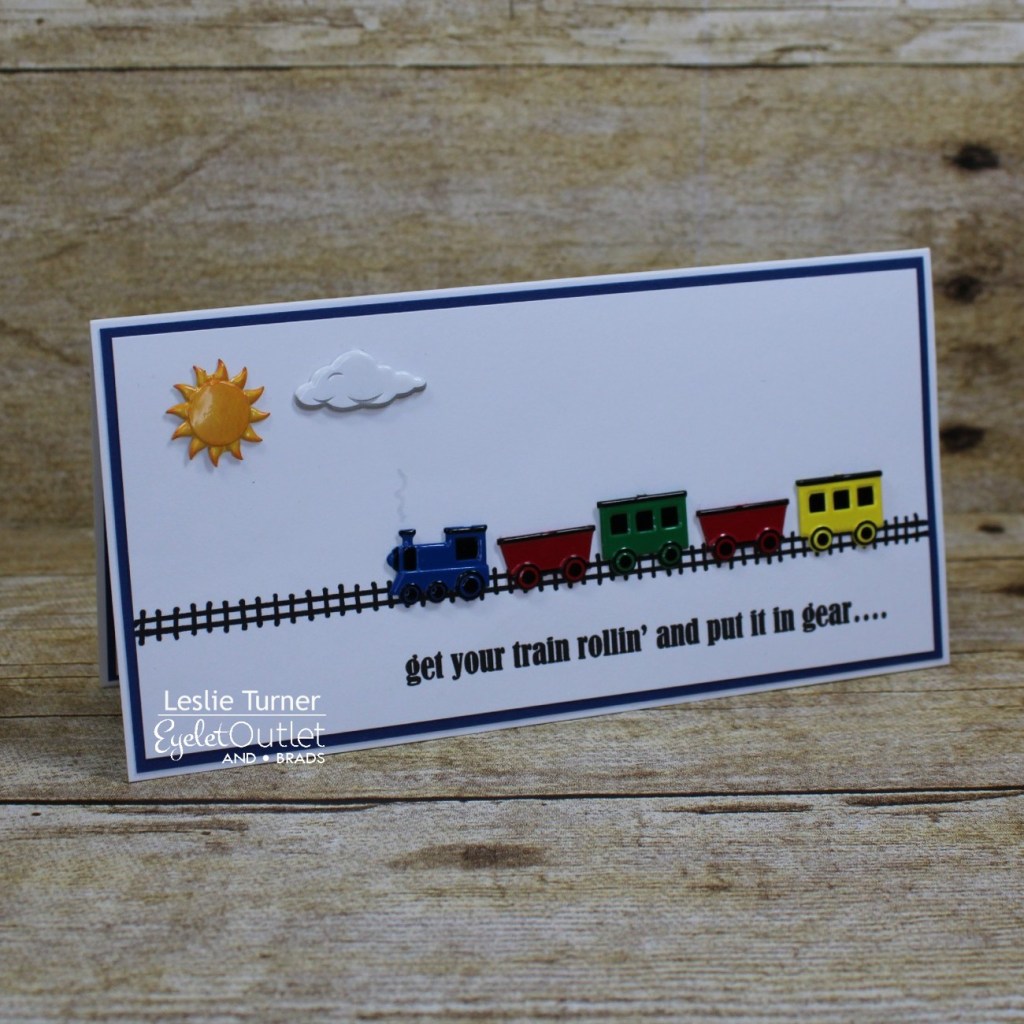
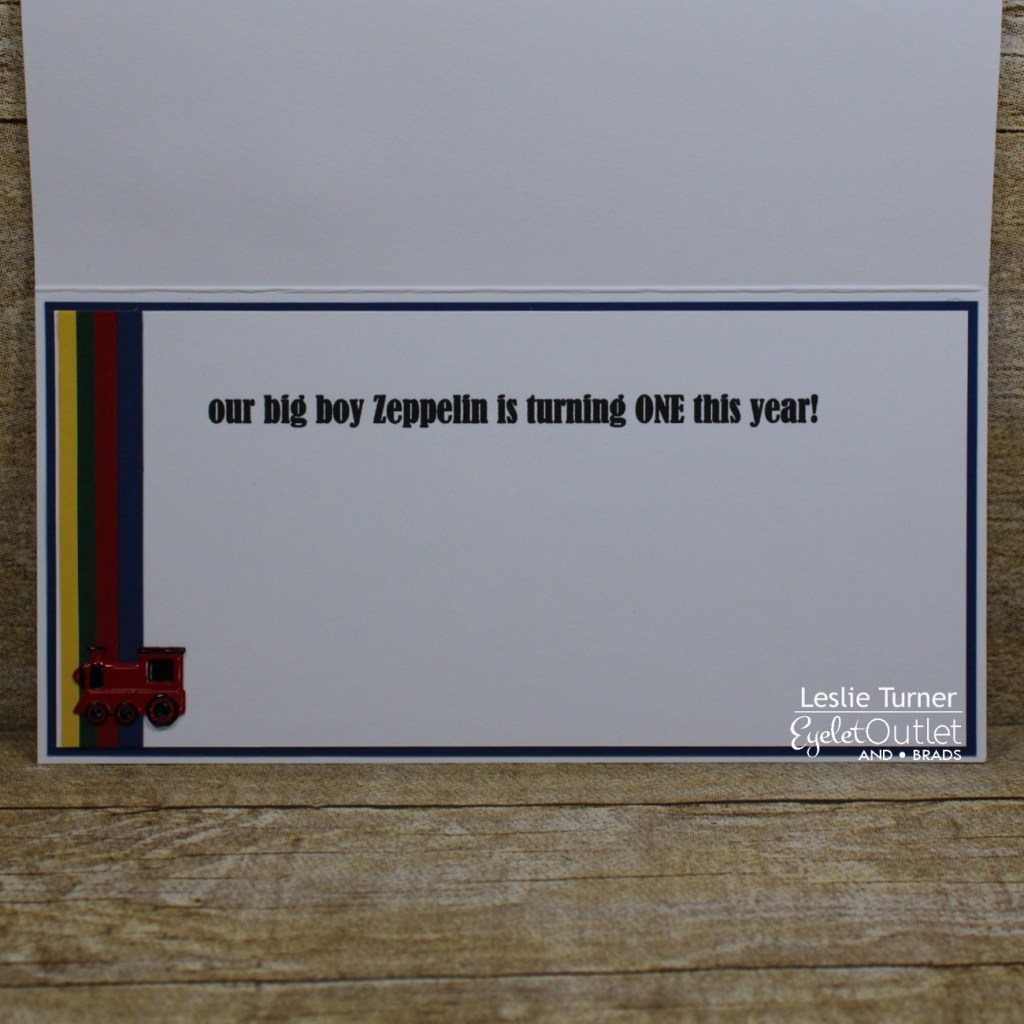
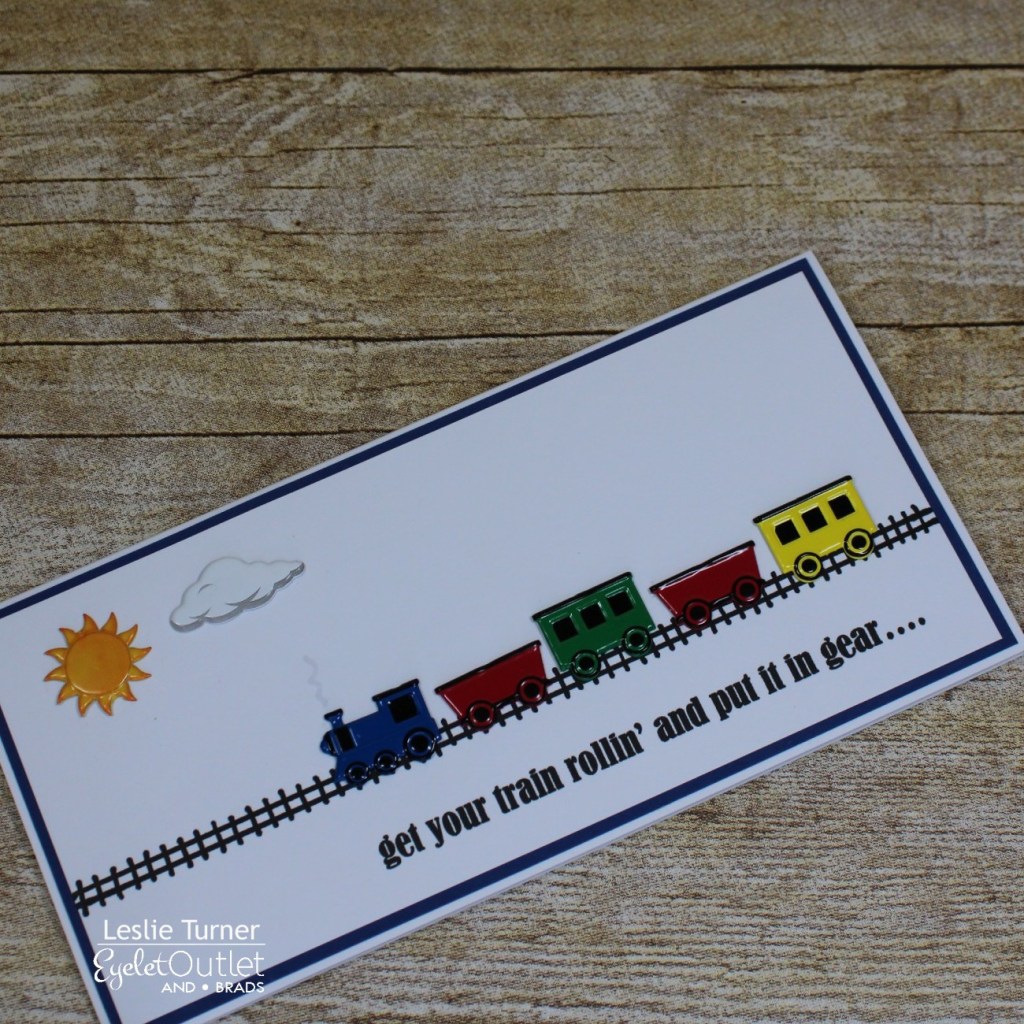
Hi everyone! A very Happy Saturday to you – I hope you’ve had a great week! October is probably my favorite month of the entire year and I can’t believe it’s here already! Yay for my birthday and Yay for Fall! ;) Affiliate links are used in this post at no cost to you. I really appreciate your support! I’m stoked to be back on the Eyelet Outlet blog today with another awesome DT inspiration project! I created a mini slimline for a super sweet little boy who turned one a few days ago! This was such a fun card and features our Train Mix Brads and Sun & Cloud Brads. I semi-CASEd the sentiment on one of my own designs from several years ago where I used a tractor.
I cut a mini slimline landscape top-folding card base from Neenah Classic Crest Solar White 110# cardstock along with a layering panel from CutCardStock Basis Blue cardstock. I printed the front and inside sentiments on a piece of Neenah Classic Crest Solar White 80# cardstock and trimmed them down to be slightly smaller than the blue panels. Let me interrupt for a PSA: The typical mini slimline is 3″ x 6″, however, I decided going forward that I’ll make mini slimlines 3-1/2″ x 6″ which will be the legal size for mailing. ;) I hand-drew the train track across the white panel with a black alcohol marker, added Train Mix Brads and Sun & Cloud Brads, and adhered the panels to the card base. The final touch was drawing a little ‘smoke’ coming from the locomotive with a light gray alcohol marker.
I hope you’ve enjoyed today’s project! Be sure to check out all the fun goodies at Eyelet Outlet! I can already see you drooling, lol! Be sure to ‘like’ and ‘follow’ Eyelet Outlet Facebook Page to keep up with news and sales, and while you’re at it, join the Eyelet Outlet Fans Facebook group for lots of creative inspiration! Thanks so much for stopping by today – we’ll see you next time! ;)
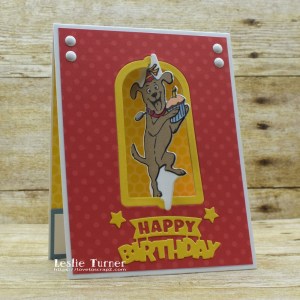
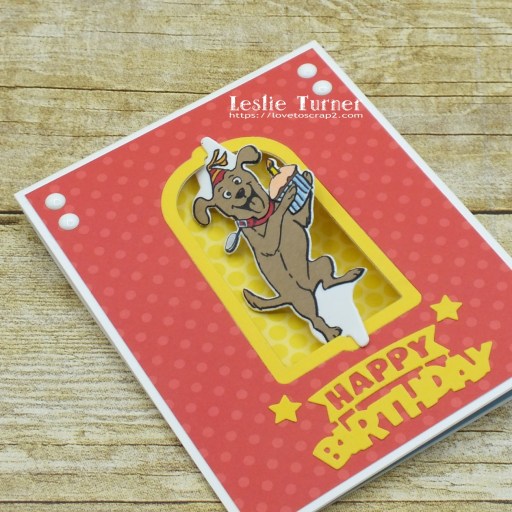
Hi friends! Happy Fri-YAY, lol! When you’re retired, every day is a YAY day, lol! Hope you’ve had a great week! Affiliate links are used in this post at no cost to you. I really appreciate your support! Our new challenge is live this morning over at Mix It Up Challenge Blog and I’m excited to share my DT inspiration project for MIUCB #54 – Anything Goes + Paper Piecing! All of our challenges are ‘anything goes’ with a technique twist offered each month just to inspire you. The twist is never mandatory to play! The twist this month is paper piecing! I find paper piecing to be somewhat tedious but relaxing in a weird kinda way, like fussy cutting, as the two come hand in hand. Can’t do one without the other, lol! I created a fun twister card using Art Impressions stamps and dies. I vowed a while ago that I would work on using everything (hoarded) in my stash… I know it’ll take a while but I AM working on it. The AI Twist series of stamps and dies, along with their Matchbooks and Tryfolds, are so much fun!
I cut a standard A2 top-folding card base from Neenah Classic Crest Solar White cardstock, adhered a red polka-dot panel (from the Sunny Studio Polka-dot Parade 6×6 paper pack) and cut the opening in the front with the Art Impressions Twist Frame die. I die cut the frame for the opening and the sentiment with stars from CutCardStock Camomile cardstock using the same die set. Then came the fun paper piecing the dog… using the Dog Twist Set stamps, I stamped him twice on Neenah Classic Crest Solar White cardstock and then again on CutCardStock Twine cardstock. I cut one of the images stamped on the white cardstock with the coordinating Dog Twist Set die and fussy cut the party hat, collar and cupcake from the other image stamped on white cardstock, and then fussy cut the dog from the image stamped on the twine cardstock. I colored the party hat, collar and cupcake with alcohol markers, his tag with a silver pen, and the whites of his eyes with a white Gelly Roll pen. I finished the front with a few white enamel dots.
I cut a yellow polka-dot panel for the inside from the Sunny Studio Polka-dot Parade 6×6 paper pack and embellished it with blue and white cardstock scraps for the sentiment and signature panel.
And one more peek… so loving how this turned out! I shake my head sometimes wondering why it takes me so long to use such fun goodies!
Products used: Cardstock/Paper: Neenah Classic Crest Solar White cardstock, CutCardStock Twine cardstock, CutCardStock Camomile cardstock, Stampin’ Up Marina Mist cardstock scraps, Sunny Studio Polka-dot Parade 6×6 paper pack Stamps: Art Impressions Dog Twist Set stamps, The Project Bin Kinda Pawsome stamp set Ink: Memento Tuxedo Black ink (pad and marker); Nuvo alcohol markers- Rich Reds Collection, Ombre Collection, Fragrant Orange Collection, Sunshine Yellow Collection, Marina Blues Collection, Neutral Browns Collection; Pentel Slicci Silver pen, Sakura White Gelly Roll pen Dies/Punches: Art Impressions Dog Twist Set dies and Twist Frame die Accessories: Tonic Studios 12″ Guillotine Paper Trimmer, MISTI stamp tool, Big Shot, Bearly Art precision craft glue, Tombow Mono permanent adhesive, Eyelet Outlet White Enamel Dots
I hope you’ve enjoyed seeing this project and will link up with us this month! We’d love to see your ‘anything goes’ project with or without the technique twist of paper piecing! Hope to see you play! Thanks so much for stopping by today – we’ll see you next time! ;)
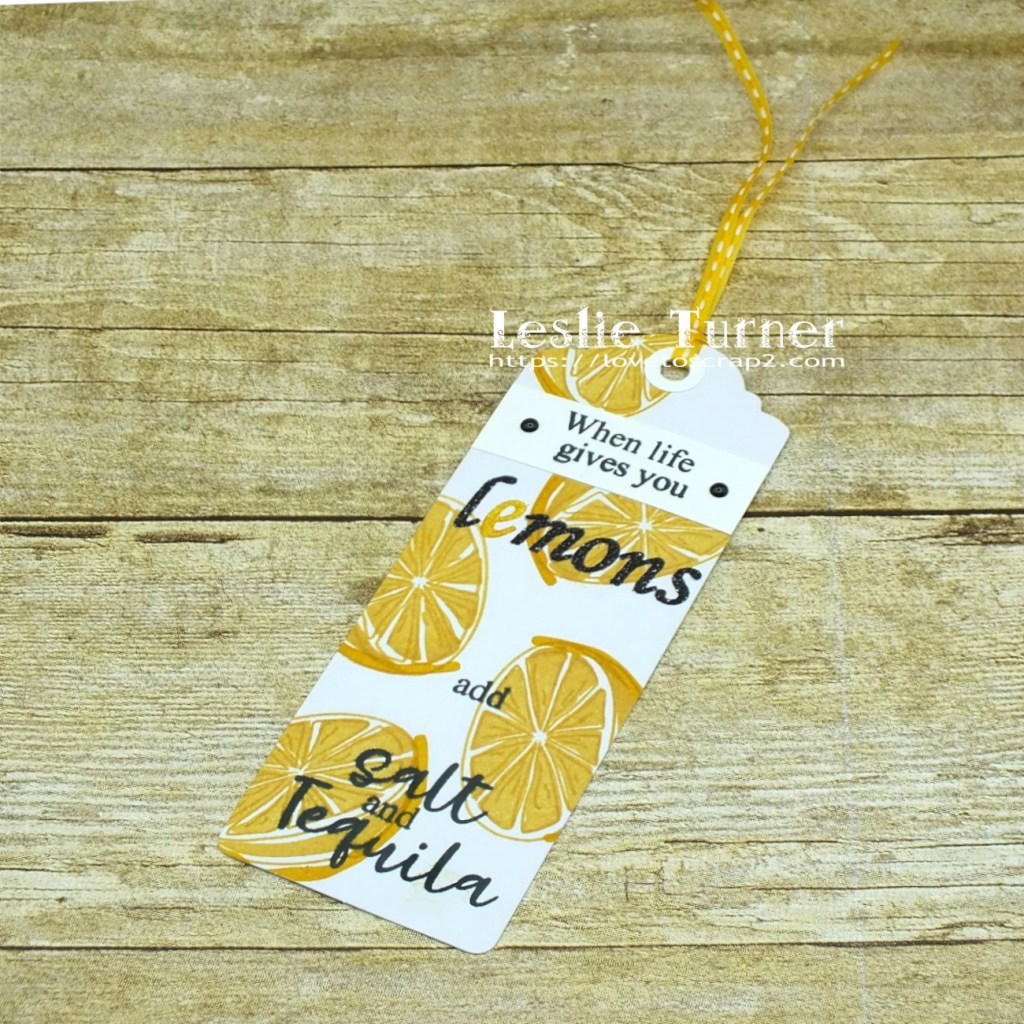
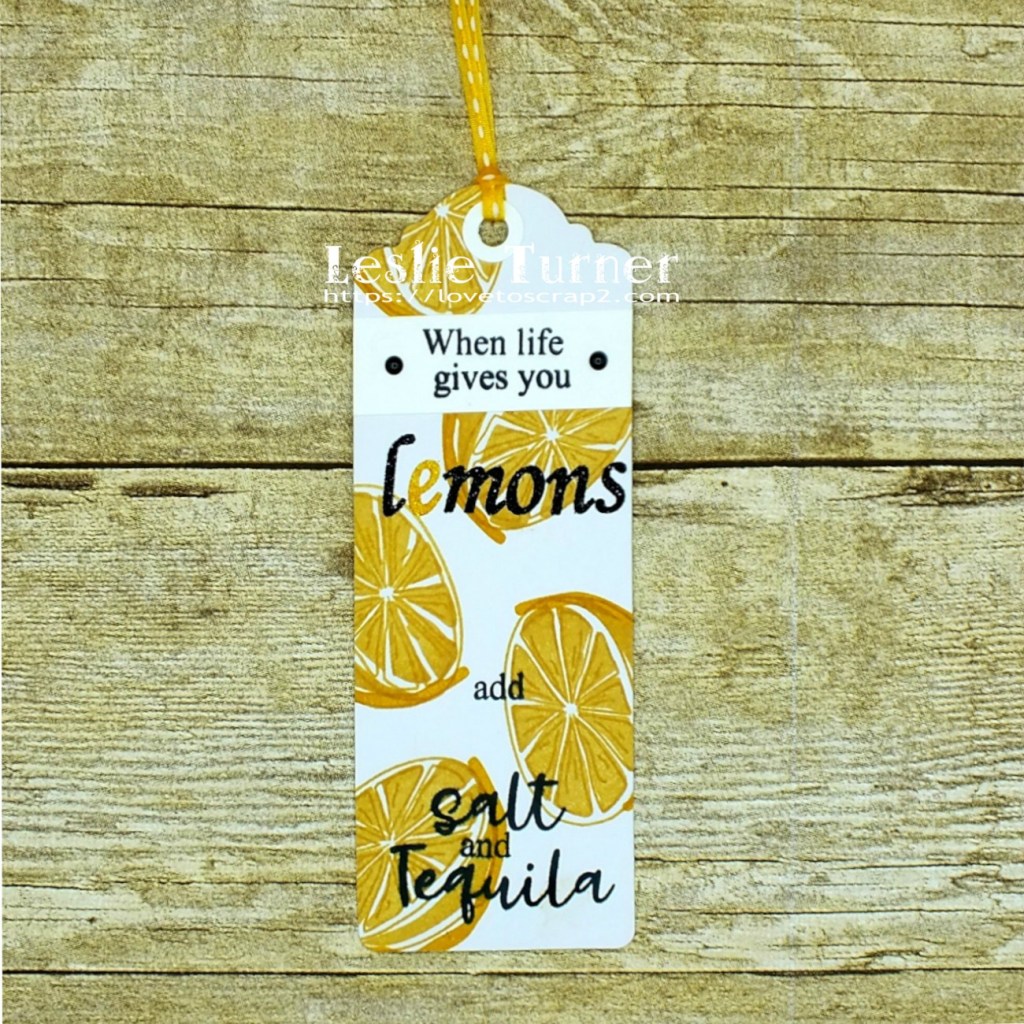
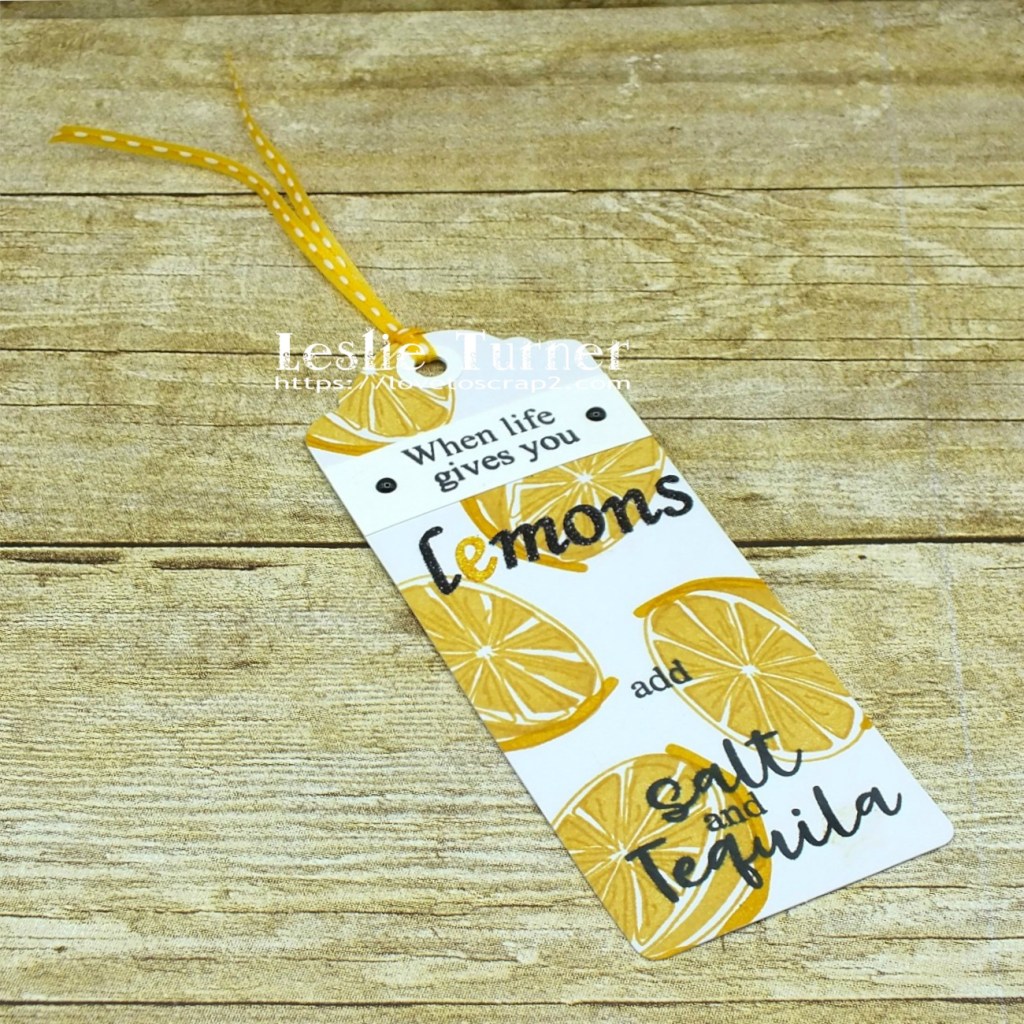
Hi everyone! Happy Friday – I can’t believe it’s the first day of October already! Where is the time going?! Our new challenge has launched over at Love To Scrap Challenge Blog and I’m thrilled to share my DT inspiration project for LTSCB #150 – Anything But A Card! We want to see anything you want to make for this challenge as long as it’s not a card! I created a fun bookmark using STAMPlorations Layered Citrus stamp set which is one of my favorites!
Using a plain white bookmark from my stash, I stamped the whimsical lemons randomly all over it. I stamped the first portion of the sentiment on a scrap piece of Neenah Classic Crest Solar White cardstock, trimmed it and adhered it to the top of the bookmark. I used glitter alpha letters for the word ‘lemons’ (all black letters except one which I colored yellow) and then stamped the rest of the sentiment from the stamp set in black ink. I made a hole reinforcement for the top with two circle punches and a scrap of white cardstock and added some narrow yellow ribbon. The final touch was the addition of a couple black enamel dots.
And one more look… such a fun project that is actually practical! ;)
Products used: Cardstock/Paper: Darice white bookmark, Neenah Classic Crest Solar White cardstock scrap Stamps: STAMPlorations Layered Citrus stamp set Ink: Stampin’ Up So Saffron, Daffodil Delight and Crushed Curry ink; Memento Tuxedo Black ink; Nuvo alcohol markers- 404, 405 Dies/Punches: Stampin’ Up 1/4″ and 1/2″ circle punches Accessories: Tim Holtz 8.5″ Guillotine Paper Trimmer, Bearly Art precision craft glue, MISTI stamp tool, Darice black and white glitter alpha stickers, Eyelet Outlet Black Enamel Dots, yellow ribbon scrap
I hope you’ve enjoyed today’s project and will link up a project with us this month that’s not a card! We’d love to see what you create! Thanks so much for stopping by today – we’ll see you again soon! ;)
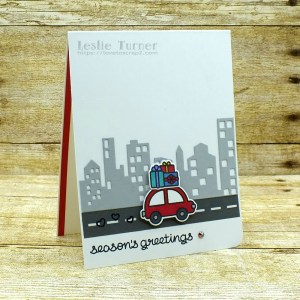
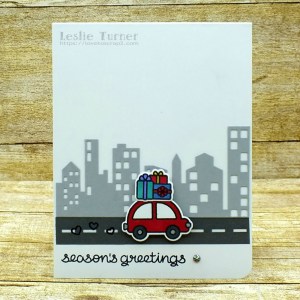
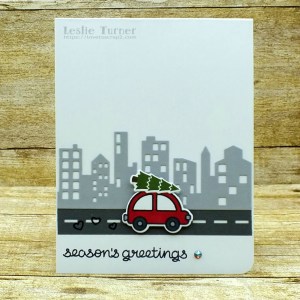
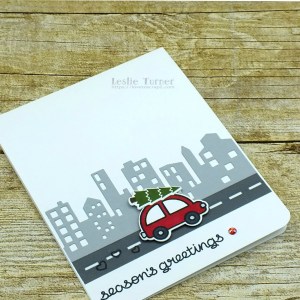
Happy Friday, friends! I hope you have a great day and a great weekend with something fun planned! Our new challenge is live over at Merry Little Christmas Challenge Blog and I’m super excited to share my DT inspiration project for MLCCB #39 – October Anything Christmas Goes! I created a pair of adorable cards that are almost identical – the only difference is what’s on top of the little car! I just had to use both of those elements! Some more older Lawn Fawn stamps and dies that I absolutely love!
I created two standard A2 size top-fold card bases from Neenah Classic Crest 110# Solar White cardstock and rounded the lower right corner on each. I stamped the car twice and both of the elements on a scrap of Neenah Classic Crest Solar White cardstock, colored them with alcohol markers and cut them with the coordinating dies. I created the background on each card base with a strip of Eyelet Outlet Road Washi Tape and a Memory Box Cityscape cut from CutCardStock Dolphin cardstock. I stamped the exhaust hearts on the washi tape in Jet Black StazOn, adhered the elements to the top of each car, and adhered the cars to the road on dimensionals. I stamped the sentiment beneath the road and added a single iridescent gemstone on each.
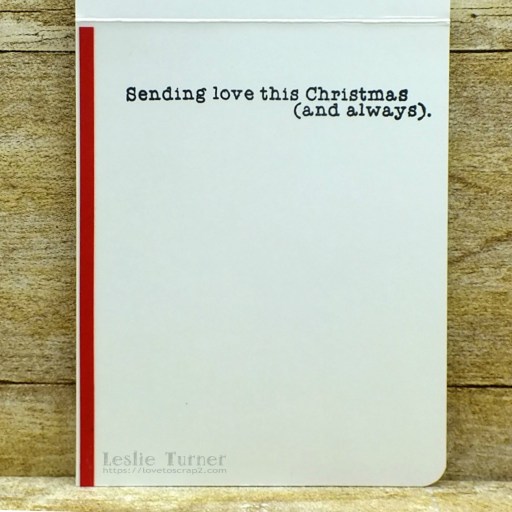
I stamped the sentiment in black ink and added a narrow red cardstock strip down the left side for a little interest. The inside is the same on both cards, and I used the Stampingbella gnome sentiments stamp set again… funny how the gnome sentiments are coming in so handy for non-gnome cards, lol!
And one more peek at the pair… totally loving how these turned out! They are so stinkin’ cute I can’t stand it!
Products used: Cardstock/Paper: Neenah Classic Crest Solar White cardstock, CutCardStock Dolphin cardstock, red cardstock scrap Stamps: Lawn Fawn Home for the Holidays stamp set, Stampingbella Festive Gnome Sentiments stamp set Ink: Memento Tuxedo Black ink, Ranger distress ink- black soot and peeled paint; Nuvo alcohol markers- Aquamarine Collection, Rich Reds Collection, Sunshine Yellow Collection, Marina Blues Collection, Palma Violets Collection, Natural Browns Collection, Stormy Greys Collection; Pentel Slicci Silver pen, StazOn Jet Black ink Dies/Punches: Lawn Fawn Home for the Holidays die set, Memory Box Cityscape Nightline die, Kadomaru Pro corner rounder Accessories: Tonic Studios 12″ Guillotine Paper Trimmer, Bearly Art precision craft glue, MISTI stamp tool, Gemini Junior, Stampin’ Up Dimensionals, Eyelet Outlet Road Washi Tape, ScraPerfect iridescent gemstone
I hope you’ve enjoyed seeing these cards and will link up a Christmas project with us this month! We’d love to see what you create! Thanks so much for stopping by today – we’ll see you again soon! ;)
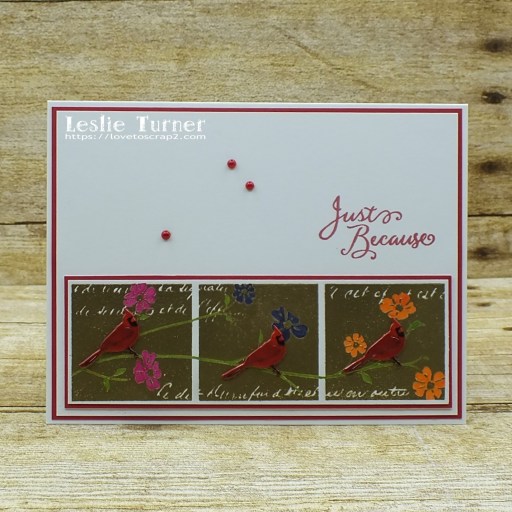
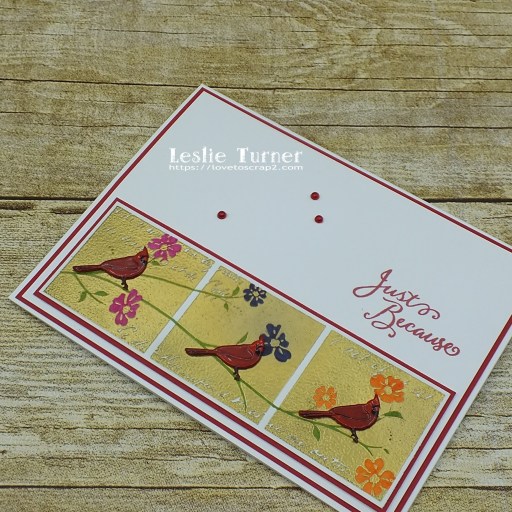
Hi everyone! It’s Friday and I swear they roll around so darn fast these days, lol! I hope you’ve had a great week! Our new challenge launched this morning over at Love To Craft Challenge Blog and I’m delighted to share my DT inspiration project for LTCCB #63 – October Anything Goes! I created a clean and simple card featuring a pretty gold heat embossed 3-Flower Collage image stamped with an old Stamp Camp stamp that my late sister gifted me a number of years ago. This stamp definitely has some sentimental value.
I created a standard A2 size top-folding landscape card base from Neenah Classic Crest 110# Solar White cardstock along with a layering panel for the front which I adhered to a CutCardStock Pop-Tone Wild Cherry cardstock panel. I stamped the 3-Flower Collage image in Versamark and heat embossed it in Ranger Super Fine Detail Gold embossing powder. I trimmed the stamped image, layered it on CutCardStock Pop-Tone Wild Cherry cardstock, and colored the negative spaces of the branches and flowers with fine point Pitt Artist pens, connecting the squares with the branches. I adhered a cardinal brad to each collage square and adhered the panel to the bottom of the card base. I stamped the sentiment in red ink and added three small red flat-back pearls.
I hope you’ve enjoyed today’s project and will link up an ‘anything goes’ project with us this month! Thanks so much for stopping by – we’ll see you again soon! ;)
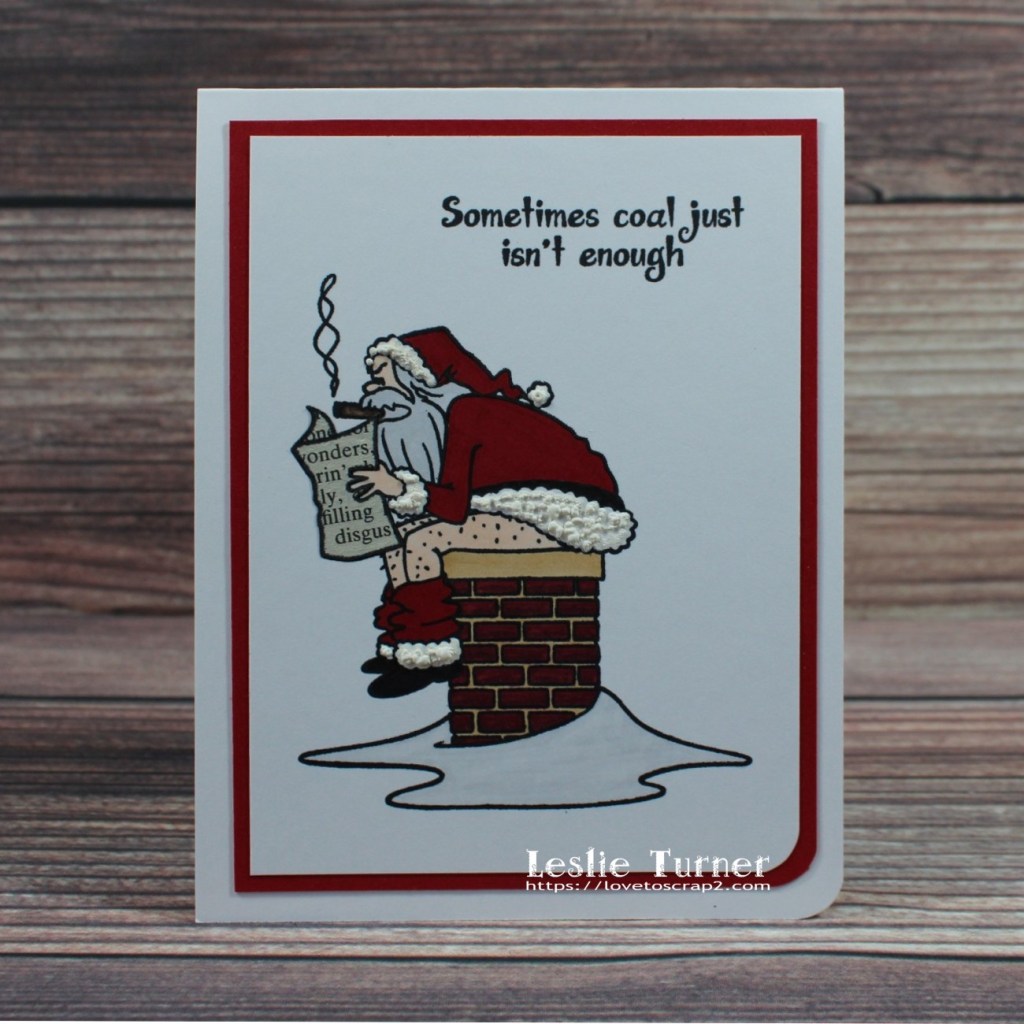
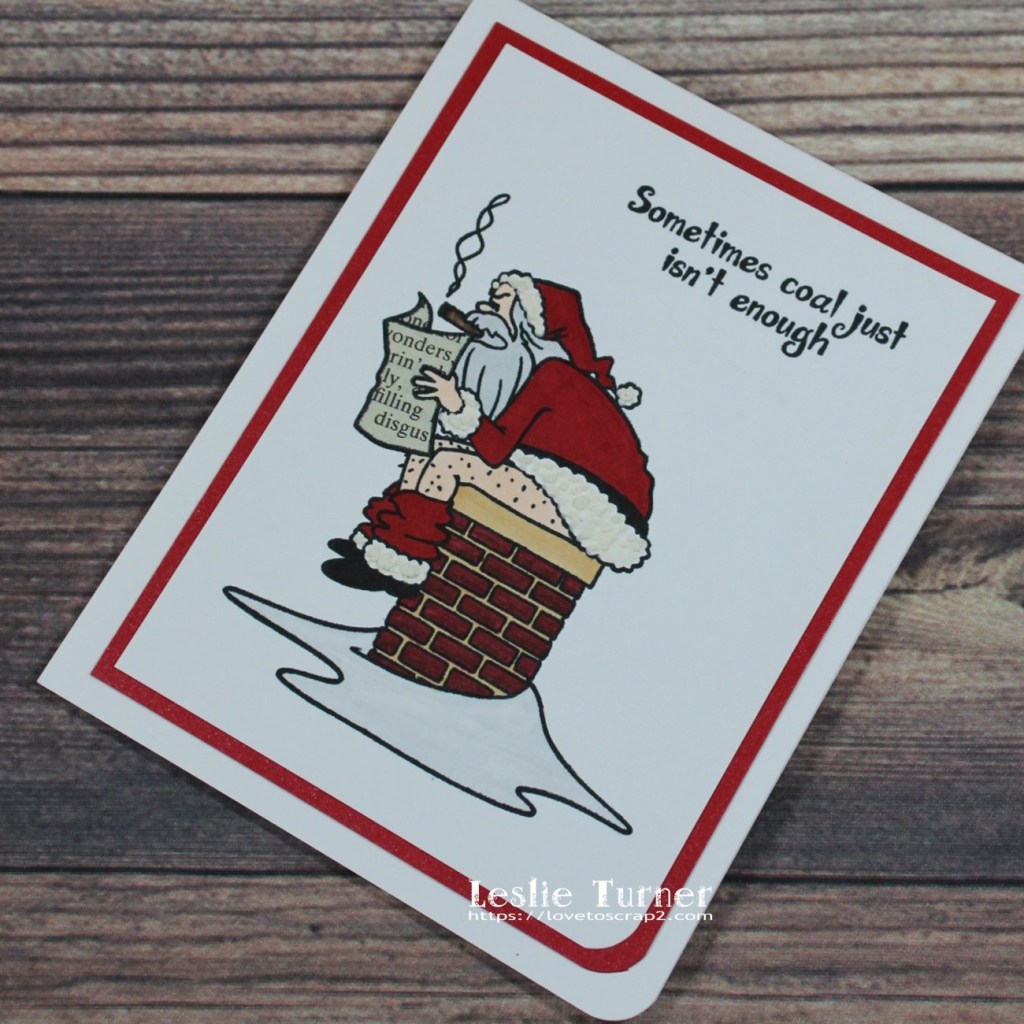
Hi friends! I hope you are having an absolutely splendid week! It’s Hump Day and our feral dad will be headed to Neuterville early tomorrow morning! It’s so stressful getting ferals ready to go to the vet because they have to be trapped, they’re scared and get really irritated, they can’t be trapped too early because they need bathroom access, etc. etc. But feral mom is doing well with her one remaining kitten that’s now about three weeks old, and she’ll be getting spayed in mid-November. Then her baby will get spayed/neutered in March at six months. Hopefully, Lord willing, this will be the end of the feral business… “Ed, are you listening?!” Affiliate links are used in this post at no cost to you. I really appreciate your support! I have an off-color Christmas card to share this evening… one I made a couple weeks ago and laughed the entire time. ;) My online friend, Deborah, shared a card a while back that she created with this same Whimsy Stamps set, and I just howled. Of course, I HAD to have the stamp set, and while shopping, I found a couple other off-colored ones that I bought as well, lol!
I cut a standard A2 top-folding card base from Neenah Classic Crest Solar White cardstock along with a layering panel from CutCardStock Stardream Metallic Jupiter cardstock, and rounded the bottom right corner. I stamped the image and sentiment in black ink and colored the image with alcohol markers. I paper-pieced Santa’s newspaper with a piece of a page torn from an old paperback novel in my stash, and embellished his suit with Marvy Snow Marker.
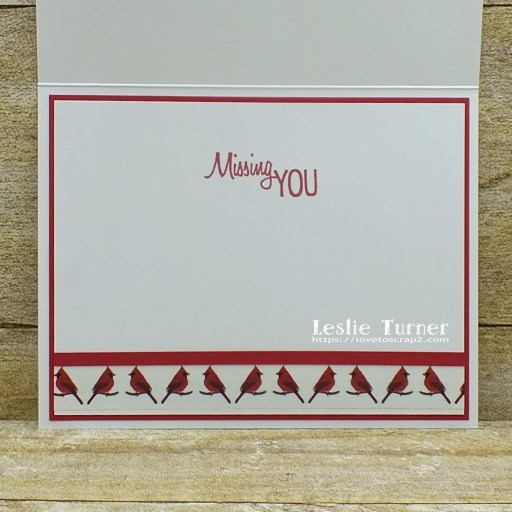
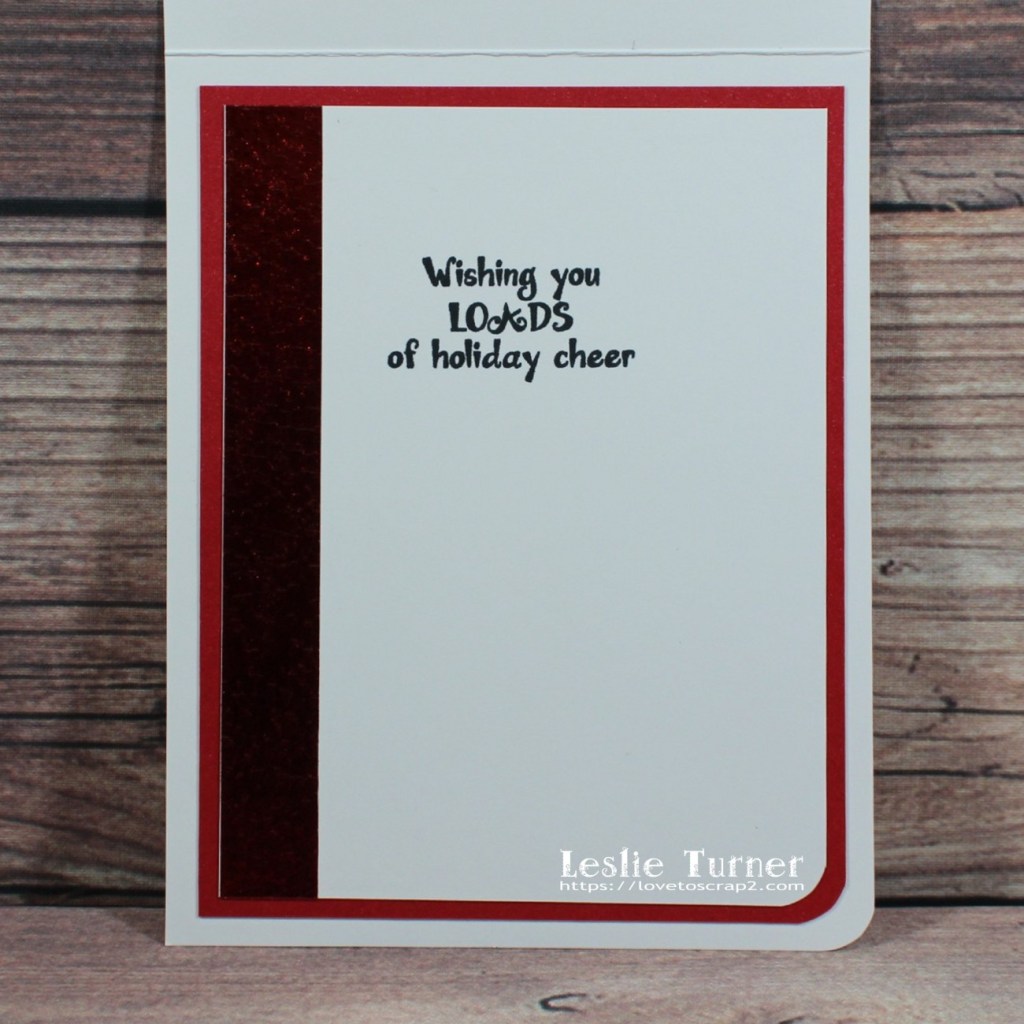
I cut the inside panel from Neenah Classic Crest Solar White cardstock and embellished it with a strip of red foil washi tape, stamped the sentiment in black ink, and layered it on red cardstock.
And one more peek… I literally laugh out loud every time I look at this card! My apology to any and all who don’t see the humor! Bahahahaha!
I hope you’ve enjoyed seeing this project and I sure hope I haven’t offended anybody, lol! I have a warped sense of humor and this fits right in! Thanks so much for stopping by today – we’ll see you next time! ;)