Enjoy the Little Things

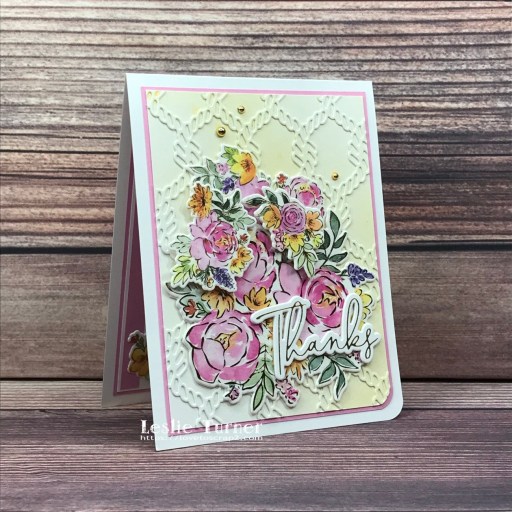
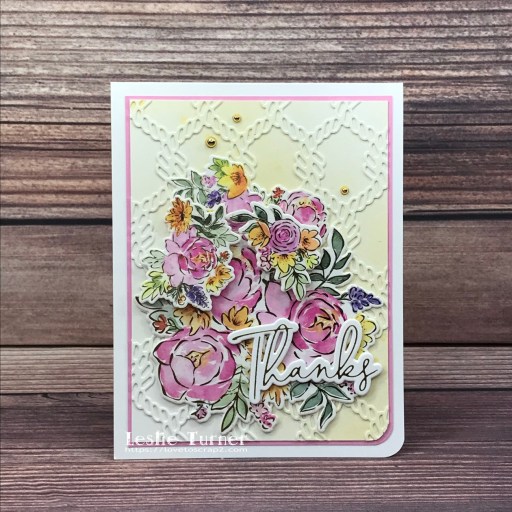
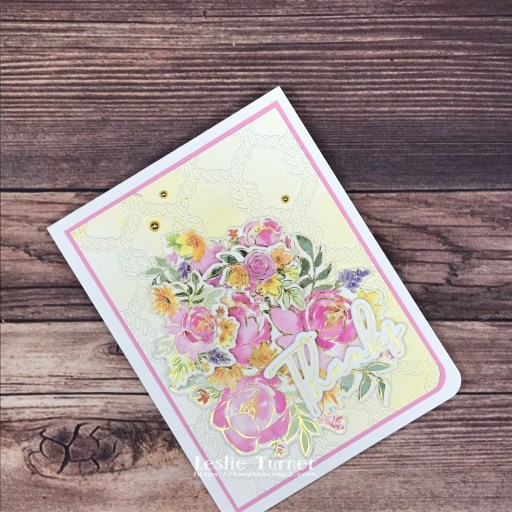
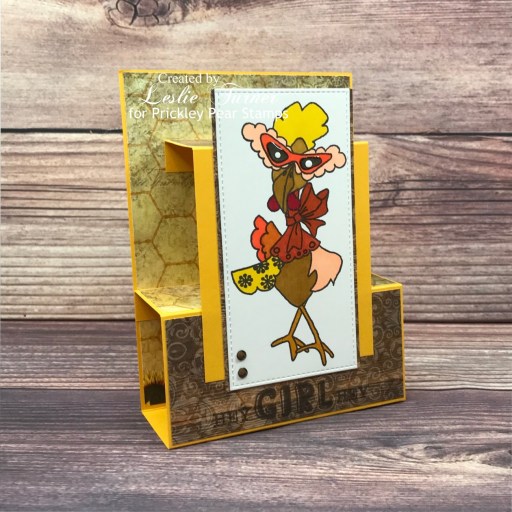
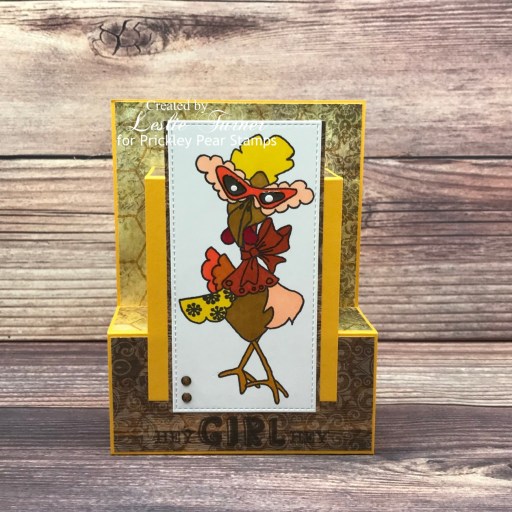
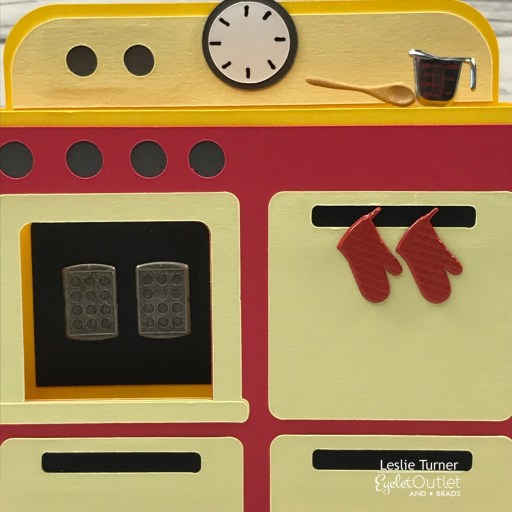
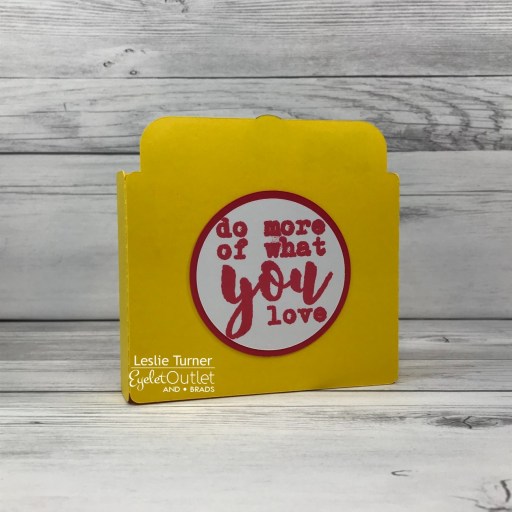
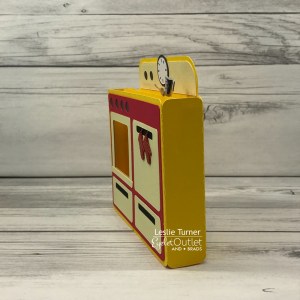
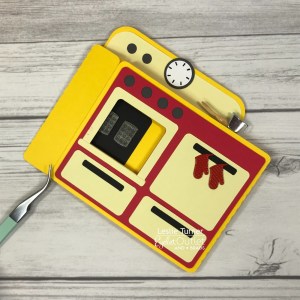
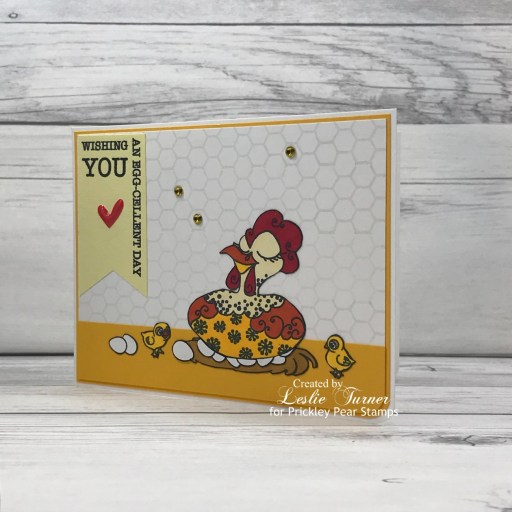
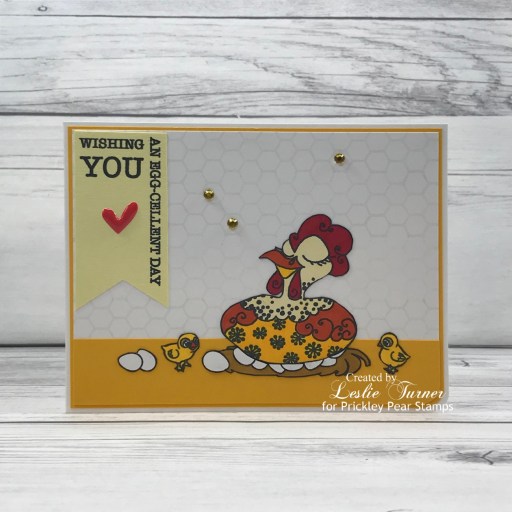
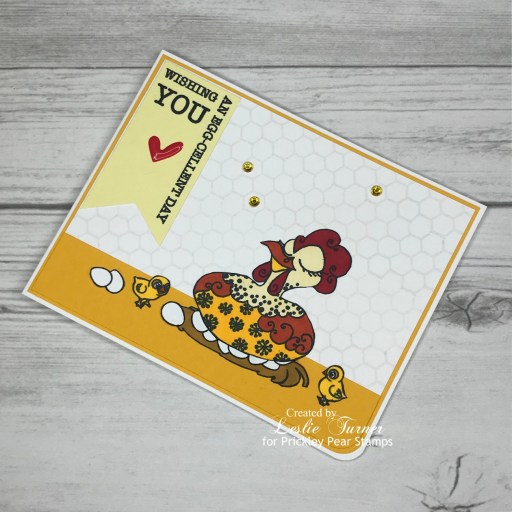
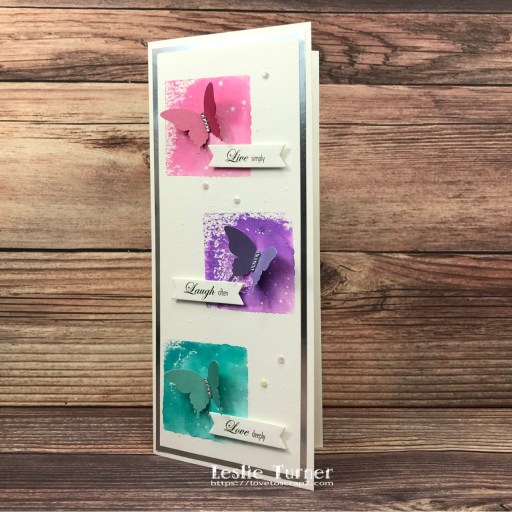
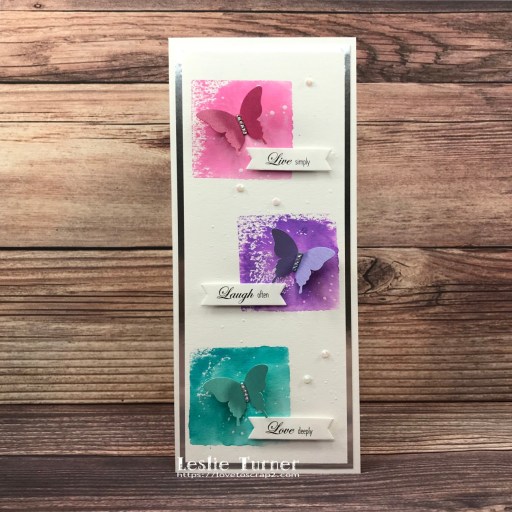
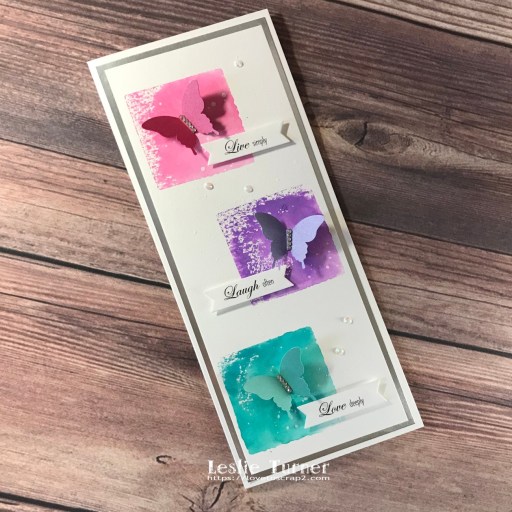
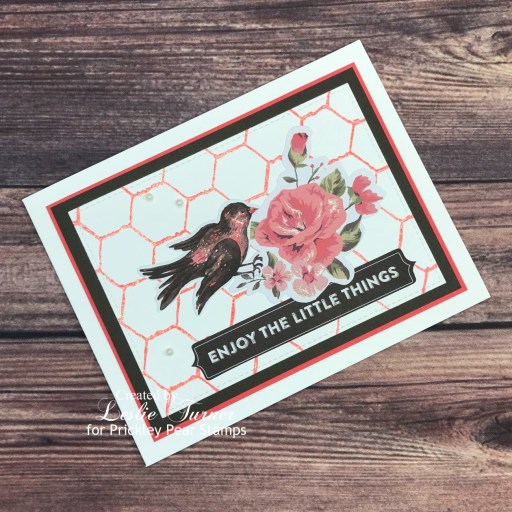
Howdy, friends! I hope you are having a most excellent week and you’re having some amazing weather where you are! Our weather here in southwestern Colorado is absolutely gorgeous and I have no complaints! I’ve popped in this morning with a Prickley Pear Stamps sample to share that I created with the new Chicken Wire Background stamp! Just as I did a couple weeks ago with the Woodgrain Background stamp, I created a card that’s not chicken-related to show how versatile this background stamp is as well! I used several Spellbinders Beauty Is Everywhere Die Cut Shapes along with a few Darice white flat-back pearls to make this background come to life!

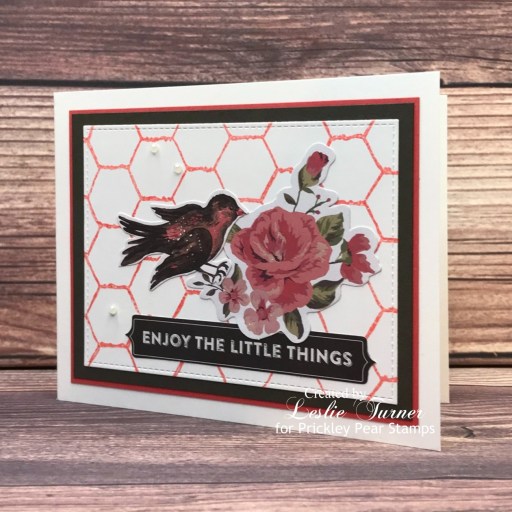
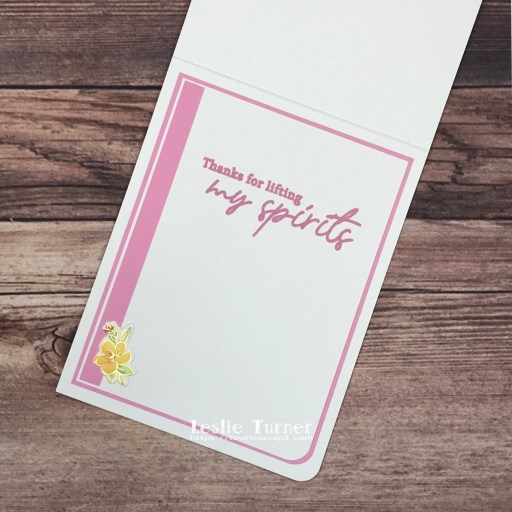
I cut a standard A2 size side-folding landscape card base from 110# Solar White cardstock along with layering panels from Stampin’ Up Watermelon Wonder cardstock, GKD Charcoal Brown cardstock and 80# Solar White cardstock. I cut the white layering panel with a My Favorite Things Stitched Rectangle STAX Die-namics die and then stamped the chicken wire background in Catherine Pooler Do-Si-Do ink. I stamped the chicken wire background again in Versamark over top of the pink ink and heat embossed it with Hero Arts Sparkle embossing powder. I adhered all the panels to the card base and then adhered the die cuts. The finishing touch was adding a few white flat-back pearls.

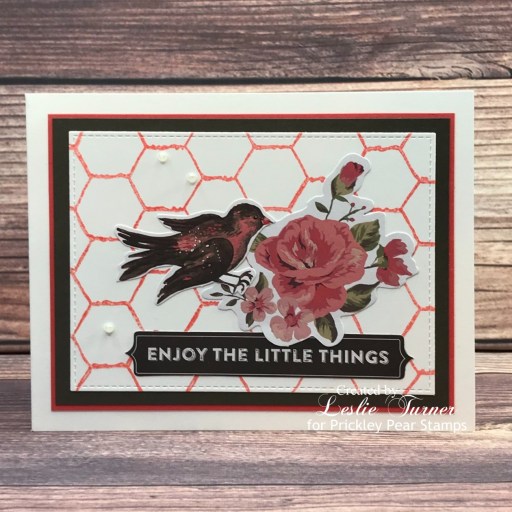
And one more look… I’m totally smitten with this card! I love the versatility of this chicken wire background stamp!

Sharing in the following challenges:
1. A Perfect Time To Craft Open Challenge: #05-2022 – Anything Goes
2. Classic Design Challenge: #5 May Anything Goes
3. Crafting Happiness Challenges: #123 – Anything Goes Always
4. Creative Moments: #234 – Summer’s Here
5. The Outlawz Monday Greetings Challenge: Anything Goes

Affiliate links are used in this post at no cost to you – I really appreciate your support!

Prickley Pear Stamps products used:
Chicken Wire Background stamp

Other products used:
Cardstock/Paper: Neenah Classic Crest 110# and 80# Solar White cardstock, GKD Charcoal Brown cardstock, Stampin’ Up Watermelon Wonder cardstock
Ink: Versamark, Catherine Pooler Do-Si-Do ink
Dies/Punches: My Favorite Things Stitched Rectangle STAX Die-namics
Accessories: We R Memory Keepers Large Guillotine Paper Trimmer, Tape Runner, Bearly Art precision craft glue, MISTI stamp tool, Milwaukee heat tool, Big Shot, Hero Arts Sparkle Embossing Powder, Spellbinders Beauty Is Everywhere Die Cut Shapes, Darice white flat-back pearls

I hope you’ve enjoyed this project! Be sure to check out all the awesome stamps and dies at Prickley Pear Stamps! If you’d like to save 10% on anything on the site when you shop at Prickley Pear Stamps, use the coupon code LESLIE10 at checkout! And be sure to ‘like’ and ‘follow’ the Prickley Pear Stamps Facebook page to keep up with news and sales, and join Prickley Pear Pals (the fan group) for lots of fun crafty ideas and to share your creativity! And finally, we’d love to see you visit the Prickley Pear Stamps blog that’s in the process of being revived and become a Follower! Hope to see you there! Thanks so much for stopping by today – we’ll see you next time! ;)

Scrappy hugs,

Thanks for lifting my spirits

Hi friends! I hope you’re having a wonderful week! Life is pretty darn good here in southwestern Colorado! We are having some gorgeous weather, our feline rescues are all healthy, and we are able to enjoy our hobbies. I’ve popped in this morning to share a pretty thank you card that I created to enter into the Pinkfresh Studio May 2022 Challenge – Anything Spring! I started this card with a different background a couple weeks ago and just wasn’t happy with it, so it sat on my desk until yesterday afternoon when the lightbulb came on and I ran with a totally different idea. I used a variety of Pinkfresh Studio products – the Painted Peony Mix Washi Tape and Die for the focal image, the Fancy Script Words Hot Foil Plate and Die for the front sentiment, and the Hibiscus stamp set for the inside sentiment! I think this captures the Spring theme pretty well, and I used four of the five gorgeous colors in the inspiration photo.

I cut a standard A2 size top-folding card base from 110# Solar White cardstock along with layering panels from CutCardStock Pop Tone Cotton Candy cardstock and 80# Solar White cardstock, and rounded the bottom right corner of each. I die cut a rope background from 110# Solar White cardstock and adhered it to the lighter weight white cardstock panel with Elmer’s Craft Bond Spray Adhesive, using a brayer to get good adhesion, and trimming the excess around all four edges. I sprayed Tattered Angels Gold Glimmer Mist on the background panel, and adhered it to the Cotton Candy panel and then to the card base.

I had previously created the flower cluster using the Pinkfresh Studio Painted Peony Mix Washi Tape and Die with 110# Solar White cardstock, so I adhered that to the background. Using the Spellbinders Glimmer Hot Foil System, a scrap of 110# Solar White cardstock and a roll of gold foil, I created the front sentiment using the Pinkfresh Studio Fancy Script Words Hot Foil Plate and Die (three layers thick) and adhered it to the card front. The finishing touch was adding several Kat Scrappiness gold pearls.

I cut the inside panel from 80# Solar White cardstock and embellished it with a strip of CutCardStock Cotton Candy cardstock and a die cut flower from the Pinkfresh Studio Painted Peony Mix Washi Tape. I stamped the sentiment in Catherine Pooler Pink Champagne ink and layered the panel on Cotton Candy cardstock.

And one more look… so loving how this turned out! I’m totally in love with all of the Pinkfresh Studio Washi Tape and Die bundles! The gold is such an elegant touch and you just can’t go wrong!

Sharing in the following challenges:
1. A Perfect Time To Craft Open Challenge: #05-2022 – Anything Goes
2. Alphabet Challenge Blog: D is for Die Cuts
3. Classic Design Challenge: #5 May Anything Goes
4. Crafting Happiness Challenges: #123 – Anything Goes Always
5. Crafty Catz: #596 – Anything Goes w/ optional Add Some Pink
6. Little Red Wagon: #654 – With a Little Help From My Friends
7. Use Your Stuff: #448 – Touch of Gold

Affiliate links are used in this post at no cost to you – I really appreciate your support! 

Products used:
Cardstock/Paper: Neenah Classic Crest 110# and 80# Solar White cardstock, CutCardStock Pop Tone Cotton Candy cardstock
Stamps: Pinkfresh Studio Hibiscus stamp set
Ink: Tattered Angels Gold Glimmer Mist, Catherine Pooler Pink Champagne ink
Dies/Punches: Kadomaru Pro corner rounder, Tutti Designs Twisted Rope background die
Accessories: We R Memory Keepers Large Guillotine Paper Trimmer, Bearly Art precision craft glue, MISTI stamp tool, Big Shot, brayer, Elmer’s Craft Bond Spray Adhesive, Pinkfresh Studio Painted Peony Mix Washi Tape and Die, Pinkfresh Studio Fancy Script Words Hot Foil Plate and Die, Spellbinders Glimmer Hot Foil System, Spellbinders Glimmer Gold Foil, Darice Double-Sided Adhesive Foam Circles, Kat Scrappiness Gold Pearl Mix

I hope you’ve enjoyed seeing this project! Thanks so much for stopping by today – we’ll see you next time! ;)

Scrappy hugs,

Hey Girl Hey

5/28/22 Top 3 at FarmQuest Challenge Blog!

Hi friends! Happy Happy Monday – here’s wishing you all a fabulous week ahead… Friday will be here before you know it! Bahahaha! I have another project to share with you today that I created for the Prickley Pear Stamps new release! This front step card (one of my favs) features the Hey Girl Hey stamp set and Chicken Wire Background stamp. These are stamps are large and easy to color, and this gal worked perfectly for the front of this card! Once again I kept with a warm color palette.

I cut the card base from CutCardStock Basis Gold cardstock and layering panels from Hot Off The Press Sunflowers 6×6 Double-Sided cardstock. I stamped the chicken wire background on all the patterned paper layering panels in Memento Peanut Brittle ink. I stamped the image from the Hey Girl Hey stamp set in Espresso Truffle ink on Neenah Classic Crest Solar White cardstock, colored it with alcohol markers, and cut it with a Memory Box Stitched Rectangle Layers die. I added Glossy Accents to her sunglasses, and when that was dry, I added white dots using a paint pen. I adhered the image to a patterned paper panel and then to card front, and stamped the sentiment beneath the image. The finishing touch was adding some Eyelet Outlet 4mm brown jewel bling.

And one more peek of the card folded flat. Have I mentioned how much fun this stamp set is?! Love, love, love!

Sharing in the following challenges:
1. A Perfect Time To Craft Open Challenge: #05-2022 – Anything Goes
2. Addicted To Stamps and More: #429 – Any Occasion
3. Alphabet Challenge Blog: D is for Die Cuts
4. Classic Design Challenge: #5 May Anything Goes
5. Crafting Happiness Challenges: #123 – Anything Goes Always
6. FarmQuest Challenge Blog: Theme #4 – Poultry and Wire or Metal
7. Paperbabe Stamps: #168 – Anything Goes

Affiliate links are used in this post at no cost to you – I really appreciate your support!

Prickley Pear Stamps products used:
Hey Girl Hey stamp set
Chicken Wire Background stamp

Other products used:
Cardstock/Paper: CutCardStock Basis Gold cardstock, Neenah Classic Crest 110# Solar White cardstock, Hot Off The Press Sunflowers 6×6 Double-Sided cardstock
Ink: Memento Peanut Brittle and Espresso Truffle inks; Arteza alcohol markers- YR00/12/32/37, R31, Y02/32/33, WG04; Sharpie White Paint Pen
Dies/Punches: Memory Box Stitched Rectangle Layers
Accessories: We R Memory Keepers Large Guillotine Paper Trimmer, Bearly Art precision craft glue, MISTI stamp tool, Big Shot, Glossy Accents, Eyelet Outlet 5mm brown jewel bling

I hope you’ve enjoyed this project! Be sure to check out all the awesome stamps and dies at Prickley Pear Stamps! If you’d like to save 10% on anything on the site when you shop at Prickley Pear Stamps, use the coupon code LESLIE10 at checkout! And be sure to ‘like’ and ‘follow’ the Prickley Pear Stamps Facebook page to keep up with news and sales, and join Prickley Pear Pals (the fan group) for lots of fun crafty ideas and to share your creativity! And finally, we’d love to see you visit the Prickley Pear Stamps blog that’s in the process of being revived and become a Follower! Hope to see you there! Thanks so much for stopping by today – we’ll see you next time! ;)

Scrappy hugs,

daytona beach may 78

Hey, everybody! I hope you had a great week and you’re having fun this weekend and staying healthy! I’m thrilled to be back on the Clear Scraps blog today with another awesome DT inspiration project! I created another 3-D Frameables project – these are so versatile and so much fun! I used the Base with Square Frame and Word n Shape Summer-Flip Flops this time to document a memory from May 1978 that is still just as fresh in my mind as it was that day! My BFF got a brand new 1978 Chevy Camaro which we drove up and down the strip on Daytona Beach – back in the day when people were actually allowed to drive on the beach. We had such a great time… hard to believe that was 44 years ago, lol!

I painted the word Summer with yellow acrylic paint and the flip flops with orange acrylic paint and let them dry. I adhered a piece of pink cardstock to the back of the flip flops and embellished them with enamel flowers.

I covered the smaller oval base with green dotted paper, the larger oval base with yellow striped paper, and the frame with red and white striped paper. I adhered an orange cardstock mini scallop frame around the opening of the frame. I added acetate to the back of the frame to keep the photo clean and free of dust (which unfortunately casts weird shadows on the photo, lol). I adhered the frame to the wood backing and let it dry overnight with clips. That’s me on the right, by the way. ;)

I added a pink scallop strip to the top edge of the frame and added white die cut letters spelling ‘daytona beach’ and then adhered pink strips to the left and right edges for a finished look. I added the date using white die cuts along with sunglasses and beach umbrealla brads. 

Sharing in the following challenges:
1. A Perfect Time To Craft Open Challenge: #05-2022 – Anything Goes
2. Classic Design Challenge: #5 May Anything Goes
3. Crafting Happiness Challenges: #123 – Anything Goes Always
4. Crafty Catz: #596 – Anything Goes w/ optional Add Some Pink
5. Cupcake Inspirations: #544 – Stripes

6. Little Red Wagon: #654 – With a Little Help From My Friends

Clear Scraps products used:
Base with Square Frame
Word n Shape Summer-Flip Flops

Other products used:
Cardstock/Paper: Canvas Corp Lots of Color Paper Collection, CutCardStock Stardream Metallic Flame cardstock, CutCardStock Stardream Metallic Azalea cardstock, Neenah Classic Crest Solar White cardstock
Dies/Punches: My Favorite Things Stitched Square STAX and Stitched Mini Scallop Square STAX Die-namics, Sizzix Alphanumeric Tiny Type Lower Thinlits, Stampin’ Up Scallop Edge Punch
Accessories: Tonic Studios 12″ Guillotine Paper Trimmer, Bearly Art precision craft glue, Liquitex Cadmium Light Hue and Primary Yellow acrylic paints, Eyelet Outlet Pastel Sunglasses and Beach Umbrella Brads, Eyelet Outlet Enamel Flowers and Clear Jewel Bling Strip

I hope you’ve enjoyed today’s project and you’re inspired to get those craft supplies out to play! Be sure to check out all the amazing acrylic, wood and chipboard goodies at Clear Scraps… OMGoodness, you won’t be disappointed! And head on over to the Clear Scraps Facebook Page for lots of inspiration! And while you’re at it, join the Clear Scraps Facebook Creative Group to connect with other Clear Scraps fans! Thanks so much for stopping by today – we’ll see you next time!

Scrappy hugs,

do more of what you love to do

Hi everyone! A very Happy Saturday to you – I hope you’ve had a great week! I’m stoked to be back on the Eyelet Outlet blog today with another awesome DT inspiration project! I’ve been having some fun with my Scan N Cut, and the cut file for this oven box card is from My Scrap Chick. I actually had my daughter in mind when I got this cut file because she loves to cook! ;) This card features our Cooking Brads, Baking Brads and Mixer & Cup Brads and was so much fun putting together!

I cut the card base from CutCardStock Astrobrights Solar Yellow, and all the remaining pieces from CutCardStock Astrobrights Re-Entry Red, Basis Light Yellow, Basis Black and Basis Gray cardstock, along with Neenah Classic Crest 80# Solar White cardstock. As I always mention, the greatest satisfaction I get is putting these box cards together and watching them come to life!

I drew markings on the clock with a Posca Black Paint pen. I adhered a mixing spoon brad and measuring cup brad to a piece of acetate so they would stand up on the cook top. I added two cookie sheet brads to the oven along with two oven mitts to the stove front.

I stamped a large sentiment from STAMPlorations in Memento Lady Bug ink on the back layered circle. This is a great all-occasion sentiment that could be used for just about any occasion.

And one more look… you know how much of box card fan I am, and this one was totally fun with all these awesome brads!

Sharing in the following challenges:
1. A Perfect Time To Craft Open Challenge: #05-2022 – Anything Goes
2. Classic Design Challenge: #5 May Anything Goes
3. Crafting Happiness Challenges: #123 – Anything Goes Always

Eyelet Outlet products used:
Cooking Brads
Baking Brads
Mixer & Cup Brads

Affiliate links are used in this post at no cost to you – I really appreciate your support!

Other products used:
Cardstock/Paper: CutCardStock Astrobrights Solar Yellow, Astrobrights Re-Entry Red, Basis Light Yellow, Basis Black, and Basis Gray cardstock; Neenah Classic Crest 80# Solar White cardstock
Stamps: STAMPlorations Do What You Love stamp
Ink: Posca Black Paint Pen; Memento Lady Bug ink
Dies/Punches/Cut Files: My Scrap Chick Oven Box Card cut file
Accessories: Brother Scan N Cut, Bearly Art precision craft glue, Ranger Collage Medium Matte, Grafix Crystal Clear Craft Plastic

I hope you’ve enjoyed today’s project! Be sure to check out all the fun goodies at Eyelet Outlet! I can already see you drooling, lol! Be sure to ‘like’ and ‘follow’ Eyelet Outlet Facebook Page to keep up with news and sales, and while you’re at it, join the Eyelet Outlet Fans Facebook group for lots of creative inspiration! Thanks so much for stopping by today – we’ll see you next time! ;)

Scrappy hugs,

Strong Women Make Waves

Hi everyone! I hope you’re having a great week and looking forward to the weekend that’s rapidly approaching! I’ve popped in this morning to share an awesome Tape Runner DT inspiration project! I created a fun friendship card featuring some sassy mermaids, and of course, all panels were adhered with Retractable Tape Runner! The mermaid stamps and dies have been in my stash for a bit just begging to be used, and I had a good play with a stencil and translucent embossing paste along with some mists and gorgeous foils – this was totally fun putting together!

As mentioned above, all panels were adhered with Retractable Tape Runner. Wet glue was used only to adhere the gemstones. I cut a standard A2 size card base from CutCardStock Stardream Metallic Lagoon cardstock along with layering panels from CutCardStock Basis Teal and Neenah Classic Crest 80# Solar White cardstock which I adhered together and then to the card base. I used DreamWeaver Translucent Embossing Paste and the Taylored Expressions Splash Stencil to create the background on a piece of Strathmore Cotton Watercolor cardstock and allowed it to dry. Next I sprayed Tattered Angels It’s Blue Glimmer Mist and Shade Simply Sheer Mist which gave the background some ‘sea’ color while keeping the splashes white, and then adhered it to the card base once dry.

I then created three mermaid tails using the Taylored Expressions Be A Mermaid detailed die along with DecoFoil Peel-N-Stick Toner Sheet and DecoFoil Glass Slipper, Rainglow and Purple Foil Transfer Sheets which I adhered to solid mermaid tails cut from CutCardStock Bright Gold and Bright Silver cardstock and then adhered to the card front. I stamped the sentiment in Catherine Pooler Bay Breeze ink on Solar White cardstock, trimmed it, and adhered it to the bottom of the card front. The finishing touch was adding several Taylored Expressions White Rhinestones.

I cut the inside panel from 80# Solar White cardstock and embellished it with a leftover strip trimmed from the background on the front and a narrow strip of teal cardstock. I stamped the sentiment from the Trinity Stamps A Sentiment For Almost Everything stamp set in teal ink on a scrap piece of Solar White cardstock, trimmed it and adhered it to the panel, then layered the panel on teal cardstock.

And one more peek… I really love how this one turned out! And it’s always great to have awesome adhesive to hold it all together!

Sharing in the following challenges:
1. A Perfect Time To Craft Open Challenge: #05-2022 – Anything Goes
2. Alphabet Challenge Blog: D is for Die Cuts
3. Classic Design Challenge: #5 May Anything Goes
4. Crafting Happiness Challenges: #123 – Anything Goes Always
5. Crafty Catz: #596 – Anything Goes w/ optional Add Some Pink
6. International Art & Soul: #133 – 3 of Something
7. Paperbabe Stamps: #168 – Anything Goes
8. World Wide Open Design Team Challenge: #05 – Anything Goes

Tape Runner products used:
Retractable Tape Runner

Affiliate links are used in this post at no cost to you – I really appreciate your support!

Other products used:
Cardstock/Paper: Strathmore Cotton Watercolor 5×7 cardstock, CutCardStock Stardream Metallic Lagoon cardstock, CutCardStock Basis Teal cardstock, Neenah Classic Crest 80# Solar White cardstock, CutCardStock Bright Gold Foil cardstock, CutCardStock Bright Silver Foil cardstock
Stamps: Taylored Expressions Be A Mermaid stamp set, Trinity Stamps A Sentiment For Almost Everything stamp set
Ink: Catherine Pooler Bay Breeze ink
Dies/Punches: Taylored Expressions Be A Mermaid die set
Accessories: We R Memory Keepers Large Guillotine Paper Trimmer, Bearly Art precision craft glue, MISTI stamping tool, Big Shot, DecoFoil Glass Slipper, Rainglow and Purple Transfer Sheets, DecoFoil Peel-N-Stick Toner Sheets, brayer, DreamWeaver Translucent Embossing Paste, DecoFoil Stencil Pal, Taylored Expressions Splash Stencil, Tattered Angels It’s Blue Glimmer Mist and Shade Simply Sheer Mist, Taylored Expressions White Rhinestones

I hope you’ve enjoyed today’s project and you’re inspired to get your craft on! Be sure to check out the ah-mazing Tape Runner, Retractable Tape Runner and Highlight Tape Runner at TapeRunner.com! Be sure to Follow us on Facebook and Instagram! Thanks so much for stopping by today – we’ll see you next time!

Scrappy hugs,

Wishing You an Egg-Cellent Day

Hey everybody, Happy Thursday! I hope your week is going without incident! We had a sad little hiccup here with a very pregnant female kitty that a neighbor trapped and brought to us. She was very sick so the vet put her on an antibiotic, but sadly all six newborn kittens got sick too and none of them made it. Fly high, sweet babies, God had other plans for you. <3 On a lighter note, I’ve popped in this morning to share another super cute sample created with one of the amazing stamp sets in the Prickley Pear Stamps new release. I created an adorable friendship card featuring the new Chicken Gal Pals stamp set! OMGoodness, I L-O-V-E this stamp set! I stuck with a warm color palette of yellow, brown and red, but the possibilities are endless coloring these gals – from subdued to bright and funky!

I cut a standard A2 size side-folding landscape card base from 110# Solar White cardstock and rounded the bottom right corner. I also cut a layering panel and strip from CutCardStock Basis Gold cardstock, another layering panel from 80# Solar White cardstock, and a flag from CutCardStock Basis Light Yellow cardstock. I stamped chicken wire repetitively over the lighter weight Solar White layering panel in Memento Luxe Wedding Dress ink and adhered it to the Basis Gold panel, and then adhered the Basis Gold strip across the bottom. I stamped the chicken, nest and egg images on a piece of the lighter weight Solar White cardstock, colored them with alcohol markers, and fussy cut them all. Finally, I stamped the sentiment on the flag and adhered it to the upper left corner, and then arranged the mama chicken, her eggs and chicks. The finishing touch was adding a few Eyelet Outlet clear gemstones that I colored with a light brown alcohol marker and an Eyelet Outlet red enamel heart to the flag.

And one more look… super happy with how this friendship card turned out! Love, love, love this stamp set!

Sharing in the following challenges:
1. A Perfect Time To Craft Open Challenge: #05-2022 – Anything Goes
2. Addicted To Stamps and More: #429 – Any Occasion
3. Classic Design Challenge: #5 May Anything Goes
4. Crafting Happiness Challenges: #123 – Anything Goes Always
5. Critter Crazy Challenges: #62 – Anything Goes with a Featured Critter
6. FarmQuest Challenge Blog: Theme #4 – Poultry and Wire or Metal

Affiliate links are used in this post at no cost to you – I really appreciate your support!

Prickley Pear Stamps products used:
Chicken Gal Pals Stamp Set

Other products used:
Cardstock/Paper: Neenah Classic Crest 110# and 80# Solar White cardstock, CutCardStock Basis Gold cardstock, CutCardStock Basis Light Yellow cardstock
Ink: Memento Tuxedo Black ink; Arteza alcohol markers- Y12/32/33/39, R31, YR00; Memento Luxe Wedding Dress ink
Dies/Punches: Stampin’ Up Triple Banner Punch, Kadomaru Pro corner rounder
Accessories: We R Memory Keepers Large Guillotine Paper Trimmer, Bearly Art precision craft glue, MISTI stamp tool, Eyelet Outlet clear jewel bling, Eyelet Outlet red enamel heart

I hope you’ve enjoyed this project! Be sure to check out all the awesome stamps and dies at Prickley Pear Stamps! If you’d like to save 10% on anything on the site when you shop at Prickley Pear Stamps, use the coupon code LESLIE10 at checkout! And be sure to ‘like’ and ‘follow’ the Prickley Pear Stamps Facebook page to keep up with news and sales, and join Prickley Pear Pals (the fan group) for lots of fun crafty ideas and to share your creativity! And finally, we’d love to see you visit the Prickley Pear Stamps blog that’s in the process of being revived and become a Follower! Hope to see you there! Thanks so much for stopping by today – we’ll see you next time! ;)

Scrappy hugs,

You’re Kind of a Big Deal

Hey y’all, Happy Hump Day! Hope you’re having a great week! I have an awesome CutCardStock DT inspiration project to share with you today featuring more of our Basis cardstock that’s on sale this month. I’m a huge fan of the Basis 110# weight for card bases, and we have some absolutely gorgeous colors of Basis 80# layering weight, so be sure to stock up! I have shared quite a few Mother’s Day cards over the past several months, and since Father’s Day will be here in just a few short weeks, I’m still cranking out Father’s Day cards. I happened to have some cool seascape patterned paper in my stash that coordinates very well with a new stamp set and coordinating punch, so that’s the direction I went!

I cut a 3-1/2″ x 6″ mini slimline card base from our Basis 110# White cardstock along with layering panels from Basis Blue cardstock and a seascape patterned paper which I adhered together to create a cool background. I stamped the whale from the Stampin’ Up ‘Whale Done’ stamp set in Catherine Pooler Twilight ink on a scrap of 80# Solar White and punched it with the coordinating punch. I punched several additional whales from scraps of 80# Solar White and Basis White that I had out on my desk, and layered them behind the stamped whale for a little dimension. I stamped the sentiment (from the same stamp set) in Memento Tuxedo Black ink in the upper right corner and added a small green enamel heart, which completed the card front.

I cut the inside panel from Basis 80# White cardstock and embellished it with strips of the seascape patterned paper and Basis Blue cardstock used on the front. I stamped the inside sentiment from the Hero Arts ‘Year-Round Messages’ stamp set in Tuxedo Black ink on a scrap piece of Basis White and added some narrow strips of Basis Medium Blue cardstock for a little interest.

And one more look… totally loving this card! Our Basis cardstock paired with great patterned paper makes the most awesome cards!

Sharing in the following challenges:
1. A Perfect Time To Craft Open Challenge: #05-2022 – Anything Goes
2. Cardz 4 Guyz: #296 – Wildlife
3. Classic Design Challenge: #5 May Anything Goes
4. Crafting Happiness Challenges: #123 – Anything Goes Always
5. Critter Crazy Challenges: #62 – Anything Goes with a Featured Critter
6. Lil Patch of Crafty Friends: #182 – Anything Goes

Affiliate links are used in this post at no cost to you – I really appreciate your support!

CutCardStock products used:
Basis 110# White cardstock
Basis 80# White cardstock
Neenah Classic Crest 110# Solar White cardstock
Basis Blue cardstock
Basis Medium Blue cardstock

Other products used:
Paper: Hot Off The Press Seascapes & Sand 6×6 double-sided cardstock
Stamps: Stampin’ Up Whale Done stamp set
Ink: Catherine Pooler Twilight ink, Memento Tuxedo Black ink
Dies/Punches: Stampin’ Up Whale Punch
Accessories: We R Memory Keepers Large Guillotine Paper Trimmer, Bearly Art precision craft glue, MISTI stamp tool, Eyelet Outlet Enamel Heart

I hope you’ve enjoyed today’s project and you’re inspired to get crafty! Be sure to check out all the awesome cardstock and other goodies at CutCardStock (adhesives, labels, stickers, pens, watercolors and ribbon to name a few). And head on over to the CutCardStock Facebook Page for more inspiration! Thanks so much for stopping by today – we’ll see you next time!

Scrappy hugs,

Live-Laugh-Love Note Card

5/27/22 Top 3 at CAS on Friday!

Hey everybody! Happy Tuesday to you all! I’m happy to share that I was invited to guest design over at Try It On Tuesday after scoring a Top 5 spot last month, so here I am with my GD inspiration project! The challenge theme this fortnight is Butterflies and I created a slimline card featuring butterflies on acrylic block stamping. I’ve done this technique quite a few times over the years although it’s been nearly two years since the last time. It is apparently making a come-back because I’ve seen it again recently on two Instagram reels so it’s been on my mind. And the cool part is I didn’t even realize when I picked out the pink, purple and teal distress oxides that I had matching shades of Stardream Metallic cardstock in my stash to use for the butterflies! A definite ‘score’ there!

I cut a 3-3/4″ x 9″ slimline card base from Basis 110# White cardstock along with layering panels from Bright Silver Foil cardstock and Basis 80# White cardstock. I inked up a 2″ square acrylic block with picked raspberry distress oxide, lightly spritzed it with water in my distress sprayer, and stamped it on the white layering panel. I repeated the process with wilted violet and peacock feathers distress oxides and gave it a few minutes to dry, then splattered white gesso mixed with a tiny bit of water over the panel with a fan brush. I adhered the panel to the Silver Foil cardstock layer and then to the card base.

I printed the Live, Laugh and Love sentiments on Basis White cardstock, cut them with a fishtail sentiment strip die, and adhered them to the panel on foam squares. I punched the butterflies from Azalea, Amethyst and Lagoon Stardream Metallic cardstock, embellished them with tiny iridescent gemstones, and adhered one to each stamped block. The final touch was adding several slightly larger iridescent gemstones.

I cut the inside panel from Basis 80# White cardstock and embellished it with small leftover strips of Amethyst Stardream Metallic cardstock and an additional punched butterfly. Since this is a note card, I left the inside panel blank, leaving plenty of room to write a custom message, and adhered it to a Silver Foil cardstock panel.

And one more peek… really loving how this turned out! It’s so awesome when an idea comes together exactly as I’ve pictured it in my head!

Sharing in the following challenges:
1. A Perfect Time To Craft Open Challenge: #05-2022 – Anything Goes
2. Addicted To Stamps and More: #429 – Any Occasion
3. CAS on Friday: #231 – Butterflies
4. Classic Design Challenge: #5 May Anything Goes
5. Crafting Happiness Challenges: #123 – Anything Goes Always
6. Creative Moments: #234 – Summer’s Here (and so are the butterflies ;)
7. Incy Wincy Designs Challenge: May Challenge – Use a Die Cut or Punch
8. International Art & Soul: #133 – 3 of Something
9. Lil Patch of Crafty Friends: #182 – Anything Goes
10. Make My Monday: #174 – Springtime
11. World Wide Open Design Team Challenge: #05 – Anything Goes

Affiliate links are used in this post at no cost to you – I really appreciate your support! 

Products used:
Cardstock/Paper: CutCardStock Basis 110# White cardstock, Basis 80# White cardstock, Stardream Metallic Azalea cardstock, Stardream Metallic Amethyst cardstock, Stardream Metallic Lagoon cardstock, Bright Silver Foil cardstock
Stamps: Computer-generated Live, Laugh and Love sentiments
Ink: Ranger distress oxides- picked raspberry, wilted violet and peacock feathers
Dies/Punches: Stampin’ Up Elegant Butterfly punch, My Favorite Things Essential Fishtail Sentiment Strip dies
Accessories: We R Memory Keepers Large Guillotine Paper Trimmer, Bearly Art precision craft glue, 2″ square acrylic stamping block, Tim Holtz Distress Sprayer, Liquitex White Gesso, fan brush, Darice tiny iridescent gemstones, Taylored Expressions White Rhinestones, Trinity Pick Up Stick, Scrapbook Adhesives 3D Foam Squares Variety Pack (small white)

I hope you’ve enjoyed seeing this project and will link up with us this time! Thanks so much for stopping by today – we’ll see you next time! ;)

Scrappy hugs,

Congrats Mini Slim Note Card

Hey everybody! I hope you’re having a great Monday! I’ve popped in a second time today to share a pretty congrats note card featuring the Kat Scrappiness Mini Slimline Fancy Scalloped Dies, Mini Slimline Tri-Frame Dies, Congrats Word Die with Shadow and Silver Pearl bling! I’ve been on the look-out for some time now for dies made specifically for a 3-1/2″ x 6″ size mini slim because it’s my personal favorite size that’s legal to mail. Well, I found quite a few more (plus some awesome word dies) at Kat Scrappiness and I can’t tell you how excited I am to have found these! They make the perfect mini slimline cards!

I cut a mini slimline card base from 110# Solar White cardstock along with a layering panel from red striped pattern paper from Sunny Studio using the Mini Slimline Fancy Scalloped Dies. Next I cut a stitched frame from 80# Solar White cardstock and a rectangle from CutCardStock Stardream Metallic Jupiter cardstock using the Mini Slimline Tri-Frame Dies. Using the shadow die from the Congrats Word Die with Shadow, I cut an aperture in the Metallic Jupiter cardstock piece and adhered a two-layer Congrats die cut sentiment cut from CutCardStock Bright Silver Foil cardstock. The finishing touch was adding several pearls from the Silver Pearl Mix.

I cut the inside panel from CutCardStock Stardream Metallic Jupiter cardstock using the Mini Slimline Fancy Scalloped Dies and embellished it with a panel cut from 80# Solar White cardstock and scraps of Sunny Studio red striped pattern paper and Metallic Jupiter cardstock using the Mini Slimline Tri-Frame dies. Since it’s a note card, I left the inside blank with room to write a custom message.

And one more peek… did I mention how excited I am to have found these awesome Kat Scrappiness dies?! LOVE how this turned out!

Sharing in the following challenges:
1. A Perfect Time To Craft Open Challenge: #05-2022 – Anything Goes
2. Classic Design Challenge: #5 May Anything Goes
3. Crafting Happiness Challenges: #123 – Anything Goes Always
4. Cupcake Inspirations: #544 – Stripes

5. Incy Wincy Designs Challenge: May Challenge – Use a Die Cut or Punch
6. Lil Patch of Crafty Friends: #182 – Anything Goes

Affiliate links are used in this post at no cost to you – I really appreciate your support! 

Products used:
Cardstock/Paper: Neenah Classic Crest 110# and 80# Solar White cardstock, CutCardStock Stardream Metallic Jupiter cardstock, CutCardStock Bright Silver Foil cardstock, Sunny Studio Striped Silly 6×6 Double-Sided Paper
Dies/Punches: Kat Scrappiness Mini Slimline Fancy Scalloped Dies, Mini Slimline Tri-Frame Dies and Congrats Word Die with Shadow
Accessories: We R Memory Keepers Large Guillotine Paper Trimmer, Bearly Art precision craft glue, Big Shot, Kat Scrappiness Silver Pearl Mix, Trinity Pick-Up Stick

I hope you’ve enjoyed seeing this project! Thanks so much for stopping by and we’ll see you next time! ;)

Scrappy hugs,