Can’t Wait To See You Tag

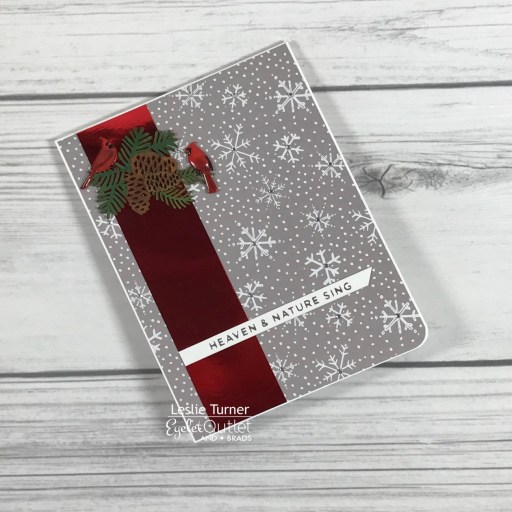
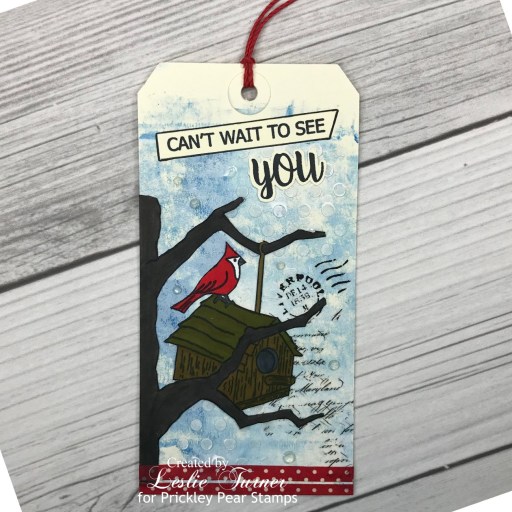
Hi friends! Happy Monday! Can’t believe how fast the time if flying by! I told the cashier at the grocery store this morning that half the year is almost over already and it just got started, lol! I have a Prickley Pear Stamps project to share with you today that I created to showcase the new All About You Cardinal stamp set – another beauty in the new release! This stamp set is absolutely gorgeous with so many possibilities! I created a simple mixed media tag featuring a paper-pieced image in the foreground (colored with Karin Brush Markers) along with acrylic inks applied with a brayer, stenciling with gel medium, more acrylic ink applied with the fingertip, and a 49 and Market curators Botanical Rub-On Transfer!

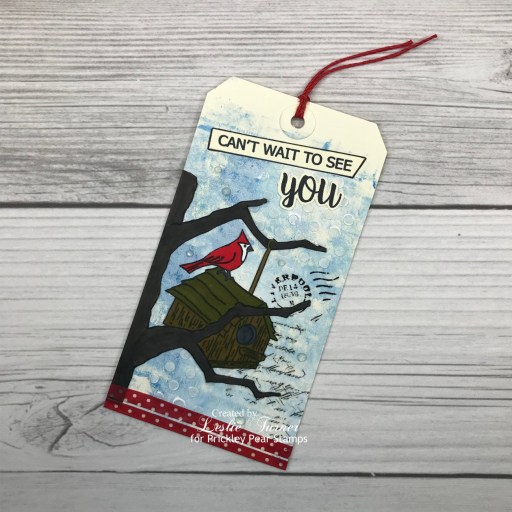
I started by stamping the cardinal image from the All About You Cardinal stamp set in Memento Tuxedo Black ink onto a piece of 165# Solar White cardstock (super heavyweight cardstock for dimension), colored it with Karin Brush Markers and fussy cut it, then ran a Memento Tuxedo Black marker around the outside edge for a more finished look. I set it aside while I worked on the tag. I applied Liquitex Cerulean Blue Hue and Titanium White acrylic paints with a brayer onto the front surface of a Tim Holtz Distress Tag. I created some background texture with a Memory Box Texture Mini Dots Designer Stencil and Golden Gel Medium. When that dried, I rubbed a tiny bit more Titanium White acrylic paint over the raised dots with my finger tip.

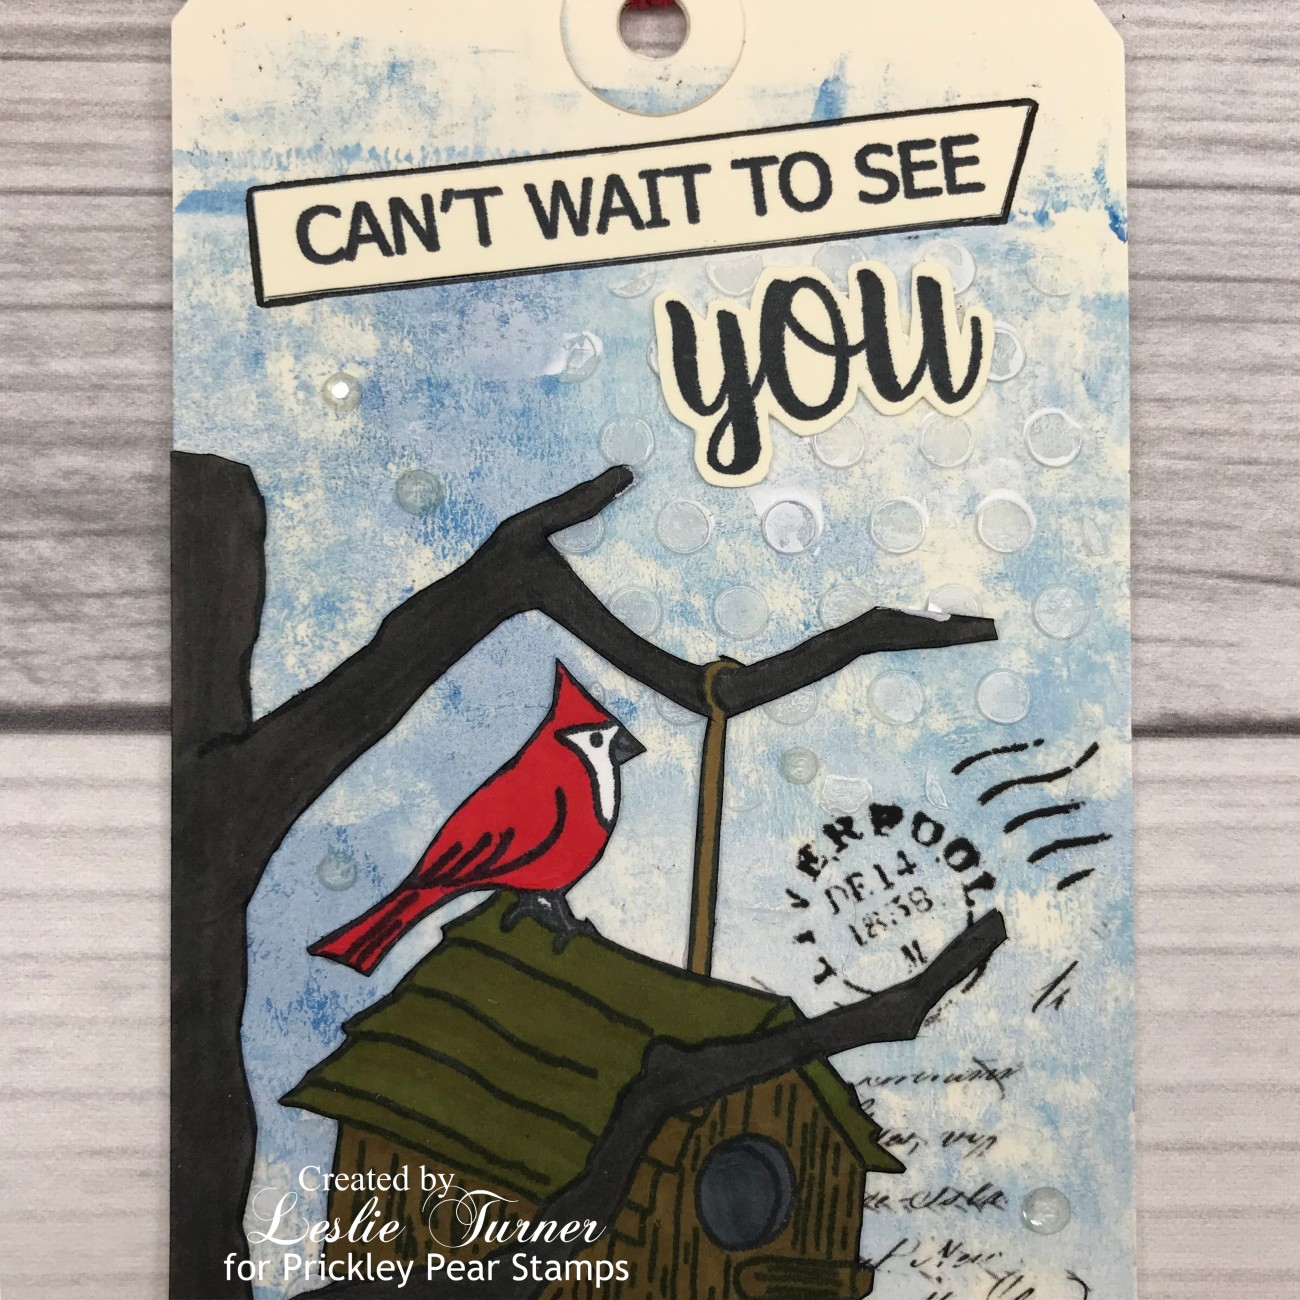
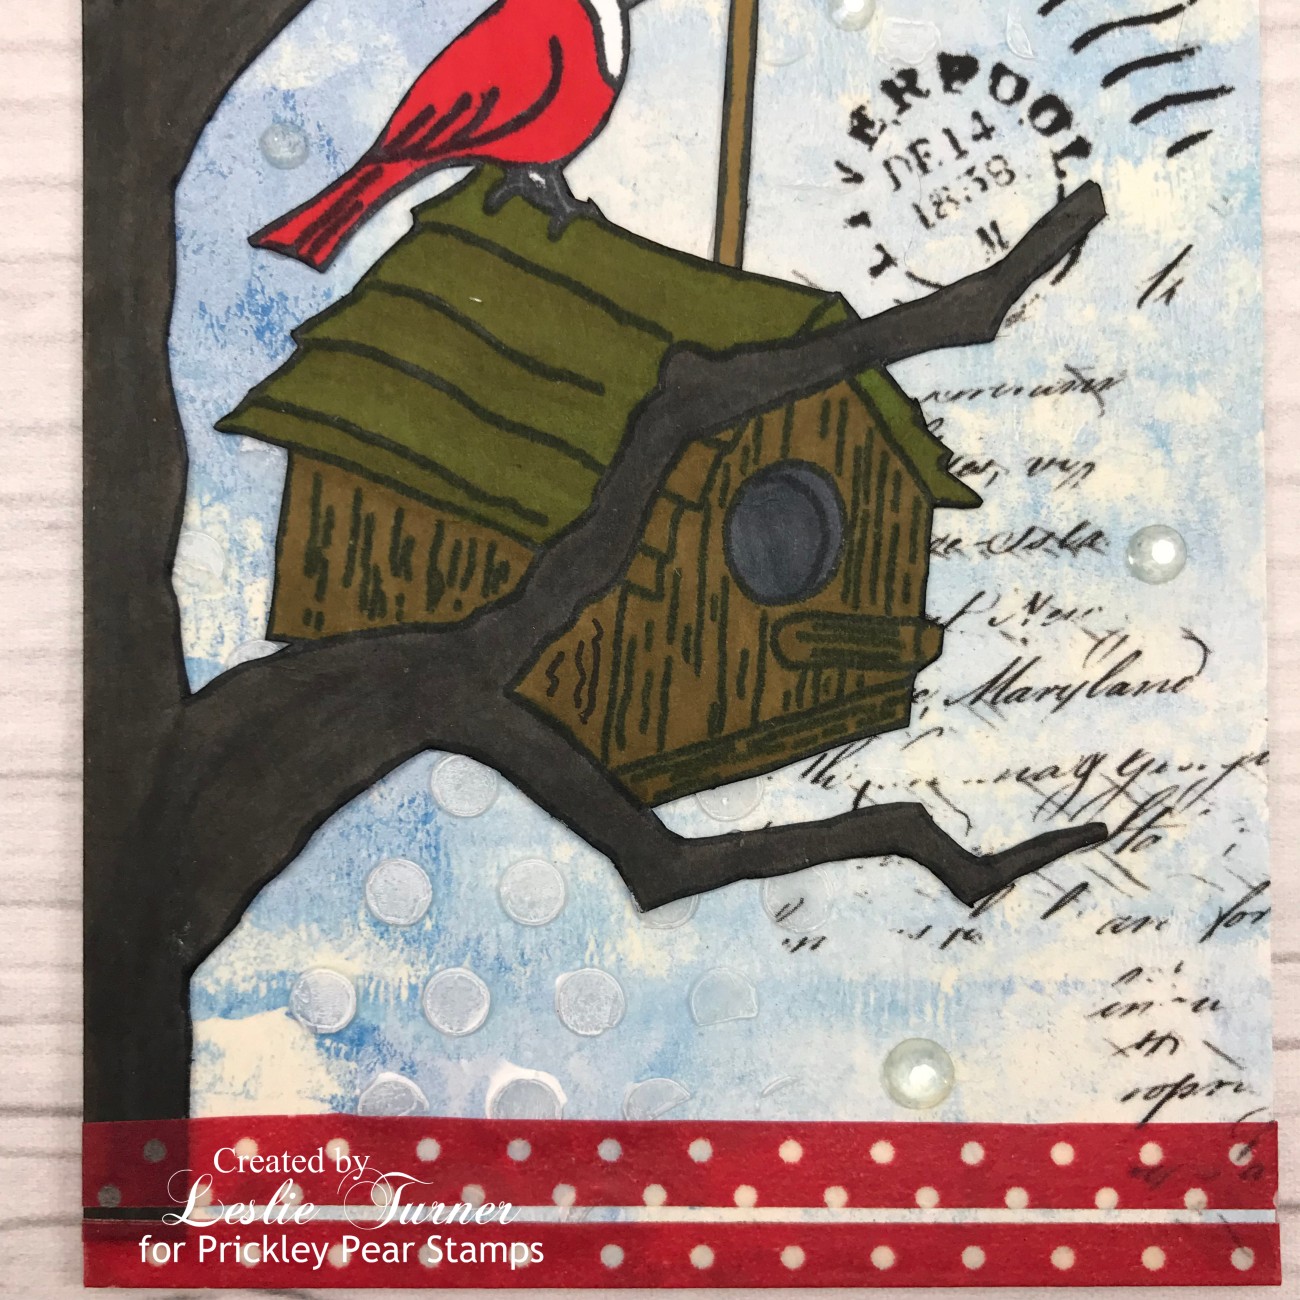
I applied a 49 and Market curators Botanical Rub-On Transfer and then adhered the cardinal image. I stamped the sentiment on Baronial Ivory cardstock in black ink, trimmed the first portion and outlined it with a black marker after adhering it to the tag. I fussy cut the remaining word and adhered it just below the first portion. I added a few Studio Katia Sparkling Crystals and a strip of Eyelet Outlet Red/White Dot Washi Tape cut in half lengthwise. I threaded some Hemptique Red Hemp Crafting Cord through the hole at the top to finish it off.

Sharing in the following challenges:
1. 613 Avenue Create: #202205 – May Anything Goes w/ optional Mother’s Day Slimline (no twist)
2. A Perfect Time To Craft Open Challenge: #05-2022 – Anything Goes
3. Classic Design Challenge: #5 May Anything Goes
4. Crafty Friends Challenge Blog: #155 – Animals/Birds
5. Crafting Happiness Challenges: #123 – Anything Goes Always
6. Jan’s Digi Stamps Challenge: May Anything Goes
7. Scrapping4fun Challenges: #212 – Anything Goes
8. Stamping Sensations: May Challenge – Anything Stamped w/ optional Floral and Fauna

Affiliate links are used in this post at no cost to you – I really appreciate your support!

Prickley Pear Stamps products used:
All About You Cardinal stamp set

Other products used:
Cardstock/Paper: Tim Holtz Distress Tags, Neenah Classic Crest 165# Solar White cardstock, Neenah Classic Baronial Ivory cardstock
Ink/Paint: Memento Tuxedo Black ink (pad and marker); Karin Brush Markers- Cocoa, Sandstone, Red, Neutral Grey 3, Olive Green and Apple; Liquitex Cerulean Blue Hue and Titanium White acrylic paints
Accessories: Brayer, MISTI stamp tool, Memory Box Texture Mini Dots Designer Stencil, Golden Gel Medium, 49 and Market Curators Botanical Rub-On Transfers, Bearly Art precision craft glue, Eyelet Outlet Red/White Dot Washi Tape, Studio Katia Sparkling Crystals, Hemptique Red Hemp Crafting Cord

I hope you’ve enjoyed this project! Be sure to check out all the awesome stamps and dies at Prickley Pear Stamps! If you’d like to save 10% on anything on the site when you shop at Prickley Pear Stamps, use the coupon code LESLIE10 at checkout! And be sure to ‘like’ and ‘follow’ the Prickley Pear Stamps Facebook page to keep up with news and sales, and join Prickley Pear Pals (the fan group) for lots of fun crafty ideas and to share your creativity! And finally, we’d love to see you visit the Prickley Pear Stamps blog that’s in the process of being revived and become a Follower! Hope to see you there! Thanks so much for stopping by today – we’ll see you next time! ;)

Scrappy hugs,

YOU ROCK! Treat Box

5/31/22 DT Favorite Winner at Classic Design Challenge Blog!
6/28/22 DT Favorite Winner at A Perfect Time To Craft Open Challenge Blog!

Hey everybody! I hope you’re having a great weekend and enjoying some wonderful weather! Our new challenge is live this morning over at Mix It Up Challenge Blog and I’m excited to share my DT inspiration project for MIUCB #59 – Anything Goes + optional 3-D Project! The sky is the limit for this one! Of course, the twist is never mandatory to play but we always love seeing our players inspired to play the twist! Let’s see some jewelry or a gift box, canvas, gift bag, home décor, etc. this time! I created a fun treat box with my Scan N Cut that looks like a jukebox! So stinkin’ cute I can’t even stand it!

I cut all the pieces from CutCardStock Basis Brown, Basis Teal, Basis White, Basis Black, Basis Gold, Stardream Metallic Silver, Pop-Tone Grape Jelly, Pop-Tone Razzleberry and Astrobright Re-Entry Red cardstock. I added a sentiment from Brutus Monroe Conversation Clippings Sweet Sayings which fits perfectly!

I know I’ve mentioned numerous times that the real fun is the assembly! None of the individual projects take very long to put together but I always cut multiple files in one sitting so I have lots and lots of assembly time to look forward to! ;)

Sharing in the following challenges:
1. 613 Avenue Create: #202205 – May Anything Goes w/ optional twist of Mother’s Day Slimline Card (no twist)
2. A Perfect Time To Craft Open Challenge: #05-2022 – Anything Goes
3. Classic Design Challenges: May #5 – Anything Goes
4. Crafting Happiness Challenges: #123 – Anything Goes Always
5. Crafty Catz: #593 – Anything Goes w/ optional Use Three Favorite Colors (pink, purple, teal)

Affiliate links are used in this post at no cost to you – I really appreciate your support! 

Products used:
Cardstock/Paper: CutCardStock Basis Brown, Basis Teal, Basis White, Basis Black and Basis Gold cardstock, CutCardStock Stardream Metallic Silver cardstock, CutCardStock Pop-Tone Grape Jelly and Pop-Tone Razzleberry cardstock, CutCardStock Astrobright Re-Entry Red cardstock
Dies/Punches: My Scrap Chick Jukebox Box cut file
Accessories: Brother Scan N Cut, Bearly Art precision craft glue, Brutus Monroe Conversation Clippings Sweet Sayings

I hope you’ve enjoyed seeing this adorable treat box and you’ll link up with us this time! Thanks so much for stopping by today – we’ll see you next time! ;)

Scrappy hugs,

fa la la la llama!

Hi friends! Well, another month is starting today and it’s really hard to believe it’s the 1st of May already! The months are flying by! Our new challenge is live this morning over at Merry Little Christmas Challenge Blog and I’m super stoked to share my DT inspiration project for MLCCB #44 – Anything Christmas Goes! Doesn’t this guy just make you giggle?! OMGosh, I chuckled the entire time I was assembling this card!

Using the Hero Arts Color Layering Llama stamp set, I stamped the image on 80# Solar White cardstock with a variety of Stampin’ Up inks and cut it with the coordinating die. I used the Concord & 9th Gingham Background stamp set to stamp the background and trimmed the panel to fit a standard A2 size top-folding card base cut from CutCardStock Basis Green cardstock. I cut a narrow panel from CutCardStock Basis Light Brown cardstock and adhered it to the background along with a narrow strip cut from the green cardstock. I adhered the llama with Stampin’ Up Dimensionals and stamped the sentiment and musical notes. The final touch was adding Eyelet Outlet Holiday Bling to complete the card front.

I cut the inside panel from 80# Solar White cardstock and embellished it with a leftover strip trimmed from the stamped gingham panel on the front and a narrow strip of CutCardStock Basis Green cardstock. I stamped a sentiment from the Hero Arts Year Round Messages stamp set and layered the panel on CutCardStock Basis Light Brown cardstock.

And one more peek… I can’t get over this llama! He’s so stinkin’ cute I can’t stand it!

Sharing in the following challenges:
1. 613 Avenue Create: #202205 – May Anything Goes w/ optional twist of Mother’s Day Slimline Card (no twist)
2. A Perfect Time To Craft Open Challenge: #05-2022 – Anything Goes
3. Classic Design Challenges: May #5 – Anything Goes
4. Crafting Happiness Challenges: #123 – Anything Goes Always
5. Crafty Catz: #593 – Anything Goes w/ optional Use Three Favorite Colors (traditional Christmas colors)
6. Crafty Friends Challenge Blog: #155 – Animals
7. Critter Crazy Challenges: #62 – Anything Goes with a Featured Critter
8. Incy Wincy Design Challenges: May Challenge – Use a Die Cut or Punch
9. Lil Patch of Crafty Friends: #181 – Anything Goes
10. Paperbabe Stamps: #166 – Anything Goes
11. QKR Stampede: #443 – Anything Goes
12. Scrapping4fun Challenges: #212 – Anything Goes
13. Through The Craft Room Door: April 26th Anything Goes
14. World Wide Open Design Team Challenge: #04-April 2022 – Anything Goes

Affiliate links are used in this post at no cost to you – I really appreciate your support! 

Products used:
Cardstock/Paper: Neenah Classic Crest Solar White cardstock, CutCardStock Basis Green cardstock, CutCardStock Basis Light Brown cardstock
Stamps: Hero Arts Color Layering Llama stamp set, Concord & 9th Gingham Background stamp set, Hero Arts Year Round Messages stamp set
Ink: Memento Tuxedo Black ink; Stampin’ Up Delightful Dijon, Baked Brown Sugar, Early Espresso, Cherry Cobbler and Emerald Envy inks; Catherine Pooler Cranberry Fizz ink
Dies/Punches: Hero Arts Color Layering Llama die set
Accessories: Tonic Studios 12″ Guillotine Paper Trimmer, Tombow Mono permanent adhesive, Bearly Art precision craft glue, MISTI stamp tool, Stampin’ Up Dimensionals, Eyelet Outlet Holiday Bling

I hope you’ve enjoyed seeing this card and will link up a Christmas project with us this time! Thanks so much for stopping by today – we’ll see you next time! ;)

Scrappy hugs,

Happy Father’s Day

Hi friends! I hope you’re having a great weekend and some good weather where you are! It’s absolutely gorgeous here in southwestern Colorado! Our new challenge is live this morning over at Love To Scrap Challenge Blog and I’m thrilled to share my DT inspiration project for LTSCB #155 – Anything Goes! I created a Father’s Day card featuring the C.C. Designs Large Mouth Bass rubber stamp. This stamp is one I’ve had in my stash for several years and I do believe this is the first time I’ve used it! It’s a nice large stamp that’s great for masculine cards and I love it!

I cut a standard A2 size top-folding card base from 110# Solar White cardstock along with half layering panels from two coordinating patterned papers in the Recollections Bold Basics paper pad which I adhered to the card base with a narrow strip of Stampin’ Up So Saffron cardstock adhered to the seam. I stamped the C.C. Designs Large Mouth Bass image on Solar White cardstock, colored it with alcohol markers, and cut it with a Memory Box Stitched Circle Layers die. I adhered the die cut image to the front of the card and stamped the Father’s Day sentiment from the Trinity Stamps A Sentiment For (Almost) Everything stamp set. I added two Eyelet Outlet Green Enamel dots to the upper corners along with Ranger Glossy Accents to the water droplets on the image, and set it aside to dry.

I cut the inside panel from 80# Solar White cardstock and embellished it with leftover strips of patterned paper and yellow cardstock used on the front. I stamped the sentiment from the Pretty Pink Posh Mom stamp set (yep, a feminine stamp set for this masculine card because it’s a great sentiment and it fits!) in black ink and layered the panel on yellow cardstock.

And one more look… such an awesome rubber stamp for a masculine card and I don’t know why I haven’t used it before now!

Sharing in the following challenges:
1. 613 Avenue Create: #202205 – May Anything Goes w/ optional twist of Mother’s Day Slimline Card (no twist)
2. A Perfect Time To Craft Open Challenge: #05-2022 – Anything Goes
3. Classic Design Challenges: May #5 – Anything Goes
4. Crafting Happiness Challenges: #123 – Anything Goes Always
5. Crafty Friends Challenge Blog: #155 – Animals
6. Critter Crazy Challenges: #62 – Anything Goes with a Featured Critter
7. Incy Wincy Design Challenges: May Challenge – Use a Die Cut or Punch
8. Lil Patch of Crafty Friends: #181 – Anything Goes
9. Paperbabe Stamps: #166 – Anything Goes
10. QKR Stampede: #443 – Anything Goes
11. Scrapping4fun Challenges: #212 – Anything Goes
12. Through The Craft Room Door: April 26th Anything Goes

Affiliate links are used in this post at no cost to you – I really appreciate your support! 

Products used:
Cardstock/Paper: Neenah Classic Crest 110# and 80# Solar White cardstock, Stampin’ Up So Saffron cardstock, Recollections Bold Basics paper pad
Stamps: C.C. Designs Large Mouth Bass rubber stamp, Trinity Stamps A Sentiment For (Almost) Everything stamp set, Pretty Pink Posh Mom stamp set
Ink: Memento Tuxedo Black ink; Nuvo alcohol markers- 379-Rich Reds Collection, 408-Organic Greens Collection, 410/412/416-Irish Clover Collection, 425/427-Marina Blues Collection, 473-Fair Skin Tones, 476-Ombre Collection
Dies/Punches: Memory Box Stitched Circle Layers die
Accessories: Tonic Studios 12″ Guillotine Paper Trimmer, Bearly Art precision craft glue, MISTI stamp tool, Gemini Junior, Ranger Glossy Accents, Eyelet Outlet Green Enamel Dots

I hope you’ve enjoyed this masculine card – Father’s Day will be here in a few short weeks! We’d love for you to link up an Anything Goes project with us this time! Thanks so much for stopping by today – we’ll see you next time! ;)

Scrappy hugs,

Scalloped Thanks

5/7/22 Top Rocker at 613 Avenue Create!

Hi everybody! A big ol’ Happy Weekend to you – I hope you’re doing something fun this weekend! Our new challenge has launched this morning over at Love To Craft Challenge Blog and I’m delighted to share my DT inspiration project for LTCCB #68 – Anything Goes! I’ve had this awesome Simply Crafty SVGs Scallop Thanks cut file in my arsenal since I was on Sandy’s design team and this is only the second time I’ve used it. It sure packs a punch!

Using my Scan N Cut, I cut the base from Cardstock Warehouse Brown Box Kraft cardstock along with the large scalloped layering panel from a floral pattern in the Crafter’s Companion Floral Delight 6×6 paper pad. I cut the remaining layers for the front from CutCardStock Basis Coral cardstock, CutCardStock Pop-Tone Tangy Orange cardstock and Neenah Classic Crest 80# Solar White cardstock. I assembled the card and added several white flat-back pearls to complete the front.

I cut the large scalloped inside panel from CutCardStock Basis Coral cardstock and the remaining two layers from CutCardStock Stardream Metallic Flame cardstock and Neenah Classic Crest Solar White cardstock, and adhered them to the inside of the card base. The final step was stamping the sentiment from the Altenew Build-A-Flower Hibiscus stamp set in Catherine Pooler Mandarin Spice ink.

And one more look… this is such a versatile card that can be cut in any color combo and used for any occasion!

Sharing in the following challenges:
1. 613 Avenue Create: #202205 – May Anything Goes w/ optional twist of Mother’s Day Slimline Card (no twist)
2. A Perfect Time To Craft Open Challenge: #05-2022 – Anything Goes
3. Classic Design Challenges: May #5 – Anything Goes
4. Crafting Happiness Challenges: #123 – Anything Goes Always
5. Lil Patch of Crafty Friends: #181 – Anything Goes

Affiliate links are used in this post at no cost to you – I really appreciate your support! 

Products used:
Cardstock/Paper: Cardstock Warehouse Brown Box Kraft cardstock, CutCardStock Basis Coral cardstock, CutCardStock Pop-Tone Tangy Orange cardstockNeenah Classic Crest 80# Solar White cardstock, CutCardStock Stardream Metallic Flame cardstock, Crafter’s Companion Floral Delight 6×6 paper pad
Stamps: Altenew Build-A-Flower Hibiscus stamp set
Ink: Catherine Pooler Mandarin Spice ink
Dies/Punches/Cut Files: Simply Crafty SVGs Scallop Thanks Card cut file
Accessories: Brother Scan N Cut, Bearly Art precision craft glue, MISTI stamp tool, Darice white flat-back pearls

I hope you’ve enjoyed seeing this scalloped card and you’ll link up an Anything Goes project with us this time! Thanks so much for stopping by today – we’ll see you next time! ;)

Scrappy hugs,

Heaven & Nature Sing

Hi friends! A very Happy Saturday to you – I hope you’ve had a great week! I’m happy to be back on the Eyelet Outlet blog today with another awesome DT inspiration project! I created a pretty Christmas card in traditional red and gray that features our Cardinal Brads and Cardinal Profile Brads along with Clear Jewel Bling. This was a fun card to put together and involved putting to good use two leftover chipboard ornament pieces I had on my desk from another project that I had previously thrown away! ;)

I cut a standard A2 size top-folding card base from 110# Solar White cardstock along with a layering panel from a pretty gray snowflake pattern and a red foil cardstock strip which I adhered to the card front. I added Clear Jewel Bling to the center of each snowflake, and then adhered a silver foiled sentiment toward the bottom.

I colored the chipboard pieces with alcohol markers, added a Cardinal Brad and a Cardinal Profile Brad, and adhered the embellishment to the top left corner.

I cut the inside panel from 80# Solar White cardstock and embellished it with strips of the snowflake pattern and red foil cardstock used on the front. I added another silver foiled sentiment and layered the panel on Basis Red cardstock.

And one more look… such a gorgeously simple design! I know I’ve mentioned before that these cardinal brads are some of my favorites in the store! And SO glad I thought to rummage through my studio can for these chipboard pieces… I knew I’d eventually find just the right project to use them on!

Sharing in the following challenges:
1. Crafty Catz: #593 – Anything Goes w/ optional Use Three Favorite Colors (all traditional Christmas colors!)
2. Paperbabe Stamps: #166 – Anything Goes
3. Through The Craft Room Door: April 26th Anything Goes
4. World Wide Open Design Team Challenge: #04-April 2022 – Anything Goes

Eyelet Outlet products used:
Cardinal Brads
Cardinal Profile Brads
Clear Jewel Bling Multi Size

Affiliate links are used in this post at no cost to you – I really appreciate your support!

Other products used:
Cardstock/Paper: Neenah Classic Crest 110# and 80# Solar White cardstock, CutCardStock Basis Red cardstock, American Crafts Christmas Print 6×6 Cardstock Pad
Ink: Arteza alcohol markers- YG01/43, BR62
Dies/Punches: Kadomaru Pro corner rounder
Accessories: We R Memory Keepers Large Guillotine Paper Trimmer, Bearly Art precision craft glue, MISTI stamp tool, Big Shot, leftover pieces from Hot Off The Press Cardinal Chipboard Ornament, Spellbinders Glimmer Hot Foil SystemSpellbinders Glimmer Silver FoilSpellbinders Glimmer Mini Christmas Sentiment Strips Hot Foil Plate & Die Set

I hope you’ve enjoyed today’s project! Be sure to check out all the fun goodies at Eyelet Outlet! I can already see you drooling, lol! Be sure to ‘like’ and ‘follow’ Eyelet Outlet Facebook Page to keep up with news and sales, and while you’re at it, join the Eyelet Outlet Fans Facebook group for lots of creative inspiration! Thanks so much for stopping by today – we’ll see you next time! ;)

Scrappy hugs,

Happy Mother’s Day Inked Pink

5/6/22 Top 3 Winner at Alphabet Challenge Blog!

Hi everyone! I hope you’re having a terrific Tuesday! Sure is hard to believe that another weekend has passed by and we’re on the downhill slide to the end of April! I’ve popped in this morning to share an awesome Tape Runner DT inspiration project! I’ve gotten a bit of a head-start on this year’s commissioned Mother’s Day cards and this one features an inked background panel with a gorgeous Pinkfresh Studio Hydrangea and Rose floral cluster! And, of course, all panels were adhered with Tape Runner… my favorite adhesive!

As mentioned above, all panels were adhered with Tape Runner. Wet glue was used only for adhering the gemstones, and double-sided adhesive foam circles were used to pop up the focal image. I cut a standard A2 size top-folding card base from 110# Solar White cardstock along with layering panels from Strathmore watercolor paper and 80# Solar White cardstock, and rounded the bottom right corner of each.

I employed the smooshing technique with Ranger Kitsch Flamingo distress ink and water spritzed from my Ranger Distress Sprayer, using my Milwaukee heat tool to dry the panel between smooshes, and then adhered the panel to the card base. I cut narrow strips from Royal Sundance Linen Emerald cardstock and Tattered Angels White Corrugated Paper, layered them together, and adhered them to the card front. I stamped the sentiment from the Hero Arts Year Round Messages stamp set in Memento Northern Pine ink in the bottom right corner. I applied the Pinkfresh Studio Hydrangea and Rose Washi Tape to 110# Solar White cardstock, cut the flowers with the Pinkfresh Studio Hydrangea and Rose die, and adhered the largest floral cluster to the card front. The finishing touch was adding several Taylored Expressions Gold Drip Drops.

I cut the inside panel from 80# Solar White cardstock and embellished it with a leftover strip of the inked background trimmed from the front panel and a narrow strip of Royal Sundance Linen Emerald cardstock. I stamped the sentiment from the Concord and 9th Painted Tulip stamp set in green ink, adhered a Pinkfresh Studio die cut floral in the lower left corner, and layered the panel on green linen cardstock.

And one more peek… totally loving how this turned out! These Pinkfresh Studio florals make the most gorgeous cards, and it always helps to have amazing adhesive to hold everything together!

Sharing in the following challenges:
1. Alphabet Challenge Blog: B is for Blooms
2. Cardz 4 Galz: #171 – Think Pink
3. Cut It Up: #250 – April Showers Bring May Flowers
4. Paperbabe Stamps: #166 – Anything Goes
5. Shopping Our Stash: #469 – What A Difference You’ve Made In My Life
6. Through The Craft Room Door: April 26th Anything Goes
7. World Wide Open Design Team Challenge: #04-April 2022 – Anything Goes

Tape Runner products used:
Tape Runner

Affiliate links are used in this post at no cost to you – I really appreciate your support!

Other products used:
Cardstock/Paper: Neenah Classic Crest 110# and 80# Solar White cardstock, Royal Sundance Linen Emerald cardstock, Strathmore Watercolor Paper, Tattered Angels White Corrugated Paper
Stamps: Hero Arts Year Round Messages stamp set, Concord and 9th Painted Tulip stamp set
Ink/Paint: Ranger Kitsch Flamingo distress ink, Tattered Angels Gold Glimmer Mist, Memento Northern Pine ink
Dies/Punches: Kadomaru Pro corner rounder, Pinkfresh Studio Hydrangea and Rose Die
Accessories: We R Memory Keepers Large Guillotine Paper Trimmer, Bearly Art precision craft glue, Ranger Distress Sprayer, Milwaukee heat tool, MISTI stamping tool, Big Shot, Pinkfresh Studio Hydrangea and Rose Washi Tape, Darice Double-Sided Adhesive Foam Circles, Taylored Expressions Gold Drip Drops

I hope you’ve enjoyed today’s project and you’re inspired to get your craft on! Be sure to check out the ah-mazing Tape Runner, Retractable Tape Runner and Highlight Tape Runner at TapeRunner.com! Be sure to Follow us on Facebook and Instagram! Thanks so much for stopping by today – we’ll see you next time!

Scrappy hugs,

Mason Jar Fridge Magnet

Hey, everybody! Happy Monday to you! The weather sure is amazing this time of year, and as I’ve said many times before, I feel guilty for being inside crafting when I could spend all day outside enjoying it! But I do walk every day for exercise and enjoy some of it! I’m thrilled to be back on the Clear Scraps blog today with another awesome DT inspiration project! I love thinking outside the box with my crafty creations, and I created a 3-D shaker refrigerator magnet featuring our Stones Stencil and Mason Jars Chipboard Embellishments! All it took to make the chipboard into a 3-D shaker was a couple double-sided adhesive foam strips and some acetate! The Stones stencil is one of several new stencils in the store and I used it with distress inks to embellish the banner on the front of the mason jar.

I started by coloring the top chipboard form of the Mason Jars Chipboard Embellishments as well as the edge of the chipboard back with a gray alcohol marker. I cut a piece of white cardstock and a piece of clear acetate the shape of the mason jar chipboard back, set aside the acetate piece, and colored three-quarters of the white cardstock with a yellow alcohol marker to resemble lemonade. I stamped a whimsical lemon in the bottom right corner in three coordinating yellow inks, and adhered the cardstock panel to the chipboard back so it’s visible through the aperture.

I adhered the paper straw in place and then added two double-sided adhesive foam strips around the edge of the mason jar, one on top of the other. I placed the top chipboard form onto the adhesive strips, added yellow sequins, and adhered the acetate piece on the very top to resemble glass. I added a twine bow around the top of the mason jar as well as a die cut banner with a computer-generated sentiment that I stenciled with the Stones Stencil and three distress inks.

I adhered a strip of cardstock around the outside edge of the mason jar to conceal the adhesive foam strip, and then adhered two small disc magnets on the back with distress collage medium which finished the project. I’m so smitten! One tweak turned this project into something entirely different than intended! Love, love, love!

Clear Scraps products used:
Stones Stencil
Mason Jars Chipboard Embellishments

Other products used:
Cardstock/Paper: Neenah Classic Crest Basis 80# White cardstock, GKD Charcoal Brown cardstock
Stamps: STAMPlorations Layered Citrus stamp set
Ink: Catherine Pooler Sauna, Shea Butter and Tiara inks; Arteza alcohol markers- Y39, NG06; Ranger squeezed lemonade and dried marigold distress inks
Dies/Punches: My Favorite Things Essential Fishtail Sentiment Strip Die-namics
Accessories: We R Memory Keepers Large Guillotine Paper Trimmer, Bearly Art precision craft glue, MISTI stamp tool, Darice Double-Sided Adhesive Foam Strips, Webster Pages Hello World Paper Straws, Doodlebug Design Yellow Sequins, Grafix Crystal Clear Craft Plastic, Studios Blackbird twine, blending brush, Ranger distress collage medium, small disc magnets

I hope you’ve enjoyed today’s project and you’re inspired to get those craft supplies out to play! Be sure to check out all the amazing acrylic, wood and chipboard goodies at Clear Scraps… OMGoodness, you won’t be disappointed! And head on over to the Clear Scraps Facebook Page for lots of inspiration! And while you’re at it, join the Clear Scraps Facebook Creative Group to connect with other Clear Scraps fans! Thanks so much for stopping by today – we’ll see you next time!

Scrappy hugs,

Lavender Happy Birthday

Hey everybody! I hope you’re having a great weekend! I’m back this morning with a project to share that I created for Prickley Pear Stamps using the new Sketched Florals Lavender stamp set! This is truly one of the most beautiful stamp sets I’ve ever seen – it’s so easy to color and seems to magically transform into a gorgeous card, lol!

I cut a 3-1/2″ x 6″ mini slimline card base from Basis Dark Purple along with a layering panel from some pretty inked patterned paper. I stamped the Lavender image twice on 110# Solar White cardstock and colored the top half of one and the bottom half of the other with Karin Brushmarkers. I cut both with a stitched banner die and layered one on top of the other with a piece of white craft foam in between for some dimension.

I die cut a slightly larger stitched banner from the dark purple cardstock and added a strip of silver washi tape across the top. I adhered the banners together and then to the card base. I stamped the sentiment from Scalloped Oval 4-Floral stamp set, heat embossed it in white, and cut it with a stitched circle die. I adhered the sentiment to the top of the layered banner and added a few tiny iridescent gemstones to complete the card front.

And one more look… I’m super happy with how this card turned out! This stamp set has quickly made it’s way to the top of my favorites list!

Affiliate links are used in this post at no cost to you – I really appreciate your support!

Prickley Pear Stamps products used:
Sketched Florals Lavender stamp set
Scalloped Oval 4-Floral stamp set

Other products used:
Cardstock/Paper: Neenah Classic Crest 110# Solar White cardstock, CutCardStock Basis Dark Purple cardstock, Hot Off The Press Flowing Ink 6×6 Double-Sided Cardstock
Ink: Memento Tuxedo Black ink, Karin Brushmarkers- Pale Violet, Violet Blue and Olive Green, Versamark
Dies/Punches: JustRite Stitched A2 Banners & Rectangles
Accessories: We R Memory Keepers Large Guillotine Paper Trimmer, Bearly Art precision craft glue, MISTI stamp tool, Big Shot, Eyelet Outlet Silver Foil Washi Tape, Hero Arts White Embossing Powder, Milwaukee Heat Tool, Darice iridescent gemstones

I hope you’ve enjoyed this project! Be sure to check out all the awesome stamps and dies at Prickley Pear Stamps! If you’d like to save 10% on anything on the site when you shop at Prickley Pear Stamps, use the coupon code LESLIE10 at checkout! And be sure to ‘like’ and ‘follow’ the Prickley Pear Stamps Facebook page to keep up with news and sales, and join Prickley Pear Pals (the fan group) for lots of fun crafty ideas and to share your creativity! And finally, we’d love to see you visit the Prickley Pear Stamps blog that’s in the process of being revived and become a Follower! Hope to see you there! Thanks so much for stopping by today – we’ll see you next time! ;)

Scrappy hugs,

Home is where you park your flip flops

Hi everybody! A very Happy Saturday to you – I hope you’ve had a great week! I’m happy to be back on the Eyelet Outlet blog today with another awesome DT inspiration project! I created a super cute card which is perfect for that RVing beach-loving friend! Everybody has a few of those, right?! This was a fun scene to create and features our Water Washi Tape, Sky Washi Tape Wide, Tall Palm Tree Brads, Sun & Cloud Brads, BBQ Brads and Flip Flop Brads.

I cut a standard A2 size top-folding card base from Neenah Classic Crest 110# Solar White cardstock along with a layering panel from 80# Solar White cardstock which I covered with a strip of Water Washi Tape and a strip of wide Sky Washi Tape. I tore a strip of Brown Bag Kraft paper and adhered it to the bottom of the panel. I hand-cut a sand bar from Basis Brown cardstock, adhered it to the washi tape seam, and added two Tall Palm Tree Brads. I added a die cut and embossed camper, a BBQ Brad and Flip Flop Brads. I stamped the sentiment in StazOn Jet Black ink, added a sun brad from the Sun & Cloud Brads, and adhered the panel to the card base.

I cut the inside panel from 80# Solar White cardstock and embellished the bottom with the leftover piece of torn Brown Bag Kraft paper used on the front. I stamped the sentiment in Catherine Pooler Suede Shoes ink and layered the panel on Basis Blue cardstock.

And one more look… totally loving how this little beach camping scene turned out – thanks to the fun mix of washi tape and assortment of brads!

Eyelet Outlet products used:
Water Washi Tape
Sky Washi Tape Wide
Tall Palm Tree Brads
Sun & Cloud Brads
BBQ Brads
Flip Flop Brads

Affiliate links are used in this post at no cost to you – I really appreciate your support!

Other products used:
Cardstock/Paper: Neenah Classic Crest 110# and 80# Solar White cardstock, CutCardStock Basis Blue cardstock, Basis Brown cardstock, and Brown Bag Kraft paper
Stamps: Prickley Pear Stamps Ham Camper Summer stamp set, Inspired by Stamping Seaside Sentiments
Ink: Versamark, StazOn Jet Black ink, Catherine Pooler Suede Shoes ink
Dies/Punches: Prickley Pear Stamps Ham Camper die
Accessories: We R Memory Keepers Large Guillotine Paper Trimmer, Bearly Art precision craft glue, MISTI stamp tool, Big Shot, Hero Arts Clear Embossing Powder, Hero Arts White Embossing Powder

I hope you’ve enjoyed today’s project! Be sure to check out all the fun goodies at Eyelet Outlet! I can already see you drooling, lol! Be sure to ‘like’ and ‘follow’ Eyelet Outlet Facebook Page to keep up with news and sales, and while you’re at it, join the Eyelet Outlet Fans Facebook group for lots of creative inspiration! Thanks so much for stopping by today – we’ll see you next time! ;)

Scrappy hugs,