Lavender

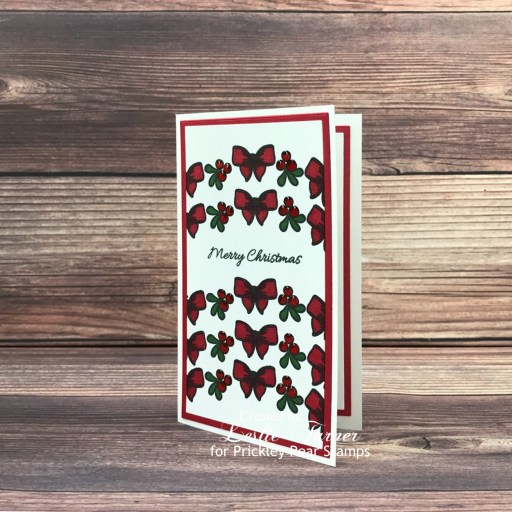
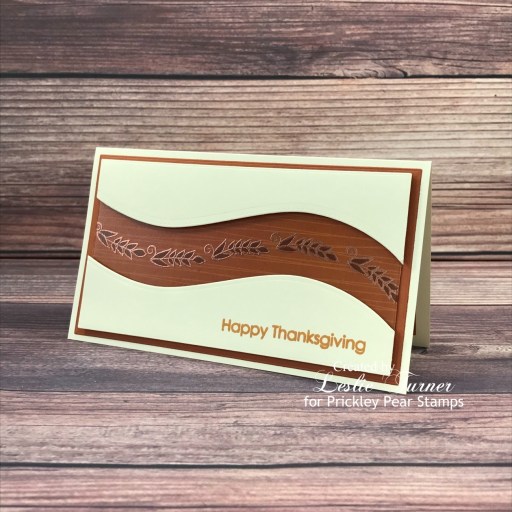
Hi friends! Happy Happy Friday! I hope your weather is wonderful and you have something fun planned this weekend! It IS Spring after all, and even though we did get a tad more snow last week (a weird random thing Mother Nature threw at us), our temps have been rising over the past few weeks and we’ve opened our windows several times to bring in the beautiful fresh air. We woke up to 41 degrees this morning and it’ll probably reach the low to mid 70s today! Update: It only reached 55 today with wind and rain! That’s okay, though, because we really need the moisture. I have a pretty card to share with you today that I created for Prickley Pear Stamps using their new Sketched Florals Lavender stamp set! OMGoodness, this stamp set is so pretty and what a delight it is to color… it only took two alcohol markers and a Pitt Artist pen!

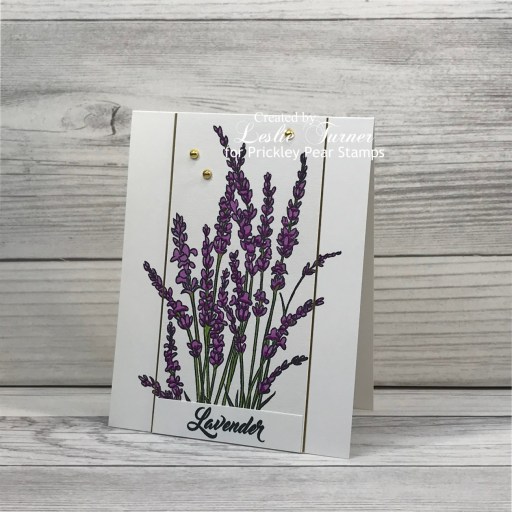
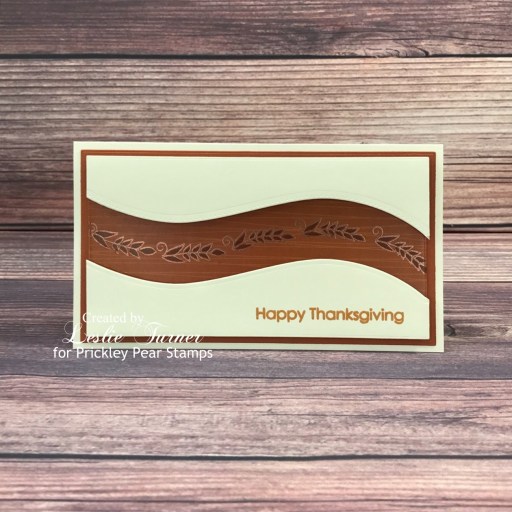
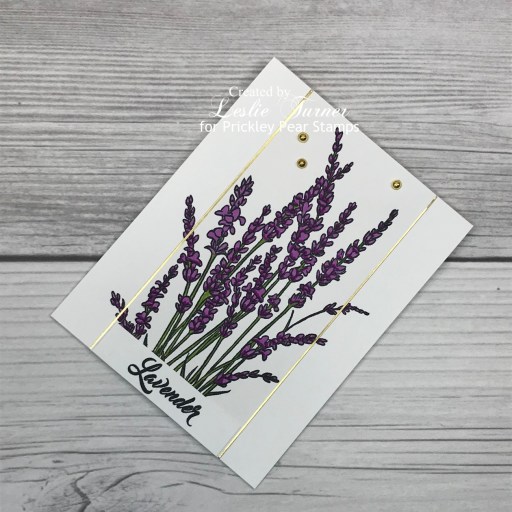
I cut a standard A2 size top-folding card base from 110# Solar White cardstock along with slightly narrower layering panels from Gold Foil cardstock and 80# Basis White cardstock. I stamped the Lavender image in black ink directly on the card base and again on the white cardstock panel. I colored four of the outermost flower spikes on the card base and the entire image on the white cardstock panel. I adhered the colored image to the gold foil panel and then to the card base lining up the flower spikes. I stamped the sentiment in black ink on a white cardstock scrap, trimmed it and adhered it across the bottom. The finishing touch was adding several gold drip drops. The owner has requested that we no longer finish the insides of our Prickley Pear Stamps samples, which feels weird to me but is a huge time-saver, so going forward I’ll be short one photo in my posts. ;)

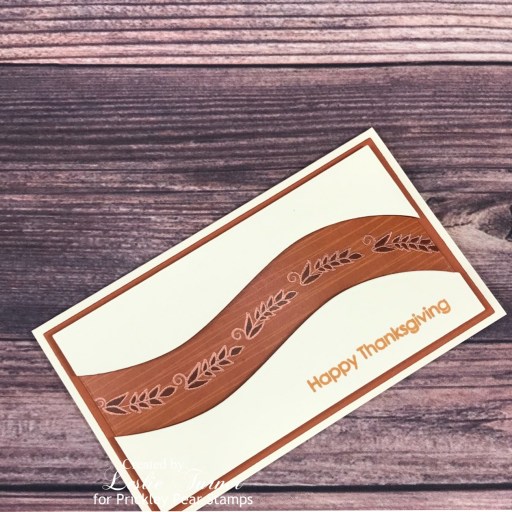
And one more peek… I absolutely love how this one turned out! Such a gorgeous stamp set! And it does have a coordinating die which I don’t have (yet)!

Affiliate links are used in this post at no cost to you – I really appreciate your support!

Prickley Pear Stamps products used:
Sketched Florals Lavender stamp set

Other products used:
Cardstock/Paper: Neenah Classic Crest 110# Solar White cardstock, CutCardStock Basis 80# White cardstock, CutCardStock Bright Foil Gold cardstock
Ink: Memento Tuxedo Black ink; Arteza alcohol markers- P01/05; Faber-Castell May Green fine point Pitt Artist pen
Accessories: We R Memory Keepers Large Guillotine Paper Trimmer, Bearly Art precision craft glue, MISTI stamp tool, Taylored Expressions Gold Drip Drops

I hope you’ve enjoyed this project! Be sure to check out all the awesome stamps and dies at Prickley Pear Stamps! If you’d like to save 10% on anything on the site when you shop at Prickley Pear Stamps, use the coupon code LESLIE10 at checkout! And be sure to ‘like’ and ‘follow’ the Prickley Pear Stamps Facebook page to keep up with news and sales, and join Prickley Pear Pals (the fan group) for lots of fun crafty ideas and to share your creativity! And finally, we’d love to see you visit the Prickley Pear Stamps blog that’s in the process of being revived and become a Follower! Hope to see you there! Thanks so much for stopping by today – we’ll see you next time! ;)

Scrappy hugs,

Challenge Blog DT Openings

Hi friends! As you may know, I’m the owner of Love To Scrap Challenge Blog, Love To Craft Challenge Blog, Mix It Up Challenge Blog and Merry Little Christmas Challenge Blog. Last summer I made the decision to close all four challenge blogs for the 2022 year for a much-needed break, and then at the last minute I changed my other mind and decided to keep them open. I made some pretty big changes to the challenge structure of each blog, and my co-owner and I have been providing inspiration. Now that we have a couple challenges under our belt with the new structure and we’ve seen how things will run, I’m recruiting a few new DT members. Most of our former DT members are coming back but we still have a few spots left on three of the teams.


Update: I have one opening on the Love To Scrap Challenge Blog. We are a scrapping challenge blog and we welcome all types of scrapped projects – cards, scrapbook layouts, ATCs, mixed media, altered items, 3-D projects, etc. All challenges are Anything Goes. All you’ll need to do is create one project every other month, have a blog to share your DT inspiration project, take good photos, and comment on one number.


Update: I have one opening on the Love To Craft Challenge Blog. We are an all-crafts challenge blog and welcome any and all kinds of handmade creations – from cards, tags, ATCs and scrapbook layouts – to 3-D projects, mixed media and altered projects – and even knitting, crocheting, quilting and jewelry-making. All challenges are Anything Goes. All you’ll need to do is create one project every other month, have a blog to share your DT inspiration project, take good photos, and comment on one number.


Update: I have no openings on the Mix It Up Challenge Blog. We are a technique challenge blog featuring various techniques on mixed media projects, altered art, and paper crafts such as cards, tags, mini albums, ATCs, 3-D projects and scrapbook layouts. All challenges are Anything Goes plus an optional technique twist offered for inspiration. All you’ll need to do is create one project every other month, have a blog to share your DT inspiration project, take good photos, and comment on one number.


Update: I have two openings on the Merry Little Christmas Challenge Blog. This team will be double the size for double the fun, lol! We are an all-things-Christmas challenge blog and we welcome any and all kinds of handmade Christmas creations all year long. All challenges are Anything Christmas Goes. All you’ll need to do is create one project every other month, have a blog to share your DT inspiration project, take good photos, and comment on one number.


All four teams are very laid back and we strive for a stress-free environment. We communicate (and send project photos) via email so there is no Facebook group or DT blog to be connected to at the hip. Click on the individual links above to visit the challenge blogs and read the Playing Guidelines to see what we’re all about! If you’re interested in joining one or more teams, click HERE and fill out the contact form! I’d love to hear from you!

Mother’s Day Edge-to-Edge Shaker

Hey everybody! Well, another Thursday has rolled around which means the weekend is rapidly approaching! Not a bad thing, huh?! I have an awesome CutCardStock DT inspiration project to share with you today featuring our glitter cardstock that’s on sale this month. I created my first edge-to-edge shaker and love how it turned out! The touch of our Gold Glitter cardstock with the layered flower on the front of this commissioned Mother’s Day card really looks nice. The die cut flower has many layers and was created with several shades of purple, green and brown cardstock, and a little bit of golden yellow cardstock in the flower center.

Using the Sizzix Bloom Colorize Thinlits, I die cut all the pieces of the layered flower from our Basis Dark Purple cardstock, Pop-Tone Grapesicle cardstock, Pop-Tone Grape Jelly cardstock, Astrobrights Planetary Purple cardstock, Grape Jellybean cardstock, Basis Pink cardstock, Pop-Tone Cotton Candy cardstock, Pop-Tone Gumdrop Green cardstock, Pop-Tone Jellybean Green cardstock, Basis Green cardstock, Royal Sundance Linen Emerald cardstock, Basis Gold cardstock, Brown Bag Kraft Paper and Basis Brown cardstock, and assembled it.

I cut a standard A2 size top-folding card base from 110# Solar White cardstock along with layering panels from 80# Solar White cardstock, Gold Glitter cardstock and Basis Dark Purple cardstock which I adhered together. I cut a strip of Gold Glitter cardstock and adhered it toward the bottom of the panel. I laid the assembled flower on the panel to get an idea of where to stamp the sentiment, and then stamped the sentiment from the Pretty Pink Posh Mom stamp set in Memento Grape Jelly ink. I slid the panel into a Tonic Studios A2 Shaker Pocket along with a pinch of shaker bits (consisting of an assortment of Spiegelmom Scraps and Darice sequins) and adhered it to the front of the card base.

I cut the inside panel from 80# Solar White cardstock and embellished it with strips of Basis Dark Purple cardstock and Gold Glitter cardstock. I stamped another sentiment from the Pretty Pink Posh Mom stamp set in Memento Grape Jelly ink and layered the panel on the dark purple cardstock.

And here’s one more look… not too bad for my first attempt at an edge-to-edge shaker card, even though it was difficult to photograph with all that acetate! Loving the gold glitter cardstock with this layered flower!

Affiliate links are used in this post at no cost to you – I really appreciate your support!

CutCardStock products used:
Neenah Classic Crest 110# and 80# Solar White cardstock
Gold Glitter cardstock
Basis Dark Purple cardstock
Pop-Tone Grapesicle cardstock
Pop-Tone Grape Jelly cardstock
Astrobrights Planetary Purple cardstock
Grape Jellybean cardstock
Basis Pink cardstock
Pop-Tone Cotton Candy cardstock
Pop-Tone Gumdrop Green cardstock
Pop-Tone Jellybean Green cardstock
Basis Green cardstock
Royal Sundance Linen Emerald cardstock
Basis Gold cardstock
Brown Bag Kraft Paper
Basis Brown cardstock

Other products used:
Stamps: Pretty Pink Posh Mom stamp set
Ink: Memento Grape Jelly ink
Dies/Punches: Sizzix Bloom Colorize Thinlits
Accessories: We R Memory Keepers Mini Guillotine Paper Trimmer, Bearly Art precision craft glue, MISTI stamp tool, Big Shot, Tonic Studios A2 Shaker Pockets, brayer, assorted Spiegelmom Scraps and Darice sequins

I hope you’ve enjoyed today’s project and you’re inspired to get crafty! Be sure to check out all the awesome cardstock and other goodies at CutCardStock (adhesives, labels, stickers, pens, watercolors and ribbon to name a few). And head on over to the CutCardStock Facebook Page for more inspiration! Thanks so much for stopping by today – we’ll see you next time!

Scrappy hugs,

Merry Christmas Angel

5/15/22 April Site-Wide Winner at The Outlawz Challenges!

Happy Hump Day everybody! I hope you’re having a great week so far! I’m several days late posting this Christmas card I created for The Outlawz April Freebie/Progressive Challenge but here I am finally! I finished it several days before I found the time to take photos and then it was three more days until I found the time to post. Dang it… there just aren’t enough hours in a day to get everything done that needs to be done! Our sponsor this month is MMedel Illustrations and we were gifted the most adorable Christmas Angel image to play with for this challenge! You may remember the ‘disappearing nine patch card’ that I discovered a while back in a Splitcoast Stampers newsletter HERE. It’s such a cool technique that I’ve used it once again for this Christmas card! ;)

I printed the digital image four times on Neenah Classic Crest 80# Solar White cardstock, fussy cut them all, and adhered them together for a little dimension. I colored the top one with alcohol markers and ran a black Posco paint pen around the edge for a more finished look. I die cut the sentiment with a My Favorite Things Essential Fishtail Sentiment Strips die and layered it on three additional fishtail sentiment strip die cuts for some dimension there as well.

I created the patchwork piece using the My Favorite Things Stitched Square STAX Die-namics and various patterned paper scraps from the American Crafts Christmas Print 6×6 Cardstock Pad. I cut a top-folding square card base from Neenah Classic Crest 110# Solar White cardstock along with a layering panel from CutCardStock Basis Green cardstock, adhered the patchwork piece to it and then adhered the panel to the card base. 

I die cut a stitched mini scallop rectangle from red foil in the Christmas Print cardstock pad and adhered it to the card front. I adhered the image and sentiment with double-sided adhesive foam circles, and added a tiny pearl necklace to the angel.

I cut the inside panel from Neenah Classic Crest 80# Solar White cardstock and embellished it with strips of patterned paper and foil from the Christmas Print cardstock pad. I stamped a sentiment from the STAMPlorations Joy stamp set in Memento Cottage Ivy ink and layered the pan on CutCardStock Basis Green cardstock.

And one more peek… really loving this ‘disappearing nine patch card’ technique, especially with the Christmas patterned paper and adorable image!

Affiliate links are used in this post at no cost to you – I really appreciate your support! 

Products used:
Cardstock/Paper: Neenah Classic Crest 110# and 80# Solar White cardstock, CutCardStock Basis Green cardstock, CutCardStock Christmas Print 6×6 Cardstock Pad
Stamps: MMedel Illustrations Christmas Angel digital image, STAMPlorations Joy stamp set
Ink: Arteza alcohol markers- G01, YG04, R31, Y36, NG08, BR08/28/51; Posca black paint pen, Sakura White Gelly Roll pen, American Crafts Gold and Copper Metallic Markers, Spectrum Noir Crystal Clear Shimmer Overlay Marker, Memento Cottage Ivy ink
Dies/Punches: My Favorite Things Stitched Square STAX Die-namics, My Favorite Things Stitched Mini Scallop Rectangle STAX Die-namics, My Favorite Things Essential Fishtail Sentiment Strips
Accessories: We R Memory Keepers Large Guillotine Paper Trimmer, Bearly Art precision craft glue, MISTI stamp tool, Big Shot, Darice Double-Sided Adhesive Foam Circles, Prima Julie Nutting Say It In Crystals

I hope you’ve enjoyed this project and will come over and join in all the fun at The Outlawz Challenges! Lots of fun going on! Thanks so much for stopping by today – we’ll see you next time! ;)

Scrappy hugs,

Set of Small Bound Notebooks

Hi everyone! A very Happy Saturday to you – I hope you’ve had a great week! I’m stoked to be back on the Eyelet Outlet blog today with another awesome DT inspiration project! I created a set of two small bound notebooks featuring our Colored Daisy Brads and Burnt Orange 5mm Jewel Strips on one, and our Mini Bee Brads and yellow Enamel Dots on the other. I had my Bind-It-All out for another project and the idea for the larger notebook popped into my head so I went with it! I ended up creating an additional (slightly smaller) notebook with the notebook paper that was left over after cutting the paper for the larger one. Seemed to make perfect sense to create a second one so as not to waste the paper! ;)

I have a pile of white 6×6 cardboard pieces that came out of some packaging from my ongoing organization effort and I cannot remember, for the life of me, what they came out of, lol! But I’m glad I saved them because I used them for the front and back covers of these notebooks. For the first notebook, I cut random sized strips of various colors of cardstock and adhered them to a panel at an angle. I added die cut alphas along with Colored Daisy Brads and burnt orange bling from a 5mm Jewel Strip to complete the front. I used a 6-hole length of binding wire to put the notebook together with my Bind-It-All.

For the second notebook, I used a nested chevron die with several colors of cardstock to create the background panel. I added die cut alphas along with a row of six Mini Bee Brads and yellow Enamel Dots to complete the front. I used a 6-hole length of binding wire to put the notebook together with my Bind-It-All for this one as well.

And one more look at the pair… love how they turned out! It helps to have amazing brads and bling to embellish the front covers! ;)

Eyelet Outlet products used:
Colored Daisy Brads
5mm Jewel Strips Burnt Orange
Mini Bee Brads
Enamel Dots Yellow

Affiliate links are used in this post at no cost to you – I really appreciate your support!

Other products used:
Cardstock/Paper: Recycled cardboard, CutCardStock Bright Foil Gold cardstock, Basis Coral, Basis Dark Orange, Stardream Metallic Flame, and Pop-Tone Tangy Orange cardstock; Neenah Classic Crest 165# Solar White cardstock scrap, CutCardStock Pop-Tone Banana Split, Pop-Tone-Black Licorice, Astrobrights Solar Yellow, Silk Glitter Black Prince cardstock
Dies/Punches: Waffle Flower Bold Alpha dies, Pinkfresh Studio Nested Chevron die, Waffle Flower Wide Alpha dies
Accessories: We R Memory Keepers Large Guillotine Paper Trimmer, Tape Runner, Bearly Art precision craft glue, Big Shot, Ranger Adhesive Strips, Zutter Bind-It-All V2.0, Zutter 1/2″ Binding Wire White and Black

I hope you’ve enjoyed today’s project! Be sure to check out all the fun goodies at Eyelet Outlet! I can already see you drooling, lol! Be sure to ‘like’ and ‘follow’ Eyelet Outlet Facebook Page to keep up with news and sales, and while you’re at it, join the Eyelet Outlet Fans Facebook group for lots of creative inspiration! Thanks so much for stopping by today – we’ll see you next time! ;)

Scrappy hugs,

‘today is the day’ Art Journal Page

4/16/22 Top Rocker at 613 Avenue Create!
4/29/22 Stand Out Creation at Scrapping4fun Challenges!
5/5/22 Top 3 at Let’s Craft and Create!
5/6/22 Winner at Creative Artiste Challenge Blog!

Hey everybody, happy Thursday! We’re another day closer to the weekend and the middle of April already! Where is the time going?! I have another amazing Tape Runner DT inspiration project to share with you today! I created a pretty Spring-themed page in my new handmade art journal, and of course, all panels were adhered with Retractable Tape Runner!

I bought a leather-bound art journal years ago when I first tried my hand at art journaling and it warped so badly from the mediums I used that I ended up tearing the finished pages out of it and throwing them all away. The now blank journal is still sitting on a shelf with several heavy books on top of it to try to straighten it out, and I’ll probably use it for notes, lists and such going forward so it doesn’t completely go to waste. That said, my Stamped Smiles blog friend, Vicki, inspired me last month to make my own art journal from heavyweight cardstsock. So I cut 7-1/2″ x 5-1/2″ panels from Neenah Classic Crest 165# Solar White cardstock and used three 7 Gypsies Binding Rings on the left side so I can remove the pages to work on each one separately. And the beauty is I can add heavyweight watercolor panels when the mood hits me to do ‘wet’ AJ pages. I think I’m gonna love this and I’m not sure why I didn’t do it sooner!

As mentioned above, all panels were adhered with Tape Runner. Spray adhesive was used to adhere the fence and flowers, and double-sided adhesive foam circles were used to pop up the large purple butterfly. This is a ‘dry’ art journal page created with 49 and Market Curators Botanical 6×8 Double-Sided Papers, Postage Stamp Washi Tape, Ephemera Bits, Tag Set, Laser Cut Elements, and Rub-On Transfers, with some added stamping to create texture to the page.

I started with a green patterned paper for the background and then added a strip of postage stamp washi tape. I gathered some ephemera, a tag, and laser cut elements, and adhered them to the page, layering them one by one. I used a small rub-on from the collection to add some texture. I also used a stamp from the Stampin’ Up Timeless Textures stamp set to add some additional areas of texture to the page. The final touch was adding several Taylored Expressions White Rhinestones.

And one more look at the page… OMGoodness, I’m in love with this collection! And it’s great to have the amazing Tape Runner to hold it all together!

Sharing in the following challenges:
1. 613 Avenue Create: #202204 – Anything Goes w/ optional April Showers (no twist)
2. A Perfect Time To Craft Open Challenge: #4-2022 – Anything Goes
3. A Place To Start: #042022 – Anything Goes w/ optional Key It Simple (no twist)
4. Ally’s Angels: #57 – Anything Goes
5. Classic Design Challenge: April #4 – Anything Goes
6. Crafting Happiness Challenges: #122 – Anything Goes Always
7. Crafty Friends Challenge Blog: #154 – Spring
8. Crafty Gals Corner: #230 – Spring/Easter
9. Creative Artiste Challenge Blog: #81 – Anything Mixed Media Goes
10. Inkspirational Challenges: #262 Photo Challenge

11. Lets Craft and Create: #182 – Anything Goes + Beautiful Butterflies
12. My Time To Craft: #479 – Springtime Insects
13. Penny’s Paper-Crafty Challenges: #513 – Anything Goes With Paper
14. River of Creativity: #12 – Anything Goes w/ optional Spring
15. Scrapping4fun Challenges: #211 – Spring

Tape Runner products used:
Retractable Tape Runner

Affiliate links are used in this post at no cost to you – I really appreciate your support!

Other products used:
Cardstock/Paper: Neenah Classic Crest 165# Solar White cardstock
Stamps: Stampin’ Up Timeless Textures stamp set
Ink: Memento Tuxedo Black ink
Accessories: We R Memory Keepers Large Guillotine Paper Trimmer, 49 and Market Curators Botanical 6×8 Double-Sided Papers, Postage Stamp Washi Tape, Rub-On Transfers, Tag Set, Ephemera Bits, and Laser Cut Elements; Elmer’s Craft Bond Spray Adhesive, Darice Double-Sided Adhesive Foam Circles, Taylored Expressions White Rhinestones, 7 Gypsies Binding Rings

I hope you’ve enjoyed today’s project and you’re inspired to get your craft on! Be sure to check out the ah-mazing Tape Runner, Retractable Tape Runner and Highlight Tape Runner at TapeRunner.com! Be sure to Follow us on Facebook and Instagram! Thanks so much for stopping by today – we’ll see you next time!

Scrappy hugs,

Merry Christmas mini slimline

Hi friends! We’ve reached another Hump Day and the weeks are just buzzing by! I’ve popped in this morning with one final card sample created for Prickley Pear Stamps, and this one catches me completely up! For now, lol! I’m working behind the scenes on more samples which I’ll be sharing later. ;) This Merry Christmas mini slimline features one of the curvy stamps from the Scalloped Borders Fall stamp set that I used a repetitive fashion, leaving a slight break in the stamping for the sentiment.

I cut a mini slimline card base from 110# Solar White cardstock along with layering panels from CutCardStock Stardream Metallic Jupiter cardstock and 80# Solar White cardstock using the Waffle Flower Mini Slimline Layers die set. I stamped the bow and mistletoe from the Scalloped Borders Fall stamp set five times down the length of the white cardstock panel and colored the images with alcohol markers with Glossy Accents added to the berries. I stamped the sentiment (from the same stamp set) in Catherine Pooler Spruce ink and layered the panels together and then to the card base.

I cut the inside panel from 80# Solar White cardstock, again using the using the Waffle Flower Mini Slimline Layers die set, and embellished it with a single strip of CutCardStock Pop-Tone Jellybean Green cardstock. I stamped the sentiment from the Christmas Holiday Gift Tags stamp set in Catherine Pooler Spruce ink and layered the panel on the Metallic Jupiter cardstock.

And one more peek… this was a fun card to create. Repetitive stamping is challenging but yields a cool effect. I’m such a rebel… I never measure anything – I just eyeball it – and I think this turned out pretty well!

Affiliate links are used in this post at no cost to you – I really appreciate your support! 

Prickley Pear Stamps products used:
Scalloped Borders Fall stamp set
Christmas Holiday Gift Tags stamp set

Other products used:
Cardstock/Paper: Neenah Classic Crest 110# and 80# Solar White cardstock, CutCardStock Stardream Metallic Jupiter cardstock, CutCardStock Pop-Tone Jellybean Green cardstock
Ink: Catherine Pooler Midnight and Spruce inks; Arteza alcohol markers- YG02, R21
Dies/Punches: Waffle Flower Mini Slimline Layers die set
Accessories: Tonic Studios 12″ Guillotine Paper Trimmer, Bearly Art precision craft glue, MISTI stamp tool, Big Shot, Ranger Glossy Accents

I hope you’ve enjoyed this project! Be sure to check out all the awesome stamps and dies at Prickley Pear Stamps! If you’d like to save 10% on anything on the site when you shop at Prickley Pear Stamps, use the coupon code LESLIE10 at checkout! And be sure to ‘like’ and ‘follow’ the Prickley Pear Stamps Facebook page to keep up with news and sales, and join Prickley Pear Pals (the fan group) for lots of fun crafty ideas and to share your creativity! And finally, we’d love to see you visit the Prickley Pear Stamps blog that’s in the process of being revived and become a Follower! Hope to see you there! Thanks so much for stopping by today – we’ll see you next time! ;)

Scrappy hugs,

Coffee Lovers Mini Album

4/17/22 Rising Star at A Place To Start!

Happy Tuesday, everybody! I hope you’re having a great week! I’m thrilled to be back on the Clear Scraps blog today with another awesome DT inspiration project! I created a Coffee Lovers Mini Album using our Blank Wood Card and Mini Shaker Coffee Mug with lots of room for photos and journaling! This is the coolest little shaker – it has three compartments for shaker bits! I had loads of fun putting this together even though I’m not a huge coffee drinker. Ed and I each have two cups every morning. Once in a while he’ll have an afternoon cup when it’s cold outside but since it keeps me awake at bedtime, I’ll join him with a cup of hot apple cider instead! ;)

I started by painting both sides of the Blank Wood Card panels with Java chalk paint and once dry, I lightly sanded the panels to expose the edges and corners for a little bit of a distressed look. I colored the top chipboard form of the Mini Shaker Coffee Mug along with the edges of the remaining forms and back with alcohol markers. I adhered pieces of three different patterns of Coffee Background ATCs from my stash to the chipboard back so they’re visible through the apertures. Then, working up from the bottom, I adhered the next two chipboard forms. I added shaker blends to the three compartments, removed the protective film from the bottom side of the acrylic divider, and adhered it. I removed the protective film from the top side of the acrylic divider, adhered the top chipboard form, and adhered the shaker to the top of the mini album. I added two coffee bean brads (prongs removed) with distress collage medium to complete the front of the album. 

I cut four pages for the inside and punched holes in the tops. I created hole reinforcements using two circle punches, colored them with an alcohol marker, and adhered them to both sides of each page. Using a variety of cardstock, ATCs and other ephemera, dies, clear stickers, and brads, I decorated each page. The assembly is always the most fun to me! ;)

And here’s a shot of the back after I added the rings and ribbon.

And one more peek… so loving how this turned out! The sky is the limit with what you can create with the blank wood card! And there are tons of mini shakers to choose from! Lots of fun!

Sharing in the following challenges:
1. 613 Avenue Create: #202204 – Anything Goes w/ optional April Showers (no twist)
2. A Perfect Time To Craft Open Challenge: #4-2022 – Anything Goes
3. A Place To Start: #042022 – Anything Goes w/ optional Key It Simple (no twist)
4. Ally’s Angels: #57 – Anything Goes
5. Classic Design Challenge: April #4 – Anything Goes
6. Crafting Happiness Challenges: #122 – Anything Goes Always

Clear Scraps products used:
Blank Wood Card
Mini Shaker Coffee Mug

Other products used:
Cardstock/Paper: CutCardStock Royal Sundance Felt cardstock, CutCardStock Brown Bag Kraft Paper, CutCardStock Sandcastle cardstock; CutCardStock Pop-Tone Hot Fudge, Black Licorice, and Tangy Orange cardstock; CutCardStock Basis Soft Pink cardstock
Ink/Paint: Folkart Java chalk paint; Arteza alcohol markers- YR25, R03, BR34
Dies/Punches: JustRite Stitched A2 Banners and Rectangles; Memory Box Stitched Heart Layers and Stitched Oval Layers; My Favorite Things Mini Scallop Rectangle STAX Die-namics and Stitched Rectangle STAX Die-namics; Sizzix Primitive Stars, Stampin’ Up 1/4″ and 1/2″ Circle Punches
Accessories: We R Memory Keepers Large Guillotine Paper Trimmer, We R Memory Keepers Mini Guillotine Paper Trimmer, Bearly Art precision craft glue, Big Shot; STAMPlorations Coffee Feel Good Clear Stickers (sampler), Coffee Backgrounds ATC Ephemera, Golden Autumn and Mocha Swirl Shaker Blends, and Newsprint Coffee Ephemera Tiles (sampler); Ranger Distress Collage Medium, 7 Gypsies Binding Rings, Eyelet Outlet Coffee Brads, Really Reasonable Ribbon Rustic Hues Assortment

I hope you’ve enjoyed today’s project and you’re inspired to get those craft supplies out to play! Be sure to check out all the amazing acrylic, wood and chipboard goodies at Clear Scraps… OMGoodness, you won’t be disappointed! And head on over to the Clear Scraps Facebook Page for lots of inspiration! And while you’re at it, join the Clear Scraps Facebook Creative Group to connect with other Clear Scraps fans! Thanks so much for stopping by today – we’ll see you next time!

Scrappy hugs,

Happy Thanksgiving mini slimline

4/17/22 Rising Star at A Place To Start!

Hey everybody! How the heck are you?! Hopefully you’re having an awesome weekend! I have a card to share with you this morning that I created for Prickley Pear Stamps featuring our Scalloped Borders Fall stamp set along with the Stitched Scallop Border die set. LOVE these stamps and dies! And you know me… I am not a seasonal crafter – my mind is all over the place when I’m in my studio and I create whatever pops into my head. That was the case with this Thanksgiving card – I know it’s not Fall but I don’t care, lol!

I cut a mini slimline card base from Neenah Classic Crest Baronial Ivory cardstock along with layering panels from CutCardStock Basis Dark Orange cardstock, Stamp Anniething Autumn Life patterned paper, and the Baronial Ivory using the using the Waffle Flower Mini Slimline Layers die set. I adhered the dark orange panel to the card base and then stamped the leaf pattern from the Scalloped Borders Fall stamp set on the patterned paper panel and heat embossed it in copper. I colored the leaves with an alcohol marker and adhered the panel on top of the dark orange panel. I then cut away a portion of the ivory panel with one of the dies in the Stitched Scallop Border die set and popped the top piece up on craft foam on top of the patterned paper panel. I stamped the sentiment (from the same stamp set) in Memento Peanut Brittle ink and popped that piece up on craft foam as well.

I cut the inside panel from Baronial Ivory, again using the using the Waffle Flower Mini Slimline Layers die set, and embellished it with strips of the Stamp Anniething patterned paper and CutCardStock Dark Orange cardstock used on the front. I stamped the sentiment in Memento Peanut Brittle ink and layered the panel on the dark orange cardstock.

And one more look… really loving how this turned out! Such gorgeous stamps and dies! Love, love, love!

Sharing in the following challenges:
1. 613 Avenue Create: #202204 – Anything Goes w/ optional April Showers (no twist)
2. A Perfect Time To Craft Open Challenge: #4-2022 – Anything Goes
3. A Place To Start: #042022 – Anything Goes w/ optional Key It Simple (no twist)
4. Ally’s Angels: #57 – Anything Goes
5. Classic Design Challenge: April #4 – Anything Goes
6. Crafting Happiness Challenges: #122 – Anything Goes Always
7. Crafty Catz: #590 – Anything Goes
8. Jan’s Digi Stamps Challenges: April 2022 – Always Anything Goes
9. Paperbabe Stamps: #165 – Anything Goes

Affiliate links are used in this post at no cost to you – I really appreciate your support! 

Prickley Pear Stamps products used:
Scalloped Borders Fall stamp set
Stitched Scallop Border die set

Other products used:
Cardstock/Paper: Neenah Classic Crest Baronial Ivory cardstock, CutCardStock Basis Dark Orange cardstock, Stamp Anniething Autumn Life 6×6 double-sided papers
Ink: Versamark, Arteza BR41 alcohol marker, Memento Peanut Brittle ink
Dies/Punches: Waffle Flower Mini Slimline Layers die set
Accessories: Tonic Studios 12″ Guillotine Paper Trimmer, SweetStamps copper fine detail embossing powder, Bearly Art precision craft glue, MISTI stamp tool, Big Shot, dark orange craft foam

I hope you’ve enjoyed this project! Be sure to check out all the awesome stamps and dies at Prickley Pear Stamps! If you’d like to save 10% on anything on the site when you shop at Prickley Pear Stamps, use the coupon code LESLIE10 at checkout! And be sure to ‘like’ and ‘follow’ the Prickley Pear Stamps Facebook page to keep up with news and sales, and join Prickley Pear Pals (the fan group) for lots of fun crafty ideas and to share your creativity! And finally, we’d love to see you visit the Prickley Pear Stamps blog that’s in the process of being revived and become a Follower! Hope to see you there! Thanks so much for stopping by today – we’ll see you next time! ;)

Scrappy hugs,

Making Spirits Bright

4/16/22 Top Rocker at 613 Avenue Create!

Hi everyone! Happy Saturday – I hope you had a fabulous week and you’re doing something fun this weekend! I have an awesome CutCardStock DT inspiration project to share with you today featuring our glitter cardstock that’s on sale this month. Our glitter cardstock is amazing because the glitter doesn’t rub off like some of the other brands out there. I created this mini slim Christmas card in non-traditional colors of purple and teal, and it features our Silver Glitter cardstock that I colored with alcohol markers and paired with our Bright Silver Foil cardstock. There’s nothing prettier to me than a Christmas card in colors other than the traditional red and green!

I cut a 3-1/2″ x 6″ mini slimline card base from Basis 110# White cardstock along with layering panels from Basis 80# White cardstock and Basis Dark Purple cardstock using the Waffle Flower Mini Slimline Layers Dies. I upcycled a pretty piece of wide teal, white and purple ribbon for this project that a stamp order was wrapped in a couple months ago. I adhered it to the left side of the white cardstock layering panel and then adhered the panel to the dark purple panel.

Using the Sizzix Seasonal Sketch Thinlits, I die cut the base flower petals, berries and leaves from Silver Glitter cardstock and colored them with purple and teal alcohol markers, and then die cut the outlines from Bright Silver Foil cardstock. I colored several tiny clear gemstones with a yellow alcohol marker and adhered them to the center of the flower. I adhered the flower to the card front and added a foiled sentiment that I created with the Spellbinders Glimmer Hot Foil System, Spellbinders Glimmer Silver Foil, and Spellbinders Glimmer Mini Christmas Sentiment Strips Hot Foil Plate & Die Set. The finishing touch was adding several gemstones from the Trinity Amethyst Accent Embellishment Mix with the Trinity Pick Up Stick.

I cut the inside panel from Basis 80# White cardstock and embellished it with a strip of Basis Dark Purple cardstock and Silver Glitter cardstock colored with the teal alcohol marker. I added another foiled sentiment created with the Spellbinders Glimmer Hot Foil System, Spellbinders Glimmer Silver Foil, and Spellbinders Glimmer Mini Christmas Sentiment Strips Hot Foil Plate & Die Set, and layered the panel on the dark purple cardstock.

And one more peek… totally loving how this turned out! This silver glitter and silver foil cardstock is ah-maazing and makes the most beautiful embellishments for cards! Who doesn’t love glitter and shine?!

Sharing in the following challenges:
1. 613 Avenue Create: #202204 – Anything Goes w/ optional April Showers (no twist)
2. A Perfect Time To Craft Open Challenge: #4-2022 – Anything Goes
3. A Place To Start: #042022 – Anything Goes w/ optional Key It Simple (no twist)
4. Christmas Craft Creations: Slimline

5. Classic Design Challenge: April #4 – Anything Goes
6. Crafting Happiness Challenges: #122 – Anything Goes Always
7. Crafty Catz: #590 – Anything Goes
8. Jan’s Digi Stamps Challenges: April 2022 – Always Anything Goes
9. Lil Patch of Crafty Friends: #179 – Anything Goes
10. Paperbabe Stamps: #165 – Anything Goes
11. QKR Stampede: #441 – Anything Goes

Affiliate links are used in this post at no cost to you – I really appreciate your support!

CutCardStock products used:
Basis 110# White cardstock
Basis 80# White cardstock
Basis Dark Purple cardstock
Silver Glitter cardstock
Bright Silver Foil cardstock

Other products used:
Ink: Arteza alcohol markers- BG57, PB06/23, YG35
Dies/Punches: Waffle Flower Mini Slimline Layers Dies, Sizzix Seasonal Sketch Thinlits
Accessories: We R Memory Keepers Large Guillotine Paper Trimmer, Bearly Art precision craft glue, MISTI stamp tool, Big Shot, Darice tiny clear gemstones, recycled ribbon scrap,  Spellbinders Glimmer Hot Foil SystemSpellbinders Glimmer Silver Foil, Spellbinders Glimmer Mini Christmas Sentiment Strips Hot Foil Plate & Die Set, Trinity Amethyst Accent Embellishment Mix, Trinity Pick Up Stick

I hope you’ve enjoyed today’s project and you’re inspired to get crafty! Be sure to check out all the awesome cardstock and other goodies at CutCardStock (adhesives, labels, stickers, pens, watercolors and ribbon to name a few). And head on over to the CutCardStock Facebook Page for more inspiration! Thanks so much for stopping by today – we’ll see you next time!

Scrappy hugs,