Best Dad Ever

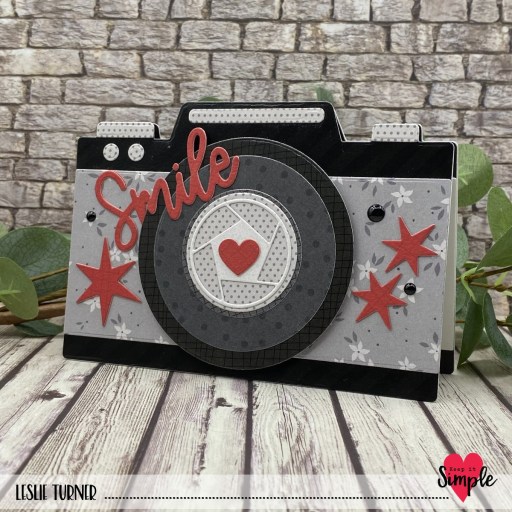
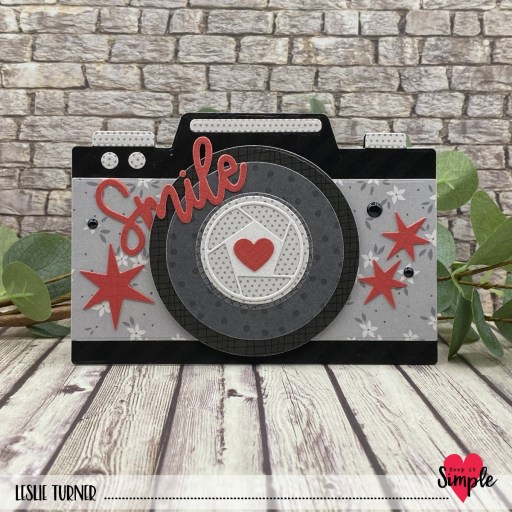
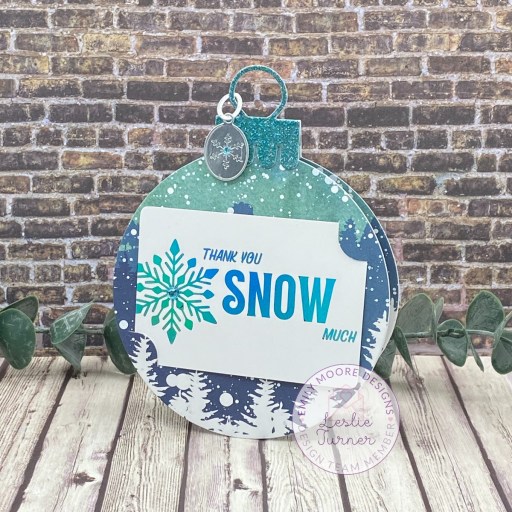
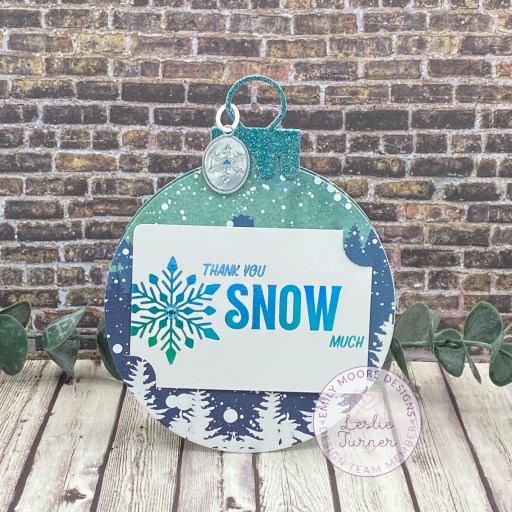
Hey y’all, happy Friday! I hope you’ve had a great week! I’m delighted to share a Brutus Monroe DT inspiration project today featuring the awesome Vintage Plaid papers and Occasional Greetings stamp set. I also used our Midnight and Jack O Lantern cardstock along with our Super Sentimental stamp set to make this incredible shirt card come to life. It’s my own fun fold/shape card design and I’m happy to share my instructions with anyone who would like to have them. The Freebies page on my blog is not available right now so use the email address on my Contact page to let me know you’d like to have them. ;)

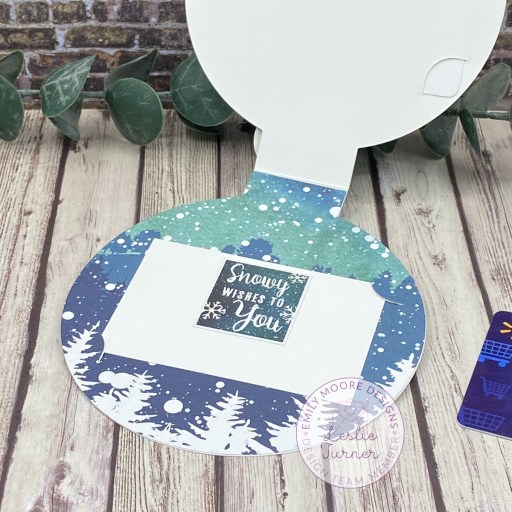
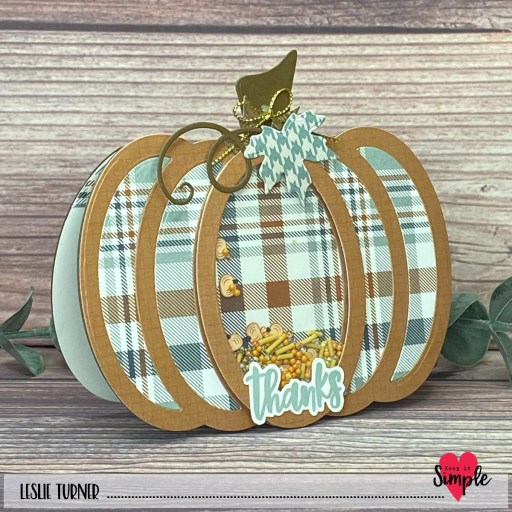
I cut the shirt card base from Midnight cardstock along with layering panels from an orange and blue plaid (LOVE!) from our Vintage Plaid 6×6 Paper Pack. I used Eyelet Outlet blue gemstones for the buttons. I stamped the sentiment from our Occasional Greetings Stamp Set on a Jack O Lantern cardstock scrap in Raven ink and punched it with a Stampin’ Up 1-3/4″ Circle Punch. I die cut a slightly larger circle (using the Love From Lizi Stitched Circle Nested Cutting Dies) from Midnight cardstock, layered them together, and affixed the sentiment to the shirt front on adhesive foam squares.

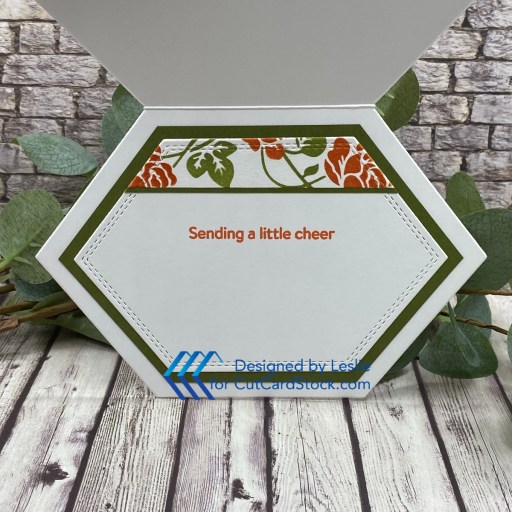
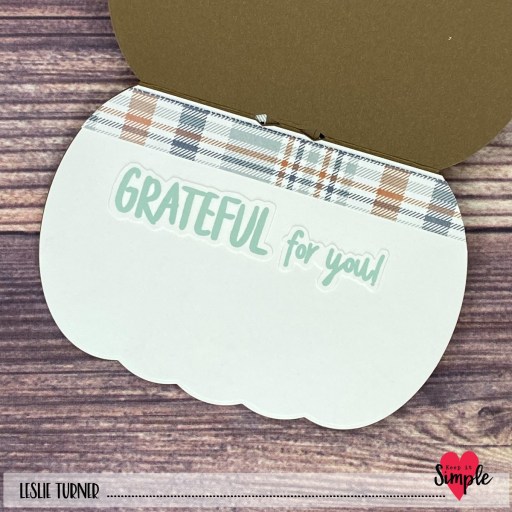
I cut the inside panel from Perfect Blend cardstock and embellished it with a leftover strip of the plaid paper used on the front. The finishing touch was stamping a sentiment from our Super Sentimental Stamp Set in Raven ink.

Affiliate links are used in this post at no cost to you – I really appreciate your support!

Brutus Monroe products used:
BRU 5512 Midnight Cardstock
BRU 5437 Jack O Lantern Cardstock
BRU 4929 Vintage Plaid 6×6 Paper Pack
BRU 9306 Occasional Greetings Stamp Set
BRU 1985 Super Sentimental Stamp Set
BRU 4013 Perfect Blend Cardstock
BRU 2543 Raven Detail 2×2 Ink

Other products used:
DIES/PUNCHES: Stampin’ Up 1-3/4″ Circle Punch, Love From Lizi Stitched Circle Nested Cutting Dies
ACCESSORIES: Fiskars 12″ ProCision Rotary Bypass Paper Trimmer, Bearly Art precision craft glue, My Sweet Petunia Precision Glue Press, Mini MISTI, Big Shot, Eyelet Outlet blue gemstones, Scrapbook Adhesives 3D Foam Squares, Scrapbook Adhesives Thin 3D Foam Squares

I hope you’ve enjoyed seeing this project and you’re inspired to get your craft on! Be sure to check out all the amazing stamps and dies, pigments and mists, cardstock and tools (just to name a few) at Brutus Monroe! And if you happen to have a sweet tooth and like to munch while you craft (like I do, lol), check out Scoozie’s Confections & Curiosities! OMG, I’m hooked! ;) Follow us on Facebook, Instagram and YouTube for tons of crafty inspiration! And come on over and join our Fan Club Facebook Group to share your crafty makes using our products! Thanks so much for stopping by today – we’ll see you next time!

Scrappy hugs,

Smile

Hey everybody, happy weekend! I hope you’re having a good one! We’ve been super busy with our move from Colorado to Iowa but once we’re settled in our new house, it’ll be business as usual, lol! I have THE cutest Keep It Simple DT inspiration project to share today… a camera shaped card featuring our new KIS Cuts Camera dies that launched just two days ago. This card has no stamping, and as much as I LOVE to stamp, it’s always fun to watch a card with no stamping come together! I love how this turned out and believe it would surely make the recipient smile!

Using the dies in the KIS Cuts Camera dies, I cut the card base from Neenah Classic Crest 110# Solar White cardstock along with all the camera pieces from assorted prints in the new Back To Basics Black & White 6×9 Collection Pack and the Ruby 12×12 Collection Pack. I also pulled out the Back To Basics Polaroids & Words Die Set and cut the sentiments from papers in the Ruby collection. The finishing touch was adding several Back To Basics Black Enamel Dots.

I cut the inside panel from 80# Solar White and embellished it with the red paper die cuts. So stinkin’ cute I can’t stand it! You HAVE to check out these dies!

Keep It Simple products used:
KIS Cuts Camera
Back To Basics Polaroids & Words Die Set
Back To Basics Black & White 6×9 Collection Pack
Back To Basics Ruby 12×12 Collection Pack
Back To Basics Black Enamel Dots

Affiliate links are used in this post at no cost to you – I really appreciate your support!

Other products used:
CARDSTOCK/PAPER: Neenah Classic Crest 110# and 80# Solar White cardstock
ACCESSORIES: Fiskars 12″ ProCision Rotary Bypass Paper Trimmer, Bearly Art precision craft glue, My Sweet Petunia Precision Glue Press, Big Shot, Scrapbook Adhesives 3D Foam Squares

I hope you’ve loved seeing this project as much as I loved creating it and you’re inspired to get crafty! Be sure to check out ALL the fun goodies in the Keep It Simple online store! Save 10% on your entire order when you shop online using code LoveToScrap2 at checkout! There is no minimum purchase requirement and no usage limits, AND it combines with product, order, and shipping discounts! Is that cool, or what?! Be sure to Follow us on Facebook, Instagram, and Pinterest for lots of crafty inspiration! Thanks so much for stopping by today – we’ll see you next time!

Scrappy hugs,

Dad We Love You

Hey everybody, another wish for a happy Friday since this is my second post of the day! I hope you’re having a great week. I’m up on the CutCardStock blog today with a tutorial for making a super cute shirt card for Dad which is my own design. It’s super easy and really packs a punch. You can dress it up or down, and make it masculine, feminine or kid-friendly. I used Misty Blue and Navy Blue from our Lessebo line along with my studio staple Neenah Classic Crest Solar White. Be sure to pop over to the blog and see my tutorial if you’d like to learn how to make this fun card!

I cut the card base from Lessebo Misty Blue cardstock and then cut the pieces for the front, sleeve, collar and placket from a plaid print in the Craft Consortium Tartan paper pad. I totally LOVE plaids for masculine shirt cards! I added Keep It Simple Back To Basics Royal Enamel Dots for the buttons along with a sentiment from the Brutus Monroe Remote King stamp set which I stamped on a Misty Blue cardstock scrap in Catherine Pooler Juniper Mist ink. I cut it with a Love From Lizi Stitched Label Nested Cutting Die and layered it on a slightly larger label die cut which I cut from Lessebo Navy Blue cardstock.

I cut the inside panel from Neenah Classic Crest 80# Solar White cardstock and embellished it with a leftover strip of the plaid paper used on the front. I stamped another Brutus Monroe sentiment from the Super Sentimental stamp set in the blue ink, and this completed the card.

Affiliate links are used in this post at no cost to you – I really appreciate your support!

CutCardStock products used:
Lessebo Misty Blue cardstock
Lessebo Navy Blue cardstock
Neenah Classic Crest 80# Solar White cardstock

Other products used:
PAPER: Craft Consortium Tartan 6×6 double-sided papers
STAMPS: Brutus Monroe Remote King stamp set and Super Sentimental stamp set
INK: Catherine Pooler Juniper Mist ink, Sharpie Fine Point White Paint Pen
DIES/PUNCHES: Love From Lizi Stitched Label Nested Cutting Dies
ACCESSORIES: Fiskars 12″ ProCision Rotary Bypass Paper Trimmer, Bearly Art precision craft glue, My Sweet Petunia Precision Glue Press, Mini MISTI, Big Shot, Spellbinders Best Ever Craft Tape 1/4″, Keep It Simple Back To Basics Royal Enamel Dots, Scrapbook Adhesives Thin 3D Foam Squares (black)

I hope you’ve enjoyed today’s project and you’re inspired to get crafty! Be sure to check out all the awesome cardstock and other goodies at CutCardStock (adhesives, labels, stickers, pens, watercolors and ribbon to name a few). And head on over to the CutCardStock Facebook Page and for more inspiration! Also, be sure to join our Creating with CutCardStock Facebook Group for even more crafty inspiration! Thanks so much for stopping by today – we’ll see you next time!

Scrappy hugs,

Thinking of you

Happy Wednesday, everybody! I hope you’re having a great week. I’m up on the CutCardStock blog today with a tutorial for making a hexagon shaped card to send a little cheer. As you know, fun folds are my most favorite kind of cards to make, and next in line at the top of that list are shaped cards. They are so fun and really pack a punch. I used our Neenah Fluorescent White Cotton cardstock for the stenciled climbing rose panel. Next up are Pop Tone Tangy Orange and Pop Tone Jellybean Green. And, of course, I used my studio staple Neenah Classic Crest Solar White (110# and 80# weights) for my card base and inside panel. Oh, and there’s a tiny bit of our Glama Natural Translucent Vellum under that front sentiment. ;)

Using the Honey Bee Climbing Rose stencils and Ranger crackling campfire and peeled paint distress inks along with a couple blending brushes, I created the focal panel. I gotta tell you that the Neenah Fluorescent White Cotton cardstock is FABulous for inking. Next, I used the Sizzix Belinda Stitched Hexagons Fanciful Framelits to cut the card base and a layering panel from Neenah Classic Crest 110# Solar White, the inside panel from 80# Solar White, a couple layering panels from Pop Tone Tangy Orange, and a couple layering panels from Pop Tone Jellybean Green.

Using the same hexagon die set, I die cut a stitched hexagon panel from the stenciled climbing rose piece. Then I trimmed a 1/8″ frame from the outside of the leftover negative space of the hexagon shape for a little interest. I adhered the extra Solar White panel to the front of the card base, and then one of the Tangy Orange panels to the back of the card base. I layered a Jellybean Green panel and the frame to the other orange panel, popping it up on foam strips.

Next, I stamped a sentiment from the Honey Bee Fall Swags stamp set in Memento Morocco ink on a scrap piece of Solar White. I cut it with the coordinating die and added it to a scrap of Glama Natural Translucent Vellum, trimming around the die cut and popping it up on a foam strip. The finishing touch was adding a few clear gemstones.

I embellished the 80# Solar White panel for the inside with a leftover piece of the stenciled climbing rose panel and a very thin strip of Jellybean Green cardstock. I stamped another sentiment from the Honey Bee Fall Swags stamp set in Morocco ink and layered the panel on the remaining green panel.

Affiliate links are used in this post at no cost to you – I really appreciate your support!

CutCardStock products used:
Neenah Classic Crest 110# Solar White cardstock
Neenah Classic Crest 80# Solar White cardstock
Neenah Fluorescent White Cotton cardstock
Pop Tone Tangy Orange cardstock
Pop Tone Jellybean Green cardstock
Glama Natural Translucent Vellum

Other products used:
STAMPS: Honey Bee Fall Swags stamp set
INK: Ranger crackling campfire and peeled paint distress inks; Memento Morocco ink
DIES/PUNCHES: Sizzix Belinda Stitched Hexagons Fanciful Framelits, Honey Bee Fall Swags die set
ACCESSORIES: Fiskars 12″ ProCision Rotary Bypass Paper Trimmer, Ranger-Wendy Vecchi Make Art Stay-tion 12″, MISTI Sticky Mats, blending brushes, Honey Bee Climbing Rose Stencils, Bearly Art precision craft glue, My Sweet Petunia Precision Glue Press, Mini MISTI, Big Shot, Scrapbook Adhesives Crafty Foam Tape White 54 ft, clear gemstones

I hope you’ve enjoyed today’s project and you’re inspired to get crafty! Be sure to check out all the awesome cardstock and other goodies at CutCardStock (adhesives, labels, stickers, pens, watercolors and ribbon to name a few). And head on over to the CutCardStock Facebook Page and for more inspiration! Also, be sure to join our Creating with CutCardStock Facebook Group for even more crafty inspiration! Thanks so much for stopping by today – we’ll see you next time!

Scrappy hugs,

Thank You Snow Much

Hey everybody, Happy Friday! It seems like the weeks are flying by this year just as quickly as last year, lol! I’m up on the Emily Moore Designs blog today with a DT inspiration project featuring our Ornament Gift Card Holder Die. We always need cards to thank those who sent Christmas gifts, and this die is perfect! This shaped card opens at the top and has a foiled panel adhered to the front where a gift card would go. When the card is opened, the gift card is on the inside covering a sentiment/signature panel. How fun to give a gift for receiving a gift, although this design could be made with or without a gift card. So stinkin’ cute!

I created a top-folding card base from Solar White cardstock using the Ornament Gift Card Holder Die. This is easy to do with just about any die by making sure it’s positioned slightly over the fold in the cardstock so the cardstock is not cut entirely in two. I cut the front and inside panels from Hot Off The Press Snowfall double-sided papers and adhered them to the card base. I cut the ornament top from CutCardStock Silver Glitter cardstock and colored it with a BT5 alcohol marker to match the patterned paper.

I ran a Pajama Crafter Stamps Chillin’ Flashcard through my Scotch Laminator with a piece of Therm O Web Deco Foil Glass Slipper foil and trimmed it the size of a gift card. I added a tiny clear gemstone colored with a BT5 alcohol marker and adhered the flashcard to the card front in the spot where a gift card would go. I die cut a loop and charm from CutCardStock Bright Silver Foil cardstock and embellished it with a tiny clear gemstone also colored with the BT5 alcohol marker.

For the inside, I cut a signature panel slightly smaller than the size of a gift card and adhered it in the center where it would be hidden beneath the gift card. I added a sentiment cut out from the Snowfall paper pack, which completed the project.

Emily Moore Designs products used:
Ornament Gift Card Holder Die

Affiliate links are used in this post at no cost to you – I really appreciate your support!

Other products used:
CARDSTOCK/PAPER: Neenah Classic Crest 80# Solar White cardstock, CutCardStock Bright Silver Foil and Silver Glitter cardstock, Hot Off The Press Snowfall 6×6 double-sided paper pack
INK: Spectrum Noir Tri-Blends- BT5
ACCESSORIES: Fiskars 12″ ProCision Rotary Bypass Paper Trimmer, Bearly Art precision craft glue, My Sweet Petunia Precision Glue Press, Big Shot, Pajama Crafter Stamps Flash Cards – Chillin; Scotch laminator, Therm O Web Deco Foil Glass Slipper Foil, clear gemstones

I hope you’ve enjoyed seeing this project and you’re inspired to get crafty! New customers – use code LESLIE10 for 10% off your order! Be sure to Follow us on Facebook, Instagram and YouTube for crafty inspiration! Emily shares videos on all the social media platforms, and they are awesome and on point! Thanks so much for stopping by today – we’ll see you next time!

Scrappy hugs,

sweet dreams

Hey everybody, happy Saturday! Dang, not that I’m complaining, but the weekends seem to roll around faster and faster, don’t they?! I’m stoked to share a Keep It Simple DT inspiration project with you today created with our NEW Little Dreamer Collection! OMGosh, this collection was just released yesterday and I love it so much! I don’t have a whole lot of baby-themed papers, stamps and ephemera in my stash and when I saw this, I was totally in love! And of course, I HAD to use our KIS Cuts Baby Romper dies with it because I love shaped cards! Seriously, how cute is this?!

Using the KIS Cuts Baby Romper Card die set, I cut the card base from Neenah Classic Crest Solar White cardstock along with layering panels for the romper from prints in the Little Dreamer 6×9 Collection Pack and our Back To Basics Rose 12×12 Collection Pack. I embellished the romper with Back To Basics Pastel Glitter Enamel Dots on the bottom flap and several little flowers in assorted colors from the Little Dreamer Die Cut Pieces popped up on adhesive foam pads. I stamped the sentiment from the Little Dreamer Collection Stamps in Catherine Pooler Rose Petals ink and cut it with the coordinating Outline Die. The finishing touch was adding a tiny iridescent gemstone to the center of each flower.

For the inside, I cut a circle using a Back To Basics Stitched Circles Nested Die and stamped a sentiment from the Collection Stamps in the Rose Petals ink. I added a little shimmer to the hearts with a Sakura Clear Star Gelly Roll pen.

Keep It Simple products used:
KIS Cuts Baby Romper Card die set
Little Dreamer 6×9 Collection Pack
Back To Basics Rose 12×12 Collection Pack
Little Dreamer Collection Stamps
Little Dreamer Outline Dies
Little Dreamer Die Cut Pieces
Back To Basics Stitched Circles Nested Dies
Back To Basics Pastel Glitter Enamel Dots (coming soon)

Affiliate links are used in this post at no cost to you – I really appreciate your support!

Other products used:
CARDSTOCK/PAPER: Neenah Classic Crest 80# Solar White cardstock
INK: Catherine Pooler Rose Petals ink, Sakura Clear Star Gelly Roll pen
ACCESSORIES: Fiskars 12″ ProCision Rotary Bypass Paper Trimmer, Bearly Art precision craft glue, My Sweet Petunia Precision Glue Press, Mini MISTI, Big Shot, Stampin’ Up Mini Dimensionals, tiny iridescent gemstones

I hope you’ve loved seeing this project as much as I loved creating it and you’re inspired to get crafty! Be sure to check out ALL the fun goodies in the Keep It Simple online store! Save 10% on your entire order when you shop online using code LoveToScrap2 at checkout! There is no minimum purchase requirement and no usage limits, AND it combines with product, order, and shipping discounts! Is that cool, or what?! Be sure to Follow us on Facebook, Instagram, and Pinterest for lots of crafty inspiration! Thanks so much for stopping by today – we’ll see you next time!

Scrappy hugs,

you make me smile

Hey everybody, Happy Thursday! If you celebrate the birth of Christ in any religion, I hope you had a beautiful holiday! The Christmas/Winter season is my favorite and we had a wonderful day. I’m stoked to share a Keep It Simple DT inspiration project created with the super adorable Bizzy Hands Snow Glad We Are Friends stamp set. Our design team created Christmas, New Year or Winter projects and I settled on a cute lil’ round Winter-themed card. I love shaped cards and this image was perfect for this, and it was fun to color!

Using dies in the set of Back To Basics Stitched Circles Nested Dies, I cut the card base and front panel from CutCardStock Basis White along with a frame from a pattern in the Back To Basics Ruby 6×9 Collection Pack. I stamped the image from the Bizzy Hands Snow Glad We Are Friends stamp set on the die cut front panel in Memento Tuxedo Black ink and colored it with alcohol markers.

I stamped a sentiment from the Namaste Home stamp set (which is on clearance, by the way) in black ink, trimmed it, and adhered it to the bottom of the card front. I adhered the frame and a tiny bow created from Back To Basics Stars & Stripes Ribbon using a cool little wooden bow maker that my awesome friend, Maureen, gifted me last Christmas.

For the inside, I die cut two circles using more dies in the set of Stitched Circles Nested Dies, adhered them together, and stamped a sentiment from the Bizzy Hands stamp set in black ink.

Keep It Simple products used:
Back To Basics Ruby 6×9 Collection Pack
Back To Basics Stitched Circles Nested Dies
Bizzy Hands Snow Glad We Are Friends stamp set
Namaste Home Stamp Set
Back To Basics Stars & Stripes Ribbon

Affiliate links are used in this post at no cost to you – I really appreciate your support!

Other products used:
CARDSTOCK/PAPER: CutCardStock Basis 110# White cardstock
INK: Memento Tuxedo Black ink, Versamark; Arteza alcohol markers- GB08, BT3/4/5/7/8/9, CT1/2/3, BO1/2/4, DG1/2/3, EB1/2/3, DR1/3/4/7; Sakura Clear Star Gelly Roll pen
ACCESSORIES: Fiskars 12″ ProCision Rotary Bypass Paper Trimmer, My Sweet Petunia Precision Glue Press, Nuvo Deluxe Adhesive, MISTI stamp tool, Big Shot, Hero Arts Clear Embossing Powder, small wooden bow maker, Milwaukee heat tool, cordless glue gun

I hope you’ve loved seeing this project as much as I loved creating it and you’re inspired to get crafty! Be sure to check out ALL the fun goodies in the Keep It Simple online store! Save 10% on your entire order when you shop online using code LoveToScrap2 at checkout! There is no minimum purchase requirement and no usage limits, AND it combines with product, order, and shipping discounts! Is that cool, or what?! Be sure to Follow us on Facebook, Instagram, and Pinterest for lots of crafty inspiration! Thanks so much for stopping by today – we’ll see you next time!

Scrappy hugs,

thanks

Hey everybody, Happy Tuesday! I’m stoked to share a Keep It Simple DT inspiration project with you today, created with our new KIS Cuts Pumpkin dies. This is THE most fun set of dies – I created a shaped card with a shaker in the middle portion, and I think it turned out so cute! Shaped cards are always a hit and the shaker portion just adds to the Fun Factor!

Using the KIS Cuts Pumpkin dies, I cut the pumpkin layers and leaves from coordinating prints in the Farmhouse Fall 6×9 Collection and Cardstock Packs, along with the card base, vine and stem from CutCardStock Lessebo Coffee Bean cardstock. I created a shaker in the center portion of the pumpkin using Polymer Clay Coffee Sprinkles, Polymer Clay Light Brown Pumpkins, 2mm Matte Orange Beads, and 2mm Caviar Glass Fall Change beads (all from the Sprinkles line). The Fall Change Caviar Glass beads haven’t hit the store yet, so stay tuned for those. I added a sentiment (from the Back To Basics Thank You Sentiments stamp set) stamped in Catherine Pooler Hot Tube ink which I fussy cut. The finishing touch on the front was adding a gold cord bow.

Using the same dies, I cut the inside panel from Solar White cardstock and embellished it with a scrap piece of the plaid paper used on the front. I stamped another sentiment from the same Thank You Sentiments stamp set in the Hot Tub ink, fussy cut it and added it to the inside.

Keep It Simple products used:
KIS Cuts Pumpkin dies
Farmhouse Fall 6×9 Collection Pack
Farmhouse Fall 6×9 Cardstock Pack
Back To Basics Thank You Sentiments stamp set
Back To Basics Shaker Basics – Foam and Acetate Pack
Sprinkles – Polymer Clay Coffee Sprinkles
Sprinkles – Polymer Clay Light Brown Pumpkins
Sprinkles – Beads 2mm Matte Orange
Sprinkles – Beads 2mm Caviar Glass Fall Change (coming soon)

Affiliate links are used in this post at no cost to you – I really appreciate your support!

Other products used:
CARDSTOCK/PAPER: CutCardStock Lessebo Coffee Bean cardstock, Neenah Classic Crest 80# Solar White cardstock
INK: Catherine Pooler Hot Tub ink
ACCESSORIES: Fiskars 12″ ProCision Rotary Bypass Paper Trimmer, My Sweet Petunia Precision Glue Press, Nuvo Deluxe Adhesive, MISTI stamp tool, Big Shot, 1/8″ red liner tape, GKD gold cording, small wooden bow maker, cordless glue gun

I hope you’ve loved seeing this project as much as I loved creating it and you’re inspired to get crafty! Be sure to check out ALL the fun goodies in the Keep It Simple online store! Save 10% on your entire order when you shop online using code LoveToScrap2 at checkout! There is no minimum purchase requirement and no usage limits, AND it combines with product, order, and shipping discounts! Is that cool, or what?! Be sure to Follow us on Facebook, Instagram, and Pinterest for lots of crafty inspiration! Thanks so much for stopping by today – we’ll see you next time!

Scrappy hugs,

Freshly Brewed shaker cards

Hey everybody! Happy Wednesday – I hope you’re having a great week! I have a super cute Keep It Simple DT inspiration project to share. You may remember that our new Shaker Kits debuted on the website back in early August. And as you know, this past Saturday was World Card Making Day and our design team organized a Facebook Live craft-along to demonstrate the assembly of our Life Is Sweet and Freshly Brewed kits. Barry and Maureen were phenomenal on the videos which you can watch HERE and HERE! Several weeks ago I shared two cards I made using the Life Is Sweet kit, and today I’m sharing the cards I made using the Freshly Brewed kit. These kits are fantastic because everything you need to create the cards is included except the adhesive. How cool is that?!

The card bases, adhesive foam, acetate, frames, ephemera, and shaker bits are all included in the kit. As with the other cards, I made mine a little different than the samples on the package. I totally love shaking things up! Here is my first card.

And here is my second card. I cut the cup sleeve on this one from a patterned paper in the Nuts About Fall 6×9 Collection Pack using the sleeve die in the KIS Cuts Freshly Brewed dies. It’s very cool that the dies are the same size and work with the items in this kit!

Keep It Simple products used:
Freshly Brewed Shaker Kit
KIS Cuts Freshly Brewed
Nuts About Fall 6×9 Collection Pack

Affiliate links are used in this post at no cost to you – I really appreciate your support!

Other products used:
CARDSTOCK/PAPER: Neenah Classic Crest 110# Solar White cardstock, Cougar Smooth 100# White cardstock, Cougar Smooth 80# White cardstock
ACCESSORIES: My Sweet Petunia Precision Glue Press, Nuvo Deluxe Adhesive, Scrapbook.com Double-Sided Adhesive foam Squares, red liner tape

I hope you’ve loved seeing this project as much as I loved creating it and you’re inspired to get crafty! Be sure to check out ALL the fun goodies in the Keep It Simple online store! Save 10% on your entire order when you shop online using code LoveToScrap2 at checkout! There is no minimum purchase requirement and no usage limits, AND it combines with product, order, and shipping discounts! Is that cool, or what?! Be sure to Follow us on Facebook, Instagram, and Pinterest for lots of crafty inspiration! Thanks so much for stopping by today – we’ll see you next time!

Scrappy hugs,

Fall Is Calling

Hi everyone! Happy Tuesday – I hope your week is going along nicely! I’m up on the CutCardStock blog today with a tutorial for making a truck-shaped Fall card! I used a variety of cardstock for this one – Solar White, Stardream Metallic Flame, Bright Gold Foil and Dolphin Gray, along with Hot Fudge, Red Hot, and Black Licorice from our Pop Tone line. I also used dies and die cut pieces from Keep It Simple.

Using the KIS Cuts Vintage Truck dies, I cut the card base from Neenah Classic Crest Solar White. Next, I cut the main truck body, rear end, and tail gate from Stardream Metallic Flame cardstock. I used Bright Gold Foil for the tail gate trim, bumper and license tag frame, along with Pop Tone Red Hot for the tail lights, Pop Tone Black Licorice for the tires, and Dolphin Gray for the window and mirrors.

I used the KIS Cuts Twinkling Stars Font to cut the F-A-L-L letters from Pop Tone Hot Fudge, and added the pumpkins and garland from the Keep It Simple Autumn Charm Die Cut Pieces. The sentiment on the license plate was stamped in Catherine Pooler Icing on the Cake ink using the Autumn Charm Collection Stamps. The finishing touch was adding a few small iridescent gemstones.

I cut the inside panel from Hot Fudge and added a die cut oval cut with the Stitched Ovals Nested Dies along with a sentiment from the Autumn Charm Collection Stamps and cut with the coordinating Outline Dies.

Affiliate links are used in this post at no cost to you – I really appreciate your support!

CutCardStock products used:
Neenah Classic Crest 80# Solar White cardstock
Stardream Metallic Flame cardstock
Bright Gold Foil cardstock
Pop Tone Hot Fudge cardstock
Pop Tone Red Hot cardstock
Pop Tone Black Licorice cardstock
Dolphin Gray cardstock

Other products used:
STAMPS: Keep It Simple Autumn Charm Autumn Sentiments Collection Stamps
INK: Catherine Pooler Icing on the Cake ink
DIES/PUNCHES: KIS Cuts Vintage Truck Dies, KIS Cuts Twinkling Stars Font, Back To Basics Stitched Ovals Nested Dies, Keep It Simple Autumn Charm Autumn Sentiments Outline Dies
ACCESSORIES: Fiskars 12″ ProCision Rotary Bypass Paper Trimmer, My Sweet Petunia Precision Glue Press, Nuvo Deluxe Adhesive, MISTI stamp tool, Big Shot, Cuttlebug Argyle Embossing Folder, Keep It Simple Autumn Charm Autumn Hedgehogs and Autumn Foxes Die Cut Pieces, 1″ double-sided foam strip, Scrapbook.com Double-Sided Foam Adhesive Squares, small iridescent gemstones

I hope you’ve enjoyed today’s project and you’re inspired to get crafty! Be sure to check out all the awesome cardstock and other goodies at CutCardStock (adhesives, labels, stickers, pens, watercolors and ribbon to name a few). And head on over to the CutCardStock Facebook Page and for more inspiration! Also, be sure to join our Creating with CutCardStock Facebook Group for even more crafty inspiration! Thanks so much for stopping by today – we’ll see you next time!

Scrappy hugs,