Love my Gnomies!

Hi everyone! It’s Saturday and I hope your weekend is off to a great start! I’ve popped in this morning to share a super cute card I made to enter into the March Outlawz Freebie/Progressive Challenge. I’ve been so busy this month that I was afraid I wasn’t going to be able to fit this project in… but here I am with three days to spare, lol! Everyone joining in the challenge receives a free sponsor digi to create with each month. SheepSki Designs is our awesome sponsor this month and we’re playing with the cutest digi stamp ever… Giant Mushroom! OMG, cuteness overload! You ought to check out The Outlawz Challenges – lots of challenges to enter and lots of fun going on!

2020_0327001

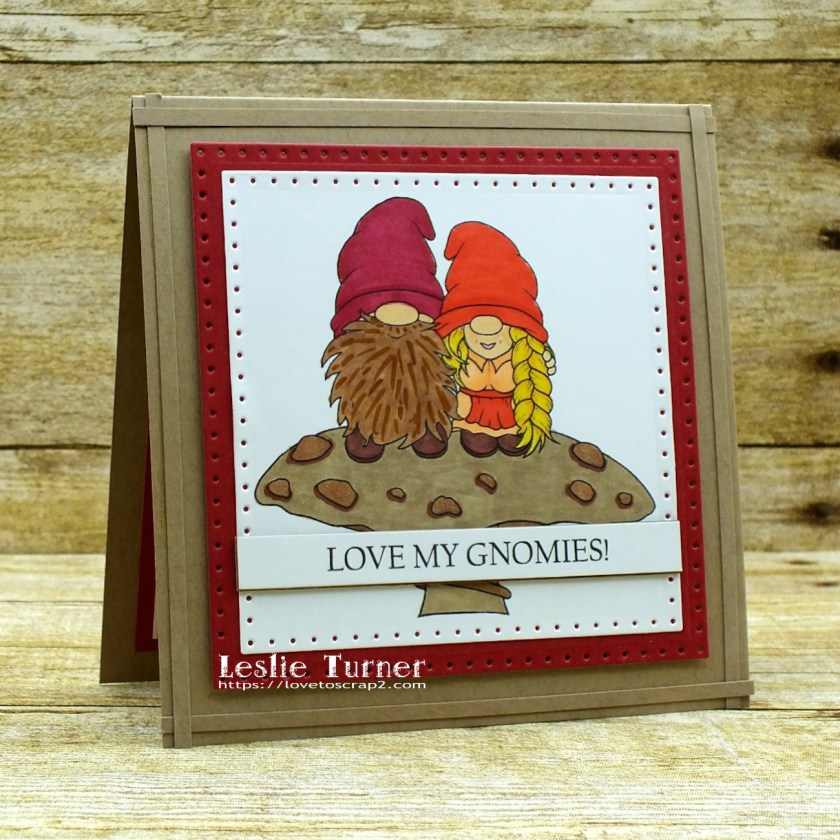
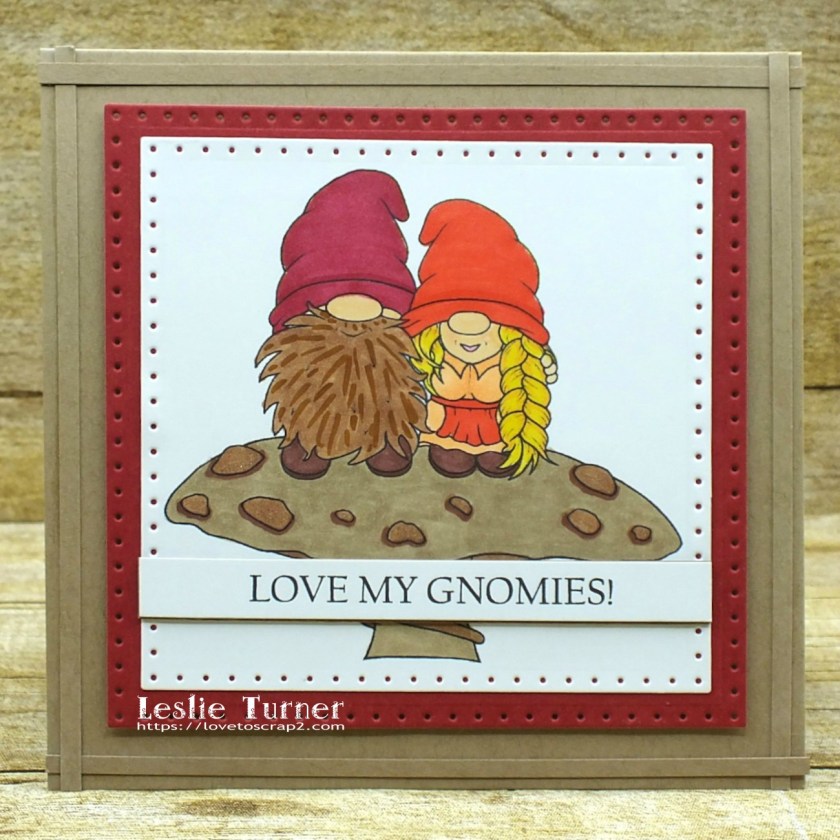
I am so in love with all the gnomes being showcased around blogland these days, and this SheepSki Designs digi is the first one I’ve ever worked with. It’s so stinkin’ adorable, I can’t stand it! I created a clean but rustic-looking square card base. I cut the image with a dotted squares die and then layered it on a red slightly larger dotted squares die cut. The front and inside sentiments are computer-generated.

2020_0327002

I embellished the inside panel with a wide strip of the red cardstock used on the front, and then layered the panel on the same red cardstock.

2020_0327003

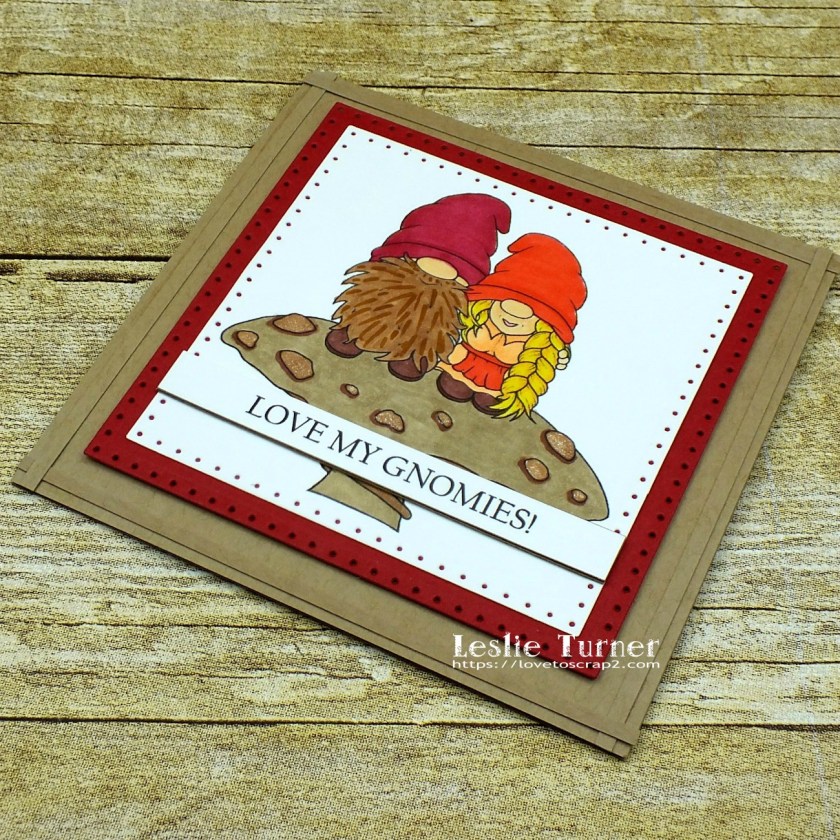
One more peek… loving how this turned out! Not bad for my first Gnomie attempt, lol!

2020_0327004

I’d love to enter this card into the following challenges:
Word Art Wednesday: Weeks #432/433 – Anything Goes

Products used:
Cardstock/Paper: CutCardStock Red Wagon and Twine cardstock, Paper Accents 120# Kraft cardstock
Stamps: SheepSki Designs Giant Mushroom digital image
Ink: Spectrum Noir Classique- FS4, FS9; Bic Mark-It markers- Pink Flamingo, Rambunctious Red, Sunset Orange, Summer Melon, Yellow Blaze, Tiki Hut Tan, Honey Brown, Woodsy Brown
Dies/Punches: Sizzix Dotted Squares dies
Accessories:  Gemini Junior die cutting machine, Tombow Mono permanent adhesive, ScraPerfect Best Glue Ever and Perfect Crafting Pouch

I hope you’ve enjoyed seeing this card as much as I enjoyed making it! Be sure to check out all the fun digis at SheepSki Designs! And I hope you will consider joining the fun at The Outlawz Challenges! Thanks so much for stopping by today – we’ll see you next time! ;)

Scrappy hugs,
lesliesig

Mr. & Mrs.

Hi everyone! I hope you’re having a fantastic week! I’m super stoked to be back on the CutCardStock blog today with an awesome DT inspiration project featuring more of the Curious Metallic cardstock that was included in our Designer’s Pack! Affiliate links are used in this post at no cost to you. I really appreciate your support! I created a pretty wedding card. I’m so smitten with this cardstock and absolutely love this color combo!

2020_0312001

I created a standard size A2 top fold card base from Classic Crest Baronial Ivory cardstock and then cut a background layer from Curious Metallic Violette cardstock. I stamped the flower element in Versamark on Curious Metallic Gold Leaf cardstock, heat embossed it in gold and then die cut it with a coordinating die. I stamped the banner in purple ink on the ivory cardstock and cut it with a coordinating die. I adhered these elements to the front of the card and added some tiny iridescent gemstones.

2020_0312002

I embellished the inside panel with strips of the Curious Metallic Gold Leaf and Violette cardstocks and a smaller embossed and die cut flower, and then stamped the inside sentiment in purple ink.

2020_0312003

One more peek… loving how this turned out! Have I mentioned how much I love this color combo?!

2020_0312004

I’d love to enter this card into the following challenges:
Word Art Wednesday: Weeks #432/433 – Anything Goes

CutCardStock products used:
Classic Crest Baronial Ivory 80# cardstock
Curious Metallic Gold Leaf 92# cardstock
Curious Metallic Violette 111# cardstock

Other products used:
Stamps: Close To My Heart Hello Lovely stamp set, Stampin’ Up Floral Phrases stamp set
Ink: Versamark, Stampin’ Up Perfect Plum ink
Dies/Punches: Close To My Heart Hello Lovely Thin Cuts
Accessories:  ScraPerfect Best Glue Ever, MISTI stamp tool, Gemini Junior die cutting machine, ScraPerfect Perfect Crafting Pouch, ScraPerfect Perfect Cleaning Cloth, Ranger Super Fine Detail Gold embossing powder, Milwaukee heat tool, Darice small iridescent gemstones, ScraPerfect Embellie Gellie

I hope you’ve enjoyed today’s project and you’re inspired to get crafty! Be sure to check out all the awesome cardstock and other goodies at CutCardStock (adhesives, labels, stickers, pens, watercolors and ribbon to name a few). And head on over to the CutCardStock Facebook Page for more inspiration! Thanks so much for stopping by today – we’ll see you next time!

Scrappy hugs,
lesliesig

Octagon gift box

Hi everyone! It’s Huuuuump Day (insert cheesy grin)! I’m not posting on the Simply Crafty SVGs Blog today but have popped in this morning to share an extra DT inspiration project with you, a super cute gift box created with the Simply Crafty SVGs Octagon Box with Handle cut file. How stinkin’ cute is this?! I can already picture several different things tucked inside this!

2019_0903005a

I cut the base from heavy kraft cardstock and the panels from some fun October Afternoon paper. Here are several shots showing how this box opens. Super cute design!


And one more look… just the perfect size for some handmade jewelry!

2019_0903006a

I’d love to enter this gift box into the following challenges:
Word Art Wednesday: Weeks #432/433 – Anything Goes

Products used:
Cardstock/Paper: Cardstock Warehouse Brown Box kraft cardstock, October Afternoon Daily Flash Girl Talk
Dies/Punches: Simply Crafty SVGs Octagon Box with Handle cut file

I hope you’ve enjoyed today’s project! Be sure to check out all the fun cut files in the Simply Crafty SVGs store – you’ll have so much fun! And there are tons of freebies to get started! Thanks so much for stopping by today – we’ll see you next time! ;)

Scrappy hugs,
lesliesig

Happy Healing Bouquet

Hi friends! Hump Day has rolled around again and we’re almost to the end of March already! I have a fun project to share today – a box card bouquet of flowers in a mason jar! Those who know me know that I’m a real sucker for fancy folds and I’m always on the look-out for new ones to try! ;)

2020_0217001

I subscribe to a variety of crafty email newsletters and when I saw this adorable box card, I just HAD to have the cut file! I started by separating all the elements in the cut file and cutting them with my Scan N Cut from various colors of cardstock. I put the bouquet together first and added a pearl embellishment to the center of the rose in the bouquet.

2020_0217002

I hand-cut the three acetate pieces and adhered the outer mason jar, lid and bottom pieces. I moved to the inside and adhered the stems to the inner mason jar acetate, and then adhered the acetate in place. I finished the card with a stamped get well greeting and some twine tied in a  bow. Here are a few shots of the card from different angles. So cool – I love it!

And one more peek… I’m so loving how this turned out! The sky is the limit with regard to occasions and color/patterns!

2020_0217006

Okay, okay, before I end this post, I have to share a pic of my frequent light box visitor, Loki, who came just as I was taking the light box apart. Hubby named him very appropriately, as Loki means God of Mischief! And is he ever! ;)

Loki2-2-17-20

I’d love to enter this box card into the following challenges:
Crafty Gals Corner: #205 – Use Flowers
The Creative Crafters: #26 – Anything Goes
Word Art Wednesday: Weeks #432/433 – Anything Goes
World Wide Open Design Team Monthly Challenge: #03 – Anything Goes

Products used:
Cardstock/Paper: American Crafts peacock, stone, key lime, grass, blush, taffy, dandelion, rouge and lemon cardstock; Hygloss Metallic Silver cardstock, Stampin’ Up Window Sheet
Stamps: Stampin’ Up And Many More stamp set
Ink: Stampin’ Up Cajun Craze ink
Dies/Punches: My Favorite Things Die-namics Essential Fish Tail Sentiment Strips
Accessories:  ScraPerfect Best Glue Ever, Gold ‘n Pearls and Embellie Gellie; Lawn Fawn cord (freebie enclosed with my last order :)

I hope you’ve enjoyed this project! Thanks so much for stopping by today – we’ll see you next time! ;)

Scrappy hugs,
lesliesig

Your wings already exist.

Hi friends! Happy Monday! Our new sketch challenges this month are live over at Stick It Down and I’ve popped in this morning to share my Card Team inspiration project! Corbett Creations is our sponsor this month so come on over and play for the chance to win a prize! The card team is showcasing projects today on the blog and this is our super awesome card sketch this month, created by yours truly:

Stick-It-Down-Mar2020-Card-Sketch

I’ve created sketches for the first six card challenges this year at Stick It Down. I’m a novice, never having created any sketches before, and I’ve had a great time! Using this month’s sketch, I created an inspirational card featuring another one of Lozzy’s digital papers, along with wings and sentiments from Paper Wings Productions.

2019_1222009a

I once again dug into my digital papers from Lozzy that I won a while back (I just LOVE them) and came up with a teal pattern that worked really well with my card design. I heat embossed the wings and watercolored them, then fussy cut them and added a little sparkle overlay marker. I added the vertical sentiment and several tiny black gemstones on the left side.

2019_1222010a

I embellished the inside panel with leftover strips of paper and cardstock used on the front. I used a vertical sentiment on the inside as well. I’ve always loved vertical sentiments, as they add interest to a card, but this is the first time I’ve ever used one on the inside and I think I like it! ;)

2019_1222011a

One more look… really loving how this turned out! It’s so amazing how something so simple can pack such a big punch!

2019_1222012a

Products used:
Cardstock/Paper: Cardstock Warehouse pure white cardstock, Marco’s Kachina Grass Cloth cardstock, Stampin’ Up Soft Sky cardstock, Lozzy Star Splash Mixed Media digital paper
Stamps: Paper Wings Productions Wings and Wish Wings stamp sets
Ink: Memento Tuxedo Black ink, Spectrum Noir Crystal Clear Sparkle overlay marker, Stampin’ Up Lost Lagoon ink
Accessories:  ScraPerfect Best Glue Ever, MISTI stamp tool, Hero Arts clear embossing powder, Niji water brush, Darice tiny black gemstones

I hope you’ve enjoyed today’s project and will link up with us! Feel free to play along with the double page or single page sketch if you’re a scrapbook layout designer, or the card sketch if you’re a card maker! You have until the end of the month to play and we’d love to see what you create! Be sure to check out all the fun goodies at Corbett Creations! Thanks so much for stopping by today – we’ll see you next time! ;)

Scrappy hugs,
lesliesig

Paris, Whimsical Heart & Sewing ATCs

Hello, my crafty friends! I hope you’re having a good day! I’m excited to share my Ephemoire inspiration project with you this morning. If you haven’t already done so, be sure to head over to the Ephemoire Etsy Shop to check out all the amazing digital printables… there are collage sheets, digital papers, journal kits, clip art and mixed media printables, and the print quality is awesome!

This week I finally got around to organizing all the ATCs I’ve been making over the past year and a half (while on an ATC design team) into an album and realized that I might have a slight addiction, lol! I’d love to add a few more to my collection, so I decided to make a variety of both cards and coins for my Ephemoire inspiration project this month. I dug into my personal journal kit stash and printed various papers and accessories from Lavande et Peridot Journal Kit, Whimsical Heart Journal Kit and Vintage Sewing Journal Kit to create these 12 ATCs.

I created these Paris coins with papers and elements from the Lavande et Peridot Journal Kit and embellished them with a gold Posca paint pen. I added some shimmer to the dragonfly with a Clear Star Gelly Roll pen.

I used elements from the Lavande et Peridot Journal Kit to create these Paris cards, and distressed them with walnut stain distress ink- going from light to medium to heavy distressing.

These Whimsical Heart cards were created with papers and elements from the Whimsical Heart Journal Kit. I distressed these with black soot distress ink and attached the tickets with tiny staples.

The final set of Sewing cards and coin were created with papers and elements from the Vintage Sewing Journal Kit. I collaged these with various sewing elements, and distressed them with black soot distress ink.

One more look at the sets… the papers and elements in these journal kits were so much fun to work with, and it’s always cool to think ‘outside the box’ and create something totally different than the intended use! I see lots and lots more ATCs in my future to add to my collection – they are fun to keep in an album and fun to trade! However, I warn you… I’m not willing to part with a few of them, lol! ;)

2020_032000132020_032000172020_032000212020_03200025

I’d love to enter these ATCs into the following challenges:
The Creative Crafters: #26 – Anything Goes
World Wide Open Design Team Monthly Challenge: #03 – Anything Goes

Products used:
Cardstock/Paper: Neenah Classic Crest Solar White cardstock
Stamps: Ephemoire digital products- Lavande et Peridot Journal Kit, Whimsical Heart Journal Kit and Vintage Sewing Journal Kit
Ink: Ranger walnut stain and black soot distress ink, gold Posca paint pen, Sakura Clear Star Gelly Roll pen
Dies/Punches: Fiskars 2-1/2″ circle punch, Tonic corner punch, 1/16″ hole punch
Accessories:  ScraPerfect Best Glue Ever, Carpe Diem Washi Tape, Tim Holtz Idea-ology Tiny Attacher

I hope you’ve enjoyed today’s project! Be sure to check out all the awesome printables at the Ephemoire Etsy Shop, and while you’re at it, head on over to the Ephemoire Facebook Page for tons of inspiration! Thanks so much for stopping by today – we’ll see you next time!

Scrappy hugs,
lesliesig

Just a Note

Hello, friends! Hope you’re having a good week! Our new challenge is live over at Southern Girls Challenge and I’m excited to share my DT inspiration project with you today! As always, the theme for our challenge is Anything Goes and we’d love to see what you create! Our sponsors this time are Krafter’s Cart, Moonflower Digi Stamps and KLM Designs. I was provided the Mum digital image from KLM Designs and created a pretty note card. 

2020_0204006a

From ivory cardstock, I created a bi-level card base (meaning the front of the card base is just a tad shorter than the back), cutting the front off with a stitched scallop edge die. I layered yellow cardstock on the front and the inside, and then die cut two stitched rectangle panels for the front and two for the inside. The ‘Just a Note’ sentiment was included with the mum digital image so I made sure to capture that on the bottom right of the ivory panel I die cut for the front. I also printed the mum image 12 times, colored them with bright Bic Mark-It markers and then commenced to fussy cutting. I arranged them in circular fashion, popping several of them up on foam pads. I finished the front with a few tiny orange gemstones.

2020_0204007a

Since this is a note card, I left the inside blank with plenty of room to write a custom message.

2020_0204008a

And one more peek… I really love how this turned out! Sure makes me think of Spring! ;)

2020_0204009a

I’d love to enter this card into the following challenges:
A Bit More Time To Craft: #112 – Anything Goes
A Bit More Time To Craft Extra Challenge: March Anything Goes
A Perfect Time To Craft: #3-2020 – Anything Goes
Cardz 4 Galz: #117 – Spring Flowers
Classic Design Challenge: #3 – Anything Goes
Crafty Gals Corner: #205 – Use Flowers
Double D Challenges: Welcome Spring
Jan’s Digi Stamps Challenges: #10 – Anything Goes
Lil Patch of Crafty Friends Challenge: #128 – Anything Goes
Pammie’s Inky Pinkies Challenges: #2011 – Anything Goes

Products used:
Cardstock/Paper: American Crafts vanilla cardstock, GKD Tomato Soup and Wild Dandelion cardstock
Stamps: KLM Designs Mum digital image
Ink: Bic Mark-It markers- Summer Melon, Sunset Orange, Yellow Blaze, Key Lime, Rambunctious Red
Dies/Punches: My Favorite Things Stitched Scallop Basic Edges die, My Favorite Things Stitched Rectangle Layers dies
Accessories:  ScraPerfect Best Glue Ever, Gemini Junior die cutting machine, Darice orange gemstones

I hope you’ve enjoyed today’s project and will link up with us this time! Can’t wait to see what you create! Be sure to check out all the fun goodies at Krafter’s Cart, Moonflower Digi Stamps and KLM Designs! Thanks so much for stopping by today – we’ll see you next time! ;)

Scrappy hugs,
lesliesig

Loved Beyond Measure

Hi everyone! It’s Hump Day and I hope you’re having a good week! I shared last week that I’m guest designing for The Hedgehog Hollow this month (a big Woo-hoo!) and I have another project to share created with goodies from the March Subscription Box. I created a fun card that I think will be for our youngest granddaughter who will turn 1 next month! If you’re interested in seeing my tutorial, check out my guest blogger post on the The Hedgehog Hollow blog! 

DSCF6276

I really enjoyed creating this background. Using different colors of ink and a stamp positioner, I stamped the ruler (from the Craft Together stamp set) vertically across the white cardstock panel, moving it about 3/4″ either to the left or to the right, starting in the middle, until the entire panel was stamped. I layered the panel on black cardstock and adhered it to a purple card base. I stamped the large sentiment (from the Inspire Me stamp set) in black ink on white cardstock, trimmed it and layered it on black cardstock, then adhered it on the front of the card. The final step was the addition of randomly-placed tiny gemstones in colors matching the inks used.

DSCF6277

I embellished the inside panel with strips of white cardstock that I DTP-inked with the inks used on the front. Then I stamped the large sentiment (also from the Inspire Me stamp set) in black ink, layered the panel on black cardstock, and adhered it to the inside of the card base.

DSCF6278

One more look… really loving how this turned out! Such awesome products I’ve had the honor of playing with! ;)

DSCF6279

I’d love to enter this card into the following challenges:
A Bit More Time To Craft: #112 – Anything Goes
A Bit More Time To Craft Extra Challenge: March Anything Goes
A Perfect Time To Craft: #3-2020 – Anything Goes
Classic Design Challenge: #3 – Anything Goes
Lil Patch of Crafty Friends Challenge: #128 – Anything Goes
Not Just Cards Challenges: March Anything Goes
Pammie’s Inky Pinkies Challenges: #2011 – Anything Goes
Paperbabe Stamps: #114 – Anything Goes
QKR Stampede: #389 – Anything Goes
The Creative Crafters: #26 – Anything Goes

The Hedgehog Hollow products used (from the March 2020 Subscription Box):
Inspire Me stamp set
Craft Together stamp set

Other products used:
Cardstock/Paper: GKD Wild Lilac and White cardstock, Colorbok Black cardstock
Ink: Stampin’ Up Coastal Cabana, Crushed Curry, Pumpkin Pie, Perfect Plum, Wild Wasabi, Strawberry Slush and Marina Mist ink; Memento Tuxedo Black ink
Accessories:  ScraPerfect Best Glue Ever, MISTI stamp tool, ScraPerfect Embellie Gellie

I hope you’ve enjoyed today’s project and have popped over to see my tutorial on the blog! Be sure to check out the Subscription Boxes over at The Hedgehog Hollow – they are just awesome! And while you’re there, sign up for the email newsletter for deals and lots of crafty inspiration! Thanks so much for stopping by today – we’ll see you next time!

Scrappy hugs,
lesliesig

Inspire

Hi friends! Happy Saturday to you! I’m beyond thrilled to share that I’m guest designing for The Hedgehog Hollow this month! Woo-hoo… a dream come true for this old gal! I was provided the March Subscription Box and created a couple projects to share this month. This first one is a friendship card featuring a fun and unique design of three vertical panels seemingly cut through the stamped image and popped up on foam. If you’re interested in seeing my tutorial, check out my guest blogger post on the The Hedgehog Hollow blog! 

2020_03010003

This was a fun design and really fairly simple. I created two background pieces by cutting random strips of patterned paper in shades of green, teal, aqua and blue. I stamped the large sentiment (from the Inspire Me stamp set) in the same place on both background pieces using a stamp positioner. I used one of the background pieces as my base and then layered three strips from the other background piece that I popped up on foam for some awesome interest. All elements are layered on black cardstock which is a great contrast to the patterned paper. I completed the front with several randomly-placed black gemstones.

2020_0301002

I embellished the inside panel with leftover strips of cardstock used on the front, and stamped the sentiment (from the Craft Together stamp set) in black ink.

2020_0301003

One more look… I am so smitten with these stamp sets and love how this card turned out!

2020_03010006

I’d love to enter this card into the following challenges:
613 Avenue Create: #231 – Anything Goes w/optional colored pencils
A Bit More Time To Craft Extra Challenge: March Anything Goes
A Perfect Time To Craft: #3-2020 – Anything Goes
Classic Design Challenge: #3 – Anything Goes
Not Just Cards Challenges: March Anything Goes
Paperbabe Stamps: #114 – Anything Goes
QKR Stampede: #389 – Anything Goes
WordArt Wednesday: Weeks #430/431 – Anything Goes

The Hedgehog Hollow products used (from the March 2020 Subscription Box):
Inspire Me stamp set
Craft Together stamp set

Products used:
Cardstock/Paper: GKD Ocean Mist, Turquoise Sea and Black Onyx cardstock; K & Co. Essentials Dark Designer Paper Pad
Ink: Memento Tuxedo Black ink
Accessories:  ScraPerfect Best Glue Ever, MISTI stamp tool; light green, medium green and aqua Foamies foam; ScraPerfect Embellie Gellie, black Darice gemstones

I hope you’ve enjoyed today’s project and have popped over to see my tutorial on the blog! Be sure to check out the Subscription Boxes over at The Hedgehog Hollow – they are just awesome! And while you’re there, sign up for the email newsletter for deals and lots of crafty inspiration! Thanks so much for stopping by today – we’ll see you next time!

Scrappy hugs,
lesliesig

St. Patty’s Day Hat treat box

Hello, crafty friends! Today is my post day on the Simply Crafty SVGs Blog and I’m stoked to share my DT inspiration project with you, a super cute treat box for St. Patrick’s Day created with the Simply Crafty SVGs Leprechaun Hat Treat Box cut file. Have you EVER seen anything cuter than this?! OMG. And it’s about the right size for a Leprechaun to wear, lol!

2019_0903001a

This has to be one of the cutest treat boxes I’ve ever made! It will definitely be displayed with some green M&Ms in it! Out of reach of the cats, of course, lol!

2019_0903002a
2019_0903003a

And one final look from overhead… love, love, love!

2019_0903004a

I’d love to enter this fun treat box into the following challenges:
A Bit More Time To Craft Extra Challenge: March Anything Goes
A Perfect Time To Craft: #3-2020 – Anything Goes
Classic Design Challenge: #3 – Anything Goes
Crafty Calendar Challenges: More Than One Fold
Moving Along With The Times: #116 – Anything But A Card
Not Just Cards Challenges: March Anything Goes
WordArt Wednesday: Weeks #430/431 – Anything Goes

Products used:
Cardstock/Paper: American Crafts black cardstock, Colorbok yellow cardstock, GKD Grass Green and Fresh Asparagus cardstock
Dies/Punches: Simply Crafty SVGs Leprechaun Hat Treat Box cut file

I hope you’ve enjoyed today’s project! Be sure to check out all the fun cut files in the Simply Crafty SVGs store – you’ll have so much fun! And there are tons of freebies to get started! Thanks so much for stopping by today – we’ll see you next time! ;)

Scrappy hugs,
lesliesig