03/28/26 Top Rocker at 613 Avenue Create!
04/05/26 Front Porch Winner at 613 Avenue Create!
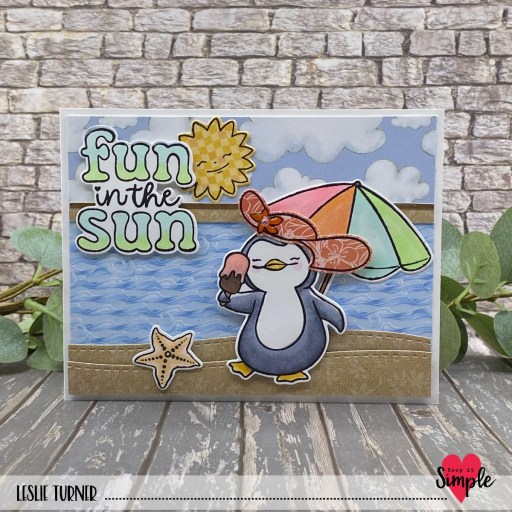
Hey everybody, happy Friday! With all the warm-weather projects I’m seeing around blogland and on the socials, I think just about everybody is ready for the cold weather to go away. Seems like Winter has just lingered, hasn’t it?! I’m delighted to share this interior stair step card with you today for Keep It Simple! This is another fun fold that I saw on Connie Stewart’s blog and it is indeed a fun one. It features papers, stamps, dies and die cut pieces from the new Summer Penguins collection! Talk about C-U-T-E… and needless to say, I had fun creating this little beach scene!
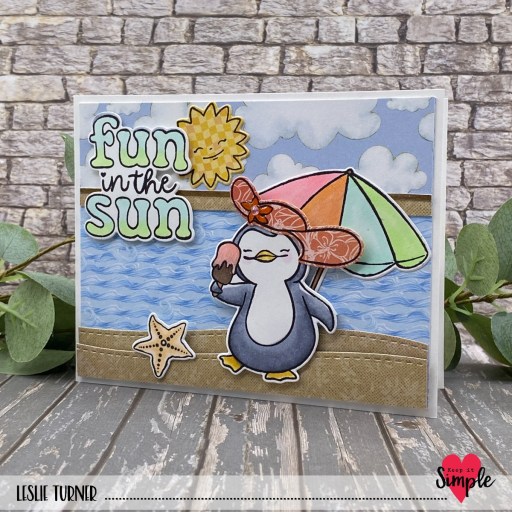
I cut the card base and components from Neenah Classic Crest 80# Solar White cardstock along with layering panels from assorted prints in the Summer Penguins 6×9 Collection Pack. I stamped several images from the Summer Penguins Collection Stamps on patterned paper and several on Solar White which I colored with Copics and cut them with the coordinating Outline Dies.
I built the sandbar with papers from the Back To Basics 6×9 Kraft Collection Pack, and the shoreline with paper from the same collection and the Back To Basics Wavy Borders Dies. As I added the elements to the card front, I popped several of them up with foam squares.
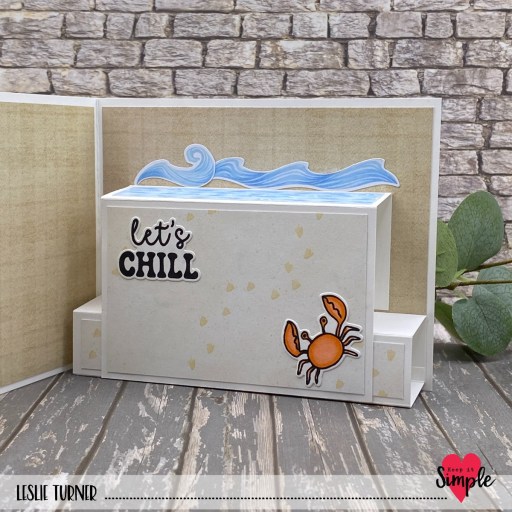
For the inside, I used additional papers from the Back To Basics Kraft 6×9 and Summer Penguins 6×9 Collection Packs. I grabbed a couple waves from the Summer Penguins Die Cut Pieces Megapack, and added a stamped sentiment and crab from the Summer Penguins Collection Stamps which I cut with the Summer Penguins Outline Dies. Super easy card that really packs a punch!
Sharing in the following challenges:
1. https://avenue613.blogspot.com/2026/03/march-2026-anything-goes-w-optional.html
2. https://lovetocraftchallengeblog.blogspot.com/2026/03/ltccb-91-and-ltccb-90-winner-and-top.html
3. https://lovetoscrapchallengeblog.blogspot.com/2026/03/ltscb-178-anything-goes-ltscb-177.html
4. https://mixitupchallenge.blogspot.com/2026/03/miucb-82-anything-goes-optional-die.html
5. https://paper-rocks-scissors.blogspot.com/2026/03/march-14-challenge.html (cardstock and paper)
Keep It Simple products used:
Summer Penguins 6×9 Collection Pack
Summer Penguins Collection Stamps
Summer Penguins Outline Dies
Summer Penguins Die Cut Pieces Megapack
Lumberjack 12×12 Collection Pack
Back To Basics 6×9 Kraft Collection Pack
Back To Basics Wavy Border Dies
Back To Basics Adhesive Basics Squares & Strips
Affiliate links are used in this post at no cost to you – I really appreciate your support!
Other products used:
CARDSTOCK/PAPER: Neenah Classic Crest 80# Solar White cardstock
INK: Memento Tuxedo Black ink, Versafine Onyx Black ink; Copic Ciao alcohol markers- C3/5/7, V000, RV1, YR02/23/68, E00/21/25/47/93, Y21, BG10, YG11; Bic Mark-It Ultra Fine Point Rambunctious Red and Fine Point Honey Brown; Sakura Clear Star Gelly Roll pen
ACCESSORIES: Fiskars 12″ ProCision Rotary Bypass Paper Trimmer, Spellbinders 12×12 Scoring Board, My Sweet Petunia Precision Glue Press, Bearly Art Precision Craft Glue, Mini MISTI, Big Shot, Spellbinders 5/8″ Best Ever Craft Tape, Nuvo Crystal Drops Morning Dew; small pink gemstone
I hope you’ve loved seeing this project as much as I loved creating it and you’re inspired to get crafty! Be sure to check out ALL the fun goodies in the Keep It Simple online store! Save 10% on your entire order when you shop online using code LoveToScrap2 at checkout! There is no minimum purchase requirement and no usage limits, AND it combines with product, order, and shipping discounts! Is that cool, or what?! Be sure to Follow us on Facebook, Instagram, and Pinterest for lots of crafty inspiration! Thanks so much for stopping by today – we’ll see you next time!
Scrappy hugs,