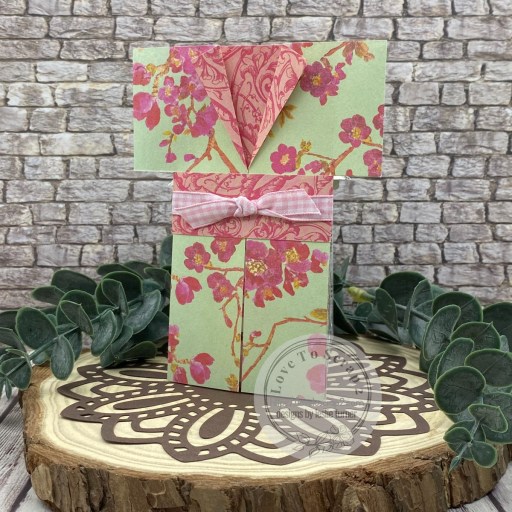
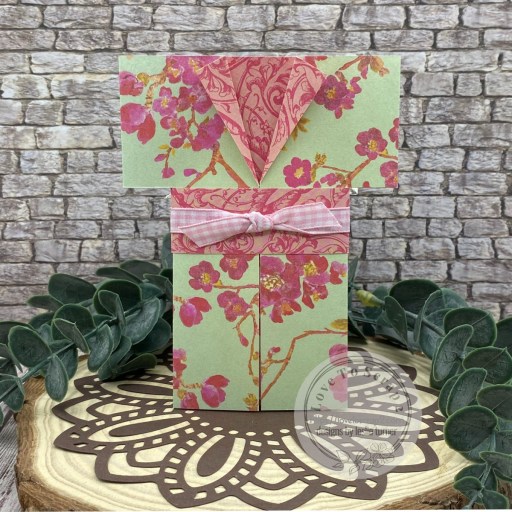
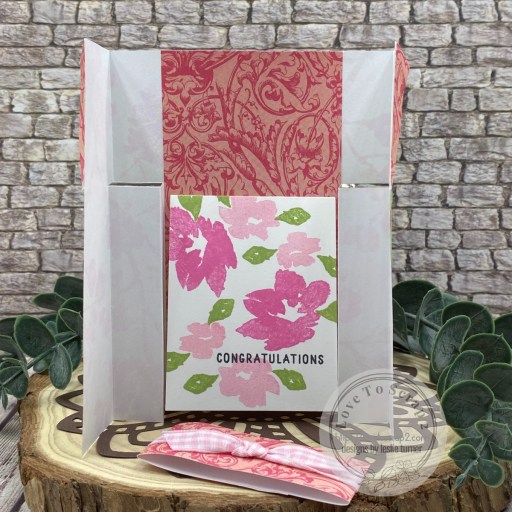
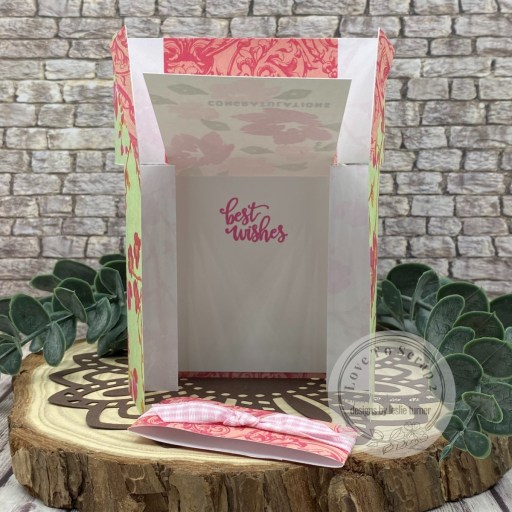
Hi friends, Happy Friday! I hope you’ve had a great first week of March! Our new challenge is live this morning over at Creative Creases and I’m thrilled to share my DT inspiration project for Challenge #101, where we always want to see your fun folds! I turned this awesome little kimono card into a congrats card, and I love how it turned out! I’ve made a few of these over the years, finding my original inspiration from THIS tutorial over at Splitcoast Stampers. This fold is super easy and really packs a punch – and it’s great for just about any occasion.
I cut the card base and sash from coordinating prints in the Colorbok Delilah 12×12 Designer Paper Pad, cutting and folding the kimono as per the tutorial. I added pink gingham ribbon from the Keep It Simple Ruby Ribbon Pack to the sash.
I cut the mini card on the inside from Neenah Classic Crest 80# Solar White cardstock, and stamped the floral images and sentiment in Memento Tuxedo Black, Rose Bud and Bamboo Leaves inks along with Catherine Pooler It’s A Girl ink. The florals and front sentiment are from the Stampin’ Up Hand-Penned Petals stamp set, and the inside sentiment is from the Stampin’ Up Artistically Inked stamp set.
Affiliate links are used in this post at no cost to you – I really appreciate your support!
Products used: CARDSTOCK/PAPER: Colorbok Delilah 12×12 Designer Paper, Neenah Classic Crest 80# Solar White cardstock STAMPS: Stampin’ Up Hand-Penned Petals and Artistically Inked stamp sets INK: Memento Tuxedo Black, Rose Bud and Bamboo Leaves inks; Catherine Pooler It’s A Girl ink ACCESSORIES: Fiskars 12″ ProCision Rotary Bypass Paper Trimmer, Bearly Art precision craft glue, MISTI stamp tool, Keep It Simple Ruby Ribbon Pack
I hope you’ve enjoyed seeing this project and will link up with us this month! Thanks so much for stopping by today – we’ll see you next time! ;)
Hey everybody, can you believe it’s Thursday already?! Dang, this week is flying by just like all the others. I’m delighted to share a Keep It Simple DT inspiration project with you today. This double diamond fold features our new Cloud Stencil along with papers, stamps and dies from our Ski Resort collection which I totally love for Winter-themed cards. I’ve made only one of these in the past and my inspiration came from some of these cards Lisa Curcio showcased on her blog. I really love how this turned out!
I cut the card base from Neenah Classic Crest Solar White and the diamond layering panels from prints in the Ski Resort 6×9 Collection Pack. Using the Cloud Stencil, I stenciled the clouds on the larger center diamond panel of Solar White using Catherine Pooler Tranquil ink, and then stamped trees in Catherine Pooler Stone Blue ink and the sentiment in Memento Tuxedo Black ink, stamps from the Ski Resort Collection Stamps.
I stamped the skiier (also from the Ski Resort Collection Stamps) in black ink and colored her with a variety of markers. I cut her with the coordinating Ski Resort Outline Die, added Morning Dew Crystal Drops to her goggles, and affixed her to the large center panel which I popped up on the card base with adhesive foam squares.
I stenciled the two smaller diamond panels for the back with the Cloud Stencil and Catherine Pooler Tranquil ink, layered them and adhered them to the back of the card, which completed the project.
I hope you’ve loved seeing this project as much as I loved creating it and you’re inspired to get crafty! Be sure to check out ALL the fun goodies in the Keep It Simple online store! Save 10% on your entire order when you shop online using code LoveToScrap2 at checkout! There is no minimum purchase requirement and no usage limits, AND it combines with product, order, and shipping discounts! Is that cool, or what?! Be sure to Follow us on Facebook, Instagram, and Pinterest for lots of crafty inspiration! Thanks so much for stopping by today – we’ll see you next time!
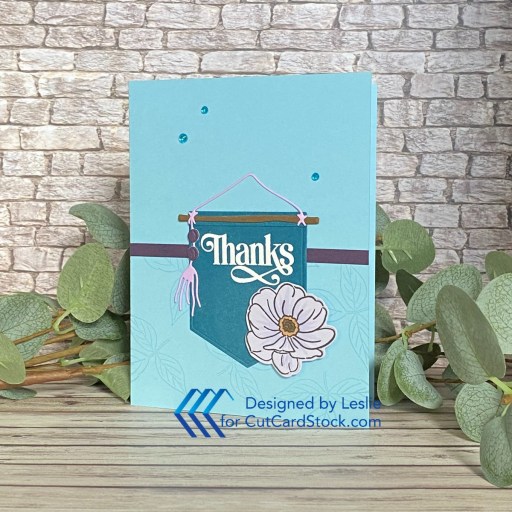
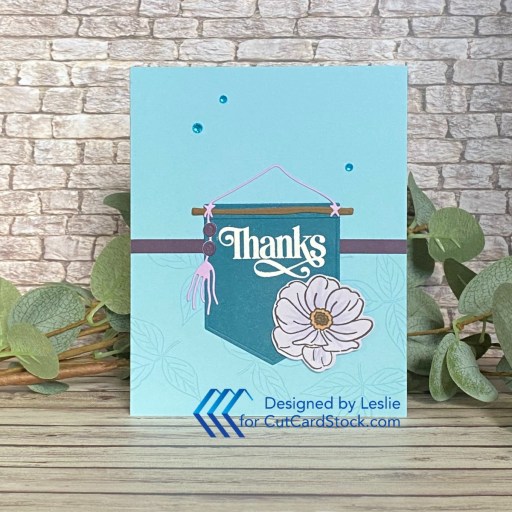
Hi everyone! Happy Wednesday – I hope you’re having a great week! I’m up on the CutCardStock blog today with a tutorial for making a pretty watermarked thank you card. Our Lessebo cardstock is on sale this month and I used Salt Water Blue, Amazon Dark Teal, Coffee Bean, Aubergine, Lilac and Amethyst from that line, along with Neenah Classic Crest Solar White, to make this card. I’ve mentioned previously that Lessebo is my favorite cardstock. It replaced the Basis line last year, and the weight and colors are glorious. It makes THE best cards! I love a teal and purple color combo, so that’s the direction I went. I also did a little Versamark watermarking on the front and inside – a detail that’s really subtle but sure adds to the ‘wow’ factor!
I cut a standard A2 side-folding card base from Lessebo Salt Water Blue. I masked off the top portion of the front of the card base and stamped a leaf image from the Altenew Mini Delight: Celebratory Banner stamp set in Versamark ink randomly over the bottom portion. I know that Versamark is a watermark ink but in all the years I’ve been crafting, I’ve never used it for watermarking! I’m serious… can you imagine?! I added a narrow strip of Lessebo Aubergine cardstock across the top of the watermarked portion.
Next, I die cut the banner and floral elements from Lessebo Amazon Dark Teal, Lessebo Coffee Bean, Lessebo Lilac and Lessebo Amethyst cardstock. I heat embossed the Thanks sentiment (from the same stamp set) in Hero Arts White Embossing Powder. I gave the flowers some highlights with a BV31 Pale Lavendar Copic Ciao alcohol marker, assembled the banner, and adhered it to the card front. The finishing touch was adding a few small teal gemstones.
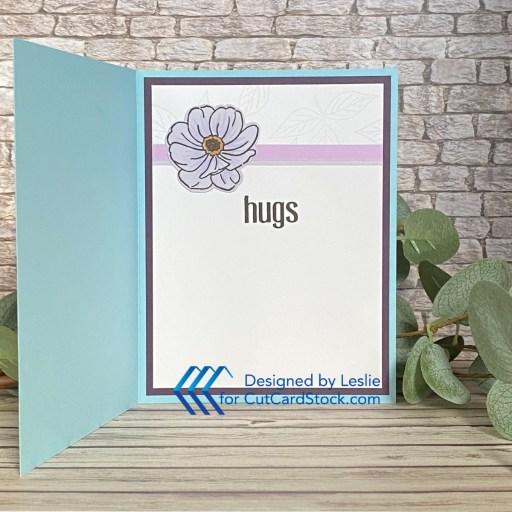
I cut the inside panel from Neenah Classic Crest 80# Solar White cardstock, masked off the bottom three-quarters of the panel. and stamped the same leaf image on the top portion of the panel. I added two narrow strips of Lessebo Lilac and Lessebo Amethyst cardstock, and then another flower. I had the Altenew Mini Delight: Watering Daisies stamps and dies out on my desk from another project, and used the ‘hugs’ stamp for the inside sentiment on this card. I layered the panel on Lessebo Aubergine cardstock, which completed the card.
Affiliate links are used in this post at no cost to you – I really appreciate your support!
I hope you’ve enjoyed today’s project and you’re inspired to get crafty! Be sure to check out all the awesome cardstock and other goodies at CutCardStock (adhesives, labels, stickers, pens, watercolors and ribbon to name a few). And head on over to the CutCardStock Facebook Page and for more inspiration! Also, be sure to join our Creating with CutCardStock Facebook Group for even more crafty inspiration! Thanks so much for stopping by today – we’ll see you next time!
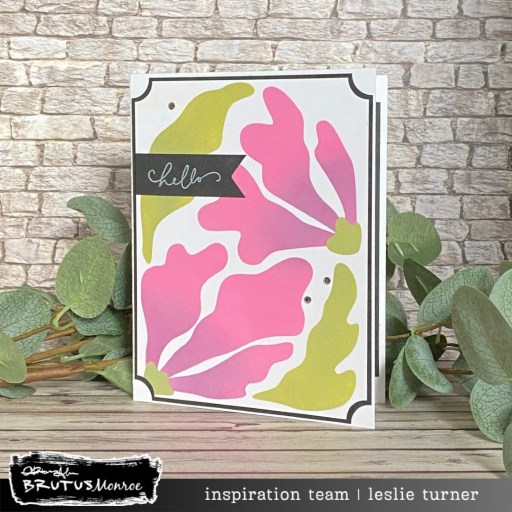
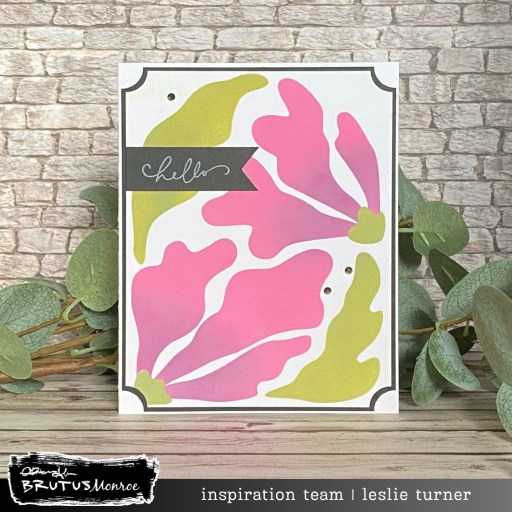
Hi friends, happy Tuesday! I hope your week is off to a nice start. I’m delighted to share a Brutus Monroe DT inspiration project today featuring the amazing Emma A2 Stencil and Super Sentimental Stamp Set. Isn’t that stencil delightful?! I also used several other Brutus Monroe products to make this card come to life, and I really love how it turned out. It’s been a while since I used any distress oxide inks and honestly, I had forgotten how awesome they blend! I totally need to get these out more often.
I grabbed a piece of Perfect Blend 4.25″ x 5.5″ cardstock (which is excellent for ink blending and alcohol marker coloring) and stuck it down on my Stamp & Stick Mat which I attached to my 12″ Make Art Stay-tion with magnets. I used the Emma stencil with peeled paint, picked raspberry and seedless preserves distress oxide inks to create the background. I cut a layering panel from Raven cardstock and cut the corners of both panels with the Spellbinders 3 in 1 Notched Corners Punch.
I cut an A2 size side-folding card base from Not Your Mamas cardstock and adhered the panels to the front. I stamped a sentiment from the Super Sentimental stamp set on Raven cardstock in Alabaster White ink, trimmed it into a flag, and adhered to the card front. The finishing touch was adding a few Hematite Flat Back Crystals.
I trimmed another panel of Perfect Blend and Raven cardstock for the inside and notched the corners with the Spellbinders punch. I stamped another sentiment from the Super Sentimental stamp set in Raven ink and colored the tiny hearts with a Copic Ciao V15 alcohol marker.
Affiliate links are used in this post at no cost to you – I really appreciate your support!
I hope you’ve enjoyed seeing this project and you’re inspired to get your craft on! Be sure to check out all the amazing stamps and dies, pigments and mists, cardstock and tools (just to name a few) at Brutus Monroe! And if you happen to have a sweet tooth and like to munch while you craft (like I do, lol), check out Scoozie’s Confections & Curiosities! OMG, I’m hooked! ;) Follow us on Facebook, Instagram and YouTube for tons of crafty inspiration! And come on over and join our Fan Club Facebook Group to share your crafty makes using our products! Thanks so much for stopping by today – we’ll see you next time!
Hi friends, a big ol’ Happy Saturday to you! I hope it’s warming up where you are and you’re getting to do something fun this weekend. I’m delighted to share a Brutus Monroe DT inspiration project today featuring papers from the amazing Fluttering Forest and Vintage Plaid 6×6 Paper Packs along with a sentiment from the Super Sentimental Stamp Set. This tiered pinwheel twist card is one of my favorite fun folds and I’ve made several over the past couple years. My inspiration originally came from Sam Calcott over at Mixed Up Craft. You know what a fun fold fanatic I am, and the pretty patterned papers and butterflies were added bonuses!
I cut the card base and the tiered panels from Raven cardstock along with layering panels from patterns in the Fluttering Forest and Vintage Plaid 6×6 Paper Packs. I love mixing patterns.
I fussy cut four butterflies from the Fluttering Forest paper pack, bent them in the middle, and adhered one to each side of the card.
I stamped a sentiment from the Super Sentimental stamp set in Raven ink on a panel of Perfect Blend cardstock, and this completed the card.
Affiliate links are used in this post at no cost to you – I really appreciate your support!
I hope you’ve enjoyed seeing this project and you’re inspired to get your craft on! Be sure to check out all the amazing stamps and dies, pigments and mists, cardstock and tools (just to name a few) at Brutus Monroe! And if you happen to have a sweet tooth and like to munch while you craft (like I do, lol), check out Scoozie’s Confections & Curiosities! OMG, I’m hooked! ;) Follow us on Facebook, Instagram and YouTube for tons of crafty inspiration! And come on over and join our Fan Club Facebook Group to share your crafty makes using our products! Thanks so much for stopping by today – we’ll see you next time!
Hey everybody! Happy Friday – I hope you have something fun planned this weekend. I’m delighted to share a Brutus Monroe DT inspiration project today featuring the awesome Clowder of Cats stamps, stencil and chipboard along with the Spring Splatter 6×6 Paper Pack, all from our February release! You know we rescue cats and these products are right up my alley! I created a fun birthday card featuring the tear and roll technique. It’s not a fun fold like I typically share, but this super fun (and easy) technique packs a punch nonetheless!
I cut an A2 panel from a pattern in the Spring Splatter 6×6 Paper Pack and tore a strip across the center. I rolled it around a skinny skewer and glued it in place as I rolled it. I laid the panel down on the card base to get the placement for my sentiment from the Clowder of Cats Stamp Set. I stamped it in Raven ink and then adhered the panel to a Pre-Scored Card Base.
I placed the Clowder of Cats Chipboard onto the Stamp & Stick Mat with the Clowder of Cats stencil that I attached to my Make Art Stay-tion with magnets. I grabbed three small blending brushes and inked the chipboard with vintage photo, walnut stain and weathered wood distress inks. I adhered this adorable row of kitties to the card front and added several Blue Shift Flat Back Crystals, which completed the card front.
I trimmed one-half of another Pre-Scored Card Base for the inside panel which I embellished with a leftover strip of the Spring Splatter paper used on the front. I stamped the paws image in Raven ink and layered the panel on light brown cardstock.
Affiliate links are used in this post at no cost to you – I really appreciate your support!
I hope you’ve enjoyed seeing this project and you’re inspired to get your craft on! Be sure to check out all the amazing stamps and dies, pigments and mists, cardstock and tools (just to name a few) at Brutus Monroe! And if you happen to have a sweet tooth and like to munch while you craft (like I do, lol), check out Scoozie’s Confections & Curiosities! OMG, I’m hooked! ;) Follow us on Facebook, Instagram and YouTube for tons of crafty inspiration! And come on over and join our Fan Club Facebook Group to share your crafty makes using our products! Thanks so much for stopping by today – we’ll see you next time!
Hey everybody, Happy Friday! I hope you’ve had a great week. I’m absolutely delighted to bring you a shaped card full of sunshine and rainbows for Keep It Simple. Our NEW cutest Rainbow Builder Dies and Sunshine & Rainbows Stamp Set were released about a week ago and I can’t tell you how much fun these products are. The possibilities are endless and the cuteness just doesn’t stop! I grabbed seven colors of our Back To Basics 6×9 Collection Packs and went to town!
Using the Rainbow Builder Dies, I cut the shaped card base from Neenah Classic Crest 110# Solar White cardstock, extending the top of the rainbow shaped die past the fold in the cardstock just a bit so it didn’t cut it in two. Then I took the Back To Basics Lemon, Mango, Rose, Ruby, Lilac, Jade and Royal 6×9 Collection Packs and die cut all the elements for the rainbow and sun, adding in some white glitter cardstock from my stash for the clouds. As I always say, the assembly is the most fun! I stamped a sentiment from the Sunshine & Rainbows Stamp Set in Memento Lady Bug ink which completed the card front.
I cut the inside panels from 80# Solar White and a print from the Royal Collection Pack which I embellished with a couple hearts. I stamped another sentiment from the Sunshine & Rainbows Stamp Set in the Lady Bug ink, which completed the card.
I hope you’ve loved seeing this project as much as I loved creating it and you’re inspired to get crafty! Be sure to check out ALL the fun goodies in the Keep It Simple online store! Save 10% on your entire order when you shop online using code LoveToScrap2 at checkout! There is no minimum purchase requirement and no usage limits, AND it combines with product, order, and shipping discounts! Is that cool, or what?! Be sure to Follow us on Facebook, Instagram, and Pinterest for lots of crafty inspiration! Thanks so much for stopping by today – we’ll see you next time!
Hey everybody! Happy Wednesday evening – I’m here with my second post today. I hope you’re having a beautiful week and it’s warming up a bit where you are, with Spring on the way! I’m up on the Love From Lizi blog today with a tutorial for making a tented easel card featuring the Butterfly Wings Stamp Set from our newest release – and you may recognize this card from our new release blog hop on Instagram last week. Yep, I’m double-dipping, lol! I also used some of our mirror cardstock, an additional stamp set, some nested cutting dies, and the centers from the purple butterfly border peel-off stickers. And you’ve probably also noticed that this is one of my favorite fun folds and I’m posting another one within the course of a week!
The measurements for this card are as follows: 1. Card base is 4-1/4″ x 11″, scored at 4-1/4″ and 8-1/2″, making the folded card 4-1/4″ square. 2. Front layering panel is 4″ x 4″. 3. Bottom layering panel is 2-1/4″ x 4″. 4. White layering panel for the inside cut at 4″ x 4″.
The card base and the stopper/bottom sentiment layering panel were cut from CutCardStock Amaranth cardstock and patterned paper layering panels from the Love You 6×6 Specialty Paper Pack. I used the Stitched Label Nested Cutting Dies to cut the background for the butterfly from Amaranth and Neenah Classic Crest 80# Solar White cardstock. I used a strip of purple butterfly border peel-off stickers across the bottom of the easel portion, keeping just the inside tiny butterflies and removing the border strip.
I stamped the large butterfly from the Butterfly Wings stamp set, colored it with Copics and fussy cut it. I adhered the body flat to the label shaped background and popped the wings up on adhesive foam squares. I adhered a piece of purple mirror cardstock from the Matte Mirror Pastel Specialty Cardstock Bundle beneath the Amaranth piece, stamped a sentiment from the Butterfly Wings stamp set in Versafine Onyx Black ink and then popped the stopper up on a 1″ adhesive foam strip.
The inside panel was cut from 80# Solar White cardstock and embellished with a strip from the Love You paper pack. I stamped a sentiment from the Simply Amazing Stamp Set in black ink and adhered the panel to the inside of the card base, which completed the card. If you’re interested in more details, be sure to see my tutorial post on the Love From Lizi blog.
Affiliate links are used in this post at no cost to you – I really appreciate your support!
I hope you’ve enjoyed seeing this project and you’re inspired to get crafty! Be sure to join our Facebook Group and Follow us on Instagram and YouTube for lots of crafty inspiration! Thanks so much for stopping by today – we’ll see you next time!
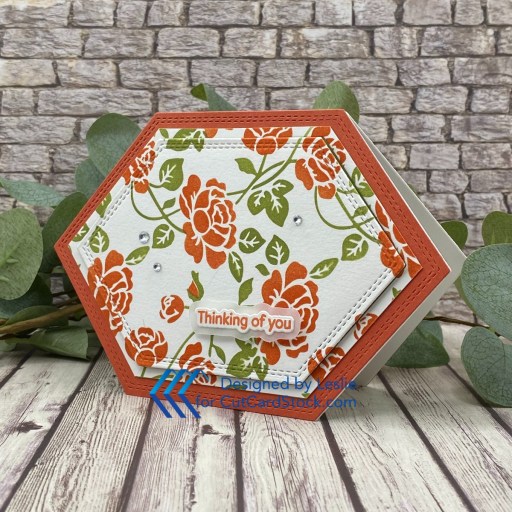
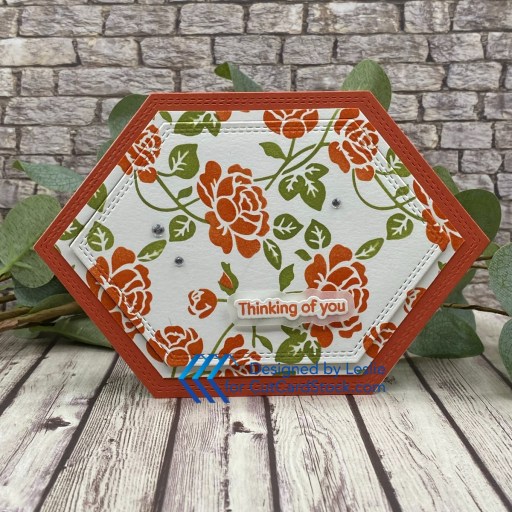
Happy Wednesday, everybody! I hope you’re having a great week. I’m up on the CutCardStock blog today with a tutorial for making a hexagon shaped card to send a little cheer. As you know, fun folds are my most favorite kind of cards to make, and next in line at the top of that list are shaped cards. They are so fun and really pack a punch. I used our Neenah Fluorescent White Cotton cardstock for the stenciled climbing rose panel. Next up are Pop Tone Tangy Orange and Pop Tone Jellybean Green. And, of course, I used my studio staple Neenah Classic Crest Solar White (110# and 80# weights) for my card base and inside panel. Oh, and there’s a tiny bit of our Glama Natural Translucent Vellum under that front sentiment. ;)
Using the Honey Bee Climbing Rose stencils and Ranger crackling campfire and peeled paint distress inks along with a couple blending brushes, I created the focal panel. I gotta tell you that the Neenah Fluorescent White Cotton cardstock is FABulous for inking. Next, I used the Sizzix Belinda Stitched Hexagons Fanciful Framelits to cut the card base and a layering panel from Neenah Classic Crest 110# Solar White, the inside panel from 80# Solar White, a couple layering panels from Pop Tone Tangy Orange, and a couple layering panels from Pop Tone Jellybean Green.
Using the same hexagon die set, I die cut a stitched hexagon panel from the stenciled climbing rose piece. Then I trimmed a 1/8″ frame from the outside of the leftover negative space of the hexagon shape for a little interest. I adhered the extra Solar White panel to the front of the card base, and then one of the Tangy Orange panels to the back of the card base. I layered a Jellybean Green panel and the frame to the other orange panel, popping it up on foam strips.
Next, I stamped a sentiment from the Honey Bee Fall Swags stamp set in Memento Morocco ink on a scrap piece of Solar White. I cut it with the coordinating die and added it to a scrap of Glama Natural Translucent Vellum, trimming around the die cut and popping it up on a foam strip. The finishing touch was adding a few clear gemstones.
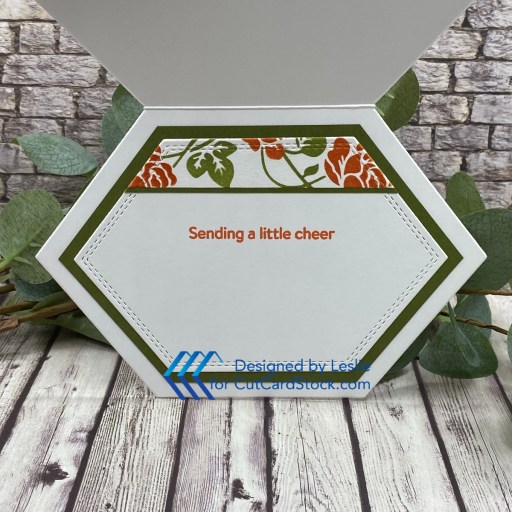
I embellished the 80# Solar White panel for the inside with a leftover piece of the stenciled climbing rose panel and a very thin strip of Jellybean Green cardstock. I stamped another sentiment from the Honey Bee Fall Swags stamp set in Morocco ink and layered the panel on the remaining green panel.
Affiliate links are used in this post at no cost to you – I really appreciate your support!
I hope you’ve enjoyed today’s project and you’re inspired to get crafty! Be sure to check out all the awesome cardstock and other goodies at CutCardStock (adhesives, labels, stickers, pens, watercolors and ribbon to name a few). And head on over to the CutCardStock Facebook Page and for more inspiration! Also, be sure to join our Creating with CutCardStock Facebook Group for even more crafty inspiration! Thanks so much for stopping by today – we’ll see you next time!
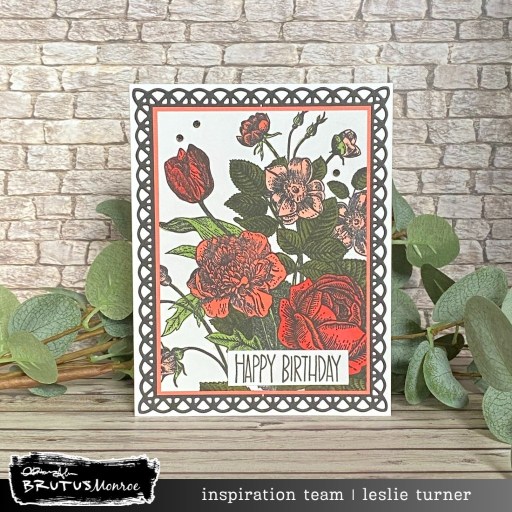
Hi friends, Happy Tuesday! I hope you’re having a great week. I’m delighted to share a Brutus Monroe inspiration project with you today as a new DT member! I’ve been a Brutus Monroe fan for a few years and you can only imagine how ecstatic I was to receive that email telling me I had been selected for the 2025 Inspiration Team! I used two of my all-time favorites, the Botanical Background Stamp and Super Sentimental Stamp Set, to create this pretty birthday card. I included a gorgeous Lace Layers die cut under the focal panel to really show it off. I kept with a simple red/coral color palette and really love how this turned out!
I stamped the Botanical Background focal image in Raven ink on a Perfect Blend 4.25″ x 5.5″ panel and colored it with Copic Ciao markers. I trimmed it and layered it on a panel of CutCardStock Wild Salmon cardstock. I adhered a Lace Layers die cut (which I cut from Raven cardstock) beneath the panel and adhered it to the card base. I stamped a simple birthday greeting from the Super Sentimental Stamp Set, trimmed it, and adhered it to the bottom portion of the card front, slightly to the right of center. The finishing touch was adding several Hematite Flat Back Crystals.
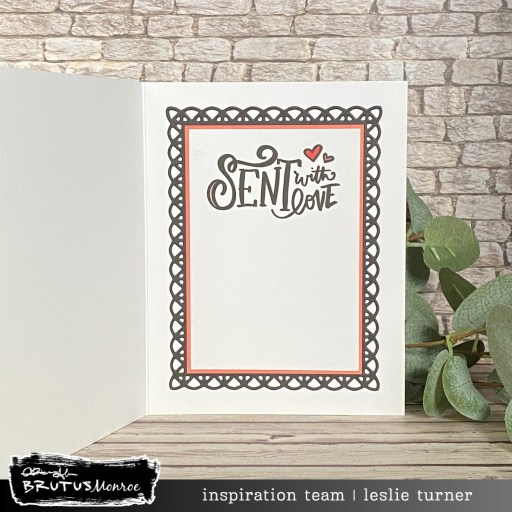
I cut the inside panels from Perfect Blend cardstock and the Wild Salmon cardstock. I stamped another sentiment from the Super Sentimental Stamp Set and layered the panel on a slightly smaller die cut Lace Layer.
Affiliate links are used in this post at no cost to you – I really appreciate your support!
I hope you’ve enjoyed seeing this project and you’re inspired to get your craft on! Be sure to check out all the amazing stamps and dies, pigments and mists, cardstock and tools (just to name a few) at Brutus Monroe! And if you happen to have a sweet tooth and like to munch while you craft (like I do, lol), check out Scoozie’s Confections & Curiosities… OMG, I’m hooked! ;) Follow us on Facebook, Instagram and YouTube for tons of crafty inspiration! And come on over and join our Fan Club Facebook Group to share your crafty makes using our products! Thanks so much for stopping by today – we’ll see you next time!