Love & Peace, Gnomie

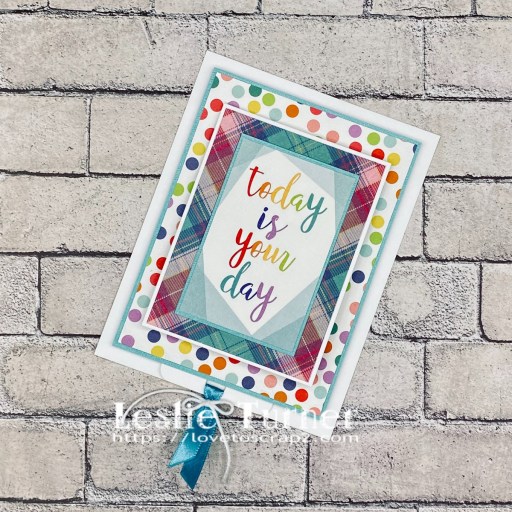
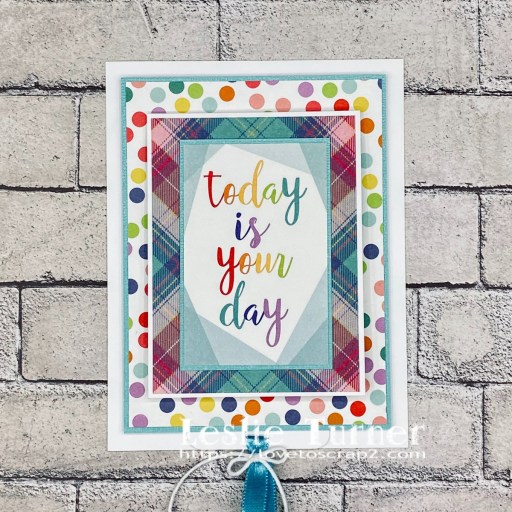
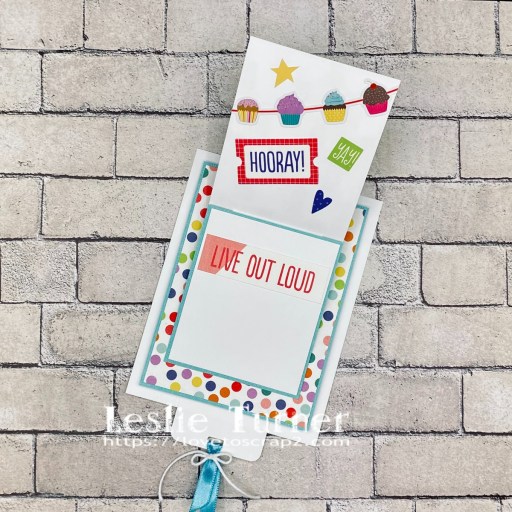
Hey everybody! I hope you had a great weekend! I’m stoked to share a Keep It Simple DT inspiration project created with the awesome Peace Gnomie stamp set from the Bizzy Hands Collection! This dude is just too cool for words, lol! I’m a late 50s girl, having grown up in the 60s and 70s, so he’s right up my alley! I created a swivel top card to showcase him with some coordinating papers from the Pajama Party Collection Pack, and I love how this turned out! It’s a super easy design that I originally saw on Lisa Curcio’s blog.

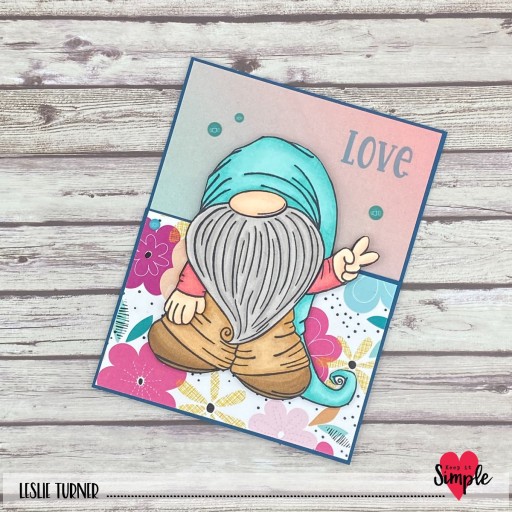
I cut the flat card base panel and pull-out card from CutCardStock Lessebo White cardstock along with layering panels from Lessebo Amazon Dark Teal cardstock and coordinating papers from the KIS Pajama Party Collection Pack. I stamped the gnome from the Peace Gnomie stamp set set in Memento Tuxedo Black ink on Lessebo White, colored him with alcohol markers, and fussy cut him.

The front bottom panel was adhered to the flat card base with foam squares to give it just a tad bit of dimension for the swivel panel and pull-out card to move freely. I adhered the gnome to the bottom panel with foam squares and added a few Hello Adventure Enamel Dots to the swivel panel.

I stamped the first part of the sentiment (from the same stamp set) in Catherine Pooler It’s A Boy ink in the upper right corner of the swivel panel and the second part centered on the pull-out card. How stinkin’ cute is this?! I LOVE it!

Keep It Simple products used:
Bizzy Hands Peace Gnomie stamp set
Pajama Party 12×12 Collection Pack
Hello Adventure Enamel Dots

Affiliate links are used in this post at no cost to you – I really appreciate your support!

Other products used:
CARDSTOCK/PAPER: CutCardStock Lessebo White and Amazon Dark Teal cardstock
INK: Memento Tuxedo Black (pad and marker); Spectrum Noir Tri-Blends FS6/7/8, PP4/5/6, BG2/3/4, AB1/2/3, TN1/2/4, EB1/2/3
ACCESSORIES: Fiskars 12″ ProCision Rotary Bypass Paper Trimmer, Elmer’s Craft Bond Tape Runner, Bearly Art precision craft glue, MISTI stamp tool, Scrapbook Adhesives 3D Foam Squares (small white)

I hope you’ve loved seeing this project as much as I loved creating it and you’re inspired to get crafty! Be sure to check out ALL the fun goodies in the Keep It Simple online store! Save 10% on your entire order when you shop online using code LoveToScrap2 at checkout! There is no minimum purchase requirement and no usage limits, AND it combines with product, order, and shipping discounts! Is that cool, or what?! Be sure to Follow us on Facebook, Instagram, and Pinterest for lots of crafty inspiration! Thanks so much for stopping by today – we’ll see you next time!

Scrappy hugs,

One Nation Under God

Hi friends! I hope you’re having a fabulous weekend and the weather is warming up a bit where you are! I have a Pajama Crafter Stamps project to share with you today created with the beautiful Some Gave All stamp set. This is another one of the projects I created prior to leaving the PCS team at the end of February and hadn’t yet showcased. I’ve got a few more, lol, so stay tuned… I’m just getting started! This note card features the American flag on a hand-cut flag pole and a scored and inked background. It has been a while since I employed this wood-look technique and I like how it turned out!

I cut the note card base and a layering panel from CutCardStock Basis Natural cardstock. I scored the layering panel in even increments and swiped Catherine Pooler Sand Castle, Over Coffee, and Icing on the Cake inks across it. Finally, I lightly swiped some Ranger walnut stain distress ink across the panel and then inked the edges.

I stamped the flag from the Some Gave All stamp set in Memento Espresso Truffle ink on Basis Natural, colored it with alcohol markers, and fussy cut it. I hand-cut a flag pole from CutCardStock Stardream Metallic Silver cardstock and adhered the pole and flag to the layering panel and then to the card front. The finishing touch was stamping the sentiment (from the same stamp set) in Memento Espresso Truffle ink.

Affiliate links are used in this post at no cost to you – I really appreciate your support!

Pajama Crafter Stamps products used:
Some Gave All stamp set

Other products used:
CARDSTOCK/PAPER: CutCardStock Basis 80# Natural and Stardream Metallic Silver cardstock
INK: Catherine Pooler Sand Castle, Over Coffee, and Icing on the Cake inks; Ranger walnut stain distress ink, Memento Espresso Truffle ink; Spectrum Noir Tri-Blends- DR3/4, TB6, BG2
ACCESSORIES: Fiskars 12″ ProCision Rotary Bypass Paper Trimmer, Elmer’s Craft Bond Tape Runner, Bearly Art precision craft glue, MISTI stamp tool

I hope you’ve enjoyed this project! Be sure to check out all the awesome stamps, dies and other goodies at Pajama Crafter Stamps which is the new home of the Prickley Pear Stamps brand and the Pajama Crafter Stamps line! Keep up with news and sales by following Pajama Crafter Stamps on Facebook, Instagram and Pinterest, and join Pajama Crafter Stamps & Friends for lots of fun crafty ideas and to share your creativity! And finally, be sure to visit the Pajama Crafter Stamps blog and sign up for the newsletter to stay in touch! Thanks so much for stopping by today – we’ll see you next time! ;)

Scrappy hugs,

Welcome, Little One (set of 3)

Hey everybody! Happy Friday! I hope you’ve had a great week and you’re looking forward to some beautiful Spring weather this weekend! Mother Nature is finally acting like she likes us… our nights are in the 40s now and we haven’t had any more snow for about a week now. For no particular reason, I’ve been in baby card mode for several weeks and today I have a set of three super adorable baby crib pop up cards to share that I created with my Cricut and an old Silhouette cut file I’ve had in my arsenal for many years.

For many years, Silhouette only offered Studio cut files which couldn’t be used with any other cutting machine, so when I gave my Cameo away and bought another brand of cutting machine I wasn’t able to use any of the gazillion files in my Silhouette library. Fortunately, Silhouette has finally started offering SVG cut files in addition to their Studio files so I’ve gone back into my library and repurchased the SVG version of many of the Studio files I already owned. It’s crappy that one has to repurchase the SVG version but in most cases they don’t cost very much so it’s more of an inconvenience. But long story short, this baby crib pop up card SVG cut file was one of those that I repurchased so I made it in three colors while I had my Cricut out! ;)

All three cards are identical except for the blue, pink and green double-sided patterned papers from Keep It Simple Back To Basics Royal, Rose and Jade 12×12 Collection Packs and the matching Back To Basics Ribbon and Enamel Hearts. I fashioned the bows with a cute little wooden bow maker that my awesome friend, Maureen, gifted me this past Christmas. The baby rattle on the front of each card was cut from CutCardStock Stardream Metallic Eris cardstock which is a pretty shimmery white. The front and inside sentiments are from Paper Pretties Oh Baby stamp set, stamped in Memento Tuxedo Black ink.

How adorable is the baby room scene inside?! So stinkin’ cute, I can’t even stand it! The window frame, shelf and 3D crib were also cut from the Eris cardstock. The building blocks were cut from papers in the Keep It Simple Ruby, Royal and Lemon 12×12 Collection Packs and backed with Neenah Classic Crest Solar White cardstock scraps.

Affiliate links are used in this post at no cost to you – I really appreciate your support! 

Products used:
CARDSTOCK/PAPER: Keep It Simple Back To Basics Royal, Rose, Jade, Ruby and Lemon 12×12 Collection Packs; CutCardStock Stardream Metallic Eris cardstock, Neenah Classic Crest 110# Solar White cardstock
STAMPS: Paper Pretties Oh Baby stamp set
INK: Memento Tuxedo Black ink
DIES/PUNCHES: The Design Store Baby Crib Pop Up Card SVG cut file
ACCESSORIES: Cricut Explore Air 2, wooden bow maker, Elmer’s Craft Bond Tape Runner, Bearly Art precision craft glue, MISTI stamp tool, Keep It Simple Back To Basics Royal, Rose and Jade Ribbon and Enamel Hearts, Scrapbook Adhesives 3D Foam Squares (small white)

I hope you’ve enjoyed seeing these adorable baby crib pop up cards! If you’re interested in any of the Keep It Simple paper packs, ribbon or enamel hearts that I’ve used, remember you can get 10% off your entire order with my code LoveToScrap2! There is no minimum purchase requirement or usage limit with this code, and it combines with product, order and shipping discounts! Thanks so much for stopping by today – we’ll see you next time! ;)

Scrappy hugs,

forever and ever more

Hi everyone! Happy Thursday – I hope you have something fun planned this weekend! I’m up on the CutCardStock blog today with a tutorial for making a masculine style anniversary card featuring our Lessebo Granite Gray and Cement Gray along with Bright Gold Foil. It seems that most anniversary cards appeal to the lady, so I used some cool metal textures papers in my stash which give this card a masculine feel. I then added floral and butterfly ephemera and gold pearls for the feminine flair, hopefully appealing to both the lady and gentleman. You know how much I love me some fun folds, and I really enjoyed putting this particular version of the corner fold card together! Be sure to visit the CutCardStock website this month for a variety of sales (one each week) on closeout and overstock items!

I cut a standard size side-folding A2 card base from Lessebo Granite Gray cardstock along with layering panels from Bright Gold Foil and two coordinating Craft Consortium Metal Textures papers. I grabbed several 49 and Market Curators Botanical Ephemera Bits and adhered the largest one with 1″ double-sided foam strips. I scored the butterfly so the wings bend upward and adhered the sentiment below the butterfly. I finished the front with several Kat Scrappiness gold pearls.

I cut the inside panels from Bright Gold Foil and Lessebo Cement Gray, and stamped a sentiment from The Cat’s Pajamas Simply Stacked Sentiments stamp set.

Affiliate links are used in this post at no cost to you – I really appreciate your support!

CutCardStock products used:
Neenah Classic Crest 110# Solar White cardstock
Cougar Smooth 100# White cardstock
Cougar Smooth 80# White cardstock

Other products used:
PAPER: Craft Consortium Metal Textures 6×6 paper pad
STAMPS: The Cat’s Pajamas Simply Stacked Sentiments stamp set
INK: Memento Tuxedo Black ink
ACCESSORIES: Fiskars 12″ ProCision Rotary Bypass Paper Trimmer, Elmer’s Dot Runner, Bearly Art precision craft glue, 49 and Market Curators Botanical Ephemera Bits, 1″ double-sided foam strip, MISTI stamp tool, Kat Scrappiness Gold Pearl Mix

I hope you’ve enjoyed today’s project and you’re inspired to get crafty! Be sure to check out all the awesome cardstock and other goodies at CutCardStock (adhesives, labels, stickers, pens, watercolors and ribbon to name a few). And head on over to the CutCardStock Facebook Page and for more inspiration! Also, be sure to join our Creating with Card Stock Facebook Group for even more crafty inspiration! Thanks so much for stopping by today – we’ll see you next time!

Scrappy hugs,

You’re The Flippin’ Best

Hey everybody! I’ve popped in again this morning to share a Pajama Crafter Stamps project created with the super adorable Flippin’ Best stamp set. All I can say is… cuteness overload! This is another one of the (many) projects I created prior to leaving the team at the end of February and hadn’t yet showcased. This design is an oldie but goodie ‘layered squares’ on a square card base and it’s been years since I’ve made one like this. It sure packs a punch!

I cut the square card base from CutCardStock Cougar Smooth White cardstock along with layering panels from CutCardStock Lessebo Amazon Dark Teal cardstock and Hot Off The Press Magnolia Blossoms 6×6 double-sided cardstock. I stamped the sentiment in Memento Tuxedo Black ink in the lower right corner and then stamped the penguin on Cougar Smooth White cardstock, colored him with alcohol markers, and fussy cut him to fit the center square. I arranged the squares on the card front with foam strips and added a couple dark teal gemstones.

I cut the inside panel from Cougar Smooth White cardstock and embellished it with strips cut from a coordinating Hot Off The Press Magnolia Blossoms print and the dark teal cardstock used on the front. I stamped another sentiment from the Flippin’ Best stamp set and layered the panel on dark teal cardstock.

Affiliate links are used in this post at no cost to you – I really appreciate your support!

Pajama Crafter Stamps products used:
Flippin’ Best stamp set

Other products used:
CARDSTOCK/PAPER: CutCardStock Cougar Smooth 100# White, Cougar Smooth 80# White and Lessebo Amazon Dark Teal cardstock, Hot Off The Press Magnolia Blossoms 6×6 double-sided cardstock
INK: Memento Tuxedo Black ink (pad and marker); Arteza alcohol markers- BG11/19, NG04, YR32, BR86; Sakura Clear Star Gelly Roll pen
ACCESSORIES: Fiskars 12″ ProCision Rotary Bypass Paper Trimmer, Elmer’s Craft Bond Tape Runner, Bearly Art precision craft glue, MISTI stamp tool, Big Shot, 1″ double-sided foam strip, dark teal gemstones

I hope you’ve enjoyed this project! Be sure to check out all the awesome stamps, dies and other goodies at Pajama Crafter Stamps which is the new home of the Prickley Pear Stamps brand and the Pajama Crafter Stamps line! Keep up with news and sales by following Pajama Crafter Stamps on Facebook, Instagram and Pinterest, and join Pajama Crafter Stamps & Friends for lots of fun crafty ideas and to share your creativity! And finally, be sure to visit the Pajama Crafter Stamps blog and sign up for the newsletter to stay in touch! Thanks so much for stopping by today – we’ll see you next time! ;)

Scrappy hugs,

Happy Easter Handbag

Howdy peeps! I hope you’re having a great week! I have an amazing ScrapbookingStore DT inspiration project to share with you this morning created with the awesome April 2024 Scrapbook Kit with Upgrades. You know how I love me some paper purses, and I just couldn’t resist making one with these gorgeous double-sided papers! I dug into my SVG cut file arsenal and once again used Luxury Handbags from SVG Cuts. There are several purses in this file and I chose the boho style handbag this time. I aim to make all of them at some point! ;)

Using my Cricut Exlore Air 2 and the SVG Cuts Luxury Handbags cut file, I cut the purse, pocket, strap, and little tag embellishments for the boho syle handbag from a pretty floral and gingham double-sided paper in the kit. I used some ancient flock-covered brads in my stash (pretty sure I’ve had them since 2006, lol) to secure each side of the strap. I made a tassel with my We R Memory Keepers The Works All In One Tool and some white yarn in my stash which I attached to the strap with the tags utilizing a small ball chain.

I added a Pink Paislee 5th & Monaco Flower Embellishment (left over from last month’s kit) to the front pocket and a sentiment sticker which I layered onto paper in the kit, trimmed, and adhered over the pocket. I included an angled back shot of the handbag. So stinkin’ cute!

Affiliate links are used in this post at no cost to you – I really appreciate your support!

ScrapbookingStore products used:
April 2024 Scrapbook Kit with Upgrades:
Echo Park It’s Easter Time 12×12 Collection Kit
Upgrades: Echo Park It’s Easter Time Chipboard Phrases
      DIY Shop Textured Flowers Embellishments
      We R Memory Keepers 2×4 Journaling Cards

Other products used:
DIES/PUNCHES: SVG Cuts Luxury Handbags cut file (specifically the boho style handbag)
ACCESSORIES: Cricut Explore Air 2, Bearly Art precision craft glue, 1″ double-sided foam strip, white yarn, We R Memory Keepers The Works All In One Tool (tassel maker), small silver ball chain, flower from Pink Paislee 5th & Monaco Embellishments

I hope you’ve enjoyed today’s project and you’re thinking about all the fun you could have with this month’s kit… you really ought to think about joining the Subscription Club! Be sure to Follow us on Facebook, Instagram, Pinterest and YouTube for lots of crafty inspiration! And if you do decide to join the Subscription Club, join our ScrapbookingStore Club Member Group on Facebook for more inspiration and to share your projects! Thanks so much for stopping by today – we’ll see you next time!

Scrappy hugs,

Hip Hop Hooray Twisted GC Holder

Hi everyone! Happy Tuesday – I hope your week has started off on a happy note! I have an amazing ScrapbookingStore DT inspiration project to share with you today, created with the awesome April 2024 Scrapbook Kit with Upgrades. This month’s kit has Easter vibes and all the Spring feels to it, and I totally love it! The twisted card was showcased in an old Splitcoast Stampers newsletter and the tutorial is HERE. So glad I finally got around to making one… not only is the shape super fun, but the design is awesome! What a great way to give a gift card or cash or any occasion!

I cut the card base from CutCardStock Brown Bag Kraft Paper along with layering panels from CutCardStock Aubergine cardstock and assorted patterned papers in the kit. I created a little scene using stickers from the sticker sheet.

I embellished the inside panels with additional papers and stickers from the kit. This card was really easy and worked up fast – it would be a great one to mass produce for gift card or cash giving!

Affiliate links are used in this post at no cost to you – I really appreciate your support!

ScrapbookingStore products used:
April 2024 Scrapbook Kit with Upgrades:
Echo Park It’s Easter Time 12×12 Collection Kit
Upgrades: Echo Park It’s Easter Time Chipboard Phrases
      DIY Shop Textured Flowers Embellishments
      We R Memory Keepers 2×4 Journaling Cards

Other products used:
CARDSTOCK/PAPER: CutCardStock Brown Bag Kraft Paper and Lessebo Aubergine cardstock
ACCESSORIES: Fiskars 12″ ProCision Rotary Bypass Paper Trimmer, Elmer’s Craft Bond Tape Runner

I hope you’ve enjoyed today’s project and you’re thinking about all the fun you could have with this month’s kit… you really ought to think about joining the Subscription Club! Be sure to Follow us on Facebook, Instagram, Pinterest and YouTube for lots of crafty inspiration! And if you do decide to join the Subscription Club, join our ScrapbookingStore Club Member Group on Facebook for more inspiration and to share your projects! Thanks so much for stopping by today – we’ll see you next time!

Scrappy hugs,

Cute & Cuddly

Hey everybody! Today is turning out to be another busy day on my blog, lol! I’ve popped in once more this morning to share a baby boy version of the new Keep It Simple Romper Card created with items in the new Floral Baby Collection! I shared a darling baby girl card about a week ago for Keep It Simple using these products with the promise that I’d soon share a boy version. These products were released on April 5th and I’m so smitten, I can’t stand it! In addition to the Baby Romper Card dies, I used papers from the 12×12 Collection Pack, Die Cut Pieces, and sentiments from both the Land Babies and Water Babies Collection Stamps.

I really don’t have many baby-themed items in my stash so I’m going crazy with ideas! If you like these Keep It Simple products and think you might want to go shopping, be sure to use my discount code LoveToScrap2 at checkout to save 10% on your entire order! There is no minimum purchase requirement and no usage limits, plus the code combines with product, order, and shipping discounts!

Using the KIS Cuts Baby Romper Card dies, I cut the card base from CutCardStock Cougar Smooth White cardstock along with the romper card elements from coordinating papers in the Floral Baby 12×12 Collection Pack and 12×12 Cardstock Shop Blue-Gray Textured cardstock. I added an elephant from the Die Cut Pieces and used two small enamel dots from the Keep It Simple Back To Basics Royal Enamel Dots on the bottom flap. I curved the sentiment from the Land Babies Collection Stamps just a tad on my MISTI and stamped it in Memento Tuxedo Black ink on Cougar Smooth White, which completed the card front.

I embellished the inside with a stitched circle cut with a Keep It Simple Stitched Circles Nested Die on which I stamped a sentiment from the Water Babies Collection Stamps in black ink. This was definitely a fun one!

Affiliate links are used in this post at no cost to you – I really appreciate your support! 

Products used:
CARDSTOCK/PAPER: CutCardStock Cougar Smooth 80# White cardstock, 12×12 Cardstock Shop Blue-Gray Textured cardstock, Keep It Simple Floral Baby 12×12 Collection Pack
STAMPS: Keep It Simple Baby Floral Collection Stamps- Land Babies and Water Babies
INK: Memento Tuxedo Black ink
DIES/PUNCHES: KIS Cuts Baby Romper Card Dies, Keep It Simple Stitched Circles Nested Dies
ACCESSORIES: Fiskars 12″ ProCision Rotary Bypass Paper Trimmer, Bearly Art precision craft glue, MISTI stamp tool, Big Shot, Keep It Simple Back To Basics Royal Enamel Dots, Keep It Simple Floral Baby Die Cut Pieces, Scrapbook Adhesives 3D Foam Squares (small white)

I hope you’ve enjoyed seeing this sweet baby boy romper card! Thanks so much for stopping by today – we’ll see you next time! ;)

Scrappy hugs,

Bunny Kisses fun fold

Hi friends! Wow, the weekend sure flew by, didn’t it?! I’m back with my second post this morning to share an amazing ScrapbookingStore DT inspiration project created with the awesome April 2024 Scrapbook Kit with Upgrades. This tented easel card features papers and stickers from the kit along with a chipboard accent from the upgrades. I love how it turned out, and of course it helps to have pretty papers with matching elements! This is a super easy fold – cardstock size is 4-1/4″ x 11″, scored at 4-1/4″ and 8-1/2″, making the folded card 4-1/4″ square. Front layering panel is 4″ x 4″ and bottom layering panel is 2-1/4″ x 4″ with a white layering panel for the inside cut at 4″ x 4″. It’s small but it’s mighty! ;)

I cut the card base from Neenah Classic Crest Solar White cardstock along with layering panels from CutCardStock Pop Tone Black Licorice and an assortment of papers in this month’s kit. The focal image/sentiment was cut with a Spellbinders Classic Oval Die, layered on a scalloped oval cut with a Classic Scalloped Oval Die, and popped up on 1″ double-sided foam strips. I added a tiny bow fashioned from Keep It Simple Back To Basics Mango Ribbon with a small wooden bowmaker that my awesome friend, Maureen, gifted me this past Christmas. I created the easel ‘stop’ using a sticker from the sticker sheet adhered to a cardstock scrap, trimmed, and popped up on thick foam squares. the finishing touch was adding a chipboard banner and tulip from the upgrades.

I embellished the inside panel with a strip cut from an additional patterned paper in the kit, a narrow black cardstock strip, and a square-cut journaling card from the collection. I included an additional angled shot so you can better see the construction. Love!

Affiliate links are used in this post at no cost to you – I really appreciate your support!

ScrapbookingStore products used:
April 2024 Scrapbook Kit with Upgrades:
Echo Park It’s Easter Time 12×12 Collection Kit
Upgrades: Echo Park It’s Easter Time Chipboard Phrases
      DIY Shop Textured Flowers Embellishments
      We R Memory Keepers 2×4 Journaling Cards

Other products used:
CARDSTOCK/PAPER: Neenah Classic Crest 80# Solar White cardstock, CutCardStock Pop Tone Black Licorice cardstock
DIES/PUNCHES: Spellbinders Classic Ovals Large and Classic Scalloped Ovals Large
ACCESSORIES: Fiskars 12″ ProCision Rotary Bypass Paper Trimmer, Elmer’s Craft Bond Tape Runner, Bearly Art precision craft glue, Big Shot, 1″ double-sided foam strips, Keep It Simple Back To Basics Mango Ribbon, thick foam squares

I hope you’ve enjoyed today’s project and you’re thinking about all the fun you could have with this month’s kit… you really ought to think about joining the Subscription Club! Be sure to Follow us on Facebook, Instagram, Pinterest and YouTube for lots of crafty inspiration! And if you do decide to join the Subscription Club, join our ScrapbookingStore Club Member Group on Facebook for more inspiration and to share your projects! Thanks so much for stopping by today – we’ll see you next time!

Scrappy hugs,

today is your day

Hey everybody! Happy Monday! I hope your weekend was a good one! Our new challenge is live this morning over at Ally’s Angels and I’m delighted to share my DT inspiration project for Challenge #81! Our challenges are always ‘anything goes’ so come on over and play! Beginning this month we have a slight change in our structure – we’re now starting at 4:00 AM Mountain Time on the 15th of the month and ending at 4:00 PM Mountain Time on the 10th of the following month. I created a pull tab flip card for this challenge and I love how it turned out. I learned about this fun fold a while back from my friend, Debbie, who got her inspiration from the StampingJill YouTube video HERE. I’ve made a couple of these already and they are so fun!

Card base and one layering panel were cut from Neenah Classic Crest Solar White cardstock along with additional layering panels from CutCardStock Surf Pearl Canvas Textured cardstock and coordinating papers from the Keep It Simple Celebrate The Little Things 12×12 Collection Pack.

I embellished the inside of the flip layers with stickers and ephemera from the same Celebrate The Little Things Collection Pack. I used Ellen Hutson ribbon and Doodlebug Design Lily White Doodle Twine on the pull tab.

Affiliate links are used in this post at no cost to you – I really appreciate your support! 

Products used:
CARDSTOCK/PAPER: Neenah Classic Crest 110# and 80# Solar White cardstock, CutCardStock Aqua Pearl Canvas Textured cardstock, Keep It Simple Celebrate The Little Things 12×12 Collection Pack with Die Cut Sticker Sheet and Ephemera Die Cuts
DIES/PUNCHES: Stampin’ Up Curvy Corner Trio Punch, Kadomaru Pro Corner Rounder, Spellbinders Fancy Framed Tags One dies
ACCESSORIES: Fiskars 12″ ProCision Rotary Bypass Paper Trimmer, Scrapbook Adhesive E-Z Runner, Bearly Art precision craft glue, Big Shot, Scrapbook Adhesives 3D Foam Squares, Ellen Hutson ribbon, Doodlebug Design Lily White Doodle Twine

I hope you’ve enjoyed seeing this project and will link up with us this time! We’d love to see what you create! Thanks so much for stopping by today – we’ll see you next time! ;)

Scrappy hugs,