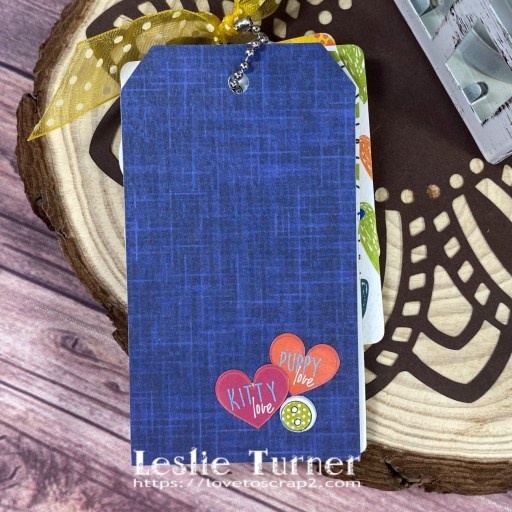
Let It Snow

Hi friends! Happy Wednesday – I hope you’re having an awesome week! I’m delighted to be back with an inspiration project for Prickley Pear Stamps! Admittedly, this is my favorite time of year – all the Christmas sights and sounds and smells! And, of course, all the delightful Christmas crafts! Our design team has created some beautiful Christmas projects to celebrate all things festive and we’re having an Insta-Hop today which starts on the Prickley Pear Stamps Instagram page and we hope you’ll join us!

You’ll find the complete hop line-up listed, and by following and leaving comments and likes at all the stops on the hop, you’ll be in for the chance to win a $25 gift card from Prickley Pear Stamps! A random winner will be chosen from all comments left by 11:59 PM EST on November 15th and announced on the Prickley Pear Stamps Instagram and Facebook pages on November 17th. So don’t waste any time… get hoppin’! ;)

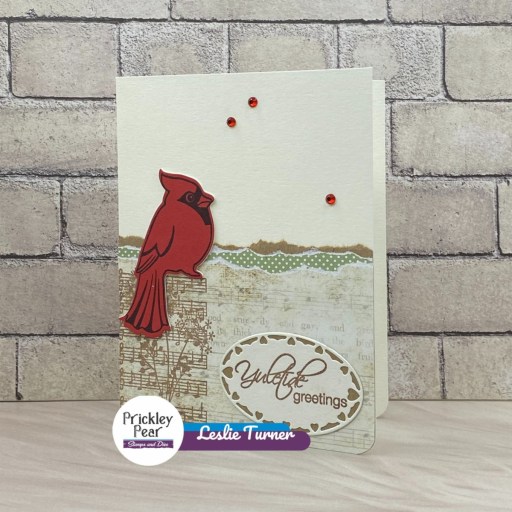
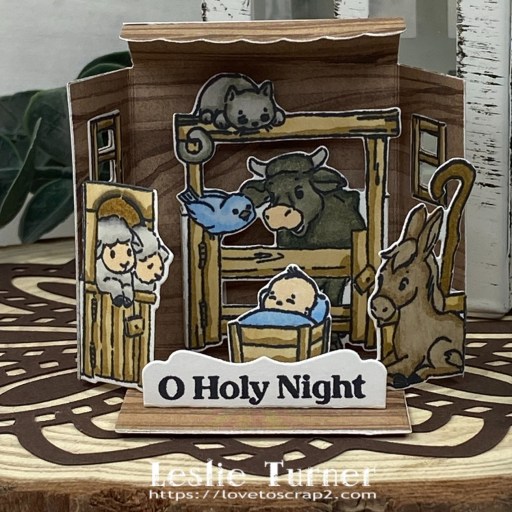
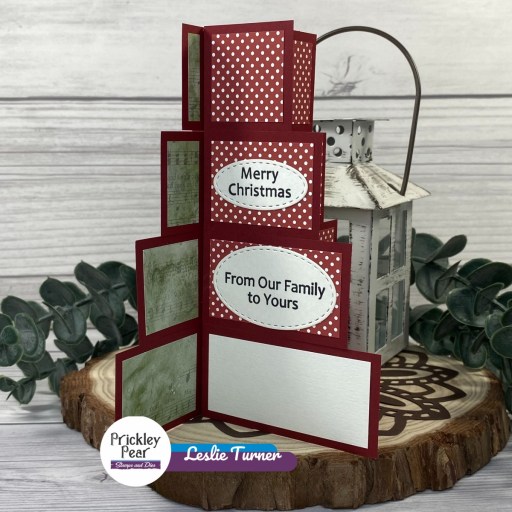
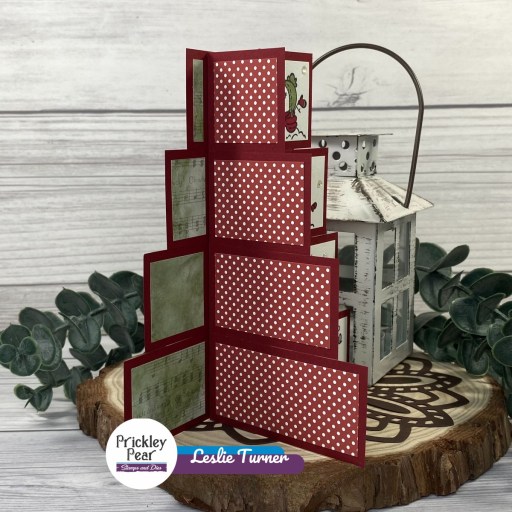
I created a tiered pinwheel twist card featuring the super cute Snow Family stamp set. This family couldn’t be any more adorable! My inspiration for this fun fold came from Sam Calcott over at Mixed Up Craft. I totally love any kind of pinwheel card (there are several versions out there), and this tiered twist one is definitely a stepped up version and perfect for showcasing the Snow Family! I totally love how it turned out!

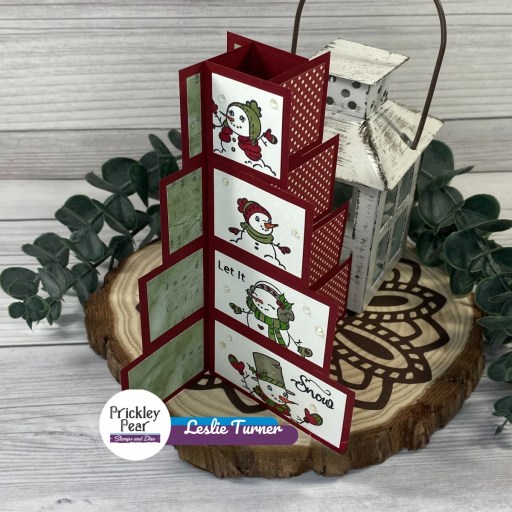
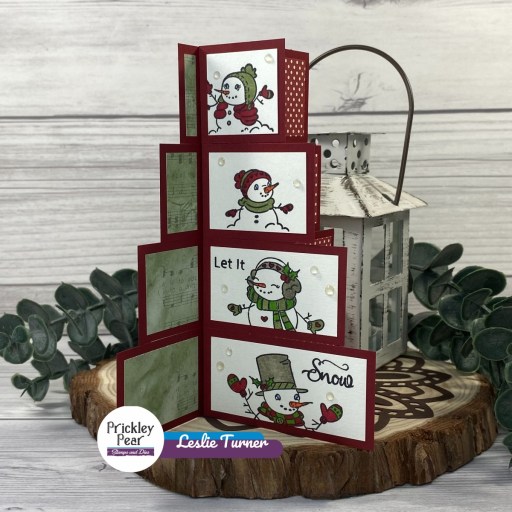
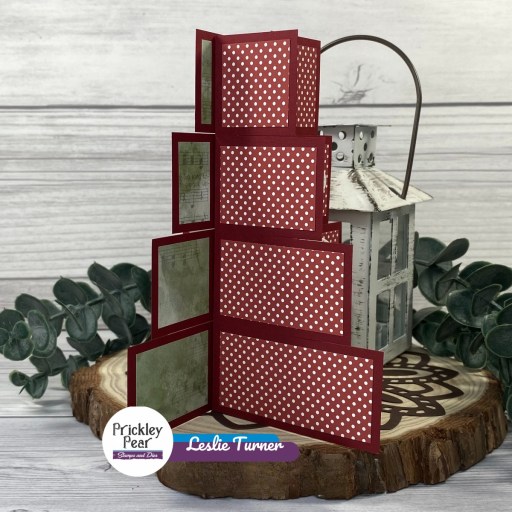
I cut the four-sided card base and all 16 tiers from CutCardStock Basis Dark Red cardstock and assembled it. Next I cut four layering panels from CutCardStock Basis Natural cardstock and stamped the four Snow Family members and sentiment words on them in Memento Tuxedo Black ink. I colored the images with alcohol markers and adhered them to the tiers, smallest down to largest.

I cut 11 more layering panels from a red and white dotted pattern in the Hot Off The Press Christmas Memories 6×6 double-sided paper pack and one more large layering panel (for a signature) from Basis Natural, and adhered them all to the tiers. I stamped two additional sentiments from the same stamp set and cut them with Keep It Simple Stitched Ovals Nested Dies and adhered them to the two panels above the signature panel. I went one step further and cut layering panels from a green pattern in the HOTP paper pack and adhered them to the back side of the main tiers. The finishing touch was adding several Studio Katia Sparkling Crystals to each of the image panels using my Trinity Pick Up Stick.

Sharing in the following challenges:
1. 613 Avenue Create: November 2023 – Anything Goes w/ optional Embossing (Heat or Dry)
2. A Barrel of Monkeys Challenge: #9 – Yeti in My Spaghetti (color red)
3. A Perfect Time To Craft Open Challenge: #11-2023 – Anything Goes
4. Classic Design Challenge: October #10 – Anything Goes
5. Crafty Gals Corner: #249 – Dots and/or Stripes (dots)
6. Inkspirational: #302 – Mood Board

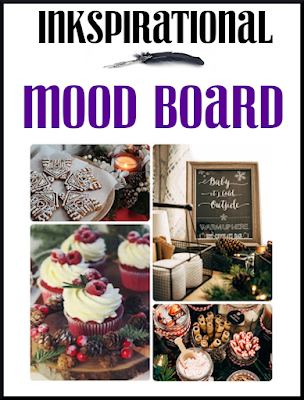
7. Jan’s Digi Stamps Challenge: November-December Anything Goes
8. My Time To Craft: #520 – Fun Fold Techniques
9. Peace On Earth Christmas Challenge: #51 – Inspiration Board + Anything Christmas Goes

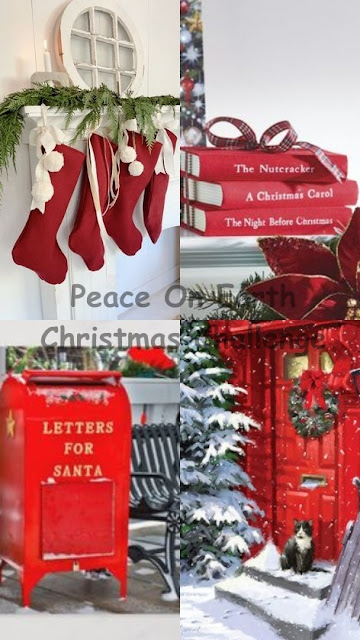
10. Scrapping4fun Challenges: #229 – Christmas Traditional Colors
11. Wednesday’s Creative Inspirations Challenge: November Challenge – Contemporary Christmas Colors

Affiliate links are used in this post at no cost to you – I really appreciate your support! 

Prickley Pear Stamps products used:
Snow Family stamp set

Other products used:
CARDSTOCK/PAPER: CutCardStock Basis Dark Red and Basis Natural cardstock, Hot Off The Press Christmas Memories 6×6 double-sided papers
INK: Memento Tuxedo Black ink; Arteza alcohol markers- YG04/45, YR32, R31, B17, GS05
DIES/PUNCHES: Keep It Simple Stitched Ovals Nested Dies
ACCESSORIES: Tonic Studios 12″ Guillotine Paper Trimmer, Tombow Mono Dots adhesive, Bearly Art precision craft glue, MISTI stamp tool, Big Shot, Studio Katia Sparkling Crystals Mix, Trinity Pick Up Stick

I hope you’ve enjoyed this project! Be sure to check out all the awesome stamps and dies at Prickley Pear Stamps! Save 10% on anything on the site when you shop at Prickley Pear Stamps by using coupon code LESLIE10 at checkout! And be sure to ‘like’ and ‘follow’ the Prickley Pear Stamps Facebook page to keep up with news and sales, and join Prickley Pear Pals (the fan group) for lots of fun crafty ideas and to share your creativity! And finally, we’d love to see you visit the Prickley Pear Stamps blog and become a Follower! Hope to see you there! Thanks so much for stopping by today – we’ll see you next time! ;)

Scrappy hugs,

I’m So Glad It’s Fall Time!

Hi everyone! I hope your week is plugging along nicely! I have an amazing ScrapbookingStore DT inspiration project to share that I created with the awesome November 2023 Scrapbook Kit with Upgrades! I’m sure by now you know that the Autumn/Fall season is my favorite. I totally love all the coordinating papers and stickers along with the upgrades in this month’s kit and I created a pull tab flip card featuring papers, stickers and a chipboard phrase from the upgrades. This is such fun fold and my inspiration came from Aubrey over at Stamping Jill through another friend, Debbie. Tutorials for both landscape and portrait options are available on the Stamping Jill website.

I used CutCardStock Basis Natural cardstock for the base along with coordinating papers from the collection layered on CutCardStock Basis Black cardstock. I embellished the front with a large sticker included in the paper pack and a chipboard phrase in the upgrades. I used Really Reasonable Ribbon yellow gingham ribbon and Doodlebug Design Lily White Doodle Twine on the pull tab.

I embellished the inside of the flip mechanism with a journaling card from the paper pack which I cut in half, rounded the corners, and layered on Basis Black cardstock. I also used stickers from the sticker sheet on the panels for some interest.

Sharing in the following challenges:
1. A Perfect Time To Craft Open Challenge: #11-2023 – Anything Goes
2. A Place To Start: November 2023 – Anything Goes w/ optional Something For A Child
3. Classic Design Challenge: October #10 – Anything Goes
4. Crafty Calendar Challenge: November Anything Goes
5. Jan’s Digi Stamps Challenge: November-December Anything Goes
6. My Time To Craft: #520 – Fun Fold Techniques
7. The Four Seasons Challenge: November Challenge – Fall

Affiliate links are used in this post at no cost to you – I really appreciate your support!

ScrapbookingStore products used:
November 2023 Scrapbook Kit with Upgrades

Other products used:
CARDSTOCK/PAPER: CutCardStock Basis Natural and Basis Black cardstock
DIES/PUNCHES: Stampin’ Up Scalloped Tag Topper Punch, Kadomaru Pro Corner Rounder
ACCESSORIES: Tonic Studios 12″ Guillotine Paper Trimmer, Gina K Designs Adhesive Dot Runner, Bearly Art precision craft glue, 1/4″ double-sided foam strips, Really Reasonable Ribbon gingham ribbon, Doodlebug Design Lily White Doodle Twine, Want2Scrap clear gemstones

I hope you’ve enjoyed today’s project and you’re thinking about all the fun you could have with this month’s kit… you really ought to think about joining the Subscription Club! Be sure to Follow us on Facebook, Instagram, Pinterest and YouTube for lots of crafty inspiration! And if you do decide to join the Subscription Club, join our ScrapbookingStore Club Member Group on Facebook for more inspiration and to share your projects! Thanks so much for stopping by today – we’ll see you next time!

Scrappy hugs,

Dream BIG vellum shaker

Hey everybody! A very Happy Tuesday to you! I’m up on the CutCardStock blog today with an awesome DT inspiration project featuring our Stardream Metallic Onyx, Stardream Metallic Eris, Stardream Metallic Azalea and Glama Natural Translucent Vellum! I created a shaker with vellum which I’ve never tried before. I’ve seen quite a few vellum shakers which look really cool so I’ve been inspired to try it! And I always seem to have difficulty with glare hitting the acetate on traditional shakers so I figured using vellum might be a good thing! It turned out to be a great thing! ;)

I cut a standard A2 size side-folding landscape card base from Stardream Metallic Onyx cardstock along with a layering panel from Stardream Metallic Eris cardstock. Using the Tim Holtz Alterations Movers & Shapers Dream Magnetic Die along with the Base Tray, I die cut the large sentiment into the bottom portion of the Eris panel. I adhered a piece of Glama Natural Translucent Vellum behind the aperture and then applied double-sided foam strips. I adhered a strip of Stardream Metallic Azalea cardstock to the bottom portion of the card base so that a muted pink would show through the shaker aperture.

I created a shaker mix with a small pinch of Kat Scrappiness Pearl Glass Dots, pink Queen & Co. Baby Beads Toppings and pink US Artquest Mini Prills, and adhered the shaker panel to the card base sealing the shaker mix inside. I stamped a sentiment word from the Dare 2B Artzy Dream Big stamp set in Memento Tuxedo Black ink on a Neenah Classic Crest 110# Solar White cardstock scrap, fussy cut it, and adhered it beneath the die cut sentiment. I completed the card front with several clear iridescent gemstones.

I have to say I like using the vellum! The shaker mix is subtly seen and heard through the vellum and there is no issue with glare. I’ll definitely be doing this again!

I cut the inside panel from Neenah Classic Crest 80# Solar White cardstock and embellished it with strips of Stardream Metallic Onyx, Stardream Metallic Eris and Stardream Metallic Azalea cardstock. I stamped the sentiment from the same Dare 2B Artzy Dream Big stamp set in black ink, and layered the panel on Azalea cardstock.

Sharing in the following challenges:
1. A Perfect Time To Craft Open Challenge: #11-2023 – Anything Goes
2. A Place To Start: November 2023 – Anything Goes w/ optional Something For A Child
3. Classic Design Challenge: October #10 – Anything Goes
4. If You Give A Crafter A Cookie: #186 – November-White

Affiliate links are used in this post at no cost to you – I really appreciate your support!

CutCardStock products used:
Stardream Metallic Onyx cardstock
Stardream Metallic Eris cardstock
Stardream Metallic Azalea cardstock
Glama Natural Translucent Vellum
Neenah Classic Crest 110# Solar White cardstock

Other products used:
STAMPS: Dare 2B Artzy Dream Big stamp set
INK: Memento Tuxedo Black ink
DIES/PUNCHES: Tim Holtz Alterations Movers & Shapers Dream Magnetic Die
ACCESSORIES: Tonic Studios 12″ Guillotine Paper Trimmer, Tim Holtz Alterations Movers & Shapers Base Tray, Tombow Mono Dots adhesive, Bearly Art precision craft glue, MISTI stamp tool, Big Shot; 1/ 4″, 1/2″ and 1″ double-sided foam strips; Kat Scrappiness Pearl Glass Dots, pink Queen & Co. Baby Beads Toppings, pink US Artquest Mini Prills, clear iridescent gemstones

I hope you’ve enjoyed today’s project and you’re inspired to get crafty! Be sure to check out all the awesome cardstock and other goodies at CutCardStock (adhesives, labels, stickers, pens, watercolors and ribbon to name a few). And head on over to the CutCardStock Facebook Page and for more inspiration! Also, be sure to join our Creating with Card Stock Facebook Group for even more crafty inspiration! Thanks so much for stopping by today – we’ll see you next time!

Scrappy hugs,

Happy Autumn

Howdy, friends! I hope you’re having a great day! I’m back with my second post today to share one more Keep It Simple DT inspiration project created with paper, dies and ephemera in the Farmhouse Fall Collection. I tell you, I sure have enjoyed these products and I could create Autumn and Fall stuff all year long! This is a flat card (meaning there is no flap and the second sentiment is on the back – kind of like a post card) with a raised inlaid die cut. I totally love the this technique and seem to be doing it often these days!

I cut a standard A2 size flat card base from CutCardStock Basis 80# Natural cardstock along with a layering panel from a patterned paper in the 6×9 CardStock Pack. Using the largest background die in the Happy Autumn KIS Cuts, I cut an aperture into the layering panel and then cut two more background pieces from Basis Natural which I layered together for dimension. I die cut the rest of the pieces from papers in the Cardstock Pack, assembled the focal image and adhered it to the layered background, and then adhered it into the negative space on the card front. The finishing touch was adding a few Jade enamel dots.

I cut the back panel from Basis Natural cardstock and embellished it with a strip of the green paper used on the front. I added a sentiment from the Falling For You Ephemera Die Cut Pieces and layered the panel on navy paper.

Sharing in the following challenges:
1. A Perfect Time To Craft Open Challenge: #11-2023 – Anything Goes
2. A Place To Start: November 2023 – Anything Goes w/ optional Something For A Child
3. Classic Design Challenge: October #10 – Anything Goes

Keep It Simple products used:
Farmhouse Fall 6×9 Cardstock Pack
Farmhouse Fall Happy Autumn KIS Cuts
Farmhouse Fall Falling For You Ephemera Die Cuts
Jade Enamel Dots

Affiliate links are used in this post at no cost to you – I really appreciate your support!

Other products used:
CARDSTOCK/PAPER: CutCardStock Basis 80# Natural cardstock
ACCESSORIES: Tonic Studios 12″ Guillotine Paper Trimmer, Scotch 3M Advanced Tape Glider, Bearly Art precision craft glue, Big Shot

I hope you’ve loved seeing this project as much as I loved creating it, and you’re inspired to get crafty! Be sure to check out ALL the fun goodies in the Keep It Simple store such as paper, stamps, die cuts, ephemera, washi tape and enamel dots to name just a few! You’ll go cRaZy! Be sure to Follow us on Facebook, Instagram, and Pinterest for lots of crafty inspiration! Thanks so much for stopping by today – we’ll see you next time!

Scrappy hugs,

happy FALL

Hey everybody! Happy Monday… it sure got here fast, didn’t it?! I’m back this morning with a Keep It Simple DT inspiration project created with papers, dies and die cut pieces in the FABulous Farmhouse Fall Collection! This clean and simple card features the amazingly large Happy Fall dies which I absolutely love! You don’t need anything else to embellish the front other than a few enamel dots!

I cut a standard A2 size top-folding landscape card base from CutCardStock Basis 110# Natural cardstock. Using the Happy Fall KIS Cuts, I cut the largest background piece from a dark blue paper in the 6×9 Cardstock Pack and the next smaller background piece from CutCardStock Basis 80# Natural cardstock (along with the words and hearts which I colored with alcohol markers). It was a breeze to assemble and the final touch was adding a few dark blue enamel dots from the Hello Adventure Collection.

I cut the inside panel from Basis 80# Natural cardstock and embellished it with a strip cut from the navy blue paper used on the front. I added a sentiment tag from the Falling For You Ephemera Die Cuts and then layered the panel on more of the navy blue paper.

Sharing in the following challenges:
1. 613 Avenue Create: November 2023 – Anything Goes w/ optional Embossing (Heat or Dry)
2. A Perfect Time To Craft Open Challenge: #11-2023 – Anything Goes
3. Classic Design Challenge: October #10 – Anything Goes
4. Cut It Up: #290 – Layer It Up
5. The Four Seasons Challenge: November Challenge – Fall

Keep It Simple products used:
Farmhouse Fall 6×9 Cardstock Pack
Farmhouse Fall Happy Fall KIS Cuts
Farmhouse Fall Falling For You Ephemera Die Cuts
Hello Adventure Enamel Dots

Affiliate links are used in this post at no cost to you – I really appreciate your support!

Other products used:
CARDSTOCK/PAPER: CutCardStock Basis 110# Natural and Basis 80# Natural cardstock
INK: Arteza alcohol markers- YG42/43/45/46, R21, BR52
ACCESSORIES: Tonic Studios 12″ Guillotine Paper Trimmer, Scotch 3M Advanced Tape Glider, Bearly Art precision craft glue, Big Shot

I hope you’ve loved seeing this project as much as I loved creating it, and you’re inspired to get crafty! Be sure to check out ALL the fun goodies in the Keep It Simple store such as paper, stamps, die cuts, ephemera, washi tape and enamel dots to name just a few! You’ll go cRaZy! Be sure to Follow us on Facebook, Instagram, and Pinterest for lots of crafty inspiration! Thanks so much for stopping by today – we’ll see you next time!

Scrappy hugs,

Vintage Yuletide Greetings

Hey everybody, happy Friday! I’m still working on Christmas projects which I do all year long. How about you… have you started on them, are you plugging away, or are you finished? I’m up on the Prickley Pear Stamps blog today with an inspiration project featuring the absolutely gorgeous Cardinals and Cardinals 2 Stamp Sets along with the coordinating Cardinal Die and the Heart Oval Insert Die. This CAS-ish vintage card is a super simple design that would be so easy to mass produce for everybody on your Christmas list.

I cut a standard A2 size side-folding card base from CutCardStock Basis 80# Natural cardstock along with layering panels from CutCardStock Brown Bag Kraft Paper and two coordinating papers from the Hot Off The Press Christmas Memories double-sided paper pack. I tore the top edge of the three layering panels and adhered them to the card base. I stamped the floral music image from the Cardinals stamp set on the left edge and the sentiment (from the Cardinals 2 stamp set) on a scrap piece of Basis Natural cardstock, both in Catherine Pooler Over Coffee ink, and cut the sentiment with the Heart Oval Insert Die. I traced around the outside edge of the oval die cut with a pencil onto a scrap piece of kraft paper, hand-cut it just inside the tracing line, and adhered it behind the die cut.

I stamped the cardinal in Memento Tuxedo Black ink on CutCardStock Basis Red cardstock and cut it with the coordinating Cardinal Die. I die cut two additional cardinals and adhered them on top of one another for a little dimension, and then adhered them to the card front. The finishing touch was adding several Eyelet Outlet small red gemstones.

Sharing in the following challenges:
1. A Perfect Time To Craft Open Challenge: #11-2023 – Anything Goes
2. Classic Design Challenge: October #10 – Anything Goes
3. Critter Crazy Challenges: #80 – Anything Goes with a Featured Critter
4. Cut It Up: #290 – Layer It Up

Affiliate links are used in this post at no cost to you – I really appreciate your support!

Prickley Pear Stamps products used:
Cardinals Stamp Set
Cardinals 2 Stamp Set
Cardinal Die
Heart Oval Insert Die

Other products used:
CARDSTOCK/PAPER: CutCardStock Basis Natural and Basis Red cardstock and Brown Bag Kraft paper, Hot Off The Press Christmas Memories 6×6 double-sided papers
INK: Catherine Pooler Over Coffee ink, Memento Tuxedo Black ink
DIES/PUNCHES: Kadomaru Pro Corner Rounder
ACCESSORIES: Tonic Studios 12″ Guillotine Paper Trimmer, Gina K Designs Adhesive Dot Runner, Bearly Art precision craft glue, MISTI stamp tool, Big Shot, Eyelet Outlet red gemstones

I hope you’ve enjoyed this project! Be sure to check out all the awesome stamps and dies at Prickley Pear Stamps! Save 10% on anything on the site when you shop at Prickley Pear Stamps by using coupon code LESLIE10 at checkout! And be sure to ‘like’ and ‘follow’ the Prickley Pear Stamps Facebook page to keep up with news and sales, and join Prickley Pear Pals (the fan group) for lots of fun crafty ideas and to share your creativity! And finally, we’d love to see you visit the Prickley Pear Stamps blog and become a Follower! Hope to see you there! Thanks so much for stopping by today – we’ll see you next time! ;)

Scrappy hugs,

Dog and Cat Lovers Mini Album

Hey everybody! Well, it’s the 1st of a new month and we’re that much closer to Christmas! Our new challenge is live this morning over at Mini Album Mania and I’m excited to share my DT inspiration project for MAM #2 – Any Type of Mini Album Goes! I used items from the super adorable Keep It Simple Max & Daisy collection to create a dog and cat lovers mini album! The six album pages are different sizes and shapes of printed chipboard pieces and there is plenty of room for tiny photos and journaling!

I chose six Die Cut Printed Chipboard pieces from the Max & Daisy Collection along with patterned papers from the Flip Sides Pack that I die cut oval, square and rectangle shapes from for the back of several of the pages. The pages were embellished with stickers from the Die Cut Adhesive Sticker Sheet, Puffy Sticker Buttons, Printed Enamel Stickers and Enamel Shapes, all from the Max & Daisy Collection. I punched a hole in the top of the stack of pages with my We R Memory Keepers Crop-A-Dile Big Bite, attached the pages with a ball chain and clasp and tied a yellow dotted ribbon onto the ball chain. Super easy and so much fun!

Sharing in the following challenges:
1. A Perfect Time To Craft Open Challenge: #11-2023 – Anything Goes
2. Classic Design Challenge: October #10 – Anything Goes
3. Critter Crazy Challenges: #80 – Anything Goes with a Featured Critter

Affiliate links are used in this post at no cost to you – I really appreciate your support! 

Products used:
CARDSTOCK/PAPER: Keep It Simple Max & Daisy Flip Sides Pack
DIES/PUNCHES: Keep It Simple Stitched Ovals Nested Dies, Stitched Squares Nested Dies and Stitched Rectangles Nested Dies; Kadomaru Pro Corner Rounder, We R Memory Keepers Crop-A-Dile Big Bite
ACCESSORIES: Tonic Studios 12″ Guillotine Paper Trimmer; Keep It Simple Max & Daisy Die Cut Printed Chipboard, Die Cut Adhesive Sticker Sheet, Puffy Sticker Buttons, Printed Enamel Stickers and Enamel Shapes; Bearly Art precision craft glue, Big Shot, Studios Blackbird yellow dotted ribbon, silver ball chain and clasp

I hope you’ve enjoyed seeing this project and will link up with us this time! Thanks so much for stopping by today – we’ll see you next time! ;)

Scrappy hugs,

NOEL

Hi friends! The last challenge of the year is going live this morning on most of my challenge blogs… it’s hard to believe this year is almost over! Our new challenge launched this morning over at Christmas BINGO Challenges and I’m excited to share my DT inspiration project for CBC #4 – Anything Goes with Featured Christmas BINGO Card! We have something exciting happening in January 2024 on this challenge blog – we’ll have a new name and we’re opening up our challenges to ALL occasions! This means you are welcome to create a project for ANY holiday, season or occasion using the Featured BINGO Card. You are more than welcome to continue creating Christmas projects if that’s your jam, but feel free to branch out if you want! This challenge, though, is still Christmas-themed, so please keep that in mind.

I used the Sizzix Ornament Fold-A-Long Thinlits (which I’ve had in my stash for a while) to create a pretty fun fold card for this challenge. I went with Column G this time (red, die cuts, pearls and fancy fold). I also used one of my forever favorite paper packs from Hot Off The Press. I’m very pleased with how it turned out!

I cut the card base from CutCardStock Basis Natural and the layers and elements from Hot Off The Press Christmas Memories 6×6 papers and CutCardStock Bright Gold Foil cardstock. Of course, as with all fun folds and 3D projects, the most fun is the assembly!

I added a bow fashioned from Hemptique craft cording paired with GKD gold craft cording. Here’s a shot of it completely opened. So pretty!

Sharing in the following challenges:
1. A Perfect Time To Craft Open Challenge: #11-2023 – Anything Goes
2. Classic Design Challenge: October #10 – Anything Goes

Affiliate links are used in this post at no cost to you – I really appreciate your support! 

Products used:
CARDSTOCK/PAPER: CutCardStock Basis Natural and Bright Gold Foil cardstock, Hot Off The Press Christmas Memories 6×6 double-sided papers
DIES/PUNCHES: Sizzix Ornament Fold-A-Long Thinlits
ACCESSORIES: Tonic Studios 12″ Guillotine Paper Trimmer, Bearly Art precision craft glue, MISTI stamp tool, Big Shot, Flourish with a Bling red gemstones, Hemptique crafter’s cord, Gina K Designs gold crafting cord

I hope you’ve enjoyed seeing this project and will link up with us this time! Thanks so much for stopping by today – we’ll see you next time! ;)

Scrappy hugs,

Have a perfect day

Howdy peeps! It seems like this new year just started and here we are closing in on the next to the last month! Our new challenge is live this morning over at Birthstone Challenges and I’m thrilled to share my DT inspiration project for BSC #6 – Anything Goes with Topaz & Turquoise! In keeping with my quest this year to use either never-been-used or barely-used stamps and dies in my stash, I’ve used this stamp set from Clearly Besotted to create a CAS birthday card. I’ve had it for some time and think I’ve used it once before, so it’s definitely time for another play!

I cut a standard A2 size top-folding card base and two layering panels from CutCardStock Basis 110# White cardstock. I stamped the image with sentiment on one of the layering panels and colored the image with alcohol markers. I glued the two layering panels together for a little dimension and adhered them to the card base. The finishing touch was adding several gemstones from the Trinity Stamps Amber Glow Embellishment Mix with my Trinity Pick Up Stick.

I cut the inside panel from 80# Solar White cardstock and simply stamped a sentiment from the Keep It Simple Congratulations Sentiments stamp set.

Sharing in the following challenges:
1. A Perfect Time To Craft Open Challenge: #11-2023 – Anything Goes
2. Classic Design Challenge: October #10 – Anything Goes
3. The Crafter’s Cafe Challenge Blog: #302 – Flowers

Affiliate links are used in this post at no cost to you – I really appreciate your support! 

Products used:
Cardstock/Paper: Neenah Classic Crest 110# and 80# Solar White cardstock,
Stamps: Clearly Besotted Perfect Peonies stamp set, Keep It Simple Congratulations Sentiments stamp set
Ink: Memento Tuxedo Black ink; Arteza alcohol markers- Y24/32, YG22
Accessories: Tonic Studios 12″ Guillotine Paper Trimmer, Bearly Art precision craft glue, MISTI stamp tool, Trinity Stamps Amber Glow Embellishment Mix, Trinity Pick Up Stick

I hope you’ve enjoyed seeing this project and will link up with us this time! Thanks so much for stopping by today – we’ll see you next time! ;)

Scrappy hugs,

Oh Holy Night Matchbook

Hey everybody! I’ve said it before and I’ll say it again… Christmas is just around the corner! Have you started on your Christmas cards and projects yet?! Our new challenge is live this morning over at Merry Little Christmas Challenge Blog and I’m excited to share my DT inspiration project for MLCCB #53 – Anything Christmas Goes! I’ve been playing with Matchbooks again – you know those tiny little Art Impressions works of art that I can’t seem to get enough of?! This Nativity Matchbook set is super adorable and I so love how this project turned out!

Using the Art Impressions Matchbook Template dies, I cut the base from P13 Always and Forever double-sided paper. It had butterflies on the reverse side of the woodgrain print which I didn’t want to show, so I adhered panels of woodgrain on the reverse side as well. I stamped the images in the Art Impressions Nativity Matchbook stamp set on Neenah Classic Crest 80# Solar White cardstock in Memento Tuxedo Black ink, colored them with alcohol markers, and cut them with the coordinating Art Impressions Nativity Matchbook die set. The fun part of these is always the assembly! ;) Finally, I cut the teeny envelope from a gray-brown paper in the Urban Style Design Pad using the Art Impressions Matchbook Envelopes Dies.

Here are a few more angled shots. I really, really love this Art Impressions Matchbook line!

Sharing in the following challenges:
1. A Perfect Time To Craft Open Challenge: #11-2023 – Anything Goes
2. Classic Design Challenge: October #10 – Anything Goes
3. Crafts Galore Encore Challenge Blog: #117 – Anything Goes
4. Critter Crazy Challenges: #80 – Anything Goes with a Featured Critter

Affiliate links are used in this post at no cost to you – I really appreciate your support! 

Products used:
CARDSTOCK/PAPER: Neenah Classic Crest 80# Solar White cardstock, P13 Always and Forever double-sided paper pad, Urban Style Design Pad
STAMPS: Art Impressions Nativity Matchbook stamp set
INK: Memento Tuxedo Black ink; Arteza alcohol markers- BR28/64/66/77/84/86, B28/29, GS02/04/05/07/09
DIES/PUNCHES: Art Impressions Nativity Matchbook Die Set, Matchbook Template Dies and Matchbook Envelope Dies
ACCESSORIES: Tonic Studios 12″ Guillotine Paper Trimmer, Bearly Art precision craft glue, MISTI stamp tool, Big Shot

I hope you’ve enjoyed seeing this project and will link up with us this time! Thanks so much for stopping by today – we’ll see you next time! ;)

Scrappy hugs,