‘Tis the Season fun fold

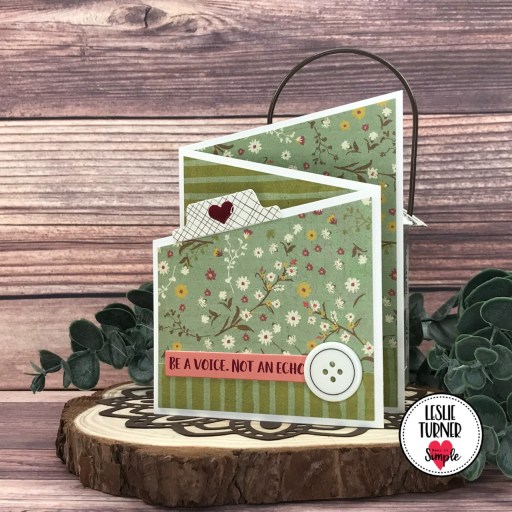
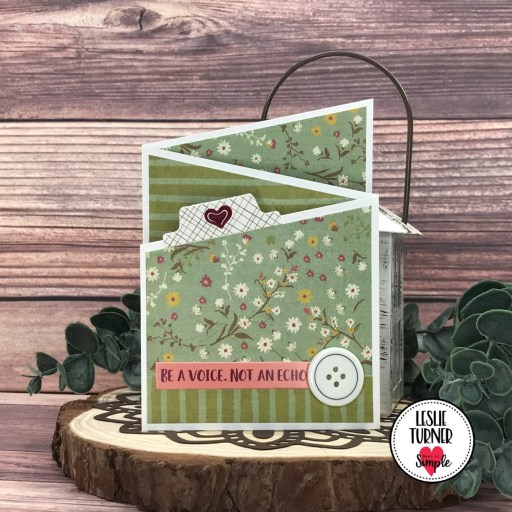
Hey everybody! Happy Thursday – it’s almost the weekend and I hope you have something fun planned! I’m back this morning with another ScrapbookingStore DT inspiration project created with the amazing 2023 Scrapbook Kit with Upgrades! I love the versatility of the double-sided papers in this kit – so many wonderful patterns for so many projects! I’ve grown especially fond of the double gatefold lately, so that’s the direction I took for this project. And who doesn’t love an adorable snow angel?!

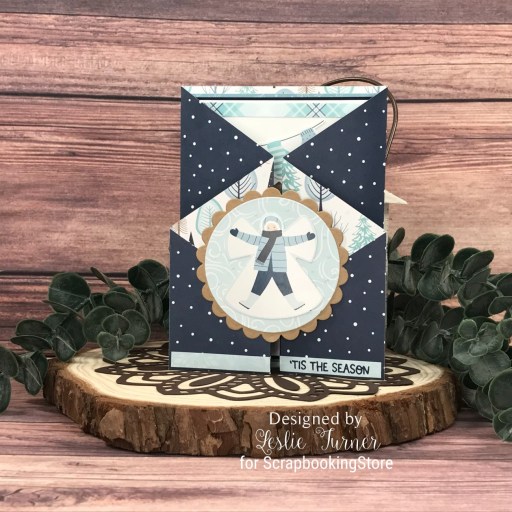
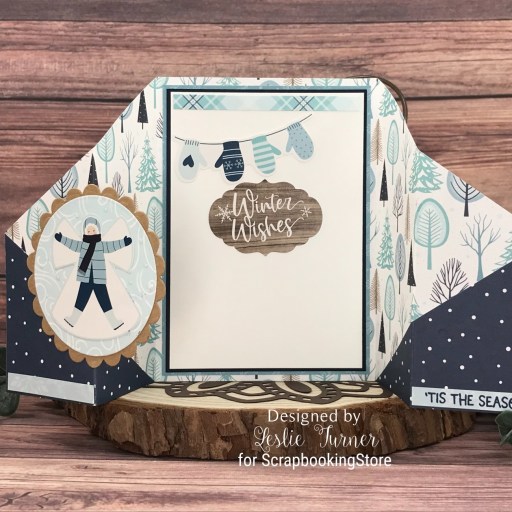
I cut the double gatefold card base from a double-sided paper in the kit. Using the Spellbinders Standard Circles Small and Classic Scalloped Circles Small dies, I cut the element for the card front from a patterned paper in the kit and CutCardStock Twine cardstock and adhered a snow angel sticker from the sticker sheet to it. I adhered patterned paper strips to the bottom of the card front and stamped the sentiment from the Taylored Expressions Winter Wishes stamp set in Catherine Pooler Juniper Mist ink.

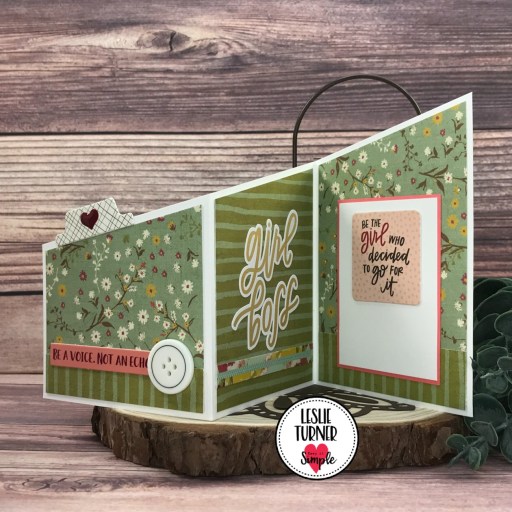
I cut the inside panel from Basis White and embellished it with a patterned paper strip and a mitten sticker and a sentiment sticker from the sticker sheet. I layered the panel on Basis Navy and an additional patterned paper from the kit. Lol, I didn’t notice until this very minute that the angle of this photo elongated the circular element on the front… sorry about that! :|

Sharing in the following challenges:
1. Classic Design Challenge: February 2023 #2 – Anything Goes
2. Scrapping4fun Challenges: #220 – Anything Goes
3. Wednesday’s Creative Inspirations Challenge Blog: February Anything Goes

Affiliate links are used in this post at no cost to you – I really appreciate your support!

ScrapbookingStore products used:
January 2023 Scrapbook Kit with Upgrades

Other products used:
Cardstock/Paper: CutCardStock Basis White, Basis Navy and Twine cardstock
Stamps: Taylored Expressions Winter Wishes stamp set
Ink: Catherine Pooler Juniper Mist ink
Dies/Punches: Spellbinders Standard Circles Small and Classic Scalloped Circles Small dies
Accessories: Tonic Studios 12″ Guillotine Paper Trimmer, Tape Runner, Art Glitter Dries Clear adhesive, MISTI stamping tool, Big Shot, Nuvo White Blizzard Glitter Drops

I hope you’ve enjoyed today’s project and you’re thinking about all the fun you could have with this month’s kit… you really ought to think about joining the Subscription Club! Be sure to Follow us on Facebook, Instagram, Pinterest and YouTube for lots of crafty inspiration! And if you do decide to join the Subscription Club, join our ScrapbookingStore Club Member Group on Facebook for more inspiration and to share your projects! Thanks so much for stopping by today – we’ll see you next time!

Scrappy hugs,

Baby it’s cold outside

Hi friends! Happy Hump Day! I’m thrilled to be back to share another ScrapbookingStore DT inspiration project with you today created with the amazing 2023 Scrapbook Kit with Upgrades! The Winter-themed papers and stickers in this kit represent wonderful childhood memories for many. I used several patterned papers and stickers from this month’s kit for this super cute A2 card. This design is really simple and could easily be mass-produced to create multiple cards for a gift set!

I cut a standard A2 size top-folding card base from Neenah Classic Crest Solar White cardstock along with a layering panel from a patterned paper in the kit, and rounded the bottom right corner of each. I cut smaller panels from CutCardStock Basis Blue cardstock and another patterned paper in the kit, adhered them together and then to the left side of the card front. Using the Cottage Cutz Double Stitched Ovals, I die cut an oval from an additional patterned paper in the kit and adhered it to the right side. I added an ice skates sticker and a sentiment sticker from the sticker sheet, which completed the card front.

I cut the inside panel from Solar White cardstock and embellished it with a scrap piece of the patterned paper used on the front. I added a sentiment sticker and a beanie sticker from the sticker sheet and layered the panel on Basis Navy.

Sharing in the following challenges:
1. Crafty Gals Corner: #239 – Winter Fun
2. Try it on Tuesday: Winter Blues

Affiliate links are used in this post at no cost to you – I really appreciate your support!

ScrapbookingStore products used:
January 2023 Scrapbook Kit with Upgrades

Other products used:
Cardstock/Paper: Neenah Classic Crest 80# Solar White cardstock, CutCardStock Basis Blue cardstock
Dies/Punches: Kadomaru Pro Corner Rounder, Cottage Cutz Double Stitched Ovals
Accessories: Tonic Studios 12″ Guillotine Paper Trimmer, Tape Runner, Art Glitter Dries Clear adhesive, Big Shot

I hope you’ve enjoyed today’s project and you’re thinking about all the fun you could have with this month’s kit… you really ought to think about joining the Subscription Club! Be sure to Follow us on Facebook, Instagram, Pinterest and YouTube for lots of crafty inspiration! And if you do decide to join the Subscription Club, join our ScrapbookingStore Club Member Group on Facebook for more inspiration and to share your projects! Thanks so much for stopping by today – we’ll see you next time!

Scrappy hugs,

Stay Humble-Work Hard-Be Kind

2/3/23 Rising Star at A Place To Start!

Hey everybody! Happy first day of February… already! Can you believe it?! Mom and Dad would have been married 75 years today and I’m sure they are celebrating that Diamond Anniversary in Heaven! I’m delighted to be back with another Keep It Simple DT inspiration project to share! This mini slimline features products from the Household Chore Gnomes collection that was released last September! You know I love me some gnomes and these are some of the cutest ever!

I cut a 3-1/2″ x 6″ mini slimline card base from Neenah Classic Crest 110# Solar White cardstock along with strips and a layering panel from papers in the Household Chore Gnomes Collection Pack and the Back To Basics Royal Collection Pack. I stamped the gnome, bubbles and soap from the Household Chore Gnomes Work Hard Stamps in Memento Tuxedo Black ink on Solar White cardstock, colored them with alcohol markers, and cut them with the coordinating Household Chore Gnomes Work Hard Dies. I stamped the sentiment from the same stamp set in Catherine Poole Suede Shoes ink and added several Back To Basics Royal Enamel Dots.

I cut the inside panel from Solar White cardstock, embellished it with strips of the papers used on the front, and stamped the sentiment in blue ink.

Sharing in the following challenges:
1. A Place To Start: January 2023 Anything Goes
2. The Crafter’s Cafe: #293 – Colors of the Rainbow and More (use bright colors)

Keep It Simple products used:
Household Chore Gnomes Work Hard Stamp & Die Bundle
Household Chore Gnomes Collection Pack 6×6 Cardstock
Back To Basics Royal Collection Pack 6×6 Cardstock
Back To Basics Royal Enamel Dots

Affiliate links are used in this post at no cost to you – I really appreciate your support!

Other products used:
Cardstock/Paper: Neenah Classic Crest 110# and 80# Solar White cardstock
Ink: Memento Tuxedo Black ink; Arteza alcohol markers- YR37, BR28, R31, CG06/08, BG24; Catherine Poole Suede Shoes ink;
Accessories: Tonic Studios 12″ Guillotine Paper Trimmer, Tonic 8.5 Comfort Trimmer, Bearly Art precision craft glue, MISTI stamping tool, Big Shot, 1mm-thick foam squares

I hope you’ve loved seeing this project as much as I loved creating it, and you’re inspired to get crafty! Be sure to check out ALL the fun goodies in the Keep It Simple store such as paper, stamps, die cuts, ephemera, washi tape and enamel dots to name just a few! You’ll love them! Be sure to Follow us on Facebook, Instagram, and Pinterest for lots of crafty inspiration! Thanks so much for stopping by today – we’ll see you next time!

Scrappy hugs,

Happy Father’s Day

Hi friends! I hope your week has started off nicely and it’s not too awfully cold where you are! Temperatures have definitely warmed up a bit since the arctic blast in December which was super scary. I’m delighted to share that one of my projects was an October winner over at A Perfect Time To Craft Open Challenge Blog and I was asked to guest design for an upcoming challenge, so here I am! For February #2-2023 – Anything Goes, we were gifted our choice of a digital image or paper pack from the sponsor, craftsUprint.com, and I chose a paper pack with some very cool papers for my Father’s Day card. Unbeknownst to me, the papers were designed by my friend, Anne Constantly-Carding, for craftsUprint, so be sure to check them out!

I cut a standard A2 size top-folding card base from CutCardStock Basis 110# Natural cardstock along with layering panels from CutCardStock Basis Blue cardstock and two coordinating papers in the craftsUprint Father’s Day Patterned Paper Pack. I printed the sentiment on CutCardStock Basis 80# Natural cardstock, punched it with a 1-3/4″ circle punch, and layered it on a 2″ circle punched from the Basis Blue and an additional 2-1/4″ circle punched from the Basis Natural cardstock. The finishing touch was adding several Eyelet Outlet ivory enamel dots.

I cut the inside panel from CutCardStock Basis 80# Natural cardstock and embellished it with a strip of one of the patterned papers used on the front along with a narrow strip of CutCardStock Basis Blue cardstock. I stamped a sentiment from the Stampin’ Up Hats Off stamp set in Catherine Pooler Suede Shoes ink.

Sharing in the following challenges:
1. Crafty Catz: #622 – Anything Goes w/ optional twist of 3 Favorite Colors (no twist)

Affiliate links are used in this post at no cost to you – I really appreciate your support! 

Products used:
Cardstock/Paper: CutCardStock Basis 110# Natural, Basis 80# Natural and Basis Blue cardstock, craftsUprint Father’s Day Patterned Paper Pack
Stamps: Stampin’ Up Hats Off stamp set
Ink: Catherine Pooler Suede Shoes ink
Dies/Punches: Stampin’ Up 1-3/4″ and 2″ circle punches, EK Success 2-1/4″ circle punch
Accessories: Tonic Studios 12″ Guillotine Paper Trimmer, Tape Runner, Bearly Art precision craft glue, MISTI stamp tool, Eyelet Outlet ivory enamel dots

I hope you’ve enjoyed seeing this guest design project and will link up an anything goes project with us this month! Thanks so much for stopping by today – we’ll see you next time! ;)

Scrappy hugs,

Chandler Purse with Latch Card Notelets

2/3/23 Rising Star at A Place To Start!

Hey everybody! I hope you’re having a great week so far! I’m having a hard time wrapping my head around the fact that January is almost over! I have another ScrapbookingStore DT inspiration project to share with you today created with the amazing January 2023 Scrapbook Kit with Upgrades! I’m in love with all the Winter-themed patterned papers and coordinating stickers in this month’s kit. You know how I love me some paper purses so I made a Chandler that contains a set of six latch card thank you notelets using a variety of patterned papers and stickers. I’ve made a few of these using the Bearly Arts tutorial HERE if you’re interested.

I cut the Chandler purse base, handle and strap closure from CutCardStock Basis Navy cardstock and layering panels from a snowflake pattern in this month’s kit. I adhered a large snowflake from the sticker sheet to a scrap piece of navy cardstock, fussy cut around it leaving a thin border, and then attached it to the end of the strap closure. I then adhered a small disc magnet with Ranger Distress Collage Medium to keep the purse closed.

I created a set of six latch cards from Solar White cardstock, Basis Navy cardstock and a variety of patterned papers in the kit. For each card, I stamped the ‘thanks’ sentiment from the Keep It Simple Thank You Sentiments stamp set in Catherine Pooler Juniper Mist ink on Solar White cardstock and cut it with a Spellbinders Classic Ovals Small die. Using the Spellbinders Classic Scalloped Ovals Large and Small dies, I cut two slightly larger scallops from Basis Navy and Solar White cardstock and adhered them together. This element created the ‘latch’ on each card.

I stamped the same sentiment (also from the Keep It Simple Thank You Sentiments stamp set) in Catherine Pooler Juniper Mist ink on the inside of each card and embellished each one with a coordinating sticker from the sticker sheet.

Sharing in the following challenges:
1. A Place To Start: January 2023 Anything Goes
2. Try it on Tuesday: Winter Blues
3. World Wide Open Design Team Challenge: #1 – January Anything Goes

Affiliate links are used in this post at no cost to you – I really appreciate your support!

ScrapbookingStore products used:
January 2023 Scrapbook Kit with Upgrades

Other products used:
Cardstock/Paper: Neenah Classic Crest 110# and 80# Solar White cardstock, CutCardStock Basis Navy cardstock
Stamps: Keep It Simple Thank You Sentiments stamp set
Ink: Catherine Pooler Juniper Mist ink
Dies/Punches: Spellbinders Classic Ovals Small die and Scalloped Ovals Large and Small dies
Accessories: Tonic Studios 12″ Guillotine Paper Trimmer, Art Glitter Dries Clear adhesive, MISTI stamping tool, Big Shot, Darice iridescent gemstones, small disc magnet, Ranger Distress Collage Medium, Bearly Art Chandler tutorial

I hope you’ve enjoyed today’s project and you’re thinking about all the fun you could have with this month’s kit… you really ought to think about joining the Subscription Club! Be sure to Follow us on Facebook, Instagram, Pinterest and YouTube for lots of crafty inspiration! And if you do decide to join the Subscription Club, join our ScrapbookingStore Club Member Group on Facebook for more inspiration and to share your projects! Thanks so much for stopping by today – we’ll see you next time!

Scrappy hugs,

Let It Snow mini slimline

2/8/23 Top 3 at Crafty Gals Corner!

Hi everyone! Happy Monday! Whoosh – the weekend went by just like that! In fact, the entire month of January is gone in a flash! I’m delighted to be back to share another ScrapbookingStore DT inspiration project with you today created with the amazing January 2023 Scrapbook Kit with Upgrades! Winter is so majestic with snow and pretty snowflakes, and everything in this kit depicts just that! I created a mini slimline card featuring a pretty ombre snowflake patterned paper and the delightful felt and glitter element from the upgrades.

I cut a 3-1/2″ x 6″ mini slimline card base from Neenah Classic Linen 100# Solar White cardstock along with a layering panel from a pretty ombre snowflake paper in this month’s kit. I added the felt and glitter element from the upgrades.

I embellished the inside with a leftover strip of the snowflake paper used on the front, a leftover glitter snowflake, and a sticker from the sticker sheet.

Sharing in the following challenges:
1. Crafty Gals Corner: #239 – Winter Fun
2. Try it on Tuesday: Winter Blues

Affiliate links are used in this post at no cost to you – I really appreciate your support!

ScrapbookingStore products used:
January 2023 Scrapbook Kit with Upgrades

Other products used:
Cardstock/Paper: Neenah Classic Linen 100# Solar White cardstock
Accessories: Tonic Studios 12″ Guillotine Paper Trimmer, Art Glitter Dries Clear adhesive

I hope you’ve enjoyed today’s project and you’re thinking about all the fun you could have with this month’s kit… you really ought to think about joining the Subscription Club! Be sure to Follow us on Facebook, Instagram, Pinterest and YouTube for lots of crafty inspiration! And if you do decide to join the Subscription Club, join our ScrapbookingStore Club Member Group on Facebook for more inspiration and to share your projects! Thanks so much for stopping by today – we’ll see you next time!

Scrappy hugs,

Be A Voice. Not An Echo.

2/3/23 Top 3 at Crafty Catz!
2/3/23 Rising Star at A Place To Start!

Hey everybody! I hope you’re having a beautiful weekend! We woke up to about 14 degrees this morning and we still have about 18″ of snow on the ground around our cabin – two feet in some areas. But that’s okay because the sun is out and it’s going to be a gorgeous day with a high of about 34 degrees. I have a pretty inspirational fun fold to share today created with an assortment of products from the Keep It Simple Clementine Bundle! This bundle is definitely a must-have for your crafty stash – it has everything you need to create amazing projects! My card is a zig-zag fold, it’s one of my favorite folds and it’s super easy!

I cut the zig-zag card base from CutCardStock 110# Basis White along with layering panels from coordinating prints in the Keep It Simple Flip Sides 12×12 Paper Pack.

I embellished each section with paper scraps, die cuts from the Die Cut Printed Chipboard, stickers from the 12×12 Sticker Sheet, and Adhesive Buttons and Enamel Shapes. I added a signature panel cut from CutCardStock Flamingo and Neenah Classic Crest Solar White which completed the card.

Sharing in the following challenges:
1. A Place To Start: January 2023 Anything Goes
2. Crafty Catz: #622 – Anything Goes w/ optional twist of 3 Favorite Colors (no twist)

Affiliate links are used in this post at no cost to you – I really appreciate your support! 

Products used:
Cardstock/Paper: CutCardStock 110# Basis White and Flamingo cardstock, Neenah Classic Crest 80# Solar White cardstock
Accessories: Tonic Studios 12″ Guillotine Paper Trimmer, Bearly Art precision craft glue; Keep It Simple Clementine Bundle: Flip Sides 12×12 Paper Pack with Die Cut Printed Chipboard, 12×12 Sticker Sheet, Adhesive Buttons and Enamel Shapes

I hope you’ve enjoyed seeing this project and you’re inspired to get crafty this weekend! Thanks so much for stopping by today – we’ll see you next time! ;)

Scrappy hugs,

Get Well Soon

Hey everybody! It’s almost the end of January already! Seems like the weeks are just flying by! I’m up on the Prickley Pear Stamps blog this morning with an inspiration project featuring stamps and dies in the new Southwestern Collection! One can never have too many get well cards in their stash so I created one using the Prickly Pear Cactus stamps and dies that I paired with purple and green patterned papers in my stash. I’ve always loved a purple and green color combo and I love stamping on patterned paper!

I cut a standard A2 size side-folding card base from CutCardStock Basis White cardstock along with layering panels from coordinating patterned papers in the Keep It Simple Lilac and Jade 12×12 Collection Packs. I cut the edge of the larger panel with a My Favorite Things Stitched Scallop Basic Edges 2 die. I stamped the images from the Prickly Pear Cactus stamps in Memento Tuxedo Black ink on purple and green patterned papers and cut them with the coordinating Prickly Pear Cactus dies. I stamped the sentiment in the upper right corner and adhered a few gemstones from the Trinity Stamps Amethyst Accent Embellishment Mix which completed the card.

Affiliate links are used in this post at no cost to you – I really appreciate your support!

Prickley Pear Stamps products used:
Prickly Pear Cactus stamp set
Prickly Pear Cactus die set

Other products used:
Cardstock/Paper: CutCardStock Basis 110# White cardstock, Keep It Simple Lilac and Jade 12×12 Collection Packs
Ink: Memento Tuxedo Black ink; Sharpie Ultra Fine Point Markers- Green and Purple; Kirarina Wink Purple Metallic Marker
Dies/Punches: My Favorite Things Stitched Scallop Basic Edges 2 Die-namics
Accessories: Tonic Studios 12″ Guillotine Paper Trimmer, MISTI stamp tool, Big Shot, Tombow Mono Permanent Adhesive, Art Glitter Dries Clear Adhesive, Trinity Stamps Amethyst Accent Embellishment Mix, Trinity Pick Up Stick, 1-mm thick foam squares

I hope you’ve enjoyed this project! Be sure to check out all the awesome stamps and dies at Prickley Pear Stamps! Save 10% on anything on the site when you shop at Prickley Pear Stamps by using coupon code LESLIE10 at checkout! And be sure to ‘like’ and ‘follow’ the Prickley Pear Stamps Facebook page to keep up with news and sales, and join Prickley Pear Pals (the fan group) for lots of fun crafty ideas and to share your creativity! And finally, we’d love to see you visit the Prickley Pear Stamps blog and become a Follower! Hope to see you there! Thanks so much for stopping by today – we’ll see you next time! ;)

Scrappy hugs,

Another Year Older

2/6/23 Top Sprout at A Place To Start!
2/3/23 Rising Star at A Place To Start!

Hey everybody! Happy Friday – I hope you’ve had a great week! I have an awesome CutCardStock DT inspiration project to share with you today featuring our Basis Gray, Dolphin Gray and Pop Tone Black Licorice which I paired with some Echo Park double-sided paper in my stash! This is one of my most favorite stamp sets because it always makes an awesome masculine card! Plus it’s a tunnel card with a pop-up sentiment on the inside! I’ve made quite a few tunnel cards over the years but have never made one quite like this, and it was rather fun!

I cut a standard A2 size side-folding card base and small rectangular panel from Basis Gray cardstock. I ran the smaller panel through the Big Shot with a Darice Diamond Plate embossing folder. I stamped the motorcycle on a scrap piece of Dolphin Gray cardstock, cut it with the coordinating die, and layered it on three additional die cuts for dimension. I stamped the sentiment from The Project Bin Wild Thing stamp set in Memento Tuxedo Black ink and added several Darice tiny gray gemstones.

The inside consists of two layering panels. Using my Fiskars 12″ SureCut paper trimmer, I cut two horizontal lines into the Dolphin Gray layer to create the pop-up mechanism. I stamped another sentiment from the same Wild Thing stamp set in black ink, trimmed it and layered it, then adhered it to the left side of the pop-up mechanism. I die cut a circle into the Echo Park plaid paper and a slightly smaller circle into a square piece of Pop Tone Black Licorice which I adhered behind the aperture in the plaid paper, leaving a small border visible. The final step for the inside was adhering the plaid panel in place, making sure the sentiment flap was through the aperture before applying adhesive.

Sharing in the following challenges:
1. A Place To Start: January 2023 Anything Goes
2. Crafty Catz: #622 – Anything Goes w/ optional twist of 3 Favorite Colors (no twist)
3. Jan’s Digi Stamps Challenge: January 2023 Anything Goes
4. World Wide Open Design Team Challenge: #1 – January Anything Goes

Affiliate links are used in this post at no cost to you – I really appreciate your support!

CutCardStock products used:
Basis Gray cardstock
Dolphin Gray cardstock
Pop Tone Black Licorice cardstock

Other products used:
Paper: Echo Park Farmhouse Kitchen double-sided paper
Stamps: The Project Bin Wild Thing stamps
Ink: Memento Tuxedo Black ink
Dies/Punches: Spellbinders Standard Circles Large and Small, The Project Bin Wild Thing dies
Accessories: Tonic Studios 12″ Guillotine Paper Trimmer, Fiskars 12″ SureCut Paper Trimmer, Art Glitter Dries Clear adhesive, Tape Runner, MISTI stamp tool, Darice Diamond Plate embossing folder, Big Shot, Darice tiny gray gemstones

I hope you’ve enjoyed today’s project and you’re inspired to get crafty! Be sure to check out all the awesome cardstock and other goodies at CutCardStock (adhesives, labels, stickers, pens, watercolors and ribbon to name a few). And head on over to the CutCardStock Facebook Page for more inspiration! Thanks so much for stopping by today – we’ll see you next time!

Scrappy hugs,

Life can be Prickly

Hey everybody! Happy Hump Day – I hope you’re having a great week! I’m up on the Prickley Pear Stamps blog this morning with an inspiration project featuring some of the stamps and dies in the new Southwestern Collection that was just released last month! I created a pretty get well card featuring the Prickly Pear Cactus stamps and dies which I paired with some pretty patterned paper in my stash.

I cut a standard A2 size top-folding card base from CutCardStock Basis Natural cardstock along with layering panels and strips from coordinating patterned papers in the Keep It Simple Ruby 12×12 Collection Pack. I stamped the images from the Prickly Pear Cactus stamps in Memento Tuxedo Black ink on Basis Natural cardstock, colored them with alcohol markers and ultra fine point markers, and cut them with the coordinating Prickly Pear Cactus dies. I stamped the sentiment in the lower left corner and added a red enamel heart to the flower pot. I adhered a few gemstones from the Trinity Stamps Andradite Sparkle Embellishment Mix which completed the card.

Sharing in the following challenges:
1. Jan’s Digi Stamps Challenge: January 2023 Anything Goes
2. World Wide Open Design Team Challenge: #1 – January Anything Goes

Affiliate links are used in this post at no cost to you – I really appreciate your support!

Prickley Pear Stamps products used:
Prickly Pear Cactus stamp set
Prickly Pear Cactus die set

Other products used:
Cardstock/Paper: CutCardStock Basis 110# Natural cardstock, Keep It Simple Ruby 12×12 Collection Pack
Ink: Memento Tuxedo Black ink; Arteza alcohol markers- YG43, R35; Sharpie Ultra Fine Point markers- Pink and Lime Green
Accessories: Tonic Studios 12″ Guillotine Paper Trimmer, MISTI stamp tool, Big Shot, Tombow Mono Permanent Adhesive, Art Glitter Dries Clear Adhesive, Eyelet Outlet Enamel Hearts, Trinity Stamps Andradite Sparkle Embellishment Mix, Trinity Pick Up Stick

I hope you’ve enjoyed this project! Be sure to check out all the awesome stamps and dies at Prickley Pear Stamps! Save 10% on anything on the site when you shop at Prickley Pear Stamps by using coupon code LESLIE10 at checkout! And be sure to ‘like’ and ‘follow’ the Prickley Pear Stamps Facebook page to keep up with news and sales, and join Prickley Pear Pals (the fan group) for lots of fun crafty ideas and to share your creativity! And finally, we’d love to see you visit the Prickley Pear Stamps blog and become a Follower! Hope to see you there! Thanks so much for stopping by today – we’ll see you next time! ;)

Scrappy hugs,