Three Favorite 2022 Eyelet Outlet Projects

Hi everyone! Happy Saturday – I hope you had a wonderful Christmas and you’re looking forward to a happy, healthy and prosperous New Year! I can’t believe how quickly 2022 flew by! I’m thrilled to be back on the Eyelet Outlet blog today sharing my three favorite projects created this year with Eyelet Outlet products! This is a different kind of post because all three of these projects have already been showcased on my blog – we’re continuing a fun tradition that the owner and DT leader started late last year! I’m a periodic guest designer these days (since May) and was delighted to have been asked to participate.

I love fun folds and Christmas is my favorite holiday, so it’s no surprise that two of my three projects are Christmas cards and two are fun folds created with my Scan N Cut! The first fav in the line-up is my Merry Christmas Cardinals card featuring our Cardinal Brads, Cardinal Profile Brads, Female Cardinal Brads and Clear Jewel Bling Strips.

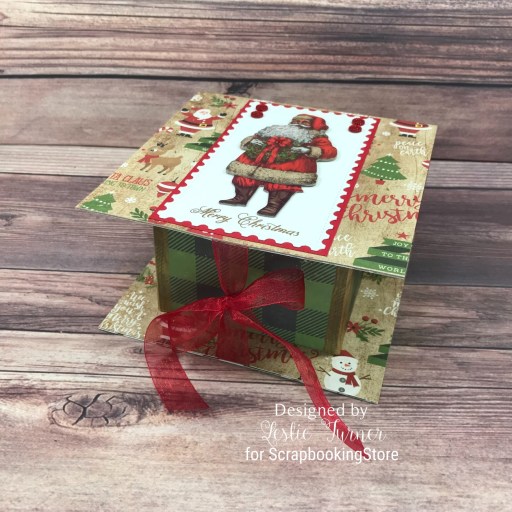
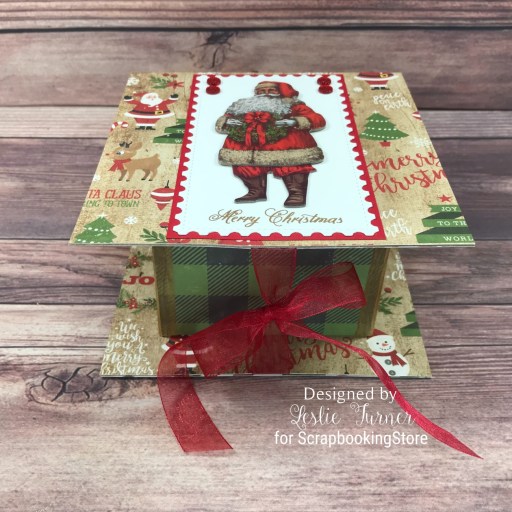
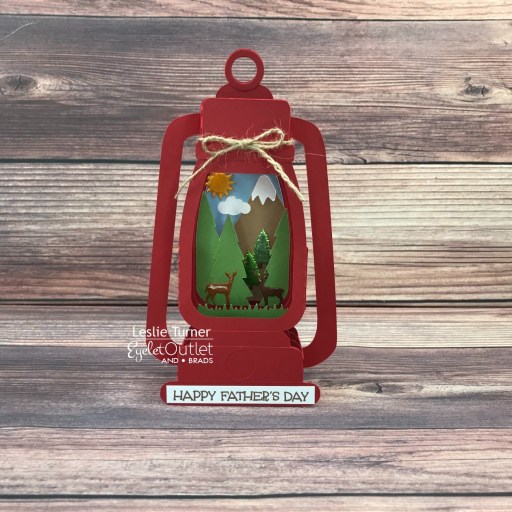
The card in the number two spot is my Happy Father’s Day Lantern. This box card folds flat for mailing and features our Deer Brads, Pine Tree Brads and Sun/Cloud Brads.

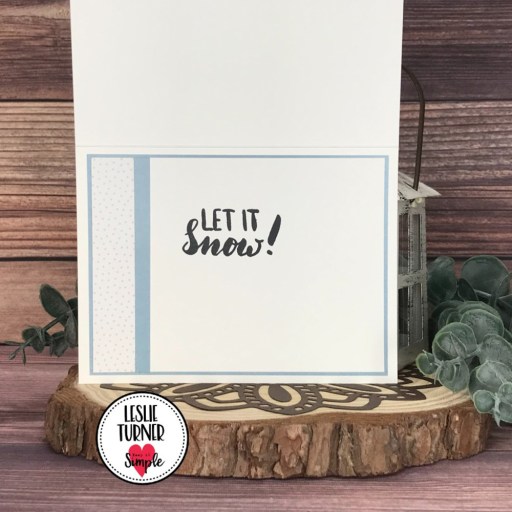
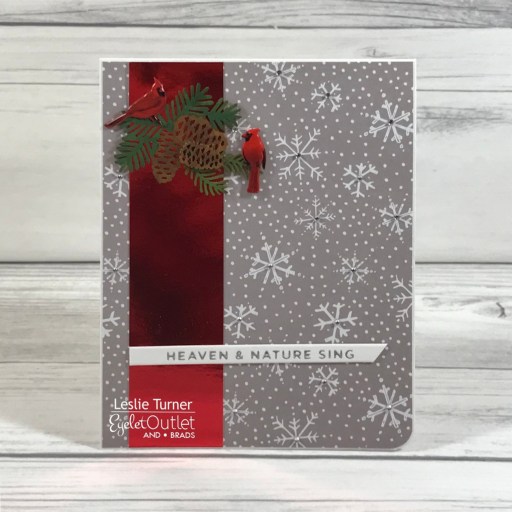
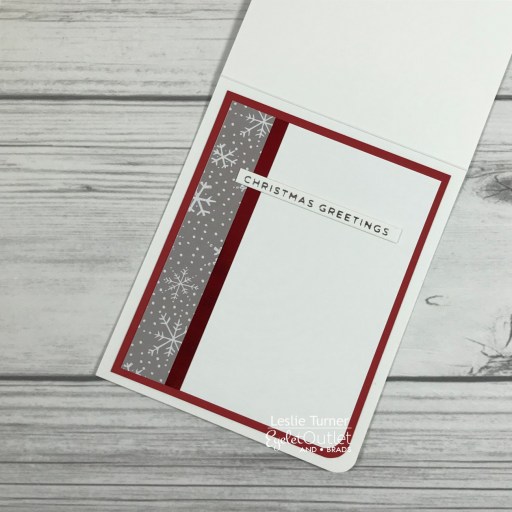
And the final card in the line-up is my Heaven & Nature sing card, a Christmas card in traditional red and gray that features our Cardinal Brads and Cardinal Profile Brads along with Clear Jewel Bling.

I hope you’ve enjoyed today’s post even though it’s a bit different than usual. Be sure to check out all the fun goodies at Eyelet Outlet and be sure to ‘like’ and ‘follow’ Eyelet Outlet Facebook Page to keep up with news and sales, and while you’re at it, join the Eyelet Outlet Fans Facebook group for lots of creative inspiration! Thanks so much for stopping by today – we’ll see you next time! ;)

Scrappy hugs,

Happy New Year!

Hi everyone! Happy Thursday to everybody! I’m still shaking my head at how fast this year has flown by! Mom always said “the older you get the faster the time flies” and she sure was right. I hope you all had a wonderful Christmas and you’re embracing the start of a new year! I’m stoked to be back on the Printable Cuttable Creatables blog today with another awesome DT inspiration project! I created a pretty but simple new year’s note card featuring the Buffalo Plaid Digital Paper Pack, Happy New Year Title SVG File & Clipart, and Champagne Glasses SVG File! This is my final project and I’d like to thank Kristin and the gang for having me along this term – I’ve definitely enjoyed myself!

I printed a black and white diamond buffalo plaid print from the Buffalo Plaid Digital Paper Pack on 65# Hammermill copy paper and trimmed a panel for the front which I layered on CutCardStock Basis Gold cardstock. Next, I printed the new year title from the PNG Clipart file in the Happy New Year Title SVG File & Clipart and cut it on my Scan N Cut. Then finally, I cut the champagne glasses (bottom layer only) from CutCardStock Dolphin cardstock. I adhered the elements to the card front and added a wooden arrow embellished with light gray pearls. The finishing touch was adding a few tiny clear gemstones at the top of the glasses for the bubbles.

I embellished the inside panel with leftover strips of the diamond buffalo plaid and Basis Gold cardstock used on the front, and left the panel blank to write a custom message.

Affiliate links are used in this post at no cost to you – I really appreciate your support!

Printable Cuttable Creatables products used:
Buffalo Plaid Digital Paper Pack
Happy New Year Title SVG File & Clipart
Champagne Glasses SVG File

Other products used:
Cardstock/Paper: Neenah Classic Crest 110# and 80# Solar White cardstock, CutCardStock Basis Gold and Dolphin cardstock, 65# Hammermill copy paper
Ink: Memento Tuxedo Black ink; Arteza alcohol marker- GS04
Accessories: Brother Scan N Cut, Tonic Studios 12″ Guillotine Paper Trimmer, Tombow Mono permanent adhesive, Bearly Art precision craft glue, MISTI stamping tool, STAMPlorations Funky Arrows #2, Eyelet Outlet 3mm clear Jewel Bling Strip and 5mm gray Pearl Bling Strip, Ranger Distress Collage Medium

I hope you’ve enjoyed today’s project and you’re inspired to get out that electronic cutting machine! Be sure to check out all the fun goodies in the Printable Cuttable Creatables store – you’ll have a blast and there are tons of freebies to get started! Save 15% off your order at Printable Cuttable Creatables by using coupon code love2scrap15 at checkout! Be sure to Follow us on Facebook, Instagram, Pinterest, Twitter and YouTube for lots of crafty inspiration! And while you’re at it, join our Crafting with Printable Cuttable Creatables Facebook Group for more inspiration and to share your projects! Thanks so much for stopping by today – we’ll see you next time!

Scrappy hugs,

Thinking of You Mini Slimline Note Card

Hey everybody! Happy Monday – I hope everyone had a wonderful Christmas and you’re staying warm and cozy throughout this crazy arctic blast. So weird and scary. I’ve popped in this morning to share another Kat Scrappiness Creative Influencer inspiration project with you! By now, you know that I totally love mini slimline cards, so I created a mini slim note card featuring several Kat Scrappiness products. I did something I haven’t done in a while… I upcycled! I used the bottom half of a store-bought pink and purple note card with gold veining that I recently received in the mail. There was nothing written on the inside of this note card (which contained an unmounted rubber stamp I won) and it was just too pretty to throw away. It was time to create my second Creative Influencer project for December, so I pulled out my Kat Scrappiness Mini Slimline Stitched Rope dies, Thinking of You Word Die (without the Shadow) and Gold Pearl Mix, and got busy!

I cut my go-to 3-1/2″ x 6″ size mini slimline card base from Neenah Classic Crest 110# Solar White cardstock along with a layering panel from CutCardStock Stardream Metallic Amethyst cardstock. I die cut a rectangle from half of the ready-made note card using a Mini Slimline Stitched Rope die. I then die cut the sentiment (using the Thinking of You Word Die without the Shadow) twice from CutCardStock Bright Gold Foil cardstock and layered them together. The finishing touch was adding several pearls from the Gold Pearl Mix. I’m so annoyed because foil is hard to photograph and I couldn’t get a good frontal shot without glare.

I cut the inside panel from 80# Solar White cardstock and embellished it with strips cut from the ready-made note card and the amethyst cardstock used on the front. I left the panel blank to write a custom message.

Affiliate links are used in this post at no cost to you – I really appreciate your support!

Kat Scrappiness products used:
Mini Slimline Stitched Rope dies
Thinking of You Word Die with Shadow
Gold Pearl Mix

Other products used:
Cardstock/Paper: Neenah Classic Crest 110# and 80# Solar White cardstock, CutCardStock Stardream Metallic Amethyst and Bright Gold Foil cardstock
Accessories: Tonic Studios 12″ Guillotine Paper Trimmer, Tape Runner, Bearly Art precision craft glue, Big Shot

I hope you’ve enjoyed this project and I’ve inspired you to get crafty! Be sure to check out all the amazing stuff in the Kat Scrappiness store… there’s some of just about everything you’ll need to get your craft on, I promise! Be sure to Follow us on Facebook, Instagram, Pinterest and YouTube for tons of crafty inspiration! And we’d love it if you’d join the Kat Scrappiness Insiders and Stamping Enablers Facebook Groups for lots of fun crafty ideas and to share your creativity! Thanks so much for stopping by today – we’ll see you next time!

Scrappy hugs,

Peace mini slimline card

Hi everyone! OMGosh, St. Nick will be here tonight… are you ready?! He’s coming regardless, lol! I have an awesome CutCardStock DT inspiration project to share with you today featuring more of our Stardream Metallic cardstock! This cardstock has the softest shimmer and is some of the prettiest I’ve ever seen! I’ve used Stardream Metallic Fairway cardstock and Stardream Metallic Jupiter cardstock on this mini slimline card, and I love how it turned out!

I cut my favorite mini slimline card size of 3-1/2″ x 6″ from Neenah Classic Crest 110# Solar White cardstock. Using the Kat Scrappiness Mini Slimline Foliage Frame die, I cut the frame from CutCardStock Stardream Metallic Fairway cardstsock, and adhered it to the card base. Next, using the Sizzix Script Holiday Words Thinlits, I die cut the sentiment three times from CutCardStock Stardream Metallic Jupiter cardstock and layered them together for a little dimension. I clipped the prongs off of four Eyelet Outlet Poinsettia Flower Brads (didn’t want the bulk under the frame) and adhered them with Ranger Distress Collage Medium. The finishing touch was adding several Darice tiny clear gemstones.

Using the Waffle Flower Mini Slimline Layers dies, I cut the inside panels from the Stardream Metallic Fairway cardstock and Neenah Classic Crest 80# Solar White cardstock, and adhered them together. I stamped a sentiment from the CAS-ual Friday Stamps Snowy Sayings stamp set in Catherine Pooler Rouge ink.

Affiliate links are used in this post at no cost to you – I really appreciate your support!

CutCardStock products used:
Neenah Classic Crest 110# and 80# Solar White cardstock
Stardream Metallic Fairway cardstock
Stardream Metallic Jupiter cardstock

Other products used:
Stamps: CAS-ual Friday Stamps Snowy Sayings stamp set
Ink: Catherine Pooler Rouge ink
Dies/Punches: Kat Scrappiness Mini Slimline Foliage Frame die, Sizzix Script Holiday Words Thinlits, Waffle Flower Mini Slimline Layers dies
Accessories: Tonic Studios 12″ Guillotine Paper Trimmer, Bearly Art precision craft glue, Ranger Distress Collage Medium, MISTI stamp tool, Big Shot, Eyelet Outlet Poinsettia Flower Brads, Darice tiny clear gemstones

I hope you’ve enjoyed today’s project and you’re inspired to get crafty! Be sure to check out all the awesome cardstock and other goodies at CutCardStock (adhesives, labels, stickers, pens, watercolors and ribbon to name a few). And head on over to the CutCardStock Facebook Page for more inspiration! Thanks so much for stopping by today – we’ll see you next time!

Scrappy hugs,

Christmas Quilt Card

Hey everybody! Are you ready for the round jolly guy in the red suit to make his appearance tomorrow evening?! He’s coming whether you’re ready or not, lol! I’m thrilled to be back to share another ScrapbookingStore DT inspiration project with you today, created with the amazing December 2022 Scrapbook Kit with Upgrades! I like everything in this month’s kit, from the pretty patterned papers to the variety of stickers. I consider myself a fun fold ‘fiend’ and thought a side fold card featuring a Christmas quilt was in order. I used the snowflake, festive floral and modern stripe and dot patterned papers in this month’s collection along with some stickers from the sticker sheet.

I cut the side fold card base from Neenah Classic Crest 110# Solar White cardstock and adhered the left panel. Using the My Favorite Things Quilt Square Cover-Up die, I die cut the quilt five times (three times with the patterned papers from the kit and two more times with CutCardStock Red Wagon and Scottish Highlands Green cardstock). Using various pieces from each of the cuts, I assembled the quilt and adhered it to the card front. I added a sentiment sticker from the sticker sheet and adhered a rectangular panel cut from the Red Wagon cardstock to the left side which I embellished with metallic gold thread and another sticker from the sticker sheet.

I cut the inside panel from 80# Solar White cardstock and embellished it with strips of the festive floral patterned paper and CutCardStock Red Wagon cardstock used on the front. I stamped the sentiment in Catherine Pooler Grass Skirt ink and layered the panel on CutCardStock Scottish Highlands Green cardstock.

Affiliate links are used in this post at no cost to you – I really appreciate your support!

ScrapbookingStore products used:
December 2022 Scrapbook Kit with Upgrades

Other products used:
Cardstock/Paper: Neenah Classic Crest 110# and 80# Solar White cardstock, CutCardStock Red Wagon and Scottish Highlands Green cardstock
Stamps: Stampin’ Up Versatile Christmas stamp set
Ink: Catherine Pooler Grass Skirt ink
Dies/Punches: My Favorite Things Quilt Square Cover-Up Die, EK Success Flag Punch (to notch the side panel where I wrapped the gold metallic thread)
Accessories: Tonic Studios 12″ Guillotine Paper Trimmer, Bearly Art precision craft glue, MISTI stamping tool, Big Shot, Coats metallic gold sewing thread, Stampin’ Up Mini Dimensionals

I hope you’ve enjoyed today’s project and you’re thinking about all the fun you could have with this month’s kit… you really ought to think about joining the Subscription Club! Be sure to Follow us on Facebook, Instagram, Pinterest and YouTube for lots of crafty inspiration! And if you do decide to join the Subscription Club, join our ScrapbookingStore Club Member Group on Facebook for more inspiration and to share your projects! Thanks so much for stopping by today – we’ll see you next time!

Scrappy hugs,

Festive Clamshell Gift Box

Hi everyone! I hope you’re having a fabulous week! I’m delighted to be back to share another ScrapbookingStore DT inspiration project with you today, created with the amazing December 2022 Scrapbook Kit with Upgrades! I absolutely love the variety of papers and coordinating stickers along with the awesome upgrades in this month’s collection. I’ve mentioned many times before that I love making and giving practical gifts, so I created a sturdy clamshell type Christmas gift box that can be used for years to come. I’ve had handwritten instructions for this in my arsenal for quite some time but had never gotten around to making one until a similar box was featured in a recent Splitcoast Stampers newsletter! Sometimes all I need is a reminder to inspire me! ;)

I constructed the shell and box from CutCardStock Kraft Chipboard and used two coordinating papers from the collection to cover the panels along with some sheer red ribbon from my stash for the closure.

I die cut a rectangular element for the top of the box from Solar White cardstock using a Kat Scrappiness Mini Slimline Postage Edge Die and layered it on CutCardStock Pop Tone Wild Cherry cardstock. I added the chipboard Santa and a sentiment rub-on from the upgrades along with some Eyelet Outlet bumpy red bling which completed the box top.

Here are shots of the actual gift box, with the shell opened up. I used CutCardStock Pop Tone Wild Cherry cardstock to cover the hinge and inside of the box.

Affiliate links are used in this post at no cost to you – I really appreciate your support!

ScrapbookingStore products used:
December 2022 Scrapbook Kit with Upgrades

Other products used:
Cardstock/Paper: CutCardStock Kraft Chipboard and Pop Tone Wild Cherry cardstock, Neenah Classic Crest 80# Solar White cardstock
Dies/Punches: Kat Scrappiness Mini Slimline Postage Stamp Edge Dies
Accessories: Tonic Studios 12″ Guillotine Paper Trimmer, Bearly Art precision craft glue, Big Shot, Michael’s sheer red ribbon, Eyelet Outlet bumpy red bling and wood washi tape

I hope you’ve enjoyed today’s project and you’re thinking about all the fun you could have with this month’s kit… you really ought to think about joining the Subscription Club! Be sure to Follow us on Facebook, Instagram, Pinterest and YouTube for lots of crafty inspiration! And if you do decide to join the Subscription Club, join our ScrapbookingStore Club Member Group on Facebook for more inspiration and to share your projects! Thanks so much for stopping by today – we’ll see you next time!

Scrappy hugs,

Merry & Bright Mitten

Hi everyone! A big ol’ Happy Hump Day to you! Another day closer to Christmas! I’m stoked to be back to share another ScrapbookingStore DT inspiration project with you today, created with the amazing December 2022 Scrapbook Kit with Upgrades! I’m digging all the festive Christmas prints and traditional colors of the papers in this collection along with the coordinating stickers and upgrades. I love creating shaped cards and used a mitten card template that I designed a number of years ago which you can find HERE if you’d like to play around with it!  

Using my template, I cut the mitten card base once from Neenah Classic Crest 110# Solar White cardstock and again from a snowflake patterned paper in the kit. I fashioned a cuff from a candy stripe patterned paper in the kit layered on CutCardStock Scottish Highlands Green cardstock which I embellished with an Eyelet Outlet 3mm white pearl bling strip. I added hand-cut stripes (from the same paper) also layered on green cardstock. I embellished the mitten with a sentiment banner sticker and several snowflake stickers from the sticker sheet that I popped up on Dimensionals.

Using the template as a guide, I hand-cut the inside panels from 80# Solar White and CutCardStock Scottish Highlands Green cardstock in graduating smaller sizes which I layered together. I embellished the panel with the candy stripe patterned paper and green cardstock used on the front, and added a sentiment sticker from the sticker sheet.

Affiliate links are used in this post at no cost to you – I really appreciate your support!

ScrapbookingStore products used:
December 2022 Scrapbook Kit with Upgrades

Other products used:
Cardstock/Paper: Neenah Classic Crest 110# and 80# Solar White cardstock, CutCardStock Scottish Highlands Green cardstock
Accessories: Tonic Studios 12″ Guillotine Paper Trimmer, Bearly Art precision craft glue, Eyelet Outlet 3mm white pearl bling strip, Stampin’ Up Dimensionals and Mini Dimensionals

I hope you’ve enjoyed today’s project and you’re thinking about all the fun you could have with this month’s kit… you really ought to think about joining the Subscription Club! Be sure to Follow us on Facebook, Instagram, Pinterest and YouTube for lots of crafty inspiration! And if you do decide to join the Subscription Club, join our ScrapbookingStore Club Member Group on Facebook for more inspiration and to share your projects! Thanks so much for stopping by today – we’ll see you next time!

Scrappy hugs,

Holly Jolly Christmas

Hey everybody! Happy Tuesday! I’m back again this morning, this time sharing another Keep It Simple DT inspiration project! This adorable Christmas card features quite a few items from the Scandinavian Christmas collection which I’m totally loving! To create this fun scene, I used paper from the Scandinavian Christmas 6×9 Cardstock Pack, stamps and die cut pieces from Santa & Friends, and die cut pieces and stamps from Gnomes!

I cut a standard A2 size top-folding landscape card base from Neenah Classic Crest #110# Solar White cardstock along with layering panels from papers in the 6×9 Cardstock Pack. I used die cuts from both the Santa & Friends and Gnomes Die Cut Pieces to create the scene, popping some of the presents up on foam dimensionals and using Nuvo Autumn Red and Gloss White Crystal Drops to embellish the tree. I stamped the sentiment from the Santa & Friends Stamps in Memento Tuxedo Black ink which completed the card front.

I cut the inside panel from 80# Solar White cardstock and embellished it with strips of the papers used on the front, and then stamped the sentiment from the Gnomes Stamps in black ink.

Keep It Simple products used:
Scandinavian Christmas 6×9 Cardstock Pack
Santa & Friends Stamps
Santa & Friends Die Cut Pieces
Gnomes Die Cut Pieces
Gnomes Stamps

Affiliate links are used in this post at no cost to you – I really appreciate your support!

Other products used:
Cardstock/Paper: Neenah Classic Crest 110# and 80# Solar White cardstock
Ink: Memento Tuxedo Black ink
Accessories: Tonic Studios 12″ Guillotine Paper Trimmer, Bearly Art precision craft glue, MISTI stamping tool, Nuvo Autumn Red and Gloss White Crystal Drops, Stampin’ Up Dimensionals and Mini Dimensionals

I hope you’ve loved seeing this project as much as I loved creating it, and you’re inspired to get crafty! Be sure to check out ALL the fun goodies in the Keep It Simple store such as paper, stamps, die cuts, ephemera, washi tape and enamel dots to name just a few! You’ll go cray-cray! Be sure to Follow us on Facebook, Instagram, and Pinterest for lots of crafty inspiration! Thanks so much for stopping by today – we’ll see you next time!

Scrappy hugs,

Christmas Double Pleated Fold

Hi friends! I hope it’s not too cold where you are… it’s technically not even Winter yet, lol! We woke up to 2 degrees a couple days ago and I believe it was 8 degrees yesterday morning! I’m delighted to be back to share another ScrapbookingStore DT inspiration project with you today, created with the amazing December 2022 Scrapbook Kit with Upgrades! I’m really loving all the Christmas-themed papers, coordinating stickers and upgrades in this month’s collection. I make Christmas cards all year long and already mailed out this year’s cards, so I have a head-start on next year’s! This card features a double pleated fold element on the front created from a houndstooth (on one side) and floral (on the other side) paper which I embellished with the chipboard doll from the upgrades!

I cut a standard A2 size side-folding landscape card base from CutCardStock Basis White cardstock along with a layering panel from CutCardStock Kale Green cardstock. I created the double pleated fold element using paper in the collection. I embellished it with Eyelet Outlet clear jewel brads and clear jewel bling strips and adhered it to the card front in a horizontal fashion. I added the chipboard doll from the upgrades to two layered die cut circles which I adhered to the center of the double pleated fold element. The finishing touch was adding a sentiment using a rub-on from the upgrades.

I cut the inside panel from Basis White cardstock and embellished it with strips of the patterned paper and kale green cardstock used on the front. I stamped a sentiment from the Stampin’ Up Oh What Fun stamp set and layered the panel on green cardstock.

Affiliate links are used in this post at no cost to you – I really appreciate your support!

ScrapbookingStore products used:
December 2022 Scrapbook Kit with Upgrades

Other products used:
Cardstock/Paper: CutCardStock Basis 80# White and Kale Green cardstock, Neenah Classic Crest 110# Solar White cardstock
Stamps: Stampin’ Up Oh What Fun stamp set
Ink: Catherine Pooler Deck the Halls ink
Dies/Punches: Spellbinders Standard Circles Large and Small dies
Accessories: Tonic Studios 12″ Guillotine Paper Trimmer, Bearly Art precision craft glue, MISTI stamping tool, Big Shot, Eyelet Outlet clear jewel brads and 3mm clear jewel bling strip

I hope you’ve enjoyed today’s project and you’re thinking about all the fun you could have with this month’s kit… you really ought to think about joining the Subscription Club! Be sure to Follow us on Facebook, Instagram, Pinterest and YouTube for lots of crafty inspiration! And if you do decide to join the Subscription Club, join our ScrapbookingStore Club Member Group on Facebook for more inspiration and to share your projects! Thanks so much for stopping by today – we’ll see you next time!

Scrappy hugs,

I Love Christmas Sticky Note Holder

Hey everybody! Happy Monday! It’s so hard to believe that this is the last week before Christmas! I’m delighted to be back to share another ScrapbookingStore DT inspiration project with you today, created with the amazing December 2022 Scrapbook Kit with Upgrades! You know how I love creating 3-D projects, and when they make practical gifts, that’s a definite win-win! This type of sticky pad holder has been around for a while but was recently featured in a Splitcoast Stamper newsletter HERE and inspired me to make one! It’s a fast project that could easily be mass-produced to make stocking stuffers or co-worker gifts!

I cut the easel base and panel from CutCardStock Kraft chipboard. Then the fun began assembling and decorating. ;) I used a pretty Christmas floral patterned paper from the kit and layered it on a panel of CutCardStock Scottish Highlands Green cardstock. I embellished the panel with floral, cardinal and sentiment stickers from the sticker sheet along with some Eyelet Outlet bumpy red bling. You can’t tell in the photo, but I popped the cardinal up on mini dimensionals for a little interest.

Like most easel-type projects, this sticky pad holder folds flat for gifting/mailing!

Affiliate links are used in this post at no cost to you – I really appreciate your support!

ScrapbookingStore products used:
December 2022 Scrapbook Kit with Upgrades

Other products used:
Cardstock/Paper: CutCardStock Kraft Chipboard and Scottish Highlands Green cardstock
Accessories: Tonic Studios 12″ Guillotine Paper Trimmer, Bearly Art precision craft glue, Stampin’ Up Mini Dimensionals, Eyelet Outlet bumpy red bling

I hope you’ve enjoyed today’s project and you’re thinking about all the fun you could have with this month’s kit… you really ought to think about joining the Subscription Club! Be sure to Follow us on Facebook, Instagram, Pinterest and YouTube for lots of crafty inspiration! And if you do decide to join the Subscription Club, join our ScrapbookingStore Club Member Group on Facebook for more inspiration and to share your projects! Thanks so much for stopping by today – we’ll see you next time!

Scrappy hugs,