you’re Eggstra special

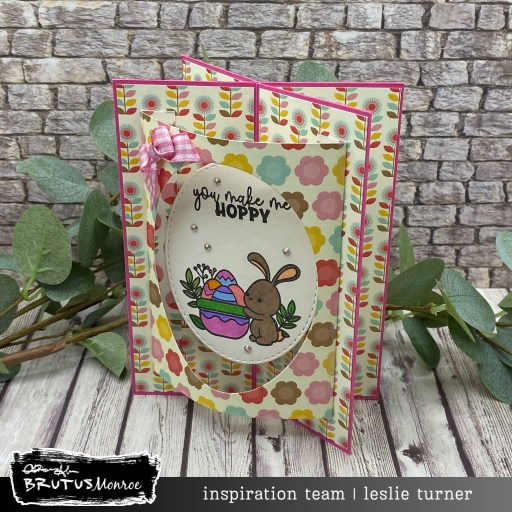
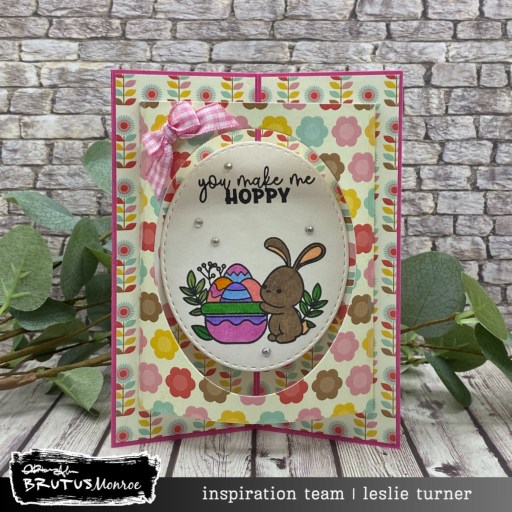
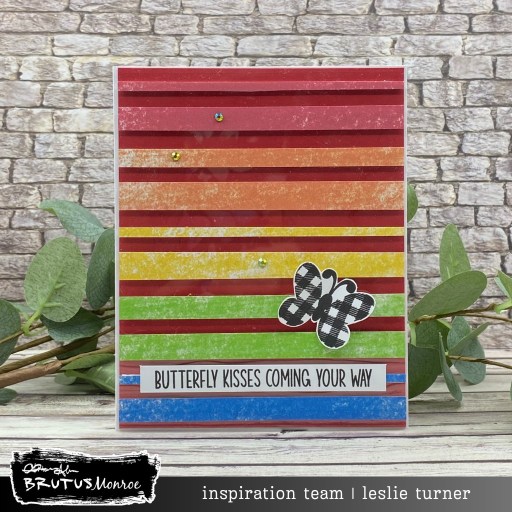
Hey everybody, happy Friday! I hope you’ve had a fabulous week and you’re looking forward to a restful and relaxing weekend. I’m thrilled to share a Brutus Monroe DT inspiration project with you today featuring our Hip Hop Hooray stamps, stencils and chipboard along with our Bunny Friends stamps and chipboard. This double easel fold is seriously one of the easiest-ever fun folds and it really packs a punch. And I just can’t get over the cuteness of all the Easter-themed crafty goodies in this latest release – be sure to check them out!

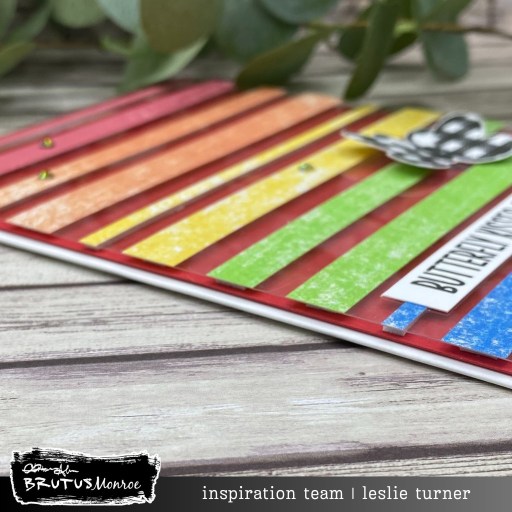
I cut the card base at 4-1/4″ x 11″ (scored at 5-1/2″) from CutCardStock Basis 110# Natural cardstock. Next, I cut the double easel panel at 4″ x 10-1/4″ (scored at 2-1/2″ and 5″) along with an embellishment strip approximately 3-5/8″ x 3/4″ from our Jack O Lantern cardstock. Finally, I cut two additional layering panels at 3-3/4″ x 5″ and 2-1/4″ x 3-3/4″ from a print in the Spring Floral 6×6 Paper Pack. I created the focal images for the front using the Hip Hop Hooray stamps and stencils with distress inks and chipboard companions. I also used a variety of markers in addition to the distress inks, and blinged out the eggs with some tiny colored gemstones in my stash. Just prior to adhering the focal images, I stamped a sentiment from the Hip Hop Hooray stamp set.

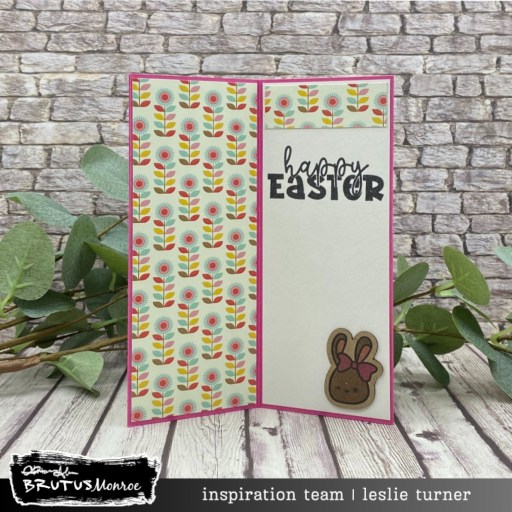
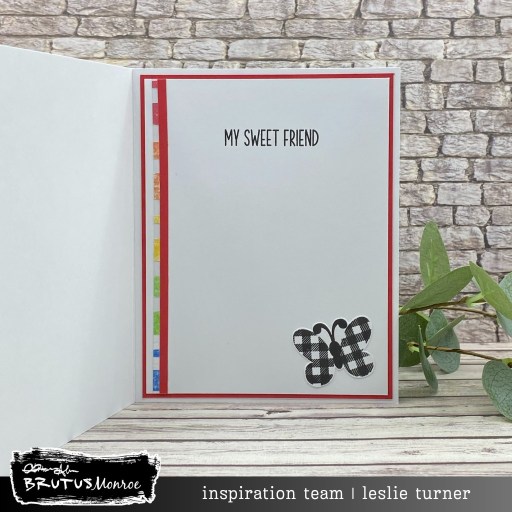
I cut the inside panel at 3-3/4″ x 5″ from CutCardStock Basis 80# Natural cardstock and embellished it with leftover strips of the patterned paper and cardstock used on the front. I stamped a sentiment from the same Hip Hop Hooray stamp set and layered it on a panel of Jack O Lantern cardstock cut at 4″ x 5-1/4″. The finishing touch was adding an additional chipboard bunny created with the Bunny Friends stamps and chipboard companions. All stamping on this card was done in our Raven ink.

Affiliate links are used in this post at no cost to you – I really appreciate your support!

Brutus Monroe products used:
BRU 8956 Hip Hop Hooray Stamp Set
BRU 9581 Hip Hop Hooray Chipboard Companions
BRU 0810 Hip Hop Hooray Layering Stencils
BRU 1018 Bunny Friends Stamp Set
BRU 1573-2 Bunny Friends Chipboard Companions
BRU 5437 Jack O Lantern Cardstock
BRU 4546 Spring Floral 6×6 Paper Pack
BRU 2543 Raven Detail 2×2 Ink

Other products used:
CARDSTOCK/PAPER: CutCardStock Basis 110# Natural and Basis 80# Natural cardstock
INK: Ranger distress inks- fossilized amber, peacock feathers and twisted citron; Copic Ciao Alcohol Markers- B18 Lapis Lauzuli, BG05 Holiday Blue, BV02 Prune, E04 Lipstick Rose, G05 Emerald Green, G94 Grayish Olive, R000 Cherry White, Y08 Acid Yellow, V15 Mallow, YR16 Apricot; Sakura Clear Star Gelly Roll pen; Bic Mark-It Fine Point Marker- Hot Aqua; Pentel Slicci Metallic Green pen
ACCESSORIES: Fiskars 12″ ProCision Rotary Bypass Paper Trimmer, Bearly Art precision craft glue, My Sweet Petunia Precision Glue Press, MISTI stamp tool, Big Shot, Catherine Pooler Detail Blending Brushes, Darice tiny gemstones in assorted colors

I hope you’ve enjoyed seeing this project and you’re inspired to get your craft on! Be sure to check out all the amazing stamps and dies, pigments and mists, cardstock and tools (just to name a few) at Brutus Monroe! And if you happen to have a sweet tooth and like to munch while you craft (like I do, lol), check out Scoozie’s Confections & Curiosities! OMG, I’m hooked! ;) Follow us on Facebook, Instagram and YouTube for tons of crafty inspiration! And come on over and join our Fan Club Facebook Group to share your crafty makes using our products! Thanks so much for stopping by today – we’ll see you next time!

Scrappy hugs,

Hip Hop Hooray

Hey everybody, happy hump day! I hope you’re having a great week! I’m delighted to share a Brutus Monroe DT inspiration project with you today featuring our Hoppy To See You Card Panels, Hip Hop Hooray Stamp Set, Bunny Friends Stamp Set and Lace Layers Nested Dies. These card panels are foilable although I chose not to do that this time. I colored this one and heat embossed it to make it shimmer. There’s nothing cuter than these little bunnies peeking out from behind the eggs! This Easter release is pretty darn cute and you need to check it out if you haven’t already. ;)

I grabbed a pre-scored card base and adhered a panel cut from Rouge cardstock along with a die cut Lace Layers panel cut from Cabbage cardstock. I colored the card panel (from the Hoppy To See You pack) with an assortment of markers, coated it with our embossing ink and some iridescent embossing powder from my stash, and then once again with some of our icicle embossing powder. This gave the panel a smooth finish. I stamped the bunnies from the Bunny Friends stamp set, colored them with alcohol markers and fussy cut them. The final step was stamping a sentiment from the Hip Hop Hooray stamp set in Memento Bamboo Leaves ink which I cut with a Love From Lizi stitched circle die.

I adhered a Rouge cardstock panel to the inside of the card base along with a slightly smaller Lace Layers panel cut from the Cabbage cardstock. I embellished a panel of Neenah Solar White cardstock with a leftover strip cut from the card panel on the front. Finally, I stamped a sentiment from the Hip Hop Hooray stamp set in Memento Bamboo Leaves ink, which completed the card.

Affiliate links are used in this post at no cost to you – I really appreciate your support!

Brutus Monroe products used:
BRU 9005-2 Hoppy To See You Card Panels
BRU 8956 Hip Hop Hooray Stamp Set
BRU 1018 Bunny Friends Stamp Set
BRU 6487 Lace Layers Nested Dies
BRU 2081 Clear Embossing 2×2 Ink
BRU 2517 Icicle Ultra Fine Embossing Powder
BRU 1729 Microfiber Stamp Cloth
BRU 5144 Pre-Scored Card Bases
BRU 6533 Rouge Cardstock
BRU 5482 Cabbage Cardstock
BRU 2543 Raven Detail 2×2 Ink

Other products used:
CARDSTOCK/PAPER: Neenah Classic Crest 80# Solar White cardstock
INK: Copic Ciao Alcohol Markers- E21 Soft Sun, R000 Cherry White, R20 Blush; Bic Mark-It Fine Point Markers- Hot Aqua, Fandango Pink, Pink Flamingo, Blue Skies Blue, Tiki Hut Tan, Margarita Green, Key Lime, Yellow Blaze, Sunset Orange, Rambunctious Red; Memento Bamboo Leaves ink, Memento Tuxedo Black Marker
DIES/PUNCHES: Love From Lizi Stitched Circle Nested Cutting Dies
ACCESSORIES: Fiskars 12″ ProCision Rotary Bypass Paper Trimmer, Bearly Art precision craft glue, My Sweet Petunia Precision Glue Press, MISTI stamp tool, Big Shot, Judi-Kins Iridescent Sparkle Embossing Powder, Spellbinders Detail Scissors, Scrapbook Adhesives Thin 3D Foam Squares

I hope you’ve enjoyed seeing this project and you’re inspired to get your craft on! Be sure to check out all the amazing stamps and dies, pigments and mists, cardstock and tools (just to name a few) at Brutus Monroe! And if you happen to have a sweet tooth and like to munch while you craft (like I do, lol), check out Scoozie’s Confections & Curiosities! OMG, I’m hooked! ;) Follow us on Facebook, Instagram and YouTube for tons of crafty inspiration! And come on over and join our Fan Club Facebook Group to share your crafty makes using our products! Thanks so much for stopping by today – we’ll see you next time!

Scrappy hugs,

you make me HOPPY

Hi friends, Happy Friday! Aren’t Fridays always happy?! I believe they are even when you’re retired… I always feel like I can freely do my own thing over the weekend with no interruptions from having to travel to doctor appointments! I’m delighted to share a Brutus Monroe DT inspiration project today featuring the uber adorable Make Me Hoppy stamps, Hip Hop Hooray stamps, and Bunny Friends stamps with chipboard. And of course I can’t leave out the gorgeous Spring Floral papers and Rouge cardstock! If you haven’t seen the March release yet, you really need to check it out – it’s chock full of Easter fun! I created a 3D Window Card which quickly rose to the top of my favorites list when I discovered it early last year on Lisa Curcio’s blog. Despite it’s complex look, it is an easy one.

I cut the pieces for the card base from Rouge cardstock along with layering panels from coordinating papers in the Spring Floral 6×6 Paper Pack. I stamped adorable bunny and basket (along with a sentiment) in Raven ink on a panel of CutCardStock Basis Natural cardstock, colored the image with an assortment of markers, and cut it with a Love From Lizi Stitched Oval Nested Cutting Die. I cut the aperture in the front panel with a slightly larger oval die and added the image in the center of the aperture. The finishing touch was adding a bow fashioned from Keep It Simple Back To Basics Rose Ribbon and some of our Light Pink Flat Back Crystals.

I cut one of the back panels from the Basis Natural cardstock and embellished it with a leftover piece of the Spring Floral paper used on the other panels. I grabbed the Hip Hop Hooray stamps and the Bunny Friends stamps with chipboard, and stamped the sentiment and bunny in Raven ink. LOVE how this turned out!

Affiliate links are used in this post at no cost to you – I really appreciate your support!

Brutus Monroe products used:
BRU 6533 Rouge Cardstock
BRU 4546 Spring Floral 6×6 Paper Pack
BRU 3710 Make Me Hoppy Stamp Set
BRU 8956 Hip Hop Hooray Stamp Set
BRU 1018 Bunny Friends Stamp Set
BRU 1573-2 Bunny Friends Chipboard Companions
BRU 2543 Raven Detail 2×2 Ink
BRU 7907 Light Pink Flat Back Crystals

Other products used:
CARDSTOCK/PAPER: CutCardStock Basis 80# Natural cardstock
INK: Bic Mark-It fine point markers- Key Lime, Margarita Green, Yellow Blaze, Pink Flamingo, Peach Parfait, Polynesian Purple, Oceanview Blue and Tiki Hut Tan; Copic Ciao E02 Fruit Pink
DIES/PUNCHES: Love From Lizi Stitched Oval Nested Cutting Dies
ACCESSORIES: Fiskars 12″ ProCision Rotary Bypass Paper Trimmer, Bearly Art precision craft glue, My Sweet Petunia Precision Glue Press, Nuvo Deluxe Adhesive, Mini MISTI, Big Shot, Trinity Pick Up Stick, Keep It Simple Back To Basics Rose Ribbon, small wooden bow maker

I hope you’ve enjoyed seeing this project and you’re inspired to get your craft on! Be sure to check out all the amazing stamps and dies, pigments and mists, cardstock and tools (just to name a few) at Brutus Monroe! And if you happen to have a sweet tooth and like to munch while you craft (like I do, lol), check out Scoozie’s Confections & Curiosities! OMG, I’m hooked! ;) Follow us on Facebook, Instagram and YouTube for tons of crafty inspiration! And come on over and join our Fan Club Facebook Group to share your crafty makes using our products! Thanks so much for stopping by today – we’ll see you next time!

Scrappy hugs,

Jelly Bean Shaker

Hi friends, Happy Tuesday! Are you gearing up for Easter – making any fun Easter crafts or planning to travel? We have no special plans (other than rejoicing in His resurrection) and I’ve made a few more whimsical Easter-themed cards that I’ll be sharing. This super cute jelly bean shaker that I created for Brutus Monroe features our amazing Jelly Bean stencil, Pink Flamingo Velveteen Glaze, Hip Hop Hooray stamps and chipboard, and our Occasional Greetings stamps. I also used a pre-scored card base and a variety of our cardstock to make the striped background. So much fun contained in one card, lol!

I started by creating an acetate panel of pink jelly beans using our Jelly Bean Mixed Media Stencil with Pink Flamingo Velveteen Glaze, a spatula and Deco Foil Stencil Pal on my 12″ Ranger-Wendy Vecchi Make Art Stay-tion. I let this dry overnight and then trimmed it to fit behind a frame cut from our Not Your Mamas cardstock using two Love From Lizi Stitched Rectangle Nested Cutting Dies. Next, I added a variety of different width strips of our Sea, Poison Apple, Aubergine and Rouge cardstock to a panel of Perfect Blend cardstock using an adhesive sheet, trimmed it down for the background panel, and adhered it to the front of a pre-scored card base.

The next step was adding the shaker mix created with several varieties of Keep It Simple Sprinkles. I always tend to over-stuff my shakers but I did a pretty good job on this one… leaving enough room to shake, shake, shake! I used the Hip Hop Hooray stamps and chipboard companion along with our Raven ink to create the adorable row of bunnies on the front which I colored with a variety of markers and attached with thin adhesive foam squares.

I cut the inside panel from Perfect Blend cardstock and embellished it with another frame cut from Sea cardstock. I stamped a sentiment from the Occasional Greetings stamp set in Raven ink, which completed the card. I totally love how this turned out!

Affiliate links are used in this post at no cost to you – I really appreciate your support!

Brutus Monroe products used:
BRU 3243 Jelly Bean Mixed Media Stencil
BRU 3641 Pink Flamingo Velveteen Glaze
BRU 3690 Heat Resistant Clear Acetate
BRU 8956 Hip Hop Hooray Stamp Set
BRU 9581 Hip Hop Hooray Chipboard Companions
BRU 5144 Pre-Scored A2 Card Bases
BRU 4013 Perfect Blend Cardstock
BRU 5529 Sea Cardstock
BRU 5505 Poison Apple Cardstock
BRU 5536 Aubergine Cardstock
BRU 6533 Rouge Cardstock
BRU 9494 Not Your Mamas Cardstock
BRU 2543 Raven Detail 2×2 Ink
BRU 9306 Occasional Greetings Stamp Set

Other products used:
INK: Copic Ciao alcohol marker- R000 Cherry White; Bic Mark-It fine point markers- Yellow Blaze Pink Flamingo, Fandango Pink, Sunset Orange, Blue Skies Blue and Tiki Hut Tan
DIES/PUNCHES: Love From Lizi Stitched Rectangle Nested Cutting Dies
ACCESSORIES: Fiskars 12″ ProCision Rotary Bypass Paper Trimmer, Bearly Art precision craft glue, My Sweet Petunia Precision Glue Press, MISTI stamp tool, Big Shot, spatula, Deco Foil Stencil Pal, Ranger-Wendy Vecchi 12″ Make Art Stay-tion, Scor-Tape 1/4″, Scrapbook Adhesives Adhesive Sheets, EK Tools Powder Tool, Scrapbook Adhesives 3D Foam Strips; Keep It Simple Paper Crafts Sprinkles- Beads-2mm Pearls, Polymer Clay-Light Green Sprinkles, Polymer Clay-Magenta Sprinkles, Polymer Clay-Eggplant Dots, Polymer Clay Spring Flower Mix, Beads-2mm Green Caviar Glass and Beads-2mm Purple Caviar Glass; Scrapbook Adhesives Thin 3D Foam Squares

I hope you’ve enjoyed seeing this project and you’re inspired to get your craft on! Be sure to check out all the amazing stamps and dies, pigments and mists, cardstock and tools (just to name a few) at Brutus Monroe! And if you happen to have a sweet tooth and like to munch while you craft (like I do, lol), check out Scoozie’s Confections & Curiosities! OMG, I’m hooked! ;) Follow us on Facebook, Instagram and YouTube for tons of crafty inspiration! And come on over and join our Fan Club Facebook Group to share your crafty makes using our products! Thanks so much for stopping by today – we’ll see you next time!

Scrappy hugs,

Glittered Bookmark

Hi friends, another Friday has rolled around and I hope you’ve had a great week. I’m delighted to share a Brutus Monroe DT inspiration project with you today featuring our amazing Doodle Bookmarks, Lace Layers Nested Dies, and Fallen Snow Glitter Glaze. I really enjoyed making this because bookmarks are trending right now and they make such awesome DIY gifts. I used to read quite a bit myself (Nancy Drew mysteries were my favorite as a teenager, lol) but gave it up years ago after having kids and just never picked it back up. These Doodle Bookmarks are really fun to color and even more fun watching them come to life as you’re creating with them. And the Lace Layers die cuts really make them frilly!

I chose one of the Doodle Bookmarks in the package, colored it with Bic Mark-It markers, and rounded the corners. I coated the bookmark with Fallen Snow Glitter Glaze using my Deco Foil Stencil Pal and let it dry overnight. I cut two Lace Layers die cuts from Raven cardstock which I pieced together vertically, and then backed the whole bookmark on a panel of Not Your Mamas cardstock for stability. I ran a Tuxedo Black Bic Mark-It around the edge of the bookmark and the white panel so all the layers would blend together nicely.

I added a panel of Raven cardstock to the back of the bookmark and stamped a sentiment from the Super Sentimental Stamp Set in Alabaster White ink. The finishing touch was adding some purple ribbon which I tied with a piece of Lawn Fawn Black Hemp Twine.

Affiliate links are used in this post at no cost to you – I really appreciate your support!

Brutus Monroe products used:
BRU 3416-2 Doodle Bookmarks
BRU 6487 Lace Layers Nested Dies
BRU 4505 Fallen Snow Glitter Glaze
BRU 9494 Not Your Mamas Cardstock
BRU 6519 Raven Cardstock
BRU 7985 Super Sentimental Stamp Set
BRU 2524 Alabaster Pigment White 2×2 Ink

Other products used:
INK: Bic Mark-It Fine Point Markers- Blue Skies Blue, Petal Pink, Fandango Pink, Polynesian Purple, Sunset Orange, Yellow Blaze, Key Lime, Tuxedo Black
DIES/PUNCHES: Kadomaru Pro Corner Rounder, 1/4″ hole punch
ACCESSORIES: Fiskars 12″ ProCision Rotary Bypass Paper Trimmer, Bearly Art precision craft glue, My Sweet Petunia Precision Glue Press, MISTI stamp tool, Big Shot, spatula, Deco Foil Stencil Pal, Really Reasonable Ribbon purple ribbon, Lawn Fawn Black Hemp Twine

I hope you’ve enjoyed seeing this project and you’re inspired to get your craft on! Be sure to check out all the amazing stamps and dies, pigments and mists, cardstock and tools (just to name a few) at Brutus Monroe! And if you happen to have a sweet tooth and like to munch while you craft (like I do, lol), check out Scoozie’s Confections & Curiosities! OMG, I’m hooked! ;) Follow us on Facebook, Instagram and YouTube for tons of crafty inspiration! And come on over and join our Fan Club Facebook Group to share your crafty makes using our products! Thanks so much for stopping by today – we’ll see you next time!

Scrappy hugs,

Butterfly Kisses

Hi friends, Happy Friday! I hope you’ve had a great week. We had THE best weather yesterday (sunny and in the mid 60s) for driving to our appointments and running our errands. We have some more cold stuff headed our way next week, though, so I guess Spring hasn’t really quite sprung yet. I’m delighted to share a Brutus Monroe DT inspiration project today featuring the amazing Rubbings Washi Sheet, Scarlet cardstock and Flying In To Say Stamp Set. I employed the ‘floating strips’ technique using strips cut from the washi sheet which I adhered to the back side of a panel of our Heat Resistant Clear Acetate and popped up on the front panel on foam strips. Super fun card that packs a punch – I always enjoy making cards with this technique.

I adhered a panel of Scarlet cardstock to the front of a Pre-Scored A2 Card Base. I affixed a panel of Heat Resistant Clear Acetate to my 7″ Make Art Stay-tion with magnets and then adhered various sizes of strips cut from the Rubbings Washi Sheet, leaving uniform space between each strip. I cut strips of Keep It Simple 2mm adhesive foam sheet which I stuck down on the back side of the acetate behind the washi sheet strips and adhered to the Scarlet cardstock panel.

I stamped a sentiment and two plaid butterflies from the Flying In To Say Stamp Set in Raven ink and fussy cut them. I bent the wings upward on one of them and adhered it to the card front, applying glue only to the body portion. I adhered the sentiment across the bottom and added Red Shift and Topaz Flat Back Crystals, which completed the card front.

I cut the inside panel from a leftover half of a pre-scored card base and embellished it with strips of the acetate and Scarlet panels used on the front. I stamped an additional sentiment from the Flying In To Say Stamp Set in Raven ink and attached the other stamped butterfly. I’ve also included an angled shot so you can see the dimension on the floating strips.

Affiliate links are used in this post at no cost to you – I really appreciate your support!

Brutus Monroe products used:
BRU 8031 Rubbings Washi Sheet
BRU 8404 Flying In To Say Stamp Set
BRU 5413 Scarlet Cardstock
BRU 3690 Heat Resistant Clear Acetate
BRU 2345 Red Shift Flat Back Crystals
BRU 0060 Topaz Flat Back Crystals
BRU 2543 Raven Detail 2×2 Ink
BRU 2828-2 Pre-Scored A2 Card Bases

Other products used:
ACCESSORIES: Fiskars 12″ ProCision Rotary Bypass Paper Trimmer, Bearly Art precision craft glue, My Sweet Petunia Precision Glue Press, MISTI stamp tool, Spellbinders Detail Scissors, Ranger-Wendy Vecchi 7″ Make Art Stay-tion, Scrapbook Adhesives E-Z Runner Permanent Strips, Keep It Simple 2mm Adhesive Foam Sheet, Trinity Pick Up Stick

I hope you’ve enjoyed seeing this project and you’re inspired to get your craft on! Be sure to check out all the amazing stamps and dies, pigments and mists, cardstock and tools (just to name a few) at Brutus Monroe! And if you happen to have a sweet tooth and like to munch while you craft (like I do, lol), check out Scoozie’s Confections & Curiosities! OMG, I’m hooked! ;) Follow us on Facebook, Instagram and YouTube for tons of crafty inspiration! And come on over and join our Fan Club Facebook Group to share your crafty makes using our products! Thanks so much for stopping by today – we’ll see you next time!

Scrappy hugs,

Hello Friend

Hey everybody! Another Friday has rolled around which means we’re a little closer to the end of March… daaaaang! I’m delighted to share a Brutus Monroe DT inspiration project today featuring our amazingly beautiful Wisteria Stamps and Dies along with a print in the Plaid Petals 6×6 Paper Pack. I also used our Aubergine cardstock and Violet Shift Crystals (among a few other BM products) to make this card come to life. I’ve made a few lattice cards over the past few years, getting my inspiration originally from Brandy Cox over at Brandy’s Cards. But this is the first one I’ve ‘enclosed’ by adhering a panel behind the front flap which was just a random idea I had. It’s a little different than the regular ‘open’ lattice version and I like it!

I have to admit, I cheated a little… I had the lattice card base already made for another design team product and decided not to use it. So, you know, it was laying on my craft desk just begging for some Brutus Monroe products to be added to it, lol! I had crafted the card base from Neenah Classic Crest 110# Solar White cardstock, cutting the lattice strips narrower on this card than those on any of the previous ones I’ve made. I cut a panel from a pre-scored card base and adhered it to the back of the front flap to enclose the lattice. And I don’t know why that random thought came into my head, but I went with it.

I added a panel of patterned paper from the Plaid Petals 6×6 Paper Pack to the top and then a panel of CutCardStock Glama Clear Natural Translucent Vellum over top of it to tone it down just a bit. Using the Wisteria stamp, I stamped the sentiment and focal image in Raven ink on Solar White, colored the image with alcohol markers, and cut it with the coordinating Wisteria die. The finishing touch was adding several Violet Shift Flat Back Crystals.

I adhered a panel of our Aubergine cardstock to the inside along with a slightly smaller panel cut from the other half of the pre-scored card base. I stamped another sentiment from the Wisteria stamp set in Raven ink, which completed this super easy card!

Affiliate links are used in this post at no cost to you – I really appreciate your support!

Brutus Monroe products used:
BRU 2047 Wisteria Stamp Set
BRU 2221 Wisteria Die Set
BRU 1322 Plaid Petals 6×6 Paper Pack
BRU 5536 Aubergine Cardstock
BRU 4247 Violet Shift Flat Back Crystals
BRU 2543 Raven Detail 2×2 Ink
BRU 2828-2 Pre-Scored A2 Card Bases

Other products used:
CARDSTOCK/PAPER: Neenah Classic Crest 110# Solar White cardstock, CutCardStock Glama Clear Natural Translucent Vellum
INK: Spectrum Noir Tri-Blends- YG1 and LV1/2
ACCESSORIES: Fiskars 12″ ProCision Rotary Bypass Paper Trimmer, Bearly Art precision craft glue, My Sweet Petunia Precision Glue Press, MISTI stamp tool, Big Shot, Scrapbook Adhesives Thin 3D Foam Squares, Trinity Pick Up Stick

I hope you’ve enjoyed seeing this project and you’re inspired to get your craft on! Be sure to check out all the amazing stamps and dies, pigments and mists, cardstock and tools (just to name a few) at Brutus Monroe! And if you happen to have a sweet tooth and like to munch while you craft (like I do, lol), check out Scoozie’s Confections & Curiosities! OMG, I’m hooked! ;) Follow us on Facebook, Instagram and YouTube for tons of crafty inspiration! And come on over and join our Fan Club Facebook Group to share your crafty makes using our products! Thanks so much for stopping by today – we’ll see you next time!

Scrappy hugs,

Sunny Friends ATCs

Hey everybody, Happy Friday! I hope you’ve had an awesome week! I’m thrilled to share a Brutus Monroe DT inspiration project with you today featuring our Sunny Friends Dies, Bee Yourself Stamp Set and Playful Patterns 6×6 Paper Pack. I also used our Not Your Mamas Cardstock, three solid color cardstock colors, and a variety of other BM products. You know how I love me some ATCs and it’s been a minute since I’ve made any… so I was ready! They were so much fun and I totally love how they turned out!

I started by die cutting all the pieces for the snail, lemon and bee focal images from Not Your Mamas Cardstock, and colored them with Copic Ciao alcohol markers. I assembled the focals and added some Fallen Snow Glitter Glaze dabbed onto spots of Bearly Art Glue, smeared them together, and set them aside to dry. I used a 1/2″ circle of our Heat Resistant Acetate to adhere the snail shell to since there were small spaces between the pieces.

I cut the 2-1/2″ x 3-1/2″ artist trading card bases from Not Your Mamas Cardstock as well as layering panels from prints in the Playful Patterns 6×6 Paper Pack, and rounded the corners on all of them. I cut a strip for each card (one from Sea, Harvest and Cabbage solid cardstock) and stamped a sentiment on each from the Bee Yourself stamp set in Raven ink. The finishing touch was adding Violet Shift, Emerald Green and Topaz Flat Back Crystals.

Here is a larger shot of each one… I love ’em!

Affiliate links are used in this post at no cost to you – I really appreciate your support!

Brutus Monroe products used:
BRU 9494 Not Your Mamas Cardstock
BRU 9837 Sunny Friends Cutting Dies
BRU 8596 Bee Yourself Stamp Set
BRU 4008 Playful Patterns 6×6 Paper Pack
BRU 5529 Sea Cardstock
BRU 7264 Harvest Cardstock
BRU 5482 Cabbage Cardstock
BRU 2543 Raven Detail 2×2 Ink
BRU 4505 Fallen Snow Glitter Glaze
BRU 8547 Stick and Stamp Mat 10 year Anniversary Edition
BRU 3690 Heat Resistant Clear Acetate
BRU 4247 Violet Shift Flat Back Crystals
BRU 6421 Emerald Green Flat Back Crystals
BRU 0060 Topaz Flat Back Crystals

Other products used:
INK: Copic Ciao- B23 Coral Sea, BV04 Blue Berry, C-3 Cool Gray, G99 Olive, R35 Coral, RV21 Light Pink, Y35 Maize, YG06 Yellowish Green, YR16 Apricot, 100 Black
DIES/PUNCHES: Kadomaru Pro Corner Rounder, Stampin’ Up 1/2″ Circle Punch
ACCESSORIES: Fiskars 12″ ProCision Rotary Bypass Paper Trimmer, Bearly Art precision craft glue, My Sweet Petunia Precision Glue Press, Mini MISTI, Big Shot, Scrapbook Adhesives Thin 3D Foam Squares, Trinity Pick Up Stick

I hope you’ve enjoyed seeing this project and you’re inspired to get your craft on! Be sure to check out all the amazing stamps and dies, pigments and mists, cardstock and tools (just to name a few) at Brutus Monroe! And if you happen to have a sweet tooth and like to munch while you craft (like I do, lol), check out Scoozie’s Confections & Curiosities! OMG, I’m hooked! ;) Follow us on Facebook, Instagram and YouTube for tons of crafty inspiration! And come on over and join our Fan Club Facebook Group to share your crafty makes using our products! Thanks so much for stopping by today – we’ll see you next time!

Scrappy hugs,

Happy Birthday

Hey everybody, happy Fri-YAY! Every day is Fri-YAY when you’re retired… there’s nothing more rewarding than being able to do whatever the heck you wanna do anytime you wanna do it! I’m delighted to share a Brutus Monroe DT inspiration project today featuring the amazing Doodle Bookmarks, Lace Layers Nested Dies, Vintage Plaid paper, and Super Sentimental stamp set. Of course, I used a boat-load of other awesome BM products to make this fun birthday mini slimline card, and I love how it turned out!

I started by coloring a Doodle Bookmark with an assortment of bold color markers. I covered the entire bookmark with embossing ink and then heat embossed it in Icicle embossing powder. I repeated the process two more times which gave the bookmark some awesome shine.

I cut my go-to size of 3-1/2″ x 6″ mini slimline card base from Raven cardstock along with layering panels from Vintage Plaid 6×6 paper and Not Your Mamas cardstock. I die cut a sentiment panel from a Lace Layers Nested Die along with a small Raven cardstock panel. I stamped a sentiment from the Super Sentimental stamp set in Alabaster White ink, and added a few Blue Shift Flat Back Crystals.

I cut the inside panel from Perfect Blend cardstock and embellished it with leftover strips of Vintage Plaid paper and Raven cardstock. I stamped another sentiment from the Super Sentiment stamp set in Raven ink, and this completed the the card.

Affiliate links are used in this post at no cost to you – I really appreciate your support!

Brutus Monroe products used:
BRU 3416-2 Doodle Bookmarks
BRU 6487 Lace Layers Nested Dies
BRU 4929 Vintage Plaid 6×6 Paper Pack
BRU 7985 Super Sentimental Stamp Set
BRU 2081 Embossing 2×2 Ink
BRU 2517 Icicle Ultra Fine Embossing Powder
BRU 2524 Alabaster Pigment White 2×2 Ink
BRU 6519 Raven Cardstock
BRU 9494 Not Your Mamas Cardstock
BRU 4013 Perfect Blend Cardstock
BRU 2543 Raven Detail 2×2 Ink
BRU 8699 Blue Shift Flat Back Crystals
BRU 9569 Squeaky Clean Lavender Stamp Cleaner
BRU 1729 Microfiber Stamp Cloth

Other products used:
INK: Bic Mark-It fine point markers- Rambunctious Red, Sunset Orange, Yellow Blaze, Margarita Green, Forest Green, Blue Skies Blue, Hot Aqua, Polynesian Purple, Fandango Pink, Peach Parfait
ACCESSORIES: Fiskars 12″ ProCision Rotary Bypass Paper Trimmer, Bearly Art precision craft glue, My Sweet Petunia Precision Glue Press, Mini MISTI, Big Shot, Scrapbook Adhesives 3D Thin Foam Squares, Trinity Pick Up Stick

I hope you’ve enjoyed seeing this project and you’re inspired to get your craft on! Be sure to check out all the amazing stamps and dies, pigments and mists, cardstock and tools (just to name a few) at Brutus Monroe! And if you happen to have a sweet tooth and like to munch while you craft (like I do, lol), check out Scoozie’s Confections & Curiosities! OMG, I’m hooked! ;) Follow us on Facebook, Instagram and YouTube for tons of crafty inspiration! And come on over and join our Fan Club Facebook Group to share your crafty makes using our products! Thanks so much for stopping by today – we’ll see you next time!

Scrappy hugs,

hello

Hi friends, happy Tuesday! I hope your week is off to a nice start. I’m delighted to share a Brutus Monroe DT inspiration project today featuring the amazing Emma A2 Stencil and Super Sentimental Stamp Set. Isn’t that stencil delightful?! I also used several other Brutus Monroe products to make this card come to life, and I really love how it turned out. It’s been a while since I used any distress oxide inks and honestly, I had forgotten how awesome they blend! I totally need to get these out more often.

I grabbed a piece of Perfect Blend 4.25″ x 5.5″ cardstock (which is excellent for ink blending and alcohol marker coloring) and stuck it down on my Stamp & Stick Mat which I attached to my 12″ Make Art Stay-tion with magnets. I used the Emma stencil with peeled paint, picked raspberry and seedless preserves distress oxide inks to create the background. I cut a layering panel from Raven cardstock and cut the corners of both panels with the Spellbinders 3 in 1 Notched Corners Punch.

I cut an A2 size side-folding card base from Not Your Mamas cardstock and adhered the panels to the front. I stamped a sentiment from the Super Sentimental stamp set on Raven cardstock in Alabaster White ink, trimmed it into a flag, and adhered to the card front. The finishing touch was adding a few Hematite Flat Back Crystals.

I trimmed another panel of Perfect Blend and Raven cardstock for the inside and notched the corners with the Spellbinders punch. I stamped another sentiment from the Super Sentimental stamp set in Raven ink and colored the tiny hearts with a Copic Ciao V15 alcohol marker.

Affiliate links are used in this post at no cost to you – I really appreciate your support!

Brutus Monroe products used:
BRU 6868 Emma A2 Stencil
BRU 7985 Super Sentimental Stamp Set
BRU 4013 Perfect Blend Cardstock
BRU 6519 Raven Cardstock
BRU 9494 Not Your Mamas Cardstock
BRU 2524 Alabaster White Ink
BRU 2543 Raven Ink
BRU 8530 Hematite Flat Back Crystals
BRU 8547 Stick & Stamp Mat 10-yr Anniversary Edition

Other products used:
INK: Ranger Distress Oxide Inks- peeled paint, picked raspberry, seedless preserves; Copic Ciao V15 Mallow
DIES/PUNCHES: Spellbinders 3 in 1 Notched Corners Punch
ACCESSORIES: Fiskars 12″ ProCision Rotary Bypass Paper Trimmer, Bearly Art precision craft glue, My Sweet Petunia Precision Glue Press, Ranger-Wendy Vecchi Make Art Stay-tion 12″, SB Detail Scissors, Mini MISTI, Big Shot, blending brushes, Trinity Pick Up Stick

I hope you’ve enjoyed seeing this project and you’re inspired to get your craft on! Be sure to check out all the amazing stamps and dies, pigments and mists, cardstock and tools (just to name a few) at Brutus Monroe! And if you happen to have a sweet tooth and like to munch while you craft (like I do, lol), check out Scoozie’s Confections & Curiosities! OMG, I’m hooked! ;) Follow us on Facebook, Instagram and YouTube for tons of crafty inspiration! And come on over and join our Fan Club Facebook Group to share your crafty makes using our products! Thanks so much for stopping by today – we’ll see you next time!

Scrappy hugs,