Fall Greetings

Hey everybody! I hope you had a good weekend and are keeping relatively cool. Our temps have reached the 90s here (while everybody else around us has been in the low 100s) and I’m now ready for Fall, lol! I’m up on the CutCardStock blog today with a tutorial for making a shaped Fall-themed card. Our orange, brown and gold cardstock is on sale this month so I used Coffee Bean and Brick Orange from our new Lessebo line paired with our Gold Glitter cardstock. I also used Lessebo Dawn Maroon and my studio staple, Neenah Classic Crest Solar White. This is the first time I’ve used this background stamp from Taylored Expressions and I really love how this card turned out. I see lots of different color palettes being used with this stamp for various seasons or holidays. ;)

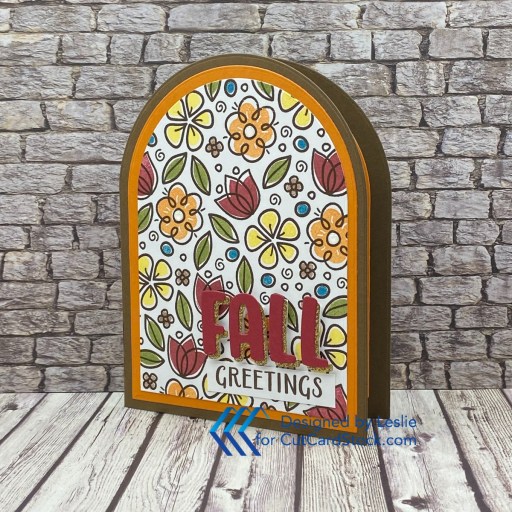
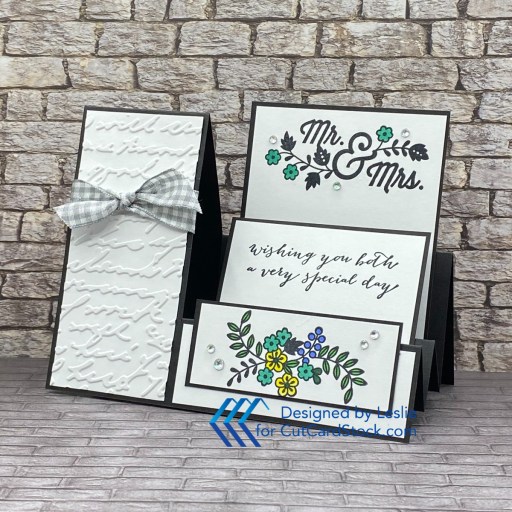
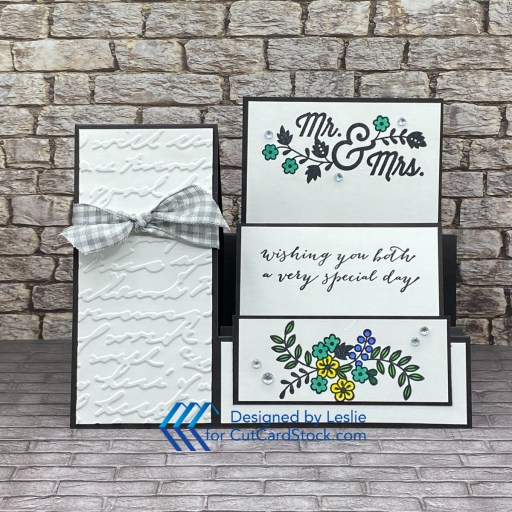
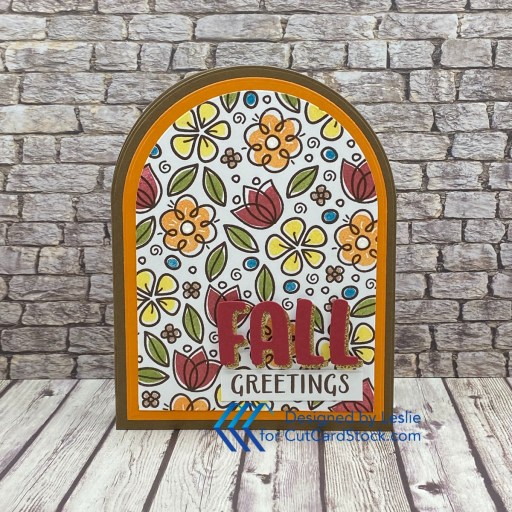
I started by stamping the background in Catherine Pooler Icing on the Cake ink on Neenah Classic Crest Solar White cardstock using the Taylored Expressions In Bloom cling stamp. Then, using the coordinating clear stamps, I filled in the blooms and leaves using Catherine Pooler Daydream, Over Coffee, Peppermint Scrub, Tiara, Orange Peel and Eucalyptus inks. I added several small Eyelet Outlet clear glitter enamel dots to the center of three of the blooms.

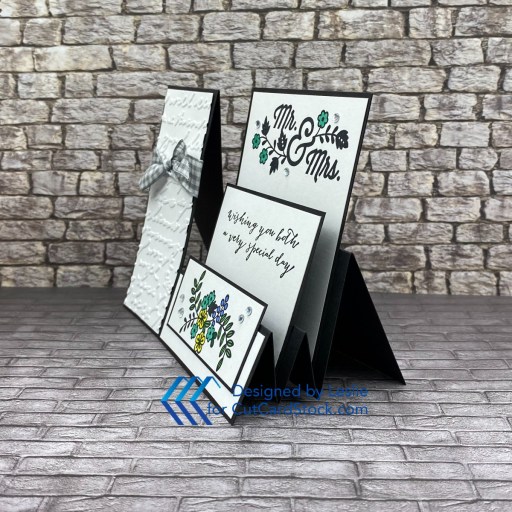
Next, using the Scrapbook.com Nested A2 Arches dies, I cut the card base from Lessebo Coffee Bean and layering panels from Lessebo Brick Orange and the stamped Solar White cardstock panel. I die cut the F-A-L-L letters from Lessebo Dawn Maroon and Gold Glitter using the KIS Cuts Twinkling Stars Font which I layered together in an offset fashion. I stamped the second portion of the sentiment on a Solar White scrap in Icing on the Cake ink (using the Keep It Simple Autumn Charm Autumn Sentiments stamp set) which I trimmed.

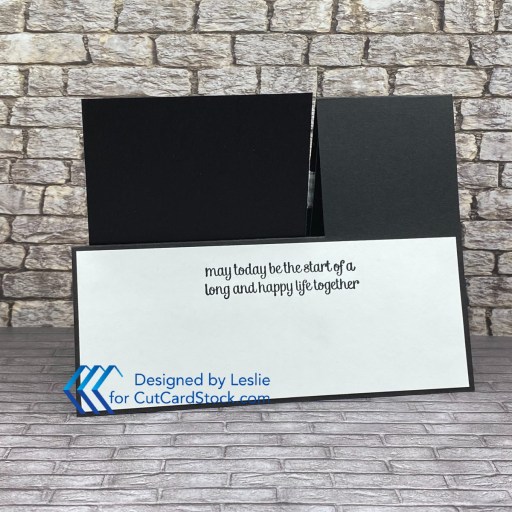
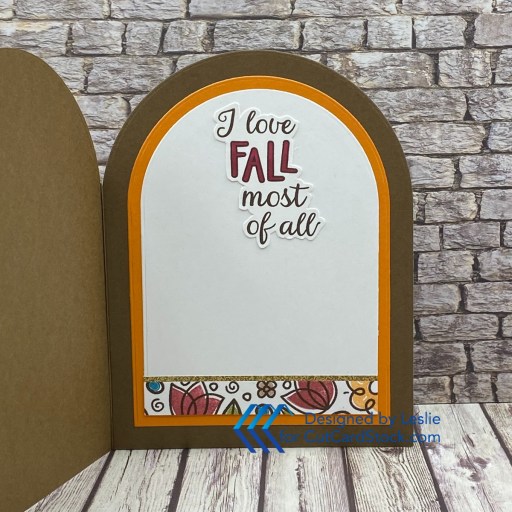
Using the same arched dies, I cut the inside panels from Lessebo Brick Orange and Solar White cardstock and embellished the bottom with leftover strips of the stamped background and gold glitter cardstock used on the front. I stamped another sentiment from the Keep It Simple Autumn Charm Autumn Sentiments stamp set on a scrap piece of Solar White cardstock, fussy cut it and colored the word ‘Fall’ with an alcohol marker.

Affiliate links are used in this post at no cost to you – I really appreciate your support!

CutCardStock products used:
Lessebo Coffee Bean cardstock
Lessebo Brick Orange cardstock
Lessebo Dawn Maroon cardstock
Neenah Classic Crest 80# Solar White cardstock
Gold Glitter cardstock

Other products used:
STAMPS: Taylored Expressions In Bloom Cling & Clear Combo, Keep It Simple Autumn Charm Autumn Sentiments stamp set
INK: Catherine Pooler Icing on the Cake, Daydream, Over Coffee, Peppermint Scurb, Tiara, Orange Peel and Eucalyptus inks; Spectrum Noir Tri-Blends DR4
DIES/PUNCHES: Scrapbook.com Nested A2 Arches dies, KIS Cuts Twinkling Stars Font dies
ACCESSORIES: Fiskars 12″ ProCision Rotary Bypass Paper Trimmer, My Sweet Petunia Precision Glue Press, Nuvo Deluxe Adhesive, MISTI stamp tool, Big Shot, Eyelet Outlet clear glitter enamel dots, Scrapbook.com Double-Sided Foam Adhesive Squares

I hope you’ve enjoyed today’s project and you’re inspired to get crafty! Be sure to check out all the awesome cardstock and other goodies at CutCardStock (adhesives, labels, stickers, pens, watercolors and ribbon to name a few). And head on over to the CutCardStock Facebook Page and for more inspiration! Also, be sure to join our Creating with CutCardStock Facebook Group for even more crafty inspiration! Thanks so much for stopping by today – we’ll see you next time!

Scrappy hugs,

Mr. & Mrs.

Hey everybody! Happy Monday – here’s wishing you a wonderful week! I’m up on the CutCardStock blog today with a tutorial for making a side step wedding card featuring our Lessebo Pitch Black and White cardstock. I totally love a black and white color combo with just a pop of color. B&W can be used for nearly any occasion but I think it’s most dramatic for a wedding card. I typically make center step cards for some reason so I made a side step card this time with standing panels which was a fun change!

I cut the card base and three standing panels from Lessebo Pitch Black cardstock along with layering panels from Lessebo White cardstock. I dry embossed the vertical panel on the left with the Cuttlebug Script Embossing Folder and tied a gray gingham ribbon. I stamped sentiments and images from the Stampin’ Up For The New Two stamp set in Memento Tuxedo Black ink on the three standing panels, adding just a little bit of color. The finishing touch was adding a few iridescent gemstones.

I added a panel to the back with an additional sentiment. I’ve included a side angle shot so you can see the construction. This is a fun one! ;)

Affiliate links are used in this post at no cost to you – I really appreciate your support!

CutCardStock products used:
Lessebo Pitch Black cardstock
Lessebo White cardstock

Other products used:
STAMPS: Stampin’ Up For The New Two stamp set
INK: Memento Tuxedo Black ink; Sharpie Ultra Fine Point markers- blue, aqua, yellow, light green, medium green
ACCESSORIES: Fiskars 12″ ProCision Rotary Bypass Paper Trimmer, Fiskars 12″ SureCut Paper Trimmer, Elmer’s Craft Bond Tape Runner, Bearly Art precision craft glue, Big Shot, Cuttlebug Script Embossing Folder, Really Reasonable Ribbon gray gingham ribbon, 1/4″ red liner tape, MISTI stamp tool, clear iridescent gemstones

I hope you’ve enjoyed today’s project and you’re inspired to get crafty! Be sure to check out all the awesome cardstock and other goodies at CutCardStock (adhesives, labels, stickers, pens, watercolors and ribbon to name a few). And head on over to the CutCardStock Facebook Page and for more inspiration! Also, be sure to join our Creating with CutCardStock Facebook Group for even more crafty inspiration! Thanks so much for stopping by today – we’ll see you next time!

Scrappy hugs,

USA – Land that I Love

Hey everybody! Happy Wednesday – I hope you’re having a great week! Happy (almost) 4th of July to all my friends in the States. I’m up on the CutCardStock blog today with a tutorial for making a slide and lock fun fold. Yep, I squeezed one more July 4th project in. This is a fun card to make and I also have the written instructions in the Freebies section of my blog HERE if you’d like to learn how to make it. My inspiration came from Lisa Curcio’s blog originally but I ended up putting my own spin on it. And I couldn’t resist using Keep It Simple Sprinkles and items from the new Stars & Stripes Collection which really complimented the cardstock! ;)

I cut the card base and a circle from Lessebo Misty Blue cardstock along with layering panels from coordinating prints in the Keep It Simple Stars & Stripes 12×12 Collection Pack. I gathered a couple die cuts from the KIS Stars & Stripes Die Cut Pieces and set everything aside to work on the shaker.

I made the shaker using Lessebo Misty Blue cardstock, a striped print in the KIS Stars & Stripes 12×12 Collection Pack, and the KIS Stitched Squares Nested Dies. The shaker mix consisted of five varieties of KIS Sprinkles. I stamped the girl gnome from the KIS Stars & Stripes Gnome of the Brave Collection Stamps on Neenah Classic Crest 110# Solar White cardstock, colored it with a variety of markers, and cut it with the coordinating Outline Die. I adhered the gnome to the shaker with 3D foam squares.

I cut the slide and lock track into the card base using my Fiskars SureCut paper trimmer. I affixed the shaker to the left side of the card base with 3D foam squares and the die cut circle on the back side. I added the two banner die cuts and a few enamel dots to the card front. The finishing touch was adding a couple small stars punched from Lessebo Dawn Maroon and Lessebo White cardstock.

I cut the inside panel from 80# Solar White and embellished it with a narrow strip of Lessebo Dawn Maroon cardstock and a leftover strip of the hearts and stars paper used on the front. I stamped a sentiment from the KIS Gnome of the Brave Collection Stamps in Memento Tuxedo Black ink. I added a couple stamped and colored hearts, and a star punched from Lessebo White cardstock.

Affiliate links are used in this post at no cost to you – I really appreciate your support!CutCardStock products used:
Neenah Classic Crest Solar White cardstock
Lessebo Misty Blue cardstock
Lessebo Dawn Maroon cardstock
Lessebo White cardstock

Other products used:
PAPER: Keep It Simple Stars & Stripes 12×12 Collection Pack
STAMPS: Keep It Simple Stars & Stripes Gnome of the Brave Collection Stamps
INK: Memento Tuxedo Black ink; Spectrum Noir Tri-Blends- AP2, FS6/7/8, TB3/4; Sharpie Ultra Fine Point Markers- light blue, medium blue, red and brown; Bic Mark-Its- Rambunctious Red and Honey Brown; Sakura Clear Star Gelly Roll Pen
DIES/PUNCHES: Keep It Simple Stitched Squares Nested Dies and Stars & Stripes Gnome of the Brave Outline Dies, Stampin’ Up Itty Bitty Star Punch
ACCESSORIES: Fiskars 12″ ProCision Rotary Bypass Paper Trimmer, Bearly Art precision craft glue, MISTI stamp tool, Big Shot, Grafix Crystal Clear Craft Plastic, 1/8″ red liner tape, GKD Shaker Strips; Keep It Simple Sprinkles- Polymer Clay American Flags, Polymer Clay Baby Blue Stars, Polymer Clay Coffee Sprinkles, Beads 2mm Matte Red, and Beads 2mm Caviar Glass Blue Mix; Keep It Simple Stars & Stripes Die Cut Pieces and Enamel Dots, Scrapbook Adhesives 3D Foam Squares (large black)

I hope you’ve enjoyed today’s project and you’re inspired to get crafty! Be sure to check out all the awesome cardstock and other goodies at CutCardStock (adhesives, labels, stickers, pens, watercolors and ribbon to name a few). And head on over to the CutCardStock Facebook Page and for more inspiration! Also, be sure to join our Creating with CutCardStock Facebook Group for even more crafty inspiration! Thanks so much for stopping by today – we’ll see you next time!

Scrappy hugs,

Red, White and Boom!

Hi everyone! Happy Wednesday – and can you believe we’re on a rapid downslide to the end of June already?! I’m up on the CutCardStock blog today with a tutorial for making a fun Independence Day card featuring strips of Cherry Red, White, and Navy Blue cardstock from our new Lessebo line which I paired with our Bright Silver Foil cardstock. The Lessebo colors and weight are wonderful, and it if you’re using it for a card base, it folds without cracking. Can’t say that about all the brands out there.

I cut a standard A2 size side-folding card base and layering panel (what, no fun fold?!) from Lessebo White cardstock along with a layering panel from Bright Silver Foil. Using the Scrapbook.com Slim Strip dies, I cut a variety of strips from Lessebo Cherry Red, White and Navy Blue and adhered them in diagonal fashion across the white layering panel. I stamped a fireworks burst in the top left quadrant in Catherine Pooler Juniper Mist ink and added a sentiment (stamped in the same ink) cut with a Keep It Simple Stitched Rectangles Nested Die. The finishing touch was adding several pearls from the Kat Scrappiness Silver Pearl Mix.

I cut the inside panel from Lessebo White and embellished it with strips of Bright Silver Foil and Lessebo Navy Blue. I stamped the sentiment from the same Red White and Boom stamp set in Catherine Pooler Juniper Mist ink and layered the panel on Lessebo Cherry Red.

Affiliate links are used in this post at no cost to you – I really appreciate your support!

CutCardStock products used:
Lessebo Cherry Red cardstock
Lessebo White cardstock
Lessebo Navy Blue cardstock
Bright Silver Foil cardstock

Other products used:
STAMPS: The Project Bin Red White & Boom stamp set
INK: Catherine Pooler Juniper Mist ink
DIES/PUNCHES: Scrapbook.com Long Strips Decorative Die Set, Keep It Simple Stitched Rectangles Nested Dies
ACCESSORIES: Fiskars 12″ ProCision Rotary Bypass Paper Trimmer, Elmer’s Craft Bond Tape Runner, Bearly Art precision craft glue, MISTI stamp tool, Big Shot, Kat Scrappiness Silver Pearl Mix

I hope you’ve enjoyed today’s project and you’re inspired to get crafty! Be sure to check out all the awesome cardstock and other goodies at CutCardStock (adhesives, labels, stickers, pens, watercolors and ribbon to name a few). And head on over to the CutCardStock Facebook Page and for more inspiration! Also, be sure to join our Creating with Card Stock Facebook Group for even more crafty inspiration! Thanks so much for stopping by today – we’ll see you next time!

Scrappy hugs,

Too Much Space

Hey everybody, Happy Tuesday! I hope your week has started off on a nice note! I’m up on the CutCardStock blog today with a tutorial for making a front flap card which is one of my most favorite fun folds. All of our red, white and blue cardstock is on sale this month, so I used Navy Blue and White cardstock from our new Lessebo line to make this outer space themed ‘missing you’ card. How stinkin’ cute is this guy in his space craft?!

I don’t have any written instructions for this fold because I’ve been making these for years, but it really is a very simple card to make. In a nutshell, the base is a flat A2 size embellished with a patterned paper layering panel. Then a narrower top folding front flap card (any width you want) is adhered to the front. You can embellish this smaller card with the same patterned paper that you used on the base or you can use a coordinating print. The focal image can be a stamped image, a die cut, or a large sentiment, and is positioned partly off the flap for a little interest. A white panel is adhered to the inside for a sentiment and signature. That’s it! ;)

I cut the card base and front flap card from Lessebo Navy Blue along with layering panels from the Craft Consortium Ink Drops-Vivid 6×6 paper pad. I stamped the Milky Way image and sentiments from The Project Bin in Catherine Pooler Juniper Mist ink on Lessebo White cardstock, cut the image with the coordinating die and trimmed the sentiments into strips. The finishing touch was adding several Eyelet Outlet 5mm blue pearls.

I cut the inside panel from Lessebo white and added the stamped sentiment.

Affiliate links are used in this post at no cost to you – I really appreciate your support!

CutCardStock products used:
Lessebo Navy Blue
Lessebo White

Other products used:
PAPER: Craft Consortium Ink Drops-Vivid 6×6 paper pad
STAMPS: The Project Bin Milky Way stamps
INK: Catherine Pooler Juniper Mist ink
DIES/PUNCHES: The Project Bin Milky Way die
ACCESSORIES: Cricut Paper Trimmer, Elmer’s Craft Bond Tape Runner, Bearly Art precision craft glue, MISTI stamp tool, Big Shot, Eyelet Outlet 5mm blue pearls

I hope you’ve enjoyed today’s project and you’re inspired to get crafty! Be sure to check out all the awesome cardstock and other goodies at CutCardStock (adhesives, labels, stickers, pens, watercolors and ribbon to name a few). And head on over to the CutCardStock Facebook Page and for more inspiration! Also, be sure to join our Creating with Card Stock Facebook Group for even more crafty inspiration! Thanks so much for stopping by today – we’ll see you next time!

Scrappy hugs,

Dragonflies for Good Luck

Hey everybody! I hope you had a great weekend! If you’re in the States, today is Memorial Day so please take a moment to remember, honor and mourn all the American soldiers who made the ultimate sacrifice for our freedom. On a lighter note, I’m up on the CutCardStock blog today with a tutorial for making a fun one-piece Z-fold card. Stardream Metallic has been on sale this month for 10% off, so I used the gorgeous Stardream Metallic Flame which I paired with Bright Gold Foil and Solar White for this good luck card. I’ve always made Z-folds with separate strips so I thought it would be fun to simplify the design into one piece. I added my instructions for this one-piece Z-fold to the Freebies section of my blog HERE if you’d like to make one.

I cut the card base from Neenah Classic Crest 110% Solar White and layering panels from Stardream Metallic Flame and Bright Gold Foil cardstock. I stamped four dragonflies on Solar White cardstock in Memento Tuxedo Black ink using the Pajama Crafter Stamps Dainty Dragonflies stamp set by Prickley Pear Stamps. I colored them with ultra fine point Sharpies and cut them with the coordinating Dainty Dragonflies die set. I adhered the bottom right dragonfly to an acetate strip to give the illusion of flight.

I stamped the sentiment from the Stampin’ Up Charming Sentiments stamp set in Catherine Pooler Orange Peel ink and cut it with the coordinating Sentiment Silhouettes die set. For a little visual interest, I layered three small stitched circles and one slightly larger one (all cut with the Keep It Simple Stitched Circles Nested Dies) on which I adhered the sentiment. I added the dragonflies and several pearls from the Kat Scrappiness Gold Pearl Mix which completed the card front.

I stamped another sentiment from the same stamp set in orange ink, cut it with a stitched rectangle (cut with a Keep It Simple Stitched Rectangles Nested Dies) and layered it on a slightly larger rectangle cut from the Flame cardstock.

Affiliate links are used in this post at no cost to you – I really appreciate your support!

CutCardStock products used:
Neenah Classic Crest 110# and 80# Solar White cardstock
Stardream Metallic Flame cardstock
Bright Gold Foil cardstock

Other products used:
STAMPS: Pajama Crafter Stamps Dainty Dragonflies stamp set by Prickley Pear Stamps, Stampin’ Up Charming Sentiments stamp set
INK: Memento Tuxedo Black ink; Sharpie Ultra Fine Point Markers- orange, yellow, light pink, teal and brown; Spectrum Noir Tri-Blends GY3, Catherine Pooler Orange Peel ink
DIES/PUNCHES: Pajama Crafter Stamps Dainty Dragonflies die set by Prickley Pear Stamps, Keep It Simple Stitched Circles and Stitched Rectangles Nested Dies, Stampin’ Up Sentiment Silhouettes die set
ACCESSORIES: Fiskars 12″ ProCision Rotary Bypass Paper Trimmer, Cricut Paper Trimmer, Elmer’s Craft Bond Tape Runner, Bearly Art precision craft glue, MISTI stamp tool, Big Shot, orange and clear gemstones, Grafix Crystal Clear Craft Plastic, Therm O Web Zots adhesive dots, Kat Scrappiness Gold Pearl Mix

I hope you’ve enjoyed today’s project and you’re inspired to get crafty! Be sure to check out all the awesome cardstock and other goodies at CutCardStock (adhesives, labels, stickers, pens, watercolors and ribbon to name a few). And head on over to the CutCardStock Facebook Page and for more inspiration! Also, be sure to join our Creating with Card Stock Facebook Group for even more crafty inspiration! Thanks so much for stopping by today – we’ll see you next time!

Scrappy hugs,

Baby Boy Bun in the Oven

Hey everybody, Happy Tuesday! I hope all the moms (to humans or furbabies) out there had a beautiful Mother’s Day! We had wonderful weather here – still a bit chilly and windy – but beautiful nonetheless! I’m up on the CutCardStock blog today with a tutorial for making a super cute oven box card with a baby boy ‘bun in the oven’ theme! I used Stardream Metallic cardstock (on sale throughout the month of May) which I paired with Lessebo cardstock. This is actually the second one of these oven box cards I’ve made so it went together pretty fast. I created the first one in a pink baby girl theme for a guest design project coming up in a couple of weeks, so stay tuned for a ‘mostly the same but slightly different’ version!

Using the Spellbinders Pop-Up 3D Vignette What’s Bakin’ Oven dies, I cut all the pieces from CutCardStock Stardream Metallic Sapphire, Stardream Metallic Vista, Stardream Metallic Silver, Lessebo Ivory, Lessebo Pitch Black, Lessebo Coffee Bean, and Lessebo Cherry Red. I used Grafix Crystal Clear Acetate for the ‘glass’ in the oven door, along with pieces of Scrapbook Adhesives 3D Foam Squares to pop up the cookie sheet, oven mitts and utensils.

The assembly is always the most fun part of making 3D projects and this one was no different! I used the Keep It Simple Stitched Rectangles Nested Dies to cut a panel from Lessebo Ivory cardstock for the back of the oven. I stamped a sentiment from the Stampin’ Up Happy & Heartfelt stamp set in Memento Tuxedo Black ink which completed the card.

Here are a couple angled shots and two more shots showing that the top of the oven opens so the card can fold flat for mailing. I just love it!

Affiliate links are used in this post at no cost to you – I really appreciate your support!

CutCardStock products used:
Stardream Metallic Sapphire cardstock
Stardream Metallic Vista cardstock
Stardream Metallic Silver cardstock
Lessebo Ivory cardstock
Lessebo Pitch Black cardstock
Lessebo Coffee Bean cardstock
Lessebo Cherry Red cardstock

Other products used:
STAMPS: Stampin’ Up Happy & Heartfelt stamp set
INK: Memento Tuxedo Black ink
DIES/PUNCHES: Spellbinders Pop-Up 3D Vignette What’s Bakin’ Oven dies, Keep It Simple Stitched Rectangles Nested Dies
ACCESSORIES: Fiskars 12″ ProCision Rotary Bypass Paper Trimmer, Bearly Art precision craft glue, MISTI stamp tool, Big Shot, Grafix Crystal Clear Craft Plastic, red liner tape, Scrapbook Adhesives 3D Foam Squares (small white)

I hope you’ve enjoyed today’s project and you’re inspired to get crafty! Be sure to check out all the awesome cardstock and other goodies at CutCardStock (adhesives, labels, stickers, pens, watercolors and ribbon to name a few). And head on over to the CutCardStock Facebook Page and for more inspiration! Also, be sure to join our Creating with Card Stock Facebook Group for even more crafty inspiration! Thanks so much for stopping by today – we’ll see you next time!

Scrappy hugs,

forever and ever more

Hi everyone! Happy Thursday – I hope you have something fun planned this weekend! I’m up on the CutCardStock blog today with a tutorial for making a masculine style anniversary card featuring our Lessebo Granite Gray and Cement Gray along with Bright Gold Foil. It seems that most anniversary cards appeal to the lady, so I used some cool metal textures papers in my stash which give this card a masculine feel. I then added floral and butterfly ephemera and gold pearls for the feminine flair, hopefully appealing to both the lady and gentleman. You know how much I love me some fun folds, and I really enjoyed putting this particular version of the corner fold card together! Be sure to visit the CutCardStock website this month for a variety of sales (one each week) on closeout and overstock items!

I cut a standard size side-folding A2 card base from Lessebo Granite Gray cardstock along with layering panels from Bright Gold Foil and two coordinating Craft Consortium Metal Textures papers. I grabbed several 49 and Market Curators Botanical Ephemera Bits and adhered the largest one with 1″ double-sided foam strips. I scored the butterfly so the wings bend upward and adhered the sentiment below the butterfly. I finished the front with several Kat Scrappiness gold pearls.

I cut the inside panels from Bright Gold Foil and Lessebo Cement Gray, and stamped a sentiment from The Cat’s Pajamas Simply Stacked Sentiments stamp set.

Affiliate links are used in this post at no cost to you – I really appreciate your support!

CutCardStock products used:
Neenah Classic Crest 110# Solar White cardstock
Cougar Smooth 100# White cardstock
Cougar Smooth 80# White cardstock

Other products used:
PAPER: Craft Consortium Metal Textures 6×6 paper pad
STAMPS: The Cat’s Pajamas Simply Stacked Sentiments stamp set
INK: Memento Tuxedo Black ink
ACCESSORIES: Fiskars 12″ ProCision Rotary Bypass Paper Trimmer, Elmer’s Dot Runner, Bearly Art precision craft glue, 49 and Market Curators Botanical Ephemera Bits, 1″ double-sided foam strip, MISTI stamp tool, Kat Scrappiness Gold Pearl Mix

I hope you’ve enjoyed today’s project and you’re inspired to get crafty! Be sure to check out all the awesome cardstock and other goodies at CutCardStock (adhesives, labels, stickers, pens, watercolors and ribbon to name a few). And head on over to the CutCardStock Facebook Page and for more inspiration! Also, be sure to join our Creating with Card Stock Facebook Group for even more crafty inspiration! Thanks so much for stopping by today – we’ll see you next time!

Scrappy hugs,

sweet

Happy Tuesday, everybody! I hope you’re having a great week so far! Has the weather warmed up any where you are? It’s still chilly here but we’re expected to have temps in the 60s this week so just maybe spring has sprung! I’m up on the CutCardStock blog today with a tutorial for making a super cute watermelon thank you card featuring our new Lessebo cardstock along with my Cricut and a Dreaming Tree cut file. I used Lessebo Cherry Red, Pitch Black, Hunter Green and White cardstock, and also Cougar Smooth White cardstock for the envelope. This card is easy and works up fast, and would be adorable as a summer party invite! The sky is the limit! Be sure to visit the CutCardStock website this month for a variety of sales (one each week) on closeout and overstock items!

Using my Cricut and the Dreaming Tree Watermelon Card SVG cut file, I cut the card base and watermelon layer from Lessebo Cherry Red, the seed layer from Pitch Black, and the rind from Hunter Green and White. I stamped a sentiment from the Taylored Expressions One In A Melon stamp set in Memento Tuxedo Black ink.

The inside sentiment layer was cut from Lessebo White and I stamped another sentiment from the same Taylored Expressions stamp set.

Here’s a shot of the card with the envelope that I cut from Cougar Smooth White cardstock and the flap layer from Lessebo Hunter Green. So stinkin’ cute!

Sharing in the following challenges:
1.https://aperfecttimetocraft.blogspot.com/2024/04/a-perfect-time-to-craft-open-challenge.html
2.https://classicdesignchallenge.blogspot.com/2024/03/classic-design-challenge-03-2024-marapr.html
3.https://crafterscafeblogchallenge.blogspot.com/2024/03/306-food.html
4.https://pennyschallenges.blogspot.com/2024/03/pennys-challenge-568.html
5.https://scrapping4funchallenges.blogspot.com/2024/04/april-234-anything-goes.html
6.https://sparklesforumchallenges.blogspot.com/2024/03/174-sweet-treats.html

Affiliate links are used in this post at no cost to you – I really appreciate your support!

CutCardStock products used:
Lessebo Cherry Red cardstock
Lessebo Pitch Black cardstock
Lessebo Hunter Green cardstock
Lessebo White cardstock
Cougar Smooth 80# White cardstock

Other products used:
STAMPS: Taylored Expressions One In A Melon stamp set
INK: Memento Tuxedo Black ink
DIES/PUNCHES: Dreaming Tree Watermelon Card SVG cut file
ACCESSORIES: Cricut Explore Air 2, Bearly Art precision craft glue, MISTI stamp tool

I hope you’ve enjoyed today’s project and you’re inspired to get crafty! Be sure to check out all the awesome cardstock and other goodies at CutCardStock (adhesives, labels, stickers, pens, watercolors and ribbon to name a few). And head on over to the CutCardStock Facebook Page and for more inspiration! Also, be sure to join our Creating with Card Stock Facebook Group for even more crafty inspiration! Thanks so much for stopping by today – we’ll see you next time!

Scrappy hugs,

Thank You with Floating Circles & Ovals

Hey everybody! Happy Hump Day! Can you believe we’re a little more than halfway through March already?! I’m up on the CutCardStock blog today with a tutorial for making a thank you card with floating circles and ovals. This card features more of our new Lessebo cardstock – White, Amazon Dark Teal, Arctic Blue and Sweet Mint. And, dang, don’t these colors look fabulous together?! I’ve made a few cards in the past with floating strips and floating tiles, and thought I would try something a little different this time with die cut shapes. I love how it turned out!

I cut a standard A2 side-folding card base from Lessebo White along with a layering panel from Lessebo Sweet Mint. Using Keep It Simple Stitched Circles and Stitched Ovals Nested Dies, I die cut a variety of circles and ovals from Lessebo Amazon Dark Teal, Lessebo Arctic Blue and Sweet Mint. I arranged them on a piece of Grafix Crystal Clear Craft Plastic, adhering them with Ranger Adhesive Strips.

I stamped the sentiment from the Stampin’ Up Charming Sentiment stamp set in Memento Tuxedo Black ink on the bottom middle oval. I added EK Tools 3D Dots to the back of the acetate (behind the die cut shapes), adhered the piece to the Sweet Mint panel, and then to the front of the card base. The finishing touch was adding a few Eyelet Outlet White Glitter Enamel Dots.

I embellished the inside Lessebo White panel with leftover strips of Lessebo Amazon Dark Teal, White and Arctic Blue and a leftover circle die cut, then stamped the sentiment (from the same Stampin’ Up stamp set) in black ink.

Sharing in the following challenges:
1. https://aperfecttimetocraft.blogspot.com/2024/03/a-perfect-time-to-craft-open-challenge.html
2. https://classicdesignchallenge.blogspot.com/2024/03/classic-design-challenge-03-2024-marapr.html
3. https://dragonflydreamschallenges.blogspot.com/2024/03/march-challenge-circles.html
4. https://giveacrafteracookie.blogspot.com/2024/03/cookie-challenge-190-march-thank-you.html
5. https://hereisaplacetostart.blogspot.com/2024/03/march-2024-anything-goes-woptional.html

Affiliate links are used in this post at no cost to you – I really appreciate your support!

CutCardStock products used:
Lessebo White cardstock
Lessebo Amazon Dark Teal cardstock
Lessebo Arctic Blue cardstock
Lessebo Sweet Mint cardstock

Other products used:
STAMPS: Stampin’ Up Charming Sentiments stamp set
INK: Memento Tuxedo Black ink
DIES/PUNCHES: Keep It Simple Stitched Circles and Stitched Ovals Nested Dies
ACCESSORIES: Fiskars 12″ ProCision Rotary Bypass Paper Trimmer, Elmer’s Craft Bond Tape Runner, Bearly Art precision craft glue, MISTI stamp tool, Big Shot, Grafix Crystal Clear Craft Plastic, Ranger Adhesive Strips, EK Tools 3D Dots, Eyelet Outlet White Glitter Enamel Dots

I hope you’ve enjoyed today’s project and you’re inspired to get crafty! Be sure to check out all the awesome cardstock and other goodies at CutCardStock (adhesives, labels, stickers, pens, watercolors and ribbon to name a few). And head on over to the CutCardStock Facebook Page and for more inspiration! Also, be sure to join our Creating with Card Stock Facebook Group for even more crafty inspiration! Thanks so much for stopping by today – we’ll see you next time!

Scrappy hugs,