Congratulations

Hi friends! Happy Tuesday – I hope you’re having a wonderful week! I’ve had to go in and tweak this post, as I found it in my drafts… that’s what happens when a person has way too much going on, lol! But I AM getting caught up and it’s a good feeling! Affiliate links are used in this post at no cost to you. I really appreciate your support! I’ve popped in to share another sample I created for Prickley Pear Stamps! Just in time for Halloween, this fun wedding congrats card features the Dancing Skeleton and Scalloped Oval stamp sets!

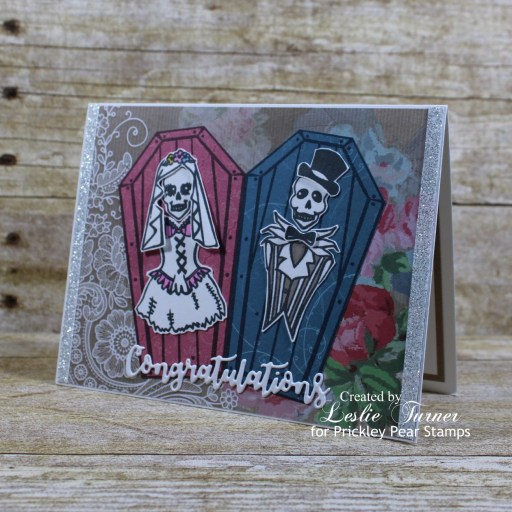
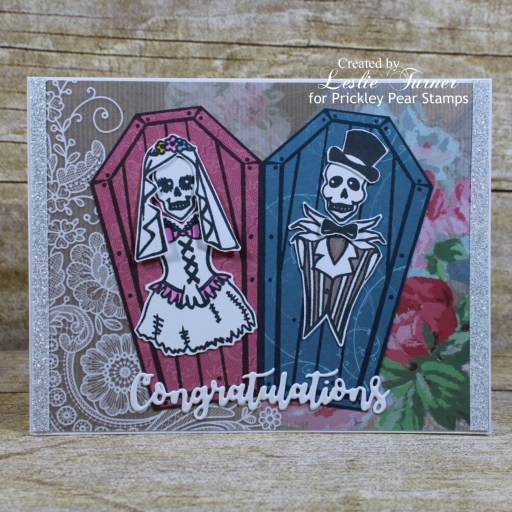
I cut a standard A2 size top-folding landscape card base from Neenah Classic Crest Solar White 110# cardstock along with a layering panel from the oh-so-pretty Crafter’s Companion Floral Delight 6×6 paper pad which I adhered to the card base. I added a strip of Holiday Colors White Glitter Tape down each side. I stamped the coffin from the Dancing Skeleton stamp set on pink and blue prints from the same Floral Delight paper pad and fussy cut them. I stamped the skellys and their clothing (also from the Dancing Skeleton stamp set) on Neenah Classic Crest Solar White 80# cardstock, fussy cut the pieces, and added just a pop of color with alcohol markers on each. I placed them in their respective coffins and adhered them to the front card panel along with a die cut sentiment.

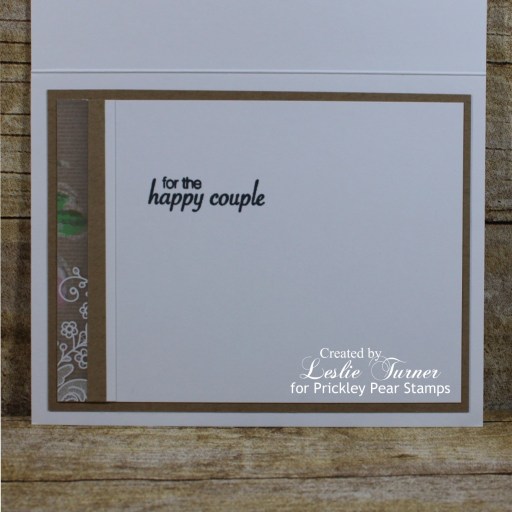
I cut the inside panel from Neenah Classic Crest 80# Solar White cardstock and embellished it with a strip of the Floral Delight paper, kraft and white cardstock, stamped the sentiment from the Scalloped Oval stamp set in black ink and layered the panel on kraft cardstock.

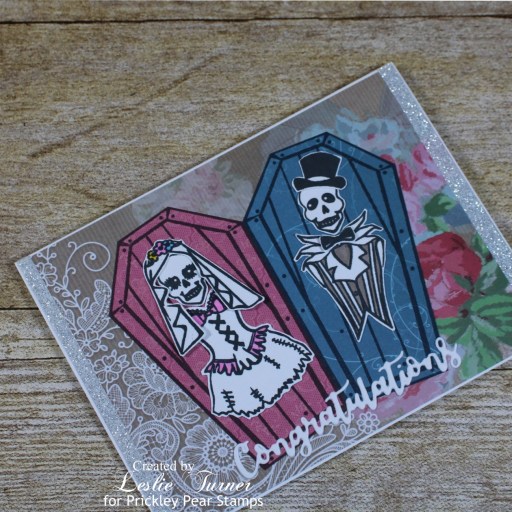
And one more peek… super happy with how this turned out! Love these skellys in their bride and groom garb! ;)

Prickley Pear Stamps products used:
Dancing Skeleton stamp set
Scalloped Oval stamp set

Other products used:
Cardstock/Paper: Neenah Classic Crest 110# and 80# Solar White cardstock, CutCardStock Twine cardstock, Crafter’s Companion Floral Delight 6×6 paper pad
Ink: Catherine Pooler Black Jack ink; Nuvo alcohol markers- 405-Sunshine Yellow Collection, 427-Marina Blues Collection, 452-Flamingo Pinks Collection, 499-Pebble Beach Collection
Dies/Punches: CUTplorations Everyday Sentiments
Accessories: Tonic Studios 12″ Guillotine Paper Trimmer, MISTI stamp tool, Big Shot, Holiday Colors White Glitter Tape, Stampin’ Up Dazzling Diamonds Glitter

I hope you’ve enjoyed this project! Be sure to check out all the awesome stamps and dies at Prickley Pear Stamps! If you’d like to save 10% on anything on the site when you shop at Prickley Pear Stamps, use the coupon code LESLIE10 at checkout! And be sure to ‘like’ and ‘follow’ the Prickley Pear Stamps Facebook page to keep up with news and sales, and join Prickley Pear Pals (the fan group) for lots of fun crafty ideas and to share your creativity! And finally, we’d love to see you visit the Prickley Pear Stamps blog that’s in the process of being revived and become a Follower! Hope to see you there! Thanks so much for stopping by today – we’ll see you next time! ;)

Scrappy hugs,
lesliesig

Sending Love

Hi friends! Happy Fri-YAY! Well, every day is like a Friday when you’re retired! And the days just start running together and I may or may not even know what day of the week it is! Bahahaha! Affiliate links are used in this post at no cost to you. I really appreciate your support! I’m back this morning with the final sample that I created for the Prickley Pear Stamps Spring 2021 Release! I used the sweet Praying For You stamp set to create a sympathy card. I know I’ve mentioned before that making sympathy cards has always been difficult for me but having the perfect stamp set does make it a little easier!

I cut a standard A2 size top-folding landscape card base from Neenah Classic Crest 80# Baronial Ivory cardstock along with a layering panel that I ran through the Gemini Junior with a CUTplorations Crazy Double Running Stitch Rectangle Nesting Die. I stamped the Praying For You image in dark brown ink, colored it with alcohol markers, and adhered it to the card base. I stamped the sentiment in brown ink, cut it with a stitched circle die and layered it on a slightly larger yellow stitched circle die cut.

I cut the inside panel from Neenah Classic Crest 80# Baronial Ivory cardstock and embellished it with strips of yellow cardstock, stamped the sentiment in brown ink and layered the panel on slightly darker yellow cardstock.

Prickley Pear Stamps products used:
Praying For You stamp set

Other products used:
Cardstock/Paper: Neenah Classic Crest 80# Baronial Ivory cardstock, Stampin’ Up Crushed Curry and Delightful Dijon cardstock
Ink: Memento Espresso Truffle ink; Nuvo alcohol markers- Coral Reef Collection, Rich Reds Collection, Ombre Collection, Fragrant Oranges Collection, Sunshine Yellow Collection, Honey Amber Collection, Irish Clover Collection, Flamingo Pinks Collection, Natural Browns Collection, Fair Skin Tones, Pebble Beach Collection; Pentel Slicci Gold pen
Dies/Punches: Memory Box Stitched Circle Layers, CUTplorations Crazy Double Running Stitch Rectangle Nesting Dies
Accessories: Tonic Studios 12″ Guillotine Paper Trimmer, MISTI stamp tool, Gemini Junior, Scotch ATG, Bearly Art precision craft glue

I hope you’ve enjoyed this project! Be sure to check out all the awesome stamps and dies at Prickley Pear Stamps! If you’d like to save 10% on anything on the site when you shop at Prickley Pear Stamps, use the coupon code LESLIE10 at checkout! And be sure to ‘like’ and ‘follow’ the Prickley Pear Stamps Facebook page to keep up with news and sales, and join Prickley Pear Pals (the fan group) for lots of fun crafty ideas and to share your creativity! And finally, we’d love to see you visit the Prickley Pear Stamps blog that’s in the process of being revived and become a Follower! Hope to see you there! Thanks so much for stopping by today – we’ll see you next time! ;)

Scrappy hugs,
lesliesig

thanks shaped card

Hi everybody! Hope you are having a fabulous week and enjoying some wonderful Spring weather! It couldn’t be any more beautiful here than it has been for the past several weeks! In fact, I almost feel guilty for spending time in my studio, lol! Affiliate links are used in this post at no cost to you. I really appreciate your support! I’ve popped in this morning to share another sample that I created for the Prickley Pear Stamps Spring 2021 Release! I used the stunning Sketched Florals – Azalea stamp set for this pretty shaped thank you card. I absolutely love shaped cards and this is one of my favorites!

I stamped the image on Neenah Classic Crest 80# Solar White cardstock, colored it with alcohol markers, and cut a front layering panel from it. I then cut the card base from Neenah Classic Crest 80# Solar White cardstock along with a layering panel from CutCardStock Basis 80# Pink cardstock. I adhered the layers together and then to the card base, and added a sentiment cut from Neenah Classic Crest 80# Solar White cardstock using the CUTplorations Skinny Sentiments die set. The finishing touch was adding iridescent gemstones to the flowers.

I cut the inside panel from Neenah Classic Crest 80# Solar White cardstock as well, stamped a sentiment from the Blobby Flowers 2 stamp set in black ink and layered the panel on another CutCardStock Basis 80# Pink cardstock layer.

Prickley Pear Stamps products used:
Sketched Florals – Azalea stamp set
Blobby Flowers 2 stamp set

Other products used:
Cardstock/Paper: Neenah Classic Crest 80# Solar White cardstock, CutCardStock Basis 80# Pink cardstock
Ink: Memento Tuxedo Black ink; Nuvo alcohol markers- Coral Reef Collection, Ombre Collection, Honey Amber Collection, Sunshine Yellow Collection, Organic Greens Collection, Marina Blues Collection, Flamingo Pinks Collection; Faber-Castell Pitt Artist (fine point) Orange Glaze pen
Dies/Punches: Crafter’s Companion Ruth Create-A-Card die set, CUTplorations Skinny Sentiments
Accessories: Bearly Art precision craft glue, MISTI stamp tool, Big Shot, Tonic Studios 12″ Guillotine Paper Trimmer, ScraPerfect iridescent gemstones

I hope you’ve enjoyed this project! Be sure to check out all the awesome stamps and dies at Prickley Pear Stamps! If you’d like to save 10% on anything on the site when you shop at Prickley Pear Stamps, use the coupon code LESLIE10 at checkout! And be sure to ‘like’ and ‘follow’ the Prickley Pear Stamps Facebook page to keep up with news and sales, and join Prickley Pear Pals (the fan group) for lots of fun crafty ideas and to share your creativity! And finally, we’d love to see you visit the Prickley Pear Stamps blog that’s in the process of being revived and become a Follower! Hope to see you there! Thanks so much for stopping by today – we’ll see you next time! ;)

Scrappy hugs,
lesliesig

Hey Beautiful, Happy Birthday

Hi everybody! Happy Tuesday and I hope, if you’re still in the working world, that your Monday was fantastic! Affiliate links are used in this post at no cost to you. I really appreciate your support! I have a very cool hybrid card sample to share with you this morning that I created for the Prickley Pear Stamps Spring 2021 Release! I used the stunning Sketched Florals – Wisteria stamp set to create this unique birthday card! I’ve created a variety of acetate-front cards over the years and always enjoy making them, and this is one that I created a duplicate of for a friend who is going through a hard time.

This card, although I’m thrilled with how it turned out, was very hard to photograph to get the full gist of what it looks like. I cut a standard A2 size top-folding card base from Neenah Classic Crest Solar White 110# cardstock and Grafix Craft Plastic. I stamped the image from the Sketched Florals – Wisteria stamp set on the Solar White panel and colored it with alcohol markers and an almost-dried-out fine point Pitt Artist pen. I’ve had this set of fine point Pitts for over five years, I’m sure, and I’m down to four now because they are drying out. Wah-wah. After assembling the card base, I used the CUTplorations ‘beautiful’ Word Die to die cut the sentiment from CutCardStock Basis 80# Dark Purple cardstock and adhered it to the acetate. I stamped a partial sentiment (the word Hey) from one of the sentiments in the Magical Enchanted Day stamp set, die cut it with a small oval scalloped die and adhered it just above the ‘beautiful’ die cut. This completed the front. For the ‘inside’, I created a digital sentiment on the computer, trimmed it into a narrow strip, and adhered it across the bottom so it was hidden behind the ‘beautiful’ die cut – which you can’t really see too well in these photos. I couldn’t take a lying-flat shot because the lights in the lightbox made the acetate shine, lol!

I embellished the back of the card with a strip of Prima patterned paper and a narrow strip of CutCardStock Basis 80# Dark Purple cardstock, and stamped another sentiment from the Magical Enchanted Day stamp set in dark purple ink. Really loving how this turned out!

Prickley Pear Stamps products used:
Sketched Florals – Wisteria stamp set
Magical Enchanted Day stamp set

Other products used:
Cardstock/Paper: Neenah Classic Crest 110# Solar White cardstock, CutCardStock Basis 80# Dark Purple cardstock, Prima Meadow Lark 6×6 Collection
Ink: Memento Elderberry ink; Nuvo alcohol markers- 416, 434, 436, 439, 441; Faber-Castell Pitt Artist Pen fine point May Green
Dies/Punches: CUTplorations ‘beautiful’ Word Die, Spellbinders Lacy Ovals die
Accessories: Grafix Craft Plastic, Bearly Art precision craft glue, Big Shot, MISTI stamp tool, Tonic Studios 12″ Guillotine Paper Trimmer

I hope you’ve enjoyed this project! Be sure to check out all the awesome stamps and dies at Prickley Pear Stamps! If you’d like to save 10% on anything on the site when you shop at Prickley Pear Stamps, use the coupon code LESLIE10 at checkout! And be sure to ‘like’ and ‘follow’ the Prickley Pear Stamps Facebook page to keep up with news and sales, and join Prickley Pear Pals (the fan group) for lots of fun crafty ideas and to share your creativity! And finally, we’d love to see you visit the Prickley Pear Stamps blog that’s in the process of being revived and become a Follower! Hope to see you there! Thanks so much for stopping by today – we’ll see you next time! ;)

Scrappy hugs,
lesliesig

Toolbox Love

Howdy peeps! I hope you’re having a fabulous weekend! We have gotten some much-needed rain but it has passed and left us with gorgeous blue skies! So absolutely no complaints here! Affiliate links are used in this post at no cost to you. I really appreciate your support! I’m back this morning to share a masculine card sample I created for the Prickley Pear Stamps Spring 2021 Release using the super cool I Love You Toolbox And All stamp set which I paired with the Tools Background stamp for a fabulous Valentine!

I cut a standard A2 size top-folding landscape card base from Neenah Classic Crest 110# Solar White cardstock along with layers from CutCardStock Basis 80# Red cardstock and CutCardStock 80# Shadow Gray cardstock, and a woodgrain patterned paper panel on which I stamped the various tools from the Tools Background stamp in gray ink. I stamped the bold sentiment from the I Love You Toolbox And All stamp set on a scrap piece of Solar white cardstock in gray ink, cut it with a stitched oval die and layered it on a slightly larger Basis Red stitched oval die cut.

I cut the inside panel from Neenah Classic Crest 80# Solar White cardstock and embellished it with strips of the stamped tools background, CutCardStock Basis 80# Red cardstock and CutCardStock 80# Shadow Gray cardstock. I stamped the sentiment in gray ink and layered the panel on Basis Red cardstock.

Prickley Pear Stamps products used:
I Love You Toolbox And All stamp set
Tools Background stamp

Other products used:
Cardstock/Paper: Neenah Classic Crest 110# and 80# Solar White cardstock, CutCardStock Basis 80# Red cardstock, CutCardStock 80# Shadow Gray cardstock, My Mind’s Eye Tangerine 6×6 paper pad
Ink: Memento Gray Flannel ink
Dies/Punches: Memory Box Stitched Oval Layers
Accessories: Scotch ATG, Bearly Art precision craft glue, MISTI stamp tool, Big Shot, Tonic Studios 12″ Guillotine Paper Trimmer

I hope you’ve enjoyed this project! Be sure to check out all the awesome stamps and dies at Prickley Pear Stamps! If you’d like to save 10% on anything on the site when you shop at Prickley Pear Stamps, use the coupon code LESLIE10 at checkout! And be sure to ‘like’ and ‘follow’ the Prickley Pear Stamps Facebook page to keep up with news and sales, and join Prickley Pear Pals (the fan group) for lots of fun crafty ideas and to share your creativity! And finally, we’d love to see you visit the Prickley Pear Stamps blog that’s in the process of being revived and become a Follower! Hope to see you there! Thanks so much for stopping by today – we’ll see you next time! ;)

Scrappy hugs,
lesliesig

Flowers for beautiful you

Hi friends! A super Happy Saturday to you! Hope you have something fun (but safe) planned this weekend! Affiliate links are used in this post at no cost to you. I really appreciate your support! I’ve popped in this morning to share another sample I created for the Prickley Pear Stamps Spring 2021 Release! I’ve had the best time creating with these amazing new sketched florals, super sweet praying Tess, and the masculine stamps! Be sure to check them out! I’ve had handwritten instructions for a new fun fold in my arsenal for several months now, called a double easel fold, which I saw in a newsletter from Sharon Armstrong, a SU Demonstrator in Texas, so I decided to try it out. It’s super easy and oh, I love it! This card features the gorgeous Sketched Florals – Lilac stamp set which I paired with the Flowers for Beautiful You stamp set!

I cut the card base and layering panels from Neenah Classic Crest Solar White 80# cardstock and CutCardStock Pop-Tone 65# Grape Jelly cardstock. I stamped the full image on the Solar White layering panel and a partial image on a scrap piece of Solar White cardstock, and colored them with Bic Mark-Its. I used those markers this time because I really liked the purples in the set for this image. I trimmed the colored images, stamped the sentiments and layered them on the purple cardstock panels.

I cut the inside panel from Neenah Classic Crest 80# Solar White cardstock as well and embellished it with strips of CutCardStock Basis 80# Dark Purple cardstock and CutCardStock Pop-Tone 65# Grape Jelly cardstock, stamped the sentiment in black ink and layered the panel on the lighter purple cardstock.

Prickley Pear Stamps products used:
Sketched Florals – Lilac stamp set
Flowers for Beautiful You stamp set

Other products used:
Cardstock/Paper: Neenah Classic Crest 80# Solar White cardstock, CutCardStock Pop-Tone 65# Grape Jelly cardstock, CutCardStock Basis 80# Dark Purple cardstock
Ink: Memento Tuxedo Black ink; Bic Mark-Its- Polynesian Purple, Plumtastic Purple, Yellow Blaze, Forest Green, Key Lime
Accessories: MISTI stamp tool, Bearly Art precision craft glue, Tonic Studios 12″ Guillotine Paper Trimmer

I hope you’ve enjoyed this project! Be sure to check out all the awesome stamps and dies at Prickley Pear Stamps! If you’d like to save 10% on anything on the site when you shop at Prickley Pear Stamps, use the coupon code LESLIE10 at checkout! And be sure to ‘like’ and ‘follow’ the Prickley Pear Stamps Facebook page to keep up with news and sales, and join Prickley Pear Pals (the fan group) for lots of fun crafty ideas and to share your creativity! And finally, we’d love to see you visit the Prickley Pear Stamps blog that’s in the process of being revived and become a Follower! Hope to see you there! Thanks so much for stopping by today – we’ll see you next time! ;)

Scrappy hugs,
lesliesig

Thank You note card

Hey peeps, Happy Friday! It’s dreary and rainy here (but we really need the rain) and it’s a beautiful day anyway! And you know where I’ll be… inside crafting, lol! Affiliate links are used in this post at no cost to you. I really appreciate your support! I have another sample to share that I created for the Prickley Pear Stamps Spring 2021 Release! Be sure to check out the gorgeous array of new sketched florals, sweet praying Tess, and the tool-related stamps for masculine cards! They are all fabulous! I created a pretty ‘thank you’ note card featuring the gorgeous Sketched Florals – Rose stamp set colored with Karin Brushmarkers. I’ve had the Karin markers for quite a while and have only used them a couple times. They are water-based and the colors are so bold and beautiful! I really would love to learn to use them as watercolors with blending, etc. on watercolor paper… so I’ve made this a (hopefully) short-term goal! ;)

I cut a standard A2 size top-folding card base from Neenah Classic Crest Solar White 110# cardstock along with layering panels from Neenah Classic Crest 80# Solar White cardstock, CutCardStock Pop-Tone Black Licorice cardstock, CutCardStock Habanero cardstock. I stamped the image from the Sketched Florals – Rose stamp set on Neenah Classic Crest 80# Solar White cardstock, hit it with the heat tool to set the ink, and colored it with Lush Green, Olive Green, Lime Green and Red from the Karin Brushmarker Pro 72 Marker Mega Box. I layered the panels, added the inner portion of the Shadow Words – Thank You die sentiment and adhered the piece to the card front. The finishing touch was the addition of several small white flat-back pearls.

I cut the inside panel from Neenah Classic Crest 80# Solar White cardstock and embellished it with leftover strips of CutCardStock Habanero cardstock and CutCardStock Pop-Tone Black Licorice cardstock. I layered the panel on the Habanero cardstock and adhered it to the card base. Since this is a note card, I left the inside blank.

Prickley Pear Stamps products used:
Sketched Florals – Rose stamp set
Karin Brushmarker Pro 72 Marker Mega Box
Shadow Words – Thank You die

Other products used:
Cardstock/Paper: Neenah Classic Crest 110# and 80# Solar White cardstock, CutCardStock Pop-Tone Black Licorice cardstock, CutCardStock Habanero cardstock
Ink: Memento Tuxedo Black ink
Accessories: MISTI stamp tool, Milwaukee heat tool, Gemini Junior, Tonic Studios 12″ Guillotine Paper Trimmer, Bearly Art precision craft glue, Darice small white flat-back pearls

I hope you’ve enjoyed this project! Be sure to check out all the awesome stamps and dies at Prickley Pear Stamps! If you’d like to save 10% on anything on the site when you shop at Prickley Pear Stamps, use the coupon code LESLIE10 at checkout! And be sure to ‘like’ and ‘follow’ the Prickley Pear Stamps Facebook page to keep up with news and sales, and join Prickley Pear Pals (the fan group) for lots of fun crafty ideas and to share your creativity! And finally, we’d love to see you visit the Prickley Pear Stamps blog that’s in the process of being revived and become a Follower! Hope to see you there! Thanks so much for stopping by today – we’ll see you next time! ;)

Scrappy hugs,
lesliesig

Thank You tower fold

Hi everybody! How is your Thursday going? Great, I hope… not much longer till the weekend is here! Affiliate links are used in this post at no cost to you. I really appreciate your support! I’ve popped in to share one of several samples I created for the Prickley Pear Stamps Spring 2021 Release! You won’t believe the gorgeous selection of sketched florals, adorable praying Tess, and even a couple sets for the guys, so be sure to check them out and stay tuned for more pretties! You know me and fun folds, and I saw another great one in a recent Splitcoast Stampers newsletter that I’m sure I’ll be making again and again! The tutorial is HERE if you’re interested. This one is called a tower fold and I’ve used the stunning Sketched Florals – Sunflowers stamp set which I think looks amazing on this thank you card!

I cut the tower fold card base from Neenah Classic Crest Solar White 110# cardstock and embellished it with coordinating patterned paper and cardstock panels. I stamped the image from the Sketched Florals – Sunflowers stamp set twice on Neenah Classic Crest Solar White 80# cardstock, colored both with alcohol markers, trimmed the portion of each image I needed for the front and back panels of the card, and layered them on cardstock panels. I adhered the front panel, stamped the sentiment from Oak & Maple Leaf 2 stamp set beneath the image, and added several tiny yellow gemstones.

Here’s a shot of the back with another sentiment from the Oak & Maple Leaf 2 stamp set – and it’s just as pretty as the front, lol! ;)

And one more peek from a different angle… such a gorgeous stamp set and fabulous fold! I’ve already made another one, lol, which you’ll see a little later on!

Prickley Pear Stamps products used:
Sketched Florals – Sunflowers stamp set
Oak & Maple Leaf 2 stamp set

Other products used:
Cardstock/Paper: Neenah Classic Crest 110# Solar White cardstock, Stampin’ Up Delightful Dijon cardstock, Stampin’ Up Delightful Dijon double-sided paper from the 2015-2017 DSP Stack
Ink: Memento Espresso Truffle ink; Nuvo alcohol markers- 389, 391, 405, 416, 420, 465, 466
Accessories: MISTI stamp tool, Bearly Art precision craft glue, Darice tiny yellow gemstones

I hope you’ve enjoyed this project! Be sure to check out all the awesome stamps and dies at Prickley Pear Stamps! If you’d like to save 10% on anything on the site when you shop at Prickley Pear Stamps, use the coupon code LESLIE10 at checkout! And be sure to ‘like’ and ‘follow’ the Prickley Pear Stamps Facebook page to keep up with news and sales, and join Prickley Pear Pals (the fan group) for lots of fun crafty ideas and to share your creativity! And finally, we’d love to see you visit the Prickley Pear Stamps blog that’s in the process of being revived and become a Follower! Hope to see you there! Thanks so much for stopping by today – we’ll see you next time! ;)

Scrappy hugs,
lesliesig

Christmas Tags Turned Into Ornaments

12/31/20 Best Technique Winner at Classic Design Challenge!

Hi everybody! I hope you’re having an awesome week! I’m posting on the Prickley Pear Stamps blog today with an adorable set of Christmas tags that are intended to be turned into ornaments after the presents have been opened! How fun is that?! Each one is a little gift in itself and I love it when something functional turns into a keepsake! I was gifted the amazing Christmas Holiday Gift Tags clear stamp set which I paired with the awesome Circle Peek A Boo Die that I had my stash to create this project. What a great combination!

There are five images in the set and I stamped them all in black ink on white cardstock, colored them with alcohol markers and cut them with a stitched octagon die. I cut five additional slightly larger octagonals from silver foil cardstock and then adhered them behind the die cut images. I used the peek a boo die to cut five different colors of cardstock, and then cut five stitched circles from white cardstock that were just a bit larger than the peek a boo die cuts, and adhered them behind the peek a boo die cuts. I stamped ‘To’ and ‘From’ along with a sentiment in coordinating red or green ink on the back of the stitched circle die cuts. I adhered the layered octagonals to the circles and added iridescent gemstones, then punched a hole at the top of each one and added a coordinating color of crafter’s cord. Here are close-ups:

And one more peek at the set… so much fun – and I definitely see more of these in my future!

Sharing in the following challenges:
1. 613 Avenue Create: December Challenge – Anything Goes w/ optional Anything Vintage (playing twist)
2. A Bit More Time To Craft Challenge: #129 – Anything Goes
3. A Perfect Time To Craft Open Challenge: #12-2020
4. ABC Christmas Challenge: Y is for Your Favorite Things and Z is for Zzzzzzz (favorite things cardstock and dies)
5. Classic Design Challenge: #12 – Anything Goes
6. Crafty Calendar Challenge: December Challenge – Christmas Theme
7. Crafty Gals Corner: #214 – Tis the Season
8. Creative Inspirations: December Challenge – Ho! Ho! Ho!
9. Creative Moments: #204 – Anything Goes
10. Jan’s Digi Stamps Challenge: December Anything Goes
11. Let’s Craft and Create: #166 – Anything Goes w/ optional Santa Claus is Coming to Town
12. Lil Patch of Crafty Friends: #147 – Anything Goes
13. Penny’s Paper-Crafty Challenge: #486 – Year-End Mega Challenge
14. Scrapping4fun Challenges: #181 – Christmas
15. Sweet Stampers Challenge Blog: #51 – Anything Goes
16. Try it on Tuesday: Christmas Sparkle
17. Winter Wonderland Challenge Blog: Anything Goes End of Year Challenge
18. Word Art Wednesday: Weeks #468/469 – Anything Goes

Products used:
Cardstock/Paper: Neenah Classic Crest Solar White cardstock; Hygloss Silver Foil cardstock, CutCardStock Bonsai Green, Red Wagon and Granny Smith cardstock; Darice green and burgundy cardstock
Stamps: Prickley Pear Stamps Christmas Holiday Gift Tags clear stamp set
Ink: Memento Tuxedo Black, Rhubarb Stalk, Bamboo Leaves and Cottage Ivy ink; Nuvo alcohol markers- 487, 489, 491, 412, 417, 403, 405, 374, 443; Spectrum Noir alcohol markers- DR1, DR6, DR7
Dies/Punches: Prickley Pear Stamps Circle Peek A Boo Die, Memory Box Stitched Circle Layers die, Memory Box Stitched Octagons dies, Stampin’ Up 1/4″ Circle punch
Accessories: ScraPerfect Best Glue Ever, Bearly Art precision craft glue, Tombow Mono permanent adhesive, MISTI stamp tool, Gemini Junior, Darice iridescent gemstones, Hemptique burgundy, green and red hemp crafter’s cord

I hope you’ve enjoyed this project! Be sure to check out all the awesome stamps and dies at Prickley Pear Stamps! If you’d like to save 10% on anything on the site when you shop at Prickley Pear Stamps, use the coupon code LESLIE10 at checkout! And be sure to ‘like’ and ‘follow’ the Prickley Pear Stamps Facebook page to keep up with news and sales, and join Prickley Pear Pals (the fan group) for lots of fun crafty ideas and to share your creativity! And finally, we’d love to see you visit the Prickley Pear Stamps blog that’s in the process of being revived and become a Follower! Hope to see you there! Thanks so much for stopping by today – we’ll see you next time! ;)

Scrappy hugs,
lesliesig

Let it Snow

Hello again! I’m back with another card I’ve showcased this morning on the Prickley Pear Stamps blog using the Snow Family clear stamp set! You know me and fun folds… I’m always on the look-out to try a new one! I saw this one in a Splitcoast Stampers newsletter not too awfully long ago, called a triple fold card with a belly band, and the tutorial can be found HERE. I had actually found the same fold (but reversed) on the Stempeleinmaleins blog this past Summer HERE which I planned to try at some point. But either way, this fold is super fun and easy, and sure packs a punch! ;)

I created the card base from teal cardstock and adhered two coordinating patterned paper layers on the folded panels. I created a layered belly band embellished with two snowflake brads to keep the card closed when it’s finished.

I stamped Poppa Snowman on the front left panel, then stamped him again on white cardstock which I colored with alcohol markers, fussy cut and paper pieced on the left panel. I stamped the sentiment and added a snowflake brad with collage medium. I took the prongs off the brad since I didn’t want them to show through on the other side.

I embellished the inside panel with a piece of the snowflake patterned paper, a stamped and die cut sentiment and a narrow strip of the teal cardstock.

And one more look… I love this fold so much that I have another base cut and folded and ready to turn into a project, lol, so stay tuned! ;)

Sharing in the following challenges:
1. ABC Christmas Challenge: W is for Winter Wonderland and/or X is for Xtra Special (Winter Wonderland)
2. Aud Sentiments Challenge Blog: #265 – Anything Goes + A Sentiment
3. Cardz 4 Galz: #135 – Cute Christmas
4. Crafty Catz: #529 – Anything Goes w/ optional Baby Its Cold Outside
5. Cut It Up: #214 – Christmas
6. Penny’s Paper-Crafty Challenge Blog: #485 – Anything Goes
7. Scrapping4fun Challenges: #180 – Snowflakes, Fairies, Angels and/or Stars (Snowflakes)
8. Sweet Stampers Challenge Blog: #50 – Christmas
9. Try it on Tuesday: Winter Wonderland

Products used:
Cardstock/Paper: Papertrey Ink Tropical Teal cardstock, Neenah Classic Crest Solar White cardstock, The Paper Studio four Seasons and Everything In Between -2- paper pad
Stamps: Prickley Pear Stamps Snow Family clear stamp set
Ink: Memento Tuxedo Black ink (pad and marker); Nuvo alcohol markers- 428, 417, 393, 363, 369, 489, 379
Dies/Punches: Inspired by Stamping Fancy Label Dies 2
Accessories: Tombow Mono permanent adhesive, Bearly Art precision craft glue, MISTI stamp tool, Gemini Junior, Eyelet Outlet Snowflake Brads

I hope you’ve enjoyed this project! Be sure to check out all the awesome stamps and dies at Prickley Pear Stamps! If you’d like to save 10% on anything on the site when you shop at Prickley Pear Stamps, use the coupon code LESLIE10 at checkout! And be sure to ‘like’ and ‘follow’ the Prickley Pear Stamps Facebook page to keep up with news and sales, and join Prickley Pear Pals (the fan group) for lots of fun crafty ideas and to share your creativity! And finally, we’d love to see you visit the Prickley Pear Stamps blog that’s in the process of being revived and become a Follower! Hope to see you there! Thanks so much for stopping by today – we’ll see you next time! ;)

Scrappy hugs,
lesliesig