Let’s Shell-ebrate

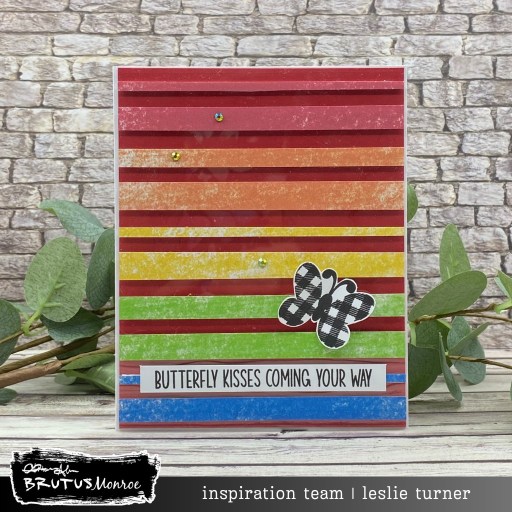
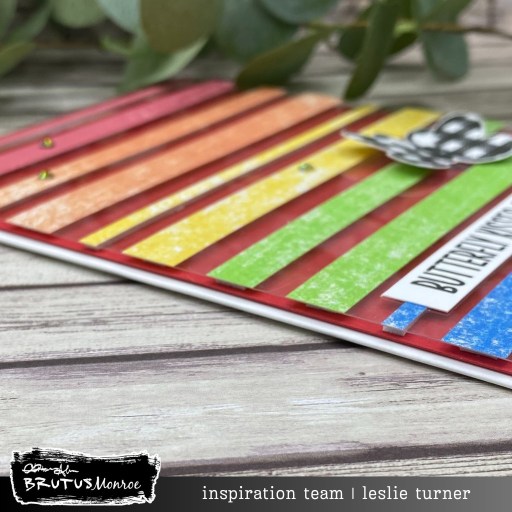
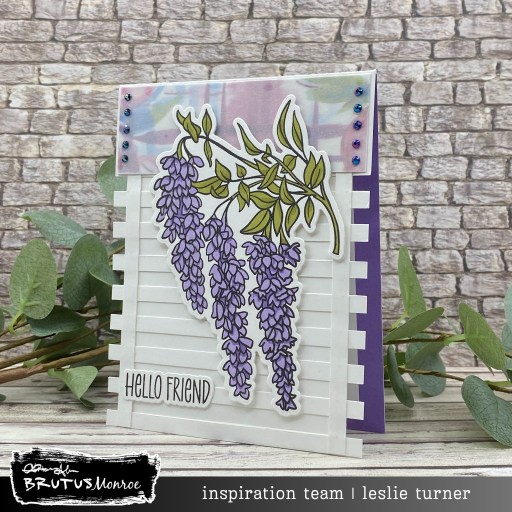
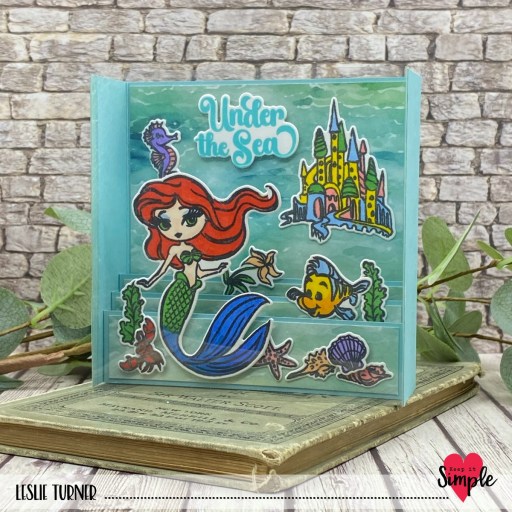
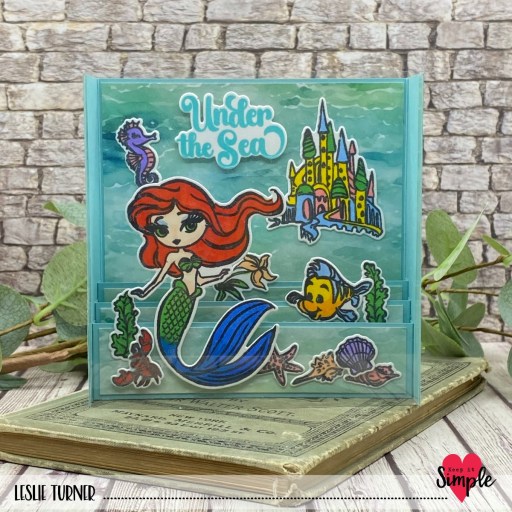
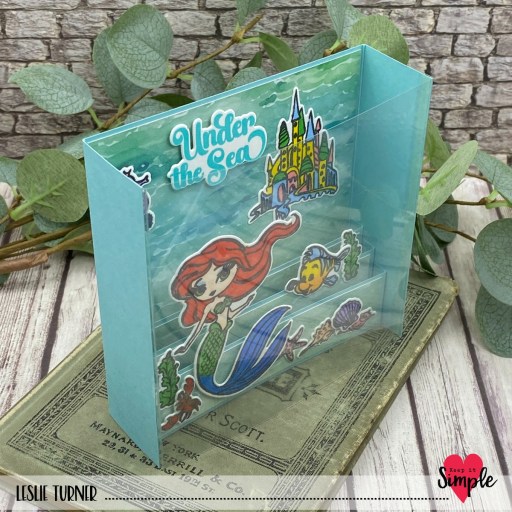
Hi friends! Happy Saturday – I hope you have something fun planned this weekend. Our weather is supposed to be nice in the mid to upper 50s so I plan to get out and walk a little and (of course) craft a little, too. ;) I’m delighted to share a Keep It Simple DT inspiration project with you that I created with papers and die cut pieces from our new Once Upon A Time: Ariel Collection. This is one of the best collections ever, and I have fond memories of my daughter watching The Little Mermaid movie. I believe she was about five when it came out. I created a twisted ribbon panel on the left side this card and I love the fun it adds. This was my first attempt and I definitely see more twisted ribbon in my future, lol!

I cut the card base and twisted ribbon panel from CutCardStock Lessebo Amazon Dark Teal cardstock along with layering panels from CutCardStock Bright Gold Foil and a print in the Ariel 6×9 Collection Pack. Next I cut strips from a couple more coordinating prints and then fashioned the twisted ribbon panel.

I added the die cuts from the Ariel Die Cut Pieces as well as a sentiment (from the Ariel Collection Stamps) which I stamped in Catherine Pooler Daydream ink and cut with the coordinating Ariel Outline Dies. The finishing touch was adding a few dots from Imagine Crafts Gold irRESISTible Pico Embellisher.

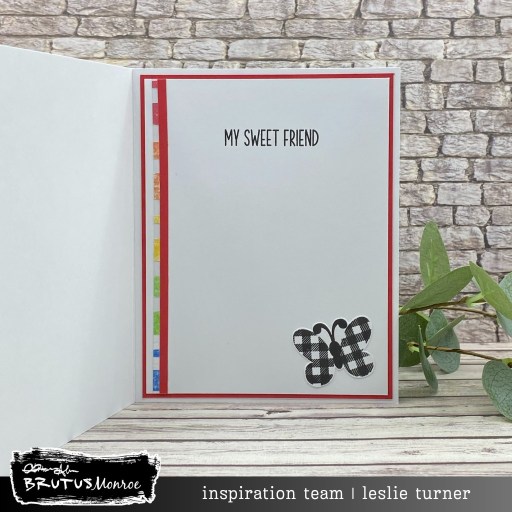
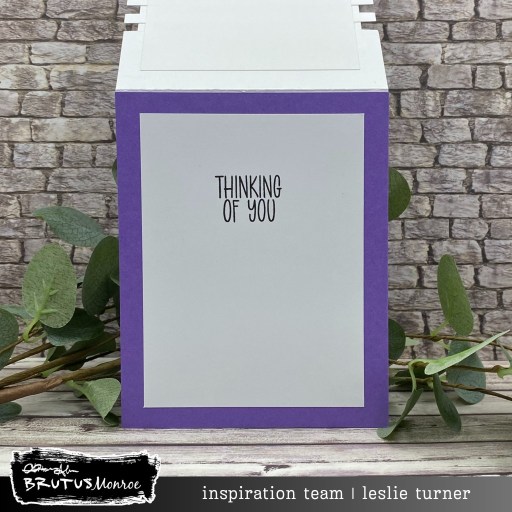
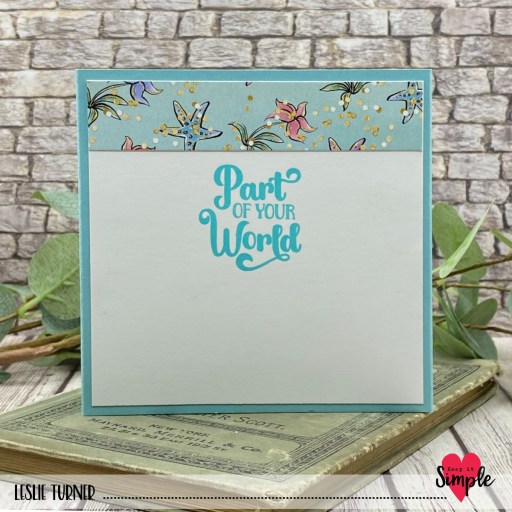
I cut the inside panel from Neenah Classic Crest 80# Solar White cardstock and embellished it with die cuts and a leftover patterned paper strip that I cut for the twisted ribbon panel. I added another sentiment that I stamped from the Ariel Collection Stamps and cut with the coordinating Outline Dies.

Keep It Simple products used:
Once Upon A Time: Ariel 6×9 Collection Pack
Once Upon A Time: Ariel Collection Stamps
Once Upon A Time: Ariel Outline Dies
Once Upon A Time: Ariel Die Cut Pieces

Affiliate links are used in this post at no cost to you – I really appreciate your support!

Other products used:
CARDSTOCK/PAPER: CutCardStock Lessebo Amazon Dark Teal, Basis Pink and Bright Gold Foil cardstock, Neenah Classic Crest 80# Solar White cardstock
INK: Imagine Crafts Gold irRESISTible Pico Embellisher, Catherine Pooler Daydream ink
ACCESSORIES: Fiskars 12″ ProCision Rotary Bypass Paper Trimmer, Elmer’s Craft Bond Tape Runner, Bearly Art precision craft glue, My Sweet Petunia Precision Glue Press, Mini MISTI, Big Shot, Scrapbook Adhesives Thin 3D Foam Squares, Scrapbook Adhesives 3D Foam Squares

I hope you’ve loved seeing this project as much as I loved creating it and you’re inspired to get crafty! Be sure to check out ALL the fun goodies in the Keep It Simple online store! Save 10% on your entire order when you shop online using code LoveToScrap2 at checkout! There is no minimum purchase requirement and no usage limits, AND it combines with product, order, and shipping discounts! Is that cool, or what?! Be sure to Follow us on Facebook, Instagram, and Pinterest for lots of crafty inspiration! Thanks so much for stopping by today – we’ll see you next time!

Scrappy hugs,

Butterfly Kisses

Hi friends, Happy Friday! I hope you’ve had a great week. We had THE best weather yesterday (sunny and in the mid 60s) for driving to our appointments and running our errands. We have some more cold stuff headed our way next week, though, so I guess Spring hasn’t really quite sprung yet. I’m delighted to share a Brutus Monroe DT inspiration project today featuring the amazing Rubbings Washi Sheet, Scarlet cardstock and Flying In To Say Stamp Set. I employed the ‘floating strips’ technique using strips cut from the washi sheet which I adhered to the back side of a panel of our Heat Resistant Clear Acetate and popped up on the front panel on foam strips. Super fun card that packs a punch – I always enjoy making cards with this technique.

I adhered a panel of Scarlet cardstock to the front of a Pre-Scored A2 Card Base. I affixed a panel of Heat Resistant Clear Acetate to my 7″ Make Art Stay-tion with magnets and then adhered various sizes of strips cut from the Rubbings Washi Sheet, leaving uniform space between each strip. I cut strips of Keep It Simple 2mm adhesive foam sheet which I stuck down on the back side of the acetate behind the washi sheet strips and adhered to the Scarlet cardstock panel.

I stamped a sentiment and two plaid butterflies from the Flying In To Say Stamp Set in Raven ink and fussy cut them. I bent the wings upward on one of them and adhered it to the card front, applying glue only to the body portion. I adhered the sentiment across the bottom and added Red Shift and Topaz Flat Back Crystals, which completed the card front.

I cut the inside panel from a leftover half of a pre-scored card base and embellished it with strips of the acetate and Scarlet panels used on the front. I stamped an additional sentiment from the Flying In To Say Stamp Set in Raven ink and attached the other stamped butterfly. I’ve also included an angled shot so you can see the dimension on the floating strips.

Affiliate links are used in this post at no cost to you – I really appreciate your support!

Brutus Monroe products used:
BRU 8031 Rubbings Washi Sheet
BRU 8404 Flying In To Say Stamp Set
BRU 5413 Scarlet Cardstock
BRU 3690 Heat Resistant Clear Acetate
BRU 2345 Red Shift Flat Back Crystals
BRU 0060 Topaz Flat Back Crystals
BRU 2543 Raven Detail 2×2 Ink
BRU 2828-2 Pre-Scored A2 Card Bases

Other products used:
ACCESSORIES: Fiskars 12″ ProCision Rotary Bypass Paper Trimmer, Bearly Art precision craft glue, My Sweet Petunia Precision Glue Press, MISTI stamp tool, Spellbinders Detail Scissors, Ranger-Wendy Vecchi 7″ Make Art Stay-tion, Scrapbook Adhesives E-Z Runner Permanent Strips, Keep It Simple 2mm Adhesive Foam Sheet, Trinity Pick Up Stick

I hope you’ve enjoyed seeing this project and you’re inspired to get your craft on! Be sure to check out all the amazing stamps and dies, pigments and mists, cardstock and tools (just to name a few) at Brutus Monroe! And if you happen to have a sweet tooth and like to munch while you craft (like I do, lol), check out Scoozie’s Confections & Curiosities! OMG, I’m hooked! ;) Follow us on Facebook, Instagram and YouTube for tons of crafty inspiration! And come on over and join our Fan Club Facebook Group to share your crafty makes using our products! Thanks so much for stopping by today – we’ll see you next time!

Scrappy hugs,

Spring Wishes

Hey everybody, happy Wednesday and happy Spring! It’s still a little chilly here but our temps are rising and I do believe Spring is in the air. I’m up on the Love From Lizi blog today with a tutorial for making a circular easel card with an acetate front. This card features our Rise and Shine Stamp Set, Floral Wellington Boot Cutting die, and Matte Silver Sway Peel-Off Stickers – all from our March release. I also used additional dies, papers and embellishments from the store. This card may look daunting but it’s really fairly simple, so be sure to check out my tutorial on the Love From Lizi blog if you’d like to learn how to make it.

I cut the card base, frames and a couple layers from CutCardStock Basis 80# White 12×12 cardstock. I also cut a layering panel from a red floral print in the Love You paper pack, as well as frames and a layering panel from a red print in the Linen Rainbow paper pack. Using the Floral Wellington Boot Cutting Die, I die cut two wellies from a coordinating print in the Love You paper pack, trimmed off the floral element and added a small strip of Matte Silver Sway Peel-Off Sticker to each.

I added a strip of white pearls to the front of each wellie, and also added a sole to each of the wellies by cutting the very bottom portion from a red linen scrap and trimming it down. I used the Winter Roses Cutting Dies to cut the white roses from white cardstock to embellish the background of the acetate panel, and then added the wellies. I layered circular die cuts to the inside and added a sentiment from the Rise and Shine stamp set, stamped in red ink, and popped up on adhesive foam which doubled as the stopper.

Here are a couple additional shots. As an optional step, I added a custom sentiment that I typed on my computer as well as a leftover frame to the bottom of the card to create an area to sign and/or write a short message.

Affiliate links are used in this post at no cost to you – I really appreciate your support!

Love From Lizi products used:
Rise and Shine Stamp Set
Floral Wellington Boot Cutting Die
Winter Rose Cutting Dies
Linen Rainbow 6×6 Patterned Paper Pack
Love You 6×6 Specialty Paper Pack
Stitched Circle Nested Cutting Dies
Matte Silver Sway Peel-Off Stickers
Mini Pearl Strips

Other products used:
CARDSTOCK/PAPER: CutCardStock Basis 80# White 12×12 cardstock
INK: Catherine Pooler Rouge ink
ACCESSORIES: Fiskars 12″ ProCision Rotary Bypass Paper Trimmer, Bearly Art precision craft glue, My Sweet Petunia Precision Glue Press, Mini MISTI, Big Shot, Grafix Crystal Clear Craft Plastic, Keep It Simple Back To Basics Shaker Basics 3mm Adhesive Foam Sheet, Scrapbook Adhesives Thin 3D Foam Squares

I hope you’ve enjoyed seeing this project and you’re inspired to get crafty! Be sure to join our Facebook Group and Follow us on Instagram and YouTube for lots of crafty inspiration! Thanks so much for stopping by today – we’ll see you next time!

Scrappy hugs,

Whoop De Doo

Hey everybody, a big ol’ Happy Saturday to you! I hope you have something fun planned this weekend. We are expecting some temps in the 60s and 70s next week, and even with the mild Winter we’ve had and our love for cooler weather, we’re ready for Spring! ;) I’m thrilled to share a Keep It Simple DT inspiration project with you today that I created with our NEW Triangle Accordion Pocket Card Dies that were released yesterday! I paired these dies with our Snow Day papers and Scandinavian Christmas Gnomes stamps and dies, along with our Birthday Sentiments stamps and Stitched Rectangles nested dies.

And I’m proud to share that Keep It Simple sent this die set into production after my Christmas-themed accordion pocket card sample HERE was deemed a huge hit at one of the expos last Summer. Needless to say, my head swelled a bit when she told us about it, and I’m thrilled to share it with you today. My sample was all hand-cut and this die set makes this card a breeze to create!

Using the KIS Cuts Triangle Accordion Pocket Card Dies, I cut the card base from American Crafts Black cardstock along with layering panels from coordinating prints from the Snow Day 6×9 and 12×12 Collection Packs. I stamped a couple images from the Scandinavian Christmas Gnomes Collection Stamps, colored them with an assortment of markers, and cut them with the coordinating Outline Dies.

Using a die in the Back To Basics Stitched Rectangles Nested Dies, I cut a card to slip into the pocket. For the final step, I stamped several sentiments from the Back To Basics Birthday Sentiments stamp set in Memento Tuxedo Black and Catherine Pooler Rockin’ Red inks, fussy cut or trimmed them, and adhered them to the front, inside and the pocket card.

Here’s an additional shot showing the card removed from the pocket. This is such a fun set of dies that can be used for literally any occasion with any color palette!

Keep It Simple products used:
KIS Cuts Triangle Accordion Pocket Card Dies
Snow Day 6×9 Collection Pack
Snow Day 12×12 Collection Pack
Back To Basics Stitched Rectangles Nested Dies
Back To Basics Black & White 6×9 Collection Pack
Scandinavian Christmas Gnomes Collection Stamps
Scandinavian Christmas Gnomes Outline Dies
Back To Basics Birthday Sentiments Stamp Set

Affiliate links are used in this post at no cost to you – I really appreciate your support!

Other products used:
CARDSTOCK/PAPER: American Crafts Black cardstock
INK: Memento Tuxedo Black ink, Catherine Pooler Rockin’ Red ink; Bic Mark-It Fine Point markers- Rambunctious Red, Tuxedo Black and Cloud Nine Grey; Copic Kirarina Wink Orange marker, Copic Ciao E50 Egg Shell, Sakura Pigma Micron 08 Black pen
ACCESSORIES: Fiskars 12″ ProCision Rotary Bypass Paper Trimmer, Elmer’s Craft Bond Tape Runner, Bearly Art precision craft glue, My Sweet Petunia Precision Glue Press, Mini MISTI, Big Shot, Spellbinders Detail Scissors, Scrapbook Adhesives Thin 3D Foam Squares

I hope you’ve loved seeing this project as much as I loved creating it and you’re inspired to get crafty! Be sure to check out ALL the fun goodies in the Keep It Simple online store! Save 10% on your entire order when you shop online using code LoveToScrap2 at checkout! There is no minimum purchase requirement and no usage limits, AND it combines with product, order, and shipping discounts! Is that cool, or what?! Be sure to Follow us on Facebook, Instagram, and Pinterest for lots of crafty inspiration! Thanks so much for stopping by today – we’ll see you next time!

Scrappy hugs,

Hello Friend

Hey everybody! Another Friday has rolled around which means we’re a little closer to the end of March… daaaaang! I’m delighted to share a Brutus Monroe DT inspiration project today featuring our amazingly beautiful Wisteria Stamps and Dies along with a print in the Plaid Petals 6×6 Paper Pack. I also used our Aubergine cardstock and Violet Shift Crystals (among a few other BM products) to make this card come to life. I’ve made a few lattice cards over the past few years, getting my inspiration originally from Brandy Cox over at Brandy’s Cards. But this is the first one I’ve ‘enclosed’ by adhering a panel behind the front flap which was just a random idea I had. It’s a little different than the regular ‘open’ lattice version and I like it!

I have to admit, I cheated a little… I had the lattice card base already made for another design team product and decided not to use it. So, you know, it was laying on my craft desk just begging for some Brutus Monroe products to be added to it, lol! I had crafted the card base from Neenah Classic Crest 110# Solar White cardstock, cutting the lattice strips narrower on this card than those on any of the previous ones I’ve made. I cut a panel from a pre-scored card base and adhered it to the back of the front flap to enclose the lattice. And I don’t know why that random thought came into my head, but I went with it.

I added a panel of patterned paper from the Plaid Petals 6×6 Paper Pack to the top and then a panel of CutCardStock Glama Clear Natural Translucent Vellum over top of it to tone it down just a bit. Using the Wisteria stamp, I stamped the sentiment and focal image in Raven ink on Solar White, colored the image with alcohol markers, and cut it with the coordinating Wisteria die. The finishing touch was adding several Violet Shift Flat Back Crystals.

I adhered a panel of our Aubergine cardstock to the inside along with a slightly smaller panel cut from the other half of the pre-scored card base. I stamped another sentiment from the Wisteria stamp set in Raven ink, which completed this super easy card!

Affiliate links are used in this post at no cost to you – I really appreciate your support!

Brutus Monroe products used:
BRU 2047 Wisteria Stamp Set
BRU 2221 Wisteria Die Set
BRU 1322 Plaid Petals 6×6 Paper Pack
BRU 5536 Aubergine Cardstock
BRU 4247 Violet Shift Flat Back Crystals
BRU 2543 Raven Detail 2×2 Ink
BRU 2828-2 Pre-Scored A2 Card Bases

Other products used:
CARDSTOCK/PAPER: Neenah Classic Crest 110# Solar White cardstock, CutCardStock Glama Clear Natural Translucent Vellum
INK: Spectrum Noir Tri-Blends- YG1 and LV1/2
ACCESSORIES: Fiskars 12″ ProCision Rotary Bypass Paper Trimmer, Bearly Art precision craft glue, My Sweet Petunia Precision Glue Press, MISTI stamp tool, Big Shot, Scrapbook Adhesives Thin 3D Foam Squares, Trinity Pick Up Stick

I hope you’ve enjoyed seeing this project and you’re inspired to get your craft on! Be sure to check out all the amazing stamps and dies, pigments and mists, cardstock and tools (just to name a few) at Brutus Monroe! And if you happen to have a sweet tooth and like to munch while you craft (like I do, lol), check out Scoozie’s Confections & Curiosities! OMG, I’m hooked! ;) Follow us on Facebook, Instagram and YouTube for tons of crafty inspiration! And come on over and join our Fan Club Facebook Group to share your crafty makes using our products! Thanks so much for stopping by today – we’ll see you next time!

Scrappy hugs,

to you & yours

Hey everybody, happy Thursday – I hope you’re having a great week! I’m delighted to share a Scrapbook Pal DT inspiration project with you today created with the very awesome Sizzix-Tim Holtz Vault Festive Wreath Thinlits. This square card was an absolute joy to create with these dies – and if you’ve ever used any of Tim’s thinlits, you know what I’m talking about!

Using the Sizzix Yvette Interlaced Squares Framelits, I cut the 5″ square side-folding card base from American Crafts Leaf cardstock along with layering panels from CutCardStock Bright Gold Foil and coordinating prints in the Lawn Fawn Watercolor Wishes Rainbow 6×6 Paper Pack. I cut all of the wreath pieces (from the Sizzix-Tim Holtz Vault Festive Wreath Thinlits) from Neenah Classic Crest 110# Solar White cardstock and colored them with a variety of Copic Ciao alcohol markers. I really enjoyed assembling the wreath! I gave the candle flames a little shimmer with a Sakura Clear Star Gelly Roll pen and added a computer-generated sentiment.

I cut the inside panel from 80# Solar White and embellished it with leftover strips of the Lawn Fawn paper and CutCardStock gold foil used on the front. I added another computer-generated sentiment which completed the card.

Affiliate links are used in this post at no cost to you – I really appreciate your support!

Scrapbook Pal products used:
Sizzix-Tim Holtz Vault Festive Wreath Thinlits
Sizzix Yvette Interlaced Squares Framelits
Lawn Fawn Watercolor Wishes Rainbow 6×6 Paper Pack
Copic Ciao BV02 Prune
Copic Ciao E37 Sepia
Copic Ciao E47 Dark Brown
Copic Ciao G21 Lime Green
Copic Ciao G82 Spring Dim Green
Copic Ciao G99 Olive
Copic Ciao R20 Blush
Copic Ciao R29 Lipstick Red
Copic Ciao Y000 Pale Lemon
Copic Ciao Y35 Maize
Copic Ciao YR02 Light Orange
Copic Ciao YR68 Orange
My Sweet Petunia Glue Press
Bearly Art precision craft glue
Scrapbook Adhesives Thin 3D Foam Squares White
Scrapbook Adhesives E-Z Runner Permanent Strips

Other products used:
CARDSTOCK/PAPER: American Crafts Leaf cardstock, CutCardStock Bright Gold Foil cardstock, Neenah Classic Crest 110# and 80# Solar White cardstock
INK: Sakura Clear Star Gelly Roll pen
ACCESSORIES: Fiskars 12″ ProCision Rotary Bypass Paper Trimmer, Big Shot

I hope you’ve enjoyed this project and you’re inspired to get crafty! Be sure to check out the awesome array of craft supplies in the Scrapbook Pal store… the selection is amazing! And head over to the Scrapbook Pal FacebookPinterest and Instagram pages for more design team inspiration! And if you haven’t yet subscribed to our YouTube Channel, be sure to do that, too, for tons of hands-on crafty inspiration! Thanks so much for stopping by today – we’ll see you next time! 

Scrappy hugs,

HELLO mini slimline

Hey everybody, happy middle of the week! The weeks sure are rolling by fast… and I sure wish some warmer weather would follow. Our southern friends are having heat waves and we have snow on the ground! In all honesty, we’ve had a very mild Winter so I’m really not complaining. I’m up on the CutCardStock blog today with a tutorial for making a fun friendship card featuring the Spellbinders Sunset In A Glass die set that I’m totally in love with! I actually had another project created and scheduled to go live this morning, but since our Lessebo cardstock is 10% off throughout the month of March (and it happens to be my favorite), I decided to switch gears and share this mini slimline card instead. Good choice, right?! I used six colors from our Lessebo line as well as light and medium shades of kraft.

I cut my go-to size of 3-1/2″ x 6″ mini slimline card base from Lessebo Coffee Bean as well as a layering panel from Desert Storm cardstock (the lighter one) and a die cut panel from Twine cardstock (the slightly darker one) using a Kat Scrappiness Mini Slimline Stitched Rope Die. Then I went to work creating the focal image. Using the Spellbinders Sunset In A Glass die set, I cut the pieces from Lessebo Coffee Bean, Lessebo Brick Orange, Lessebo Sunset Orange, Lessebo Cherry Red, Lessebo Arctic Blue, Lessebo White, Twine and Desert Storm. Once I completed the assembly of the glass, the finishing touch was adding several Freckled Fawn Enamel Dots.

I used the same Kat Scrappiness Mini Slimline Stitched Rope Die to cut the inside panel from Twine cardstock and then added a slightly smaller panel of Desert Storm cardstock. The sentiment is from the Pinkfresh Studio Wonderful Sentiments stamp set which I stamped in Catherine Pooler Icing on the Cake ink.

Affiliate links are used in this post at no cost to you – I really appreciate your support!

CutCardStock products used:
Lessebo Coffee Bean cardstock
Lessebo Brick Orange cardstock
Lessebo Sunset Orange cardstock
Lessebo Cherry Red cardstock
Lessebo Arctic Blue cardstock
Lessebo White cardstock
Twine cardstock
Desert Storm cardstock

Other products used:
STAMPS: Pinkfresh Studio Wonderful Sentiments Stamp Set
INK: Catherine Pooler Icing on the Cake ink
DIES/PUNCHES: Spellbinders Sunset In A Glass Die Set, Kat Scrappiness Mini Slimline Stitched Rope Dies
ACCESSORIES: Fiskars 12″ ProCision Rotary Bypass Paper Trimmer, Bearly Art precision craft glue, My Sweet Petunia Precision Glue Press, MISTI stamp tool, Big Shot, Scrapbook Adhesives 3D Foam Squares, Freckled Fawn Enamel Dots

I hope you’ve enjoyed today’s project and you’re inspired to get crafty! Be sure to check out all the awesome cardstock and other goodies at CutCardStock (adhesives, labels, stickers, pens, watercolors and ribbon to name a few). And head on over to the CutCardStock Facebook Page and for more inspiration! Also, be sure to join our Creating with CutCardStock Facebook Group for even more crafty inspiration! Thanks so much for stopping by today – we’ll see you next time!

Scrappy hugs,

Irish You A… Lucky Day

Hey everybody, Happy St. Patty’s Day and may the luck o’ the Irish be with you! I’m excited to share a DT inspiration project for Keep It Simple with you today. Several of our DT members made optional ‘green projects’ to share today and I’m showcasing a super cute hinge card using papers and stamps from our Lucky Day Collection. I recently saw this hinge card on Pinterest that sparked my interest and looked really familiar. I was sure I had made one similar to it but with a different name, and after searching I came up with THIS double flap fun fold from a couple years ago. Similar but slightly different, and a whole lot of fun!

I cut the card base and scored flaps from Neenah Classic Crest Solar White cardstock along with layering panels from assorted prints in the Lucky Day 6×9 Collection Pack. I stamped the rainbow and gnome on Solar White, colored them with an assortment of green Copic Ciao alcohol markers, and adhered them to the narrow front flap on adhesive foam squares. I added some Cosmic Shimmer Fluffy Stuff to the clouds and heated it with my heat tool to fluff it up.

I then stamped the sentiment in two sections (along with some stars and clover) in Memento Cottage Ivy, Bamboo Leaves and Pear Tart inks, and adhered one part to the front and the other part to a panel beneath the narrow front flap. I added a small disc magnet to keep the card closed.

When the narrow front flap is lifted, there is a larger flap that opens to the left. I embellished this area with a strip cut from a print in the Lucky Day Collection Pack as well as a heart die cut from another print in the collection pack. I used the KIS Slimline Cuts Stitched Hearts Die to cut the heart. I stamped a sentiment from the Lucky Day Collection Stamps in Cottage Ivy ink, trimmed it into a strip, and adhered it across the heart.

Keep It Simple products used:
Lucky Day 6×9 Collection Pack
Lucky Day Collection Stamps
KIS Slimline Cuts Stitched Hearts
Back To Basics Stars & Stripes Enamel Stars
Back To Basics Lime Enamel Dots

Affiliate links are used in this post at no cost to you – I really appreciate your support!

Other products used:
CARDSTOCK/PAPER: Neenah Classic Crest 110# and 80# Solar White cardstock
INK: Memento Tuxedo Black, Cottage Ivy, Bamboo Leaves and Pear Tart inks; Copic Ciao alcohol markers- G21 Lime Green, G82 Spring Dim Green, G99 Olive, Y28 Lionet Gold, C-0 Cool Gray; Spectrum Noir Tri-Blends- FS6/7/8; Sakura Clear Star Gelly Roll pen
ACCESSORIES: Fiskars 12″ ProCision Rotary Bypass Paper Trimmer, Bearly Art precision craft glue, My Sweet Petunia Precision Glue Press, Mini MISTI, Big Shot, Cosmic Shimmer Fluffy Stuff, Milwaukee heat tool, Scrapbook Adhesives Thin 3D Foam Squares, small disc magnet

I hope you’ve loved seeing this project as much as I loved creating it and you’re inspired to get crafty! Be sure to check out ALL the fun goodies in the Keep It Simple online store! Save 10% on your entire order when you shop online using code LoveToScrap2 at checkout! There is no minimum purchase requirement and no usage limits, AND it combines with product, order, and shipping discounts! Is that cool, or what?! Be sure to Follow us on Facebook, Instagram, and Pinterest for lots of crafty inspiration! Thanks so much for stopping by today – we’ll see you next time!

Scrappy hugs,

Sunny Friends ATCs

Hey everybody, Happy Friday! I hope you’ve had an awesome week! I’m thrilled to share a Brutus Monroe DT inspiration project with you today featuring our Sunny Friends Dies, Bee Yourself Stamp Set and Playful Patterns 6×6 Paper Pack. I also used our Not Your Mamas Cardstock, three solid color cardstock colors, and a variety of other BM products. You know how I love me some ATCs and it’s been a minute since I’ve made any… so I was ready! They were so much fun and I totally love how they turned out!

I started by die cutting all the pieces for the snail, lemon and bee focal images from Not Your Mamas Cardstock, and colored them with Copic Ciao alcohol markers. I assembled the focals and added some Fallen Snow Glitter Glaze dabbed onto spots of Bearly Art Glue, smeared them together, and set them aside to dry. I used a 1/2″ circle of our Heat Resistant Acetate to adhere the snail shell to since there were small spaces between the pieces.

I cut the 2-1/2″ x 3-1/2″ artist trading card bases from Not Your Mamas Cardstock as well as layering panels from prints in the Playful Patterns 6×6 Paper Pack, and rounded the corners on all of them. I cut a strip for each card (one from Sea, Harvest and Cabbage solid cardstock) and stamped a sentiment on each from the Bee Yourself stamp set in Raven ink. The finishing touch was adding Violet Shift, Emerald Green and Topaz Flat Back Crystals.

Here is a larger shot of each one… I love ’em!

Affiliate links are used in this post at no cost to you – I really appreciate your support!

Brutus Monroe products used:
BRU 9494 Not Your Mamas Cardstock
BRU 9837 Sunny Friends Cutting Dies
BRU 8596 Bee Yourself Stamp Set
BRU 4008 Playful Patterns 6×6 Paper Pack
BRU 5529 Sea Cardstock
BRU 7264 Harvest Cardstock
BRU 5482 Cabbage Cardstock
BRU 2543 Raven Detail 2×2 Ink
BRU 4505 Fallen Snow Glitter Glaze
BRU 8547 Stick and Stamp Mat 10 year Anniversary Edition
BRU 3690 Heat Resistant Clear Acetate
BRU 4247 Violet Shift Flat Back Crystals
BRU 6421 Emerald Green Flat Back Crystals
BRU 0060 Topaz Flat Back Crystals

Other products used:
INK: Copic Ciao- B23 Coral Sea, BV04 Blue Berry, C-3 Cool Gray, G99 Olive, R35 Coral, RV21 Light Pink, Y35 Maize, YG06 Yellowish Green, YR16 Apricot, 100 Black
DIES/PUNCHES: Kadomaru Pro Corner Rounder, Stampin’ Up 1/2″ Circle Punch
ACCESSORIES: Fiskars 12″ ProCision Rotary Bypass Paper Trimmer, Bearly Art precision craft glue, My Sweet Petunia Precision Glue Press, Mini MISTI, Big Shot, Scrapbook Adhesives Thin 3D Foam Squares, Trinity Pick Up Stick

I hope you’ve enjoyed seeing this project and you’re inspired to get your craft on! Be sure to check out all the amazing stamps and dies, pigments and mists, cardstock and tools (just to name a few) at Brutus Monroe! And if you happen to have a sweet tooth and like to munch while you craft (like I do, lol), check out Scoozie’s Confections & Curiosities! OMG, I’m hooked! ;) Follow us on Facebook, Instagram and YouTube for tons of crafty inspiration! And come on over and join our Fan Club Facebook Group to share your crafty makes using our products! Thanks so much for stopping by today – we’ll see you next time!

Scrappy hugs,

Under the Sea

Hey everybody, I hope you’re having a great day! I’ve popped in this morning with a Keep It Simple DT inspiration project created with papers, stamps and dies from our new Once Upon A Time: Ariel Collection. This collection just released last week and if you’re a fan of fairytales and princesses, you are in for a real treat. I used my own open box card design to create an aquarium card, and I totally love how it turned out. I’ve made quite a few open box cards over the years – even a fairly large one for another design team project a couple years ago – and it’s super simple to make. My Freebies page is currently unavailable but drop me a comment on this post if you’d like me to email you my instructions.

I cut the card base and strips from CutCardStock Basis Aqua cardstock along with layering panels from a watery looking print in the Aerial collection that was perfect for an underwater scene. I stamped a sentiment and quite a few images from the Ariel Collection Stamps on Neenah Classic Crest 110# Solar White cardstock and colored the images with an assortment of markers. I added some shimmer with a Spectrum Noir Crystal Clear Overlay marker and then die cut them with the coordinating Ariel Outline Dies. I built my scene, adding images to all three strips and to the background, along with the sentiment, and popping some of them up on thin adhesive foam squares. The final touch was adding a panel of clear acetate from our Shaker Basics- Foam & Acetate Pack for the aquarium front.

I cut a panel of 80# Solar White cardstock for the back and embellished it with another print in the Ariel Collection. I stamped a sentiment, also from the Ariel Collection Stamps, in Catherine Pooler Cummerbund ink, and this completed the card. I’ve also included an overhead angle shot so you can see the construction. So fun!

Keep It Simple products used:
Once Upon A Time: Ariel 12×12 Collection Pack
Once Upon A Time: Ariel Collection Stamps
Once Upon A Time: Ariel Outline Dies
KIS Shaker Basics- Foam & Acetate Pack

Affiliate links are used in this post at no cost to you – I really appreciate your support!

Other products used:
CARDSTOCK/PAPER: CutCardStock Basis Aqua cardstock, Neenah Classic Crest 110# and 80# Solar White cardstock
INK: Memento Tuxedo Black ink; Bic Mark-It Fine Point markers- Peach Parfait, Sunset Orange, Yellow Blaze, Key Lime, Oceanview Blue, Blue Skies Blue, Hot Aqua, Summer Melon and Polynesian Purple; Sharpie Ultra Fine Point marker- Red; Spectrum Noir Tri-Blends- FS6/7/8; Spectrum Noir Crystal Clear Overlay Marker, Catherine Pooler Cummerbund ink
ACCESSORIES: Fiskars 12″ ProCision Rotary Bypass Paper Trimmer, Elmer’s Craft Bond Tape Runner, Bearly Art precision craft glue, My Sweet Petunia Precision Glue Press, Mini MISTI, Big Shot, Scor-Tape 1/8″, Scrapbook Adhesives Thin 3D Foam Squares

I hope you’ve loved seeing this project as much as I loved creating it and you’re inspired to get crafty! Be sure to check out ALL the fun goodies in the Keep It Simple online store! Save 10% on your entire order when you shop online using code LoveToScrap2 at checkout! There is no minimum purchase requirement and no usage limits, AND it combines with product, order, and shipping discounts! Is that cool, or what?! Be sure to Follow us on Facebook, Instagram, and Pinterest for lots of crafty inspiration! Thanks so much for stopping by today – we’ll see you next time!

Scrappy hugs,