Metallic & Suede Fringe Earrings

3/28/22 Rising Star at A Place To Start!
4/4/22 Top Sprout at A Place To Start!

Hey, everybody! Happy Friday! What you got goin’ on this weekend… anything fun?! Lol, you know where I’ll be (wink-wink)! Affiliate links are used in this post at no cost to you – I really appreciate your support! I’m stoked to be back on the CutCardStock blog today with an awesome DT inspiration project featuring more of the Curious Metallic cardstock on sale this month! Have you ever even considered making earrings out of cardstock?! I created another couple pairs of fringe earrings – one pair is made entirely from Curious Metallic cardstock and embellished with tiny clear gemstones, and the other pair has Curious Metallic cardstock elements but is made primarily from craft leather and embellished with Nuvo Bottle Green Crystal Drops. These were so much fun!

This first pair is made entirely of cardstock. I die cut the pieces for each earring from Curious Metallic White Silver, Curious Metallic Violette and Curious Metallic Night. I assembled them with Bearly Art precision craft glue, affixed the earring wires and rings, and then adhered tiny clear gemstones.

This second pair has Curious Metallic cardstock elements but is made primarily from craft leather. I die cut two of the pieces for each earring from Curious Metallic Chestnut and Curious Metallic Aloe, and the fringe pieces from brown and green craft leather. I assembled them with Bearly Art precision craft glue, affixed the earring wires and rings, and then applied tiny dots of Bottle Green Crystal Drops.

And one more peek of each pair… super happy with how these turned out! Not sure whether I want to gift them or keep them! ;)

Sharing in the following challenges:
1. A Perfect Place To Craft Open Challenge: #3-2022 – Anything Goes
2. A Place To Start: #032022 – Anything Goes w/ optional Two By Two
3. Classic Design Challenge: March #3 – Anything Goes
4. The Creative Crafters: #50 – Anything Goes

CutCardStock products used:
Curious Metallic White Silver
Curious Metallic Violette
Curious Metallic Night
Curious Metallic Chestnut
Curious Metallic Aloe

Other products used:
Dies/Punches: Taylored Expressions Designer Dangles – Fringe
Accessories: Taylored Expressions Craft Leather – Faux Suede, eeBeads earring wires and rings, Big Shot, Darice tiny clear gemstones, Nuvo Bottle Green Crystal Drops, Bearly Art precision craft glue

I hope you’ve enjoyed today’s project and you’re inspired to get crafty! Be sure to check out all the awesome cardstock and other goodies at CutCardStock (adhesives, labels, stickers, pens, watercolors and ribbon to name a few). And head on over to the CutCardStock Facebook Page for more inspiration! Thanks so much for stopping by today – we’ll see you next time!

Scrappy hugs,

RIP

Howdy, peeps! Happy St. Patty’s Day to ya! The weekend is almost here and I hope you have something fun planned! Our weather is starting to warm up and it’s just beautiful outdoors! Affiliate links are used in this post at no cost to you – I really appreciate your support! I’m back this morning to share another sample I created a while back for Prickley Pear Stamps – a fun Halloween card with a coffin that opens up to reveal shaker elements and die cut bones inside! Bahahaha… I had THE best time creating this! This card features our Dancing Skeleton stamp set and coordinating Dancing Skeleton die set along with the inside sentiment from our Bats 2 stamp set.

I cut a standard A2 size side-folding card base from CutCardStock Basis Light Brown cardstock along with a wood-look layering panel from My Mind’s Eye Howdy Doody paper pad which I adhered to the card base. I added a light brown cardstock strip down the left side of the card front that I embellished with a strip of Eyelet Outlet gold film strip washi tape and clear bling colored with a brown alcohol marker. Using the Dancing Skeleton stamp set, a piece of acetate, and several double-sided adhesive foam strips, I created a 3-D coffin shaker which I embellished with some paper flowers. I stamped the RIP sentiment (from the same stamp set) in the lower right corner prior to adhering the coffin to the front of the card.

Here’s a shot of the open coffin revealing bones die cut from Neenah Classic Crest Baronial Ivory cardstock using the Dancing Skeleton die set. The shaker filler consists of spider confetti from stash, Pretty Pink Posh Silver Shimmer Seed Beads, Spiegelmom Scraps Snowy Fields Sequin Mix, and Doodlebug Design Orange Sequins. I added homemade hinges and a small magnet closure.

I cut the inside panel from Neenah Classic Crest Baronial Ivory cardstock and embellished it with a strip of the wood-look paper used on the front as well as a narrow strip of CutCardStock Basis Light Brown cardstock. I stamped a sentiment from the Bats 2 stamp set in Memento Rich Cocoa ink and layered the panel on light brown cardstock.

And one more look… so so so happy with how this turned out! These stamp sets (and dies) are amazing and create some of the most fun cards!

Sharing in the following challenges:
1. A Perfect Time To Craft: #3-2022 – Anything Goes
2. Classic Design Challenge: March #3 – Anything Goes
3. Crafting Happiness Challenges: #121 – Anything Goes Always
4. Paperbabe Stamps: #163 – Anything Goes
5. QKR Stampede: #440 – Anything Goes
6. The Creative Crafters: #50 – Anything Goes
7. Through The Craft Room Door: March Anything Goes
8. World Wide Open Design Team Monthly Challenge: #03 March – Anything Goes

Prickley Pear Stamps products used:
Dancing Skeleton stamp set
Dancing Skeleton die set
Bats 2 stamp set

Other products used:
Cardstock/Paper: CutCardStock Basis Light Brown cardstock, Neenah Classic Crest Baronial Ivory cardstock, My Mind’s Eye Howdy Doody 6×6 designer paper pad
Ink: Memento Rich Cocoa ink (pad and marker); Nuvo alcohol marker- 465-Natural Browns
Accessories: Tonic Studios 12″ Guillotine Paper Trimmer, MISTI stamp tool, Bearly Art precision craft glue, Grafix Crystal Clear Craft Plastic, spider confetti from stash, Pretty Pink Posh Silver Shimmer Seed Beads, Spiegelmom Scraps Snowy Fields Sequin Mix, Doodlebug Design Orange Sequins, Darice Double-Sided Adhesive Foam Strips, Eyelet Outlet Gold Film Strip washi tape, Eyelet Outlet clear bling

I hope you’ve enjoyed this project! Be sure to check out all the awesome stamps and dies at Prickley Pear Stamps! If you’d like to save 10% on anything on the site when you shop at Prickley Pear Stamps, use the coupon code LESLIE10 at checkout! And be sure to ‘like’ and ‘follow’ the Prickley Pear Stamps Facebook page to keep up with news and sales, and join Prickley Pear Pals (the fan group) for lots of fun crafty ideas and to share your creativity! And finally, we’d love to see you visit the Prickley Pear Stamps blog that’s in the process of being revived and become a Follower! Hope to see you there! Thanks so much for stopping by today – we’ll see you next time! ;)

Scrappy hugs,

You’ve Got This

Hi friends! Happy Hump Day, and a happy day it is! Our weather is starting to warm up a bit and it’s just gorgeous here! Affiliate links are used in this post at no cost to you – I really appreciate your support! I’m tickled pink to share that I’m guesting for Penny’s Paper-Crafty Challenge Blog this fortnight! I scored a top pick honor over there in January so I was invited to be a guest designer for Challenge #517 – Anything Goes with Paper. The sponsors are LeAnn’s World 101 and Pattie’s Creations, and I was given a choice of images to design with and I chose the adorable Briannah digital image from LeAnn’s World. Isn’t she a doll?! This was a fun little scene to put together – from the brick wall to the hardwood floor!

I cut a standard A2 size side-folding card base from CutCardStock Basis 110# white cardstock along with a slightly smaller layering panel from CutCardStock Basis 80# white cardstock which I covered with Eyelet Outlet Brick Wall and Wood washi tape. Using the Stampin’ Up Extra Large Oval punch, I punched an oval and stamped a tone-on-tone design on it in Ranger spun sugar distress ink with the Impression Obsession Cover-a-Card Canvas background stamp. I then punched a scalloped oval with the Marvy Uchida Scalloped Oval punch and DTP-inked the edges with the spun sugar distress ink. I adhered the two punched elements together to create the rug and adhered it to the card front. I then adhered the Briannah digital image which I colored with alcohol markers and cut with my Scan N Cut. I hand-drew a floor lamp, colored it with alcohol markers, and fussy cut it. I adhered it to the card front and added a pull-chain (with a gold pen) and some bling on the lamp shade. I also added a stamped, colored and die cut picture to the wall created with the Art Impressions Matchbook Wall Accessories stamp set. I stamped the sentiment from the Trinity Stamps A Sentiment For (Almost) Everything stamp set on a scrap piece of white cardstock in Catherine Pooler Over Coffee ink, trimmed it, and adhered it to the card front.

I cut the inside panel from CutCardStock Basis 80# white cardstock and embellished it with a strip of CutCardStock Basis Pink cardstock and layered it on the pink cardstock. I will be donating this card to the Cards for Cubs project so I left the inside blank.

And one more peek… so loving how this turned out! This adorable image created the cutest scene! ;)

Sharing in the following challenges:
1. A Perfect Time To Craft: #3-2022 – Anything Goes
2. Ally’s Angels: #56 – Anything Goes
3. Classic Design Challenge: March #3 – Anything Goes
4. Crafting Happiness Challenges: #121 – Anything Goes Always
5. Fab ‘n’ Funky Challenges: #547 – Hand Colored Image
6. QKR Stampede: #440 – Anything Goes
7. The Creative Crafters: #50 – Anything Goes
8. Through The Craft Room Door: March Anything Goes

Products used:
Cardstock/Paper: CutCardStock Basis 110# white cardstock, CutCardStock Basis 80# white cardstock, CutCardStock Basis Pink cardstock
Stamps: Impression Obsession Cover-a-Card Canvas background stamp, Trinity Stamps A Sentiment For (Almost) Everything stamp set, Art Impressions Matchbook Wall Accessories stamp set
Ink: Arteza alcohol markers- PB09/16, R15/18/25, B28, BR28/52, Y31/32; Ranger spun sugar distress ink, Catherine Pooler Over Coffee ink, Sakura white Gelly Roll pen, Pentel Slicci gold pen
Dies/Punches: Stampin’ Up Extra Large Oval punch, Marvy Uchida Scalloped Oval punch
Accessories: We R Memory Keepers Large Guillotine Paper Trimmer, Bearly Art precision craft glue, Eyelet Outlet Brick Wall and Wood washi tape, Darice tiny iridescent gemstones

I hope you’ve enjoyed seeing this guest design project and will link up with us this fortnight! Be sure to check out all the fun digital images at LeAnn’s World 101 and Pattie’s Creations! Thanks so much for stopping by today – we’ll see you next time! ;)

Scrappy hugs,

Some Bunny Loves You Easter Decor

3/20/22 Rising Star at A Place To Start!
4/3/22 Top 3 at International Art & Soul!

Happy Monday, everybody! Hope you had a great weekend and your weather is warming up… even just a little bit! It’s absolutely gorgeous here and I almost feel guilty for not being outdoors enjoying it! I’m thrilled to be back on the Clear Scraps blog today with another awesome DT inspiration project! I created a fun Easter home decor project featuring our Medium DIY Egg Pallet Shape, Easter Chipboard Word Title and Bunnies Chipboard Embellishments. Spring is my second favorite season and I love everything that Easter represents!

I started by covering all three sections of the Medium DIY Egg Pallet Shape with a pretty pastel plaid patterned paper and the two narrow sections of the mounting stick that are visible from the front with CutCardStock Pop-Tone Grape Jelly cardstock. I always use Bearly Art precision craft glue to adhere the patterned paper to the pallet shape and run my brayer back and forth over it several times, and it sticks very nicely. I fashioned a small bow from a Really Reasonable Ribbon pink ribbon scrap and adhered it to the top with Ranger Distress Collage Medium.

Next I worked on the Easter Chipboard Word Title. I first colored it with a teal alcohol marker, and then applied Versamark (from my dirty ‘grunge’ Versamark pad) and Ranger Bridal Tinsel embossing powder, heat embossed it and let it cool down. I then applied Dare 2B Artzy Paradise ink directly from the ink cube, more Versamark (from my grunge pad) and Hero Arts Clear embossing powder, and heat embossed it a second time. I adhered the Easter word at an angle toward the top. I stamped the bunny sentiment in Catherine Pooler Midnight ink on a scrap of Neenah Classic Crest 110# Solar White cardstock, cut it with a My Favorite Things Stitched Rectangle STAX Die-namics, and adhered it on 3-mm-thick adhesive tabs just under the Easter word.

I covered the Bunnies Chipboard Embellishments in Colorbok Bright pink and yellow-orange cardstock, added small cottontails made from cotton balls, and adhered them to the bottom center. I removed the prongs from three colored egg brads and adhered them at the bottom with Ranger Distress Collage Medium. The final touch was adding several YNS purple glitter Gumdrops.

And one more peek… super happy with how this turned out! It’s so simple but really packs a punch… and oh, those colors! These were definitely fun products to play with!

Sharing in the following challenges:
1. A Perfect Time To Craft: #3-2022 – Anything Goes
2. A Place To Start: #032022 – March Anything Goes w/ optional Two By Two
3. Alphabet Challenge Blog: Y is for Your Favorite Color Combination (Pastels!)
4. Aud Sentiments Challenge Blog: #292 – Easter or Spring Sentiment
5. Classic Design Challenge: March #3 – Anything Goes
6. Crafting Happiness Challenges: #121 – Anything Goes Always
7. Crafty Calendar Challenge: March Challenge – Spots/Stripes or Easter
8. Critter Crazy Challenge Blog: #60 – Anything Goes with a Featured Critter
9. International Art & Soul: #129 – Easter Chicks or Rabbits
10. Your Scrapbook Place: March Anything Goes

Clear Scraps products used:
Medium DIY Egg Pallet Shape
Easter Chipboard Word Title
Bunnies Chipboard Embellishments

Other products used:
Cardstock/Paper: Neenah Classic Crest 110# Solar White cardstock, CutCardStock Pop-Tone Grape Jelly cardstock, Colorbok Bright smooth cardstock, The Paper Studio Four Seasons and Everything In Between -2- paper pad
Stamps: Dare 2B Artzy Raggity Rabbit stamp set
Ink: Arteza BG35 alcohol marker, Versamark, Dare 2B Artzy Paradise ink cube, Catherine Pooler Midnight ink
Dies/Punches: My Favorite Things Stitched Rectangle STAX Die-namics
Accessories: We R Memory Keepers Mini Guillotine Paper Trimmer, Bearly Art precision craft glue, Milwaukee heat tool, Ranger Bridal Tinsel embossing powder, Hero Arts Clear embossing powder, MISTI stamp tool, Big Shot, cotton balls, Really Reasonable Ribbon pink ribbon scrap, Ranger Distress Collage Medium, American Crafts 3-mm-thick adhesive foam tabs, YNS purple glitter Gumdrops, Eyelet Outlet Colored Eggs Brads

I hope you’ve enjoyed today’s project and you’re inspired to get those craft supplies out to play! Be sure to check out all the amazing acrylic, wood and chipboard goodies at Clear Scraps… OMGoodness, you won’t be disappointed! And head on over to the Clear Scraps Facebook Page for lots of inspiration! And while you’re at it, join the Clear Scraps Facebook Creative Group to connect with other Clear Scraps fans! Thanks so much for stopping by today – we’ll see you next time!

Scrappy hugs,

Praying For You

Hey, everybody! Can you believe we’re headed into the middle of March already?! Whoosh… won’t be long before another month is on the books! Affiliate links are used in this post at no cost to you – I really appreciate your support! I’ve popped in this morning to share another sample I created for Prickley Pear Stamps with one of THE most adorable stamp sets ever! This card is a standing triple panel card and features our Praying For You stamp set which I paper-pieced using some sweet coordinating patterned papers from Lawn Fawn. I think I have made one card previously with this fold – and it was a number of years ago – so I thought it was time to bring it back around.

I cut the card base from Neenah Classic Crest Solar White 80# cardstock along with layering panels and embellishing strips from an assortment of pink cardstock (two shades I forgot to write down, lol) and patterned papers from the Lawn Fawn Spring Fling 6×6 paper pack, and rounded the corners of most of the pieces. I stamped the focal image on a Solar White cardstock panel and colored part of it with alcohol markers and a metallic gold pen. Using scraps from the same paper pack, I paper-pieced the rest of the image and then assembled the card. I added pink enamel dots to complete the card front.

Here is a close-up of the paper-piecing.

And a couple angled shots so you can see the cool but simple construction.

And one final shot of the back. I left the panel blank to write a custom message and sign. And a cool feature is that the card folds flat for mailing! This was a fun one!

Sharing in the following challenges:
1. A Perfect Time To Craft: #3-2022 – Anything Goes
2. Ally’s Angels: #56 – Anything Goes
3. Classic Design Challenge: March #3 – Anything Goes
4. Crafting Happiness Challenges: #121 – Anything Goes Always
5. Paperbabe Stamps: #163 – Anything Goes
6. Your Scrapbook Place: March Anything Goes

Prickley Pear Stamps products used:
Praying For You stamp set

Other products used:
Cardstock/Paper: Neenah Classic Crest 80# Solar White cardstock, two shades of pink cardstock I forgot to write down (darn it!), Lawn Fawn Spring Fling 6×6 paper pack
Ink: Memento Tuxedo Black ink; Nuvo alcohol markers- 379-Rich Reds Collection, 393-Fragrant Oranges Collection, 405-Sunshine Yellow Collection, 420-Organic Greens Collection, 461-Natural Browns, 476-Ombre Collection, 497-Pebble Beach Collection; Pentel Slicci Gold pen
Dies/Punches: Kadomaru Pro corner rounder
Accessories: Tonic Studios 12″ Guillotine Paper Trimmer, MISTI stamp tool, Bearly Art precision craft glue, Eyelet Outlet Pink Enamel Dots

I hope you’ve enjoyed this project! Be sure to check out all the awesome stamps and dies at Prickley Pear Stamps! If you’d like to save 10% on anything on the site when you shop at Prickley Pear Stamps, use the coupon code LESLIE10 at checkout! And be sure to ‘like’ and ‘follow’ the Prickley Pear Stamps Facebook page to keep up with news and sales, and join Prickley Pear Pals (the fan group) for lots of fun crafty ideas and to share your creativity! And finally, we’d love to see you visit the Prickley Pear Stamps blog that’s in the process of being revived and become a Follower! Hope to see you there! Thanks so much for stopping by today – we’ll see you next time! ;)

Scrappy hugs,

Thank You So Much

Hi everyone! A very Happy Saturday to you – I hope you’ve had a great week! Affiliate links are used in this post at no cost to you – I really appreciate your support! I’m stoked to be back on the Eyelet Outlet blog today with another awesome DT inspiration project! I created a pretty thank you card featuring our Gold Skinny Washi Tape and Black Pearl Bling! I did the bleaching technique on the stamped image on the front of this card and used a lighter-weight 80# cardstock this time (versus 100# cardstock I’ve used in the past) which yielded a sort of mottled effect that I thought looked really cool and added some texture. Foil is so difficult to photograph and I took photos in my studio and outdoors, and these angled ones were the best I could get. *sigh*

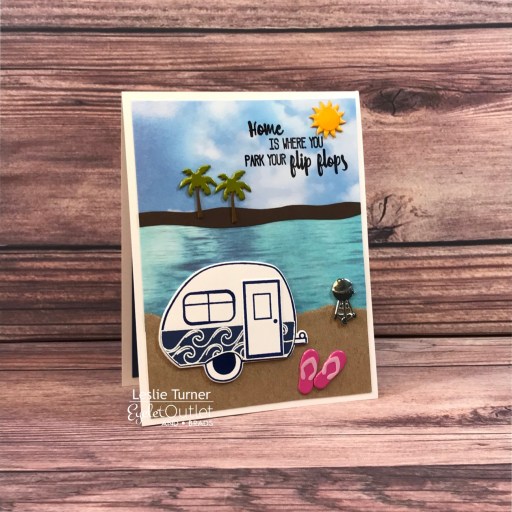
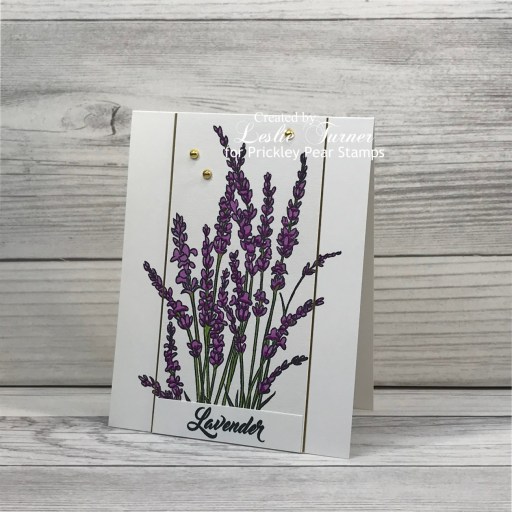
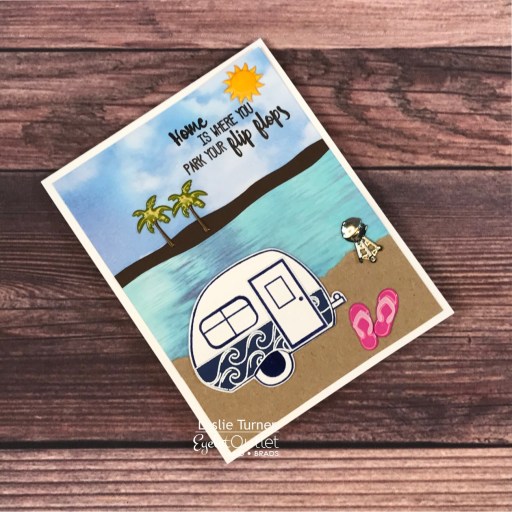
I cut a standard A2 size top-folding card base and layering panel from CutCardStock Basis Black cardstock along with a gold metallic foil layering panel. I applied strips of our Gold Skinny Washi Tape in a diagonal fashion across the black cardstock panel (eyeballed it… didn’t measure) and then adhered it to the gold metallic foil panel and then to the card base. I stamped the floral image from the Trinity Stamps Summer Blooms stamp set in Versamark and heat embossed it with Ranger Super Fine Detail Gold Embossing Powder. I painted the image with a Tsukineko Fantastix Brush and household bleach, and then used Karin Brushmarkers to color the bleached areas of the image. I die cut the image with the coordinating Trinity Stamps Summer Blooms die set and adhered it to three more plain die cuts for a little dimension, and adhered the piece to the card front. I stamped the sentiment from the Trinity Stamps A Sentiment For (Almost) Everything stamp set in Versamark on a scrap piece of the black cardstock and heat embossed it in gold, trimmed it, and adhered it to the card front with Scrapbook Adhesives Black Thin Foam Squares. To finish off the front, I added some Black Pearl Bling.

I cut the inside panel from CutCardStock Basis Light Yellow cardstock and embellished it with a strip of Gold Skinny Washi Tape and two narrow strips of CutCardStock Basis Black cardstock cardstock. I stamped the sentiment (from the same stamp set) in black ink and layered the panel on the Hygloss Gold Metallic Foil cardstock.

And one more look… super happy with how this turned out! There’s nothing more classy-looking than our gold skinny washi tape on black cardstock! And the Black Pearl Bling really tops it off!

Sharing in the following challenges:
1. A Perfect Time To Craft: #3-2022 – Anything Goes
2. Classic Design Challenge: March #3 – Anything Goes
3. Crafting Happiness Challenges: #121 – Anything Goes Always
4. Crafty Gals Corner: #229 – Add A Flower
5. Paperbabe Stamps: #163 – Anything Goes
6. Your Scrapbook Place: March Anything Goes

Eyelet Outlet products used:
Gold Skinny Washi Tape
Pearl Bling Multi Size Black

Other products used:
Cardstock/Paper: CutCardStock Basis Black cardstock, CutCardStock Basis Light Yellow cardstock, Hygloss Gold Metallic Foil cardstock
Stamps: Trinity Stamps Summer Blooms stamp set, Trinity Stamps A Sentiment For (Almost) Everything stamp set
Ink: Versamark; Karin Brushmarkers- Red Lilac, Olive Green, Apple and Gold
Dies/Punches: Trinity Stamps Summer Blooms die set
Accessories: Tonic Studios 12″ Guillotine Paper Trimmer, Bearly Art precision craft glue, MISTI stamp tool, Big Shot, Ranger Super Fine Detail Gold Embossing Powder, Tsukineko Fantastix Brush, household bleach, Scrapbook Adhesives 3D Foam Squares Variety Pack

I hope you’ve enjoyed today’s project! Be sure to check out all the fun goodies at Eyelet Outlet! I can already see you drooling, lol! Be sure to ‘like’ and ‘follow’ Eyelet Outlet Facebook Page to keep up with news and sales, and while you’re at it, join the Eyelet Outlet Fans Facebook group for lots of creative inspiration! Thanks so much for stopping by today – we’ll see you next time! ;)

Scrappy hugs,

Lilac Flowers 4-Panel Fold

Hi friends! Happy Friday… is your week flying by as quickly as mine is?! Dang! ;) Affiliate links are used in this post at no cost to you – I really appreciate your support! I’m back on this fine chilly morning to share a card I created last summer for Prickley Pear Stamps. This fun fold is called a 4-panel fold and features our Sketched Florals Lilac stamp set along with sentiments from our Flowers For Beautiful You stamp set and some paper-piecing! ;) Despite it’s complex look, though, it was really quite simple.

I cut the card base pieces from CutCardStock Basis Dark Purple cardstock along with layering panels from CutCardStock Stardream Metallic Amethyst cardstock, CutCardStock Pop-Tone Grapesicle cardstock, Neenah Classic Crest Solar White cardstock, and plaid patterned paper from the Recollections Bold Basics paper pad. I also die cut two rectangles using a Cottage Cutz Double-Stitched Rectangle die on which I stamped sentiments. I stamped the lilacs image on the three white cardstock panels and on one of the die cut rectangles. I stamped it several more times on scrap pieces of Solar White cardstock which I colored with alcohol markers, a Heather Spectrum Aqua marker, and a Faber Castell May Green Pitt Artist Pen. I fussy cut the images and paper-pieced them onto the three white cardstock panels and the one die cut rectangle. I layered all the panels together and adhered them to the card base. I then added Nuvo English Mustard Crystal Drops to the centers of all the lilac flowers and added a few gemstones from the Trinity Stamps Amethyst Accent Embellishment Mix to the backgrounds.

Here are a couple additional shots.

And one more look… such a fun fold created with beautiful stamps! I’ve had this handwritten tutorial in my arsenal for many years and it’s hard to believe I hadn’t made one before last summer!

Sharing in the following challenges:
1. A Perfect Time To Craft: #3-2022 – Anything Goes
2. Ally’s Angels: #56 – Anything Goes
3. Classic Design Challenge: March #3 – Anything Goes
4. Crafting Happiness Challenges: #121 – Anything Goes Always
5. Crafty Gals Corner: #229 – Add A Flower
6. Paperbabe Stamps: #163 – Anything Goes
7. Stamping Sensations: March Challenge – Stamp Something For Spring
8. Wednesday’s Creative Inspirations Challenge Blog: Spring Flowers

Prickley Pear Stamps products used:
Sketched Florals Lilac stamp set
Flowers For Beautiful You stamp set

Other products used:
Cardstock/Paper: Neenah Classic Crest 80# Solar White cardstock, CutCardStock Basis Dark Purple cardstock, CutCardStock Stardream Metallic Amethyst cardstock, CutCardStock Pop-Tone Grapesicle cardstock, Recollections Bold Basics paper pad
Ink: Memento Tuxedo Black ink; Nuvo alcohol markers- 409/420-Organic Greens Collection, 439-Royal Purples Collection; Heather Spectrum Aqua marker, Faber Castell May Green Pitt Artist Pen
Dies/Punches: Cottage Cutz Double-Stitched Rectangle dies
Accessories: Tonic Studios 12″ Guillotine Paper Trimmer, MISTI stamp tool, Big Shot, Trinity Stamps Amethyst Accent Embellishment Mix, Nuvo English Mustard Crystal Drops

I hope you’ve enjoyed this project! Be sure to check out all the awesome stamps and dies at Prickley Pear Stamps! If you’d like to save 10% on anything on the site when you shop at Prickley Pear Stamps, use the coupon code LESLIE10 at checkout! And be sure to ‘like’ and ‘follow’ the Prickley Pear Stamps Facebook page to keep up with news and sales, and join Prickley Pear Pals (the fan group) for lots of fun crafty ideas and to share your creativity! And finally, we’d love to see you visit the Prickley Pear Stamps blog that’s in the process of being revived and become a Follower! Hope to see you there! Thanks so much for stopping by today – we’ll see you next time! ;)

Scrappy hugs,

Celebrate

Hi everyone! Well y’all, we’ve rounded the corner to another Thursday so that means we’re on the down-slide to Friday! Hope your weather is warming up just a little bit and you have something fun planned this weekend! Affiliate links are used in this post at no cost to you – I really appreciate your support! I’ve popped in today to share an awesome Tape Runner DT inspiration project! I created a cool birthday card featuring a STAMPlorations Wish Big A2 Card Front that was included a Paper Goods sampler tucked into one of my orders a while back, and of course, all panels were adhered with Retractable Tape Runner. I also used CUTplorations Circles All Over Texture Cover Plate and Skinny Sentiments (some of my all-time favorites) on this card front. I donated this card to the Bearly Arts Cards for Cubs project. :)

As mentioned above, all panels were adhered with Retractable Tape Runner. Wet glue was used only to adhere the front sentiment and the narrow strip inside. I cut a standard A2 size card base from Neenah Classic Crest Solar White 110# cardstock along with a layering panel from CutCardStock Pop-Tone Black Licorice cardstock. I trimmed the STAMPlorations Wish Big A2 Card Front and ran it through the Big Shot with the CUTplorations Circles All Over Texture Cover Plate to give it a little interest. I layered it on the black cardstock panel and adhered it to the card base. Using the CUTplorations Skinny Sentiments, I die cut the sentiment from the black cardstock and adhered it to the bottom right, completing the card front. No bling or anything else… very unusual for me, lol! ;)

I cut the inside panel from Neenah Classic Crest Solar White 80# cardstock and embellished it with a leftover strip trimmed from the Wish Big Card Front and a narrow strip of CutCardStock Pop-Tone Black Licorice cardstock. I left the inside panel blank with plenty of room to write a custom message, and layered the panel on black cardstock.

And one more peek… love how this simple card took shape! The secure assembly of all the layers with Tape Runner speaks volumes!

Sharing in the following challenges:
1. A Perfect Time To Craft: #3-2022 – Anything Goes
2. Classic Design Challenge: March #3 – Anything Goes
3. Crafting Happiness Challenges: #121 – Anything Goes Always
4. Jan’s Digi Stamps Challenges: March 2022 Always Anything Goes
5. Lil Patch of Crafty Friends: #177 – Anything Goes

Tape Runner products used:
Retractable Tape Runner

Other products used:
Cardstock/Paper: Neenah Classic Crest 110# and 80# Solar White cardstock, CutCardStock Pop-Tone Black Licorice cardstock
Dies/Punches: CUTplorations Circles All Over Texture Cover Plate, CUTplorations Skinny Sentiments
Accessories: We R Memory Keepers Large Guillotine Paper Trimmer, Big Shot, Bearly Art precision craft glue

I hope you’ve enjoyed today’s project and you’re inspired to get your craft on! Be sure to check out the ah-mazing Tape Runner, Retractable Tape Runner and Highlight Tape Runner at TapeRunner.com! Be sure to Follow us on Facebook and Instagram! Thanks so much for stopping by today – we’ll see you next time!

Scrappy hugs,

Happy Spring Note Card

Hey everybody! Hope you’re having a great week – we are rockin’ and rollin’ here, and Ed is getting better every day! He’ll get his stitches taken out on Thursday morning and hopefully we’ll get good news of clear margins on the melanoma excision, and that’ll be the end of that! ;) Affiliate links are used in this post at no cost to you – I really appreciate your support! I’ve popped in this morning to share the final sample I created in conjunction with the Prickley Pear Stamps new release of the Easter Cross stamp set. This pretty Spring note card is a super simple design and features stamps from the previously-released Crosses 2 stamp set.

I cut a mini slimline card base from CutCardStock Royal Sundance Felt 110# Natural cardstock and angled all four corners. I cut half layering panels from two coordinating prints from the My Mind’s Eye Howdy Doody 6×6 designer paper pad which I adhered together, and then added a strip of Eyelet Outlet Gold Script Washi Tape at the seam and adhered the panel to the card base. I cut a scrap piece of the felt cardstock into a tag, punched the top with a tag topper punch and angled the bottom corners. I stamped a vertical sentiment and a bird image on the tag with stamps from the Crosses 2 stamp set, added an Eyelet Outlet 12mm Red Pearl Brad and a brown twine bow, and adhered the tag to the card front. The finishing touch was adding several tiny clear gemstones that I colored with a brown alcohol marker.

For the inside, I cut embellishing strips from the My Mind’s Eye Howdy Doody patterned papers used on the front, which completed the card.

And one more look… such a pretty design with a tag, which I love!

Sharing in the following challenges:
1. A Perfect Time To Craft: #3-2022 – Anything Goes
2. Classic Design Challenge: March #3 – Anything Goes
3. Ellibelle’s Corner: March Challenge – Spring is in the Air
4. Jan’s Digi Stamps Challenges: March 2022 Always Anything Goes
5. Paperbabe Stamps: #162 – Anything Goes

Prickley Pear Stamps products used:
Crosses 2 stamp set

Other products used:
Cardstock/Paper: CutCardStock Royal Sundance Felt 110# Natural cardstock, My Mind’s Eye Howdy Doody 6×6 designer paper pad
Ink: Catherine Pooler Polished and Icing on the Cake inks; Arteza BR51 alcohol marker
Dies/Punches: Stampin’ Up Scalloped Tag Topper punch, Tonic corner punch
Accessories: We R Memory Keepers Large Guillotine Paper Trimmer, Bearly Art precision craft glue, Eyelet Outlet Gold Script Washi Tape, Studios Blackbird Brown Twine, Eyelet Outlet 12mm Red Pearl Brads, Darice Clear Gemstones

I hope you’ve enjoyed this project! Be sure to check out all the awesome stamps and dies at Prickley Pear Stamps! If you’d like to save 10% on anything on the site when you shop at Prickley Pear Stamps, use the coupon code LESLIE10 at checkout! And be sure to ‘like’ and ‘follow’ the Prickley Pear Stamps Facebook page to keep up with news and sales, and join Prickley Pear Pals (the fan group) for lots of fun crafty ideas and to share your creativity! And finally, we’d love to see you visit the Prickley Pear Stamps blog that’s in the process of being revived and become a Follower! Hope to see you there! Thanks so much for stopping by today – we’ll see you next time! ;)

Scrappy hugs,