5/4/24 Weekly Favorite at Splitcoast Stampers!
Hey everybody! Happy Happy Wednesday! Can you believe it’s the first of May… the first half of the year is almost gone! Our new challenge is live this morning over at Love To Craft Challenge Blog and I’m thrilled to share my DT inspiration project for LTCCB #80 – Anything Goes! I created a fun pop-up book fold using papers, stamps, a foam element and a puffy button from the super adorable Keep It Simple Hello Adventure Collection. It’s been quite a while since I’ve made this fun fold and I had forgotten how fun it was to make and to embellish!
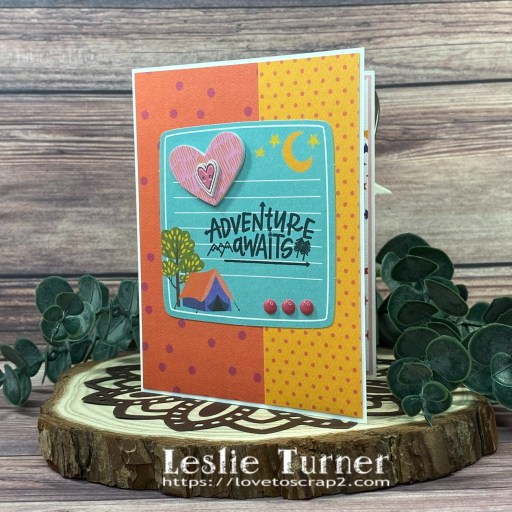
I cut the card base from Neenah Classic Crest 80# Solar White along with layering panels from dotted prints in the Keep It Simple Hello Adventure 12×12 Collection Pack and Flipsides Pack. I stamped a sentiment from the Adventure Awaits stamp set in Memento Esspresso Truffle ink on the focal die cut piece and then added hearts from the Hello Adventure Foam Alpha Bits and Puffy Buttons. The finishing touch was adding several Hello Adventure Enamel Dots.

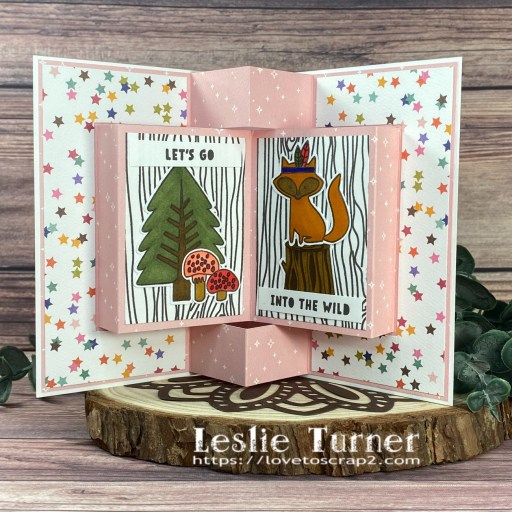
I embellished the outer panels on the inside with prints in the Keep It Simple Hello Adventure 12×12 Collection Pack and Flipsides Pack. I stamped woodgrain on the two smaller Solar White pop-up panels in Memento Espresso Truffle ink using the Keep It Simple Woodgrain background stamp. Next I added a stamped tree, mushrooms and stump from the Adventure Awaits stamp set along with a stamped fox and sentiment from the Find Your Wild Side stamp set which I colored with alcohol markers and fussy cut.
Affiliate links are used in this post at no cost to you – I really appreciate your support!
Products used:
CARDSTOCK/PAPER: Neenah Classic Crest 110# and 80# Solar White cardstock, Keep It Simple Hello Adventure 12×12 Collection Pack and Flipsides Pack
STAMPS: Keep It Simple Adventure Awaits and Find Your Wild Side stamp sets; Keep It Simple Woodgrain background stamp
INK: Memento Espresso Truffle ink; Arteza alcohol markers- R05/21/23, YG45, B20, YR12, BR52/62/63
ACCESSORIES: Fiskars 12″ SureCut Paper Trimmer, Tonic Studios 12″ Guillotine Paper Trimmer, Tombow Mono Dots adhesive, Bearly Art precision craft glue, MISTI stamp tool; Keep It Simple Hello Adventure Foam Alpha Bits, Puffy Buttons and Enamel Dots
I hope you’ve enjoyed seeing this project and will link up with us this time! Thanks so much for stopping by today – we’ll see you next time! ;)
Scrappy hugs,