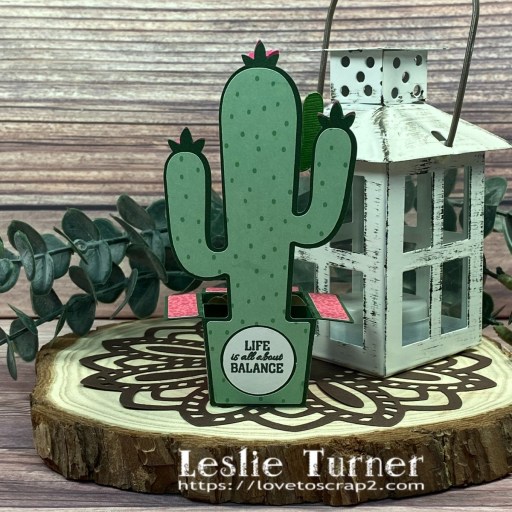
Life is all about Balance

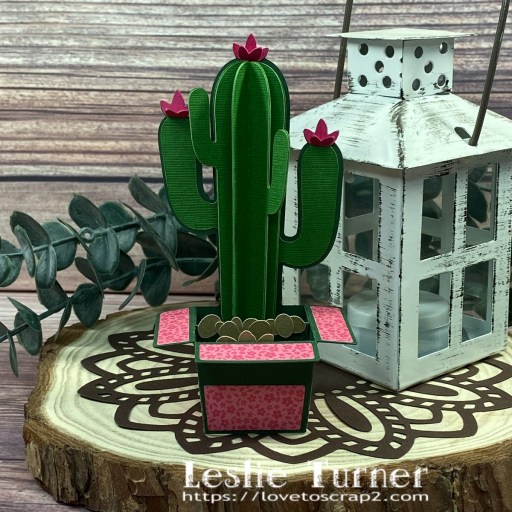
Hey everybody! Happy Hump Day and middle of May already! Our new challenge is live this morning over at Ally’s Angels and I’m super stoked to share my DT inspiration project for Challenge #82! I’ve been having a little (more) fun with my Cricut and created an adorable cactus box card for this challenge. It looks pretty darn real, doesn’t it?! But no thorns… just good ol’ cardstock! And the best part is it folds flat for mailing!
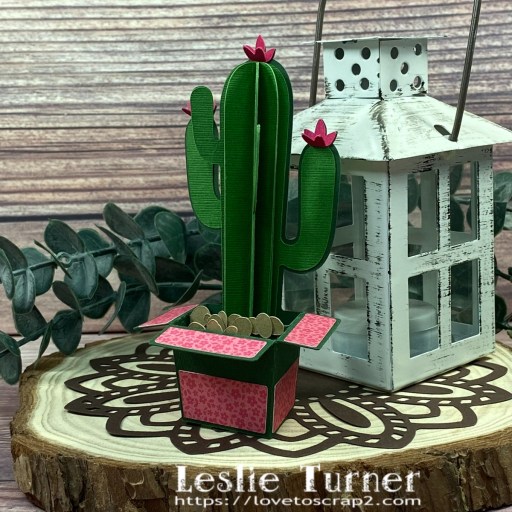
Using my Cricut Explore Air 2 and the SVG Cuts Cactus Box Card SVG cut file, I cut the cactus, box and stones from CutCardStock Kale Green, Amaranth, Scottish Highlands Green and Twine cardstock. I cut the box panels from a pink floral print in the Doodlebug Design Floral-Graph Rainbow Petite Prints 6×6 double-sided cardstock pad. I didn’t take a photo of the envelope, but it was cut from K & Company 12×12 Essentials Dark Designer Paper Pad.
I cut the back panel from a green print in the Echo Park Away We Go Collection Kit. The sentiment is from the Spellbinders Around the Garden stamp set and was stamped in Memento Northern Pine ink.
Affiliate links are used in this post at no cost to you – I really appreciate your support! 

Products used:
CARDSTOCK/PAPER: CutCardStock Kale Green, Amaranth, Scottish Highlands Green and Twine cardstock; Neenah Classic Crest 80# Solar white cardstock, Doodlebug Design Floral-Graph Rainbow Petite Prints 6×6 double-sided cardstock pad, Echo Park Away We Go Collection Kit, K & Company 12×12 Essentials Dark Designer Paper Pad
STAMPS: Spellbinders Around the Garden stamp set
INK: Memento Northern Pine ink
DIES/PUNCHES: SVG Cuts Cactus Box Card SVG cut file
ACCESSORIES: Cricut Explore Air 2, Bearly Art precision craft glue, MISTI stamp tool

I hope you’ve enjoyed seeing this project and will link up with us this time! Thanks so much for stopping by today – we’ll see you next time! ;)

Scrappy hugs,

Baby Boy Bun in the Oven

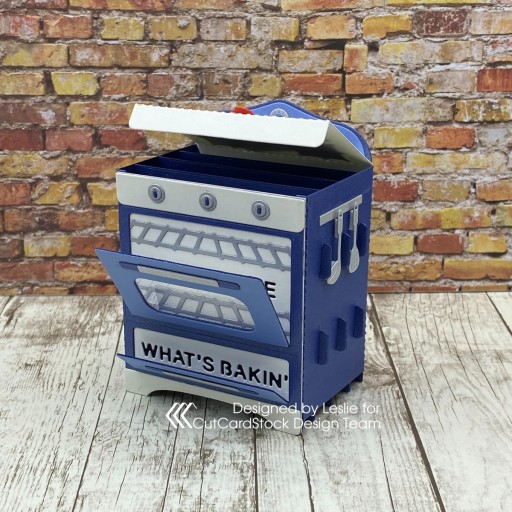
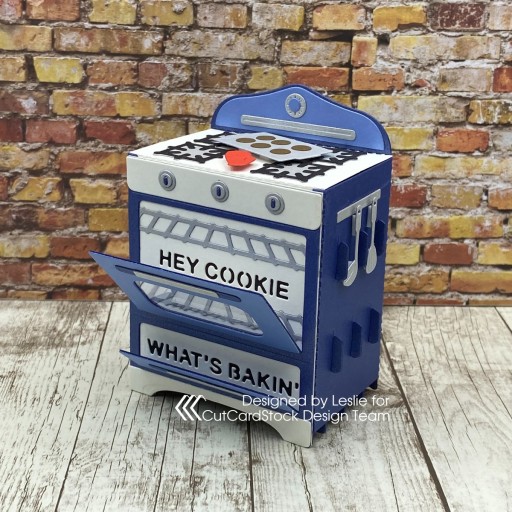
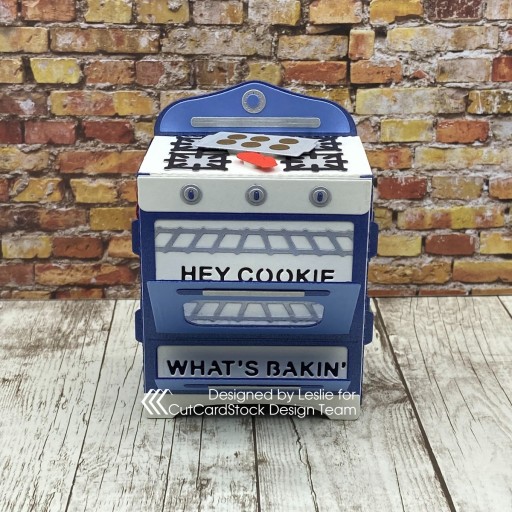
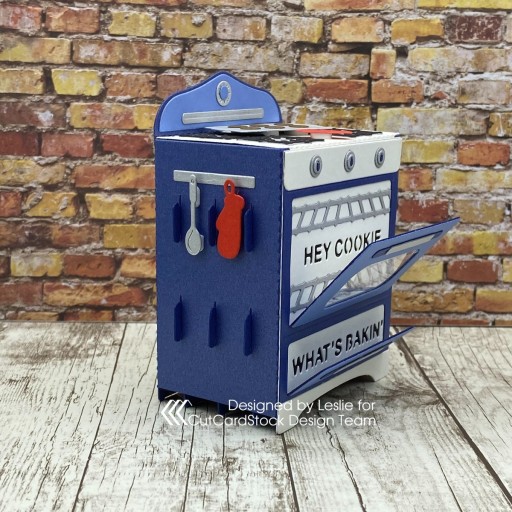
Hey everybody, Happy Tuesday! I hope all the moms (to humans or furbabies) out there had a beautiful Mother’s Day! We had wonderful weather here – still a bit chilly and windy – but beautiful nonetheless! I’m up on the CutCardStock blog today with a tutorial for making a super cute oven box card with a baby boy ‘bun in the oven’ theme! I used Stardream Metallic cardstock (on sale throughout the month of May) which I paired with Lessebo cardstock. This is actually the second one of these oven box cards I’ve made so it went together pretty fast. I created the first one in a pink baby girl theme for a guest design project coming up in a couple of weeks, so stay tuned for a ‘mostly the same but slightly different’ version!

Using the Spellbinders Pop-Up 3D Vignette What’s Bakin’ Oven dies, I cut all the pieces from CutCardStock Stardream Metallic Sapphire, Stardream Metallic Vista, Stardream Metallic Silver, Lessebo Ivory, Lessebo Pitch Black, Lessebo Coffee Bean, and Lessebo Cherry Red. I used Grafix Crystal Clear Acetate for the ‘glass’ in the oven door, along with pieces of Scrapbook Adhesives 3D Foam Squares to pop up the cookie sheet, oven mitts and utensils.

The assembly is always the most fun part of making 3D projects and this one was no different! I used the Keep It Simple Stitched Rectangles Nested Dies to cut a panel from Lessebo Ivory cardstock for the back of the oven. I stamped a sentiment from the Stampin’ Up Happy & Heartfelt stamp set in Memento Tuxedo Black ink which completed the card.

Here are a couple angled shots and two more shots showing that the top of the oven opens so the card can fold flat for mailing. I just love it!

Affiliate links are used in this post at no cost to you – I really appreciate your support!

CutCardStock products used:
Stardream Metallic Sapphire cardstock
Stardream Metallic Vista cardstock
Stardream Metallic Silver cardstock
Lessebo Ivory cardstock
Lessebo Pitch Black cardstock
Lessebo Coffee Bean cardstock
Lessebo Cherry Red cardstock

Other products used:
STAMPS: Stampin’ Up Happy & Heartfelt stamp set
INK: Memento Tuxedo Black ink
DIES/PUNCHES: Spellbinders Pop-Up 3D Vignette What’s Bakin’ Oven dies, Keep It Simple Stitched Rectangles Nested Dies
ACCESSORIES: Fiskars 12″ ProCision Rotary Bypass Paper Trimmer, Bearly Art precision craft glue, MISTI stamp tool, Big Shot, Grafix Crystal Clear Craft Plastic, red liner tape, Scrapbook Adhesives 3D Foam Squares (small white)

I hope you’ve enjoyed today’s project and you’re inspired to get crafty! Be sure to check out all the awesome cardstock and other goodies at CutCardStock (adhesives, labels, stickers, pens, watercolors and ribbon to name a few). And head on over to the CutCardStock Facebook Page and for more inspiration! Also, be sure to join our Creating with Card Stock Facebook Group for even more crafty inspiration! Thanks so much for stopping by today – we’ll see you next time!

Scrappy hugs,

Happy Flippin’ Birthday

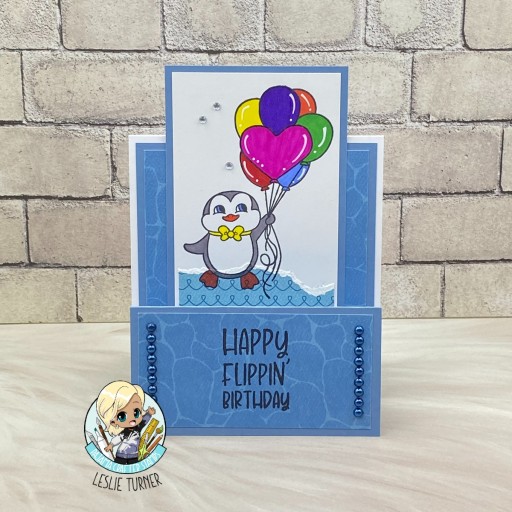
Hi friends! I hope you’re having a great weekend! I have another Pajama Crafter Stamps project to share today featuring the super cute Flippin’ Best stamp set that was released in January of this year. This is another one of the (many) projects I created prior to leaving the team at the end of February and hadn’t yet showcased. There’s nothing cuter than this little guy being showcased on a faux step card with his bunch of birthday balloons! I don’t have written instructions for this faux step card fun fold but it’s basically a double easel fold (seen on Sharon Armonstrong’s blog HERE a while back) with a tall fixed panel to make it look like a step card. The assembled card is A2 size.

The card base was cut from Neenah Classic Crest 110# Solar White cardstock with panels cut from CutCardStock Lessebo Misty Blue. I stamped the penguin from the Flippin’ Best stamp set in Memento Tuxedo Black ink on 80# Solar White and colored him with Sharpie and Bic Mark-It markers. I cut layering panels from papers in the Carta Bella Beach Party Collection Kit and added a sentiment (from the same stamp set) on the bottom flap. The finishing touch was adding several iridescent gemstones to the focal image and two strips of Eyelet Outlet 4mm blue pearls to the bottom flap.

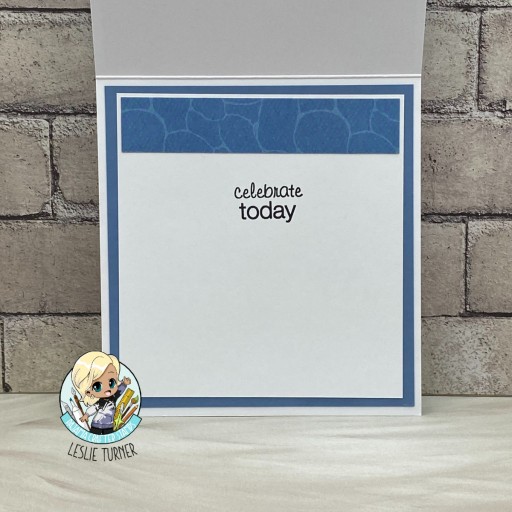
I cut the inside panel from 80# Solar White and embellished it with a leftover strip of paper used on the front. I stamped a sentiment from the Prickley Pear Stamps Spring Scalloped Circles stamp set and layered the panel on Lessebo Misty Blue cardstock.

Affiliate links are used in this post at no cost to you – I really appreciate your support!

Pajama Crafter Stamps products used:
Flippin’ Best stamp set
Prickley Pear Stamps Spring Scalloped Circles stamp set

Other products used:
CARDSTOCK/PAPER: Neenah Classic Crest 110# and 80# Solar White cardstock, CutCardStock Lessebo Misti Blue cardstock, Carta Bella Beach Party Collection Kit
INK: Memento Tuxedo Black ink; Sharpie Ultra Fine Point markers- red, orange, yellow, light green, blue, purple and gray; Bic Mark-It Fine Point Marker- Fandango Pink; Sharpie Fine Point White Paint Marker
ACCESSORIES: Fiskars 12″ ProCision Rotary Bypass Paper Trimmer, Elmer’s Craft Bond Tape Runner, Bearly Art precision craft glue, MISTI stamp tool, iridescent gemstones, Eyelet Outlet 4mm blue pearls

I hope you’ve enjoyed this project! Be sure to check out all the awesome stamps, dies and other goodies at Pajama Crafter Stamps which is the new home of the Prickley Pear Stamps brand and the Pajama Crafter Stamps line! Keep up with news and sales by following Pajama Crafter Stamps on Facebook, Instagram and Pinterest, and join Pajama Crafter Stamps & Friends for lots of fun crafty ideas and to share your creativity! And finally, be sure to visit the Pajama Crafter Stamps blog and sign up for the newsletter to stay in touch! Thanks so much for stopping by today – we’ll see you next time! ;)

Scrappy hugs,

Congrats!

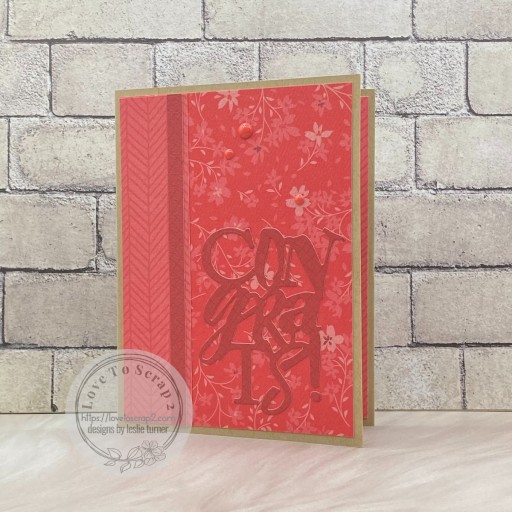
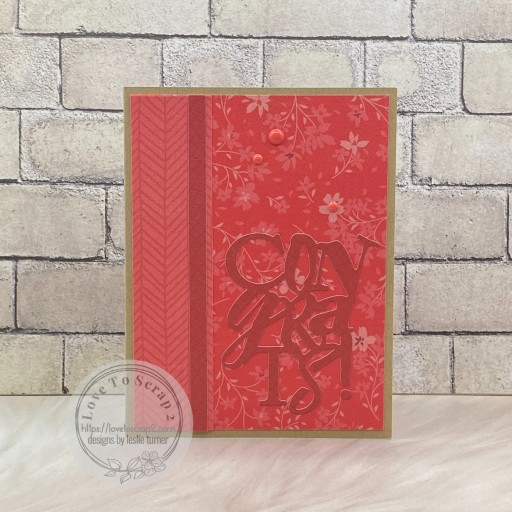
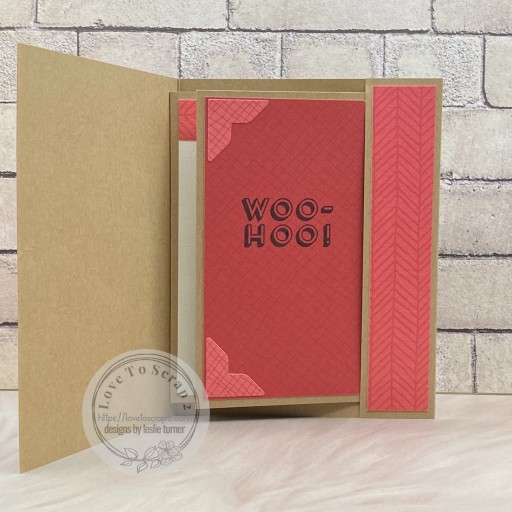
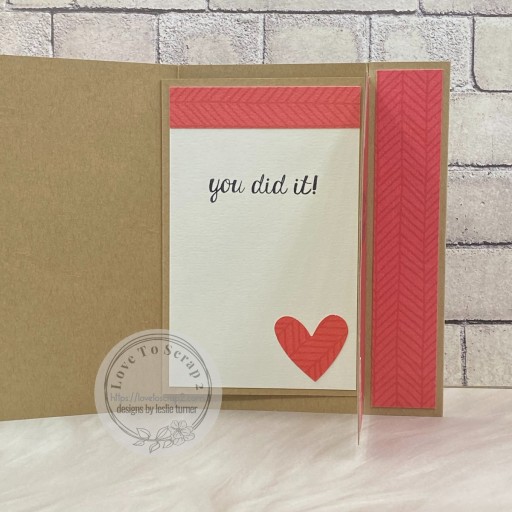
Hey everybody! Happy Fri-YAY! I’m doing the happy dance because I’m once again guesting for Creative Creases Challenge! One of my fun folds was a winner back in December and I was invited by the lovely Debbie to guest for an upcoming challenge, so here I am, just in time for Challenge #82! The Creative Creases Challenges are always ‘anything goes with a fun fold’ (preferably with stamping), so come on over and play! I created a fun hidden pocket pop up card using some favorite items in my stash! My inspiration came from Lisa Curcio’s blog – she loves fun folds as much as I do and shares quite a few of them! This one looks like a regular A2 card from the front but the magic is on the inside! ;)

I cut the fun fold card base from CutCardStock Twine 80# 12×12 cardstock and layering panels from several prints in the Keep it Simple Ruby 12×12 Collection Pack. The die cut on the front is from STAMPlorations and is one of my favorites. I finished the front with a few Keep It Simple Ruby enamel dots.

As I said above, the magic is on the inside! There is a hidden pocket with two panels, which means room for two stamped sentiments, and both of them are from the Stampin’ Up Bravo stamp set. I added ephemera from the same Ruby Collection Pack to both panels, which completed the card.

Affiliate links are used in this post at no cost to you – I really appreciate your support! 

Products used:
CARDSTOCK/PAPER: CutCardStock Twine 80# 12×12 cardstock and Basis 80# Natural cardstock, Keep It Simple Ruby 12×12 Collection Pack (paper and ephemera)
STAMPS: Stampin’ Up Bravo stamp set
INK: Memento Tuxedo Black ink
DIES/PUNCHES: STAMPlorations Congrats Word Die
ACCESSORIES: Fiskars 12″ ProCision Rotary Bypass Paper Trimmer, Elmer’s Craft Bond Tape Runner, Bearly Art precision craft glue, MISTI stamp tool, Big Shot, Keep It Simple Ruby Enamel Dots

I hope you’ve enjoyed seeing this project and will link up with us this time! Thanks so much for stopping by today – we’ll see you next time! ;)

Scrappy hugs,
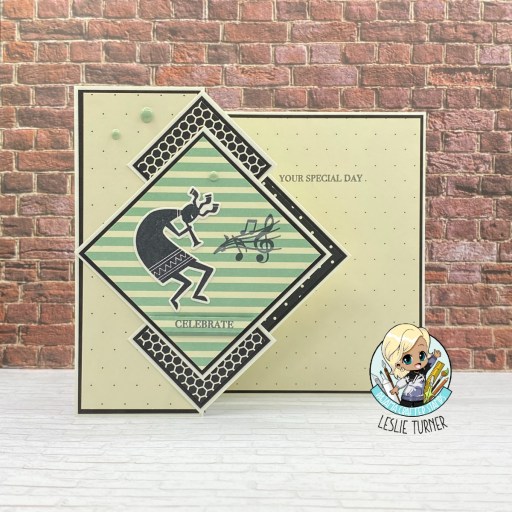
Celebrate Your Special Day

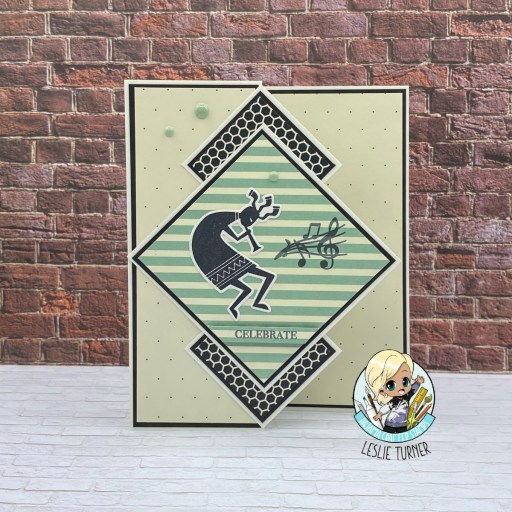
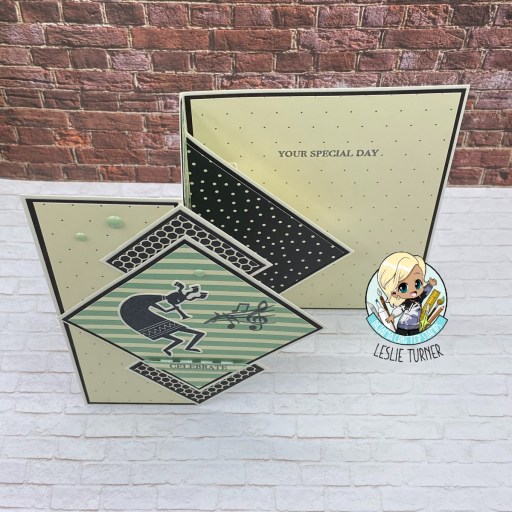
Hey everybody! I hope you’re having a fabulous weekend. Our weather here in southwestern Colorado is indescribably gorgeous! I’ve popped in with another Pajama Crafter Stamps project to share today created with the awesome Prickley Pear Stamps Kokopelli-Happy Birthday stamp set and die. This is another one of the (many) projects I created prior to leaving the Pajama Crafter Stamps team at the end of February and hadn’t yet showcased. I have fallen in love with this pop out z-fold design seen on Lisa Curcio’s blog (she called it a ‘pop up and pull out’) and created another one with a different tube type pop up mechanism that I think is easier. Instead of cutting into the card base, I just scored a piece of cardstock three times and created a tube which I adhered to the center of the card base beneath the black dotted triangle. It’s the easiest way to add a pop up mechanism to any kind of card!

I cut the card base and layers from CutCardStock Basis Natural cardstock and layering panels from CutCardStock Pop Tone Black Licorice cardstock and several coordinating prints in the Stampin’ Up Pretty Petals Designer Series Paper Stack. I stamped the image from the Prickley Pear Stamps Kokopelli-Happy Birthday stamp set in Memento Tuxedo Black ink and cut him with the coordinating Kokopell-Happy Birthday die.

I stamped the music notes directly on the background and the sentiment on a scrap piece of the striped paper which I trimmed and popped up on foam squares, lining up with the background paper. I stamped the second part of the sentiment on the back panel. The finishing touch was adding a few Keep It Simple Back To Basics Jade Enamel Dots.

Here’s one last overhead shot so you can see the construction. This really IS a pretty cool fun fold! ;)

Affiliate links are used in this post at no cost to you – I really appreciate your support!

Pajama Crafter Stamps products used:
Prickley Pear Stamps Kokopelli-Happy Birthday Stamps
Prickley Pear Stamps Kokopelli-Happy Birthday Die

Other products used:
CARDSTOCK/PAPER: CutCardStock Basis Natural and Pop Tone Black Licorice cardstock, Stampin’ Up Pretty Petals Design Series Paper Stack
INK: Memento Tuxedo Black ink
ACCESSORIES: Fiskars 12″ ProCision Rotary Bypass Paper Trimmer, Elmer’s Craft Bond Tape Runner, Bearly Art precision craft glue, MISTI stamp tool, Big Shot, 3D foam squares, Keep It Simple Back To Basics Jade Enamel Dots

I hope you’ve enjoyed this project! Be sure to check out all the awesome stamps, dies and other goodies at Pajama Crafter Stamps which is the new home of the Prickley Pear Stamps brand and the Pajama Crafter Stamps line! Keep up with news and sales by following Pajama Crafter Stamps on Facebook, Instagram and Pinterest, and join Pajama Crafter Stamps & Friends for lots of fun crafty ideas and to share your creativity! And finally, be sure to visit the Pajama Crafter Stamps blog and sign up for the newsletter to stay in touch! Thanks so much for stopping by today – we’ll see you next time! ;)

Scrappy hugs,

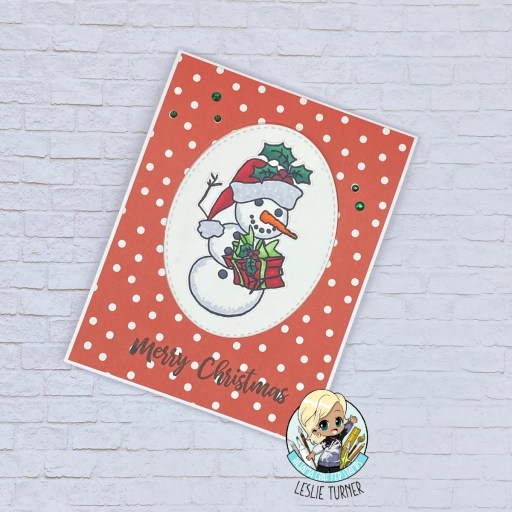
Merry Christmas fun fold

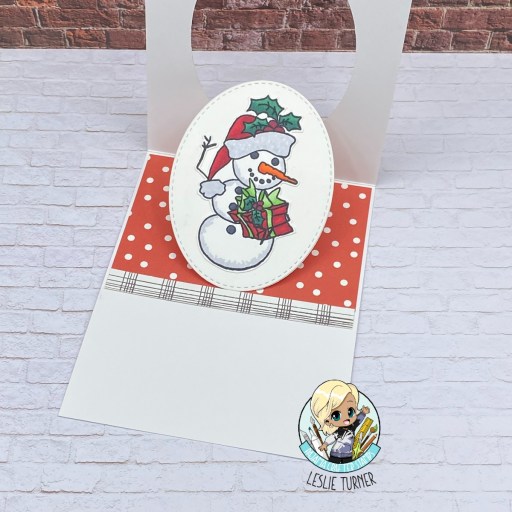
Hey everybody! Well, another Thursday has rolled around and it’s almost Friday again! I hope you have something fun planned this weekend! I’ve popped in this morning with a Pajama Crafter Stamps project to share created with the super fun Prickley Pear Stamps Holly Jolly Christmas stamp set. As mentioned in my previous posts, I have quite a few Pajama Crafter Stamps projects to share that I created prior to leaving the team at the end of February and hadn’t yet showcased. This pop up window card is one I’ve never seen before, and I cannot remember where I saw it. But it’s super easy – an aperture of any shape is cut into the front flap, the die cut shape is reserved to use for the focal image, and a pop up mechanism (simple four-sided box) is added to the top back of the focal image so it stands up when the card is opened. Poof – you have a super cute fun fold!

I cut the card base from Cougar Smooth White cardstock along with two layering panels and a strip from patterned papers in the Simple Stories The Little Things 12×12 Collection Kit. I used a die from the Keep It Simple Stitched Ovals Nested Dies to cut an oval aperture into the front flap. I stamped a snowman from the Prickley Pear Stamps Holly Jolly Christmas stamp set in Memento Tuxedo Black ink on the oval die cut and colored it with alcohol markers. I added a simple four-sided box pop-up mechanism to the top back of the image and adhered it back into the negative space on the card front. I added several green gemstones and a sentiment (from the same stamp set), which completed the card.

Affiliate links are used in this post at no cost to you – I really appreciate your support!

Pajama Crafter Stamps products used:
Prickley Pear Stamps Holly Jolly Christmas stamp set

Other products used:
CARDSTOCK/PAPER: CutCardStock Cougar 100# Smooth White and Cougar 80# Smooth White cardstock, Simple Stories The Little Things 12×12 Collection Kit
INK: Memento Tuxedo Black ink; Spectrum Noir Tri-Blends- DR1/3/4/7, OR1/2/3, IG2/6/8/9, LG1/3/5, JG4/5/7
DIES/PUNCHES: Keep It Simple Stitched Ovals Nested Dies
ACCESSORIES: Fiskars 12″ ProCision Rotary Bypass Paper Trimmer, Elmer’s Craft Bond Tape Runner, Bearly Art precision craft glue, MISTI stamp tool, Big Shot, green gemstones

I hope you’ve enjoyed this project! Be sure to check out all the awesome stamps, dies and other goodies at Pajama Crafter Stamps which is the new home of the Prickley Pear Stamps brand and the Pajama Crafter Stamps line! Keep up with news and sales by following Pajama Crafter Stamps on Facebook, Instagram and Pinterest, and join Pajama Crafter Stamps & Friends for lots of fun crafty ideas and to share your creativity! And finally, be sure to visit the Pajama Crafter Stamps blog and sign up for the newsletter to stay in touch! Thanks so much for stopping by today – we’ll see you next time! ;)

Scrappy hugs,

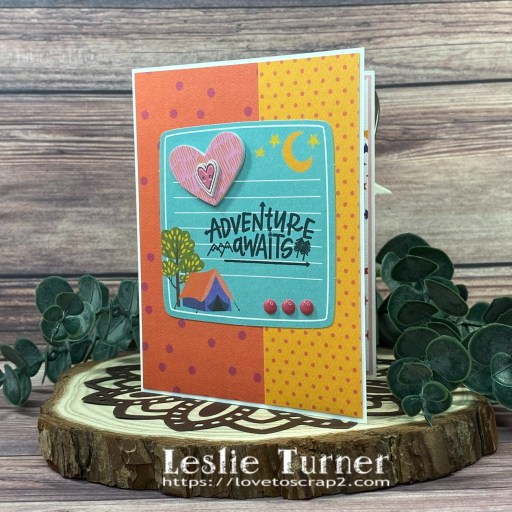
Adventure Awaits

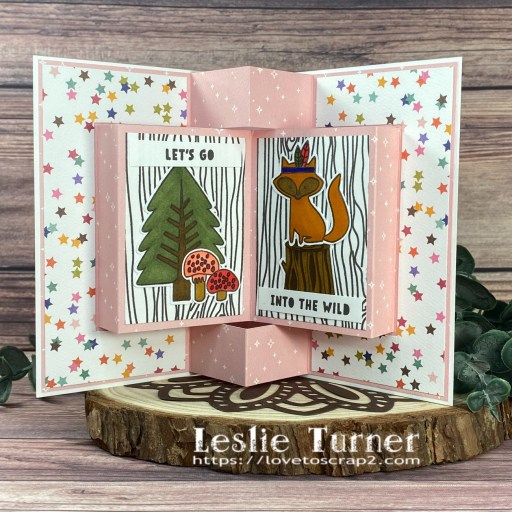
Hey everybody! Happy Happy Wednesday! Can you believe it’s the first of May… the first half of the year is almost gone! Our new challenge is live this morning over at Love To Craft Challenge Blog and I’m thrilled to share my DT inspiration project for LTCCB #80 – Anything Goes! I created a fun pop-up book fold using papers, stamps, a foam element and a puffy button from the super adorable Keep It Simple Hello Adventure Collection. It’s been quite a while since I’ve made this fun fold and I had forgotten how fun it was to make and to embellish!

I cut the card base from Neenah Classic Crest 80# Solar White along with layering panels from dotted prints in the Keep It Simple Hello Adventure 12×12 Collection Pack and Flipsides Pack. I stamped a sentiment from the Adventure Awaits stamp set in Memento Esspresso Truffle ink on the focal die cut piece and then added hearts from the Hello Adventure Foam Alpha Bits and Puffy Buttons. The finishing touch was adding several Hello Adventure Enamel Dots.

I embellished the outer panels on the inside with prints in the Keep It Simple Hello Adventure 12×12 Collection Pack and Flipsides Pack. I stamped woodgrain on the two smaller Solar White pop-up panels in Memento Espresso Truffle ink using the Keep It Simple Woodgrain background stamp. Next I added a stamped tree, mushrooms and stump from the Adventure Awaits stamp set along with a stamped fox and sentiment from the Find Your Wild Side stamp set which I colored with alcohol markers and fussy cut.

Affiliate links are used in this post at no cost to you – I really appreciate your support! 

Products used:
CARDSTOCK/PAPER: Neenah Classic Crest 110# and 80# Solar White cardstock, Keep It Simple Hello Adventure 12×12 Collection Pack and Flipsides Pack
STAMPS: Keep It Simple Adventure Awaits and Find Your Wild Side stamp sets; Keep It Simple Woodgrain background stamp
INK: Memento Espresso Truffle ink; Arteza alcohol markers- R05/21/23, YG45, B20, YR12, BR52/62/63
ACCESSORIES: Fiskars 12″ SureCut Paper Trimmer, Tonic Studios 12″ Guillotine Paper Trimmer, Tombow Mono Dots adhesive, Bearly Art precision craft glue, MISTI stamp tool; Keep It Simple Hello Adventure Foam Alpha Bits, Puffy Buttons and Enamel Dots

I hope you’ve enjoyed seeing this project and will link up with us this time! Thanks so much for stopping by today – we’ll see you next time! ;)

Scrappy hugs,
Love You Mama Bear

Hey everybody! Happy Wednesday – I hope you’re having a great week! Our new challenge is live this morning over at Love To Scrap Challenge Blog and I’m excited to share my DT inspiration project for LTSCB #167 – Anything Goes! The inside of this Mother’s Day card was one of the first projects I made with my Cricut Explore Air 2, and I instantly fell in love with it! I embellished the front with items in my stash.

The Mama Bear SVG cut file was an introduction to cutting and printing in Cricut Design Space, which I really needed when my new machine arrived last Fall. I used CutCardStock Pop Tone Sno Cone cardstock for the base, a patterned paper from the Keep It Simple Snow Day 12×12 Collection Pack for the background, Desert Storm for the folded insert, and Pop Tone Red Hot for the hearts.

The machine printed the sentiment with an 0.4 black pen which very cool. I ended up cutting the folded insert a second time from Pop Tone Hot Fudge and used just the bears which I adhered to the front of those on the Desert Storm folded insert. I embellished the bottom left corner with a bear paw die cut from the Keep It Simple Lumberjack Cards & Ephemera Die Cut Pieces.

I adhered a strip cut from a patterned paper in the Keep It Simple Snow Day 12×12 Collection Pack to a piece of CutCardStock Desert Storm cardstock. I used the STAMPlorations Crazy Double Running Stitch Nesting Dies to cut a background panel for the card front. I stamped HAPPY from the Lawn Fawn Happy Happy Happy Add On stamps in Memento Tuxedo Black ink on a scrap piece of Desert Storm cardstock and cut it with the coordinating die.

I stamped the rest of the sentiment from the same stamp set in black ink and added another bear paw die cut from the Keep It Simple Lumberjack Cards & Ephemera Die Cut Pieces.

Affiliate links are used in this post at no cost to you – I really appreciate your support! 

Products used:
CARDSTOCK/PAPER: CutCardStock Pop Tone Sno Cone, Pop Tone Hot Fudge, Pop Tone Red Hot and Desert Storm cardstock; Keep It Simple Snow Day 12×12 Collection Pack
STAMPS: Lawn Fawn Happy Happy Happy Add On Stamps
INK: Cricut 0.4 black pen, Memento Tuxedo Black ink
DIES/PUNCHES: Cricut Design Space Mama Bear SVG cut file, Lawn Fawn Happy Happy Happy dies, STAMPlorations Crazy Double Running Stitch Nesting Dies
ACCESSORIES: Tonic Studios 12″ Guillotine Paper Trimmer, Tombow Mono Dots adhesive, Bearly Art precision craft glue, MISTI stamp tool, Big Shot, Keep It Simple Lumberjack Cards & Ephemera Die Cut Pieces, 1/2″ Scor-Tape

I hope you’ve enjoyed seeing this project and will link up with us this time! Thanks so much for stopping by today – we’ll see you next time! ;)

Scrappy hugs,

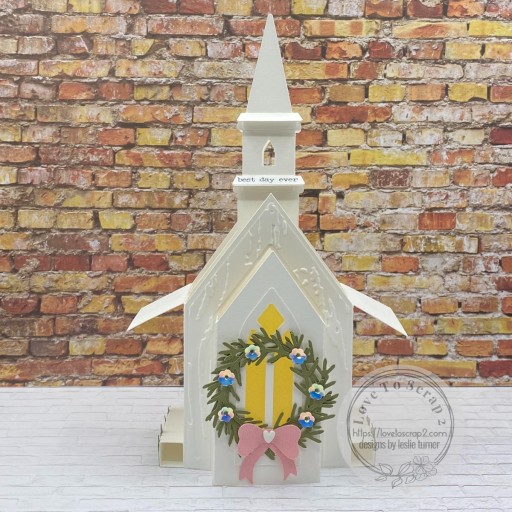
best day ever

Hi friends! I hope you are having the kind of beautiful weather we’re having out here in southwestern Colorado! I’m delighted to share that one of my projects was a top pick a few weeks ago over at Scrapping4fun Challenges. I was invited to guest design for an upcoming challenge, so here I am just in time for Challenge #235 – Wedding/Anniversary! I dug into my arsenal of SVG cut files and came up with this pretty church box card (cut file from SVG Cuts) to make for this challenge. I tailored it for a wedding by changing the wreath a bit, adding yellow vellum to the windows, and adding grass on the sides of the church. I love how it turned out!

Using my Cricut Explore Air 2 and the SVG Cuts Church Box Card cut file, I cut all the church pieces from CutCardStock Basis White cardstock and the wreath from 12×12 Cardstock Shop green and pink textured cardstock. I assembled the wreath, adding flower sequins and a white heart from the Keep It Simple Sprinkles Polymer Clay-Pink & White Hearts with Pearls mix.

Next, I die cut a grass border for each side of the church from the green textured cardstock using the Precious Marieke grass border die, and hand-cut small pieces of 12×12 Cardstock Shop yellow vellum for the front and side windows. The final touch on the front was adding a Tim Holtz idea-ology Small Talk sentiment sticker to the bottom steeple element.

For the back, I stamped a floral pattern on the frame using the Keep It Simple Simply Spring stamp set in Catherine Pooler Pink Champagne ink. I colored the florals with a few alcohol markers (to bring in the purple and pink in the iridescent flower sequins on the wreath) and added some Eyelet Outlet white glitter enamel dots. I stamped a tiny sentiment from the Trinity Stamps A Sentiment for (Almost) Everything stamp set in Memento Tuxedo Black ink on a Basis White scrap, trimmed it, and adhered it horizontally to the sentiment panel. The assembly is always the most fun, and I really enjoyed putting this one together. It was quite easy, actually!

Affiliate links are used in this post at no cost to you – I really appreciate your support! 

Products used:
CARDSTOCK/PAPER: CutCardStock Basis 80# 12×12 White cardstock, 12×12 Cardstock Shop Green Textured and Pink Textured cardstock and Yellow Translucent vellum
STAMPS: Keep It Simple Simply Spring stamp set, Trinity Stamps A Sentiment for (Almost) Everything stamp set
INK: Catherine Pooler Pink Champagne ink; Spectrum Noir Tri-Blends- MG1, DG1, LV1; Memento Tuxedo Black ink
DIES/PUNCHES: SVG Cuts Church Box Card SVG cut file, Precious Marieke Grass Border die
ACCESSORIES: Cricut Explore Air 2, Fiskars 12″ ProCision Rotary Bypass Paper Trimmer, Elmer’s Craft Bond Tape Runner, Bearly Art precision craft glue, MISTI stamp tool, Big Shot, Tim Holtz Alterations/Texture Fades Woodgrain embossing folder, Keep It Simple Sprinkles Polymer Clay-Pink & White Hearts with Pearls, Eyelet Outlet white glitter enamel dots, Tim Holtz idea-ology Small Talk sentiment stickers

I hope you’ve enjoyed seeing this project and will link up a wedding or anniversary project with us this time! Thanks so much for stopping by today – we’ll see you next time! ;)

Scrappy hugs,
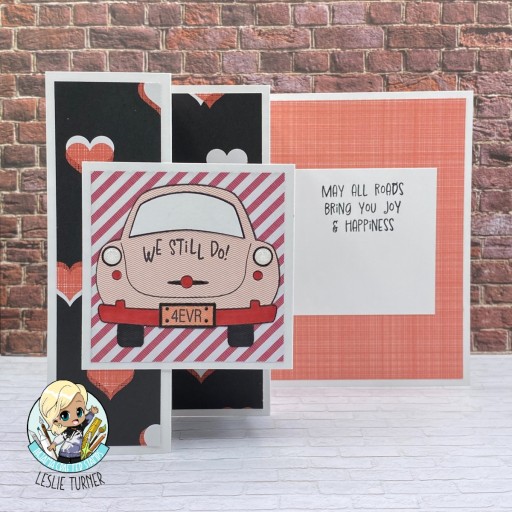
We Still Do!

Hey everybody! Can you believe we’re near the end of April already?! I’m thoroughly enjoying sharing all these Pajama Crafter Stamps projects with y’all! I love to work ahead on my design teams and had created quite a few cards prior to stepping down from the Pajama Crafter Stamps DT at the end of February that had not been showcased on my blog or social media platforms. This side accordion panel card features the new Just Married stamp set which I paired with an older Stampin’ Up paper pad. I love the color palette and thought it was perfect for an anniversary card! I’ve seen this fun fold on Pinterest, Sharon Armstrong has a video on her blog, and Lisa Curcio has a version on her blog that she calls an expanding accordion fun fold. So there are a few resources (and different names) out there for this one.

Here are the mini instructions: Cut the 5-1/2″ x 11″ card base from CutCardStock Lessebo White cardstock, score at 1-3/4″, 3-1/2″, 5-1/4″ and 7″, and fold on all the score lines. Cut a smaller folded piece from White at 3″ x 6″ and score at 3″. From coordinating prints in the Stampin’ Up Stacked With Love designer series paper stack, cut three 1-1/2″ x 5-1/4″ panels for the left side, a 3-3/4″ x 5-1/4″ panel for the right side, and two 2-3/4″ square panels for the smaller folded piece. Cut one additional 2-3/4″ square panel from white cardstock for a sentiment. Embellish as desired.

I stamped the car from the Just Married stamp set in Memento Tuxedo Black ink on a light print in the paper stack, and colored the trunk release, bumper, license plate and tires with alcohol markers. I paper-pieced the back window with a white cardstock scrap and added Eyelet Outlet white glitter enamel dots to the back lights. I stamped sentiments from the same stamp set which completed the card.

Here’s an overhead shot so you can see the construction. Super easy fold that really packs a punch!

Affiliate links are used in this post at no cost to you – I really appreciate your support!

Pajama Crafter Stamps products used:
Just Married stamp set

Other products used:
CARDSTOCK/PAPER: CutCardStock Lessebo White cardstock, Stampin’ Up Stacked With Love designer series paper stack
INK: Memento Tuxedo Black ink (pad and marker); Spectrum Noir Tri-Blends- CR3/6/10; black Copic Sketch, Sakura Pigma 08 Micron pen
ACCESSORIES: Fiskars 12″ ProCision Rotary Bypass Paper Trimmer, Elmer’s Craft Bond Tape Runner, Bearly Art precision craft glue, MISTI stamp tool, Eyelet Outlet White Glitter Enamel Dots

I hope you’ve enjoyed this project! Be sure to check out all the awesome stamps, dies and other goodies at Pajama Crafter Stamps which is the new home of the Prickley Pear Stamps brand and the Pajama Crafter Stamps line! Keep up with news and sales by following Pajama Crafter Stamps on Facebook, Instagram and Pinterest, and join Pajama Crafter Stamps & Friends for lots of fun crafty ideas and to share your creativity! And finally, be sure to visit the Pajama Crafter Stamps blog and sign up for the newsletter to stay in touch! Thanks so much for stopping by today – we’ll see you next time! ;)

Scrappy hugs,