Let It Snow tag

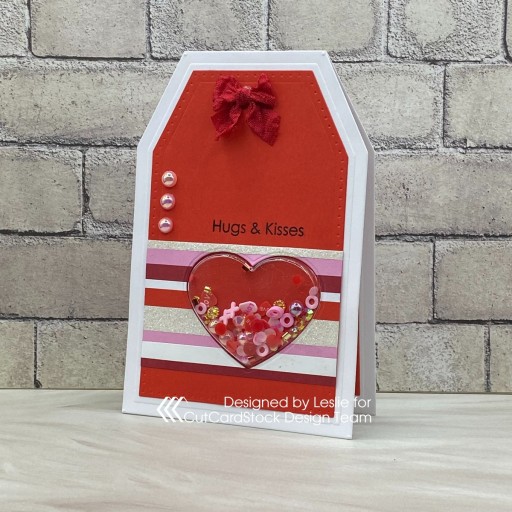
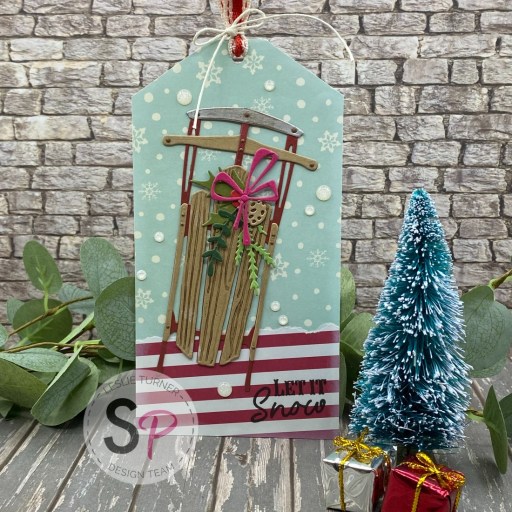
Hey everybody, I’m back with my second post on this beautiful Sunday! I’m delighted to share a Scrapbook Pal DT inspiration project with you that I created with the Sizzix-Tim Holtz Vintage Sled Thinlits and Sizzix-Catherine Pooler Greetings of the Season Stamp Set along with a few other items carried on the website. It’s been a while since I created a tag and these amazing dies and stamps just ‘screamed’ tag to me. This is an oversized 3-1/4″ x 6-1/4″ tag that could very easily be given as a flat card, and that’s how I made it! ;)

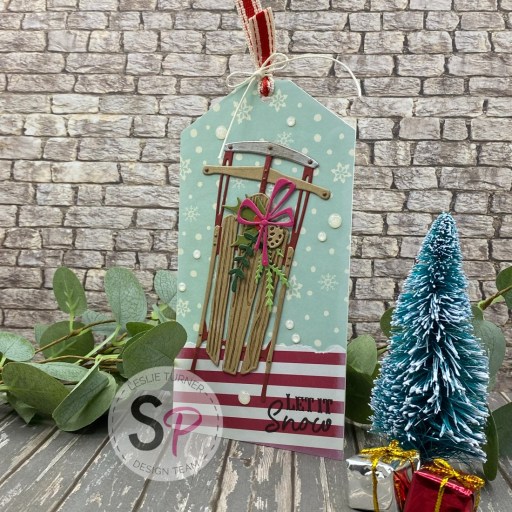
I cut the tag base from Neenah Classic Crest Double Thick 165# Solar White cardstock and covered it with two coordinating prints from The Paper Studio Four Seasons and Everything In Between -2- paper pad, tearing the horizontal striped piece across the top and adhering it to the bottom of the tag at a slight angle.

Using the Sizzix-Tim Holtz Vintage Sled Thinlits, I die cut all the sled pieces from CutCardStock Stardream Metallic Silver, Twine, Pop Tone Red Hot, Pop Tone Gumdrop Green, Pop tone Jellybean Green, Kale Green, and Amaranth cardstock. I conducted an experiment, not entirely sure it was going to work. I ran the Copic Ciao E47 Dark Brown alcohol marker along the ridges on the main sled piece just prior to running it through the Big Shot in hopes it would look like wood, and it did! It’s a little blotchy looking but I thought that added to the vintage feel. I also scribbled this same marker on my finger and rubbed it across the ‘metal’ piece on the top to make it look distressed, and that worked, too! ;)

I stamped a sentiment from the Sizzix-Catherine Pooler Greetings of the Season Stamp Set in Versafine Onyx Black ink and inked the edges of the tag in white ink. I added Eyelet Outlet Clear Glitter Enamel Dots randomly over the background over top of the snow drops on the patterned paper. The finishing touch was looping some Really Reasonable Ribbon canvas stitched ribbon through the hole at the top and tying it with Lawn Fawn Lawn Trimmings White Hemp Twine.

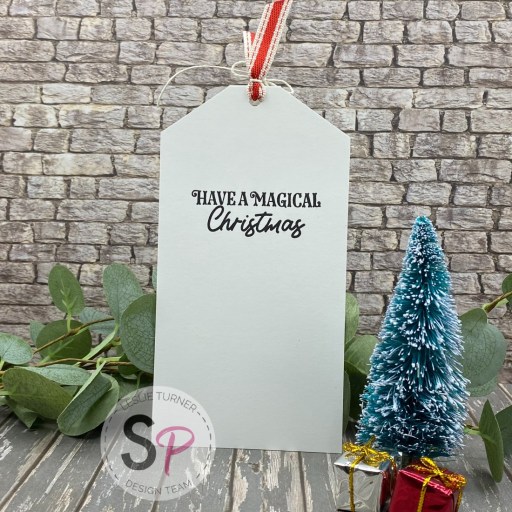
I stamped another sentiment from the Sizzix-Catherine Pooler Greetings of the Season Stamp Set on the back in Versafine Onyx Black ink. I totally love how this turned out… tags are such fun!

Affiliate links are used in this post at no cost to you – I really appreciate your support!

Scrapbook Pal products used:
Sizzix-Tim Holtz Vintage Sled Thinlits
Sizzix-Catherine Pooler Greetings of the Season Stamp Set
Versafine Onyx Black ink
Copic Ciao E47 Dark Brown alcohol marker
Lawn Fawn Lawn Trimmings White Hemp Twine
MISTI stamp tool
Spellbinders 1/4″ Best Ever Craft Tape
My Sweet Petunia Glue Press
Bearly Art precision craft glue
Scrapbook Adhesives E-Z Runner Permanent Strips

Other products used:
CARDSTOCK/PAPER: Neenah Classic Crest Double Thick 165# Solar White cardstock, CutCardStock Stardream Metallic Silver, Twine, Pop Tone Red Hot, Pop Tone Gumdrop Green, Pop tone Jellybean Green, Kale Green, and Amaranth cardstock; The Paper Studio Four Seasons and Everything In Between -2- paper pad
DIES/PUNCHES: WRMK Crop-A-Dile Big Bite
ACCESSORIES: Fiskars 12″ ProCision Rotary Bypass Paper Trimmer, Big Shot, Eyelet Outlet Clear Glitter Enamel Dots, Really Reasonable Ribbon canvas stitched ribbon

I hope you’ve enjoyed this project and you’re inspired to get your craft on! Be sure to check out the awesome array of craft supplies in the Scrapbook Pal store… the selection is amazing! And head over to the Scrapbook Pal FacebookPinterest and Instagram pages for more design team inspiration! And if you haven’t yet subscribed to our YouTube Channel, be sure to do that, too, for tons of hands-on crafty inspiration! Thanks so much for stopping by today – we’ll see you next time! 

Scrappy hugs,

So Grateful gift tag

Hey everybody! Happy Saturday! I hope you have something fun planned this weekend! I’m stoked to share a Keep It Simple DT inspiration project created with our NEW KIS Cuts Freshly Brewed that just debuted yesterday! Can you say SQUEAL?! This is a fun die set and there are so many possibilities to use it for! I created a gift tag to go with a coffee-themed gift of assorted coffees, a coffee grinder, coffee mugs, etc. How fun is that?!

Using the KIS Cuts Freshly Brewed dies, I cut the cup shaped tag and all the layers from Neenah Classic Crest Solar White cardstock and coordinating papers in the Jade and Rose 12×12 Collection Packs. Of course I had to make a shaker using a variety of polymer clay, beads and crush from our new Sprinkles line! The sentiment on the cup sleeve is from the Thank You Sentiments stamp set, stamped in Memento Tuxedo Black, and embellished with 3mm Pearls and die cut hearts. The tag loop was fashioned from a length of Rose Ribbon.

I cut the back panel and layers using dies in the KIS Cuts Freshly Brewed set which I embellished with a die cut heart and a stamped sentiment (also from the Thank You Sentiments stamp set). Love how this turned out!

Keep It Simple products used:
KIS Cuts Freshly Brewed
Back To Basics Jade 12×12 Collection Pack
Back To Basics Rose 12×12 Collection Pack
Back To Basics Ruby Ribbon Pack
Back To Basics Thank You Sentiments stamp set
Sprinkles- Polymer Clay Grass Green Dots
Sprinkles- Polymer Mint Sprinkles
Sprinkles- Polymer Mint Hearts
Sprinkles- 2mm Dark Green Matte Beads
Sprinkles- 3mm White Pearl Beads
Sprinkles- Metallic Crush Rivers Edge

Affiliate links are used in this post at no cost to you – I really appreciate your support!

Other products used:
CARDSTOCK/PAPER: Neenah Classic Crest 110# Solar White cardstock
INK: Memento Tuxedo Black ink
DIES/PUNCHES: We R Memory Keepers Crop-A-Dile II Big Bite
ACCESSORIES: Fiskars 12″ ProCision Rotary Bypass Paper Trimmer, Bearly Art precision craft glue, MISTI stamp tool, Big Shot, GKD Shaker Stripes, Grafix Crystal Clear Craft Plastic, 1/4″ red liner tape

I hope you’ve loved seeing this project as much as I loved creating it and you’re inspired to get crafty! Be sure to check out ALL the fun goodies in the Keep It Simple online store! Save 10% on your entire order when you shop online using code LoveToScrap2 at checkout! There is no minimum purchase requirement and no usage limits, AND it combines with product, order, and shipping discounts! Is that cool, or what?! Be sure to Follow us on Facebook, Instagram, and Pinterest for lots of crafty inspiration! Thanks so much for stopping by today – we’ll see you next time!

Scrappy hugs,

Every Day Is A New Chance

Hey everybody! I hope your weather is as gorgeous as ours is out here in southwestern Colorado! OMGosh, it’s absolutely wonderful and has been a long time coming… seems like the snow just wouldn’t stop! Our new challenge is live this morning over at Mini Album Mania and I’m thrilled to share my DT inspiration project for MAM #5 – Any Type of Mini Album Goes! Our challenges are probably coming to an end. Our participation rate after four challenges is still pretty low and I told our design team that we’d give it a full six challenges and if participation doesn’t pick up, the next one (July 1st thru August 15th) will be the last one. I chose the super cute Stamp & Scrapbook Expo Celebrate the Little Things Collection Pack, specifically a tag sheet and stickers, to create this sweet little tag mini album. It’s inspirational, super easy and fun!

I cut apart the sheet of tags in the Stamp & Scrapbook Expo Celebrate the Little Things Collection Pack and picked out the 12 I wanted to use. I adhered each one to CutCardStock Cougar Smooth 80# White cardstock and trimmed them, leaving the back side white. I embellished the front and/or back of most of them with stickers from the sticker sheet, leaving a few of them plain and leaving enough room for photos and journaling. I finished this mini with a piece of green gingham Keep It Simple Back To Basics Jade Ribbon.

Affiliate links are used in this post at no cost to you – I really appreciate your support! 

Products used:
CARDSTOCK/PAPER: CutCardStock Cougar Smooth 80# White cardstock, Stamp & Scrapbook Expo Celebrate the Little Things Collection Pack
ACCESSORIES: Fiskars 12″ ProCision Rotary Bypass Paper Trimmer, Elmer’s Craft Bond Tape Runner, Bearly Art precision craft glue, 7 Gypsies book ring, Keep It Simple Back To Basics Jade Ribbon

I hope you’ve enjoyed seeing this project and will link up with us this time! We’d love to see what kind of mini album you create! Thanks so much for stopping by today – we’ll see you next time! ;)

Scrappy hugs,

Hugs & Kisses tag card

Hey everybody, Happy Tuesday! I hope you’re having a great week so far and it’s not too awfully cold where you are! I’m up on the CutCardStock blog today with a tutorial for making a Valentine tag card with a shaker! I used White, Cherry Red and Dawn Maroon cardstock from the new Lessebo line along with Pop Tone Cotton Candy and Silk Glitter Opulent Opal. I haven’t made a shaker card for a minute or three so I figured I’d do it up! Shakers are always fun to make and even more fun to receive!

Using the Prickley Pear Stamps Nesting Tag Dies, I cut a top-folding tag-shaped card base and layering panel from Lessebo White along with a tag-shaped layering panel from Lessebo Cherry Red cardstock. I embellished the front layer with strips cut from Lessebo White, Lessebo Cherry Red, Lessebo Dawn Maroon, Pop Tone Cotton Candy and Silk Glitter Opulent Opal cardstock. I used the Heart Shaker Pouch Starter Kit (including the die) from This Calls For Confetti to cut the aperture into the front layer.

I stamped a sentiment from the My Favorite Things Lots of Hugs stamp set in Memento Tuxedo Black centered over the aperture. I added shaker mix consisting of Buttons Galore & More Love & Kisses Sprinkletz Embellishments, Pitter Patter Doo Dadz Embellishments, and Love Story Half Pearlz Embellishments, and adhered the layer to the card base. The finishing touch was adding several flat-back pearls from the Buttons Galore & More Love Story Half Pearlz Embellishments. I also added a tiny bow fashioned from Prairie Bird Boutique red wrinkled ribbon using a wooden bow maker my awesome friend Mo sent me for Christmas!

I cut tag-shaped layers for the inside from Lessebo White and Lessebo Cherry Red cardstock using the same Nested Tag Dies and embellished the white one with a few leftover strips from the front. I stamped another sentiment from the My Favorite Things Lots of Hugs stamp set in black ink.

Sharing in the following challenges:
1. A Perfect Time To Craft Open Challenge: January #1-2024 – Anything Goes
2. Classic Design Challenge: Jan/Feb #01-2024 – Anything Goes
3. Fab ‘n’ Funky Challenges: #587 – Stamp It

Affiliate links are used in this post at no cost to you – I really appreciate your support!

CutCardStock products used:
Lessebo White cardstock
Lessebo Cherry Red cardstock
Lessebo Dawn Maroon cardstock
Pop Tone Cotton Candy cardstock
Silk Glitter Opulent Opal 12×12 cardstock

Other products used:
STAMPS: My Favorite Things Lots of Hugs stamp set
INK: Memento Tuxedo Black ink
DIES/PUNCHES: Prickley Pear Stamps Nesting Tag Dies, This Calls For Confetti Heart Shaker Pouch Starter Kit (including the die)
ACCESSORIES: Tonic Studios 12″ Guillotine Paper Trimmer, Elmer’s Craft Bond Tape Runner, Bearly Art precision craft glue, MISTI stamp tool, Big Shot, This Calls For Confetti Heart Shaker Pouch Starter Kit (including the die); Buttons Galore & More Love & Kisses Sprinkletz Embellishments, Pitter Patter Doo Dadz Embellishments, and Love Story Half Pearlz Embellishments; Prairie Bird Boutique red wrinkled ribbon

I hope you’ve enjoyed today’s project and you’re inspired to get crafty! Be sure to check out all the awesome cardstock and other goodies at CutCardStock (adhesives, labels, stickers, pens, watercolors and ribbon to name a few). And head on over to the CutCardStock Facebook Page and for more inspiration! Also, be sure to join our Creating with Card Stock Facebook Group for even more crafty inspiration! Thanks so much for stopping by today – we’ll see you next time!

Scrappy hugs,

Christmas Gift Tags in Non-Traditional Colors

Hey everybody! We’re on the downslide into December and I hope you all had a very happy Thanksgiving! This month has flown by and Christmas is on our heels! I’m up on the Prickley Pear Stamps blog today with a super fun set of Christmas gift tags in non-traditional colors! I used the Christmas Holiday Gift Tags stamp set and Gift Tags dies along with the Nesting Tags dies. I pulled out a variety of Karin markers and alcohol markers to color these beauties and I love how they turned out! You know me… I’m always down for using non-traditional colors for my Christmas projects!

I stamped all five images from the Christmas Holiday Gift Tags stamp set in Memento London Fog ink and then again in Versamark, and heat embossed them with Hero Arts clear embossing powder. I used a variety of bold colored markers to color the images, cut them with the coordinating Gift Tags dies and added tiny red gemstones to several of them.

I used the Nesting Tag dies and cut a tag from CutCardStock Pop Tone Grape Jelly, Pop Tone Razzleberry, Pop Tone Tangy Orange, Pop Tone Limeade and Basis Gray cardstock (backed each one with a tag cut from Solar White cardstock), stamped ‘To and From’ on the back of each one in London Fog ink, and adhered the images. I punched a 1/4″ hole at the top of each tag, threaded a coordinating color ribbon (from Really Reasonable Ribbon) through the hole at the top, and tied it (along with a piece of knotted silver string, also from Really Reasonable Ribbon) with Doodlebug Design Lily White Doodle Twine.

Sharing in the following challenges:
1. Classic Design Challenge: November #11 – Anything Goes

Affiliate links are used in this post at no cost to you – I really appreciate your support!

Prickley Pear Stamps products used:
Christmas Holiday Gift Tags stamp set
Gift Tags dies
Nesting Tag dies

Other products used:
CARDSTOCK/PAPER: CutCardStock Pop Tone Grape Jelly, Pop Tone Razzleberry, Pop Tone Tangy Orange, Pop Tone Limeade and Basis Gray cardstock; Neenah Classic Crest 110# Solar White cardstock
INK: Memento London Fog ink, Versamark, assorted Karin markers and alcohol markers
ACCESSORIES: Tonic Studios 12″ Guillotine Paper Trimmer, Bearly Art precision craft glue, MISTI stamp tool, Big Shot, Hero Arts Clear embossing powder, Milwaukee Heat Tool, Stampin’ Up 1/4″ circle punch, Really Reasonable Ribbon silver string and assorted ribbon, Doodlebug Design Lily White Doodle Twine, red gemstones

I hope you’ve enjoyed this project! Be sure to check out all the awesome stamps and dies at Prickley Pear Stamps! Save 10% on anything on the site when you shop at Prickley Pear Stamps by using coupon code LESLIE10 at checkout! And be sure to ‘like’ and ‘follow’ the Prickley Pear Stamps Facebook page to keep up with news and sales, and join Prickley Pear Pals (the fan group) for lots of fun crafty ideas and to share your creativity! And finally, we’d love to see you visit the Prickley Pear Stamps blog and become a Follower! Hope to see you there! Thanks so much for stopping by today – we’ll see you next time! ;)

Scrappy hugs,

Fully Rely On God

Happy Saturday, everybody! I hope you’re having a good one! I’m up on the Prickley Pear Stamps blog today with an inspiration project featuring the new ‘F.R.O.G. – Fully Rely On God’ stamp set. It’s a small 3×3 stamp set but sure packs a big punch… I totally love our little Ramona! I made a simple tag that could easily be used for a bookmark.

I cut two tag/bookmark bases from CutCardStock Cougar Smooth 80# White cardstock and stamped the Ramona image from the F.R.O.G. – Fully Rely On God stamp set on one of them. I colored it with an assortment of markers, and added three strips of skinny MAMBI washi tape and several green Stampendous Dot Sparklers. I adhered the second tag to the back of the first one for a clean finish, and added hole reinforcements that I created with 1/2″ and 1/4″ Stampin’ Up circle punches and a scrap piece of CutCardStock Kale Green cardstock. I looped three pieces of ribbon through the hole and secured it with a Doodlebug Design Lily White Doodle Twine bow.

Sharing in the following challenges:
1. A Perfect Time To Craft Open Challenge: August #8-2023 – Anything Goes
2. Classic Design Challenge: August #8 – Anything Goes
3. Once Upon A Time Challenges: #13 – It Feels Good To Be Yourself (totally feels good to rely on God on a daily basis!)

Affiliate links are used in this post at no cost to you – I really appreciate your support!

Prickley Pear Stamps products used:
F.R.O.G. – Fully Rely On God stamp set

Other products used:
CARDSTOCK/PAPER: CutCardStock Cougar Smooth 80# White and Kale Green cardstock
INK: Memento Tuxedo Black ink; Arteza alcohol markers- YG25/26, RP09, GS09, PB25; Bic Mark-It Fine Point markers- Hot Aqua, Summer Melon, Sunset Orange, Key Lime and Yellow Blaze; Sharpie Ultra Fine Point markers- Lime Green, Aqua, Light Pink and Brown; Faber Castell Orange Glaze Pitt Artist Pen
DIES/PUNCHES: Stampin’ Up 1/2″ and 1/4″ Circle Punches
ACCESSORIES: Tonic Studios 12″ Guillotine Paper Trimmer, Tombow Mono Dots adhesive, Bearly Art precision craft glue, MISTI stamp tool, Me & My Big Ideas skinny washi tape, Stampendous Green Dot Sparklers, assorted ribbons from stash, Doodlebug Design Lily White Doodle Twine

I hope you’ve enjoyed this project! Be sure to check out all the awesome stamps and dies at Prickley Pear Stamps! Save 10% on anything on the site when you shop at Prickley Pear Stamps by using coupon code LESLIE10 at checkout! And be sure to ‘like’ and ‘follow’ the Prickley Pear Stamps Facebook page to keep up with news and sales, and join Prickley Pear Pals (the fan group) for lots of fun crafty ideas and to share your creativity! And finally, we’d love to see you visit the Prickley Pear Stamps blog and become a Follower! Hope to see you there! Thanks so much for stopping by today – we’ll see you next time! ;)

Scrappy hugs,

make today count

Hey everybody! I hope your week has started off rather nicely! I have another Splitcoast Stampers Dirty Dozen DT inspiration project to share with you today – a motivational tag with inlaid die cuts and bold pops of purple, lime green and pink! I love making tags and don’t seem to make very many for some reason. And I used a dragonfly die set that I’ve had in my stash for quite some time and have never used, so I thought it was time to bring it out for a play!

I cut two tags from CutCardStock Basis Black cardstock and die cut three dragonfly shaped apertures into one of them, using the Prickley Pear Stamps dainty Dragonflies dies, reserving the negative space pieces to put back into the apertures for a little dimension. I die cut the dragonflies twice more from Basis Black and purple, lime green and pink striped papers in the Doodlebug Design Dot-Stripe Rainbow Petite Prints 6×6 paper pad, and adhered them on top of the negative spaces in the tag with the striped papers on top.

I added gemstones from the Trinity Stamps Amethyst Accent, Andradite Sparkle and Morganite Muse Embellishment Mixes using my Trinity Pick Up Stick. I adhered several motivational sentiments from the Tim Holtz Idea-ology Small Talk stickers. The final touch was adding black stripe ribbon from Really Reasonable Ribbon which I tied with Doodlebug Design Lily White Doodle Twine.

Sharing in the following challenges:
1. A Perfect Time To Craft Open Challenge: August #8-2023 – Anything Goes
2. Classic Design Challenge: August #8 – Anything Goes
3. Crafts Galore Encore Challenge Blog: #114 – August Anything Goes

Affiliate links are used in this post at no cost to you – I really appreciate your support! 

Products used:
CARDSTOCK/PAPER: CutCardStock Basis Black cardstock, Doodlebug Design Dot-Stripe Rainbow Petite Prints 6×6 paper pad
DIES/PUNCHES: Prickley Pear Stamps Dainty Dragonflies dies, Stampin’ Up 1/4″ and 1/2″ circle punches
ACCESSORIES: Tonic Studios 12″ Guillotine Paper Trimmer, Art Glitter Dries Clear adhesive, Big Shot, Tim Holtz Idea-ology Small Talk sentiment stickers, Doodlebug Design Lily White Doodle Twine, Really Reasonable Ribbon black stripe ribbon, Trinity Stamps Amethyst Accent, Andradite Sparkle and Morganite Muse Embellishment Mixes, Trinity Pick Up Stick

I hope you’ve enjoyed seeing this project and will consider joining the Splitcoast Stampers Fan Club which costs less than $25 for an entire year! There are tons of member perks (like seeing all the Dirty Dozen DT’s inspiration projects each month) in addition to access to all the other free content on the Splitcoast Stampers website. Be sure to check it out! The subscription is seriously awesome! Thanks for stopping by today – we’ll see you again soon!

Scrappy hugs,

Fa La La Stationery Box

Hey everybody! Happy Saturday… another week is behind us which means we’re a little closer to Christmas and that sure doesn’t disappoint me! I’m delighted to be back with a ‘Christmas in July’ inspiration project to share for Keep It Simple DT! Don’t you just love seeing all the Christmas projects this time of year?! Our design team has created some pretty awesome projects to share and we’re having a social media hop, so be sure to check it out for a chance to win a gift certificate! I created a stationery box using products in our Scandinavian Christmas Collection!

This amazing little box contains six Christmas cards, six tags, three square notelets, an address book and pen, and a pocket for a book of stamps! I’ve made a couple of these over the years and if you’re interested in looking, they are HERE and HERE. The first one was sort of plain (although still very awesome) but the second one was stepped up a bit which is my favorite version of the two.

I created the stationery box base and lid using coordinating papers in the Ruby 12×12 Collection Pack from the Christmas Bundle. The fun part is always the assembly! I embellished the box and lid with Scandinavian Christmas Alphabits Die Cut Pieces and Santa & Friends Die Cut Pieces along with some clear gemstones in my stash. I made the address book, pen loop and stamp pocket with the same paper collection and used Santa & Friends Die Cut Pieces along with a couple strips of skinny gold washi tape in my stash.

Next, I made six tags, three 3×3 notelets and six A2 size cards to tuck into the pockets, all from Cougar Smooth White cardstock. I used papers from the Scandinavian Christmas 6×9 Collection Pack and 6×9 Cardstock Pack, Stitched Rectangles Nested Dies and Stitched Squares Nested dies for the notelets and cards. I hand-cut the tags and tied jute cord to them. I embellished all the cards and tags with items from the Santa & Friends Die Cut Pieces, Gnomes Die Cut Pieces and Royal Enamel Dots. I used the Santa & Friends Stamps for the sentiment on the cards, stamped in Catherine Pooler Stone Blue ink and popped up on foam strips. I made envelopes for the notelets and cards from 32# HP copy paper using my WRMK Envelope Punch Board.

Sharing in the following challenges:
1. A Perfect Time To Craft Open Challenge: July #7-2023 – Anything Goes
2. Christmas Craft Creations: July Anything Goes

3. Classic Design Challenge: July #7 – Anything Goes
4. Crafty Gals Corner: #245 – Christmas in July
5. Dragonfly Dreams: July challenge – Christmas
6. My Time To Craft Christmas: #65 – Cute Christmas
7. Sparkles Monthly Challenge Blog: #166 – Christmas in July
8. The Crafter’s Cafe Challenge Blog: #299 – Christmas in July

Keep It Simple products used:
Ruby 12×12 Collection Pack (from Christmas Bundle)
Royal Enamel Dots (from Christmas Bundle)
Scandinavian Christmas 6×9 Collection Pack
Scandinavian Christmas 6×9 Cardstock Pack
Scandinavian Christmas Santa & Friends Die Cut Pieces
Scandinavian Christmas Gnomes Die Cut Pieces
Scandinavian Christmas Alphabits Die Cut Pieces
Scandinavian Christmas Santa & Friends Stamps
Stitched Rectangles Nested Dies
Stitched Squares Nested Dies

Affiliate links are used in this post at no cost to you – I really appreciate your support!

Other products used:
CARDSTOCK/PAPER: Cougar Smooth 80# White cardstock, 32# HP copy paper
INK: Catherine Pooler Stone Blue ink
DIES/PUNCHES: We R Memory Keepers Crop-A-Dile Big Bite, Stampin’ Up 3/4″ Circle Punch
ACCESSORIES: Tonic Studios 12″ Guillotine Paper Trimmer, CutCardStock Plus High Capacity adhesive, Art Glitter Dries Clear adhesive, 1/4″ Scor-Tape, MISTI stamping tool, Big Shot, Me & My Big Ideas Skinny Gold Washi Tape, Canvas Corp jute cord, 1″ and 1/4″ double-sided foam strips, brown brads, clear gemstones, We R Memory Keepers Envelope Punch Board

I hope you’ve loved seeing this project as much as I loved creating it, and you’re inspired to get crafty! Be sure to check out ALL the fun goodies in the Keep It Simple store such as paper, stamps, die cuts, ephemera, washi tape and enamel dots to name just a few! You’ll go cray-cray! Be sure to Follow us on Facebook, Instagram, and Pinterest for lots of crafty inspiration! Thanks so much for stopping by today – we’ll see you next time!

Scrappy hugs,

Hello Summer tag album

6/16/23 Top Cut at Cut It Up Challenge Blog!
6/17/23 Top Rocker at 613 Avenue Create!

Hi everyone! Can you believe we’re headed straight into the middle of June already?! The year is almost half over… where are these months going?! I’m delighted to share a ScrapbookingStore DT inspiration project with you today created with the amazing June 2023 Scrapbook Kit with Upgrades! Next to fun folds, you know much I love making mini albums, and this tag album is a super simple project that is both adorable and useful! I used papers and stickers as well as chipboard, ephemera and adhesive brads from the upgrades!

I die cut eight tags from Neenah Classic Crest 110# Solar White cardstock using a tag die from the STAMPlorations Stitched Tags Nesting Dies which became the pages of the album. I die cut two additional tags from patterned papers in the collection to cover the front and back of each page.

I embellished the pages with stickers from the sticker sheet as well as chipboard elements, ephemera and adhesive brads from the upgrades. I also used rectangle, square and circle die cuts using My Favorite Things Stitched Square STAX, Stitched Rectangle STAX and Wonky Stitched Circle STAX, and CottageCutz Double-Stitched Rectangles and Double-Stitched Ovals, all cut from Neenah Classic Crest 110# Solar White cardstock. I bound the album pages with a book ring and tied an assortment of ribbon pieces to the ring.

Sharing in the following challenges:
1. 613 Avenue Create: June 2023 – Anything Goes w/ optional Good Old Summertime (playing twist)
2. A Perfect Time To Craft: June #6-2023 – Anything Goes
3. A Place To Start: June 2023 – Anything Goes
4. Classic Design Challenge: June #6 – Anything Goes
5. Crafting Happiness Challenges: #143 – Anything Goes
6. Crafts Galore Encore Challenge Blog: #112 – Anything Goes
7. Crafty Calendar Challenge: June Challenge – Summertime
8. Cut It Up: #279 – Tag You’re It – Make A Tag
9. Jan’s Digi Stamp Challenges: June Anything Goes
10. Make My Monday: #202 – Summer Theme
11. Penny’s Paper-Crafty Challenge Blog: #548 – Anything Goes with Paper
12. Wednesday’s Creative Inspirations Challenge Blog: June Challenge – Something For the Girls

Affiliate links are used in this post at no cost to you – I really appreciate your support!

ScrapbookingStore products used:
June 2023 Scrapbook Kit with Upgrades

Other products used:
CARDSTOCK/PAPER: Neenah Classic Crest 110# Solar White cardstock
DIES/PUNCHES: STAMPlorations Stitched Tags Nesting Dies; My Favorite Things Stitched Square STAX, Stitched Rectangle STAX and Wonky Stitched Circle STAX; CottageCutz Double-Stitched Rectangles and Double-Stitched Ovals
ACCESSORIES: Tonic Studios 12″ Guillotine Paper Trimmer, CutCardStock Plus High Capacity adhesive, Art Glitter Dries Clear adhesive, MISTI stamping tool, Big Shot, book ring, ribbon assortment from Really Reasonable Ribbon

I hope you’ve enjoyed today’s project and you’re thinking about all the fun you could have with this month’s kit… you really ought to think about joining the Subscription Club! Be sure to Follow us on Facebook, Instagram, Pinterest and YouTube for lots of crafty inspiration! And if you do decide to join the Subscription Club, join our ScrapbookingStore Club Member Group on Facebook for more inspiration and to share your projects! Thanks so much for stopping by today – we’ll see you next time!

Scrappy hugs,

Beware! Halloween Tag

Hi everyone! Happy Sunday – I hope you’re having a great weekend! I’m delighted to be back (finally) to share another ScrapbookingStore DT inspiration project with you, created with the amazing October 2022 Scrapbook Kit with Upgrades! This is the most awesome company to design for. Hurricane Ian caused delays in shipping of the October kit and then the November kit arrived while we were moving and my studio was torn apart, so needless to say, showcasing my projects using the October and November kits has been delayed. So let’s back-track to Halloween… I’m so loving all the coordinating papers in this kit and since I think tags are especially fun, I created a spooky Halloween tag using some of the fun papers and stickers in this kit.

I cut a tag shape from Neenah Classic Crest 110# Solar White cardstock and embellished it with several coordinating papers from the collection, tearing some into strips.

I added stickers from the sticker sheet as well as a variety of elements from the upgrades. The finishing touch was tying Haunted Halloween ribbons from Really Reasonable Ribbon to the top of the tag with Doodlebug Design Lily White Doodle Twine.

Affiliate links are used in this post at no cost to you – I really appreciate your support!

ScrapbookingStore products used:
October 2022 Scrapbook Kit with Upgrades

Other products used:
Cardstock/Paper: Neenah Classic Crest 110# Solar White cardstock
Dies/Punches: Stampin’ Up 1/4″ circle punch
Accessories: Tonic Studios 12″ Guillotine Paper Trimmer, Bearly Art precision craft glue, Trinity Stamps Topaz Twinkle Embellishment Mix, Stampin’ Up Dimensionals, Really Reasonable Ribbon Haunted Halloween ribbon assortment, Doodlebug Design Lily White Doodle Twine

I hope you’ve enjoyed today’s project and you’re thinking about all the fun you could have with this month’s kit… you really ought to think about joining the Subscription Club! Be sure to Follow us on Facebook, Instagram, Pinterest and YouTube for lots of crafty inspiration! And if you do decide to join the Subscription Club, join our ScrapbookingStore Club Member Group on Facebook for more inspiration and to share your projects! Thanks so much for stopping by today – we’ll see you next time!

Scrappy hugs,