add Salt and Tequila

Hey everybody! I hope your weather isn’t too cold where you are! We’re having some cold stuff here but that’s how we like it! Our new challenge is live this morning over at Mix It Up Challenge Blog and I’m delighted to share my inspiration project for MIUCB #68 – Anything Goes + optional Stamping! We’d love to see your project with rubber/clear stamps and no digis this time if you choose to play the twist. But remember, the twist is not necessary to play in our challenges – we’d be happy to see just an ‘anything goes’ project! I created a super cute and somewhat whimsical shaker card featuring some of my favorite STAMPlorations and This Calls For Confetti products in my stash. This card was for an online friend who is battling pancreatic cancer, and I believe she’s received it, so there’s no spoiler alert. My heart really goes out to this sweet lady; she is such an inspiration with her upbeat and positive attitude. I’m not sure how I would handle the situation she’s in, but she’s handling it with grace and dignity.

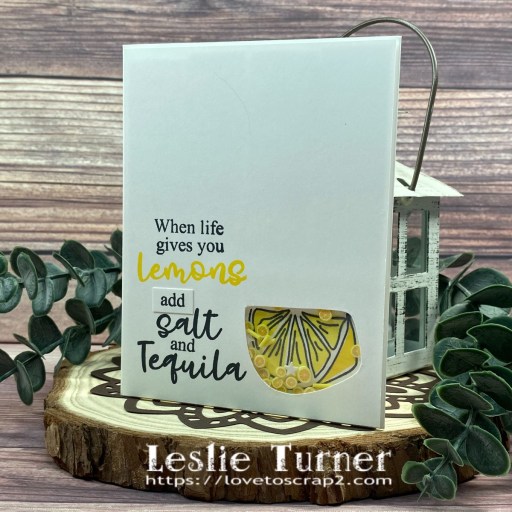
I cut a standard A2 size side-folding card base and layering panel from Neenah Classic Crest 80# Solar White cardstock. I stamped the lemon outline from the STAMPlorations Layered Citrus stamp set in Memento Tuxedo Black on the layering panel, cut around the perimeter, and adhered acetate behind the window with Scor-Tape. I then stamped the full color lemon in Memento Tuxedo Black and Catherine Pooler Limoncello and Chiffon inks directly on the card base.

I stamped the sentiment (also from the Layered Citrus stamp set) in Memento Tuxedo Black and Catherine Pooler Limoncello ink on the layering panel. I added tiny lemon slices from This Calls For Confetti Iced Pink Lemonade confetti and tiny white stars from The 80s Polymer Clay Mix, and adhered the layering panel to the card base with double-sided foam strips, closing up the shaker.

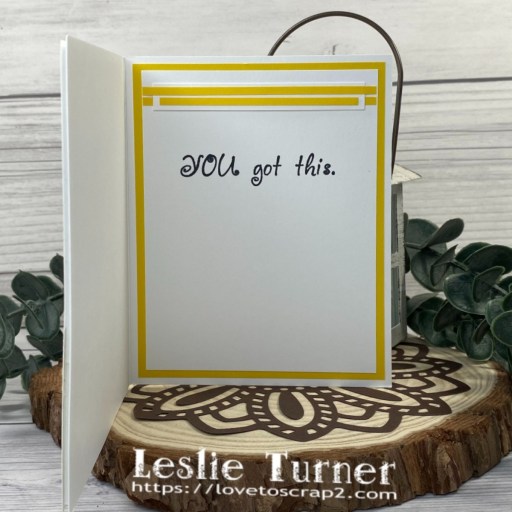
I cut the inside panel from Solar White cardstock and embellished it with leftover strips of Solar White cardstock and strips of CutCardStock Pop Tone Lemon Drop cardstock. I stamped a sentiment from the Unity Stamp Co. Blossom By Blossom stamp set in Memento Tuxedo Black ink, and layered the panel on Lemon Drop cardstock.

Sharing in the following challenges:
1. A Perfect Time To Craft Open Challenge: #11-2023 – Anything Goes
2. Classic Design Challenge: October #10 – Anything Goes
3. Crafts Galore Encore Challenge Blog: #117 – Anything Goes

Affiliate links are used in this post at no cost to you – I really appreciate your support! 

Products used:
CARDSTOCK/PAPER: Neenah Classic Crest 80# Solar White cardstock, CutCardStock Pop Tone Lemon Drop cardstock
STAMPS: STAMPlorations Layered Citrus stamp set, Unity Stamp Co. Blossom By Blossom stamp set
INK: Memento Tuxedo Black ink; Catherine Pooler Limoncello and Chiffon inks
ACCESSORIES: Tonic Studios 12″ Guillotine Paper Trimmer, Tombow Mono Dots adhesive, Bearly Art precision craft glue, MISTI stamp tool, 1/4″ Scor-Tape, Grafix Crystal Clear Craft Plastic, This Calls For Confetti Iced Pink Lemonade confetti and The 80s Polymer Clay Mix, 1″ and 1/4″ double-sided foam strips

I hope you’ve enjoyed seeing this project and will link up with us this time! Thanks so much for stopping by today – we’ll see you next time! ;)

Scrappy hugs,

Seize The Cake

Hi friends! So how is the weather where you are? Are you getting any chilly weather, or better yet, any snow?! You know we love our snowy winter weather out here in southwestern Colorado! Our new challenge is live this morning over at Love To Craft Challenge Blog and I’m super stoked to share my DT inspiration project for LTCCB #77 – Anything Goes! I made THE cutest birthday card using the Hot Off The Press Cake Box Cutting Dies. I’ve already made a couple box cards using this die set and they sure don’t disappoint! I love these dies and I love how this card turned out! Definitely got some color goin’ on! ;)

I cut the box card base (chocolate cake layers, lol) from CutCardStock Basis Brown cardstock and the icing layers from a cute dotted print in the My Favorite Things Sweet Celebration 6×6 paper pack, and assembled the card. I cut the candle and a bunch of flower layers from various prints in the Sweet Celebration paper pack, and the flame from CutCardStock Bright Gold Foil cardstock. I assembled the candle and flowers, and adhered them to the card base.

I stamped the sentiment from the Stampin’ Up Something To Say stamp set in Memento Espresso Truffle ink on a scrap piece of Neenah Classic Crest 110# Solar White cardstock and cut it with the fancy die in the HOTP die set. I added a white twine bow along with iridescent gemstones in the flower centers.

I used the middle cake layer die in the set to cut a sentiment panel for the back from Solar White cardstock, and stamped another sentiment from the same Stampin’ Up stamp set in brown ink.

Sharing in the following challenges:
1. A Perfect Time To Craft Open Challenge: #11-2023 – Anything Goes
2. Classic Design Challenge: October #10 – Anything Goes
3. Crafts Galore Encore Challenge Blog: #117 – Anything Goes
4. The Crafter’s Cafe Challenge Blog: #302 – Flowers

Affiliate links are used in this post at no cost to you – I really appreciate your support! 

Products used:
CARDSTOCK/PAPER: Neenah Classic Crest 110# Solar White cardstock, CutCardStock Basis Brown and Bright Gold Foil cardstock, My Favorite Things Sweet Celebration 6×6 paper pack
STAMPS: Stampin’ Up Something To Say stamp set
INK: Memento Espresso Truffle ink
DIES/PUNCHES: Hot Off The Press Cake Box Cutting Dies
ACCESSORIES: Tonic Studios 12″ Guillotine Paper Trimmer, Art Glitter Dries Clear adhesive, MISTI stamp tool, Big Shot, 1″ double-sided foam strips, Doodlebug Design Lily White Doodle Twine, Darice clear iridescent gemstones

I hope you’ve enjoyed seeing this project and will link up with us this time! Thanks so much for stopping by today – we’ll see you next time! ;)

Scrappy hugs,

Everything’s Coming Up Carrots

Hi friends! Happy Hump Day – I hope you’re having a great week! I know… it’s a very busy morning on my blog! Our new challenge is live this morning over at Love To Scrap Challenge Blog and I’m super excited to share my DT inspiration project for LTSCB #164 – Anything Goes! I created a super cute thank you card created with a Stampin’ Up stamp set that I’ve had a little while but haven’t had a chance to use yet, and I love how it turned out!

I cut a standard A2 size side-folding card base from Neenah Classic Crest 110# Solar White cardstock. I stamped the carrot images from the Stampin’ Up Thanks A Bunch stamp set in Memento Tangelo, Potter’s Clay, New Sprout, Bamboo Leaves and Olive Grove inks directly on the card front. I stamped the sentiment on a Solar White scrap in Potter’s Clay ink, cut it with a Spellbinders Classic Ovals Small die, and adhered it to the card front with a 1″ double-sided foam strip. The finishing touch was adding several gemstones from the Trinity Stamps Topaz Twinkle Embellishment Mix.

I stamped the inside sentiment and small bunch of carrots from the same stamp set in Tangelo, Potter’s Clay, New Sprout and Bamboo Leaves inks. It’s almost a one-layer card! ;)

Sharing in the following challenges:
1. A Perfect Time To Craft Open Challenge: #11-2023 – Anything Goes
2. Classic Design Challenge: October #10 – Anything Goes

Affiliate links are used in this post at no cost to you – I really appreciate your support! 

Products used:
CARDSTOCK/PAPER: Neenah Classic Crest 110# Solar White cardstock
STAMPS: Stampin’ Up Thanks A Bunch stamp set
INK: Memento Tangelo, Potter’s Clay, New Sprout, Bamboo Leaves and Olive Grove inks
DIES/PUNCHES: Spellbinders Classic Ovals Small die
ACCESSORIES: Tonic Studios 12″ Guillotine Paper Trimmer, Art Glitter Dries Clear adhesive, MISTI stamp tool, Big Shot, 1″ double-sided foam strip, Trinity Stamps Topaz Twinkle Embellishment Mix

I hope you’ve enjoyed seeing this project and will link up with us this time! Thanks so much for stopping by today – we’ll see you next time! ;)

Scrappy hugs,

let it snow

Hey everybody! We had our first snow of the season a couple days ago but it wasn’t much and all melted away! We’re just a mere 6-7 (ish) weeks from Christmas, so are you getting ready?! I’ve been making Christmas cards all year long and I’m still making them! I’m up on the Prickley Pear Stamps blog today with another inspiration project featuring the beautiful Ornaments 2 stamp set. I made a mini slimline featuring three clusters of hanging snowflakes and I really love how it turned out!

I cut a 3-1/2″ x 6″ mini slimline card base from CutCardStock Cougar 80# Smooth White cardstock. Using the Kat Scrappiness Mini Slimline Fancy Scalloped Dies, I cut a Cougar Smooth White panel for the front. I also cut a frame from CutCardStock Stardream Metallic Lagoon cardstock using the Kat Scrappiness Mini Slimline Tri-Frame dies. I stamped three clusters of hanging snowflakes and a sentiment in Catherine Pooler Cummerbund ink. I added gemstones from the Trinity Stamps Aquamarine Ripple Embellishment Mix to the center of each snowflake with my Trinity Pick Up Stick. The finishing touch was adding several Eyelet Outlet Teal Enamel Dots.

Sharing in the following challenges:
1. Classic Design Challenge: October #10 – Anything Goes

Affiliate links are used in this post at no cost to you – I really appreciate your support!

Prickley Pear Stamps products used:
Ornaments 2 stamp set

Other products used:
CARDSTOCK/PAPER: CutCardStock Cougar Smooth 80# White and Stardream Metallic Lagoon cardstock
INK: Catherine Pooler Cummerbund ink
DIES/PUNCHES: Kat Scrappiness Mini Slimline Fancy Scalloped Dies and Mini Slimline Tri-Frame Dies
ACCESSORIES: Tonic Studios 12″ Guillotine Paper Trimmer, CutCardStock Plus High Capacity adhesive, Art Glitter Dries Clear adhesive, MISTI stamp tool, Big Shot, Eyelet Outlet Teal Enamel Dots, Trinity Stamps Aquamarine Ripple Embellishment Mix, Trinity Pick Up Stick

I hope you’ve enjoyed this project! Be sure to check out all the awesome stamps and dies at Prickley Pear Stamps! Save 10% on anything on the site when you shop at Prickley Pear Stamps by using coupon code LESLIE10 at checkout! And be sure to ‘like’ and ‘follow’ the Prickley Pear Stamps Facebook page to keep up with news and sales, and join Prickley Pear Pals (the fan group) for lots of fun crafty ideas and to share your creativity! And finally, we’d love to see you visit the Prickley Pear Stamps blog and become a Follower! Hope to see you there! Thanks so much for stopping by today – we’ll see you next time! ;)

Scrappy hugs,

Drink Up, Witches!

Hey everybody! I hope you’re having an awesome week – it’s Friday! I’m delighted to be back with an inspiration project to share for Keep It Simple DT! I just love seeing all the spooky and not-so-spooky Halloween projects this time of year! Our design team has created some awesome projects and we’re having a social media HOP to share some last-minute Halloween project ideas today, tomorrow and Sunday! There’s a full HOP list on my Instagram post HERE if you want to hop along!

If you are hopping along – and hopefully enjoying our design team projects – then you’ve landed here because I’m the last stop on the hop! And I have blog candy! If you are participating in the HOP and you’d like to get in on the chance to win a prize pack from me, I invite you to (1) follow me on Instagram, (2) follow me here on my blog, and (3) leave a comment on this post telling me your favorite drink! I’ll draw a winner on Monday, October 30th!

I created a very cool pop out gatefold card featuring papers and die cut pieces from the ‘A Wee Bit Wicked’ Collection! I am totally in love with literally everything in this collection! My inspiration for this fold came from Sandie on the Stampingbella DT. Her tutorial is HERE on the Stampingbella blog if you’re interested. It was definitely a fun one and I totally love how it turned out!

I cut the card base from Neenah Classic Crest 110# Solar White cardstock along with layering panels from coordinating prints in the A Wee Bit Wicked 6×9 Collection Pack. I used quite a few die cuts from the A Wee Bit Wicked Wee Bits Die Cut Pieces to embellish the card. I used a piece of black thread to connect the spiders to the web.

Here’s a shot of the card closed and folded flat for mailing. There is room on the back for a signature and optional message which I didn’t photograph.

Sharing in the following challenges:
1. Classic Design Challenge: October #10 – Anything Goes
2. Crafty Catz: #656 – Anything Goes w/ optional 4-Legged Critter
3. Creative Crafting Uncles: #46 – Halloween
4. Fab ‘n’ Funky: #582 – Make It Female
5. Halloween Crafts All Year ‘Round: #9 – Anything Halloween Goes
6. Little Red Wagon: #728 – Trick or Treat
7. Try It On Tuesday: Halloween

Keep It Simple products used:
A Wee Bit Wicked 6×9 Collection Pack
A Wee Bit Wicked Wee Bits Die Cut Pieces

Affiliate links are used in this post at no cost to you – I really appreciate your support!

Other products used:
CARDSTOCK/PAPER: Neenah Classic Crest 110# Solar White cardstock
ACCESSORIES: Tonic Studios 12″ Guillotine Paper Trimmer, Bearly Art precision craft glue, black thread, Stampin’ Up Dimensionals

I hope you’ve loved seeing this project as much as I loved creating it, and you’re inspired to get crafty! Be sure to check out ALL the fun goodies in the Keep It Simple store such as paper, stamps, die cuts, ephemera, washi tape and enamel dots to name just a few! You’ll go crazy! Be sure to Follow us on Facebook, Instagram, and Pinterest for lots of crafty inspiration! Thanks so much for stopping by today – we’ll see you next time!

Scrappy hugs,

Christmas Blessings

Hey everybody! Happy Monday! Dang, this weekend sure went by fast – in fact, this whole month has flown by! I’m up on the CutCardStock blog today with an amazing DT inspiration project featuring our Silk Glitter Opulent Opal along with a couple colors in the Pop Tone line and a couple greens! I used alcohol inks on the glitter cardstock for this Christmas card and it turned out so pretty! Not sure why I haven’t thought to do this before!

I started by cutting two pieces of Silk Glitter Opulent Opal cardstock and dropping Watermelon, Poppyfield and Cranberry alcohol inks onto one of them, and Citrus, Lettuce and Botanical alcohol inks onto the other one. While they were drying, I die cut some of the floral pieces from Pop Tone Wild Cherry and Pop Tone Lemon Drop, along with the berries from Opulent Opal and the leaf pieces from Mantis Green and Kale Green. Once the glitter pieces were dry, I die cut the main floral piece from the red one and the main leaf piece from the green one. I went ahead and assembled the floral spray before I lost any of those tiny pieces, lol! ;)

I cut a standard A2 size top-folding card base from Neenah Classic Crest 110# Solar White cardstock along with a layering panel from 80# Solar White which I ran through the Big Shot with the Sizzix Texture Fades Plaid embossing folder. I adhered the assembled floral spray to the embossed panel with foam strips. I stamped the sentiment from the Taylored Expressions In & Out Christmas stamp set in Memento Northern Pine ink on Solar White and cut it with a Keep It Simple Stitched Rectangles Nested Dies. I adhered the sentiment and added several clear gemstones which completed the card front.

I cut the inside panel from 80# Solar White cardstock and embellished it with an embossed Mantis Green strip and a narrow strip of Solar White. I stamped the sentiment (from the same Taylored Expressions stamp set) in green ink and layered the panel on Kale Green cardstock.

Sharing in the following challenges:
1. Beautiful Blossoms Challenge: #10 – Anything Flowers Goes w/ optional Mood Board
2. Classic Design Challenge: October #10 – Anything Goes
3. Cut It Up Challenges: 3289 – Add A Sentiment
4. Fab ‘n’ Funky: #582 – Make It Female
5. Sparkles Christmas Challenges: #153 Christmas Flower/Foliage
6. The Crafter’s Cafe Challenge Blog: #302 – Flowers

Affiliate links are used in this post at no cost to you – I really appreciate your support!

CutCardStock products used:
Neenah Classic Crest 110# Solar White cardstock
Neenah Classic Crest 80# Solar White cardstock
Silk Glitter Opulent Opal 12×12
Pop Tone Wild Cherry
Mantis Green
Kale Green

Other products used:
STAMPS: Taylored Expressions In & Out Christmas stamp set
INK: Ranger alcohol inks- Watermelon, Poppyfield, Cranberry, Citrus, Lettuce, and Botanical; Memento Northern Pine ink
DIES/PUNCHES: Sizzix Holiday Brushstroke #3 Thinlits, Keep It Simple Stitched Rectangles Nested Dies
ACCESSORIES: Tonic Studios 12″ Guillotine Paper Trimmer, Scrapbook Adhesives E-Z Runner, Bearly Art precision craft glue, Sizzix Texture Fades Plaid Embossing Folder, MISTI stamp tool, Big Shot, 1″ double-sided foam strips, clear gemstones

I hope you’ve enjoyed today’s project and you’re inspired to get crafty! Be sure to check out all the awesome cardstock and other goodies at CutCardStock (adhesives, labels, stickers, pens, watercolors and ribbon to name a few). And head on over to the CutCardStock Facebook Page and for more inspiration! Also, be sure to join our Creating with Card Stock Facebook Group for even more crafty inspiration! Thanks so much for stopping by today – we’ll see you next time!

Scrappy hugs,

holiday hugs

Hey peeps, how are you today? I hope you had a great weekend and you’re looking forward to an awesome week coming up! I’ve popped in this morning with another card I created for the 2023 Cat Lovers Christmas Challenge in honor of our friend, Janis. I dug into some of my older papers, stamps and dies and made another triple point fun fold featuring a Paper Smooches kitty sitting in a Birch Tree Design wreath! It’s funny how a fun fold design that I was not crazy about initially has become one that I really like!

I cut the card base from Neenah Classic Crest 80# Solar White cardstock along with layering panels from coordinating prints in the American Crafts Christmas Print 6×6 cardstock pad. Next, I created the wreath using the Birch Tree Design Roundabout die set. I cut the layers from CutCardStock Bright Gold Foil, Habanero Red and Kale Green cardstock and assembled the wreath. Using a My Favorite Things Stitched Mini Scallop STAX, I cut a large circle from CutCardStock Mantis Green cardstock and adhered the wreath.

I stamped the kitty from the Paper Smooches Feline Friends stamp set in Catherine Pooler Sand Castle ink and cut it with the coordinating die. Next, I stamped a sentiment from the Paper Smooches Holiday Cheer stamp set in Memento Northern Pine ink and adhered the kitty beneath it on a foam strip. The final touch was adding a tiny heart punched from a Habanero Red cardstock scrap using the Stampin’ Up Cookie Cutter punch.

Using the My Favorite Things Stitched Mini Scallop STAX, I cut another large circle from Neenah Classic Crest 80# Solar White cardstock. I stamped a sentiment from the Paper Smooches Holiday Cheer stamp set in Memento Northern Pine ink and adhered the circle to the inside panel directly beneath the circle on the front panel.

Sharing in these additional challenges:
1. Classic Design Challenge: October #10 – Anything Goes
2. Cut It Up Challenges: 3289 – Add A Sentiment

Affiliate links are used in this post at no cost to you – I really appreciate your support! 

Products used:
CARDSTOCK/PAPER: Neenah Classic Crest 80# Solar White cardstock; CutCardStock Bright Gold Foil, Habanero Red, Kale Green and Mantis Green cardstock; American Crafts Christmas Print 6×6 cardstock pad
STAMPS: Paper Smooches Feline Friends and Holiday Cheer stamp sets
INK: Catherine Pooler Sand Castle ink; Memento Northern Pine ink
DIES/PUNCHES: Birch Press Design Roundabout die set, Paper Smooches Feline Friends die set, My Favorite Things Stitched Mini Scallop Oval STAX, Stampin’ Up Cookie Cutter punch (tiny heart on kitty)
ACCESSORIES: Tonic Studios 12″ Guillotine Paper Trimmer, Gina K Designs Adhesive Dot Runner, Bearly Art precision craft glue, MISTI stamp tool, Big Shot, 1″ double-sided foam strip

I hope you’ve enjoyed seeing this project and will link up with us this time! Thanks so much for stopping by today – we’ll see you next time! ;)

Scrappy hugs,

dia De muertos

Howdy peeps! It’s a beautiful Sunday and I hope you’re having a great weekend! I’m back up on the Prickley Pear Stamps blog today with a center easel card! You know how I love fun folds and this one is so easy and works up fast. I used the day of the dead cat in the Scary Cats 2 stamp set which I paired with pink patterned papers in my stash.

I cut the A2 size card base from Neenah Classic Crest Solar White cardstock and covered the panels with pink plaid, polka dot and floral patterned papers. I stamped the day of the dead cat from the Scary Cats 2 stamp set in Memento Tuxedo Black ink on CutCardStock Basis White cardstock, colored the flowers on her head and face with alcohol markers, and fussy cut her.

I adhered the cat to the center panel, stamped the sentiment in black ink, and added a few gemstones from the Trinity Stamps Morganite Muse Embellishment Mix with my Trinity Pick Up Stick. The final step was adding a ‘stop’ for the center easel to rest on. I created this by stamping the circular cluster of flowers (in the same stamp set), coloring them with alcohol markers, and punching the cluster with a 1″ circle punch. I then layered it on several more punched circles to give it some dimension.

Sharing in the following challenges:
1. Classic Design Challenge: October #10 – Anything Goes

Affiliate links are used in this post at no cost to you – I really appreciate your support!

Prickley Pear Stamps products used:
Scary Cats 2 stamp set

Other products used:
Cardstock/Paper: Neenah Classic Crest 80# Solar White cardstock, CutCardStock Basis 80# White cardstock, Keep It Simple Rose 12×12 Collection Pack
Ink: Memento Tuxedo Black ink; Arteza alcohol markers- RP15, R21, Y02, YG04, YR32, PB25
Dies/Punches: Stampin’ Up 1″ Circle Punch
Accessories: Tonic Studios 12″ Guillotine Paper Trimmer, Fiskars 12″ SureCut Paper Trimmer, Art Glitter Dries Clear adhesive, MISTI stamp tool, Trinity Stamps Morganite Muse Embellishment Mix, Trinity Pick Up Stick

I hope you’ve enjoyed this project! Be sure to check out all the awesome stamps and dies at Prickley Pear Stamps! Save 10% on anything on the site when you shop at Prickley Pear Stamps by using coupon code LESLIE10 at checkout! And be sure to ‘like’ and ‘follow’ the Prickley Pear Stamps Facebook page to keep up with news and sales, and join Prickley Pear Pals (the fan group) for lots of fun crafty ideas and to share your creativity! And finally, we’d love to see you visit the Prickley Pear Stamps blog and become a Follower! Hope to see you there! Thanks so much for stopping by today – we’ll see you next time! ;)

Scrappy hugs,

hello Winter

Hi friends! I hope you’re having a great weekend! I have an awesome Keep It Simple DT inspiration project to share today created with papers, die cut pieces, stamps and dies in the new Snow Day Collection! OMGoodness, yumminess to the third degree here, folks! The colors in this collection are amazing and absolutely fitting for Winter-themed projects! I created a double pleated card, also known as a drapery fold, with a little twist. Our papers are robust, so instead of folding the paper, I cut it in strips and reassembled it. This took a little extra time but yielded a very cool design which was flatter than it would have been folded.

I cut a standard A2 size side-folding landscape card base from Neenah Classic Crest 110# Solar White cardstock along with a layering panel from a navy paper in the 12×12 Collection Pack. I cut the pleated panel from a coordinating print and instead of folding, I cut it in strips and reassembled it. I added a horizontal strip across the front of the panel and added the sentiment pieces from the Words and Phrases Die Cut Pieces. The finishing touch was adding several Clear Enamel Dots.

I cut the inside panel from 80# Solar White cardstock and embellished it with a leftover triangle cut from the pleated panel on the front. I stamped a sentiment in Memento Paris Dusk ink from the Collection Stamp and cut it with an Outline Die. The final step was adhering the panel to a navy layer.

Sharing in the following challenges:
1. Classic Design Challenge: October #10 – Anything Goes

Keep It Simple products used:
Snow Day 12×12 Collection Pack
Snow Day Words and Phrases Die Cut Pieces
Snow Day Collection Stamp
Snow Day Outline Dies
Clear Enamel Dots

Affiliate links are used in this post at no cost to you – I really appreciate your support!

Other products used:
CARDSTOCK/PAPER: Neenah Classic Crest 110# and 80# Solar White cardstock
INK: Memento Paris Dusk ink
ACCESSORIES: Tonic Studios 12″ Guillotine Paper Trimmer, Tombow Mono Dots adhesive, Bearly Art precision craft glue, MISTI stamp tool, Big Shot, 1″ and 1/2″ double-sided foam strips

I hope you’ve loved seeing this project as much as I loved creating it, and you’re inspired to get crafty! Be sure to check out ALL the fun goodies in the Keep It Simple store such as paper, stamps, die cuts, ephemera, washi tape and enamel dots to name just a few! You’ll go crazy! Be sure to Follow us on Facebook, Instagram, and Pinterest for lots of crafty inspiration! Thanks so much for stopping by today – we’ll see you next time!

Scrappy hugs,

A Perfect Christmas

Hi friends! I hope you are healthy and happy, and your weekend has started off nicely! I have a very cool triple Z-fold to share with you this morning that I created for the 2023 Cat Lovers Christmas Challenge honoring our dear friend, Janis. I’ve seen several versions of a triple Z-fold on Pinterest and since the basic Z-fold is one of the easiest to make, I figured adding the triple strips would be a breeze – and it was! I made this one in a standard A2 size and it folds flat for mailing. I have shared the instructions for this easy fun fold in the Freebies section of my blog, so be sure to check it out you’d like to learn how to make it. I totally love Tim’s Crazy Cat stamps and dies, and this is the second card I made using them for the cat lovers Christmas challenge. These cats never get old! And I couldn’t resist putting sunglasses on this guy, too! ;)

I cut the card base and strips from 80# Solar White cardstock along with layering panels from two coordinating prints in the Echo Park A Perfect Christmas Collection Kit. Using the Keep It Simple Stitched Ovals Nested Dies, I die cut ovals from Solar White cardstock and CutCardStock Scottish Highlands Green cardstock. I adhered them to the card front and added a sentiment sticker from the Echo Park collection. I stamped the cat from the Stampers Anonymous Crazy Cats stamp set on Solar White cardstock, colored him with alcohol markers and cut him with the coordinating Crazy Cats Framelits.

I wanted to use the Santa hat in the Stampers Anonymous Crazy Things stamp set but it was right-hand oriented, so I used the Neat & Tangled Backdrop stamp and Memento Tuxedo Black ink to reverse the image and make it left-hand oriented which ‘flowed’ better with the this particular cat. I darkened the outline just a tad with a Sakura black Pigma Micron 08 pen. I colored the image with alcohol markers, and fussy cut it, and added an Eyelet Outlet Sunglasses Brad.

I cut the back panel from Neenah Classic Solar White cardstock and embellished it with a leftover strip of patterned paper used on the front. I added a sentiment sticker from the Echo Park collection and layered the panel on Scottish Highlands Green cardstock.

Sharing in the following challenges:
1. Classic Design Challenge: October #10 – Anything Goes
2. Creative Creases Challenges: #68 – Anything Goes with a Fun Fold
3. Critter Crazy Challenge Blog: #79 – Anything Goes with a Featured Critter
4. Cut It Up Challenges: 3289 – Add A Sentiment

Affiliate links are used in this post at no cost to you – I really appreciate your support! 

Products used:
CARDSTOCK/PAPER: Neenah Classic Crest 80# Solar White cardstock, CutCardStock Scottish Highlands Green cardstock, Echo Park A Perfect Christmas Collection Kit
STAMPS: Stampers Anonymous Crazy Cats and Crazy Things Stamps, Neat & Tangled Backdrop stamp
INK: Memento Tuxedo Black ink (pad and marker), Sakura black Pigma Micron 08 pen, Arteza alcohol markers- R21, YR19, CG08, BR84
DIES/PUNCHES: Keep It Simple Stitched Ovals Nested Dies, Stampers Anonymous Crazy Cats Framelits
ACCESSORIES: Tonic Studios 12″ Guillotine Paper Trimmer, Gina K Designs Adhesive Dot Runner, Bearly Art precision craft glue, MISTI stamp tool, Big Shot, Eyelet Outlet Sunglasses Brads

I hope you’ve enjoyed seeing this triple Z-fold! If you’re a cat lover, come on over and link up some cat-themed Christmas cards in the challenge! We’d love to see what you come up with! Thanks so much for stopping by today – we’ll see you next time! ;)

Scrappy hugs,