Hey everybody! I hope your new year has started off on a nice note and it’s not too cold where you are. We’ve gotten a little more snow out here in southwestern Colorado but our Winter has been so mild we have absolutely zero complaints. And today is my dad’s birthday in Heaven – he was born 112 years ago and I sure do miss him. I was a daddy’s girl and he left us when I was only 16, leaving a gaping hole in my heart.
I’m up on the CutCardStock blog today with a tutorial for making a postcard. A postcard, you say? Well, we need to thank those who sent Christmas gifts, so I thought this would be a fun way to do it! I used the awesome Classic Crest Epic Black and Beetle Black which I paired with our Brilliant White Cotton. I also used Silk Glitter Opulent Opal and 80# Solar White. The Sizzix Dash Away All die set was included in the prize pack I recently won on Instagram and I really wanted to use it even though the Christmas season is over. ;)

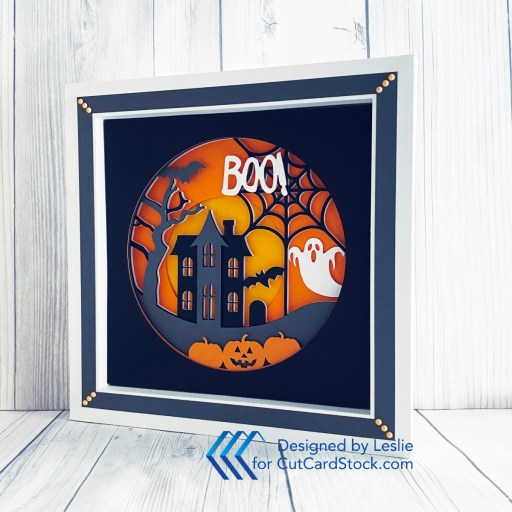
I started by inking a piece of Savoy Brilliant White Cotton cardstock with a variety of Ranger distress inks. I punched a 1-3/4″ circle into a piece of masking paper and inked the moon with fossilized amber and vintage photo. Then I masked off the moon with the punched circle and inked the sky with stormy sky, prize ribbon and villainous potion. I cut the inked panel with a Love From Lizi Stitched Rectangle Nested Cutting Die. I die cut the star trail directly into the inked panel using a die in the Dash Away All set and backed it with a Silk Glitter Opulent Opal scrap. And finally, I splattered Copic Opaque White paint over the panel.
Next, using the Pinkfresh Studio Postage Edge Nested Rectangles Dies, I cut the postcard base from Neenah Classic Crest 130# Epic Black cardstock. I also die cut three Santas with reindeer using the Sizzix Dash Away All Thinlits and a cityscape using the Memory Box Cityscape Nightline die, all from Beetle Black cardstock. Project assembly is always the most fun and I loved watching this one come to life. I adhered the cityscape across the bottom, trimmed it and ran the panel back through the Big Shot with the stitched rectangle die. I stacked the three Santas and reindeer for dimension and adhered them in the sky. The final touch was stamping the sentiment from the Keep It Simple Thank You Sentiments stamp set in Versafine Onyx Black ink.

I die cut an additional stitched rectangle for the back from Neenah Classic Crest Solar White cardstock using a Love From Lizi Stitched Rectangle Nested Cutting Die and stamped another sentiment from the Keep It Simple Thank You Sentiments stamp set in Versafine Onyx Black ink.

Affiliate links are used in this post at no cost to you – I really appreciate your support!
CutCardStock products used:
Savoy Brilliant White Cotton cardstock
Neenah Classic Crest 130# Epic Black
Beetle Black Canvas Textured cardstock
Silk Glitter 12×12 Opulent Opal cardstock
Neenah Classic Crest 80# Solar White cardstock
Other products used:
STAMPS: Keep It Simple Thank You Sentiments stamp set
INK: Ranger distress inks- fossilized amber, vintage photo, stormy sky, prize ribbon, villainous potion; Copic Opaque White paint; Versafine Onyx Black ink
DIES/PUNCHES: Stampin’ Up 1-3/4″ circle punch, Pinkfresh Studio Postage Edge Nested Rectangles Dies, Love From Lizi Stitched Rectangle Nested Cutting Dies, Sizzix Dash Away All Thinlits, Memory Box Cityscape Nightline Die
ACCESSORIES: Fiskars 12″ ProCision Rotary Bypass Paper Trimmer, Bearly Art precision craft glue, My Sweet Petunia Precision Glue Press, mini MISTI, MISTI Sticky Mats, Ranger-Wendy Vecchi Make Art Stay-tion 12″, Big Shot, Rabbit Hole blending brush, Waffle Flower Shader 1+ blending brush
I hope you’ve enjoyed today’s project and you’re inspired to get crafty! Be sure to check out all the awesome cardstock and other goodies at CutCardStock (adhesives, labels, stickers, pens, watercolors and ribbon to name a few). And head on over to the CutCardStock Facebook Page and for more inspiration! Also, be sure to join our Creating with CutCardStock Facebook Group for even more crafty inspiration! Thanks so much for stopping by today – we’ll see you next time!
Scrappy hugs,