Happy Birthday

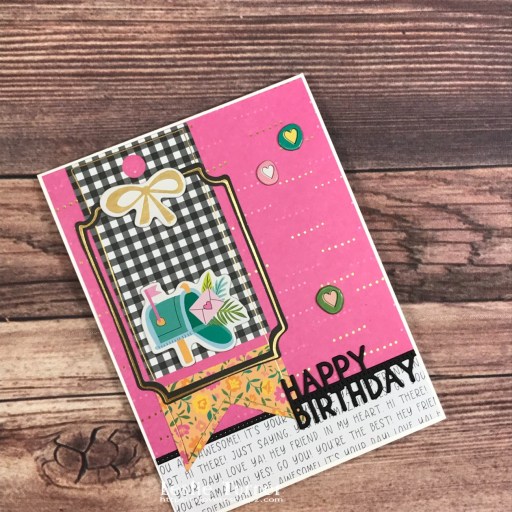
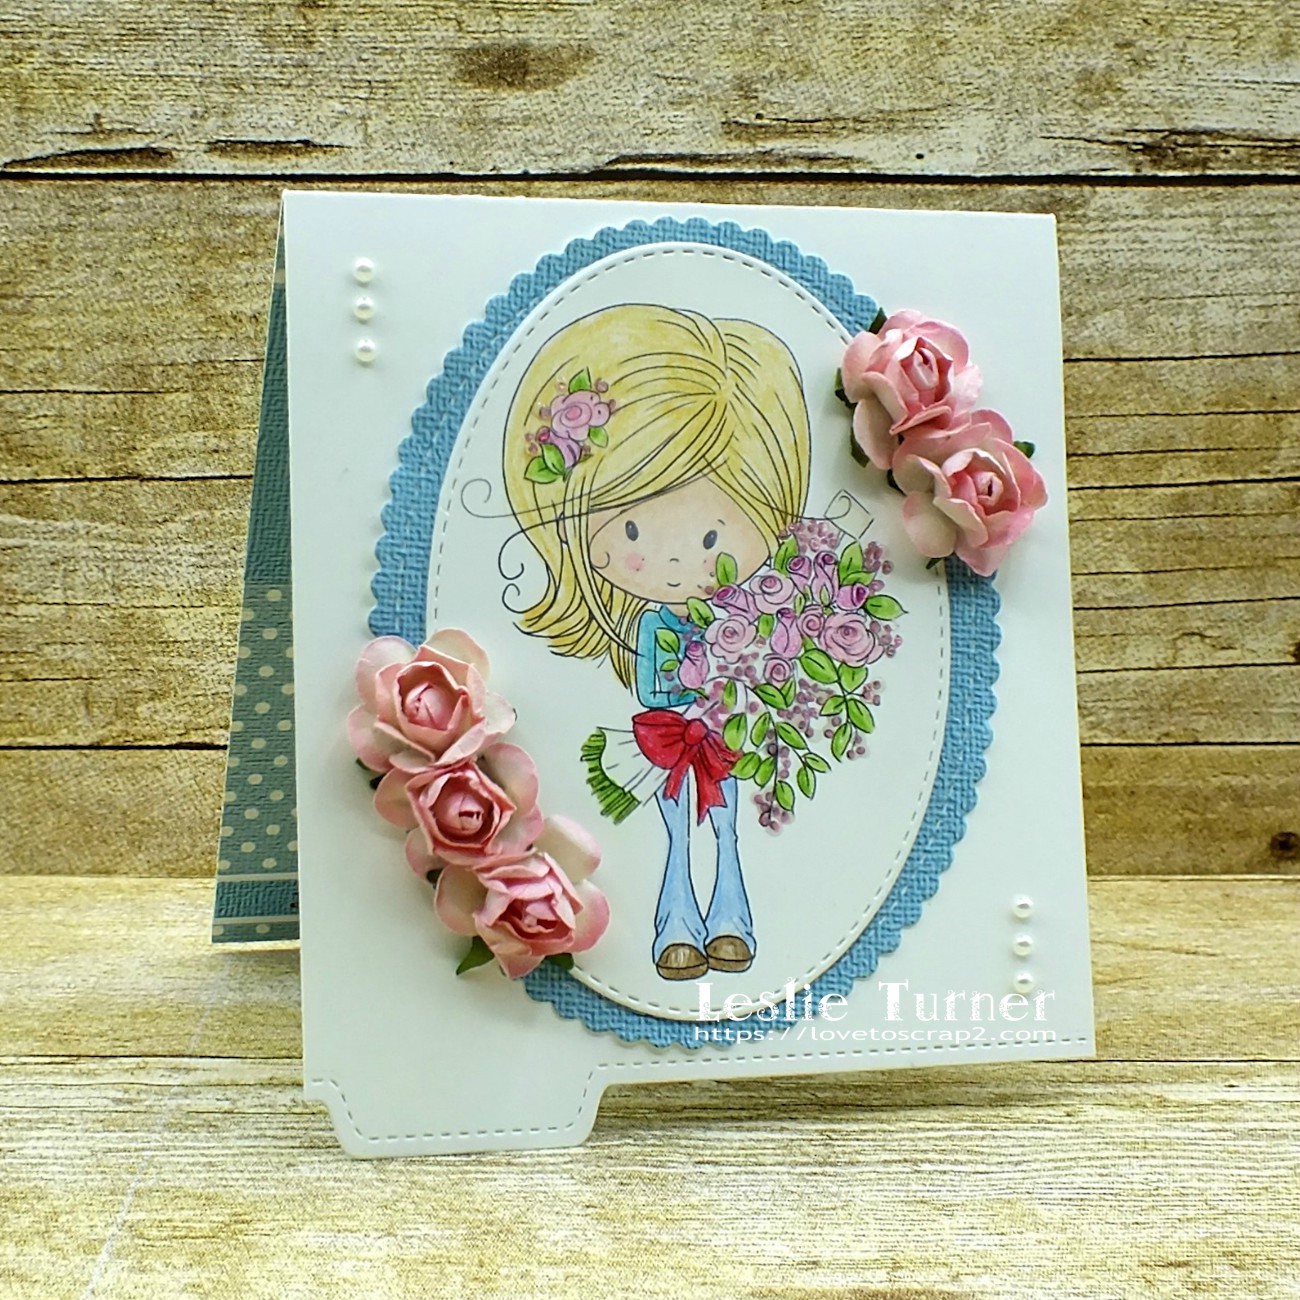
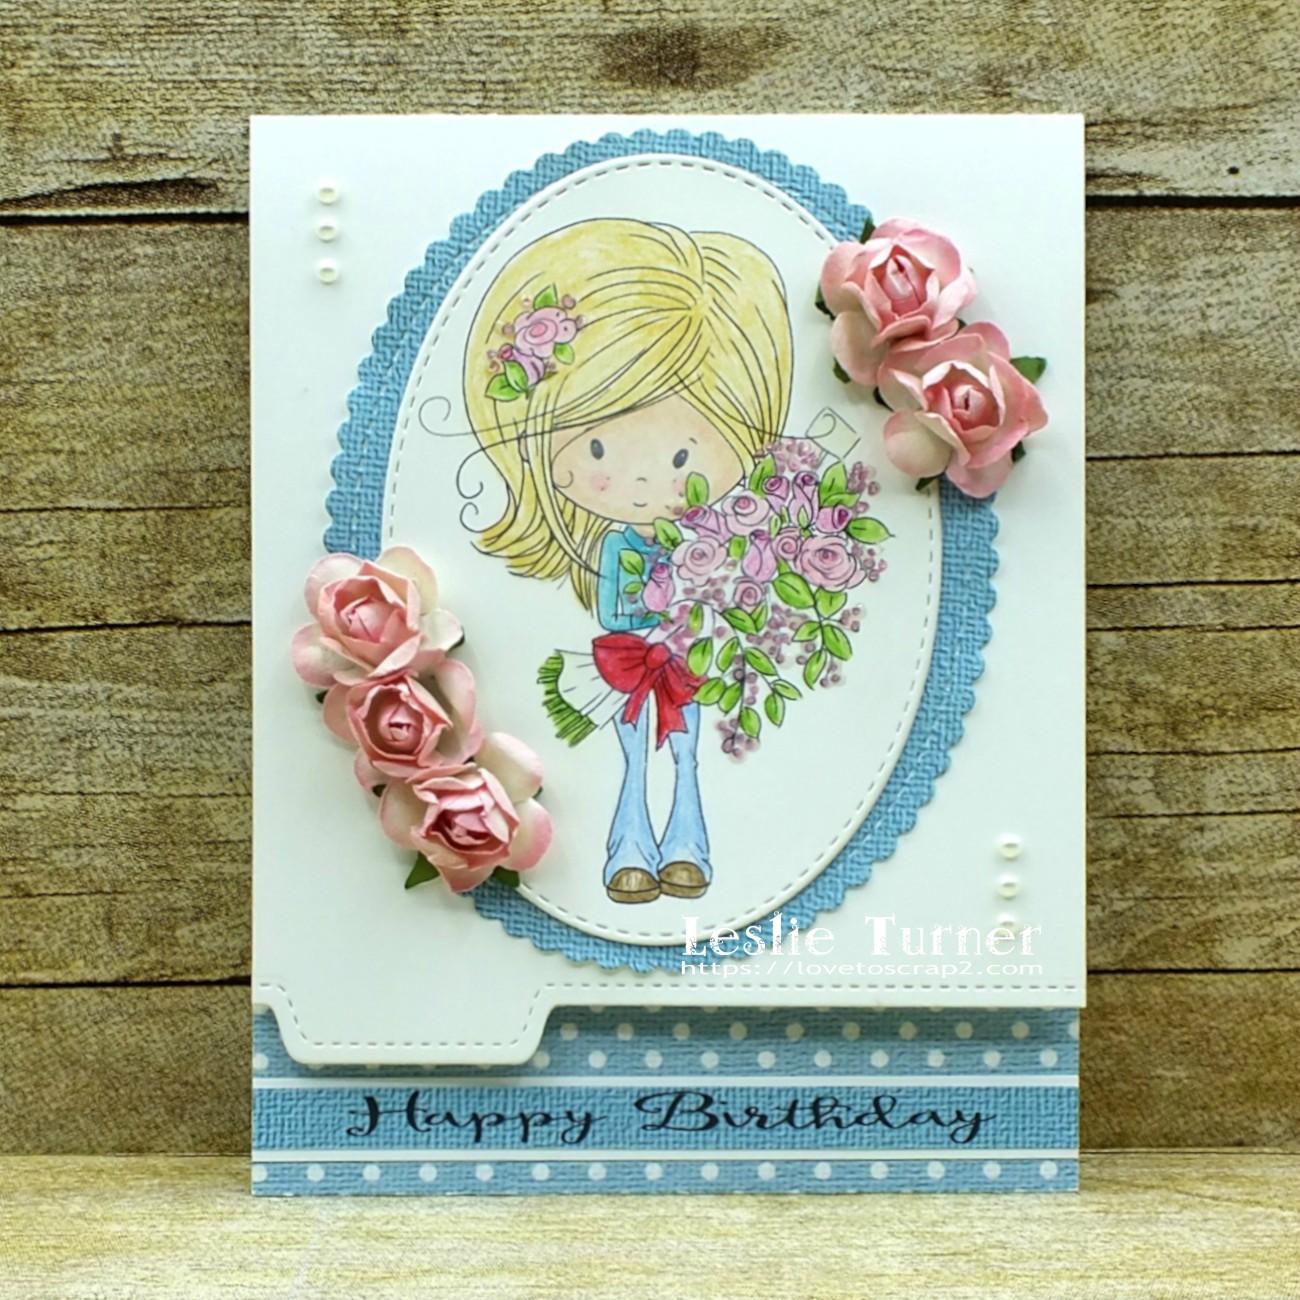
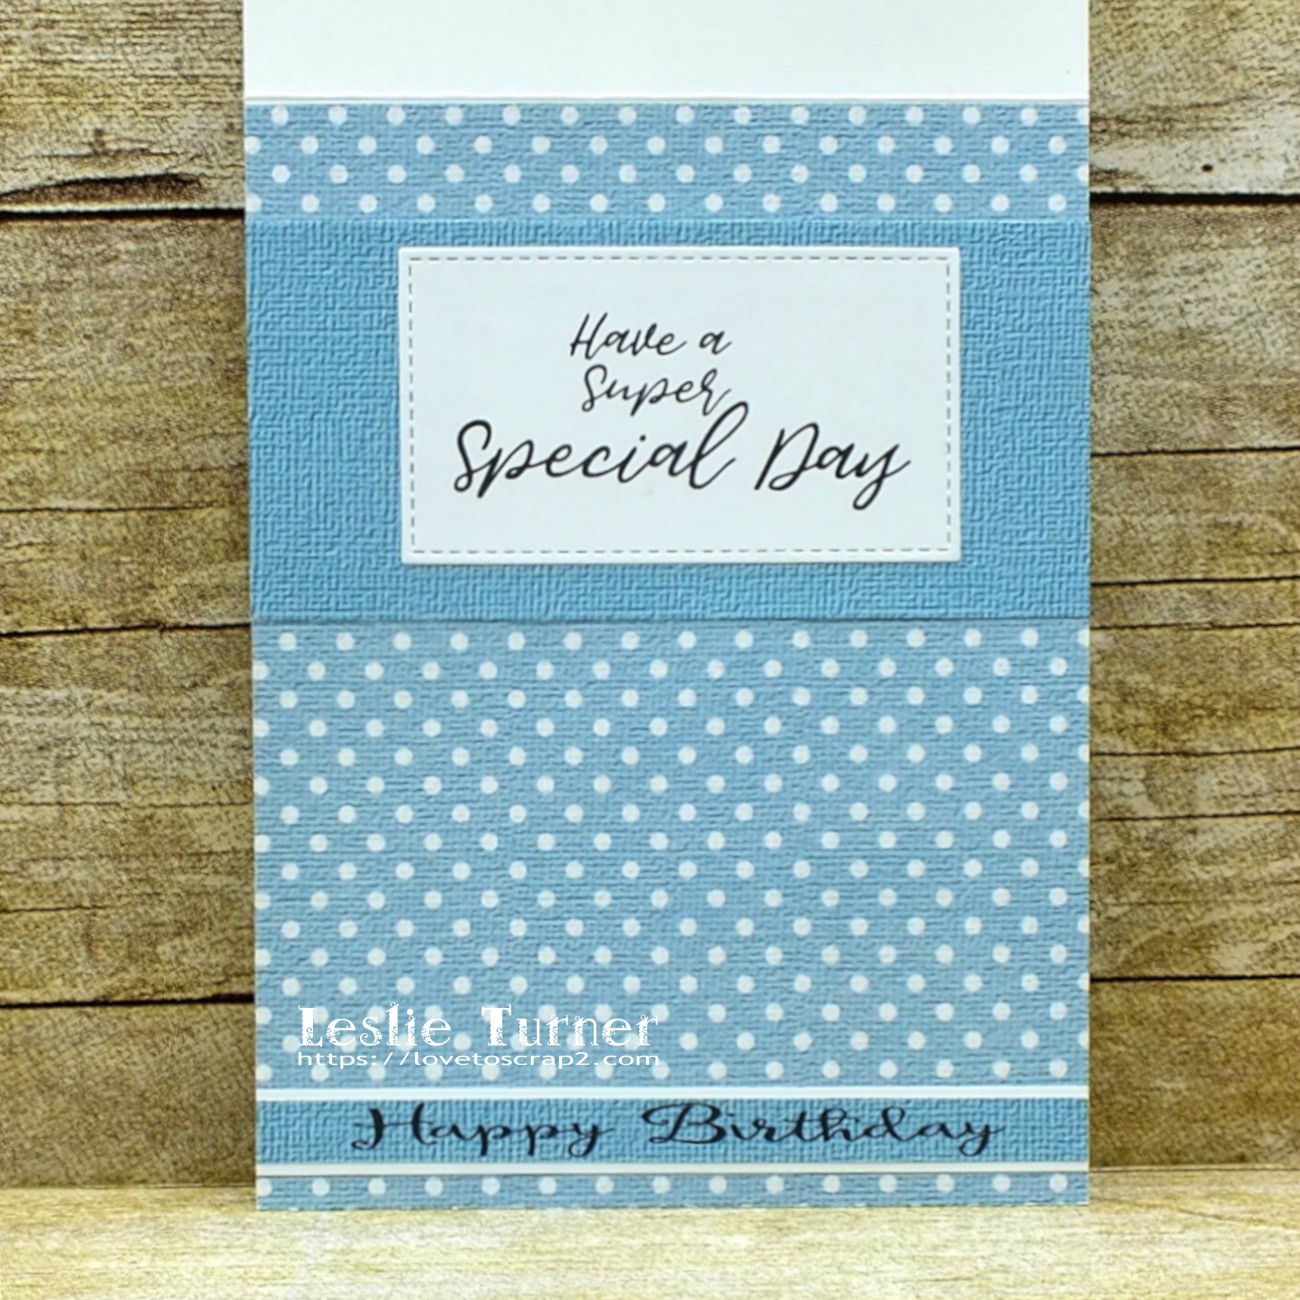
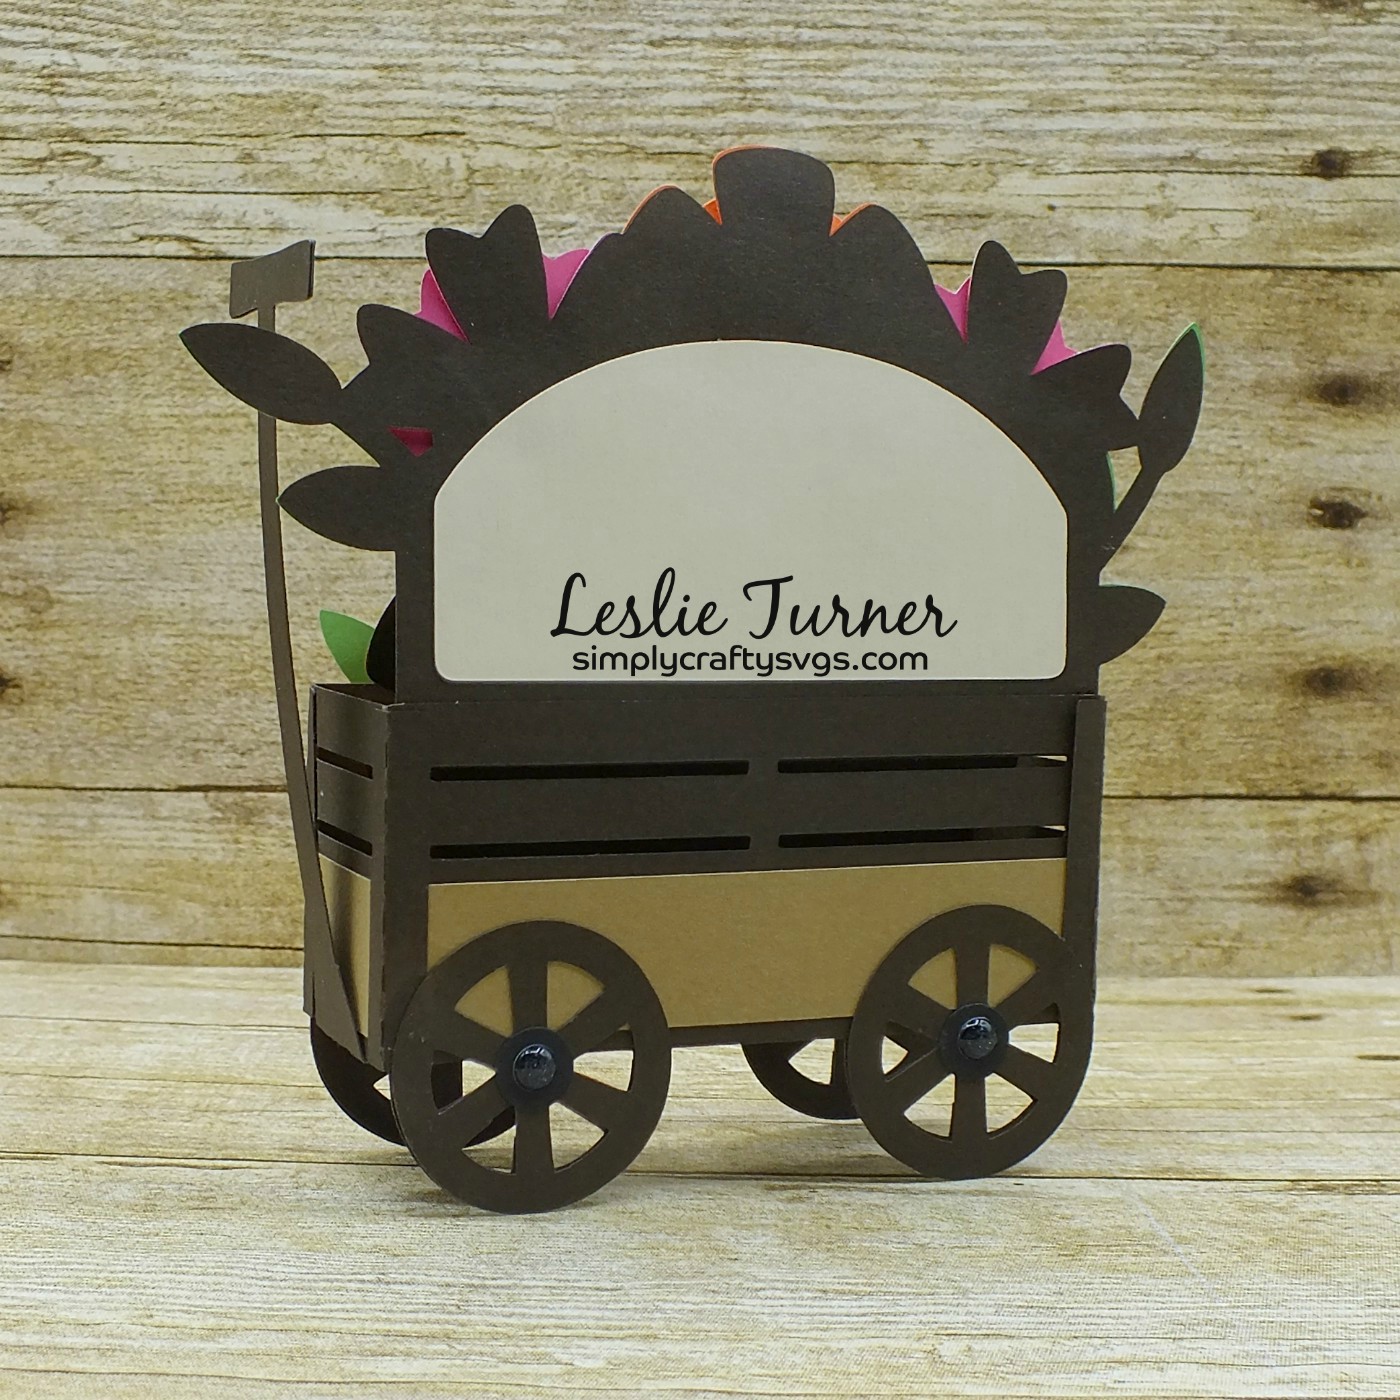
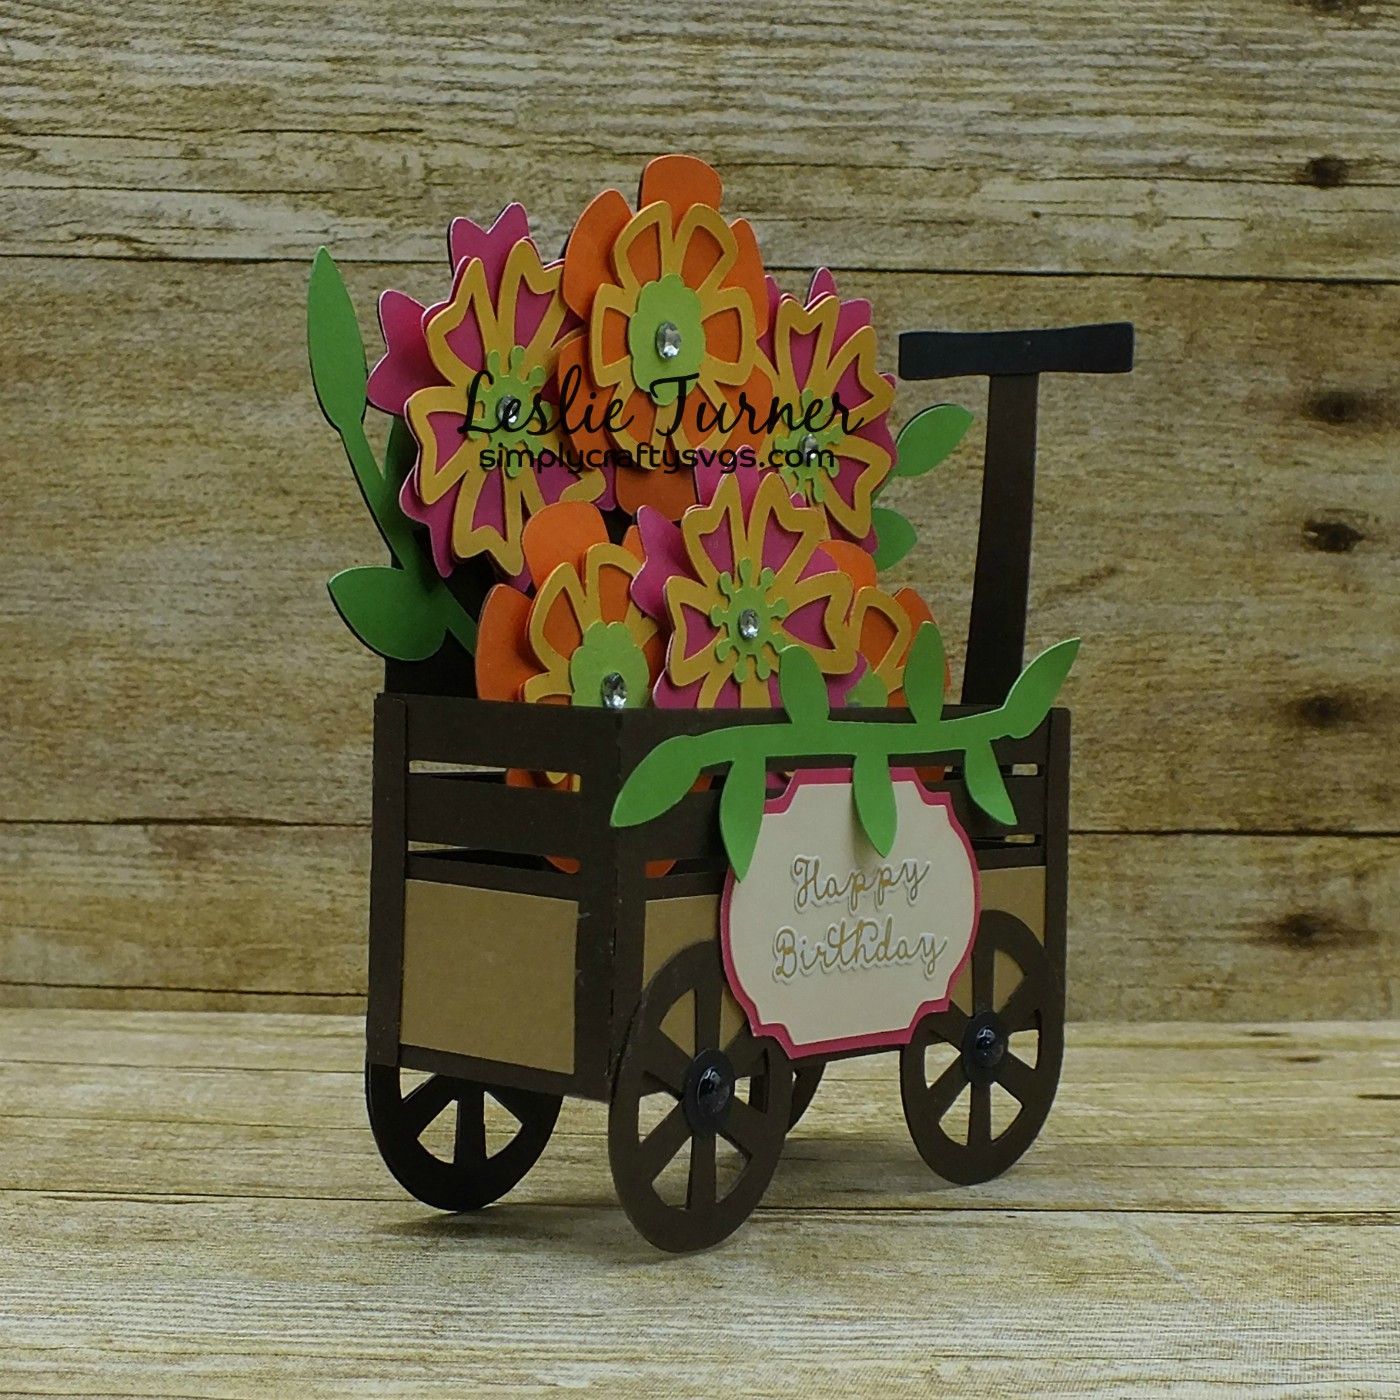
Hey everybody, happy Fri-YAY! Every day is Fri-YAY when you’re retired… there’s nothing more rewarding than being able to do whatever the heck you wanna do anytime you wanna do it! I’m delighted to share a Brutus Monroe DT inspiration project today featuring the amazing Doodle Bookmarks, Lace Layers Nested Dies, Vintage Plaid paper, and Super Sentimental stamp set. Of course, I used a boat-load of other awesome BM products to make this fun birthday mini slimline card, and I love how it turned out!

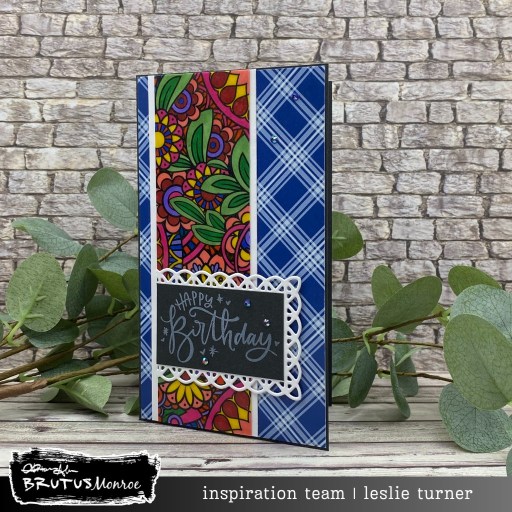
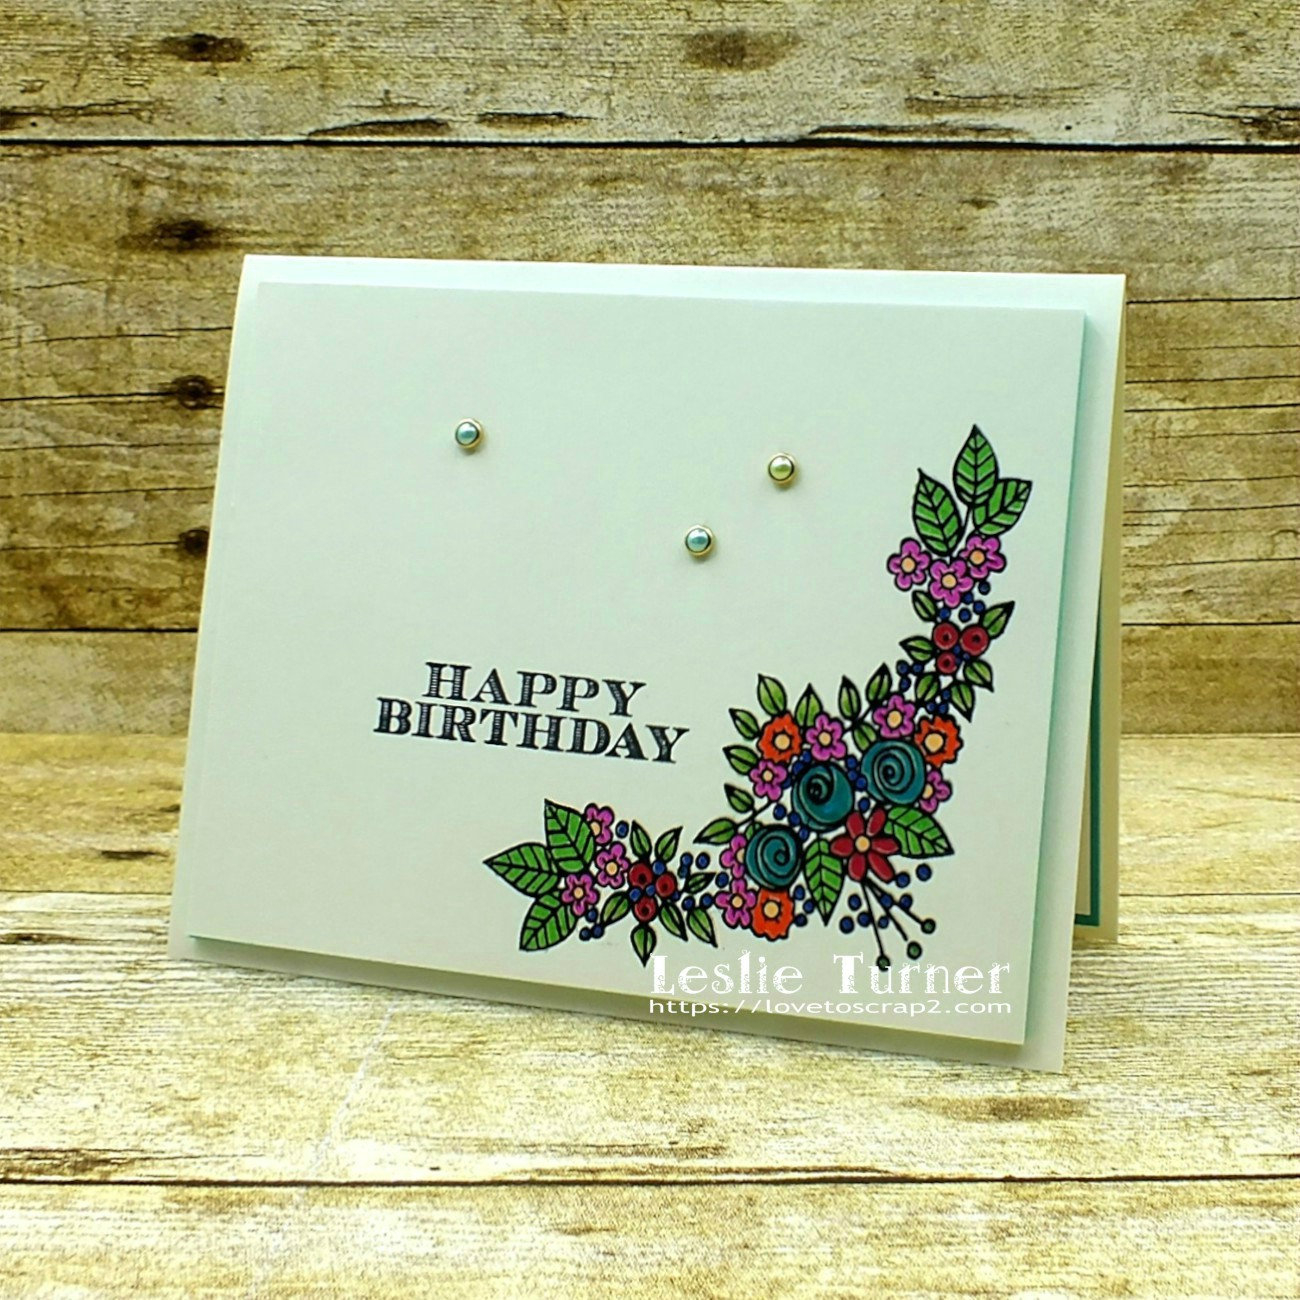
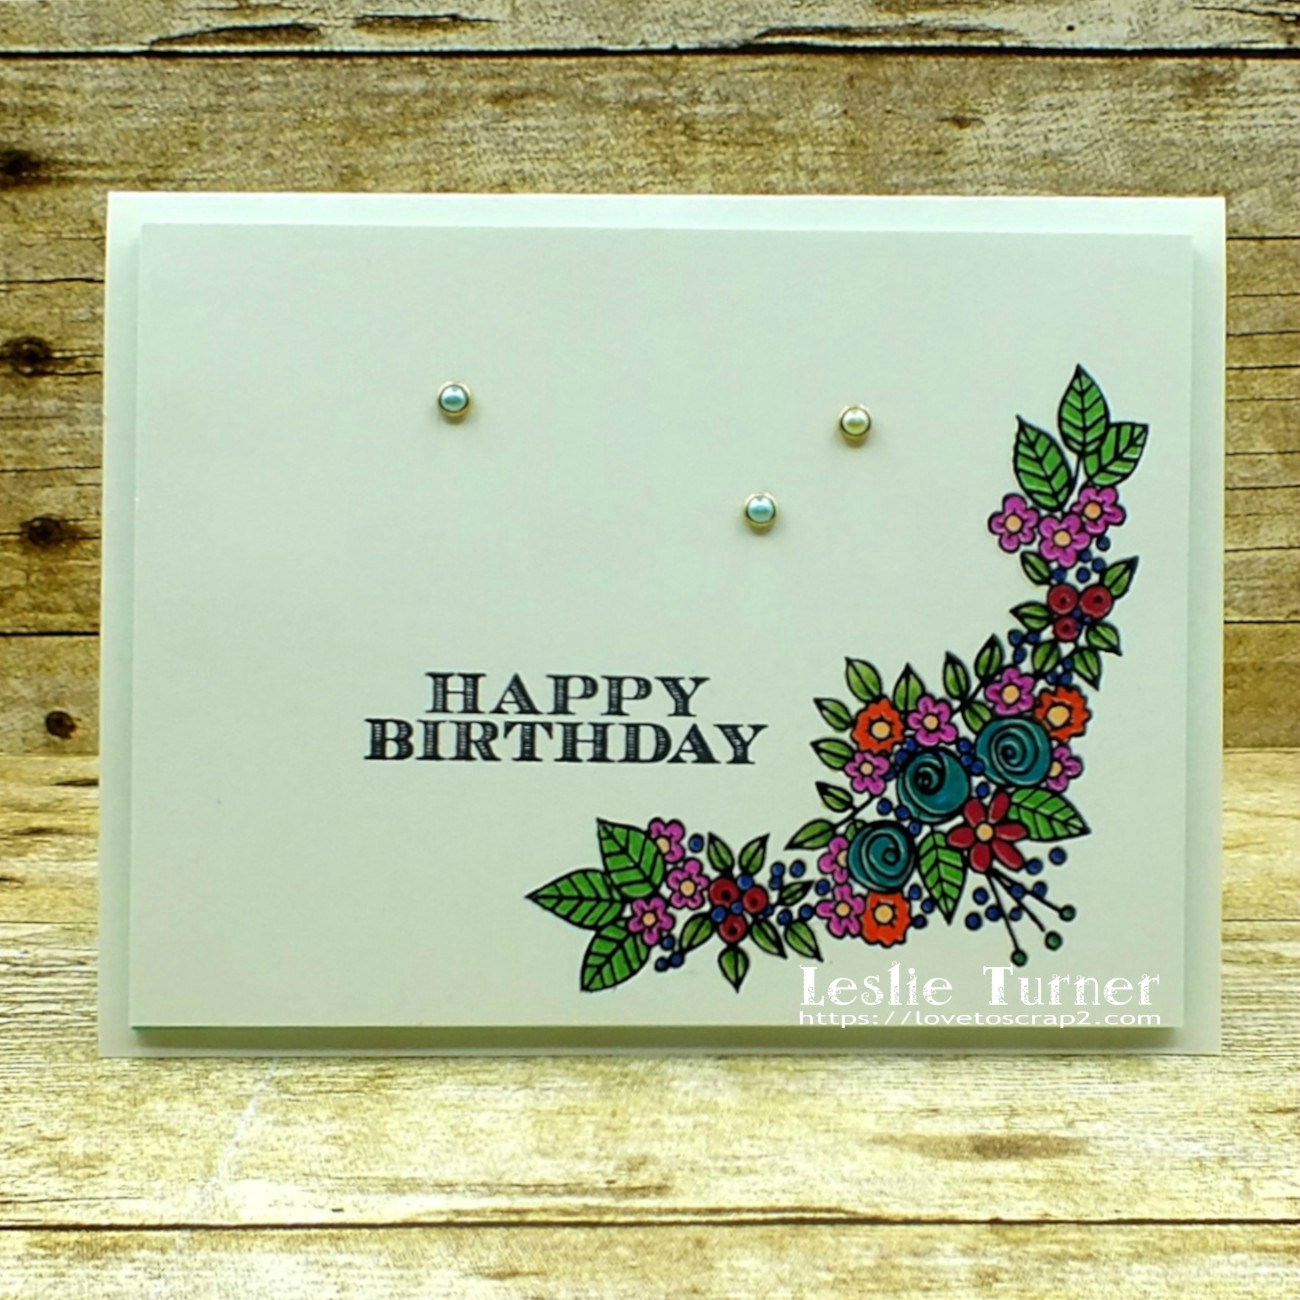
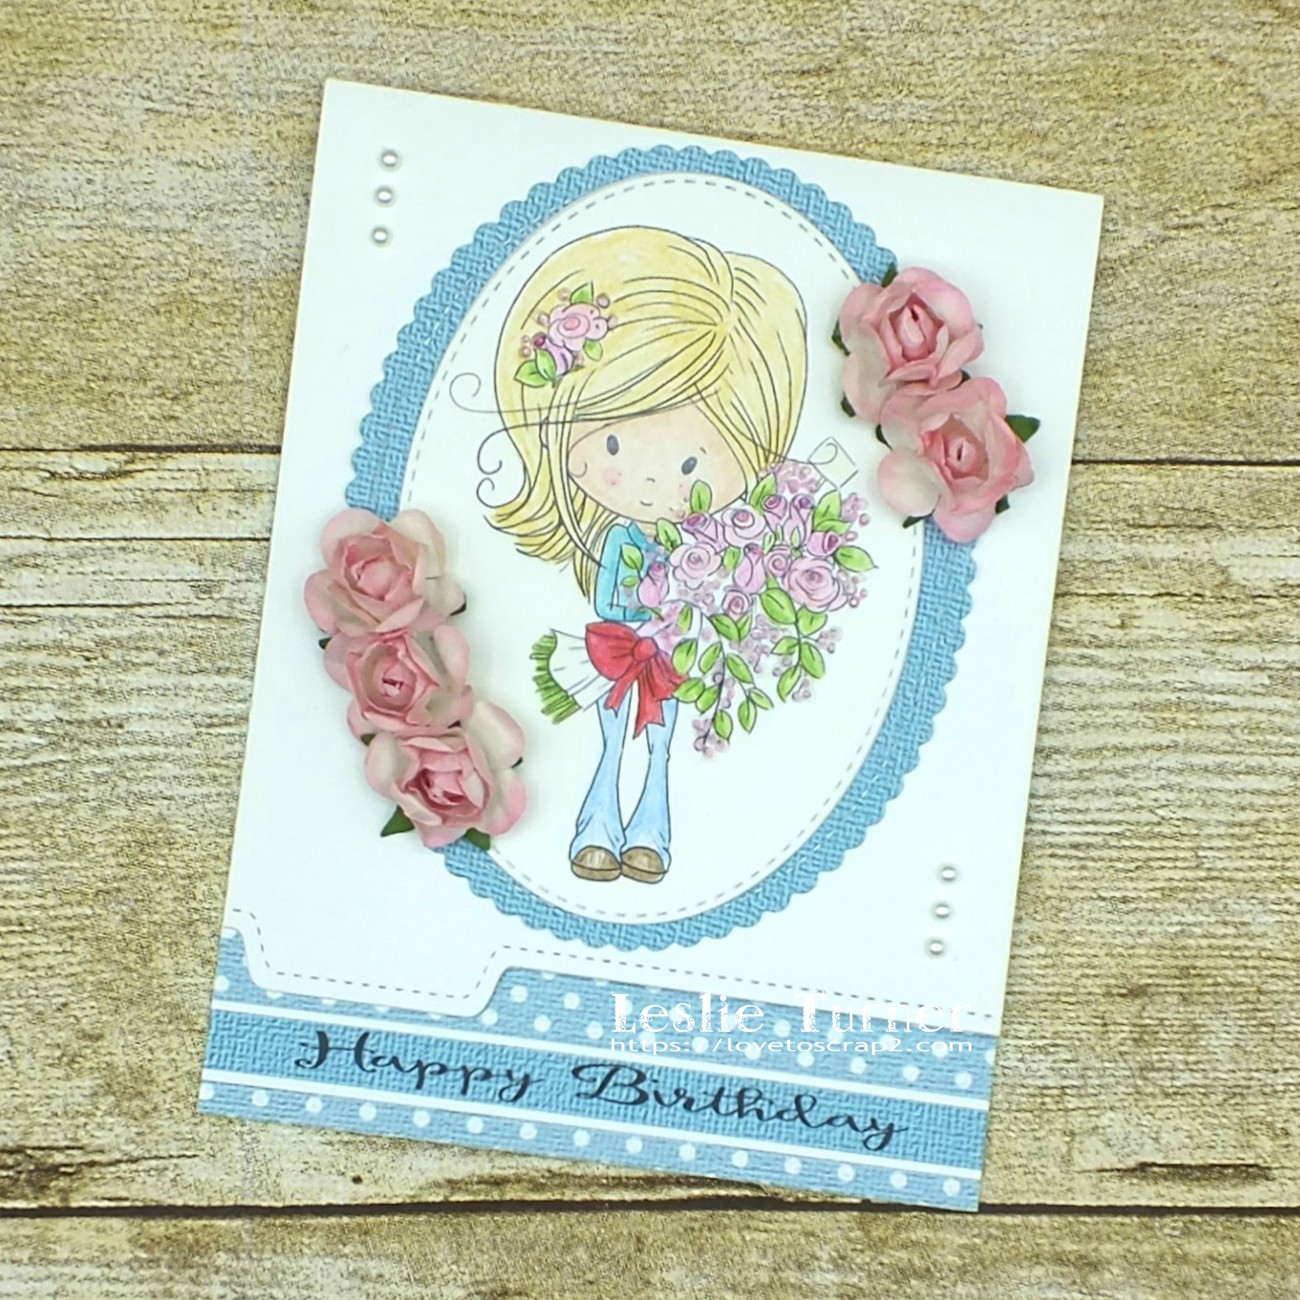
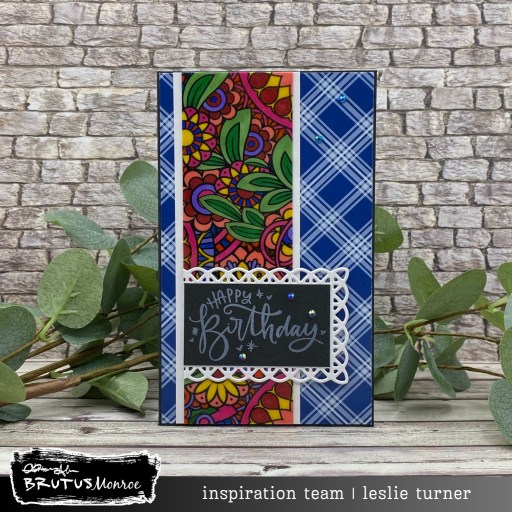
I started by coloring a Doodle Bookmark with an assortment of bold color markers. I covered the entire bookmark with embossing ink and then heat embossed it in Icicle embossing powder. I repeated the process two more times which gave the bookmark some awesome shine.

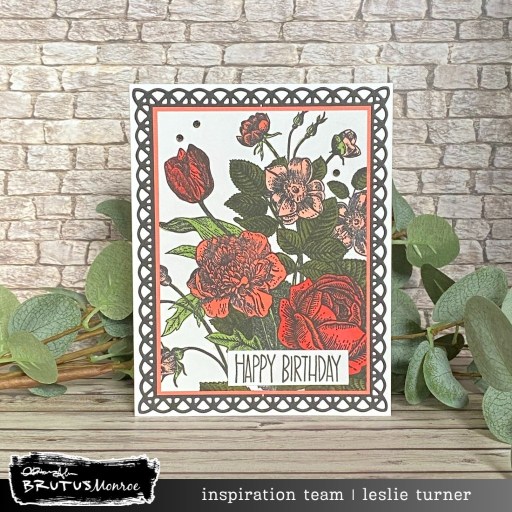
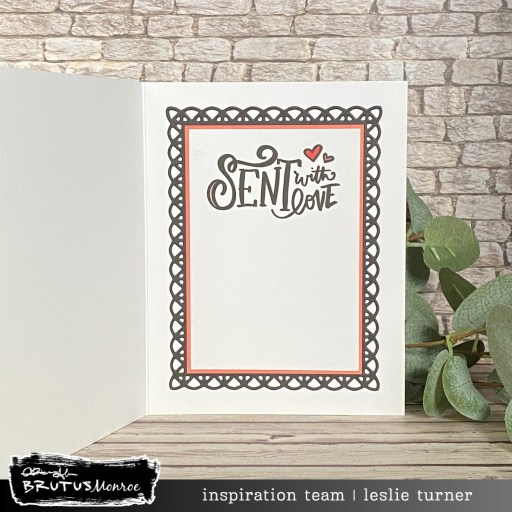
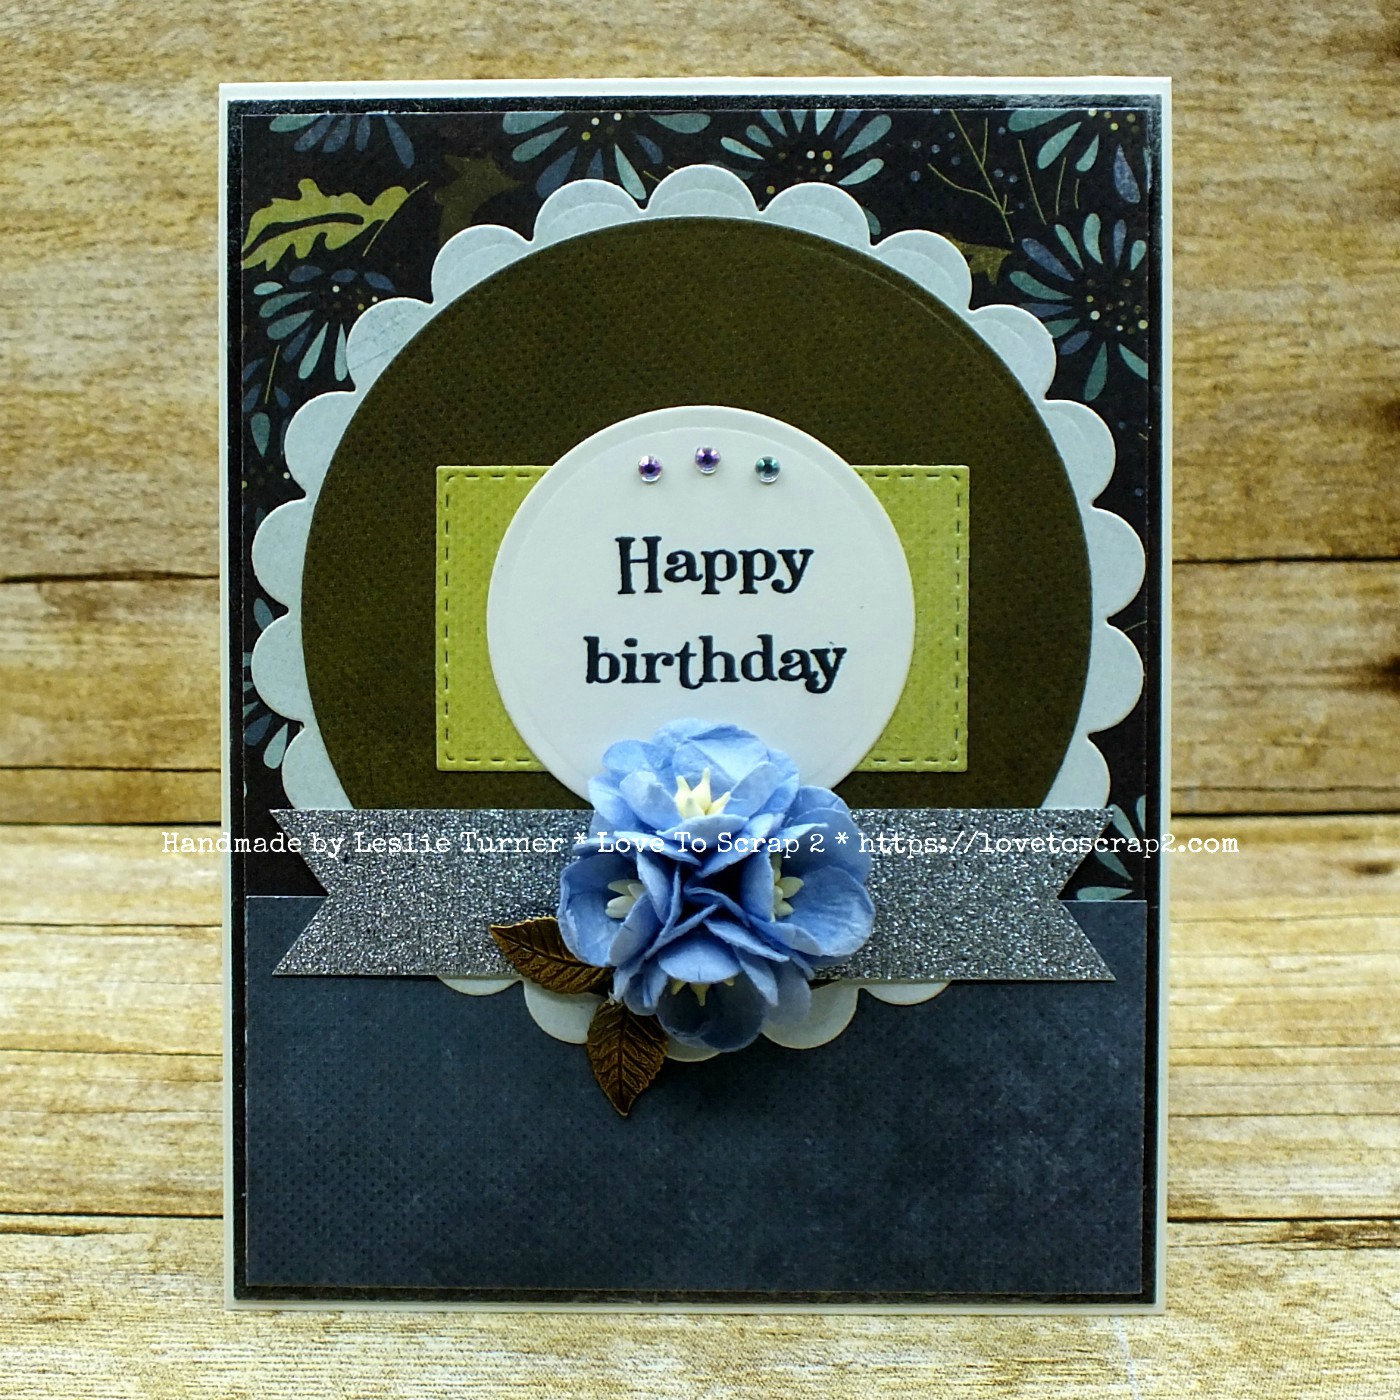
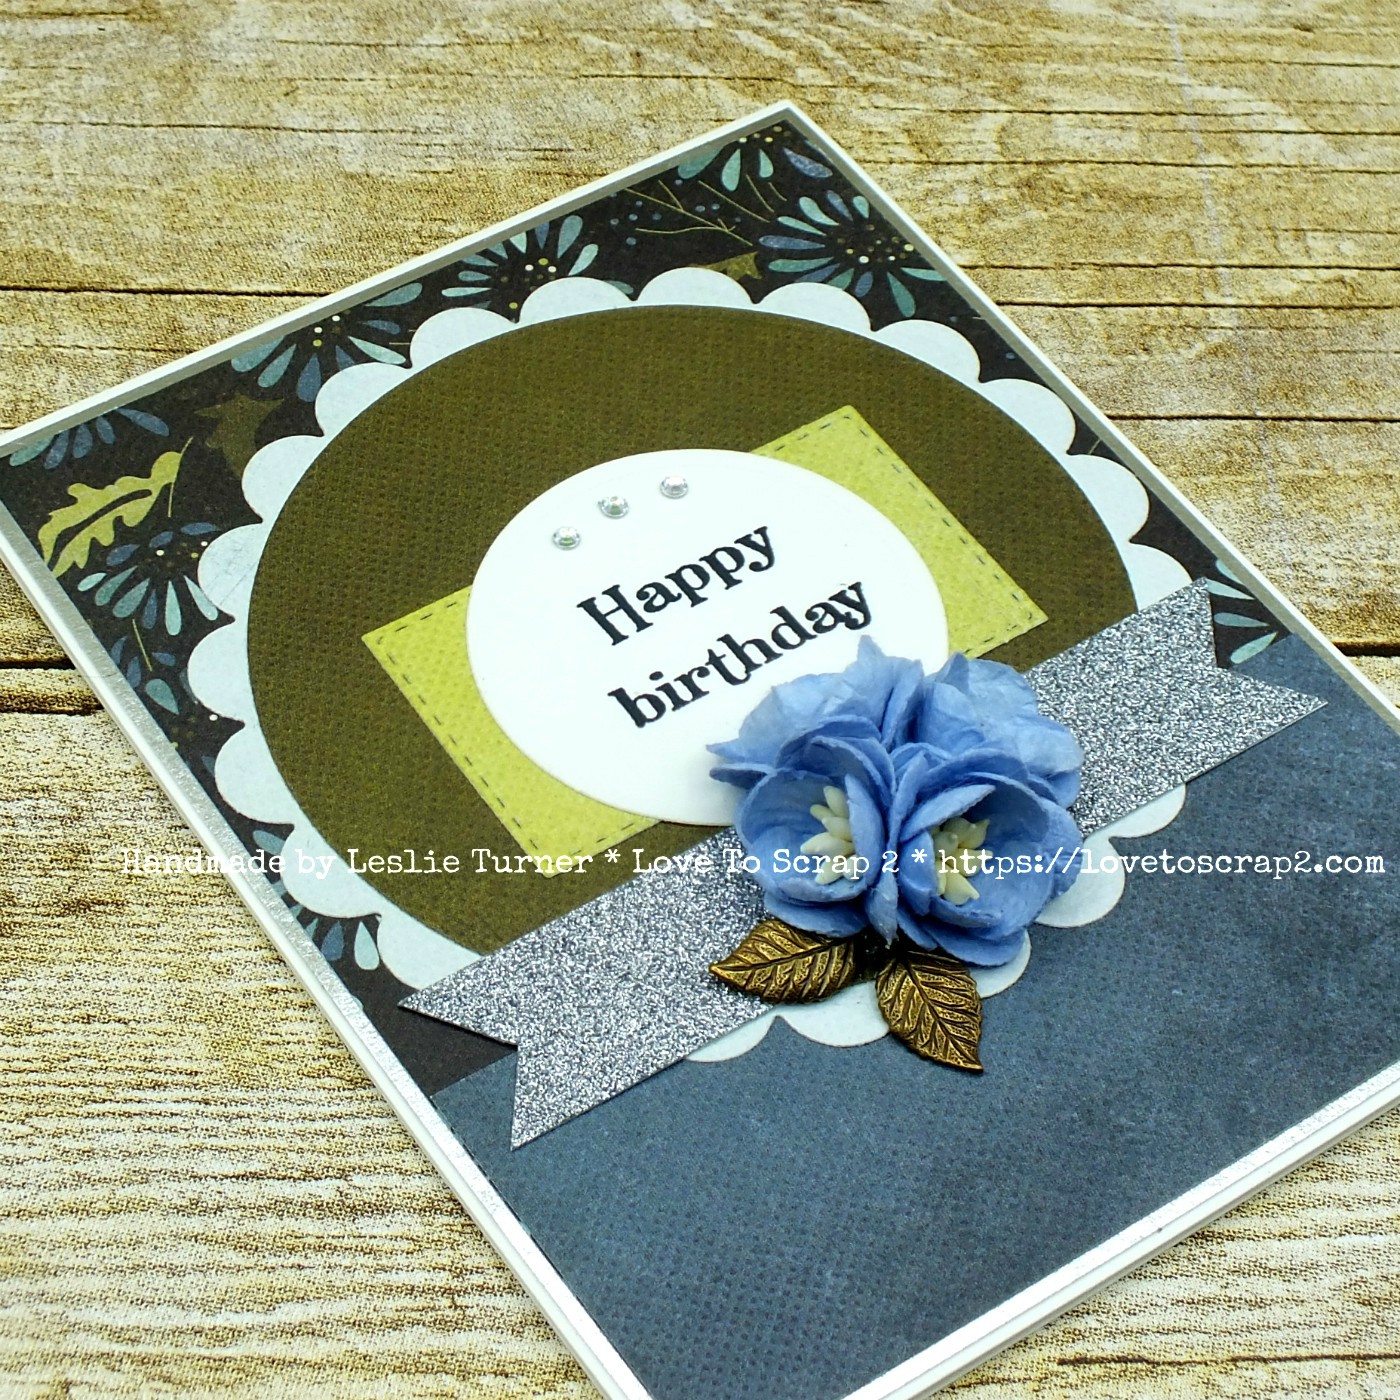
I cut my go-to size of 3-1/2″ x 6″ mini slimline card base from Raven cardstock along with layering panels from Vintage Plaid 6×6 paper and Not Your Mamas cardstock. I die cut a sentiment panel from a Lace Layers Nested Die along with a small Raven cardstock panel. I stamped a sentiment from the Super Sentimental stamp set in Alabaster White ink, and added a few Blue Shift Flat Back Crystals.

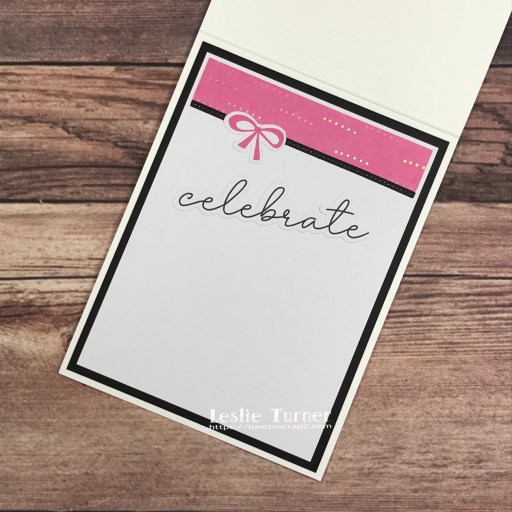
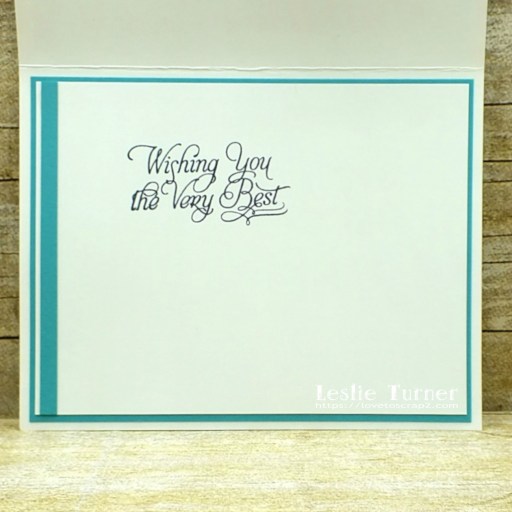
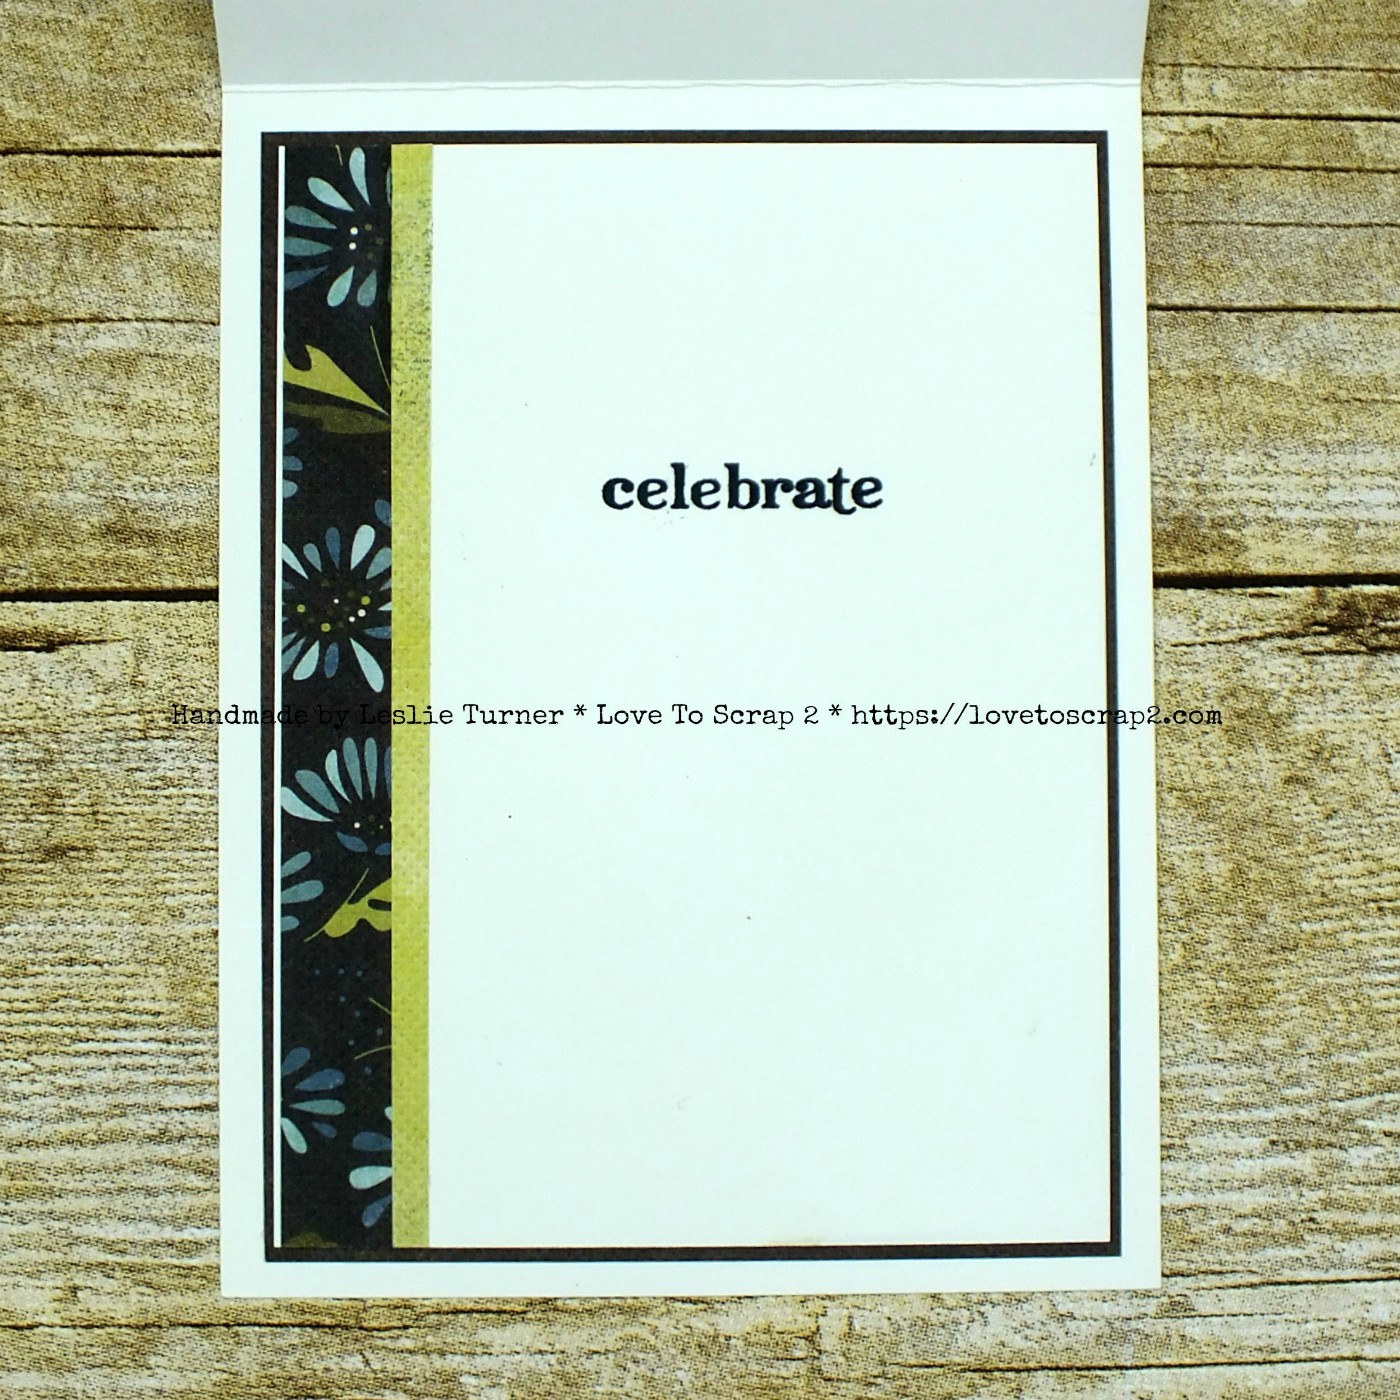
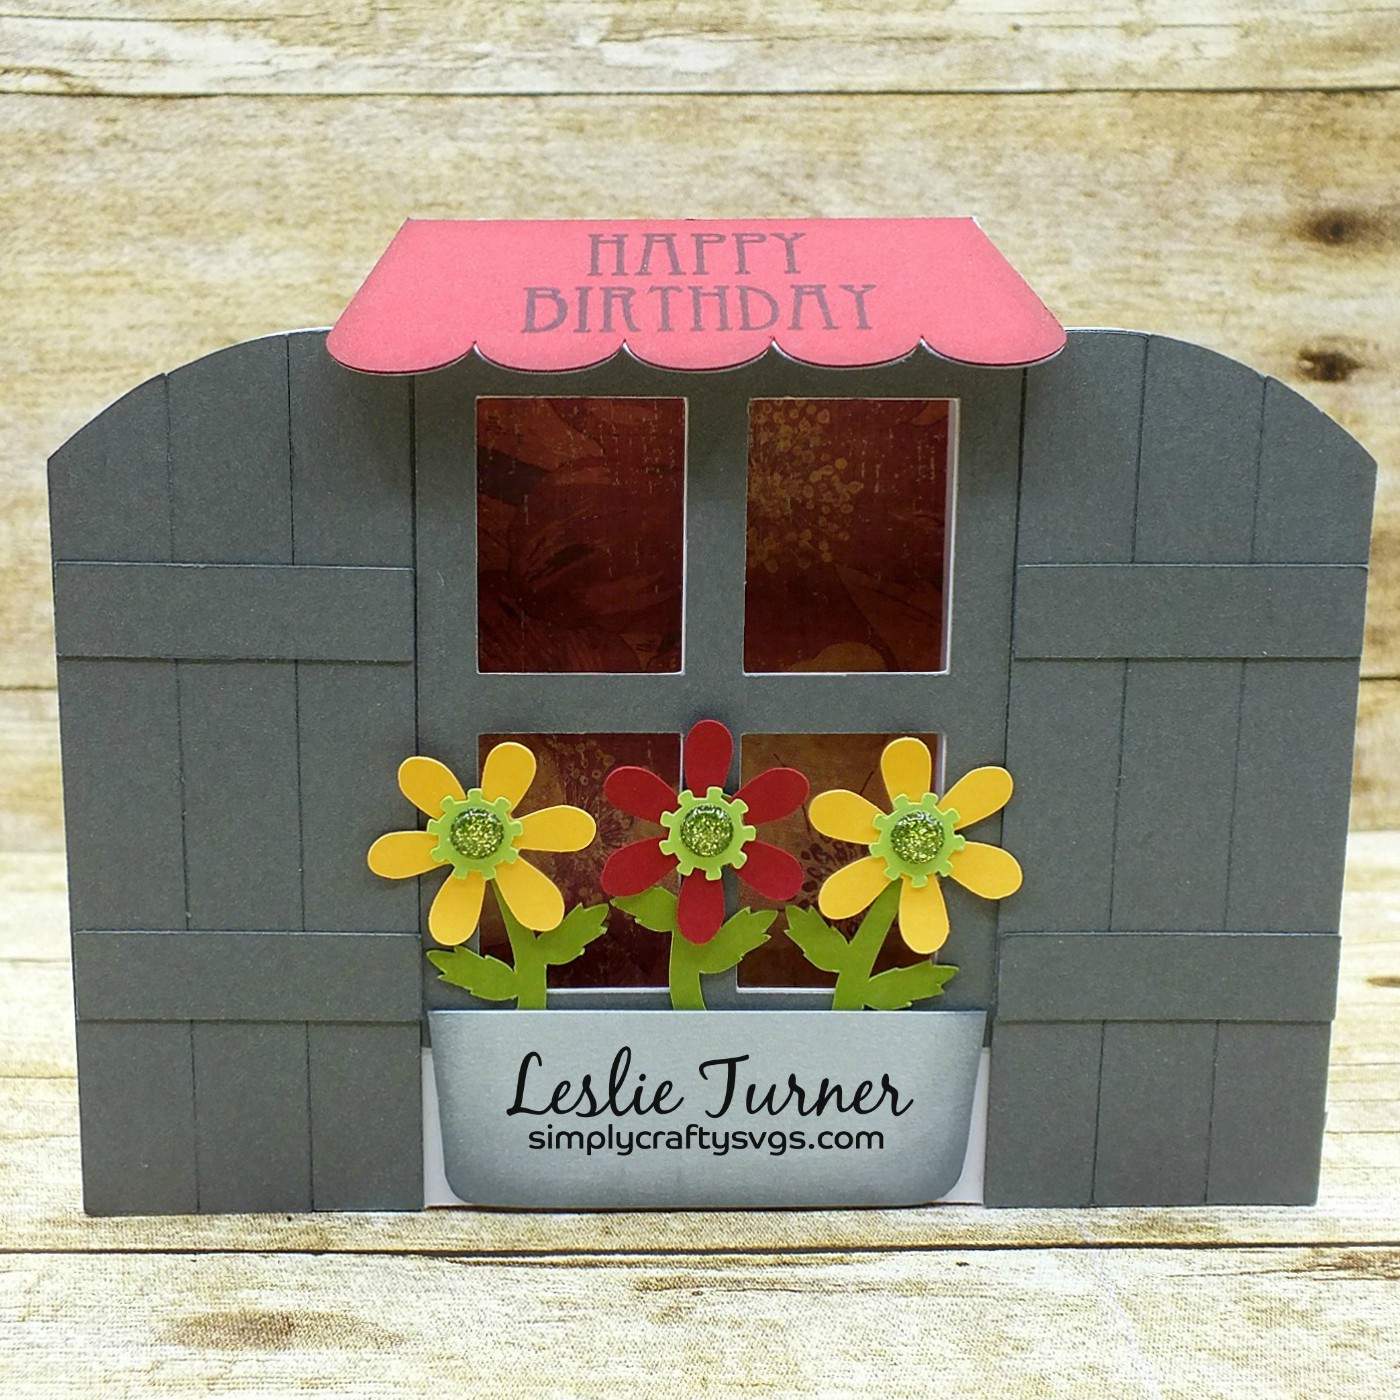
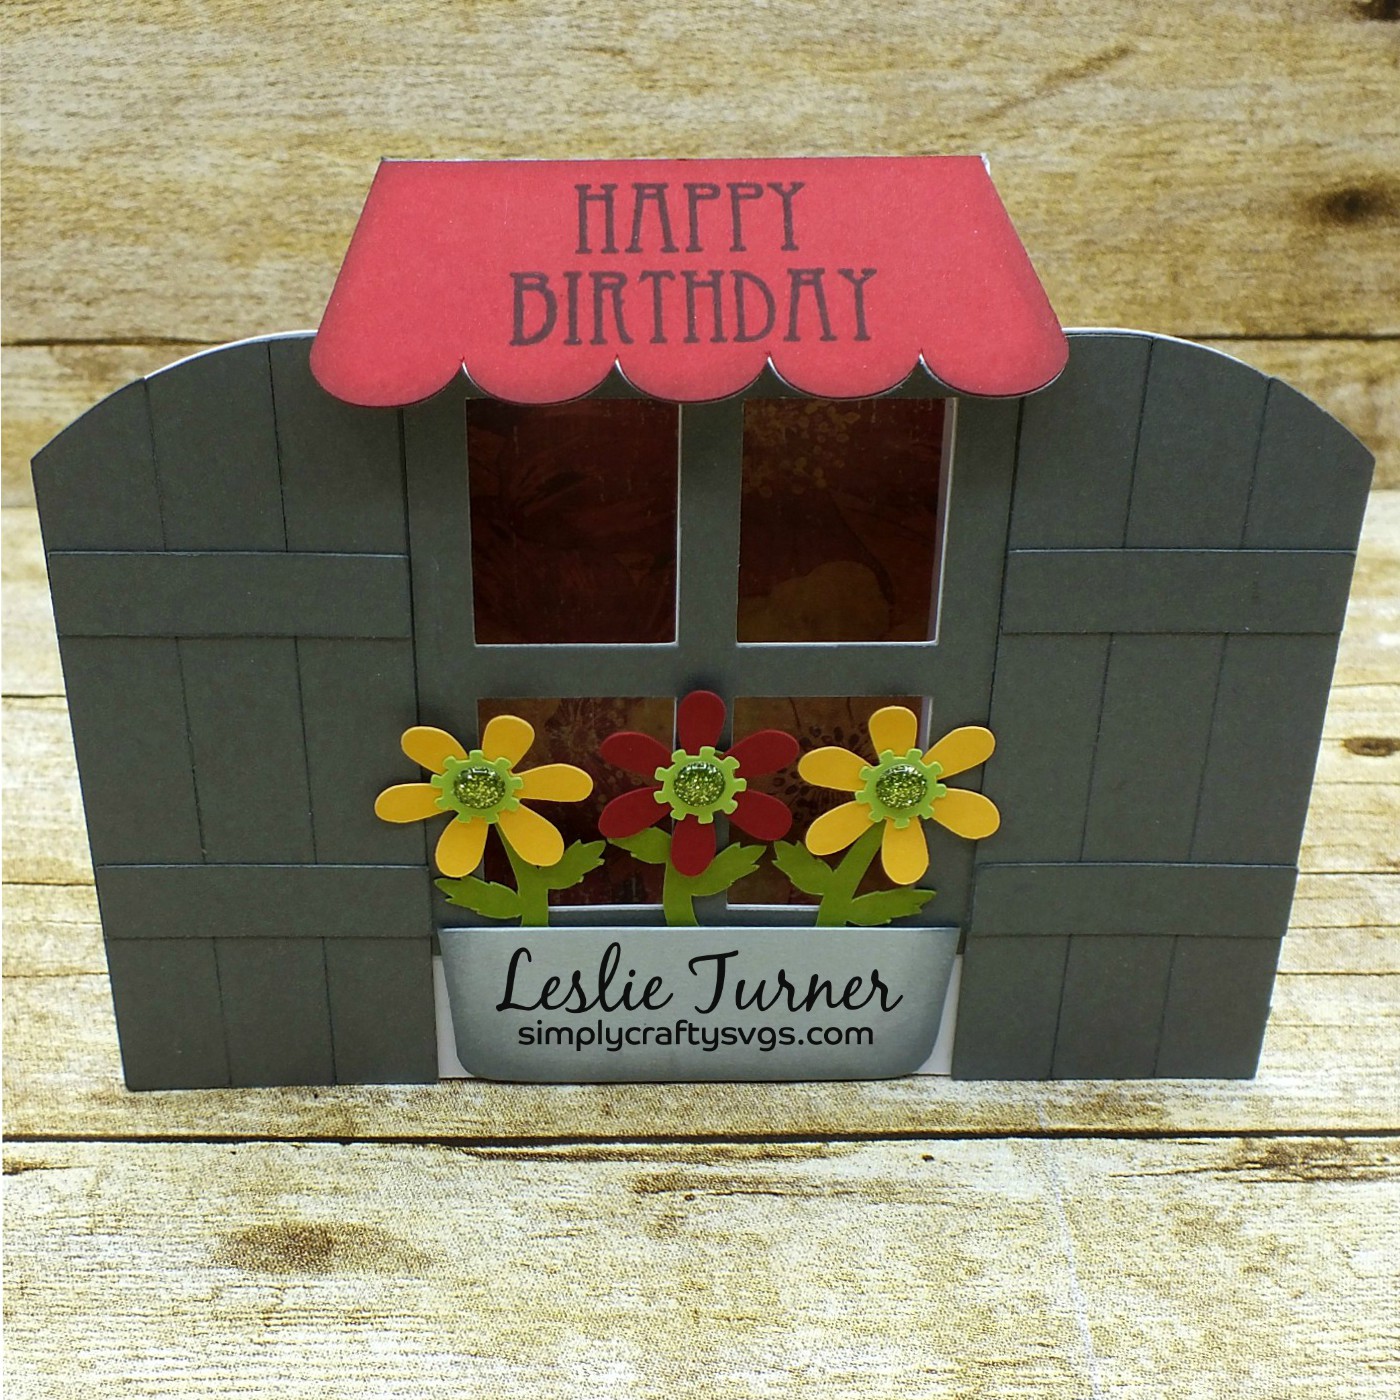
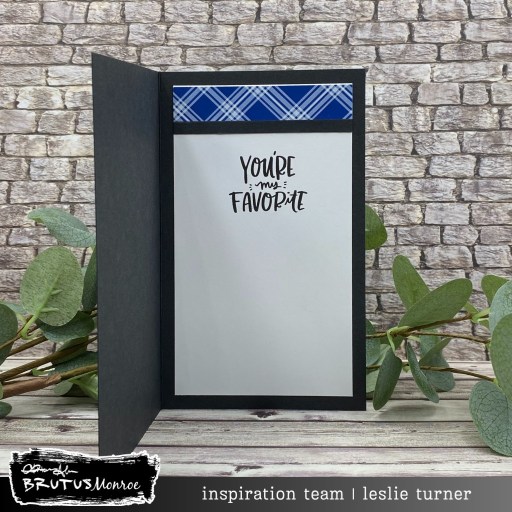
I cut the inside panel from Perfect Blend cardstock and embellished it with leftover strips of Vintage Plaid paper and Raven cardstock. I stamped another sentiment from the Super Sentiment stamp set in Raven ink, and this completed the the card.

Affiliate links are used in this post at no cost to you – I really appreciate your support!

Brutus Monroe products used:
BRU 3416-2 Doodle Bookmarks
BRU 6487 Lace Layers Nested Dies
BRU 4929 Vintage Plaid 6×6 Paper Pack
BRU 7985 Super Sentimental Stamp Set
BRU 2081 Embossing 2×2 Ink
BRU 2517 Icicle Ultra Fine Embossing Powder
BRU 2524 Alabaster Pigment White 2×2 Ink
BRU 6519 Raven Cardstock
BRU 9494 Not Your Mamas Cardstock
BRU 4013 Perfect Blend Cardstock
BRU 2543 Raven Detail 2×2 Ink
BRU 8699 Blue Shift Flat Back Crystals
BRU 9569 Squeaky Clean Lavender Stamp Cleaner
BRU 1729 Microfiber Stamp Cloth

Other products used:
INK: Bic Mark-It fine point markers- Rambunctious Red, Sunset Orange, Yellow Blaze, Margarita Green, Forest Green, Blue Skies Blue, Hot Aqua, Polynesian Purple, Fandango Pink, Peach Parfait
ACCESSORIES: Fiskars 12″ ProCision Rotary Bypass Paper Trimmer, Bearly Art precision craft glue, My Sweet Petunia Precision Glue Press, Mini MISTI, Big Shot, Scrapbook Adhesives 3D Thin Foam Squares, Trinity Pick Up Stick

I hope you’ve enjoyed seeing this project and you’re inspired to get your craft on! Be sure to check out all the amazing stamps and dies, pigments and mists, cardstock and tools (just to name a few) at Brutus Monroe! And if you happen to have a sweet tooth and like to munch while you craft (like I do, lol), check out Scoozie’s Confections & Curiosities! OMG, I’m hooked! ;) Follow us on Facebook, Instagram and YouTube for tons of crafty inspiration! And come on over and join our Fan Club Facebook Group to share your crafty makes using our products! Thanks so much for stopping by today – we’ll see you next time!

Scrappy hugs,

Happy Birthday

Hi friends, Happy Tuesday! I hope you’re having a great week. I’m delighted to share a Brutus Monroe inspiration project with you today as a new DT member! I’ve been a Brutus Monroe fan for a few years and you can only imagine how ecstatic I was to receive that email telling me I had been selected for the 2025 Inspiration Team! I used two of my all-time favorites, the Botanical Background Stamp and  Super Sentimental Stamp Set, to create this pretty birthday card. I included a gorgeous Lace Layers die cut under the focal panel to really show it off. I kept with a simple red/coral color palette and really love how this turned out!

I stamped the Botanical Background focal image in Raven ink on a Perfect Blend 4.25″ x 5.5″ panel and colored it with Copic Ciao markers. I trimmed it and layered it on a panel of CutCardStock Wild Salmon cardstock. I adhered a Lace Layers die cut (which I cut from Raven cardstock) beneath the panel and adhered it to the card base. I stamped a simple birthday greeting from the Super Sentimental Stamp Set, trimmed it, and adhered it to the bottom portion of the card front, slightly to the right of center. The finishing touch was adding several Hematite Flat Back Crystals.

I cut the inside panels from Perfect Blend cardstock and the Wild Salmon cardstock. I stamped another sentiment from the Super Sentimental Stamp Set and layered the panel on a slightly smaller die cut Lace Layer.

Affiliate links are used in this post at no cost to you – I really appreciate your support!

Brutus Monroe products used:
BRU 1984 Botanical Background Stamp
BRU 7985 Super Sentimental Stamp Set
BRU 6487 Lace Layers Nested Dies
BRU 2543 Raven Detail 2×2 Ink
BRU 4013 Perfect Blend Cardstock 4.25″ x 5.5″
BRU 6519 Raven Cardstock
BRU 2828-2 Pre-Scored A2 Card Bases
BRU 8530 Hematite Flat Back Crystals

Other products used:
CARDSTOCK/PAPER: CutCardStock Wild Salmon cardstock
INK: Copic Ciao alcohol markers- R20 Blush, R22 Light Prawn, R35 Coral, G82 Spring Dim Green, G99 Olive
ACCESSORIES: Fiskars 12″ ProCision Rotary Bypass Paper Trimmer, Bearly Art precision craft glue, My Sweet Petunia Precision Glue Press, Mini MISTI, Big Shot, Trinity Pick Up Stick

I hope you’ve enjoyed seeing this project and you’re inspired to get your craft on! Be sure to check out all the amazing stamps and dies, pigments and mists, cardstock and tools (just to name a few) at Brutus Monroe! And if you happen to have a sweet tooth and like to munch while you craft (like I do, lol), check out Scoozie’s Confections & Curiosities… OMG, I’m hooked! ;) Follow us on Facebook, Instagram and YouTube for tons of crafty inspiration! And come on over and join our Fan Club Facebook Group to share your crafty makes using our products! Thanks so much for stopping by today – we’ll see you next time!

Scrappy hugs,

Happy Birthday

Howdy everybody! Happy Monday – I hope you had a fabulous weekend! I’m proud to share that another one of my projects was Featured over at Scrapping4fun Challenges several weeks ago which scored me another guest gig – this time for Challenge #215 – Tags or Add a Tag on Your Creation! I love adding tags to my card fronts so I really enjoyed making this one! I had the Spellbinders Wild Hello June 2021 Kit of the Month in my stash so I pulled it out and decided to loosely CASE one of the card samples in the kit that I fell in love with. I used cardstock, a line die, patterned paper, die cut shapes (one being a tag which was in line with this challenge) and chipboard embellishments from the kit to create a birthday card.

I cut a standard A2 size top-folding card base from white cardstock in the Spellbinders kit along with a layering panel and strip from the patterned paper. I die cut the Happy Birthday line sentiment from black cardstock and adhered it to the seam of the patterned papers. I arranged a couple die cut shapes and several chipboard embellishments which completed the card front.

I cut the inside panel from white cardstock in the kit and embellished it with leftover strips of patterned paper and cardstock. I added a couple die cut shapes and layered the panel on black cardstock.

And one more look… totally loving how this turned out! The tag takes center stage with the die cut frame, and then comes the die cut sentiment and those chipboard embellishments! Love, love, love!

Sharing in the following challenges:
1. A Perfect Time To Craft Open Challenge: #8-2022 – Anything Goes
2. Classic Design Challenge: August #8 – Anything Goes
3. Country View Challenges: August 2022 – Happy Birthday
4. Moving Along With the Times: #145 – Anything Goes
5. Penny’s Paper-Crafty Challenge Blog: #526 – Anything Goes with Paper

Affiliate links are used in this post at no cost to you – I really appreciate your support! 

Products used:
Accessories: Spellbinders Wild Hello June 2021 Kit of the Month (white and Black cardstock, Happy Birthday Die, Patterned Paper, Die Cut Shapes and Chipboard Embellishments); We R Memory Keepers Mini Guillotine Paper Trimmer, Bearly Art precision craft glue

I hope you’ve enjoyed seeing my GD inspiration project and will link up a tag project with us this time! Thanks so much for stopping by today – we’ll see you next time! ;)

Scrappy hugs,

Happy Birthday

Hi everyone! Happy Fri-YAY – hope you’ve had a great week! Our new sketch challenges this month are live over at Stick It Down and I’m thrilled to be one of the Featured Designers! I’ve popped in this morning to share my Card Team inspiration project! Angie’s Variety Store is our sponsor this month so come on over and play for your chance to win a prize! This is our super awesome card sketch this month, created by none other than yours truly, lol:

Stick-It-Down-May2020-Card-Sketch


I’ve been busy creating the first six sketches this year for the Stick It Down card team and I’ve had a blast! Using this month’s sketch, I created a pretty birthday card in shades of purple with pops of green. Green and purple have been one of my most favorite color combos for a long time.

2019_1222005a

I used Grass Cloth cardstock for the background which yields some beautiful texture and a strip of Lozzy’s pretty digital paper down the left side. The focal image, cut with a stitched circle die, features paper piecing of a pretty stamped floral image along with some background stamping using stamps from the same set. I stamped the sentiment, from a different stamp set, in dark purple ink and embellished the strip with Sprinkles. I finished the front with some Crystal Drops.

2019_1222006a

I embellished the inside panel with leftover strips of paper and cardstock used on the front, and stamped the sentiment in dark purple ink.

2019_1222007a

One more look… I’m so smitten! Such a pretty design in gorgeous colors!

2019_1222008a

Sharing in the following challenges:
A Bit More Time To Craft Extra Challenge: May Anything Goes
A Perfect Time To Craft Open Challenge: #05-2020 – Anything Goes

Products used:
Cardstock/Paper: Cardstock Warehouse pure white cardstock, Marco’s Wild Pansy Grass Cloth cardstock, Stampin’ Up Elegant Eggplant and Old Olive cardstock, Lozzy Star Splash Mixed Media digital paper
Stamps: Stampin’ Up Butterfly Basics and Designer Tee stamp sets
Ink: Stampin’ Up Elegant Eggplant, Perfect Plum and Old Olive ink
Dies/Punches: Memory Box Stitched Circle Layers dies
Accessories:  ScraPerfect Best Glue Ever, MISTI stamp tool, Gemini Junior die cutting machine, Nuvo English Mustard and Violet Galaxy Crystal Drops, Doodlebug Design Sprinkles Lilac Assortment

I hope you’ve enjoyed today’s project and will link up with us! Feel free to play along with the double page or single page sketch if you’re a scrapbook layout designer, or the card sketch if you’re a card maker! You have until the end of the month to play and we’d love to see what you create! Be sure to check out all the fun goodies at Angie’s Variety Store! Thanks so much for stopping by today – we’ll see you next time! ;)

Scrappy hugs,
lesliesig

Happy Birthday

Hi everyone! Enjoying some quiet time here on the sofa this evening with the hubs kicked back snoring in my left ear, lol! I’m back with another card I created this afternoon for The Outlawz Challenges. This beauty is for the new Crash Your Stash Challenge where the challenge this month is to use Ribbon from our stash. Lemon Shortbread is our sponsor and I’ve used her absolutely stunning Flowers Curls Girl digital image to create a birthday card.

2020_0423010

I started with muted mint, green and pink digital background papers, and then as I colored the image, the colors got brighter and brighter, so I pulled it all together with the checkered ribbon. I printed the digital sentiment, trimmed it and added it to the bottom right. I finished off the front with some hot pink glittered gumdrops.

2020_0423011

I printed the inside sentiment, trimmed the panel and embellished it with the digital papers used on the front.

2020_0423012

And one more look… really loving how this came together! What a gorgeous image! ;)

2020_0423013

I’d love to enter this card into these additional challenges:
A Place To Start: April Challenge – Use Ribbons and/or Bows
Not Just Cards Challenges: April Anything Goes
Aud Sentiments Challenge Blog: #249 – Aud Sentiment’s 10th Birthday
Lemon Shortbread Challenge Blog: #118 – Anything Goes
The Crafter’s Cafe: #240 – Flowers
The Sisterhood of Crafters: Happy Birthday or Fun Fold or Both
WordArt Wednesday: Weeks #436/437 – Anything Goes

Products used:
Cardstock/Paper: Neenah Classic Crest Solar white cardstock, Polkadoodles digital papers
Stamps: Lemon Shortbread Flowers Curls Girl digital image, Polkadoodles digital sentiments
Ink: Spectrum Noir alcohol markers- FS3, FS9, EB1, EB2; Bic Mark-It ultra fine markers- Sunset Orange, Yellow Blaze, Margarita Green, Fandango Pink; Sharpie fine point- Orange; Faber-Castell pitt artist pen- May Green; Posca white paint pen, Memento Tuxedo Black marker, Sakura white Gelly Roll pen, Pentel Slicci Gold pen
Accessories:  ScraPerfect Best Glue Ever, Tombow Mono permanent adhesive, Studios Blackbird checkered ribbon, YNS Pink Glittered Gumdrops

I hope you’ve enjoyed this card and will come join us in The Outlawz Challenges! Lots of fun going on! Thanks so much for stopping by – we’ll see you next time!

Scrappy hugs,
lesliesig

Happy Birthday

2/29/20 Spotlight Winner at A Perfect Time To Craft Open Challenge!

Hi friends! Hope your week is off to a great start! I have a pretty birthday card to share today that features a CAS panel popped up on colored foam! I love adding colored foam beneath a focal image so there’s just a hint of color peeking out from around it.

2020_0202001

I created the card base and trimmed down the background panel. I stamped and heat embossed the floral swag image, then colored the image with bright markers and put it off to the side while I trimmed a piece of teal-colored foam to go behind the background panel and cut the inside panels. I adhered the focal image to the foam, adhered the piece to the card base, and then added a few pearl embellishments.

2020_0202002

I embellished the inside panel with a strip of teal cardstock, stamped the inside sentiment and layered the panel on teal cardstock.

And one more look… I couldn’t be happier with how this turned out! And I always need more birthday cards in my stash! ;)

2020_0202004

I’d love to enter this card into the following challenges:
AAA Cards #159 – One Corner + optional Love Those Older Supplies (markers & foam)

A Perfect Time To Craft Open Challenge Blog: #02-2020 – Anything Goes
Allsorts Challenge Blog: #560 – Make It Girly
Aud Sentiments: #245 – Anything Goes + Sentiment
Brown Sugar Challenge Blog: #298 – February Anything Goes
Classic Design Challenge: #2 – Anything Goes
Crafty Cardmakers: #251 – Embossing
Crafty Friends Challenge Blog: Gemstones/Pearls
Creative Moments: #185 – Anything Goes with optional For The Girls
If You Give A Crafter A Cookie: #136 – photo inspiration

Jan’s Digi Stamps Challenges: #8 – Anything Goes
Krafty Chicks Challenge: #495 – Clean And Simple
My Time To Craft: #426 – No Digis Allowed
Not Just Cards Challenges: February Anything Goes
World Wide Open Design Team Monthly Challenge: #02 – February Anything Goes

Products used:
Cardstock/Paper: Stampin’ Up thick and regular Very Vanilla cardstock, Stampin’ Up Bermuda Bay cardstock
Stamps: Spellbinders Flowers Swag 2 rubber stamp, The Cat’s Pajamas Simply Stacked Sentiments stamp set
Ink: Memento Tuxedo Black ink, Versamark; Bic Mark-It markers- Margarita Green, Key Lime, Forest Green, Hot Aqua, Rambunctious Red, Fandango Pink, Summer Melon, Sunset Orange, Deep Sea blue
Accessories:  ScraPerfect Best Glue Ever, Perfect Cleaning Cloth, Gold ‘n Pearls embellishments and Embellie Gellie; Hero Arts clear embossing powder, Darice teal craft foam

I hope you’ve enjoyed this project! Thanks so much for stopping by today – we’ll see you next time! ;)

Scrappy hugs,
lesliesig

Happy Birthday

Hi friends! Happy Saturday! I have a fun project to share with you today – an absolutely adorable birthday card that’s fairly simple but packs a powerful punch! This is a bi-level card base, meaning the front flap is cut slightly shorter than the back.

2020_0101013

I colored the adorable Polkadoodles digital image with Prismacolor pencils and cut it with a stitched oval die, then adhered it to a stitched mini scallop oval die cut. I adhered pink paper flowers around the image and tiny white flat-back pearls in the upper left and lower right corners.

2020_0101014

I embellished the inside with coordinating digital papers and cardstock, along with a digital sentiment cut with a stitched rectangle die. As mentioned earlier, the back flap of the card base is slightly longer than the front, so the main birthday sentiment strip at the very bottom will be visible when the card is closed (which you’ll see in the last photo).

2020_0101016

One more look… super happy with how this turned out! I don’t use paper flowers very often these days but I really love how they look. I might just have to re-think that. ;)

2020_0101017

Products used:
Cardstock/Paper: Stampin’ Up thick and regular Whisper White cardstock, Polkadoodles Octavia Moonfly Big Kahuna Digital Craft Download Bundle (Paper Heaven 1 and Plain Janes digital papers)
Stamps: Polkadoodles Big Bunch Winnie Celebrations 1 digital image and Winnie Celebrations 1 & 2 Sentiments
Ink: White Sharpie paint marker, Pentel Slicci Pink Metallic pen
Dies/Punches: My Favorite Things Stitched Rectangles STAX die, My Favorite Things Die-namics Stitched Mini Scallop Oval STAX die
Accessories:  ScraPerfect Best Glue Ever and Embellie Gellie; Prismacolor pencils- Pink, Process Red, Crimson Red, Light Cerulean Blue, Apple Green, Light Umber, Yellow Ochre, Aquamarine, White, Cream, Peach, Light Peach; Wild Orchid Crafts paper flowers, Darice white flat-back pearls

I hope you’ve enjoyed this project! Thanks so much for stopping by today – we’ll see you next time! ;)

Scrappy hugs,
lesliesig

happy birthday

Hello, crafty peeps! I have a special kind of project to share with you today, a card I created for the Scrapping4fun Challenges Guest Designer Challenge! Anyone who was a guest designer for Scrapping4fun Challenges this year has been invited to participate. We were allowed to choose our own theme as long as we follow this sketch:

Mojo306Sketch

I love sketches and pretty much followed this one to a ‘T’ (as I usually do) and created a pretty birthday card using five coordinating papers from the BasicGrey Marjolaine paper pad. I also used some silver foil and glitter Washi.

2019_1023008a

I used a variety of dies to achieve the elements in the sketch, along with Wild Orchid Crafts flowers and leaf charm, and a little bit of bling.

2019_1023009a

I embellished the inside with leftover strips of paper used on the front, and stamped the sentiment in black ink. The front and inside sentiments are from Inspired by Stamping.

2019_1023010a

And here’s one more peek… I really love how this turned out! And that sketch is pure awesomeness! ;)

2019_1023011a

Proud to enter this birthday card into the following challenges:
A Bit More Time To Craft: #106 – Anything Goes
A Perfect Time To Craft: #12 – December Anything Goes
Classic Design Team Open Challenge Blog: #12 – Anything Goes
Crafting by Designs: December Anything Goes
Not Just Cards: December Anything Goes
Pammie’s Inky Pinkies: #1950 – Anything Goes
The Creative Crafters: #23 – Anything Goes

Products used:
Cardstock/Paper: GKD Pure Luxury Ivory cardstock, BasicGrey Marjolaine paper pad, DCWV Washi Basics
Stamps: Inspired by Stamping Little Phrases stamp set
Ink: Memento Tuxedo Black ink
Dies/Punches: Spellbinders Classic Scalloped Circles Small dies, Spellbinders Standard Circles Large and Small dies, Memory Box Stitched Rectangle Layers dies
Accessories: Wild Orchid Flowers paper flowers and leaf charm, Darice tiny iridescent gemstones

I hope you’ve enjoyed this card created for the Scrapping4fun Challenges Guest Designer Challenge! Thanks so much for stopping by – we’ll see you next time! ;)

Scrappy hugs,
lesliesig

Happy Birthday

10/3/19 Top 3 at Brown Sugar Challenge Blog!

Hi everyone! Happy Hump Day! Today is my post day on the Simply Crafty SVGs Blog and I’m excited to share my DT inspiration project with you, an adorable birthday wagon full of posies, created with the Simply Crafty SVGs Wagon of Flowers Box Card cut file. Super cute and loads of fun!

2019_087004a

Sandy created this as a box card which folds flat for mailing, however, I took it one step further and made it into a fixed piece of decor for a mantle or shelf. ;) I love how this turned out! I do apologize for how the ‘Happy Birthday’ sentiment photographed in this pic – foil is so darn hard to photograph!

2019_087005a

Here’s a shot of the back of the wagon which features a plain panel for writing a custom message and signature.

2019_087006a

I used a gold foil sentiment sticker rather than stamping on this one, and it could be used for just about any occasion. I think is this one of my favorite cut files so far and I have several favorites… lots of fun picking out the bright colors and putting this together! ;)

2019_087007a

Proud to enter this adorable wagon into the following challenge:
Brown Sugar Challenge Blog: #293 – Anything Goes
Crafty Calendar Challenge: September – Add Lots of Layers
Dragonfly Dreams Challenge: September – Happy Birthday
Let’s Craft and Create: #151 – AG + Put Some Extra Layers On
Not Just Cards Challenge Blog: September Anything Goes
The Corrosive Challenge: #9 – Anything Goes

Products used:
Cardstock/Paper: American Crafts smooth black, chocolate, grass, key lime, caramel, vanilla and dandelion cardstock; Colorbok orange and pink cardstock
Dies/Punches: Simply Crafty SVGs Wagon of Flowers Box Card cut file
Accessories:  Darice gold foil sentiment sticker, Stampin’ Up clear rhinestones, YNS black Glittered Gumdrops

I hope you’ve enjoyed today’s project! Be sure to check out all the fun cut files in the Simply Crafty SVGs store – you’ll have so much fun! And there are tons of freebies to get started! Thanks so much for stopping by today – we’ll see you next time! ;)

Scrappy hugs,
lesliesig

Happy Birthday

Hi everyone! Happy Hump Day! Today is my post day on the Simply Crafty SVGs Blog and I’m excited to share my DT inspiration project with you, a totally adorable birthday card created with the Simply Crafty SVGs Garden Window Card cut file. OMG, I couldn’t wait to get my hands on this… what a fun project! Now I can’t wait to give it to someone special! ;)

2019_0730001a

I dug into my stash of American Crafts smooth cardstock and pulled out several colors to cut all the pieces from, then put the card together. I love watching Sandy’s videos, and this one was as easy as she portrayed it to be. ;)

2019_0730002a

I inked the panel on the back for the personal message and signature.

2019_0730003a

Here’s a view from the top so you can see the awesome construction of this box card. Sorry my angle is a little off, lol!

2019_0730004a

And one final look… flattened and ready to go into an envelope. I absolutely love how this turned out!

Products used:
Cardstock/Paper: American Crafts White, Charcoal, Stone, Dandelion, Rouge, Key Lime and Leaf cardstock; The Paper Studio Tattered and Worn 12×12 paper stack
Stamps: Kitchen Sink Multi-Step Lighthouse stamp set
Ink: Memento Tuxedo Black and Gray Flannel ink
Dies/Punches: Simply Crafty SVGs Garden Window Card cut file
Accessories:  Tim Holtz stamp platform, YNS green Glittered Gumdrops

I hope you’ve enjoyed today’s project! Be sure to check out all the fun cut files in the Simply Crafty SVGs store – you’ll have so much fun! And there are tons of freebies to get started! Thanks so much for stopping by today – we’ll see you next time! ;)

Scrappy hugs,
lesliesig