Hello

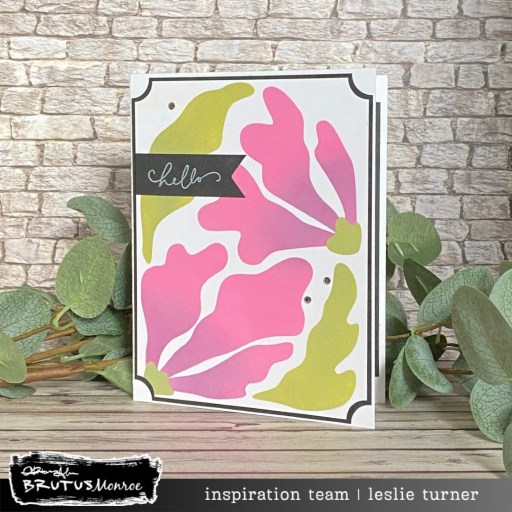
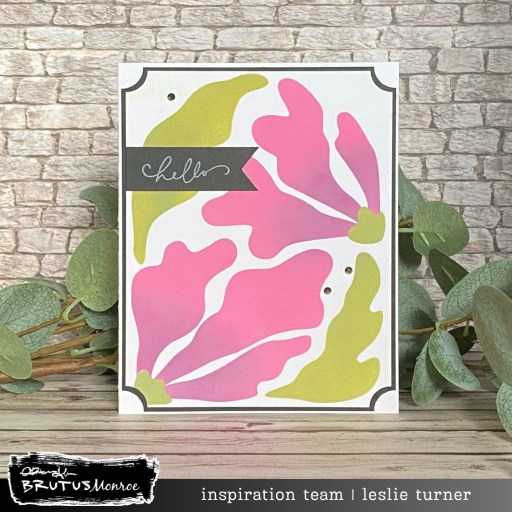
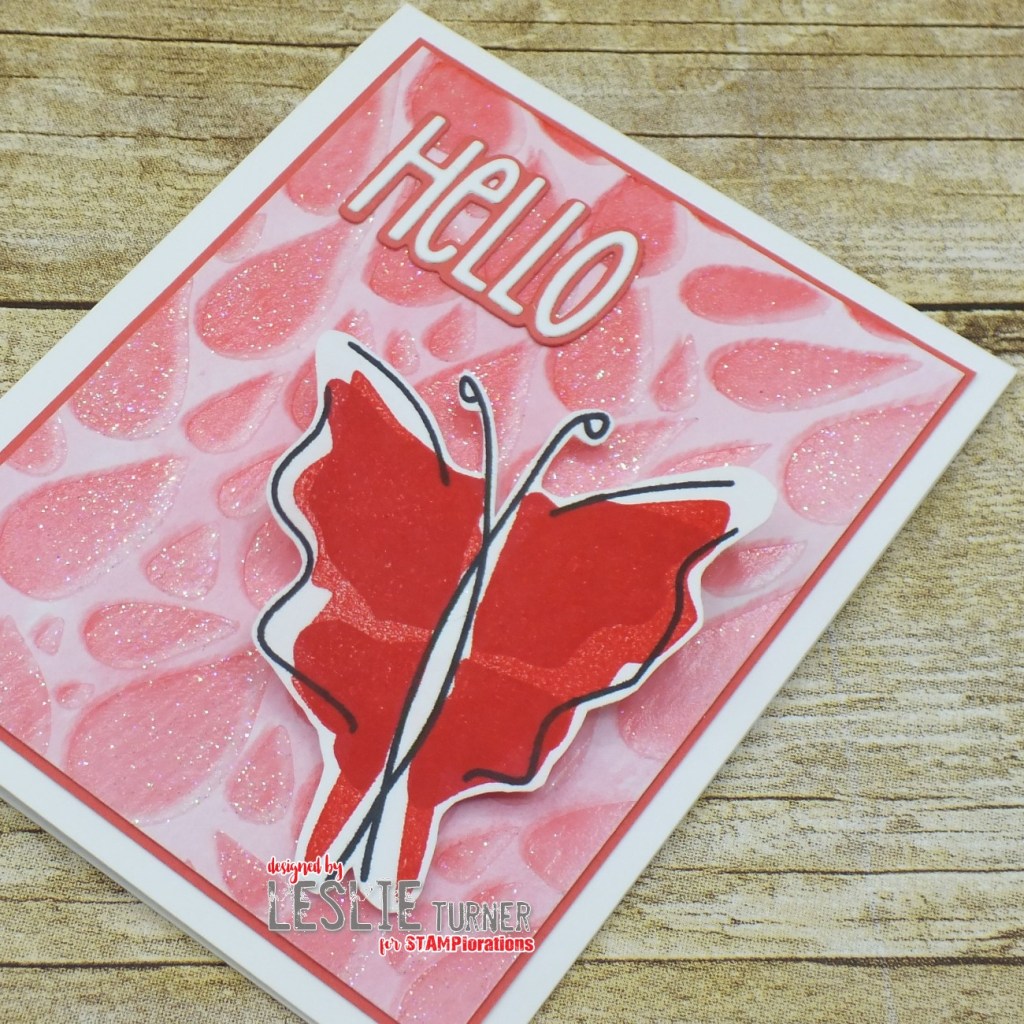
Hey everybody! Happy April Fool’s Day – are pranking anybody today? LOL, I’ve been good… I’ve popped in this afternoon to share a card I created for Lizi’s Layout Challenge #1 featuring our Background Builder One die set. In case you haven’t heard, Love From Lizi has started up a brand new layout challenge, and because this month marks Lizi’s 100th monthly kit, we are celebrating with a milestone giveaway… a $100CAD gift card to the Love From Lizi store! How cool is that?! Read on for more details!

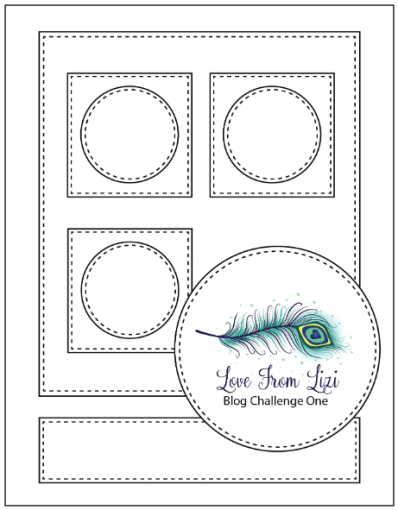
All that’s required to participate in this challenge is to make a card using the following layout. You can enter as many different cards as you’d like. You’ll earn points for using the layout, for using a majority of Love From Lizi products, and for using the Background Builder One die set. There are additional guidelines, so be sure to read the post prior to entering your cards.

I actually combined the Love From Lizi layout challenge with a personal challenge. I’ve had both volumes of the Color Cubes for nearly a year now and have not used the first card out of either box. So my friend, Danni, issued me a challenge on March 17th to use at least one card within the next two weeks. The card was finished on March 30th which was one day before the two-week mark, but I’m late posting it, lol. Hey, at least I FINALLY used a Color Cube card, lol!

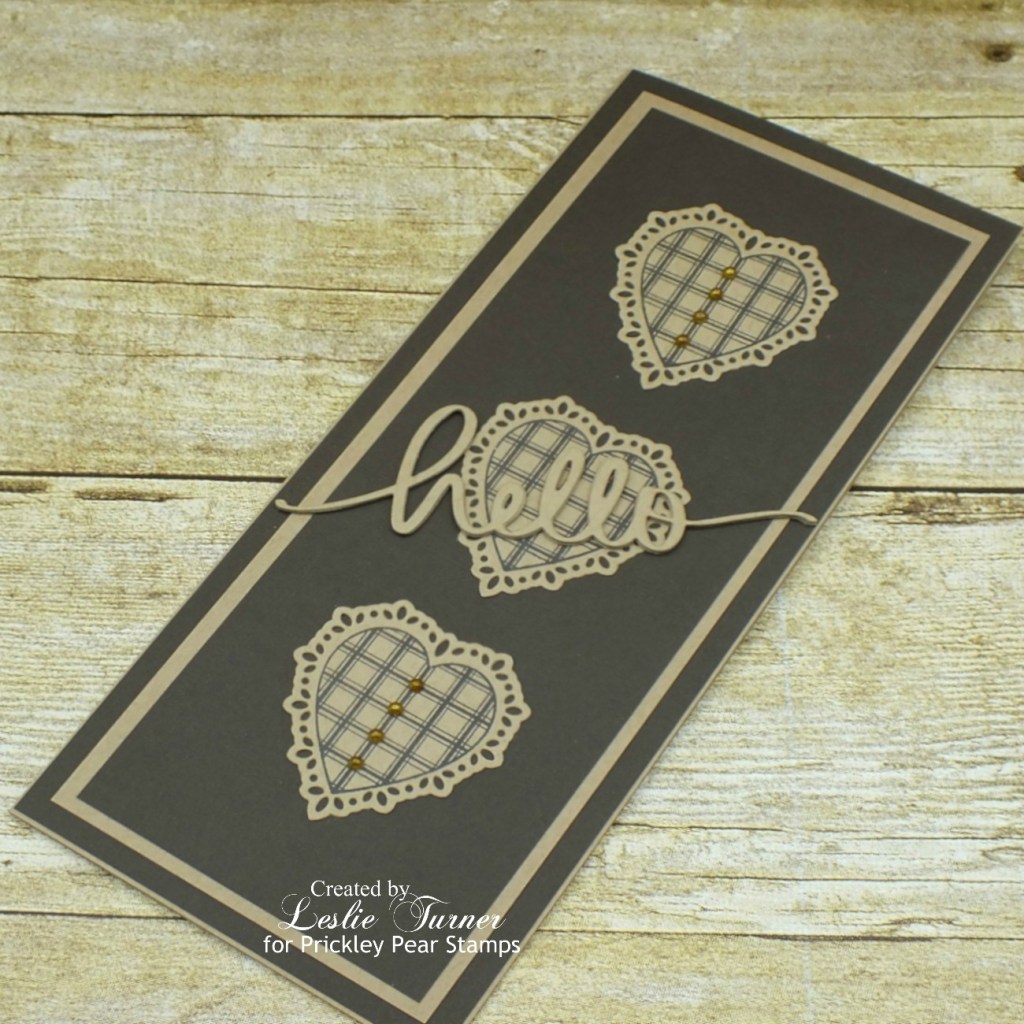
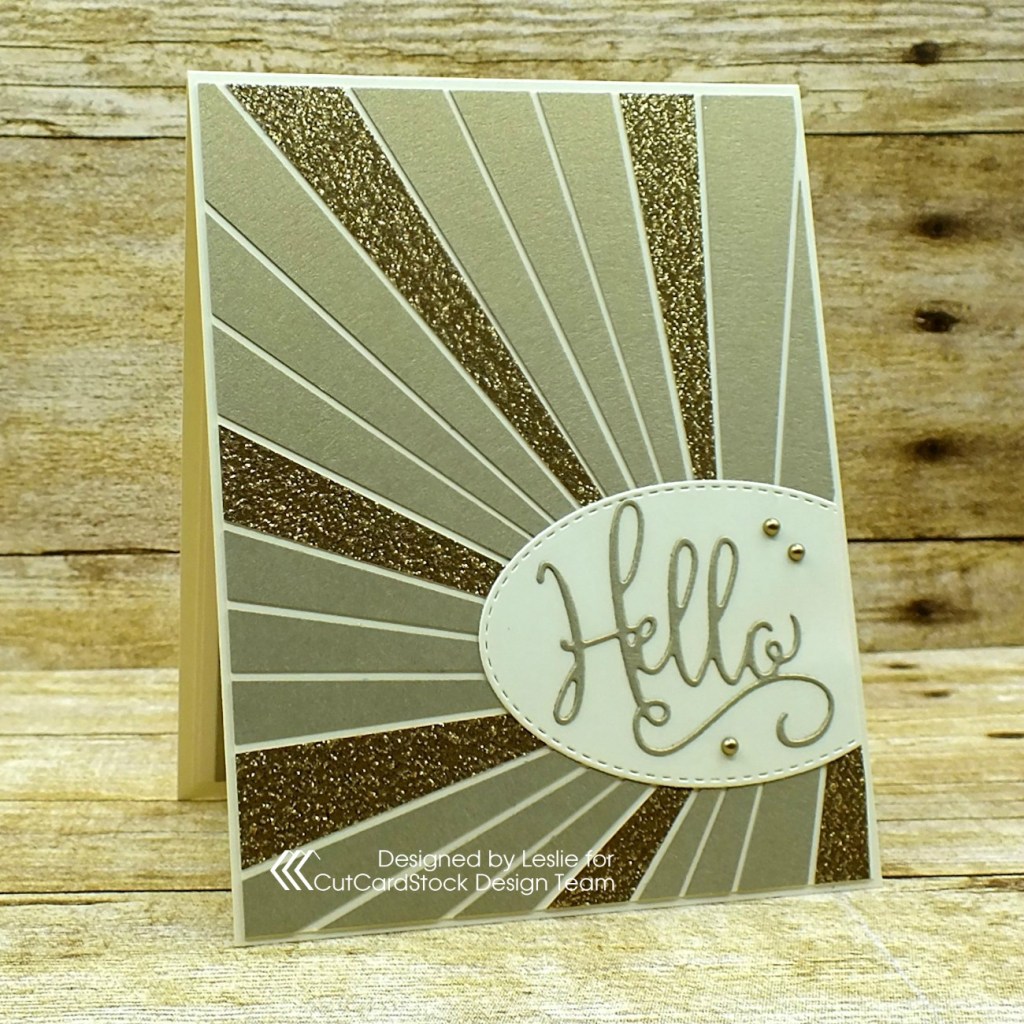
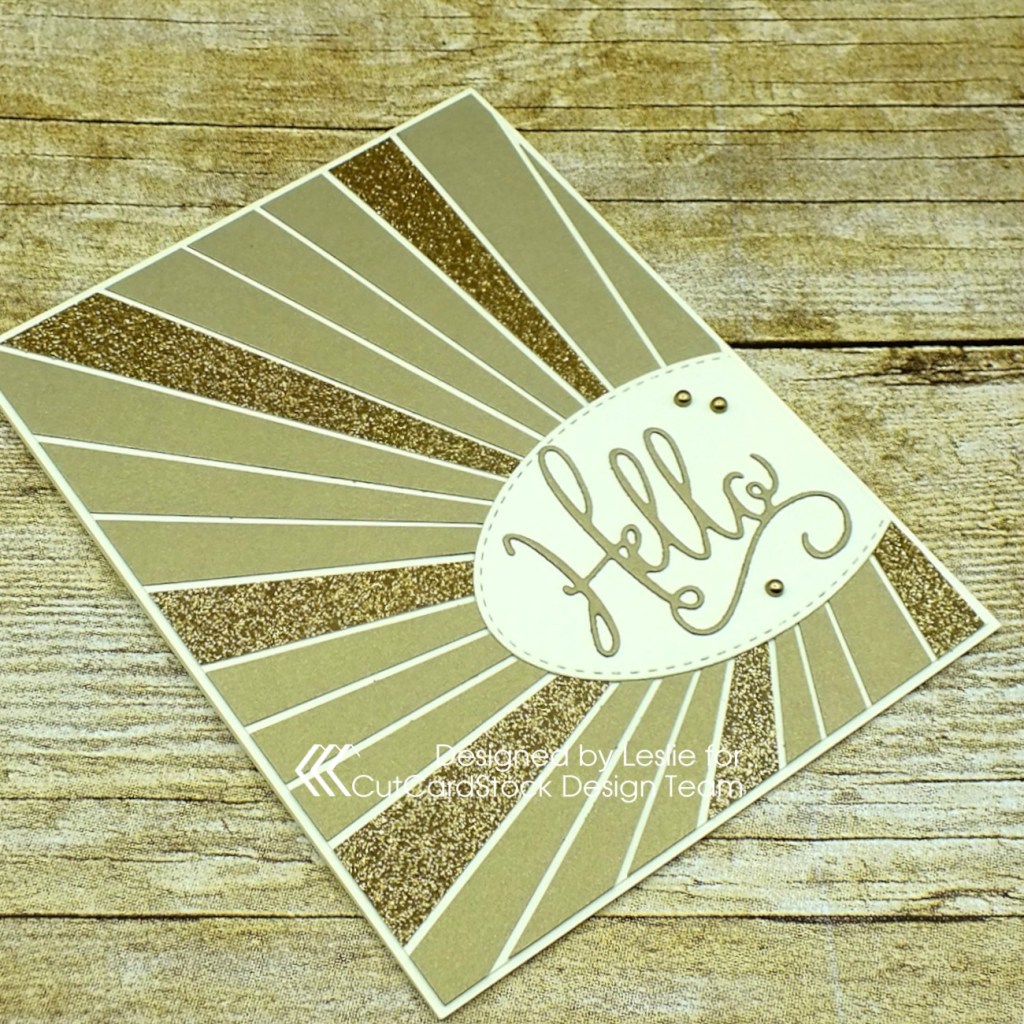
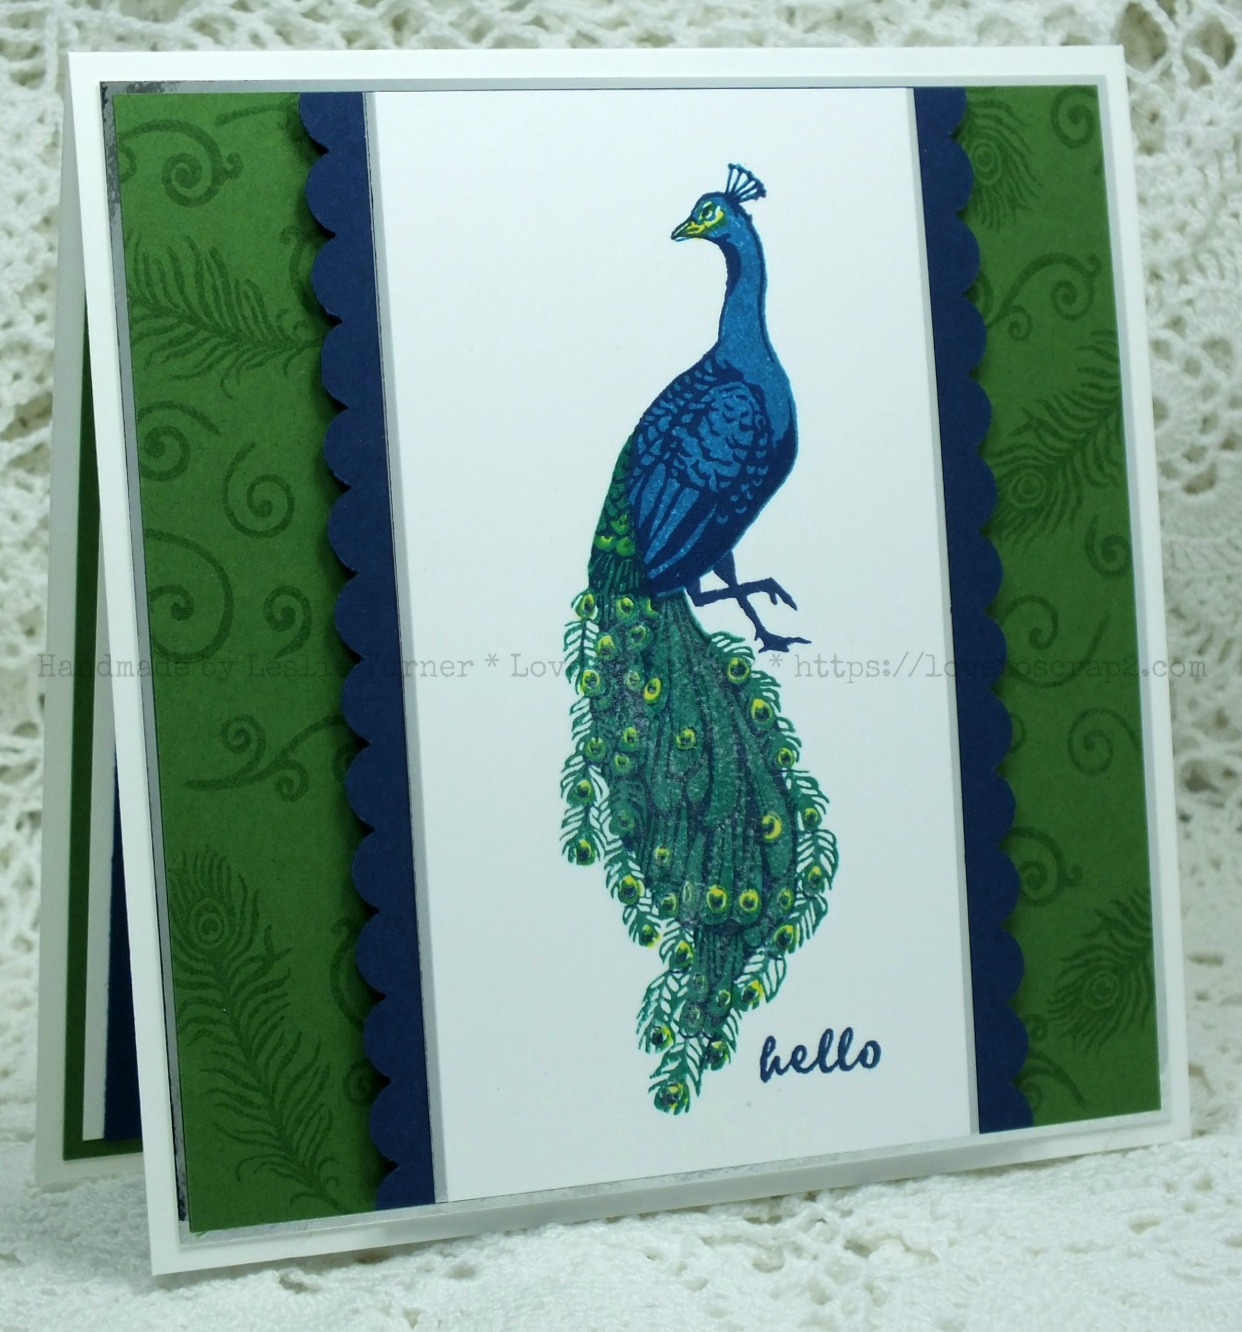
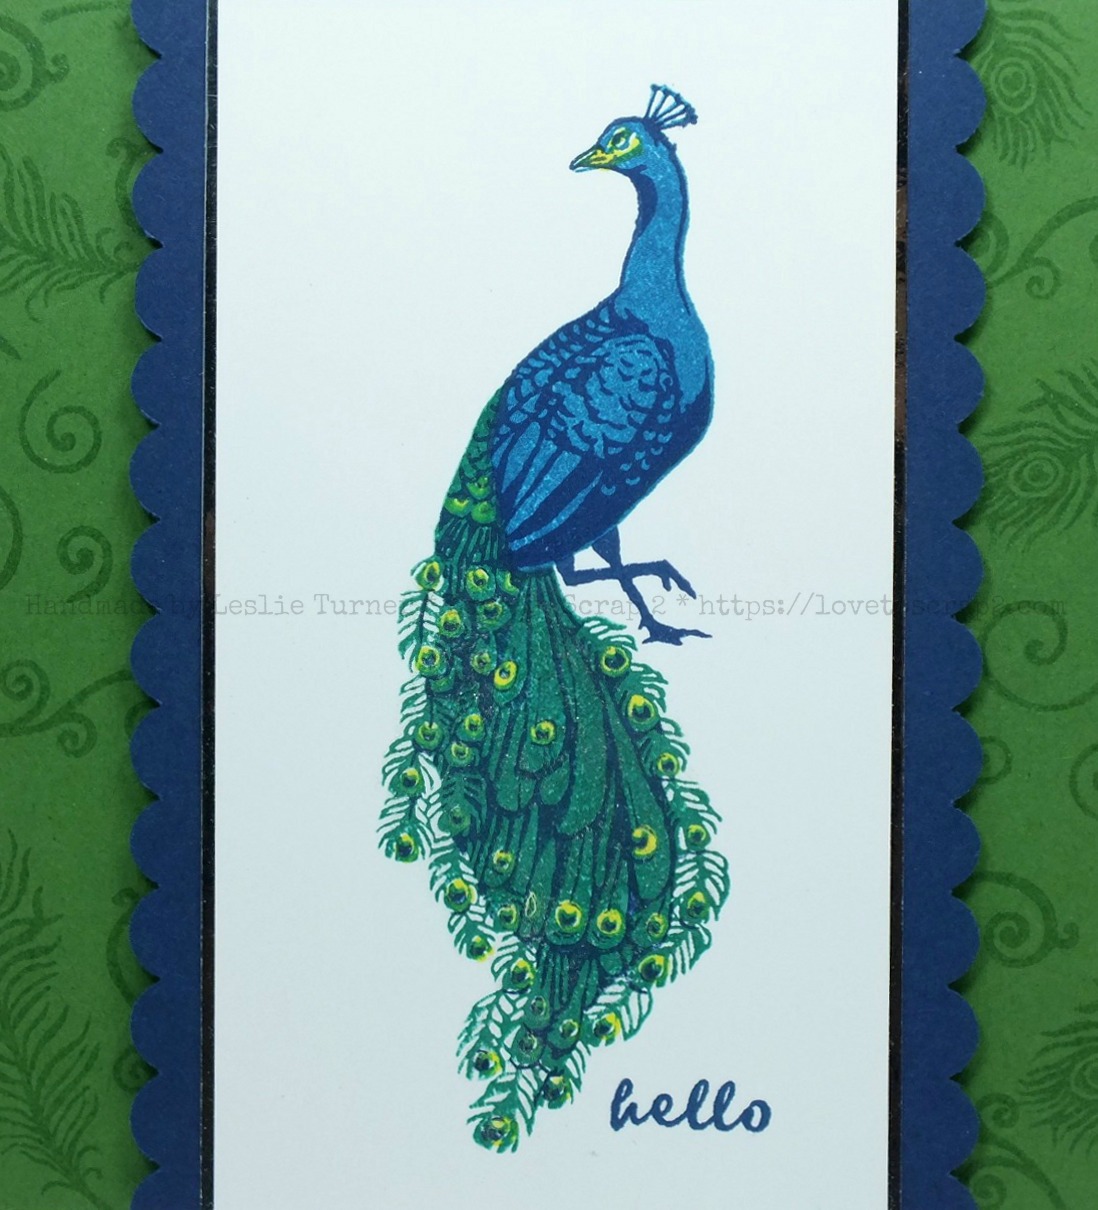
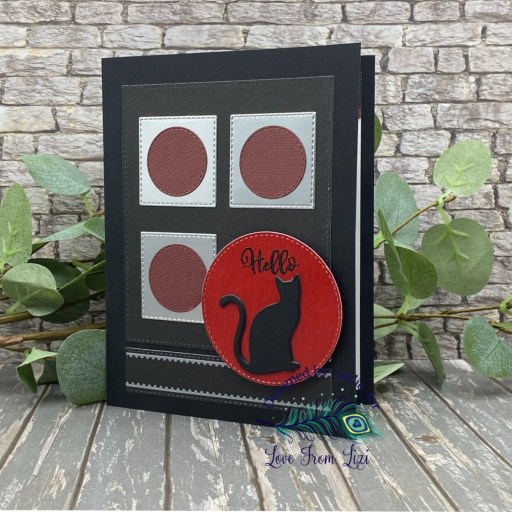
I cut the card base from CutCardStock Astrobrights Eclipse Black cardstock. Using our Background Builder One die set, I cut the pieces from our Neutrals paper pack, Linen Rainbow paper pack, and Silver Mirror cardstock, along with some rust colored cardstock from my stash. I used our Sitting Cat die for the focal image along with an embossed sentiment from our Just Because stamp set. The finishing touch was adding a couple strips of our Silver Sway peel-offs.

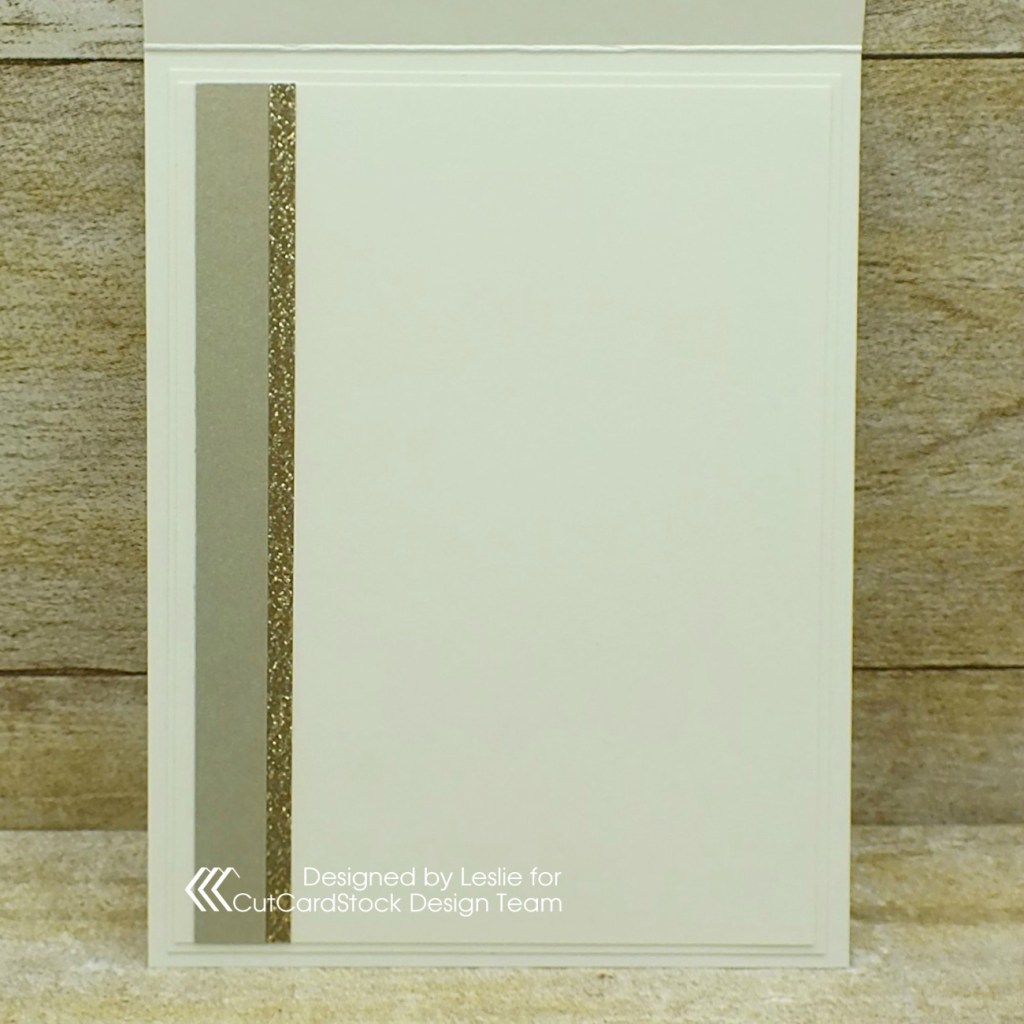
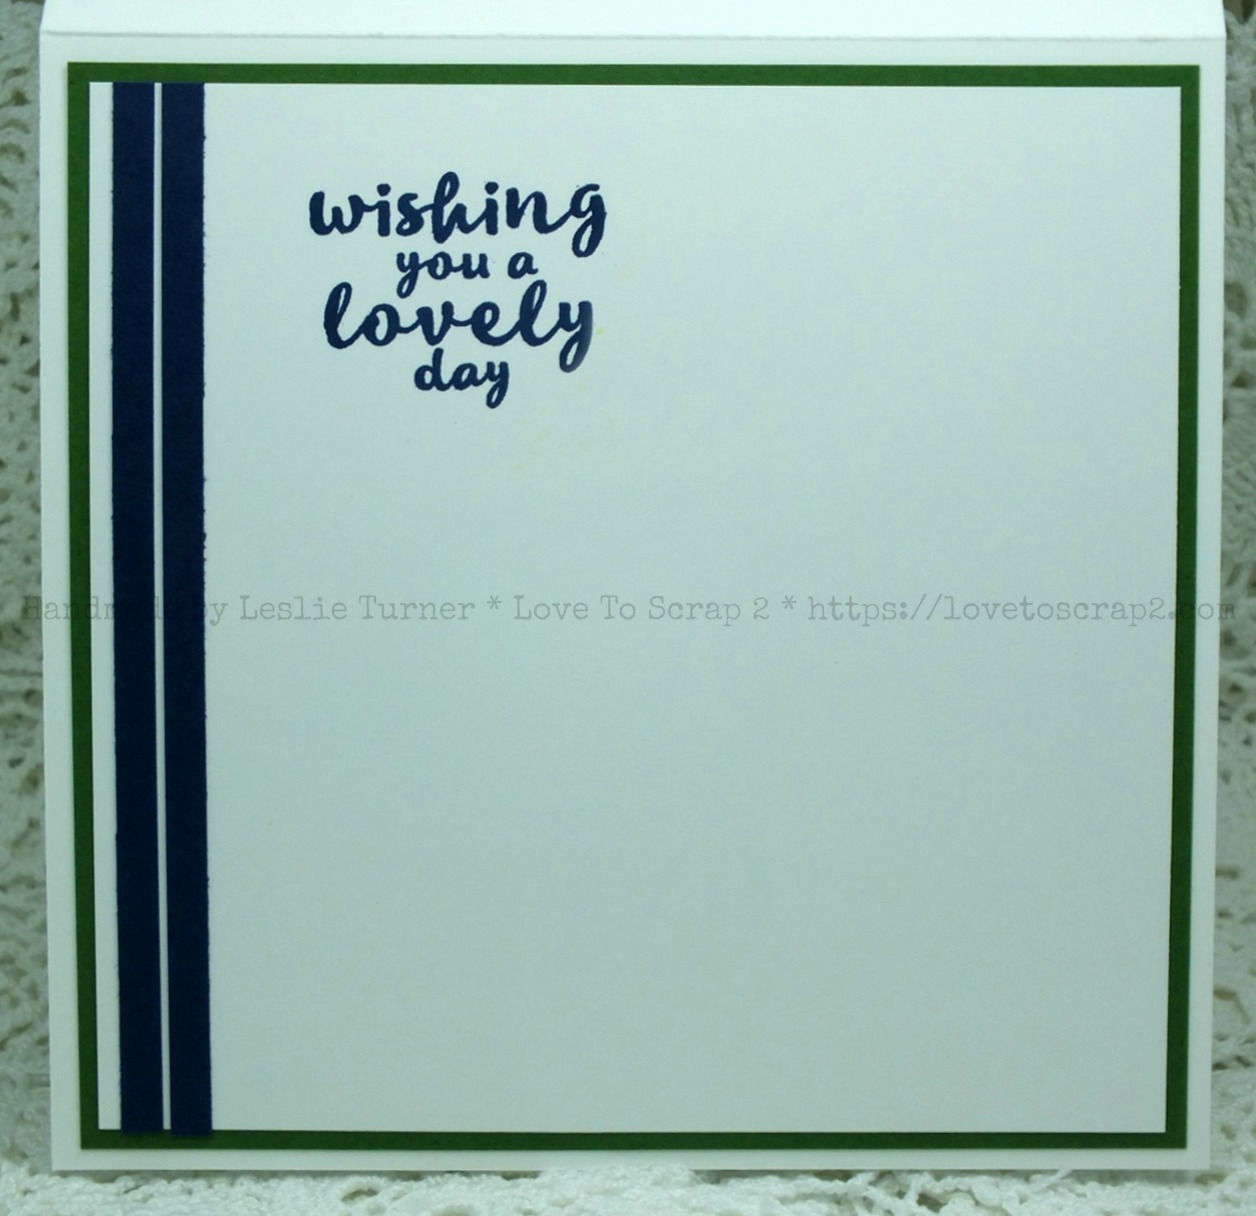
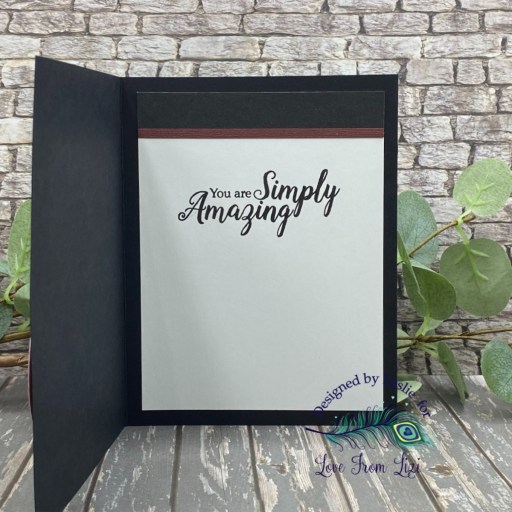
I cut the inside panel from Neenah Classic Crest Solar White cardstock and embellished it with strips of the dark gray and rust papers used on the front. I stamped a sentiment from our Simply Amazing stamp set in Versafine Onyx Black ink, which completed the card.

Affiliate links are used in this post at no cost to you – I really appreciate your support!

Love From Lizi products used:
Background Builder One Cutting Dies
Linen Rainbow 6×6 Paper Pack
Neutrals 6×6 Paper Pack
Matte Mirror Pastel Cardstock Bundle
Sitting Cat Cutting Die
Just Because Stamp Set
Simply Amazing Stamp Set
Matte Silver Sway Peel-Off Stickers

Other products used:
CARDSTOCK/PAPER: CutCardStock Astrobrights Eclipse Black and Lessebo Dawn Maroon cardstock, Darice Rust Premium Cardstock, Neenah Classic Crest 80# Solar White cardstock
INK: Versafine Onyx Black ink
ACCESSORIES: Fiskars 12″ ProCision Rotary Bypass Paper Trimmer, Bearly Art precision craft glue, My Sweet Petunia Precision Glue Press, Mini MISTI, Big Shot, Hero Arts Clear Embossing Powder, Scrapbook Adhesives 3D Foam Squares

I hope you’ve enjoyed seeing this project and you’re inspired to get crafty! Be sure to join the Love From Lizi Facebook Group and Follow us on Instagram and YouTube for lots of crafty inspiration! Thanks so much for stopping by today – we’ll see you next time!

Scrappy hugs,

hello

Hi friends, happy Tuesday! I hope your week is off to a nice start. I’m delighted to share a Brutus Monroe DT inspiration project today featuring the amazing Emma A2 Stencil and Super Sentimental Stamp Set. Isn’t that stencil delightful?! I also used several other Brutus Monroe products to make this card come to life, and I really love how it turned out. It’s been a while since I used any distress oxide inks and honestly, I had forgotten how awesome they blend! I totally need to get these out more often.

I grabbed a piece of Perfect Blend 4.25″ x 5.5″ cardstock (which is excellent for ink blending and alcohol marker coloring) and stuck it down on my Stamp & Stick Mat which I attached to my 12″ Make Art Stay-tion with magnets. I used the Emma stencil with peeled paint, picked raspberry and seedless preserves distress oxide inks to create the background. I cut a layering panel from Raven cardstock and cut the corners of both panels with the Spellbinders 3 in 1 Notched Corners Punch.

I cut an A2 size side-folding card base from Not Your Mamas cardstock and adhered the panels to the front. I stamped a sentiment from the Super Sentimental stamp set on Raven cardstock in Alabaster White ink, trimmed it into a flag, and adhered to the card front. The finishing touch was adding a few Hematite Flat Back Crystals.

I trimmed another panel of Perfect Blend and Raven cardstock for the inside and notched the corners with the Spellbinders punch. I stamped another sentiment from the Super Sentimental stamp set in Raven ink and colored the tiny hearts with a Copic Ciao V15 alcohol marker.

Affiliate links are used in this post at no cost to you – I really appreciate your support!

Brutus Monroe products used:
BRU 6868 Emma A2 Stencil
BRU 7985 Super Sentimental Stamp Set
BRU 4013 Perfect Blend Cardstock
BRU 6519 Raven Cardstock
BRU 9494 Not Your Mamas Cardstock
BRU 2524 Alabaster White Ink
BRU 2543 Raven Ink
BRU 8530 Hematite Flat Back Crystals
BRU 8547 Stick & Stamp Mat 10-yr Anniversary Edition

Other products used:
INK: Ranger Distress Oxide Inks- peeled paint, picked raspberry, seedless preserves; Copic Ciao V15 Mallow
DIES/PUNCHES: Spellbinders 3 in 1 Notched Corners Punch
ACCESSORIES: Fiskars 12″ ProCision Rotary Bypass Paper Trimmer, Bearly Art precision craft glue, My Sweet Petunia Precision Glue Press, Ranger-Wendy Vecchi Make Art Stay-tion 12″, SB Detail Scissors, Mini MISTI, Big Shot, blending brushes, Trinity Pick Up Stick

I hope you’ve enjoyed seeing this project and you’re inspired to get your craft on! Be sure to check out all the amazing stamps and dies, pigments and mists, cardstock and tools (just to name a few) at Brutus Monroe! And if you happen to have a sweet tooth and like to munch while you craft (like I do, lol), check out Scoozie’s Confections & Curiosities! OMG, I’m hooked! ;) Follow us on Facebook, Instagram and YouTube for tons of crafty inspiration! And come on over and join our Fan Club Facebook Group to share your crafty makes using our products! Thanks so much for stopping by today – we’ll see you next time!

Scrappy hugs,

hello

Hey everybody! Happy Saturday – I hope you have something fun planned this weekend! I’m back this morning with one more awesome ScrapbookingStore DT inspiration project to share created with the awesome January 2024 Scrapbook Kit with Upgrades! I’m absolutely enamored with the papers in this month’s collection and I’ve made another cool fun fold. This one is a 3D window card which features a floral and a geometric print along with a journaling card and stickers from the sticker sheet. My inspiration once again has come from Lisa Curcio’s blog. I took a few minutes a couple weeks ago to look around her blog and came away with quite a few ideas for some new fun folds! She’s amazing!

The card base was cut from CutCardStock Lessebo Sunflower Yellow cardstock along with layering panels from two coordinating prints in the kit. An oval aperture was die cut into the front layer using a Keep It Simple Stitched Ovals Nested Die.

The focal element seen in the center of the aperture was cut from a journaling card in the collection and embellished with stickers from the sticker sheet. I added a back panel which I embellished with a strip of paper along with butterfly and sentiment stickers from the sticker sheet.

Sharing in the following challenges:
1. A Perfect Time To Craft Open Challenge: January #1-2024 – Anything Goes
2. Classic Design Challenge: Jan/Feb #01-2024 – Anything Goes

Affiliate links are used in this post at no cost to you – I really appreciate your support!

ScrapbookingStore products used:
January 2024 Scrapbook Kit with Upgrades:
Simple Stories The Little Things 12×12 Collection Kit
Upgrades: Simple Stories The Little Things Page Pieces
      Echo Park Day In The Life Chipboard Accents
      Heidi Swapp Rub-On Foil Kit

Other products used:
CARDSTOCK/PAPER: CutCardStock Lessebo Sunflower Yellow and Cougar Smooth 80# White cardstock
DIES/PUNCHES: Keep It Simple Stitched Ovals Nested Dies
ACCESSORIES: Fiskars 12″ ProCision Rotary Bypass Paper Trimmer, Elmer’s Craft Bond Tape Runner, Bearly Art precision craft glue, Big Shot

I hope you’ve enjoyed today’s project and you’re thinking about all the fun you could have with this month’s kit… you really ought to think about joining the Subscription Club! Be sure to Follow us on Facebook, Instagram, Pinterest and YouTube for lots of crafty inspiration! And if you do decide to join the Subscription Club, join our ScrapbookingStore Club Member Group on Facebook for more inspiration and to share your projects! Thanks so much for stopping by today – we’ll see you next time!

Scrappy hugs,

hello

Hey everybody! I hope you’re having a wonderful weekend! It’s time for another Splitcoast Stampers Dirty Dozen DT inspiration project! This fun coffee cup shaped friendship card features Simple Stories patterned paper with a gorgeous butterfly and die cut sentiment on a corrugated ‘cup sleeve.’ I’ve made several of these coffee cup shaped cards over the years and the design never gets old!

I cut the card base and lid elements from CutCardStock Basis 110# Natural cardstock along with layering panels from a pretty floral print in the Simple Stories Simple Vintage Cottage Fields 6×8 paper pad and kraft corrugated paper in my stash. I die cut the sentiment twice (and layered them) from CutCardStock Pop Tone Sno Cone cardstock using the Mama Elephant hello script die. The finishing touch was adding a fussy-cut butterfly (from the same Simple Stories paper pad).

I embellished the inside flap with the same Simple Stories floral print used on the front, and stamped a sentiment from the Taylored Expressions Joe To Go stamp set in Memento Rich Cocoa ink.

Sharing in the following challenges:
1. Shopping Our Stash: #499 – Sentimentally Yours
2. Wednesday’s Creative Inspirations Challenge Blog: June Challenge – Something for the Girls

Affiliate links are used in this post at no cost to you – I really appreciate your support! 

Products used:
CARDSTOCK/PAPER: CutCardStock Basis 110# Natural and Pop Tone Sno Cone cardstock, kraft corrugated paper, Simple Stories Simple Vintage Cottage Fields 6×8 paper pad
STAMPS: Taylored Expressions Joe To Go stamp set
INK: Memento Rich Cocoa ink
DIES/PUNCHES: Mama Elephant hello script die
ACCESSORIES: Tonic Studios 12″ Guillotine Paper Trimmer and Tim Holtz 8.5″ Comfort Paper Trimmer, Art Glitter Dries Clear adhesive, MISTI stamp tool, Big Shot, EK Tools 3D Dots

I hope you’ve enjoyed seeing this project and will consider joining the Splitcoast Stampers Fan Club which costs less than $25 for an entire year! There are tons of member perks (like seeing all the Dirty Dozen DT’s inspiration projects each month) in addition to access to all the other free content on the Splitcoast Stampers website. Be sure to check it out! The subscription is seriously awesome! Thanks for stopping by today – we’ll see you again soon!

Scrappy hugs,

hello

Hi everyone! Happy Hump Day – I hope you’re having a great week with some lovely weather where you are! Affiliate links are used in this post at no cost to you. I really appreciate your support! It’s time for a new challenge over at Mix It Up Challenge Blog and I’m thrilled to share my DT inspiration project with you for MIUCB #53 – Anything Goes + Monochrome! Our challenges are always ‘anything goes’ and we offer a technique twist each month to inspire you! This month the twist is monochrome – but the twist is never required to play! I created a pretty ‘thinking of you’ slimline card in brown and tan using Prickley Pear Stamps Heart Key Crown stamp set and Hearts 2 stamp set and coordinating Heart Key Crown die set, along with an all-time favorite hello script die from Mama Elephant.

I jumped on the slimline wagon last Summer but I’ll admit that I am a bit of a rebel when it comes to size, lol! I always create a 9″ x 3-3/4″ card base because I think it fits better in a #10 business envelope. I created a side-folding portrait card base from CutCardStock Twine cardstock along with several additional layering panels from Darice textured brown cardstock and CutCardStock Twine cardstock. Using the Prickley Pear Stamps Heart Key Crown stamp set, I stamped the hearts in brown ink on the twine cardstock and used the coordinating Heart Key Crown die set to cut them.

I arranged the three stamped and die cut hearts on the front and added the die cut sentiment to the front of the middle heart at an angle. I colored several white flat-back pearls with an alcohol marker (did you know you could do that?!) to match the monochrome scheme.

I cut the inside panel from CutCardStock Twine cardstock and kept it fairly simple by just stamping a heart and the sentiment from the Hearts 2 stamp set on the panel in brown ink and layering the panel on brown cardstock, leaving a wide border.

And one more look… I really like how this slimline turned out! Always loving a monochrome color scheme, too!

Cardstock/Paper: CutCardStock Twine cardstock, Darice brown textured cardstock
Stamps: Prickley Pear Stamps Heart Key Crown stamp set and Hearts 2 stamp set
Ink: Memento Espresso Truffle ink; Nuvo alcohol marker- 466 (Honey Amber Collection) used to color the pearls
Dies/Punches: Prickley Pear Stamps Heart Key Crown die set, Mama Elephant hello script die
Accessories: Tonic Studios 12″ Guillotine Paper Trimmer, Tombow Mono permanent adhesive, Bearly Art precision craft glue, MISTI stamp tool, Gemini Junior, Darice small white flat-back pearls

I hope you’ve enjoyed this project and will link up with us this month! All of our challenges are ‘anything goes’ and we offer a technique twist each month to inspire you! We’d love to see either ‘anything goes’ or a monochrome project… you choose! Thanks so much for stopping by today – we’ll see you next time! ;)

Scrappy hugs,
lesliesig

hello

Howdy peeps! As you know, I’ve had a three-month guest designing gig for STAMPlorations Stencil Sunday and I’m having an absolute blast! Affiliate links are used in this post at no cost to you. I really appreciate your support! As mentioned in my previous post, I have three projects to share for my third feature and I’m showcasing them in individual posts so I can enjoy sharing them in some challenges. All three projects feature several ARTplorations Stencils and Masks along with other products available in the store. So I’m back with my second project which is a pretty friendship card with a stenciled and glittery background created with the ARTplorations Abstract April Showers stencil, and features a flutterby (one of my all-time favorite winged things next to a dragonfly) and a cool layered sentiment created with the STAMPlorations Layered Butterflies stamp set and CUTplorations Skinny Sentiments!

I cut a standard A2 size top-folding card base from Neenah Classic Crest Solar White 110# cardstock along with a watermelon cardstock layer and an A2 size panel of Canson cold press watercolor paper. I laid down some Ranger festive berries distress ink on my Tim Holtz glass media mat, spritzed it generously with water in the Tim Holtz distress sprayer and smooshed the watercolor paper into it multiple times until the entire piece was covered, and let it dry for several hours. Using the ARTplorations Abstract April Showers stencil, I applied the festive berries distress ink very lightly with a blending brush over the entire piece, untaped the stencil and moved it to about the ten o’clock position. I applied the festive berries a little heavier along with some Versamark, and lightly sprinkled some diamond glitter over the piece. When everything was completely dry, I tapped off any excess glitter and sprayed the piece with a matte fixative. I trimmed the panel and adhered it to the watermelon cardstock layer and then to the card base.

I stamped the outline of a butterfly from the STAMPlorations Layered Butterflies stamp set in black ink on Neenah Classic Crest Solar White 110# cardstock, and using the layering stamps in the same set, filled it in with Ranger festive berries and candied apple distress ink. I fussy cut the butterfly and affixed it to the lower right corner with foam pads. Using the CUTplorations Skinny Sentiments, I die cut the sentiment from Neenah Classic Crest Solar White 110# cardstock and watermelon cardstock, and adhered it to the upper left corner.

I cut the inside panel from Neenah Classic Crest 80# Solar White cardstock and embellished it with leftover strips of the inked panel on the front and the watermelon cardstock, stamped the sentiment in Ranger candied apple distress ink, and layered the panel on watermelon cardstock.

And one more peek… I absolutely love how this card turned out! Love the stencil, the stamps and the dies!

STAMPlorations products used:
ARTplorations Abstract April Showers stencil
STAMPlorations Layered Butterflies stamp set
CUTplorations Skinny Sentiments

Other products used:
Cardstock/Paper: Neenah Classic Crest 110# and 80# Solar White cardstock, Stampin’ Up Watermelon Wonder cardstock
Ink: Ranger festive berries and candied apple distress ink, Versamark, Memento Tuxedo Black ink
Accessories: Tim Holtz distress sprayer, Stampendous Dreamweaver Translucent embossing paste, Deco Foil Stencil Pal, Stampin’ Up Dazzling Diamonds glitter, Tonic Studios 12″ Guillotine Paper Trimmer, Bearly Art precision craft glue, Tombow Mono permanent adhesive, Krylon matte fixative

I hope you’ve enjoyed these projects and you’re inspired to grab some of your stencils and play! Be sure to check out all the amazing stamps, dies, stencils, digis and other crafty goodies at the STAMPlorations main, outlet and digital stores! Use code STAMPGIRLLESLIE for a 20% discount on your orders in the store (with unlimited uses)! And there is A LOT going on over at the STAMPlorations blog – tons of creative inspiration, tutorials, promotions and giveaways – all month long! If you’ve never visited, you are definitely in for a good time! When you do visit, be sure to leave comments on the posts! Every month Shery draws seven random winners from all the posts published during the month, so the more posts you comment on, the more chances you have to win! And be sure to Follow STAMPlorations on Facebook, Instagram and Pinterest for more creative inspiration! Thanks so much for stopping by today – we’ll see you next time! ;)

Scrappy hugs,
lesliesig

hello

Howdy peeps! Well, it’s Tuesday already – do you feel like you just bypassed the weekend altogether?! Can’t believe how fast the time is flying by! Affiliate links are used in this post at no cost to you. I really appreciate your support! I’ve popped in this morning to share a fun friendship card I created yesterday afternoon for The Outlawz Freebie/Progressive February Challenge! Our sponsor this month is All Dressed Up and we were gifted the adorable Piggy Back digital image! A free digital image is the perk for playing in this challenge each month! Come join us! I’m also entering this card in The Outlawz Twisted Thursday Challenge where the theme is Anything Goes with an optional twist of Stitching, real or faux. I used stitched oval and rectangle dies.

I cut my usual A2 sized top-folding card base from Neenah Classic Crest Solar White cardstock and adhered a panel of pretty teal paper. I cut a stitched rectangle from emboss resist cardstock, inked it with teal ink and adhered it to the paper panel. I printed the image on Neenah Classic Crest Solar White cardstock, cut it with a stitched oval die and colored it with alcohol markers. I dug into my scrap bin and found a piece of textured teal cardstock and cut a slightly larger stitched oval die which I layered in an offset fashion beneath the focal image and then adhered the piece to the paper panel. I stamped the sentiment in teal ink on a scrap piece of Neenah Classic Crest Solar White cardstock, cut it with the coordinating die and layered it on three more die cuts for a little dimension. I added several gold rim pearls in three of the corners to finish the card front.

I embellished the inside panel with leftover strips of the teal paper and inked emboss resist cardstock, stamped the sentiment in teal ink and layered the panel on more of the teal paper.

And one more peek… I thoroughly enjoyed working with this sweet image!

Sharing in these additional challenges:
1. 613 Avenue Create: #2 – February Anything Goes w/ optional twist of Heart and Soles
2. A Perfect Time To Craft Open Challenge: #2-2021 – Anything Goes
3. Classic Design Challenge: #2 – Anything Goes
4. Creative Moments: #208 – Anything Goes
5. Lemon Shortbread Challenge Blog: #139 – Anything Goes
6. Scrapping4fun Challenges: #185 – Wedding/Valentine/Friendship

Products used:
Cardstock/Paper: Neenah Classic Crest Solar White cardstock, Stampin’ Up Perfectly Artistic DSP, Stampin’ Up Irresistibly Yours Specialty DSP
Stamps: Trinity Stamps Hello Sweet Friend stamp set
Ink: Nuvo alcohol markers- 461, 420, 379, 369, 360 391, 405; Spectrum Noir alcohol markers- FS4, FS7, IG1; Stampin’ Up Lost Lagoon ink
Dies/Punches: Memory Box Stitched Oval Layers dies, My Favorite Things Stitched Rectangle STAX dies, Trinity Stamps Hello Sweet Friend die set
Accessories: Tombow Mono permanent adhesive, Bearly Art precision craft glue, ScraPerfect gold rim pearls

I hope you’ve enjoyed this project and will come join us in The Outlawz Challenges! Lots of fun going on! Thanks so much for stopping by – we’ll see you next time!

Scrappy hugs,
lesliesig

Hello

9/10/20 Top 3 at Cardz 4 Galz!
9/22/20 Top 5 at Try It On Tuesday!

Hi everyone! Can you believe we’re headed into September already?! I keep saying it’ll be Christmas before we know it… and you know I’m right! Our new CutCardStock DT term starts today and I’m stoked to be back on the CutCardStock blog with an awesome DT inspiration project featuring Curious Metallic Gold Leaf and CCS Gold Glitter cardstock! Affiliate links are used in this post at no cost to you. I really appreciate your support! I created a note card – and this is not your ordinary note card! This note card features a gold starburst background!

I sure had fun with this! I created an A2 size top-folding card base from Classic Crest Baronial Ivory cardstock along with an extra panel for the front and two panels for the inside. I cut strips between 3″ and 5″ long from CCS Gold Glitter cardstock and Curious Metallic Gold Leaf cardstock. The width of the strips for this background can be 1/2″, 3/4″ or 1″ depending on the size of your card. I used 3/4″ wide strips for this note card. I cut each strip in half diagonally, from top right down to bottom left.

Adhering the strips to the panel is absolutely the most fun part of this card! I started at about 10 o’clock and worked my way around the panel in a counter-clockwise fashion, leaving a very thin border between the strips. I then die cut a stitched oval to cover the ends, adhered a die cut sentiment to the oval, and trimmed the right side of the oval even with the right side of the panel. I adhered the panel to the card base and added a few tiny gold flat-back pearls.

I embellished the inside panel with leftover strips of the gold glitter and the gold leaf cardstock, then layered the panel onto another ivory panel for some tone-on-tone interest. I adhered the panel to the inside of the card base and left it blank to write a custom message.

And one more peek… sure am loving how this turned out! So elegant!

Sharing in the following challenges:
1. A Perfect Time To Craft Open Challenge: #9-2020 – Anything Goes
2. Cardz 4 Galz: #129 – Just Saying Hello
3. Classic Design Challenge: #9 – Anything Goes
4. The Crafter’s Cafe: #250 – Anything Goes
5. Try it on Tuesday: Neat and Tidy
6. Word Art Wednesday: Weeks #454/455 – Anything Goes
7. Your Scrapbook Place: September Anything Goes

CutCardStock products used:
Classic Crest Baronial Ivory 80# cardstock
CCS Gold Glitter 74# cardstock
Curious Metallic Gold Leaf 92# cardstock

Other products used:
Dies/Punches: Memory Box Stitched Oval Layers die, Gemini Opulent Swirls die set
Accessories:  Tombow Mono permanent adhesive, Bearly Art precision craft glue, Gemini Junior, Flourish with a Bling Antique Gold flat-back pearls

I hope you’ve enjoyed today’s project and you’re inspired to get crafty! Be sure to check out all the awesome cardstock and other goodies at CutCardStock (adhesives, labels, stickers, pens, watercolors and ribbon to name a few). And head on over to the CutCardStock Facebook Page for more inspiration! Thanks so much for stopping by today – we’ll see you next time!

Scrappy hugs,
lesliesig

Hello

Hello, my crafty peeps! Happy Hump Day! I’m sharing a super cute ‘just because’ card I created to enter into the January Outlawz Freebie/Progressive Challenge. As a perk for joining the challenge, participants receive a free sponsor digi to create with each month. Bugaboo Digi Stamps is our sponsor this month and I received Chibi Flowerpot Peeker – how stinkin’ cute is she?! You ought to check out The Outlawz Challenges – lots of challenges to enter and lots of fun going on!

2020_0108009a

I colored the image with my Bic Mark-It markers, cut it with a stitched circle die and layered it on a die cut doily. I cut the ‘Hello’ sentiment three times and layered them for a little dimension. I created some triangle corners and added some gemstones around the doily to finish the front.

2020_01080010a

I embellished the inside panel with leftover strips of paper and cardstock used on the front, and added a layered digital sentiment.

2020_01080011a

And one more peek… love how this turned out! I’m such a sucker for Bugaboo images!

2020_01080012a

Products used:
Cardstock/Paper: GKD White and Tomato Soup cardstock, American Crafts Charcoal cardstock, Simple Stories Wood & Gingham Basics
Stamps: Bugaboo Digi Stamps Chibi Flowerpot Peeker, Polkadoodles Winnie Celebrations 2 Sentiments
Ink: Bic Mark-It markers- Key Lime, Summer Melon, Yellow Blaze, Tiki Hut Tan, Peach Parfait, Rambunctious Red, Margarita Green, Sunset Orange, Fandango Pink, Woodsy Brown, Honey Brown, Cloud Nine Grey, Blue Skies Blue
Dies/Punches: Memory Box Stitched Circle Layers die, Crafter’s Companion Opulent Swirls die set, Cheery Lynn Designs English Tea Party die
Accessories:  ScraPerfect Best Glue Ever, ScraPerfect Embellie Gellie, Gemini Junior die cutting machine, Darice orange gemstones

I hope you’ve enjoyed this sweet card and will consider joining the fun at The Outlawz Challenges – a fun time is guaranteed! And be sure to check out all the fun digital stamps at Bugaboo Digi Stamps! Thanks so much for stopping by today – we’ll see you next time! ;)

Scrappy hugs,
lesliesig

Hero Arts Peacock hello

Hi everyone! Happy Friday – hope you’ve had a good week! Today is my post day on the a2z Scrapbooking blog and I’m happy to share a DT inspiration project using the Hero Arts Color Layering Peacock stamp set, Hero Arts Peacock Layering Inks and Versamark. I’ve created an all-occasion card in one of my (many) favorite color combos of blue and green, and this card could be used for birthday, encouragement or just because. These color layering stamps and accompanying sentiments are amazing!

Before I get to my project details, we’ve had quite a few of the Hero Arts color layering stamp sets sell out recently and this was one of them. I work ahead and had this card made prior to this stamp set selling out, but I have good news – you can special order it at no extra cost when you order your other Hero Arts stamps from a2Z Scrapbooking!

2017_07130010a

I created the background by stamping a peacock feather and several swirl designs in Versamark randomly over a piece of green cardstock which I layered on silver mirror cardstock. It’s been a long while since I’ve used Versamark as a watermark and I really like the look! Next, for the focal image, I stamped the peacock and simple sentiment on white cardstock, trimmed it and layered it on silver mirror cardstock and then on a navy blue panel with a scallop border on each side. I centered this on the watermark background and then adhered the panel to the card base.

2017_07130011a

I decorated the inside panel with two narrow strips of navy blue cardstock, stamped the sentiment and layered the panel on green cardstock. I’m really loving how this turned out!

2017_07130012a

I’d love to enter this card into the following challenges:
Deep Ocean Challenge Blog: #162 – Fave Color Combo (blue and green)
Little Miss Muffet Challenges: #170 – Anything Goes
Not Just Cards Challenge Blog: #47 – Anything Goes
The Sisterhood of Crafters: Anything Goes
World Wide Open Design Team Challenge: #25 – Anything Goes

a2z Scrapbooking products used:
Stamps: Hero Arts Color Layering Peacock stamp set (special order at no extra cost)
Ink: Hero Arts Peacock Layering Inks, Versamark

Other products used:
Cardstock/Paper: Stampin’ Up Thick and regular Whisper White, Night of Navy and Garden Green cardstock, Marco’s Silver Mirror cardstock
Ink: Spectrum Noir Crystal Clear Sparkle overlay marker
Dies/Punches: Stampin’ Up Scallop Border Punch

I hope you’ve enjoyed this card and will link up a project with us! Remember, our challenge is Bright and Beautiful this month and we’d love to see your project using Hero Arts products! Be sure to check out all the amazing crafty goodies in the a2z Scrapbooking store! AND if you use the code Leslie15 you’ll get 15% off your order of $25 or more! Woot-woot! Thanks so much for stopping by today – we’ll see you soon!

Scrappy hugs,
lesliesig