fall is the best season

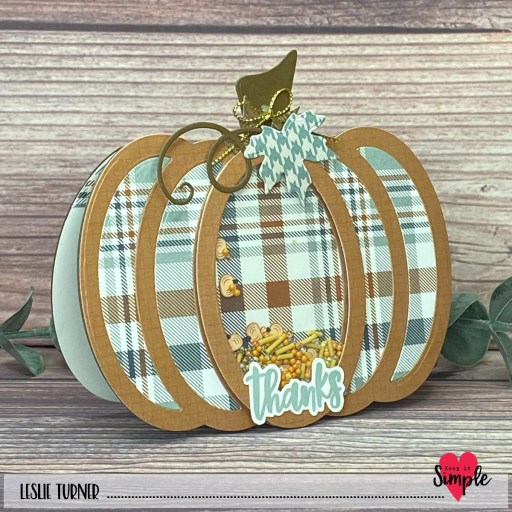
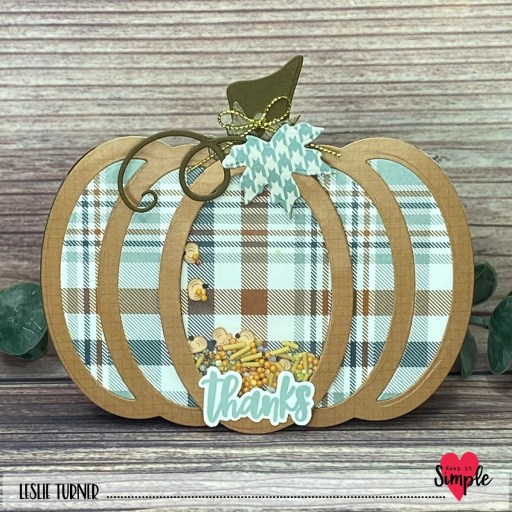
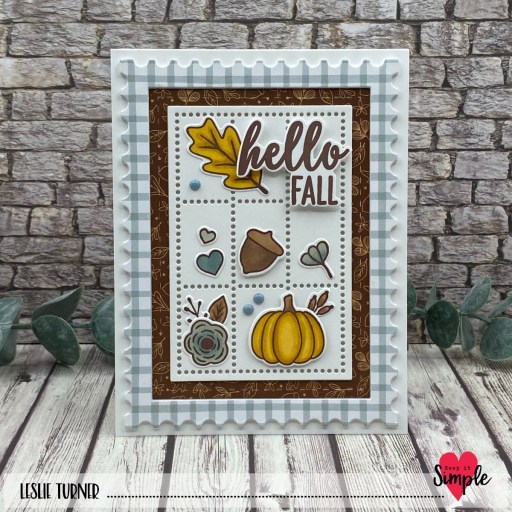
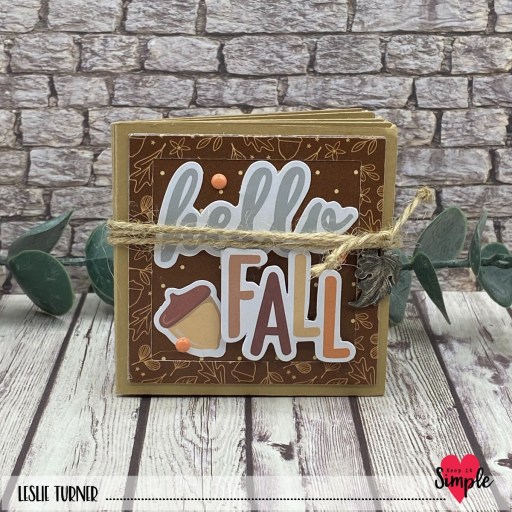
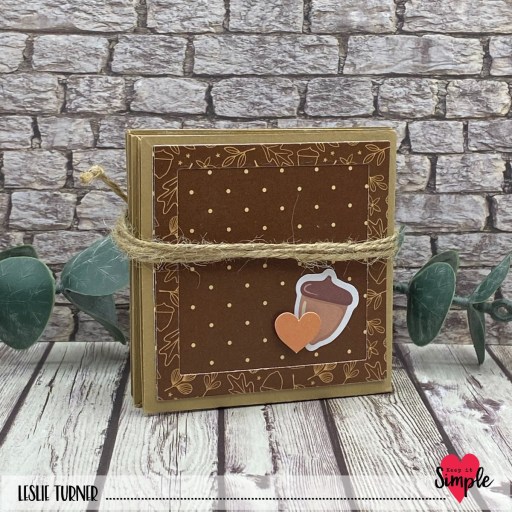
Hi friends! As I sit here looking outside at the snow we got last night, I’m reminded of how blessed we are. So many people don’t care for snow but Ed and I absolutely love it. I’m delighted to share a Keep It Simple DT inspiration project with you this morning created with our new Nuts About Fall Collection. This one is called a building block card and is such a fun card to make -it really packs a punch when the recipient opens it up! This is the second or third one I’ve made, and my inspiration comes from THIS Splitcoast Stampers tutorial.

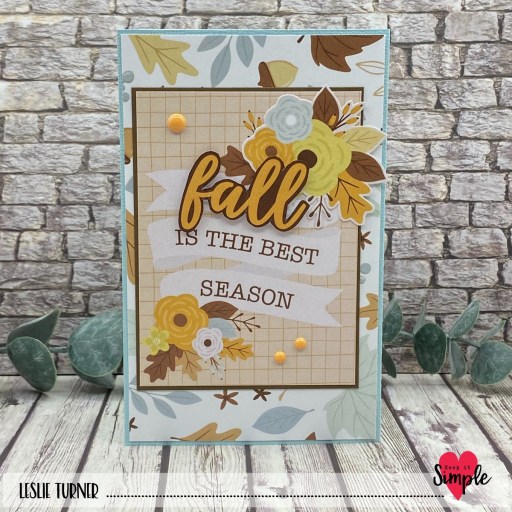
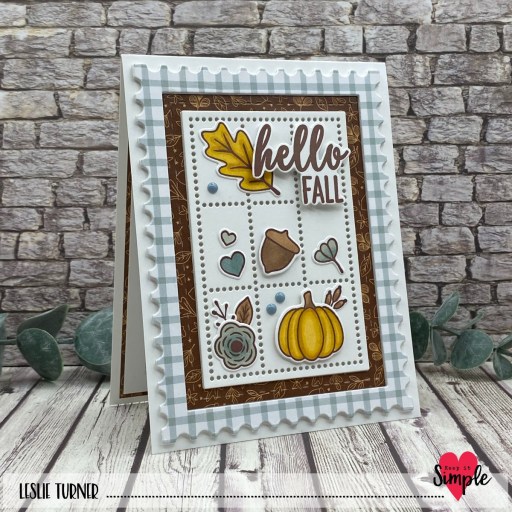
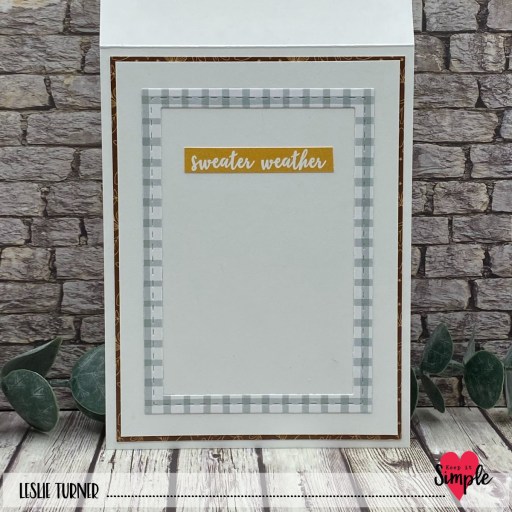
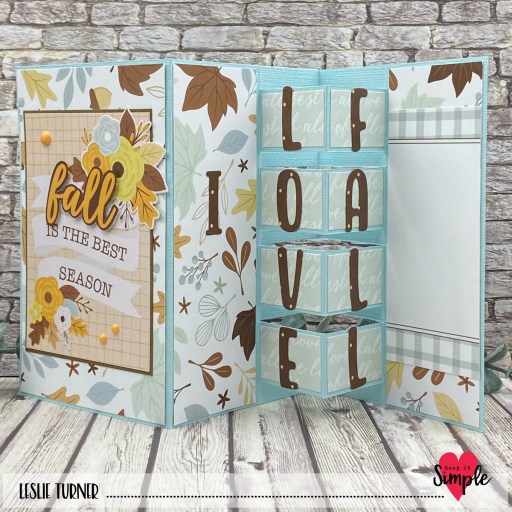
I cut the card base from CutCardStock Jet Stream Blue cardstock along with layering panels from CutCardStock Lessebo Coffee Bean and an assortment of prints in the Nuts About Fall 12×12 Collection Pack. I used a journaling card, a fussy cut floral and a word from the cut apart sheet as the focal image. I popped the ‘fall’ up on several adhesive foam squares and added several Back To Basics Mango Enamel Dots which completed the card front.

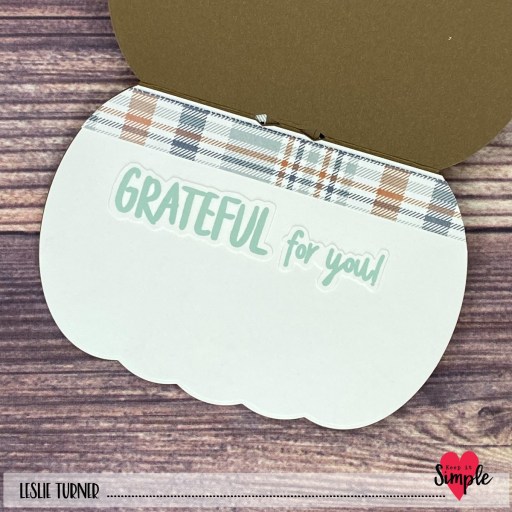
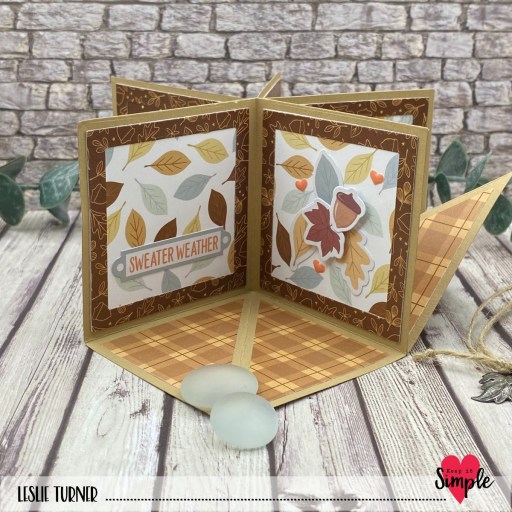
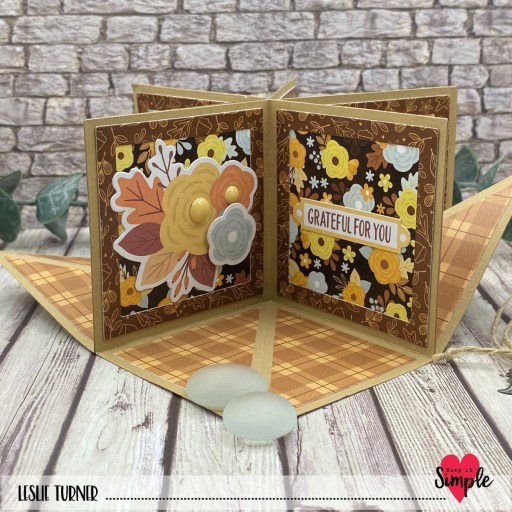
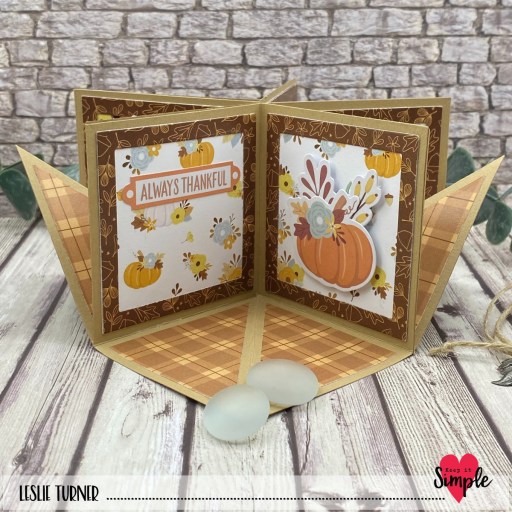
The inside is where it’s happening on this card! I adhered the pieces to the sections on the inside and used the KIS Cuts Twinkling Stars Font dies to cut the ‘I LOVE FALL’ sentiment. Isn’t this fun?!

Keep It Simple products used:
Nuts About Fall 12×12 Collection Pack
KIS Cuts Twinkling Stars Font Dies
Back To Basics Mango Enamel Dots

Affiliate links are used in this post at no cost to you – I really appreciate your support!

Other products used:
CARDSTOCK/PAPER: CutCardStock Jet Stream Blue and Lessebo Coffee Bean cardstock, Neenah Classic Crest 80# Solar White cardstock
INK: Memento Rich Cocoa marker
ACCESSORIES: Fiskars 12″ ProCision Rotary Bypass Paper Trimmer, Cricut Paper Trimmer, Elmer’s Craft Bond Tape Runner, Bearly Art precision craft glue, Big Shot, Scrapbook Adhesives Thin Adhesive Foam Squares

I hope you’ve loved seeing this project as much as I loved creating it and you’re inspired to get crafty! Be sure to check out ALL the fun goodies in the Keep It Simple online store! Save 10% on your entire order when you shop online using code LoveToScrap2 at checkout! There is no minimum purchase requirement and no usage limits, AND it combines with product, order, and shipping discounts! Is that cool, or what?! Be sure to Follow us on Facebook, Instagram, and Pinterest for lots of crafty inspiration! Thanks so much for stopping by today – we’ll see you next time!

Scrappy hugs,

thanks

Hey everybody, Happy Tuesday! I’m stoked to share a Keep It Simple DT inspiration project with you today, created with our new KIS Cuts Pumpkin dies. This is THE most fun set of dies – I created a shaped card with a shaker in the middle portion, and I think it turned out so cute! Shaped cards are always a hit and the shaker portion just adds to the Fun Factor!

Using the KIS Cuts Pumpkin dies, I cut the pumpkin layers and leaves from coordinating prints in the Farmhouse Fall 6×9 Collection and Cardstock Packs, along with the card base, vine and stem from CutCardStock Lessebo Coffee Bean cardstock. I created a shaker in the center portion of the pumpkin using Polymer Clay Coffee Sprinkles, Polymer Clay Light Brown Pumpkins, 2mm Matte Orange Beads, and 2mm Caviar Glass Fall Change beads (all from the Sprinkles line). The Fall Change Caviar Glass beads haven’t hit the store yet, so stay tuned for those. I added a sentiment (from the Back To Basics Thank You Sentiments stamp set) stamped in Catherine Pooler Hot Tube ink which I fussy cut. The finishing touch on the front was adding a gold cord bow.

Using the same dies, I cut the inside panel from Solar White cardstock and embellished it with a scrap piece of the plaid paper used on the front. I stamped another sentiment from the same Thank You Sentiments stamp set in the Hot Tub ink, fussy cut it and added it to the inside.

Keep It Simple products used:
KIS Cuts Pumpkin dies
Farmhouse Fall 6×9 Collection Pack
Farmhouse Fall 6×9 Cardstock Pack
Back To Basics Thank You Sentiments stamp set
Back To Basics Shaker Basics – Foam and Acetate Pack
Sprinkles – Polymer Clay Coffee Sprinkles
Sprinkles – Polymer Clay Light Brown Pumpkins
Sprinkles – Beads 2mm Matte Orange
Sprinkles – Beads 2mm Caviar Glass Fall Change (coming soon)

Affiliate links are used in this post at no cost to you – I really appreciate your support!

Other products used:
CARDSTOCK/PAPER: CutCardStock Lessebo Coffee Bean cardstock, Neenah Classic Crest 80# Solar White cardstock
INK: Catherine Pooler Hot Tub ink
ACCESSORIES: Fiskars 12″ ProCision Rotary Bypass Paper Trimmer, My Sweet Petunia Precision Glue Press, Nuvo Deluxe Adhesive, MISTI stamp tool, Big Shot, 1/8″ red liner tape, GKD gold cording, small wooden bow maker, cordless glue gun

I hope you’ve loved seeing this project as much as I loved creating it and you’re inspired to get crafty! Be sure to check out ALL the fun goodies in the Keep It Simple online store! Save 10% on your entire order when you shop online using code LoveToScrap2 at checkout! There is no minimum purchase requirement and no usage limits, AND it combines with product, order, and shipping discounts! Is that cool, or what?! Be sure to Follow us on Facebook, Instagram, and Pinterest for lots of crafty inspiration! Thanks so much for stopping by today – we’ll see you next time!

Scrappy hugs,

hello FALL

Hi friends, I hope your week is off to a nice start! I’m delighted to share a Keep It Simple DT inspiration project with you today featuring our new KIS Shaker Frames A2 Frames #5 along with papers, stamps and dies from our new Nuts About Fall Collection. This pretty Fall-themed card has the look of a sunken frame and is super easy. I love that the central die in this particular shaker frame die set can be used like the popular postage grid dies, which is how I used it here. ;)

The card base, a postage frame and a postage grid were cut from Neenah Classic Crest 80# Solar White cardstock. One additional postage frame was cut from a plaid pattern in the Nuts About Fall 6×9 Collection Pack and layered on top of the white cardstock frame. I cut the inner frame from a dark pattern in the Collection Pack and adhered it to card base, and then adhered the outer postage frame and central postage grid which I popped up on 2mm adhesive foam strips from our Shaker Basics Foam & Acetate Pack, giving the appearance of a sunken frame.

I stamped multiple images from the Nuts About Fall Collection Stamps in Catherine Pooler Over Coffee ink, colored them with alcohol markers, and cut them with the coordinating Outline Dies. I also stamped a sentiment (from the same stamp set) in the brown ink and cut it with the coordinating die. I arranged the images and sentiment in the grid spaces, popping some up on thin 1mm adhesive foam squares. The finishing touch was adding several Royal Enamel Dots.

I cut the inside panel from Solar White cardstock and embellished it with a frame cut from the plaid paper used on the front and a sentiment cut from the bonus cut-apart sheet in the Collection Pack. I layered the panel on the dark print (also used on the front), which completed the card.

Keep It Simple products used:
KIS Shaker Frames A2 Frames #5
KIS Shaker Basics Foam & Acetate Pack (2mm adhesive foam)
Nuts About Fall 6×9 Collection Pack
Nuts About Fall Collection Stamps
Nuts About Fall Outline Dies
Back To Basics Royal Enamel Dots

Affiliate links are used in this post at no cost to you – I really appreciate your support!

Other products used:
CARDSTOCK/PAPER: Neenah Classic Crest 80# Solar White cardstock
INK: Catherine Pooler Over Coffee ink; Spectrum Noir Tri-Blends- GY2/3/5, EB1/2/3, VB1/2/3
ACCESSORIES: Fiskars 12″ ProCision Rotary Bypass Paper Trimmer, Elmer’s Craft Bond Tape Runner, Bearly Art precision craft glue, MISTI stamp tool, Big Shot, thin 1mm adhesive foam squares

I hope you’ve loved seeing this project as much as I loved creating it and you’re inspired to get crafty! Be sure to check out ALL the fun goodies in the Keep It Simple online store! Save 10% on your entire order when you shop online using code LoveToScrap2 at checkout! There is no minimum purchase requirement and no usage limits, AND it combines with product, order, and shipping discounts! Is that cool, or what?! Be sure to Follow us on Facebook, Instagram, and Pinterest for lots of crafty inspiration! Thanks so much for stopping by today – we’ll see you next time!

Scrappy hugs,

O Holy Night

Hey everybody! I hope you’re having a great week so far. I’m delighted to share a Keep It Simple DT inspiration project with you today, created with our new KIS Cuts Tags #1. This fun accordion tag mini album also features papers and die cut pieces from our new O Holy Night Collection which I totally love and I think is my absolute favorite Christmas collection. And you know how I love me some mini albums, so this was a win-win for me!

Using the KIS Cuts Tags #1 dies, I cut eight tags from Neenah Classic Crest Solar White cardstock along with three rectangles that I used to connect the tags. I then cut layering panels (from the same die set) from an assortment of papers in the O Holy Night Collection Pack. I adhered four tags to the three rectangle connectors and then adhered the additional four tags on top, sandwiching the connectors between the tag layers. Next, I adhered the patterned paper layers to both sides of each tag and embellished them with an assortment of Die Cut Pieces. The final step was adding Royal, Jade and Stars & Stripes ribbon to the top of each tag, tying it with Doodlebug Design Lily White Doodle Twine.

Here’s an overhead shot so you can see the super simple construction. I just love how this turned out!

Keep It Simple products used:
KIS Cuts Tags #1
O Holy Night 12×12 Collection Pack
O Holy Night Die Cut Pieces
Back To Basics Royal Ribbon
Back To Basics Jade Ribbon
Back To Basics Stars & Stripes Ribbon

Affiliate links are used in this post at no cost to you – I really appreciate your support!

Other products used:
CARDSTOCK/PAPER: Neenah Classic Crest 80# Solar White cardstock
ACCESSORIES: Fiskars 12″ ProCision Rotary Bypass Paper Trimmer, Bearly Art precision craft glue, My Sweet Petunia Precision Glue Press, Big Shot, Doodlebug Design Lily White Doodle Twine, Scrapbook.com Double-Sided Adhesive Foam Squares

I hope you’ve loved seeing this project as much as I loved creating it and you’re inspired to get crafty! Be sure to check out ALL the fun goodies in the Keep It Simple online store! Save 10% on your entire order when you shop online using code LoveToScrap2 at checkout! There is no minimum purchase requirement and no usage limits, AND it combines with product, order, and shipping discounts! Is that cool, or what?! Be sure to Follow us on Facebook, Instagram, and Pinterest for lots of crafty inspiration! Thanks so much for stopping by today – we’ll see you next time!

Scrappy hugs,

hello FALL

Hey everybody! Happy Hump Day – did you survive the time change?! I personally wish they’d just leave the time alone. SMH. I’m thrilled to share another Keep It Simple DT inspiration project with you today featuring the square version of our new KIS Cuts Circular Pop-Ups. I made a Fall version using papers and die cut pieces from our new Nuts About Fall Collection. OMGosh, these little pop-ups are so stinkin’ fun and can be decorated a gazillion ways. You gotta check them out! I’m very honored because this die set was modeled after the carousel card I made earlier this year. That post is HERE if you’d like to see it. And I have to say that having the die set makes this project much more enjoyable versus hand-cutting the pieces. ;)

Using the KIS Cuts Circular Pop-Up: Square dies, I cut the base pieces from CutCardStock Basis Light Brown cardstock along with frames and panels for all the pages from coordinating prints in the Nuts About Fall 6×9 Collection Pack. I embellished each page with items from the Nuts About Fall Die Cut Pieces, Mango Enamel Dots and Hearts, and Lilac Enamel Dots. I made a twine closure using Canvas Corp jute rope and a leaf charm from The Funkie Junkie Boutique. Here are shots of the front, inside pages and the back. I totally love how this turned out!

Keep It Simple products used:
KIS Cuts Circulcar Pop-Up: Squqre
Nuts About Fall 6×9 Collection Pack
Nuts About Fall Die Cut Pieces
Back To Basics Mango Enamel Dots
Back To Basics Mango Enamel Hearts
Back To Basics Lilac Enamel Dots

Affiliate links are used in this post at no cost to you – I really appreciate your support!

Other products used:
CARDSTOCK/PAPER: CutCardStock Basis Light Brown cardstock
ACCESSORIES: Fiskars 12″ ProCision Rotary Bypass Paper Trimmer, My Sweet Petunia Precision Glue Press, Nuvo Deluxe Adhesive, Big Shot, Scrapbook.com Double-Sided Adhesive Foam Squares, Canvas Corp jute rope, The Funkie Junkie Boutique leaf charm

I hope you’ve loved seeing this project as much as I loved creating it and you’re inspired to get crafty! Be sure to check out ALL the fun goodies in the Keep It Simple online store! Save 10% on your entire order when you shop online using code LoveToScrap2 at checkout! There is no minimum purchase requirement and no usage limits, AND it combines with product, order, and shipping discounts! Is that cool, or what?! Be sure to Follow us on Facebook, Instagram, and Pinterest for lots of crafty inspiration! Thanks so much for stopping by today – we’ll see you next time!

Scrappy hugs,

Spooky

Hey everybody, I hope you’re having a great week! Well, today is election day in the States so please pray for a favorable outcome for our nation. And also today would have been my sister’s 76th birthday and I’m sure she’s celebrating in Heaven. I’m delighted to share one final Halloween project for Keep It Simple created with our new Haunted Halloween Collection. Seems like I made quite a few Halloween projects this year, and this vertical split panel fold is such a fun one I just couldn’t resist! The instructions for this fold are in the Freebies section of my blog HERE if you’d like to learn how to make it.

I cut the card base from CutCardStock Lessebo Pitch Black cardstock along with layering panels from coordinating papers in the Haunted Halloween 6×9 Collection Pack. I stamped several images from the Spooky Characters Collection Stamps, colored them with alcohol markers, and cut them with the coordinating Spooky Characters Outline Dies. I used those and a sentiment die cut from the Die Cut Pieces Mega Pack to build the scene on the front on a stitched rectangle cut with a Back To Basics Stitched Rectangles Nested Die.

I cut the inside panel from Neenah Classic Crest 80# Solar White cardstock and embellished it with a strip of paper from the 6×9 Collection pack and a stamped/die cut bat. I stamped a sentiment from the Haunted Sentiments Stamps and added a disc magnet behind the front focal to keep the card closed.

Keep It Simple products used:
Haunted Halloween 6×9 Collection Pack
Haunted Halloween Spooky Characters Collection Stamps
Haunted Halloween Spooky Characters Outline Dies
Haunted Halloween Haunted Sentiments Stamps
Haunted Halloween Die Cut Pieces Mega Pack
Back To Basics Stitched Rectangles Nested Dies

Affiliate links are used in this post at no cost to you – I really appreciate your support!

Other products used:
CARDSTOCK/PAPER: CutCardStock Lessebo Pitch Black cardstock, Neenah Classic Crest 80# Solar White cardstock
STAMPS: Catherine Pooler Chiffon and Sauna inks; Spectrum Noir Tri-Blends- IG2/4/5, EB5/6/7
INK: Memento Tuxedo Black ink
ACCESSORIES: Cricut Paper Trimmer, Elmer’s Craft Bond Tape Runner, Bearly Art precision craft glue, MISTI stamp tool, Big Shot, 1/4″ double-sided foam strips, small disc magnet, Ranger, distress collage medium, thin 1mm adhesive foam squares

I hope you’ve loved seeing this project as much as I loved creating it and you’re inspired to get crafty! Be sure to check out ALL the fun goodies in the Keep It Simple online store! Save 10% on your entire order when you shop online using code LoveToScrap2 at checkout! There is no minimum purchase requirement and no usage limits, AND it combines with product, order, and shipping discounts! Is that cool, or what?! Be sure to Follow us on Facebook, Instagram, and Pinterest for lots of crafty inspiration! Thanks so much for stopping by today – we’ll see you next time!

Scrappy hugs,

Fright Night

Hey everybody! Happy Saturday – I hope you have something totally fun planned this weekend! I have a fun Keep It Simple DT inspiration project to share today for our Halloween hop. The theme is “In Disguise” and these little ghouls in costumes on my accordion card are perfect! Be sure to visit the KIS Instagram Page to start hopping with us. This was a fun card and I really enjoyed creating the scene on the front, complete with a bat hanging upside down, lol!

I cut the 5-1/2″ x 8-1/2″ card base from CutCardStock Lessebo Pitch Black cardstock along with layering panels from coordinating prints and a scalloped border in the Haunted Halloween 6×9 Collection Pack. I went through the Die Cut Pieces Mega Pack (and boy howdy, this is a mega pack indeed!) and chose the ones I wanted to use for my little scene, popping the little ghoul, the star and the bat up on foam squares and strips. I scored and creased the wings on the bat for a little dimension.

I cut a 5-1/4″ x 10″ panel for the accordion on the inside from Hammermill 32# copy paper and stamped a spider web background (using the Spider Web Background Stamp) on it. I then scored this panel at 2”, 3”, 4”, 5”, 6”, 7” and 8”, folded it on the score lines, and adhered the outside portions to the inside of the card base. I stamped several spiders from The Moon Made Me Do It stamp set and cut them with the coordinating die set.

I added a few more ghouls and sentiments from the Die Cut Pieces Mega Pack, staggering them on the mountain folds of the accordion portion. The finishing touch was adding a panel to the back of the card which I cut from Neenah Classic Crest Solar White cardstock and embellished with a sentiment from the Die Cut Pieces and a stamped spider.

Keep It Simple products used:
Haunted Halloween 6×9 Collection Pack
Haunted Halloween Die Cut Pieces Mega Pack
A Wee Bit Wicked Spider Web Background Stamp
A Wee Bit Wicked The Moon Made Me Do It Stamps
A Wee Bit Wicked The Moon Made Me Do It Outline Dies

Affiliate links are used in this post at no cost to you – I really appreciate your support!

Other products used:
CARDSTOCK/PAPER: CutCardStock Lessebo Pitch Black cardstock, Neenah Classic Crest 110# and 80# Solar White cardstock, Hammermill 32# white copy paper
ACCESSORIES: Cricut Paper Trimmer, Bearly Art precision craft glue, MISTI stamp tool, Big Shot, 1/2″ double-sided foam strips, Scrapbook.com Double-Sided Foam Adhesive Squares

I hope you’ve loved seeing this project as much as I loved creating it and you’re inspired to get crafty! Be sure to check out ALL the fun goodies in the Keep It Simple online store! Save 10% on your entire order when you shop online using code LoveToScrap2 at checkout! There is no minimum purchase requirement and no usage limits, AND it combines with product, order, and shipping discounts! Is that cool, or what?! Be sure to Follow us on Facebook, Instagram, and Pinterest for lots of crafty inspiration! Thanks so much for stopping by today – we’ll see you next time!

Scrappy hugs,

Halloqueen shaker

Hey everybody! Happy Tuesday – I hope you’re having a great week so far! I’m delighted to share another Keep It Simple DT inspiration project today. I created this fun Halloween shaker card using an assortment of Sprinkles along with paper, die cut pieces and stamps from last year’s A Wee Bit Wicked Collection. This collection is a popular one and was out of stock a good part of this summer. It’s back in stock, so what better way to celebrate than share some Halloween inspiration using it!

I cut a landscape top-folding A2 size card base from Neenah Classic Crest 110# Solar White cardstock along with layering panels from two prints in the 6×9 Collection Pack. Using a Back To Basics Stitched Ovals Nested Die, I cut an aperture into the top one. I then grabbed the next larger die and cut a frame from CutCardStock Lessebo Pitch Black cardstock. I used white tulle rather than acetate this time because it’s SO much easier to photograph! ;) I used Halloween Confetti, Peach Hearts and Black Matte Beads from our Sprinkles line to fill the shaker. I added a couple Wee Bits Die Cut Pieces and some Back To Basics Mango Enamel Dots which finished the card front.

I cut the inside panel from 80# Solar White cardstock and embellished it with a leftover strip of the striped paper used on the front. I stamped a sentiment from the Halloqueen Sentiments stamp set in Memento Tuxedo Black ink and layered the panel on the Pitch Black cardstock.

Keep It Simple products used:
A Wee Bit Wicked 6×9 Collection Pack
A Wee Bit Wicked Wee Bits Die Cut Pieces
A Wee Bit Wicked Halloqueen Sentiments stamp set
Back To Basics Stitched Ovals Nested Dies
Sprinkles – Polymer Clay-Halloween Confetti
Sprinkles – Polymer Clay-Peach Hearts
Sprinkles – Beads-2mm Black Matte
Back To Basics Mango Enamel Dots

Affiliate links are used in this post at no cost to you – I really appreciate your support!

Other products used:
CARDSTOCK/PAPER: Neenah Classic Crest 110# and 80# Solar White cardstock, CutCardStock Lessebo Pitch Black cardstock
INK: Memento Tuxedo Black ink
ACCESSORIES: Fiskars 12″ ProCision Rotary Bypass Paper Trimmer, Elmer’s Craft Bond Tape Runner, Bearly Art precision craft glue, MISTI stamp tool, Big Shot, GKD Shaker Strips, white tulle

I hope you’ve loved seeing this project as much as I loved creating it and you’re inspired to get crafty! Be sure to check out ALL the fun goodies in the Keep It Simple online store! Save 10% on your entire order when you shop online using code LoveToScrap2 at checkout! There is no minimum purchase requirement and no usage limits, AND it combines with product, order, and shipping discounts! Is that cool, or what?! Be sure to Follow us on Facebook, Instagram, and Pinterest for lots of crafty inspiration! Thanks so much for stopping by today – we’ll see you next time!

Scrappy hugs,

Meet me at the pumpkin patch

Hey everybody! Happy Thursday – the weeks are just FLYING by! We’ve had a busy week with doctor appointments. All is well… just check-ups and lab work, and even got some good news. I’m delighted to share a Keep It Simple DT inspiration project with you today featuring our new KIS Cuts Pumpkin Builder that was released last week. Talk about a whole lotta fun for Autumn/Fall and Halloween projects! I took a quick break from Halloween and created a Fall-themed split panel fold. I have a pet peeve about stuff hanging off the edges of an A2 card but I couldn’t help myself on this one… just gonna have to use a larger envelope.

Using my own instructions for the vertical split panel fold HERE (which I turned horizontally) I cut the card base from Neenah Classic Crest 110# Solar White cardstock along with layering panels from coordinating prints in the Mango 12×12 Collection Pack. I cut the pumpkin from a couple more coordinating prints in the same paper pack using the Pumpkin Builder dies. I inked the stem, tendrels and leaf with Catherine Pooler Over Coffee and Spruce inks. I stamped the sentiment from the Autumn Charm Autumn Sentiments Stamps in Spruce ink and cut it with the coordinating Autumn Sentiments Outline Dies. I added some small disc magnets to keep the card closed, and the finishing touch was adding a few orange gemstones.

I cut the inside panel fron 80# Solar White cardstock and embellished it with a leftover strip of paper from the same paper pack. I stamped the sentiment from the same stamp set in the Over Coffee and Spruce inks.

Keep It Simple products used:
Mango 12×12 Collection Pack
KIS Cuts Pumpkin Builder
Autumn Charm Sentiments Stamps
Autumn Charm Sentiments Outline Dies

Affiliate links are used in this post at no cost to you – I really appreciate your support!

Other products used:
CARDSTOCK/PAPER: Neenah Classic Crest 110# Solar White cardstock
INK: Catherine Pooler Over Coffee and Spruce inks
ACCESSORIES: Fiskars 12″ ProCision Rotary Bypass Paper Trimmer, My Sweet Petunia Precision Glue Press, Nuvo Deluxe Adhesive, MISTI stamp tool, Big Shot, Ranger Distress Collage Medium, small disc magnets, orange gemstones

I hope you’ve loved seeing this project as much as I loved creating it and you’re inspired to get crafty! Be sure to check out ALL the fun goodies in the Keep It Simple online store! Save 10% on your entire order when you shop online using code LoveToScrap2 at checkout! There is no minimum purchase requirement and no usage limits, AND it combines with product, order, and shipping discounts! Is that cool, or what?! Be sure to Follow us on Facebook, Instagram, and Pinterest for lots of crafty inspiration! Thanks so much for stopping by today – we’ll see you next time!

Scrappy hugs,

I {heart} School

Hey everybody! I hope you’re having a fabulous week! First of all, prayers going out to friends and family in Florida (where I grew up) and actually to everyone in the path of Hurrcane Milton. May God be with you. I’m delighted to be back with another Keep It Simple DT inspiration project to share today. This slimline shaker card was created with papers, stamps, dies and die cut pieces from our Love To Learn Collection that was released in August. I used our new KIS Slimline Cuts Stitched Square die for the shaker frame and quite a variety of our Sprinkles for the shaker bits. And I even threw a few stamped and die cut images in with the shaker bits for a little interest.

I cut my go-to 3-3/4″ x 9″ slimline card base from Neenah Classic Crest 110# Solar White cardstock along with layering panels from CutCardStock Pop Tone Black Licorice and coordinating papers in the Love To Learn 12×12 Collection Pack. I used acetate and 4-mm adhesive foam from our Back To Basics Shaker Basics along with our new KIS Slimline Cuts Stitched Squares die to create the shaker. I stamped a few images from the Collection Stamps, colored them with alcohol markers, and cut them with the Outline Dies. I filled the shaker with these die cuts and a variety of our Sprinkles. The finishing touch was adding a few blue and white enamel stars from the Stars & Stripes Enamel Stars along with a stamped sentiment that I fussy cut.

I cut the inside panel from 80# Solar White and embellished it with leftover pieces of the papers used on the front. I added some stars from the Die Cut Pieces along with a stamped sentiment, and layered the panel on CutCardStock Lessebo Misty Blue cardstock.

Keep It Simple products used:
Love To Learn 12×12 Collection Pack
Love To Learn Collection Stamps
Love To Learn Outline Dies
Love To Learn Die Cut Pieces
KIS Slimline Cuts Stitched Squares
Back To Basics Stars & Stripes Enamel Stars
Back To Basics Shaker Basics
Sprinkles – Beads-2mm Green Caviar Glass
Sprinkles – Beads-2mm Light Blue Caviar Glass
Sprinkles – Beads-2mm White Pearls
Sprinkles – Beads- 2mm Matte Red
Sprinkles – Beads-2mm Matte Green
Sprinkles – Polymer Clay-Yellow Dots
Sprinkles – Polymer Clay-Back To School Mix
Sprinkles – Polymer Clay-Baby Blue Hearts
Sprinkles – Polymer Clay-Grass Green Sprinkles
Sprinkles – Polymer Clay-Numbers

Affiliate links are used in this post at no cost to you – I really appreciate your support!

Other products used:
CARDSTOCK/PAPER: Neenah Classic Crest 110# and 80# Solar White cardstock, CutCardStock Lessebo Misty Blue and Pop Tone Black Licorice cardstock
INK: Memento Tuxedo Black ink; Spectrum Noir Tri-Blends- JG1/2/3/5, DR1/3/4, IG2/4/5, BT3/4/5, CT1/2/3
ACCESSORIES: Fiskars 12″ ProCision Rotary Bypass Paper Trimmer, Bearly Art precision craft glue, MISTI stamp tool, Big Shot, thin 1-mm foam adhesive squares, red liner tape

I hope you’ve loved seeing this project as much as I loved creating it and you’re inspired to get crafty! Be sure to check out ALL the fun goodies in the Keep It Simple online store! Save 10% on your entire order when you shop online using code LoveToScrap2 at checkout! There is no minimum purchase requirement and no usage limits, AND it combines with product, order, and shipping discounts! Is that cool, or what?! Be sure to Follow us on Facebook, Instagram, and Pinterest for lots of crafty inspiration! Thanks so much for stopping by today – we’ll see you next time!

Scrappy hugs,