Thinking of You Cardinal

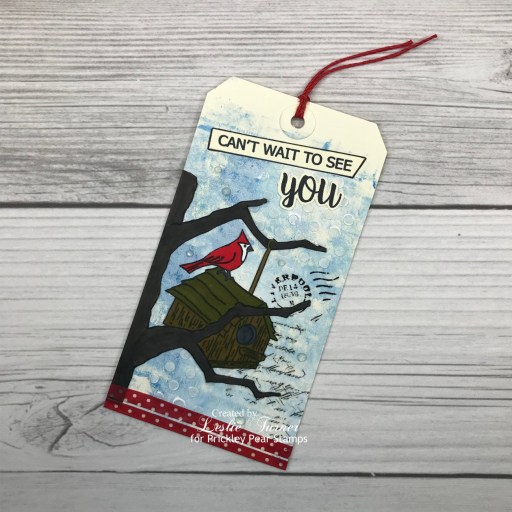
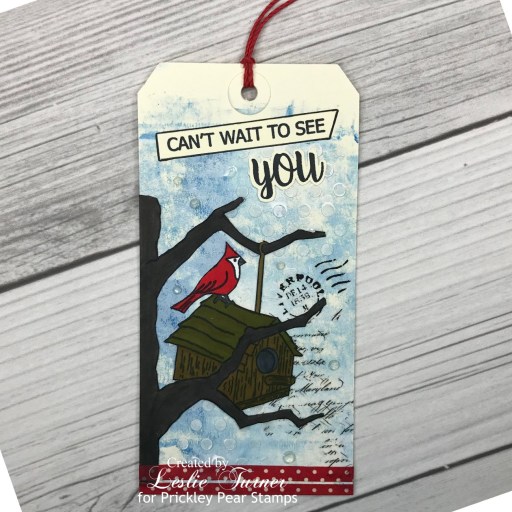
Hey everybody! It’s Hump Day and I hope you’re having a great week! I have another Prickley Pear Stamps sample to share with you this morning featuring the new All About You Cardinal stamp set! OMGoodness, I’m so in love with this stamp set! I absolutely love cardinals – there are a lot of people who believe that a loved one is watching over us if a cardinal appears, and that’s what I always think of when I see one. I have many loved ones in Heaven and I’m sure they’re watching over us until we see them again one day! <3

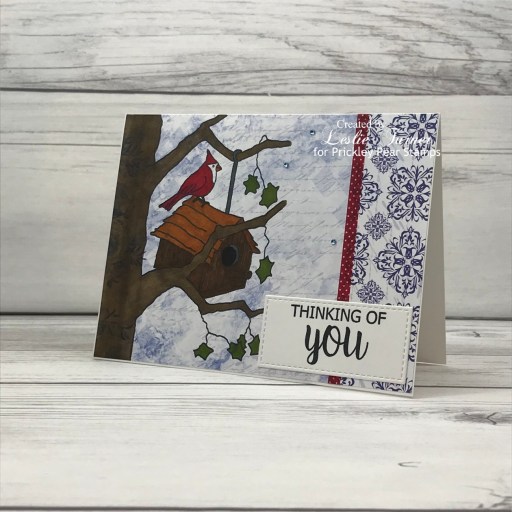
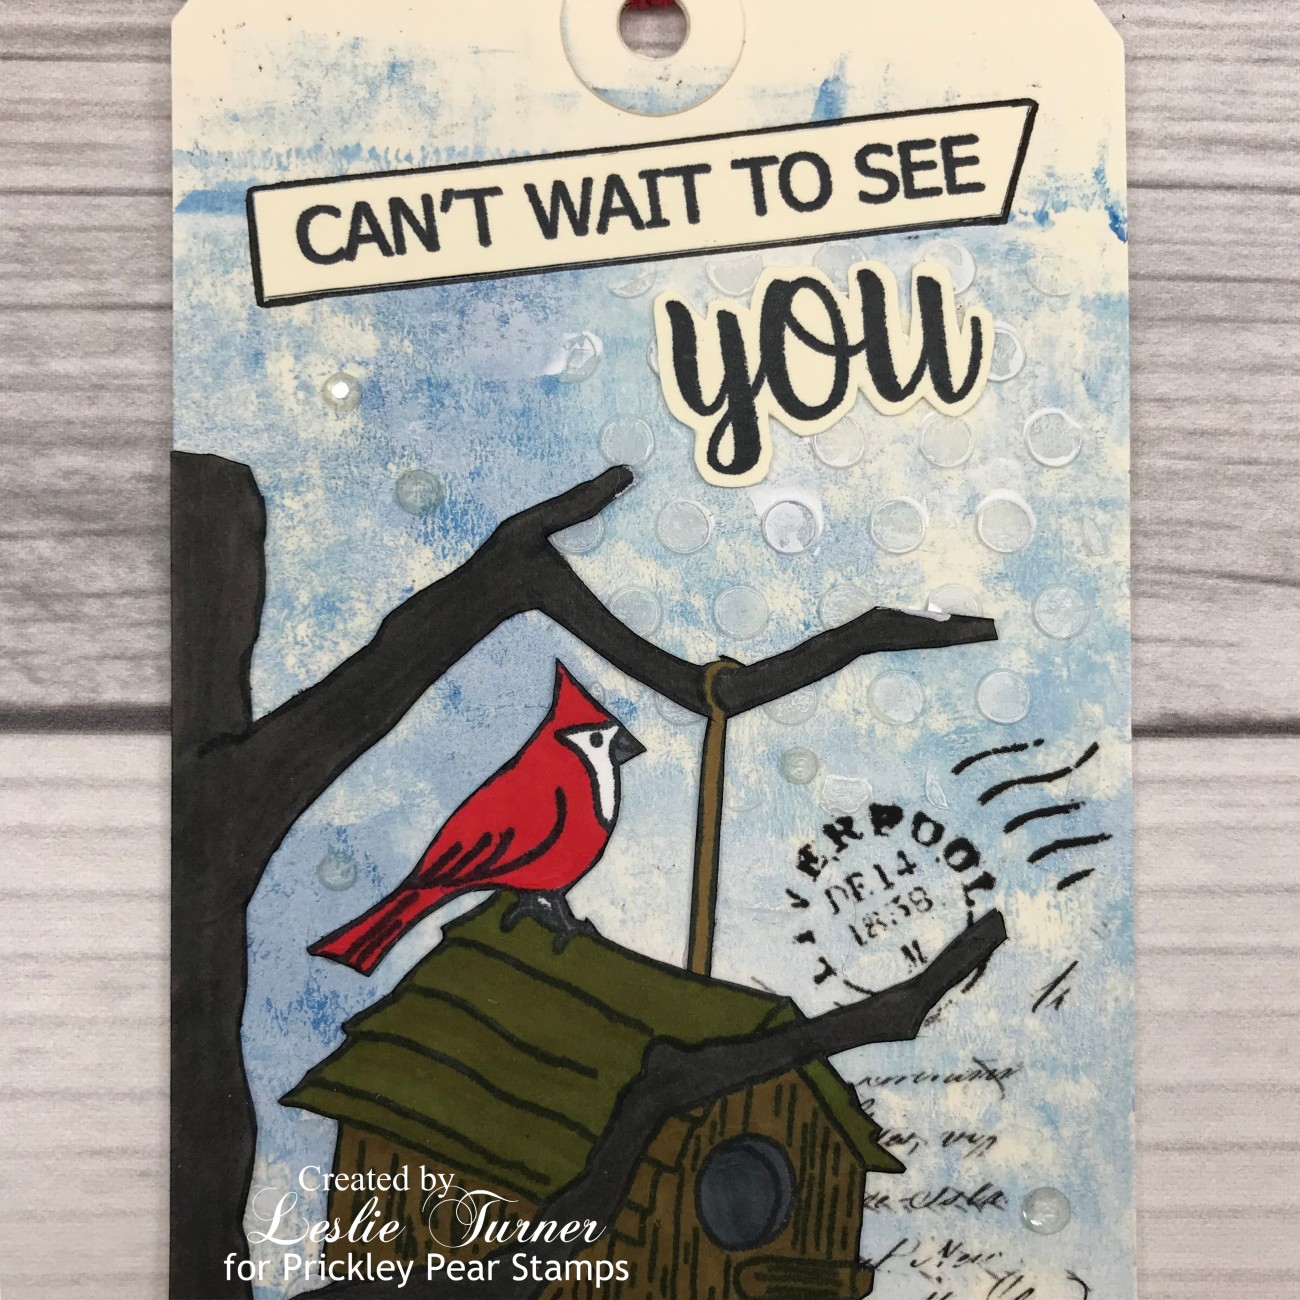
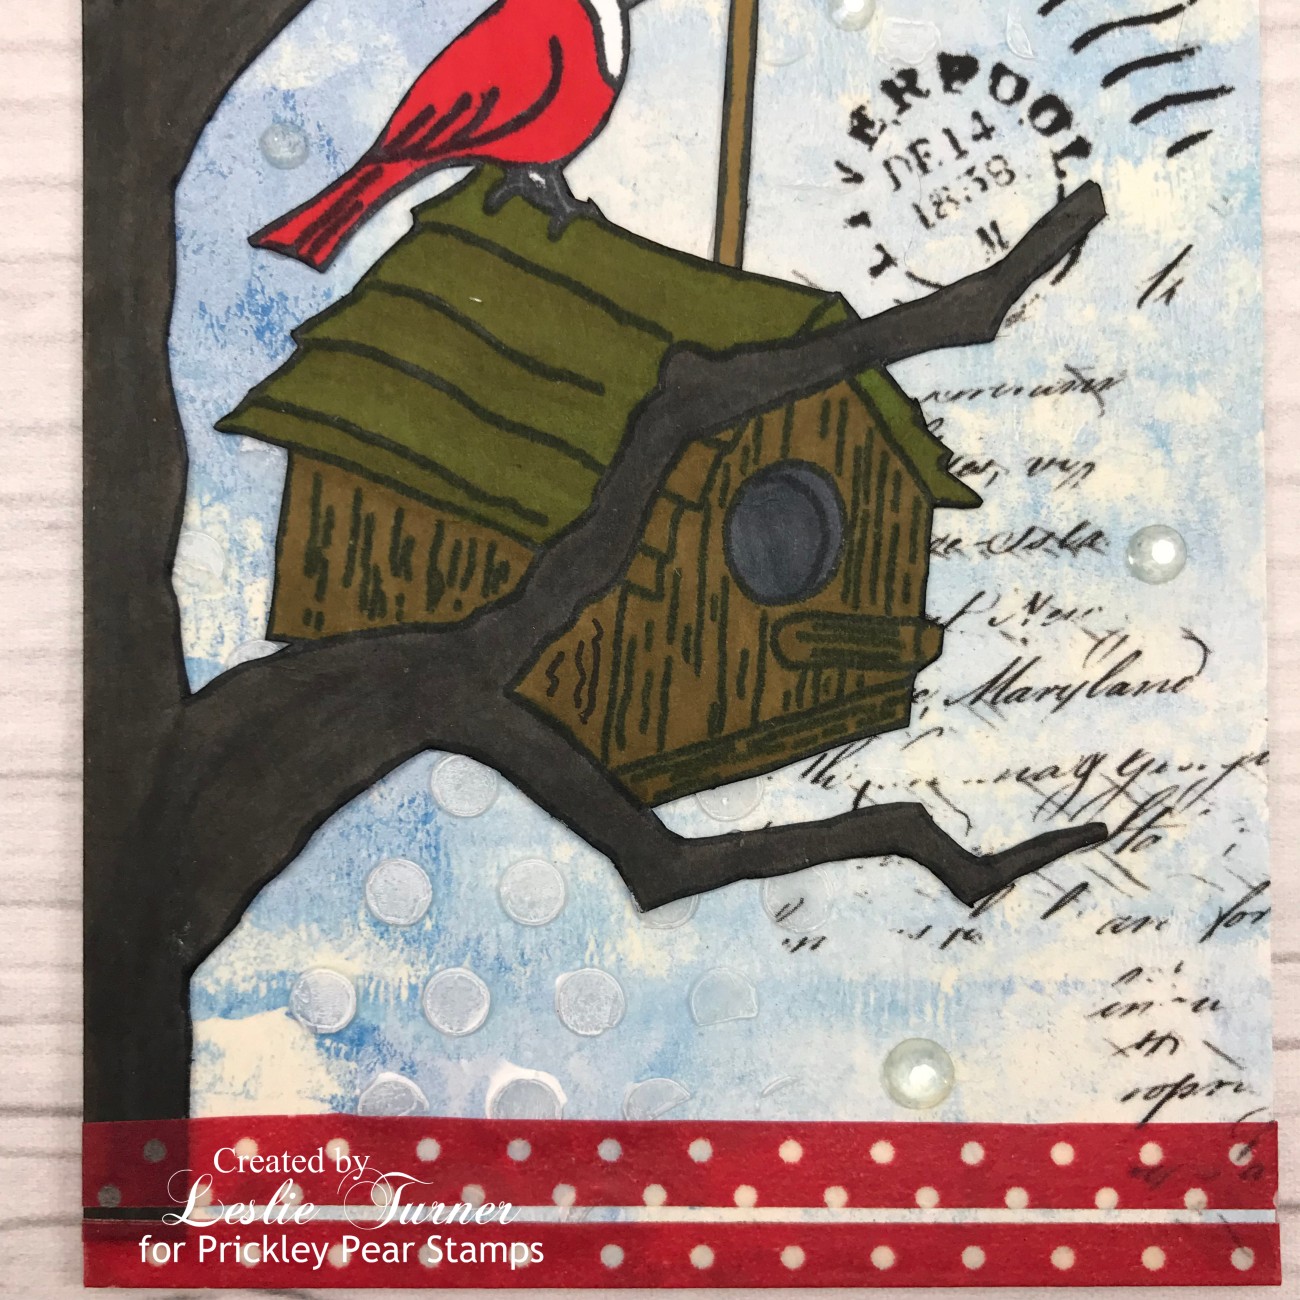
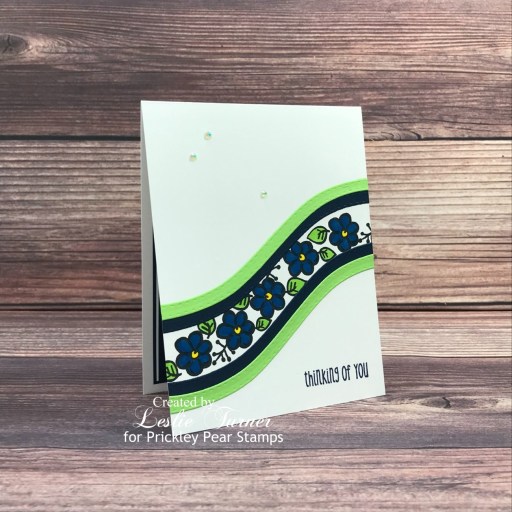
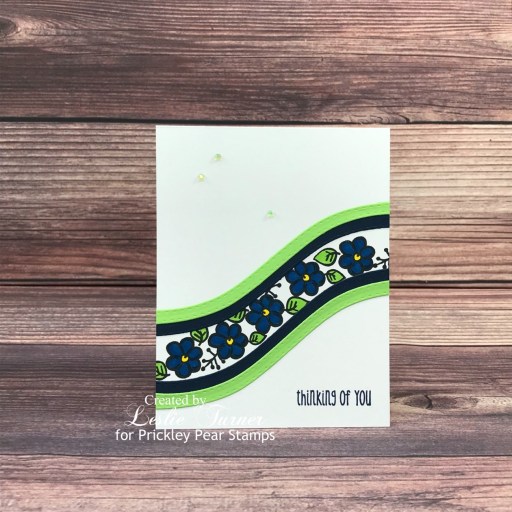
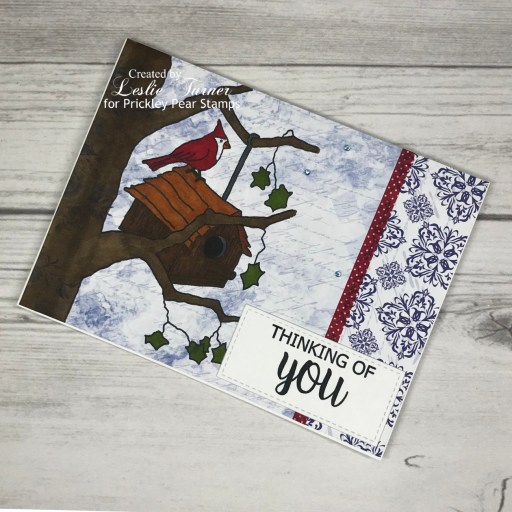
I cut a standard A2 size landscape top-folding card base from 110# Solar White cardstock along with two panels from Hot Off The Press Blue Persuasion patterned paper which I adhered together and applied a strip of skinny washi tape at the seam. I stamped the cardinal image directly on the patterned paper in Memento Tuxedo Black ink and colored it with alcohol markers, and then adhered the panel to the card base. I stamped the sentiment on a scrap piece of 80# Solar White cardstock and cut it with a My Favorite Things Stitched Rectangle STAX die. I adhered the sentiment to the bottom right corner and added a few tiny light blue gemstones which completed the front.

And another look… really happy with how this card turned out! Love, love, love this stamp set, and it’s so versatile with all the sentiments included!

Sharing in the following challenges:
1. A Perfect Time To Craft Open Challenge: #05-2022 – Anything Goes
2. A Place To Start: #052022 – Anything Goes w/ optional Lilies and Lace (no twist)
3. Classic Design Challenge: #5 May Anything Goes
4. Critter Crazy Challenge Blog: #62 – Anything Goes with a Featured Critter
5. Your Scrapbook Place: May Anything Goes

Affiliate links are used in this post at no cost to you – I really appreciate your support!

Prickley Pear Stamps products used:
All About You Cardinal stamp set

Other products used:
Cardstock/Paper: Neenah Classic Crest 110# and 80# Solar White cardstock, Hot Off The Press Blue Persuasion 6×6 Double-Sided Papers
Ink: Memento Tuxedo Black ink; Arteza alcohol markers- R21, YG22, YR00, BK00, NG04, BR41/42/52/82
Dies/Punches: My Favorite Things Stitched Rectangle STAX Die-namics
Accessories: We R Memory Keepers Large Guillotine Paper Trimmer, Bearly Art precision craft glue, MISTI stamp tool, Big Shot, Stampin’ Up Red and White Dotted Skinny Washi Tape, Darice light blue gemstones

I hope you’ve enjoyed this project! Be sure to check out all the awesome stamps and dies at Prickley Pear Stamps! If you’d like to save 10% on anything on the site when you shop at Prickley Pear Stamps, use the coupon code LESLIE10 at checkout! And be sure to ‘like’ and ‘follow’ the Prickley Pear Stamps Facebook page to keep up with news and sales, and join Prickley Pear Pals (the fan group) for lots of fun crafty ideas and to share your creativity! And finally, we’d love to see you visit the Prickley Pear Stamps blog that’s in the process of being revived and become a Follower! Hope to see you there! Thanks so much for stopping by today – we’ll see you next time! ;)

Scrappy hugs,

Can’t Wait To See You Tag

Hi friends! Happy Monday! Can’t believe how fast the time if flying by! I told the cashier at the grocery store this morning that half the year is almost over already and it just got started, lol! I have a Prickley Pear Stamps project to share with you today that I created to showcase the new All About You Cardinal stamp set – another beauty in the new release! This stamp set is absolutely gorgeous with so many possibilities! I created a simple mixed media tag featuring a paper-pieced image in the foreground (colored with Karin Brush Markers) along with acrylic inks applied with a brayer, stenciling with gel medium, more acrylic ink applied with the fingertip, and a 49 and Market curators Botanical Rub-On Transfer!

I started by stamping the cardinal image from the All About You Cardinal stamp set in Memento Tuxedo Black ink onto a piece of 165# Solar White cardstock (super heavyweight cardstock for dimension), colored it with Karin Brush Markers and fussy cut it, then ran a Memento Tuxedo Black marker around the outside edge for a more finished look. I set it aside while I worked on the tag. I applied Liquitex Cerulean Blue Hue and Titanium White acrylic paints with a brayer onto the front surface of a Tim Holtz Distress Tag. I created some background texture with a Memory Box Texture Mini Dots Designer Stencil and Golden Gel Medium. When that dried, I rubbed a tiny bit more Titanium White acrylic paint over the raised dots with my finger tip.

I applied a 49 and Market curators Botanical Rub-On Transfer and then adhered the cardinal image. I stamped the sentiment on Baronial Ivory cardstock in black ink, trimmed the first portion and outlined it with a black marker after adhering it to the tag. I fussy cut the remaining word and adhered it just below the first portion. I added a few Studio Katia Sparkling Crystals and a strip of Eyelet Outlet Red/White Dot Washi Tape cut in half lengthwise. I threaded some Hemptique Red Hemp Crafting Cord through the hole at the top to finish it off.

Sharing in the following challenges:
1. 613 Avenue Create: #202205 – May Anything Goes w/ optional Mother’s Day Slimline (no twist)
2. A Perfect Time To Craft Open Challenge: #05-2022 – Anything Goes
3. Classic Design Challenge: #5 May Anything Goes
4. Crafty Friends Challenge Blog: #155 – Animals/Birds
5. Crafting Happiness Challenges: #123 – Anything Goes Always
6. Jan’s Digi Stamps Challenge: May Anything Goes
7. Scrapping4fun Challenges: #212 – Anything Goes
8. Stamping Sensations: May Challenge – Anything Stamped w/ optional Floral and Fauna

Affiliate links are used in this post at no cost to you – I really appreciate your support!

Prickley Pear Stamps products used:
All About You Cardinal stamp set

Other products used:
Cardstock/Paper: Tim Holtz Distress Tags, Neenah Classic Crest 165# Solar White cardstock, Neenah Classic Baronial Ivory cardstock
Ink/Paint: Memento Tuxedo Black ink (pad and marker); Karin Brush Markers- Cocoa, Sandstone, Red, Neutral Grey 3, Olive Green and Apple; Liquitex Cerulean Blue Hue and Titanium White acrylic paints
Accessories: Brayer, MISTI stamp tool, Memory Box Texture Mini Dots Designer Stencil, Golden Gel Medium, 49 and Market Curators Botanical Rub-On Transfers, Bearly Art precision craft glue, Eyelet Outlet Red/White Dot Washi Tape, Studio Katia Sparkling Crystals, Hemptique Red Hemp Crafting Cord

I hope you’ve enjoyed this project! Be sure to check out all the awesome stamps and dies at Prickley Pear Stamps! If you’d like to save 10% on anything on the site when you shop at Prickley Pear Stamps, use the coupon code LESLIE10 at checkout! And be sure to ‘like’ and ‘follow’ the Prickley Pear Stamps Facebook page to keep up with news and sales, and join Prickley Pear Pals (the fan group) for lots of fun crafty ideas and to share your creativity! And finally, we’d love to see you visit the Prickley Pear Stamps blog that’s in the process of being revived and become a Follower! Hope to see you there! Thanks so much for stopping by today – we’ll see you next time! ;)

Scrappy hugs,

Lavender

Hi friends! Happy Happy Friday! I hope your weather is wonderful and you have something fun planned this weekend! It IS Spring after all, and even though we did get a tad more snow last week (a weird random thing Mother Nature threw at us), our temps have been rising over the past few weeks and we’ve opened our windows several times to bring in the beautiful fresh air. We woke up to 41 degrees this morning and it’ll probably reach the low to mid 70s today! Update: It only reached 55 today with wind and rain! That’s okay, though, because we really need the moisture. I have a pretty card to share with you today that I created for Prickley Pear Stamps using their new Sketched Florals Lavender stamp set! OMGoodness, this stamp set is so pretty and what a delight it is to color… it only took two alcohol markers and a Pitt Artist pen!

I cut a standard A2 size top-folding card base from 110# Solar White cardstock along with slightly narrower layering panels from Gold Foil cardstock and 80# Basis White cardstock. I stamped the Lavender image in black ink directly on the card base and again on the white cardstock panel. I colored four of the outermost flower spikes on the card base and the entire image on the white cardstock panel. I adhered the colored image to the gold foil panel and then to the card base lining up the flower spikes. I stamped the sentiment in black ink on a white cardstock scrap, trimmed it and adhered it across the bottom. The finishing touch was adding several gold drip drops. The owner has requested that we no longer finish the insides of our Prickley Pear Stamps samples, which feels weird to me but is a huge time-saver, so going forward I’ll be short one photo in my posts. ;)

And one more peek… I absolutely love how this one turned out! Such a gorgeous stamp set! And it does have a coordinating die which I don’t have (yet)!

Affiliate links are used in this post at no cost to you – I really appreciate your support!

Prickley Pear Stamps products used:
Sketched Florals Lavender stamp set

Other products used:
Cardstock/Paper: Neenah Classic Crest 110# Solar White cardstock, CutCardStock Basis 80# White cardstock, CutCardStock Bright Foil Gold cardstock
Ink: Memento Tuxedo Black ink; Arteza alcohol markers- P01/05; Faber-Castell May Green fine point Pitt Artist pen
Accessories: We R Memory Keepers Large Guillotine Paper Trimmer, Bearly Art precision craft glue, MISTI stamp tool, Taylored Expressions Gold Drip Drops

I hope you’ve enjoyed this project! Be sure to check out all the awesome stamps and dies at Prickley Pear Stamps! If you’d like to save 10% on anything on the site when you shop at Prickley Pear Stamps, use the coupon code LESLIE10 at checkout! And be sure to ‘like’ and ‘follow’ the Prickley Pear Stamps Facebook page to keep up with news and sales, and join Prickley Pear Pals (the fan group) for lots of fun crafty ideas and to share your creativity! And finally, we’d love to see you visit the Prickley Pear Stamps blog that’s in the process of being revived and become a Follower! Hope to see you there! Thanks so much for stopping by today – we’ll see you next time! ;)

Scrappy hugs,

Merry Christmas mini slimline

Hi friends! We’ve reached another Hump Day and the weeks are just buzzing by! I’ve popped in this morning with one final card sample created for Prickley Pear Stamps, and this one catches me completely up! For now, lol! I’m working behind the scenes on more samples which I’ll be sharing later. ;) This Merry Christmas mini slimline features one of the curvy stamps from the Scalloped Borders Fall stamp set that I used a repetitive fashion, leaving a slight break in the stamping for the sentiment.

I cut a mini slimline card base from 110# Solar White cardstock along with layering panels from CutCardStock Stardream Metallic Jupiter cardstock and 80# Solar White cardstock using the Waffle Flower Mini Slimline Layers die set. I stamped the bow and mistletoe from the Scalloped Borders Fall stamp set five times down the length of the white cardstock panel and colored the images with alcohol markers with Glossy Accents added to the berries. I stamped the sentiment (from the same stamp set) in Catherine Pooler Spruce ink and layered the panels together and then to the card base.

I cut the inside panel from 80# Solar White cardstock, again using the using the Waffle Flower Mini Slimline Layers die set, and embellished it with a single strip of CutCardStock Pop-Tone Jellybean Green cardstock. I stamped the sentiment from the Christmas Holiday Gift Tags stamp set in Catherine Pooler Spruce ink and layered the panel on the Metallic Jupiter cardstock.

And one more peek… this was a fun card to create. Repetitive stamping is challenging but yields a cool effect. I’m such a rebel… I never measure anything – I just eyeball it – and I think this turned out pretty well!

Affiliate links are used in this post at no cost to you – I really appreciate your support! 

Prickley Pear Stamps products used:
Scalloped Borders Fall stamp set
Christmas Holiday Gift Tags stamp set

Other products used:
Cardstock/Paper: Neenah Classic Crest 110# and 80# Solar White cardstock, CutCardStock Stardream Metallic Jupiter cardstock, CutCardStock Pop-Tone Jellybean Green cardstock
Ink: Catherine Pooler Midnight and Spruce inks; Arteza alcohol markers- YG02, R21
Dies/Punches: Waffle Flower Mini Slimline Layers die set
Accessories: Tonic Studios 12″ Guillotine Paper Trimmer, Bearly Art precision craft glue, MISTI stamp tool, Big Shot, Ranger Glossy Accents

I hope you’ve enjoyed this project! Be sure to check out all the awesome stamps and dies at Prickley Pear Stamps! If you’d like to save 10% on anything on the site when you shop at Prickley Pear Stamps, use the coupon code LESLIE10 at checkout! And be sure to ‘like’ and ‘follow’ the Prickley Pear Stamps Facebook page to keep up with news and sales, and join Prickley Pear Pals (the fan group) for lots of fun crafty ideas and to share your creativity! And finally, we’d love to see you visit the Prickley Pear Stamps blog that’s in the process of being revived and become a Follower! Hope to see you there! Thanks so much for stopping by today – we’ll see you next time! ;)

Scrappy hugs,

Happy Thanksgiving mini slimline

4/17/22 Rising Star at A Place To Start!

Hey everybody! How the heck are you?! Hopefully you’re having an awesome weekend! I have a card to share with you this morning that I created for Prickley Pear Stamps featuring our Scalloped Borders Fall stamp set along with the Stitched Scallop Border die set. LOVE these stamps and dies! And you know me… I am not a seasonal crafter – my mind is all over the place when I’m in my studio and I create whatever pops into my head. That was the case with this Thanksgiving card – I know it’s not Fall but I don’t care, lol!

I cut a mini slimline card base from Neenah Classic Crest Baronial Ivory cardstock along with layering panels from CutCardStock Basis Dark Orange cardstock, Stamp Anniething Autumn Life patterned paper, and the Baronial Ivory using the using the Waffle Flower Mini Slimline Layers die set. I adhered the dark orange panel to the card base and then stamped the leaf pattern from the Scalloped Borders Fall stamp set on the patterned paper panel and heat embossed it in copper. I colored the leaves with an alcohol marker and adhered the panel on top of the dark orange panel. I then cut away a portion of the ivory panel with one of the dies in the Stitched Scallop Border die set and popped the top piece up on craft foam on top of the patterned paper panel. I stamped the sentiment (from the same stamp set) in Memento Peanut Brittle ink and popped that piece up on craft foam as well.

I cut the inside panel from Baronial Ivory, again using the using the Waffle Flower Mini Slimline Layers die set, and embellished it with strips of the Stamp Anniething patterned paper and CutCardStock Dark Orange cardstock used on the front. I stamped the sentiment in Memento Peanut Brittle ink and layered the panel on the dark orange cardstock.

And one more look… really loving how this turned out! Such gorgeous stamps and dies! Love, love, love!

Sharing in the following challenges:
1. 613 Avenue Create: #202204 – Anything Goes w/ optional April Showers (no twist)
2. A Perfect Time To Craft Open Challenge: #4-2022 – Anything Goes
3. A Place To Start: #042022 – Anything Goes w/ optional Key It Simple (no twist)
4. Ally’s Angels: #57 – Anything Goes
5. Classic Design Challenge: April #4 – Anything Goes
6. Crafting Happiness Challenges: #122 – Anything Goes Always
7. Crafty Catz: #590 – Anything Goes
8. Jan’s Digi Stamps Challenges: April 2022 – Always Anything Goes
9. Paperbabe Stamps: #165 – Anything Goes

Affiliate links are used in this post at no cost to you – I really appreciate your support! 

Prickley Pear Stamps products used:
Scalloped Borders Fall stamp set
Stitched Scallop Border die set

Other products used:
Cardstock/Paper: Neenah Classic Crest Baronial Ivory cardstock, CutCardStock Basis Dark Orange cardstock, Stamp Anniething Autumn Life 6×6 double-sided papers
Ink: Versamark, Arteza BR41 alcohol marker, Memento Peanut Brittle ink
Dies/Punches: Waffle Flower Mini Slimline Layers die set
Accessories: Tonic Studios 12″ Guillotine Paper Trimmer, SweetStamps copper fine detail embossing powder, Bearly Art precision craft glue, MISTI stamp tool, Big Shot, dark orange craft foam

I hope you’ve enjoyed this project! Be sure to check out all the awesome stamps and dies at Prickley Pear Stamps! If you’d like to save 10% on anything on the site when you shop at Prickley Pear Stamps, use the coupon code LESLIE10 at checkout! And be sure to ‘like’ and ‘follow’ the Prickley Pear Stamps Facebook page to keep up with news and sales, and join Prickley Pear Pals (the fan group) for lots of fun crafty ideas and to share your creativity! And finally, we’d love to see you visit the Prickley Pear Stamps blog that’s in the process of being revived and become a Follower! Hope to see you there! Thanks so much for stopping by today – we’ll see you next time! ;)

Scrappy hugs,

Thinking of You

Hi friends! I hope you’re having a wonderful weekend and either relaxing or doing something fun – whichever suits! To those who have jumped on the affiliate links train – I’ve been told that the FTC is issuing fines to people who are not properly disclosing affiliate links, so it probably would be a good idea to tell your readers that your blog posts contain affiliate links before you list the affiliate links in your posts. I’ve been doing this all along, but have decided that it shouldn’t be one of the first things people see when they read my posts, so I’ve moved it to the bottom of my posts going forward. Cleaner posts with less work = happier me, LOL!

I have a pretty CAS get well card to share this morning that I created for Prickley Pear Stamps which features the Flourish Border stamp set and Stitched Scallop Border die set. These stamp sets are so much fun with those little curves that really add some sassy pizzazz to this card! And I’m so in love with that sentiment font!

I cut a standard A2 size top-folding card base from 110# Solar White cardstock along with two narrow curved borders each from CutCardStock Basis Light Lime and CutCardStock Royal Sundance Linen Midnight Blue cardstock using the Stitched Scallop Border die set. I stamped a curved row of flowers from the Flourish Border stamp set in Catherine Pooler Midnight ink on a scrap piece of 80# Solar White cardstock, cut it with dies from the Stitched Scallop Border die set, and colored it with Karin Brushmarkers.

I adhered the stamped border and the narrow curved borders to the bottom front of the card base and stamped the sentiment (from the same stamp set) in Catherine Pooler Juniper ink. The finishing touch was adding gemstones from the Trinity Stamps Andradite Sparkle Embellishment Mix using the Trinity Pick Up Stick.

I cut the inside panel from 80# Solar White cardstock and embellished it with strips cut from CutCardStock Royal Sundance Linen Midnight Blue and CutCardStock Basis Light Lime cardstock. I stamped the sentiment in Catherine Pooler Juniper ink and layered the panel on the midnight blue cardstock.

And one more look… love how this card turned out! This is a great stamp set to use for creating cards for a variety of occasions. These flowers – and the sentiment font – just make me happy!

Sharing in the following challenges:
1. A Perfect Time To Craft Open Challenge Blog: #4-April 2022
2. Classic Design Challenge: April #4
3. Crafting Happiness Challenges: #122 – Anything Goes Always

Affiliate links are used in this post at no cost to you – I really appreciate your support! 

Prickley Pear Stamps products used:
Flourish Border stamp set
Stitched Scallop Border die set

Other products used:
Cardstock/Paper: Neenah Classic Crest 110# and 80# Solar White cardstock, CutCardStock Basis Light Lime cardstock, CutCardStock Royal Sundance Linen Midnight Blue cardstock
Ink: Catherine Pooler Midnight and Juniper Mist inks; Karin Brushmarkers- Sapphire blue, Apple, Canary
Accessories: Tonic Studios 12″ Guillotine Paper Trimmer, Bearly Art precision craft glue, MISTI stamp tool, Big Shot, Trinity Stamps Andradite Sparkle Embellishment Mix, Trinity Pick Up Stick

I hope you’ve enjoyed this project! Be sure to check out all the awesome stamps and dies at Prickley Pear Stamps! If you’d like to save 10% on anything on the site when you shop at Prickley Pear Stamps, use the coupon code LESLIE10 at checkout! And be sure to ‘like’ and ‘follow’ the Prickley Pear Stamps Facebook page to keep up with news and sales, and join Prickley Pear Pals (the fan group) for lots of fun crafty ideas and to share your creativity! And finally, we’d love to see you visit the Prickley Pear Stamps blog that’s in the process of being revived and become a Follower! Hope to see you there! Thanks so much for stopping by today – we’ll see you next time! ;)

Scrappy hugs,

Celebrating You!

Hey everybody! Happy Tuesday – I hope your week is going well! Now that Spring is here, we are getting snowed on one last time! It started raining several hours ago which turned into snow. I need to get cat food and pick up a prescription today so I hope it doesn’t last long. Affiliate links are used in this post at no cost to you – I really appreciate your support! I’ve popped in to share a cute bi-level birthday card I created for Prickley Pear Stamps. I had the best time playing with the Flourish Border stamp set and coordinating Stitched Scallop Border die set. And you know me and pretty colors… I just couldn’t resist coloring these candles to coordinate with the striped patterned paper!

I cut a standard A2 size top-folding card base from Neenah Classic Crest Solar White 110# cardstock along with additional panels from Neenah Classic Crest 80# Solar White cardstock and The Paper Studio Four Seasons and Everything In Between -2- paper pad. Using dies from the Stitched Scallop Border die set, I cut off a diagonal portion of the front panel of the card base and the additional white cardstock panel to be used on the inside. I adhered the striped patterned paper to the inside of the card base and rounded the bottom right corner. Using the same die set, I cut a border element for the front of the card base from CutCardStock Stardream Metallic Lagoon cardstock. I stamped the candles and sentiment from the Flourish Border stamp set in black ink, colored the candles with alcohol markers and added detail with a Posca white paint pen. I colored the candle flames with a Sakura Clear Star Gelly Roll pen, and finished the front with gemstones from the Trinity Stamps Andradite Sparkle, Brilliant Citrine, Topaz Twinkle, Morganite Muse, Amethyst Accent and Aquamarine Ripple Embellishment Mixes applied with the Trinity Pick Up Stick.

I adhered the diagonally-cut white cardstock panel to the inside of the card base and stamped a sentiment from the Play Day on the Beach stamp set in black ink.

And one more look… I sure love how this turned out! These colors are awesome! This card was a booger to photograph – the front flap wouldn’t stay down and I had to lay my heavy metal pokey tool down on one side!

Sharing in the following challenges:
1. Crafty Catz: #588 – Anything Goes w/ optional Easter
2. Paperbabe Stamps: #164 – Anything Goes
3. The Corrosive Challenges: #3 March 2022 – Anything Goes
4. Through The Craft Room Door: March 29th Anything Goes

Prickley Pear Stamps products used:
Flourish Border stamp set
Stitched Scallop Border die set
Play Day on the Beach stamp set

Other products used:
Cardstock/Paper: Neenah Classic Crest 110# and 80# Solar White cardstock, CutCardStock Stardream Metallic Lagoon cardstock, The Paper Studio Four Seasons and Everything In Between -2- paper pad
Ink: Catherine Pooler Midnight ink; Arteza alcohol markers- Y02/36, P13, YR04, YG06, RP15, BG37/45; Posca white paint pen, Sakura Clear Star Gelly Roll pen
Dies/Punches: Kadomaru Pro corner rounder
Accessories: Tonic Studios 12″ Guillotine Paper Trimmer; Bearly Art precision craft glue, MISTI stamp tool, Big Shot, Trinity Stamps Andradite Sparkle, Brilliant Citrine, Topaz Twinkle, Morganite Muse, Amethyst Accent and Aquamarine Ripple Embellishment Mixes; Trinity Pick Up Stick

I hope you’ve enjoyed this project! Be sure to check out all the awesome stamps and dies at Prickley Pear Stamps! If you’d like to save 10% on anything on the site when you shop at Prickley Pear Stamps, use the coupon code LESLIE10 at checkout! And be sure to ‘like’ and ‘follow’ the Prickley Pear Stamps Facebook page to keep up with news and sales, and join Prickley Pear Pals (the fan group) for lots of fun crafty ideas and to share your creativity! And finally, we’d love to see you visit the Prickley Pear Stamps blog that’s in the process of being revived and become a Follower! Hope to see you there! Thanks so much for stopping by today – we’ll see you next time! ;)

Scrappy hugs,

RIP

Howdy, peeps! Happy St. Patty’s Day to ya! The weekend is almost here and I hope you have something fun planned! Our weather is starting to warm up and it’s just beautiful outdoors! Affiliate links are used in this post at no cost to you – I really appreciate your support! I’m back this morning to share another sample I created a while back for Prickley Pear Stamps – a fun Halloween card with a coffin that opens up to reveal shaker elements and die cut bones inside! Bahahaha… I had THE best time creating this! This card features our Dancing Skeleton stamp set and coordinating Dancing Skeleton die set along with the inside sentiment from our Bats 2 stamp set.

I cut a standard A2 size side-folding card base from CutCardStock Basis Light Brown cardstock along with a wood-look layering panel from My Mind’s Eye Howdy Doody paper pad which I adhered to the card base. I added a light brown cardstock strip down the left side of the card front that I embellished with a strip of Eyelet Outlet gold film strip washi tape and clear bling colored with a brown alcohol marker. Using the Dancing Skeleton stamp set, a piece of acetate, and several double-sided adhesive foam strips, I created a 3-D coffin shaker which I embellished with some paper flowers. I stamped the RIP sentiment (from the same stamp set) in the lower right corner prior to adhering the coffin to the front of the card.

Here’s a shot of the open coffin revealing bones die cut from Neenah Classic Crest Baronial Ivory cardstock using the Dancing Skeleton die set. The shaker filler consists of spider confetti from stash, Pretty Pink Posh Silver Shimmer Seed Beads, Spiegelmom Scraps Snowy Fields Sequin Mix, and Doodlebug Design Orange Sequins. I added homemade hinges and a small magnet closure.

I cut the inside panel from Neenah Classic Crest Baronial Ivory cardstock and embellished it with a strip of the wood-look paper used on the front as well as a narrow strip of CutCardStock Basis Light Brown cardstock. I stamped a sentiment from the Bats 2 stamp set in Memento Rich Cocoa ink and layered the panel on light brown cardstock.

And one more look… so so so happy with how this turned out! These stamp sets (and dies) are amazing and create some of the most fun cards!

Sharing in the following challenges:
1. A Perfect Time To Craft: #3-2022 – Anything Goes
2. Classic Design Challenge: March #3 – Anything Goes
3. Crafting Happiness Challenges: #121 – Anything Goes Always
4. Paperbabe Stamps: #163 – Anything Goes
5. QKR Stampede: #440 – Anything Goes
6. The Creative Crafters: #50 – Anything Goes
7. Through The Craft Room Door: March Anything Goes
8. World Wide Open Design Team Monthly Challenge: #03 March – Anything Goes

Prickley Pear Stamps products used:
Dancing Skeleton stamp set
Dancing Skeleton die set
Bats 2 stamp set

Other products used:
Cardstock/Paper: CutCardStock Basis Light Brown cardstock, Neenah Classic Crest Baronial Ivory cardstock, My Mind’s Eye Howdy Doody 6×6 designer paper pad
Ink: Memento Rich Cocoa ink (pad and marker); Nuvo alcohol marker- 465-Natural Browns
Accessories: Tonic Studios 12″ Guillotine Paper Trimmer, MISTI stamp tool, Bearly Art precision craft glue, Grafix Crystal Clear Craft Plastic, spider confetti from stash, Pretty Pink Posh Silver Shimmer Seed Beads, Spiegelmom Scraps Snowy Fields Sequin Mix, Doodlebug Design Orange Sequins, Darice Double-Sided Adhesive Foam Strips, Eyelet Outlet Gold Film Strip washi tape, Eyelet Outlet clear bling

I hope you’ve enjoyed this project! Be sure to check out all the awesome stamps and dies at Prickley Pear Stamps! If you’d like to save 10% on anything on the site when you shop at Prickley Pear Stamps, use the coupon code LESLIE10 at checkout! And be sure to ‘like’ and ‘follow’ the Prickley Pear Stamps Facebook page to keep up with news and sales, and join Prickley Pear Pals (the fan group) for lots of fun crafty ideas and to share your creativity! And finally, we’d love to see you visit the Prickley Pear Stamps blog that’s in the process of being revived and become a Follower! Hope to see you there! Thanks so much for stopping by today – we’ll see you next time! ;)

Scrappy hugs,

Praying For You

Hey, everybody! Can you believe we’re headed into the middle of March already?! Whoosh… won’t be long before another month is on the books! Affiliate links are used in this post at no cost to you – I really appreciate your support! I’ve popped in this morning to share another sample I created for Prickley Pear Stamps with one of THE most adorable stamp sets ever! This card is a standing triple panel card and features our Praying For You stamp set which I paper-pieced using some sweet coordinating patterned papers from Lawn Fawn. I think I have made one card previously with this fold – and it was a number of years ago – so I thought it was time to bring it back around.

I cut the card base from Neenah Classic Crest Solar White 80# cardstock along with layering panels and embellishing strips from an assortment of pink cardstock (two shades I forgot to write down, lol) and patterned papers from the Lawn Fawn Spring Fling 6×6 paper pack, and rounded the corners of most of the pieces. I stamped the focal image on a Solar White cardstock panel and colored part of it with alcohol markers and a metallic gold pen. Using scraps from the same paper pack, I paper-pieced the rest of the image and then assembled the card. I added pink enamel dots to complete the card front.

Here is a close-up of the paper-piecing.

And a couple angled shots so you can see the cool but simple construction.

And one final shot of the back. I left the panel blank to write a custom message and sign. And a cool feature is that the card folds flat for mailing! This was a fun one!

Sharing in the following challenges:
1. A Perfect Time To Craft: #3-2022 – Anything Goes
2. Ally’s Angels: #56 – Anything Goes
3. Classic Design Challenge: March #3 – Anything Goes
4. Crafting Happiness Challenges: #121 – Anything Goes Always
5. Paperbabe Stamps: #163 – Anything Goes
6. Your Scrapbook Place: March Anything Goes

Prickley Pear Stamps products used:
Praying For You stamp set

Other products used:
Cardstock/Paper: Neenah Classic Crest 80# Solar White cardstock, two shades of pink cardstock I forgot to write down (darn it!), Lawn Fawn Spring Fling 6×6 paper pack
Ink: Memento Tuxedo Black ink; Nuvo alcohol markers- 379-Rich Reds Collection, 393-Fragrant Oranges Collection, 405-Sunshine Yellow Collection, 420-Organic Greens Collection, 461-Natural Browns, 476-Ombre Collection, 497-Pebble Beach Collection; Pentel Slicci Gold pen
Dies/Punches: Kadomaru Pro corner rounder
Accessories: Tonic Studios 12″ Guillotine Paper Trimmer, MISTI stamp tool, Bearly Art precision craft glue, Eyelet Outlet Pink Enamel Dots

I hope you’ve enjoyed this project! Be sure to check out all the awesome stamps and dies at Prickley Pear Stamps! If you’d like to save 10% on anything on the site when you shop at Prickley Pear Stamps, use the coupon code LESLIE10 at checkout! And be sure to ‘like’ and ‘follow’ the Prickley Pear Stamps Facebook page to keep up with news and sales, and join Prickley Pear Pals (the fan group) for lots of fun crafty ideas and to share your creativity! And finally, we’d love to see you visit the Prickley Pear Stamps blog that’s in the process of being revived and become a Follower! Hope to see you there! Thanks so much for stopping by today – we’ll see you next time! ;)

Scrappy hugs,

Lilac Flowers 4-Panel Fold

Hi friends! Happy Friday… is your week flying by as quickly as mine is?! Dang! ;) Affiliate links are used in this post at no cost to you – I really appreciate your support! I’m back on this fine chilly morning to share a card I created last summer for Prickley Pear Stamps. This fun fold is called a 4-panel fold and features our Sketched Florals Lilac stamp set along with sentiments from our Flowers For Beautiful You stamp set and some paper-piecing! ;) Despite it’s complex look, though, it was really quite simple.

I cut the card base pieces from CutCardStock Basis Dark Purple cardstock along with layering panels from CutCardStock Stardream Metallic Amethyst cardstock, CutCardStock Pop-Tone Grapesicle cardstock, Neenah Classic Crest Solar White cardstock, and plaid patterned paper from the Recollections Bold Basics paper pad. I also die cut two rectangles using a Cottage Cutz Double-Stitched Rectangle die on which I stamped sentiments. I stamped the lilacs image on the three white cardstock panels and on one of the die cut rectangles. I stamped it several more times on scrap pieces of Solar White cardstock which I colored with alcohol markers, a Heather Spectrum Aqua marker, and a Faber Castell May Green Pitt Artist Pen. I fussy cut the images and paper-pieced them onto the three white cardstock panels and the one die cut rectangle. I layered all the panels together and adhered them to the card base. I then added Nuvo English Mustard Crystal Drops to the centers of all the lilac flowers and added a few gemstones from the Trinity Stamps Amethyst Accent Embellishment Mix to the backgrounds.

Here are a couple additional shots.

And one more look… such a fun fold created with beautiful stamps! I’ve had this handwritten tutorial in my arsenal for many years and it’s hard to believe I hadn’t made one before last summer!

Sharing in the following challenges:
1. A Perfect Time To Craft: #3-2022 – Anything Goes
2. Ally’s Angels: #56 – Anything Goes
3. Classic Design Challenge: March #3 – Anything Goes
4. Crafting Happiness Challenges: #121 – Anything Goes Always
5. Crafty Gals Corner: #229 – Add A Flower
6. Paperbabe Stamps: #163 – Anything Goes
7. Stamping Sensations: March Challenge – Stamp Something For Spring
8. Wednesday’s Creative Inspirations Challenge Blog: Spring Flowers

Prickley Pear Stamps products used:
Sketched Florals Lilac stamp set
Flowers For Beautiful You stamp set

Other products used:
Cardstock/Paper: Neenah Classic Crest 80# Solar White cardstock, CutCardStock Basis Dark Purple cardstock, CutCardStock Stardream Metallic Amethyst cardstock, CutCardStock Pop-Tone Grapesicle cardstock, Recollections Bold Basics paper pad
Ink: Memento Tuxedo Black ink; Nuvo alcohol markers- 409/420-Organic Greens Collection, 439-Royal Purples Collection; Heather Spectrum Aqua marker, Faber Castell May Green Pitt Artist Pen
Dies/Punches: Cottage Cutz Double-Stitched Rectangle dies
Accessories: Tonic Studios 12″ Guillotine Paper Trimmer, MISTI stamp tool, Big Shot, Trinity Stamps Amethyst Accent Embellishment Mix, Nuvo English Mustard Crystal Drops

I hope you’ve enjoyed this project! Be sure to check out all the awesome stamps and dies at Prickley Pear Stamps! If you’d like to save 10% on anything on the site when you shop at Prickley Pear Stamps, use the coupon code LESLIE10 at checkout! And be sure to ‘like’ and ‘follow’ the Prickley Pear Stamps Facebook page to keep up with news and sales, and join Prickley Pear Pals (the fan group) for lots of fun crafty ideas and to share your creativity! And finally, we’d love to see you visit the Prickley Pear Stamps blog that’s in the process of being revived and become a Follower! Hope to see you there! Thanks so much for stopping by today – we’ll see you next time! ;)

Scrappy hugs,