you are the sweetest.

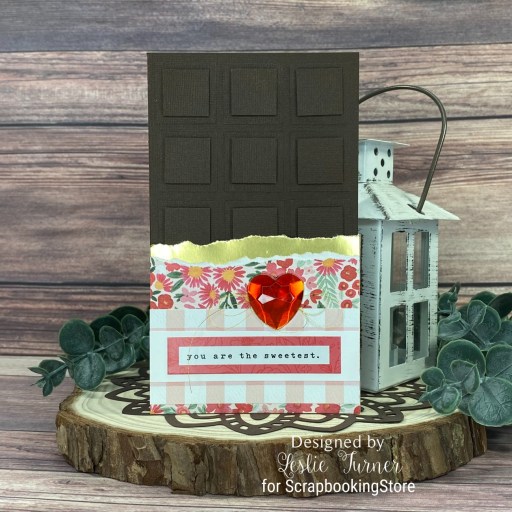
Hi everyone! Well, another week has passed us by and we’re on the down-slide to the end of February already! I’m delighted to be back to share another ScrapbookingStore DT inspiration project with you today, created with the February 2023 Scrapbook Kit with Upgrades! February is the month of love so I made another one of my favorite cards – a chocolate bar card! Who doesn’t love chocolate?! This card was featured in a Splitcoast Stampers newsletter a while back HERE so I made one for my daughter-in-law’s birthday and thought it only fitting to make another one for Valentine’s Day!

I cut a 3-1/2″ x 6″ mini slimline card base from CutCardStock Vanilla Bean Brown cardstock along with layering panels from coordinating patterned papers in the kit and some torn CutCardStock Bright Gold Foil cardstock. I added a sentiment from the sticker sheet and a large red heart gemstone from the upgrades with some looped Coats & Clark Metallic Gold sewing thread behind it, which completed the card front.

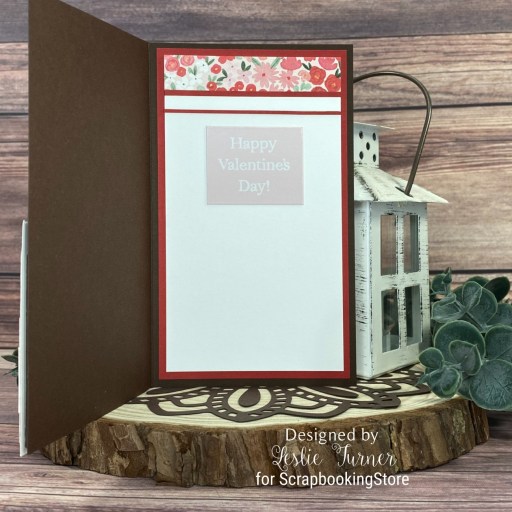
I cut the inside panel from Neenah Classic Crest 80# Solar White cardstock and embellished it with strips of the floral patterned paper used on the front and CutCardStock Basis Red. The finishing touch was adding a sentiment from the sticker sheet.

Sharing in the following challenges:
1. 613 Avenue Create: February 2023 Anything Goes w/ optional Use Red for Anything But a Heart (no twist)
2. Classic Design Challenge: February 2023 #2 – Anything Goes
3. Crafting Happiness Challenges: #139 – Love
4. Crafty Friends Challenge: #164 – Love/Romance
5. Crafty Gals Corner: #240 – Add a Heart
6. Once Upon a Time Challenge Blog: #7 – My Heart
7. Penny’s Paper-Crafty Challenges: #540 – Anything Goes with Paper
8. QKR Stampede: #461 – Anything Goes

Affiliate links are used in this post at no cost to you – I really appreciate your support!

ScrapbookingStore products used:
February 2023 Scrapbook Kit with Upgrades

Other products used:
Cardstock/Paper: CutCardStock Vanilla Bean Brown, Bright Gold Foil, and Basis Red cardstock, Neenah Classic Crest 80# Solar White cardstock
Dies/Punches: EK Success 1″ and 3/4″ square punches
Accessories: Tonic Studios 12″ Guillotine Paper Trimmer, Tombow Mono permanent adhesive, Art Glitter Dries Clear adhesive, Scrapbook Adhesives 3D Foam Squares Variety Pack (large black), Coats & Clark Metallic Gold sewing thread

I hope you’ve enjoyed today’s project and you’re thinking about all the fun you could have with this month’s kit… you really ought to think about joining the Subscription Club! Be sure to Follow us on Facebook, Instagram, Pinterest and YouTube for lots of crafty inspiration! And if you do decide to join the Subscription Club, join our ScrapbookingStore Club Member Group on Facebook for more inspiration and to share your projects! Thanks so much for stopping by today – we’ll see you next time!

Scrappy hugs,

Snow Much Fun

2/28/23 Stand Out Creation at Scrapping4fun Challenges!

Hi friends! Dang, this week has flown by! It’s Friday already which is a good thing for all the working folks! I’m delighted to be back to share one more ScrapbookingStore DT inspiration project with you created with the amazing 2023 Scrapbook Kit with Upgrades! The upgrades in these monthly kits are always just as amazing as the papers and coordinating sticker sheets. In addition to the paper and stickers, I was excited to use the large snowflake element in this month’s kit upgrades to create a fun Winter-themed card.

I cut a standard A2 size side-folding card base from Neenah Classic Crest 110# Solar White cardstock along with layering panels from a patterned paper in the kit and CutCardStock Twine cardstock. I adhered a sentiment sticker from the sticker sheet in the upper left corner and then adhered the large snowflake from the upgrades to the card front. I cut two words from a tag on the sticker sheet, adhered them to trimmed scraps of twine cardstock, and adhered them to the card front. I added Eyelet Outlet 3mm blue pearls to the six shorter arms of the snowflake for a little interest.

I cut the inside panel from 80# Solar White cardstock and embellished it with a scalloped strip from the sticker sheet and a strip of CutCardStock Twine cardstock. I adhered a sentiment sticker and a polar bear sticker from the sticker sheet, which completed the card.

Sharing in the following challenges:
1. Classic Design Challenge: February 2023 #2 – Anything Goes
2. Crafts Galore Encore Challenge Blog: #108 – Anything Goes
3. QKR Stampede: #460 – Anything Goes
4. Scrapping4fun Challenges: #220 – Anything Goes

Affiliate links are used in this post at no cost to you – I really appreciate your support!

ScrapbookingStore products used:
January 2023 Scrapbook Kit with Upgrades

Other products used:
Cardstock/Paper: Neenah Classic Crest 110# and 80# Solar White cardstock, CutCardStock Twine cardstock
Accessories: Tonic Studios 12″ Guillotine Paper Trimmer, Tape Runner, Art Glitter Dries Clear adhesive, Eyelet Outlet 3mm blue pearls

I hope you’ve enjoyed today’s project and you’re thinking about all the fun you could have with this month’s kit… you really ought to think about joining the Subscription Club! Be sure to Follow us on Facebook, Instagram, Pinterest and YouTube for lots of crafty inspiration! And if you do decide to join the Subscription Club, join our ScrapbookingStore Club Member Group on Facebook for more inspiration and to share your projects! Thanks so much for stopping by today – we’ll see you next time!

Scrappy hugs,

‘Tis the Season fun fold

Hey everybody! Happy Thursday – it’s almost the weekend and I hope you have something fun planned! I’m back this morning with another ScrapbookingStore DT inspiration project created with the amazing 2023 Scrapbook Kit with Upgrades! I love the versatility of the double-sided papers in this kit – so many wonderful patterns for so many projects! I’ve grown especially fond of the double gatefold lately, so that’s the direction I took for this project. And who doesn’t love an adorable snow angel?!

I cut the double gatefold card base from a double-sided paper in the kit. Using the Spellbinders Standard Circles Small and Classic Scalloped Circles Small dies, I cut the element for the card front from a patterned paper in the kit and CutCardStock Twine cardstock and adhered a snow angel sticker from the sticker sheet to it. I adhered patterned paper strips to the bottom of the card front and stamped the sentiment from the Taylored Expressions Winter Wishes stamp set in Catherine Pooler Juniper Mist ink.

I cut the inside panel from Basis White and embellished it with a patterned paper strip and a mitten sticker and a sentiment sticker from the sticker sheet. I layered the panel on Basis Navy and an additional patterned paper from the kit. Lol, I didn’t notice until this very minute that the angle of this photo elongated the circular element on the front… sorry about that! :|

Sharing in the following challenges:
1. Classic Design Challenge: February 2023 #2 – Anything Goes
2. Scrapping4fun Challenges: #220 – Anything Goes
3. Wednesday’s Creative Inspirations Challenge Blog: February Anything Goes

Affiliate links are used in this post at no cost to you – I really appreciate your support!

ScrapbookingStore products used:
January 2023 Scrapbook Kit with Upgrades

Other products used:
Cardstock/Paper: CutCardStock Basis White, Basis Navy and Twine cardstock
Stamps: Taylored Expressions Winter Wishes stamp set
Ink: Catherine Pooler Juniper Mist ink
Dies/Punches: Spellbinders Standard Circles Small and Classic Scalloped Circles Small dies
Accessories: Tonic Studios 12″ Guillotine Paper Trimmer, Tape Runner, Art Glitter Dries Clear adhesive, MISTI stamping tool, Big Shot, Nuvo White Blizzard Glitter Drops

I hope you’ve enjoyed today’s project and you’re thinking about all the fun you could have with this month’s kit… you really ought to think about joining the Subscription Club! Be sure to Follow us on Facebook, Instagram, Pinterest and YouTube for lots of crafty inspiration! And if you do decide to join the Subscription Club, join our ScrapbookingStore Club Member Group on Facebook for more inspiration and to share your projects! Thanks so much for stopping by today – we’ll see you next time!

Scrappy hugs,

Baby it’s cold outside

Hi friends! Happy Hump Day! I’m thrilled to be back to share another ScrapbookingStore DT inspiration project with you today created with the amazing 2023 Scrapbook Kit with Upgrades! The Winter-themed papers and stickers in this kit represent wonderful childhood memories for many. I used several patterned papers and stickers from this month’s kit for this super cute A2 card. This design is really simple and could easily be mass-produced to create multiple cards for a gift set!

I cut a standard A2 size top-folding card base from Neenah Classic Crest Solar White cardstock along with a layering panel from a patterned paper in the kit, and rounded the bottom right corner of each. I cut smaller panels from CutCardStock Basis Blue cardstock and another patterned paper in the kit, adhered them together and then to the left side of the card front. Using the Cottage Cutz Double Stitched Ovals, I die cut an oval from an additional patterned paper in the kit and adhered it to the right side. I added an ice skates sticker and a sentiment sticker from the sticker sheet, which completed the card front.

I cut the inside panel from Solar White cardstock and embellished it with a scrap piece of the patterned paper used on the front. I added a sentiment sticker and a beanie sticker from the sticker sheet and layered the panel on Basis Navy.

Sharing in the following challenges:
1. Crafty Gals Corner: #239 – Winter Fun
2. Try it on Tuesday: Winter Blues

Affiliate links are used in this post at no cost to you – I really appreciate your support!

ScrapbookingStore products used:
January 2023 Scrapbook Kit with Upgrades

Other products used:
Cardstock/Paper: Neenah Classic Crest 80# Solar White cardstock, CutCardStock Basis Blue cardstock
Dies/Punches: Kadomaru Pro Corner Rounder, Cottage Cutz Double Stitched Ovals
Accessories: Tonic Studios 12″ Guillotine Paper Trimmer, Tape Runner, Art Glitter Dries Clear adhesive, Big Shot

I hope you’ve enjoyed today’s project and you’re thinking about all the fun you could have with this month’s kit… you really ought to think about joining the Subscription Club! Be sure to Follow us on Facebook, Instagram, Pinterest and YouTube for lots of crafty inspiration! And if you do decide to join the Subscription Club, join our ScrapbookingStore Club Member Group on Facebook for more inspiration and to share your projects! Thanks so much for stopping by today – we’ll see you next time!

Scrappy hugs,

Chandler Purse with Latch Card Notelets

2/3/23 Rising Star at A Place To Start!

Hey everybody! I hope you’re having a great week so far! I’m having a hard time wrapping my head around the fact that January is almost over! I have another ScrapbookingStore DT inspiration project to share with you today created with the amazing January 2023 Scrapbook Kit with Upgrades! I’m in love with all the Winter-themed patterned papers and coordinating stickers in this month’s kit. You know how I love me some paper purses so I made a Chandler that contains a set of six latch card thank you notelets using a variety of patterned papers and stickers. I’ve made a few of these using the Bearly Arts tutorial HERE if you’re interested.

I cut the Chandler purse base, handle and strap closure from CutCardStock Basis Navy cardstock and layering panels from a snowflake pattern in this month’s kit. I adhered a large snowflake from the sticker sheet to a scrap piece of navy cardstock, fussy cut around it leaving a thin border, and then attached it to the end of the strap closure. I then adhered a small disc magnet with Ranger Distress Collage Medium to keep the purse closed.

I created a set of six latch cards from Solar White cardstock, Basis Navy cardstock and a variety of patterned papers in the kit. For each card, I stamped the ‘thanks’ sentiment from the Keep It Simple Thank You Sentiments stamp set in Catherine Pooler Juniper Mist ink on Solar White cardstock and cut it with a Spellbinders Classic Ovals Small die. Using the Spellbinders Classic Scalloped Ovals Large and Small dies, I cut two slightly larger scallops from Basis Navy and Solar White cardstock and adhered them together. This element created the ‘latch’ on each card.

I stamped the same sentiment (also from the Keep It Simple Thank You Sentiments stamp set) in Catherine Pooler Juniper Mist ink on the inside of each card and embellished each one with a coordinating sticker from the sticker sheet.

Sharing in the following challenges:
1. A Place To Start: January 2023 Anything Goes
2. Try it on Tuesday: Winter Blues
3. World Wide Open Design Team Challenge: #1 – January Anything Goes

Affiliate links are used in this post at no cost to you – I really appreciate your support!

ScrapbookingStore products used:
January 2023 Scrapbook Kit with Upgrades

Other products used:
Cardstock/Paper: Neenah Classic Crest 110# and 80# Solar White cardstock, CutCardStock Basis Navy cardstock
Stamps: Keep It Simple Thank You Sentiments stamp set
Ink: Catherine Pooler Juniper Mist ink
Dies/Punches: Spellbinders Classic Ovals Small die and Scalloped Ovals Large and Small dies
Accessories: Tonic Studios 12″ Guillotine Paper Trimmer, Art Glitter Dries Clear adhesive, MISTI stamping tool, Big Shot, Darice iridescent gemstones, small disc magnet, Ranger Distress Collage Medium, Bearly Art Chandler tutorial

I hope you’ve enjoyed today’s project and you’re thinking about all the fun you could have with this month’s kit… you really ought to think about joining the Subscription Club! Be sure to Follow us on Facebook, Instagram, Pinterest and YouTube for lots of crafty inspiration! And if you do decide to join the Subscription Club, join our ScrapbookingStore Club Member Group on Facebook for more inspiration and to share your projects! Thanks so much for stopping by today – we’ll see you next time!

Scrappy hugs,

Let It Snow mini slimline

2/8/23 Top 3 at Crafty Gals Corner!

Hi everyone! Happy Monday! Whoosh – the weekend went by just like that! In fact, the entire month of January is gone in a flash! I’m delighted to be back to share another ScrapbookingStore DT inspiration project with you today created with the amazing January 2023 Scrapbook Kit with Upgrades! Winter is so majestic with snow and pretty snowflakes, and everything in this kit depicts just that! I created a mini slimline card featuring a pretty ombre snowflake patterned paper and the delightful felt and glitter element from the upgrades.

I cut a 3-1/2″ x 6″ mini slimline card base from Neenah Classic Linen 100# Solar White cardstock along with a layering panel from a pretty ombre snowflake paper in this month’s kit. I added the felt and glitter element from the upgrades.

I embellished the inside with a leftover strip of the snowflake paper used on the front, a leftover glitter snowflake, and a sticker from the sticker sheet.

Sharing in the following challenges:
1. Crafty Gals Corner: #239 – Winter Fun
2. Try it on Tuesday: Winter Blues

Affiliate links are used in this post at no cost to you – I really appreciate your support!

ScrapbookingStore products used:
January 2023 Scrapbook Kit with Upgrades

Other products used:
Cardstock/Paper: Neenah Classic Linen 100# Solar White cardstock
Accessories: Tonic Studios 12″ Guillotine Paper Trimmer, Art Glitter Dries Clear adhesive

I hope you’ve enjoyed today’s project and you’re thinking about all the fun you could have with this month’s kit… you really ought to think about joining the Subscription Club! Be sure to Follow us on Facebook, Instagram, Pinterest and YouTube for lots of crafty inspiration! And if you do decide to join the Subscription Club, join our ScrapbookingStore Club Member Group on Facebook for more inspiration and to share your projects! Thanks so much for stopping by today – we’ll see you next time!

Scrappy hugs,

Christmas Quilt Card

Hey everybody! Are you ready for the round jolly guy in the red suit to make his appearance tomorrow evening?! He’s coming whether you’re ready or not, lol! I’m thrilled to be back to share another ScrapbookingStore DT inspiration project with you today, created with the amazing December 2022 Scrapbook Kit with Upgrades! I like everything in this month’s kit, from the pretty patterned papers to the variety of stickers. I consider myself a fun fold ‘fiend’ and thought a side fold card featuring a Christmas quilt was in order. I used the snowflake, festive floral and modern stripe and dot patterned papers in this month’s collection along with some stickers from the sticker sheet.

I cut the side fold card base from Neenah Classic Crest 110# Solar White cardstock and adhered the left panel. Using the My Favorite Things Quilt Square Cover-Up die, I die cut the quilt five times (three times with the patterned papers from the kit and two more times with CutCardStock Red Wagon and Scottish Highlands Green cardstock). Using various pieces from each of the cuts, I assembled the quilt and adhered it to the card front. I added a sentiment sticker from the sticker sheet and adhered a rectangular panel cut from the Red Wagon cardstock to the left side which I embellished with metallic gold thread and another sticker from the sticker sheet.

I cut the inside panel from 80# Solar White cardstock and embellished it with strips of the festive floral patterned paper and CutCardStock Red Wagon cardstock used on the front. I stamped the sentiment in Catherine Pooler Grass Skirt ink and layered the panel on CutCardStock Scottish Highlands Green cardstock.

Affiliate links are used in this post at no cost to you – I really appreciate your support!

ScrapbookingStore products used:
December 2022 Scrapbook Kit with Upgrades

Other products used:
Cardstock/Paper: Neenah Classic Crest 110# and 80# Solar White cardstock, CutCardStock Red Wagon and Scottish Highlands Green cardstock
Stamps: Stampin’ Up Versatile Christmas stamp set
Ink: Catherine Pooler Grass Skirt ink
Dies/Punches: My Favorite Things Quilt Square Cover-Up Die, EK Success Flag Punch (to notch the side panel where I wrapped the gold metallic thread)
Accessories: Tonic Studios 12″ Guillotine Paper Trimmer, Bearly Art precision craft glue, MISTI stamping tool, Big Shot, Coats metallic gold sewing thread, Stampin’ Up Mini Dimensionals

I hope you’ve enjoyed today’s project and you’re thinking about all the fun you could have with this month’s kit… you really ought to think about joining the Subscription Club! Be sure to Follow us on Facebook, Instagram, Pinterest and YouTube for lots of crafty inspiration! And if you do decide to join the Subscription Club, join our ScrapbookingStore Club Member Group on Facebook for more inspiration and to share your projects! Thanks so much for stopping by today – we’ll see you next time!

Scrappy hugs,

Festive Clamshell Gift Box

Hi everyone! I hope you’re having a fabulous week! I’m delighted to be back to share another ScrapbookingStore DT inspiration project with you today, created with the amazing December 2022 Scrapbook Kit with Upgrades! I absolutely love the variety of papers and coordinating stickers along with the awesome upgrades in this month’s collection. I’ve mentioned many times before that I love making and giving practical gifts, so I created a sturdy clamshell type Christmas gift box that can be used for years to come. I’ve had handwritten instructions for this in my arsenal for quite some time but had never gotten around to making one until a similar box was featured in a recent Splitcoast Stampers newsletter! Sometimes all I need is a reminder to inspire me! ;)

I constructed the shell and box from CutCardStock Kraft Chipboard and used two coordinating papers from the collection to cover the panels along with some sheer red ribbon from my stash for the closure.

I die cut a rectangular element for the top of the box from Solar White cardstock using a Kat Scrappiness Mini Slimline Postage Edge Die and layered it on CutCardStock Pop Tone Wild Cherry cardstock. I added the chipboard Santa and a sentiment rub-on from the upgrades along with some Eyelet Outlet bumpy red bling which completed the box top.

Here are shots of the actual gift box, with the shell opened up. I used CutCardStock Pop Tone Wild Cherry cardstock to cover the hinge and inside of the box.

Affiliate links are used in this post at no cost to you – I really appreciate your support!

ScrapbookingStore products used:
December 2022 Scrapbook Kit with Upgrades

Other products used:
Cardstock/Paper: CutCardStock Kraft Chipboard and Pop Tone Wild Cherry cardstock, Neenah Classic Crest 80# Solar White cardstock
Dies/Punches: Kat Scrappiness Mini Slimline Postage Stamp Edge Dies
Accessories: Tonic Studios 12″ Guillotine Paper Trimmer, Bearly Art precision craft glue, Big Shot, Michael’s sheer red ribbon, Eyelet Outlet bumpy red bling and wood washi tape

I hope you’ve enjoyed today’s project and you’re thinking about all the fun you could have with this month’s kit… you really ought to think about joining the Subscription Club! Be sure to Follow us on Facebook, Instagram, Pinterest and YouTube for lots of crafty inspiration! And if you do decide to join the Subscription Club, join our ScrapbookingStore Club Member Group on Facebook for more inspiration and to share your projects! Thanks so much for stopping by today – we’ll see you next time!

Scrappy hugs,

Merry & Bright Mitten

Hi everyone! A big ol’ Happy Hump Day to you! Another day closer to Christmas! I’m stoked to be back to share another ScrapbookingStore DT inspiration project with you today, created with the amazing December 2022 Scrapbook Kit with Upgrades! I’m digging all the festive Christmas prints and traditional colors of the papers in this collection along with the coordinating stickers and upgrades. I love creating shaped cards and used a mitten card template that I designed a number of years ago which you can find HERE if you’d like to play around with it!  

Using my template, I cut the mitten card base once from Neenah Classic Crest 110# Solar White cardstock and again from a snowflake patterned paper in the kit. I fashioned a cuff from a candy stripe patterned paper in the kit layered on CutCardStock Scottish Highlands Green cardstock which I embellished with an Eyelet Outlet 3mm white pearl bling strip. I added hand-cut stripes (from the same paper) also layered on green cardstock. I embellished the mitten with a sentiment banner sticker and several snowflake stickers from the sticker sheet that I popped up on Dimensionals.

Using the template as a guide, I hand-cut the inside panels from 80# Solar White and CutCardStock Scottish Highlands Green cardstock in graduating smaller sizes which I layered together. I embellished the panel with the candy stripe patterned paper and green cardstock used on the front, and added a sentiment sticker from the sticker sheet.

Affiliate links are used in this post at no cost to you – I really appreciate your support!

ScrapbookingStore products used:
December 2022 Scrapbook Kit with Upgrades

Other products used:
Cardstock/Paper: Neenah Classic Crest 110# and 80# Solar White cardstock, CutCardStock Scottish Highlands Green cardstock
Accessories: Tonic Studios 12″ Guillotine Paper Trimmer, Bearly Art precision craft glue, Eyelet Outlet 3mm white pearl bling strip, Stampin’ Up Dimensionals and Mini Dimensionals

I hope you’ve enjoyed today’s project and you’re thinking about all the fun you could have with this month’s kit… you really ought to think about joining the Subscription Club! Be sure to Follow us on Facebook, Instagram, Pinterest and YouTube for lots of crafty inspiration! And if you do decide to join the Subscription Club, join our ScrapbookingStore Club Member Group on Facebook for more inspiration and to share your projects! Thanks so much for stopping by today – we’ll see you next time!

Scrappy hugs,

Christmas Double Pleated Fold

Hi friends! I hope it’s not too cold where you are… it’s technically not even Winter yet, lol! We woke up to 2 degrees a couple days ago and I believe it was 8 degrees yesterday morning! I’m delighted to be back to share another ScrapbookingStore DT inspiration project with you today, created with the amazing December 2022 Scrapbook Kit with Upgrades! I’m really loving all the Christmas-themed papers, coordinating stickers and upgrades in this month’s collection. I make Christmas cards all year long and already mailed out this year’s cards, so I have a head-start on next year’s! This card features a double pleated fold element on the front created from a houndstooth (on one side) and floral (on the other side) paper which I embellished with the chipboard doll from the upgrades!

I cut a standard A2 size side-folding landscape card base from CutCardStock Basis White cardstock along with a layering panel from CutCardStock Kale Green cardstock. I created the double pleated fold element using paper in the collection. I embellished it with Eyelet Outlet clear jewel brads and clear jewel bling strips and adhered it to the card front in a horizontal fashion. I added the chipboard doll from the upgrades to two layered die cut circles which I adhered to the center of the double pleated fold element. The finishing touch was adding a sentiment using a rub-on from the upgrades.

I cut the inside panel from Basis White cardstock and embellished it with strips of the patterned paper and kale green cardstock used on the front. I stamped a sentiment from the Stampin’ Up Oh What Fun stamp set and layered the panel on green cardstock.

Affiliate links are used in this post at no cost to you – I really appreciate your support!

ScrapbookingStore products used:
December 2022 Scrapbook Kit with Upgrades

Other products used:
Cardstock/Paper: CutCardStock Basis 80# White and Kale Green cardstock, Neenah Classic Crest 110# Solar White cardstock
Stamps: Stampin’ Up Oh What Fun stamp set
Ink: Catherine Pooler Deck the Halls ink
Dies/Punches: Spellbinders Standard Circles Large and Small dies
Accessories: Tonic Studios 12″ Guillotine Paper Trimmer, Bearly Art precision craft glue, MISTI stamping tool, Big Shot, Eyelet Outlet clear jewel brads and 3mm clear jewel bling strip

I hope you’ve enjoyed today’s project and you’re thinking about all the fun you could have with this month’s kit… you really ought to think about joining the Subscription Club! Be sure to Follow us on Facebook, Instagram, Pinterest and YouTube for lots of crafty inspiration! And if you do decide to join the Subscription Club, join our ScrapbookingStore Club Member Group on Facebook for more inspiration and to share your projects! Thanks so much for stopping by today – we’ll see you next time!

Scrappy hugs,