the GOOD life

11/30/21 November Rising Star at A Place To Start!

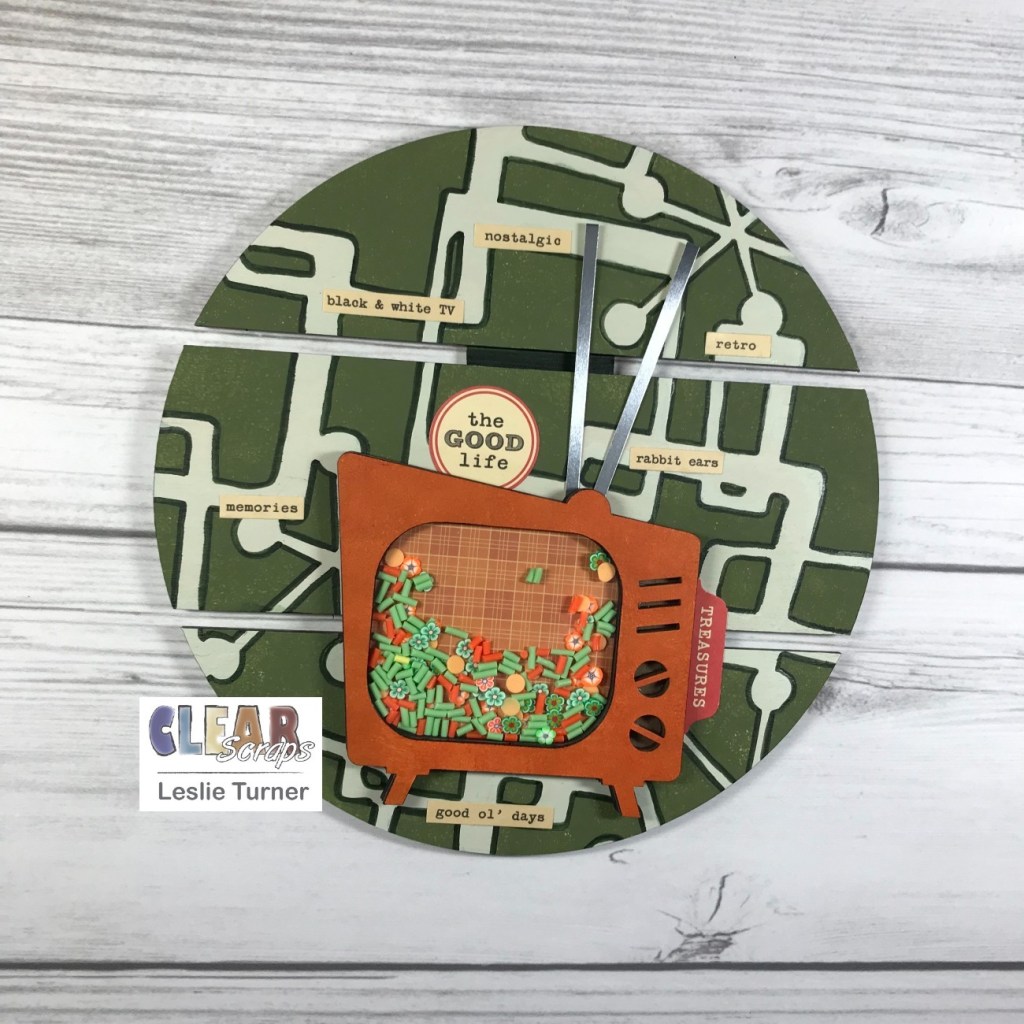
Hey, everybody! It’s Friday and I hope you have something fun – and safe – planned for this weekend! You know where I’ll be… I can’t be any safer than I am in my studio, lol! ;) I’m thrilled to be back on the Clear Scraps blog today with another awesome DT inspiration project! I created a retro home decor piece featuring the Medium Circle DIY Pallet Shape decorated with paint, the 12″ Funky Boxes Mascils Mask/Stencil and markers, along with a Mini Shaker Retro TV with Sprinkles Groovy Flowers and Sprinkles Lime Confetti as the shaker filler! This was beyond fun and brought back so many memories! I distinctly remember the groovy green and orange color palette so many people had in their homes (and clothing) in the 70s! Yep, those were the good ol’ days!

I started by painting the front and back of the Medium Circle DIY Pallet Shape a super pale green by mixing Adirondack White with a tiny bit of Spanish Moss chalk paint. When that was dry, I laid the 12″ Funky Boxes Mascils Mask/Stencil on the pallet and pounced Spanish Moss chalk paint all over it with a dauber. The paint ended up sparse and spotty in some areas and thicker in other areas but I left it that way to add to the retro/vintage feel. Once dry, I outlined all the stenciled areas with a dark green alcohol marker for contrast and interest.

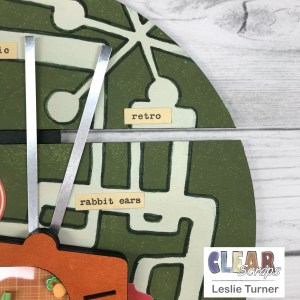
Next, I painted the front chip form of the Mini Shaker Retro TV with Liquitex Yellow Oxide mixed with Cadmium Orange acrylic paint. Once that was dry, I ran a black alcohol marker around the outside edges and the TV screen cut-out and set it aside. I also ran the black marker around the outside edges of the rest of the chip forms so they’d all be uniform. I adhered a piece of orange patterned paper to the inside of the chip back and then adhered the next two chip forms to it. I added the shaker filler consisting of green and orange pieces of Sprinkles Groovy Flowers and Sprinkles Lime Confetti, added the acrylic divider, and then adhered the painted front chip form to close it up. I cut a rabbit ears antenna from metallic silver foil cardstock and adhered it to the TV. I adhered the TV to the bottom front of the pallet and added retro thrift shop word stickers to complete the piece.

And one more look… I couldn’t be more happy with how this turned out! All of the absolutely awesome Clear Scraps products made this project come to life! I LOVE it!

Sharing in the following challenges:
1. A Perfect Time To Craft Challenge: #11 November – Anything Goes
2. A Place To Start: #11 – Craft A Favorite Memory (teenage years!)
3. Classic Design Challenge Blog: #11 November – Anything Goes
4. Moving Along With The Times: #136 – Anything But A Card
5. Through The Purple Haze: #186 – Anything Goes with optional For Him

Clear Scraps products used:
Medium Circle DIY Pallet Shape
12″ Funky Boxes Mascils Mask/Stencil
Mini Shaker Retro TV
Sprinkles Groovy Flowers
Sprinkles Lime Confetti

Other products used:
Cardstock/Paper: Polly’s Paper Studio orange patterned paper, Hygloss Metallic Silver Foil cardstock
Ink: Copic alcohol marker- 100 Black; Arteza alcohol marker- YG10 Jasper Green
Accessories: Folkart Adirondack White and Spanish Moss chalk paint, Liquitex Yellow Oxide and Cadmium Orange acrylic paint, Bearly Art precision craft glue, Ranger Distress Collage Medium, October Afternoon Thrift Shop Word Stickers

I hope you’ve enjoyed today’s project and you’re inspired to get those craft supplies out to play! Be sure to check out all the amazing acrylic, wood and chipboard goodies at Clear Scraps… OMGoodness, you won’t be disappointed! And head on over to the Clear Scraps Facebook Page for lots of inspiration! And while you’re at it, join the Clear Scraps Facebook Creative Group to connect with other Clear Scraps fans! Thanks so much for stopping by today – we’ll see you next time!

Scrappy hugs,
lesliesig

Season’s Greetings To You & Yours

12/5/21 Top 5 at Jan’s Digi Stamps Challenges!

Happy Hump Day, y’all! I hope you’re having a wonderful week! I’m thrilled to be back on the CutCardStock blog today with an awesome DT inspiration project featuring red, white and green cardstock which is all on sale this month so be sure to stock up for your holiday crafting! Affiliate links are used in this post at no cost to you – I really appreciate your support! I have one of the easiest card designs ever to share with you today using Stardream Metallic Jupiter cardstock, Basis Red cardstock, Silk Glitter Opulent Opal cardstock, Neenah Classic Crest Solar White 80# cardstock, Basis Green cardstock and Pop-Tone Jellybean Green cardstock! While I used a die set with a different name for this design team project, I found handwritten measurements for an ‘open box card’ (with angled sides) in my tutorial arsenal and typed up a tutorial that I’ll share. The only differences between the die set and my handwritten instructions are the shape and the width of the box layer strips. And, of course, the sky is the limit with regard to occasion, embellishments and sentiments. ;)

I die cut the card base and box layer strips from Silk Glitter Opulent Opal cardstock and assembled the card. This is where the lightbulb came on… this assembled piece looked familiar so I sat down with my tutorial files (about 6″ worth) and looked through most of the files until I found measurements I had written down (who knows how long ago) for the open box card. If you’re interested, I’ve added the open box card tutorial HERE. Bear in mind that the box layer strips on this project using the die set are slightly narrower but achieve the same result, and the shape is different. I die cut the three poinsettia flowers from Stardream Metallic Jupiter cardstock, the poinsettia leaves from Pop-Tone Jellybean Green cardstock, the greenery and berries from Basis Red cardstock and Basis Green cardstock, and the flower centers from Basis Gold cardstock. I assembled the poinsettias and set them aside. I die cut the sentiment from Stardream Metallic Jupiter cardstock and again from Basis Green cardstock and layered them together with just a tad bit of the dark green showing beneath the red. I stamped the sentiment in green ink on a Neenah Classic Crest Solar White 80# cardstock scrap and die cut it with a stitched rectangle die, and layered it on a slightly larger stitched rectangle die cut from Pop-Tone Jellybean Green cardstock. I adhered one of the poinsettias on the top of the sentiment and adhered the piece to the left side, the second poinsettia to the right side and the third poinsettia in the middle.

Here is a shot from overhead so you can see the construction (which, as mentioned above, is the same as the typical box card but with an open front), and another shot of the card folded flat for mailing in a standard A2 size envelope.

And a few more peeks of the finished project… so loving how this turned out! Let me know if you end up making an open box card using my measurements! This is definitely a fun one! I’ve made several over the years but didn’t use any of them as design team projects so they didn’t get posted on my blog. This design makes beautiful sympathy, birthday, anniversary, and of course Christmas cards!

Sharing in the following challenges:
1. A Perfect Time To Craft Challenge: #11 November – Anything Goes
2. Christmas Crafts All Year ‘Round: November – Something that starts with U, V and/or W (Winter)
3. Classic Design Challenge Blog: #11 November – Anything Goes
4. Crafts Galore Encore Challenge Blog: #93 – Anything Goes
5. Creative Inspirations Challenge Blog: November – Wonderful Winter/Feeling Festive
6. Jan’s Digi Stamps Challenges: November – Anything Goes
7. Your Scrapbook Place: November – Anything Goes

CutCardStock products used:
Silk Glitter Opulent Opal cardstock
Stardream Metallic Jupiter cardstock
Basis Red cardstock
Basis Green cardstock
Pop-Tone Jellybean Green cardstock
Basis Gold cardstock
Neenah Classic Crest Solar White 80# cardstock

Other products used:
Stamps: Concord & 9th Poinsettia Fill-In stamp set
Ink: Catherine Pooler Eucalyptus ink
Dies/Punches: Concord & 9th Card Stacks base dies, Concord & 9th Poinsettia Fill-In dies, Memory Box Stitched Rectangle Layers
Accessories: Tonic Studios 12″ Guillotine Paper Trimmer, Big Shot, MISTI stamp tool, Bearly Art precision craft glue, Ranger Distress Collage Medium, Nuvo Bottle Green Crystal Drops

I hope you’ve enjoyed today’s project and you’re inspired to get crafty! Be sure to check out all the awesome cardstock and other goodies at CutCardStock (adhesives, labels, stickers, pens, watercolors and ribbon to name a few). And head on over to the CutCardStock Facebook Page for more inspiration! Thanks so much for stopping by today – we’ll see you next time!

Scrappy hugs,
lesliesig

Hi from Jack!

Hi friends! A very Happy Tuesday to you! I hope you’re having an awesome day! It has been a beautiful one here! Affiliate links are used in this post at no cost to you – I really appreciate your support! I’m back with another card to share that I created for the new release over at Prickley Pear Stamps! I mentioned a few days ago that the owners’ son and daughter-in-law have kids named Jack and Lily, and the new Jack and Lily Collection is all about them! I created an adorable friendship card featuring the Hello Jack stamp set with coordinating Hello Jack die set! This card is a side fold (you know how love fun folds), and I did something with this stamped image that I’ve never done before… I scored the flat two-dimensional image and creased his legs so he could sit on a brick wall! LOL, I absolutely love how this turned out!

I cut the side fold card base from Neenah Classic Crest Baronial Ivory cardstock along with layering panels from CutCardStock Basis Gray cardstock and coordinating papers from Crafter’s Companion Just For Men Urban Collection. I adhered the panels together and adhered them to the card base, added some twine tied in a bow, and then fashioned the sitting part of the brick wall.

Using the Hello Jack stamp set, I stamped Jack, his clothing and toy airplane on Neenah Classic Crest Solar White cardstock, colored them with alcohol markers and cut them with the coordinating Hello Jack die set. I scored Jack’s legs in two places, folded on the score lines, and adhered him to the card front sitting on the brick wall. I adhered his toy airplane and stamped the sentiment to complete the card front.

I typed the sentiment on the laptop and printed it on Neenah Classic Crest Baronial Ivory cardstock, then trimmed the panel and embellished it with strips cut from the patterned paper and CutCardStock Basis Gray cardstock, and finally layered it on gray cardstock.

And one more peek… this is such a fun fold and I sure do love it with this adorable little guy gracing the front of it!

Sharing in the following challenges:
1. A Bit More Time To Craft Extra Challenge: November Anything Goes
2. A Perfect Time To Craft Challenge: #11 November – Anything Goes
3. Classic Design Challenge Blog: #11 November – Anything Goes

Prickley Pear Stamps products used:
Hello Jack stamp set
Hello Jack die set

Other products used:
Cardstock/Paper: Neenah Classic Crest Baronial Ivory cardstock, CutCardStock Basis Gray cardstock, Neenah Classic Crest Solar White cardstock, Crafter’s Companion Just For Men Urban Collection 6×6 paper pad
Stamps: Computer-generated inside sentiment
Ink: Memento Tuxedo Black ink; Arteza alcohol markers- R25, BG54, B25, GB06, YR12, BR28/63/92
Accessories: Tonic Studios 12″ Guillotine Paper Trimmer, MISTI stamp tool, Big Shot, Bearly Art precision craft glue, twine, Darice Double-Sided Adhesive Foam Circles

I hope you’ve enjoyed this project! Be sure to check out all the awesome stamps and dies at Prickley Pear Stamps! If you’d like to save 10% on anything on the site when you shop at Prickley Pear Stamps, use the coupon code LESLIE10 at checkout! And be sure to ‘like’ and ‘follow’ the Prickley Pear Stamps Facebook page to keep up with news and sales, and join Prickley Pear Pals (the fan group) for lots of fun crafty ideas and to share your creativity! And finally, we’d love to see you visit the Prickley Pear Stamps blog that’s in the process of being revived and become a Follower! Hope to see you there! Thanks so much for stopping by today – we’ll see you next time! ;)

Scrappy hugs,
lesliesig

Thank You tower card

Hey, hey, hey, Happy Monday, everybody! Hope you had a wonderful weekend and got out and enjoyed this beautiful Fall weather we’re having! Love, love, love this time of year! Affiliate links are used in this post at no cost to you. I really appreciate your support! Our new challenge is live this morning over at Love To Scrap Challenge Blog and I’m super stoked to share my DT inspiration project for LTSCB #151 – Anything Goes! I tried out this cool tower card fun fold earlier this year and enjoyed it so much that I had to make another one, lol! I used the oh-so-pretty Prickley Pear Stamps Sketched Florals – Wisteria stamp set along with the Prickley Pear Stamps Oak & Maple Leaf stamp set and the Prickley Pear Stamps Shadow Words – Thank You die.

I stamped the image from the Prickley Pear Stamps Sketched Florals – Wisteria stamp set on a full sheet of Neenah Classic Crest 80# Solar White cardstock, colored it with alcohol markers, and cut a small square panel for the front and a long panel for the back of the card. I cut the card base from Neenah Classic Crest 110# Solar White cardstock along with layering panels from CutCardStock Basis Dark Purple cardstock and swiss dot patterned paper from Crafter’s Companion Verity Rose 6×6 paper pad, and adhered all the layers to the card base. Using the Prickley Pear Stamps Shadow Words – Thank You die, I cut the sentiment from CutCardStock Stardream Metallic Amethyst cardstock and CutCardStock Basis Dark Purple cardstock, and adhered it to the front. The final touch was adding several iridescent gemstones for a little interest.

I adhered the long panel with the stamped and colored image to a CutCardStock Basis Dark Purple cardstock layer, stamped a sentiment from the Prickley Pear Stamps Oak & Maple Leaf stamp set, and adhered the panel to the back of the card.

Sharing in the following challenges:
1. A Bit More Time To Craft Extra Challenge: November Anything Goes
2. A Perfect Time To Craft Challenge: #11 November – Anything Goes

Products used:
Cardstock/Paper: Neenah Classic Crest 110# Solar White cardstock, CutCardStock Stardream Metallic Amethyst cardstock, CutCardStock Basis Dark Purple cardstock, Crafter’s Companion Verity Rose 6×6 paper pad
Stamps: Prickley Pear Stamps Sketched Florals – Wisteria stamp set, Prickley Pear Stamps Oak & Maple Leaf stamp set
Ink: Memento Tuxedo Black ink; Nuvo alcohol markers- Organic Greens Collection, Palma Violets Collection, Royal Purples Collection; Faber-Castell Pitt Artist fine point pen- May Green
Dies/Punches: Prickley Pear Stamps Shadow Words – Thank You die
Accessories: Tonic Studios 12″ Guillotine Paper Trimmer, Fiskars SureCut Paper Trimmer, Big Shot, MISTI stamp tool, Bearly Art precision craft glue, ScraPerfect iridescent gemstones

I hope you’ve enjoyed seeing this project and will link up an ‘anything goes’ project with us this month! We’d love to see what you create! Thanks so much for stopping by today – we’ll see you next time! ;)

Scrappy hugs,
lesliesig

Merry Christmas Camper

11/30/21 November Rising Star at A Place To Start!
8/17/22 CAS Weekly Favorite at Splitcoast Stampers!

Hi everyone! It’s Monday already and I hope you had a fabulous weekend! Affiliate links are used in this post at no cost to you. I really appreciate your support! Our new challenge is live over at Merry Little Christmas Challenge Blog and I’m excited to share my DT inspiration project for MLCCB #40 – November Anything Christmas Goes! I created another clean and simple card and this one is near and dear to my heart – hubby and I were full-time RVers for nearly four years and just sold our fifth wheel last year. We sure had some good times and met some awesome people! This was a super fun project created with Prickley Pear Stamps Ham Camper Winter stamp set and Prickley Pear Stamps Ham Camper stamp set along with the coordinating Ham Camper die set!

I created a standard A2 size top-folding card base from Neenah Classic Crest 110# Solar White cardstock along with a slightly smaller layering panel. Using the Prickley Pear Stamps Ham Camper Winter stamp set and Prickley Pear Stamps Ham Camper stamp set, I stamped the camper and elements on a scrap of Neenah Classic Crest 80# Solar White cardstock, colored them with alcohol markers and then cut them with the Ham Camper die set, and then adhered the awning and door to the camper. I applied a strip of Eyelet Outlet Grass Washi Tape across the bottom of the front panel and adhered the camper. I adhered the panel to the card base, stamped the sentiment above the camper, and added three red gold rim flat-back pearls.

I cut the inside panel from Neenah Classic Crest 80# Solar White cardstock and kept it fairly CAS as well – embellished it with a narrow strip of red cardstock, stamped the sentiment and candy cane, and layered the panel on red cardstock.

And one more peek… what a fun card for that RVer on your Christmas card list!

Sharing in the following challenges:
1. A Bit More Time To Craft Extra Challenge: November Anything Goes
2. A Perfect Time To Craft Challenge: #11 November – Anything Goes
3. A Place To Start: #11 – Craft A Favorite Memory (we were full-time RVers in a fifth wheel for nearly 4 years)
4. Classic Design Challenge Blog: #11 November – Anything Goes

Products used:
Cardstock/Paper: Neenah Classic Crest Solar White cardstock, Colorbok red cardstock
Stamps: Prickley Pear Stamps Ham Camper Winter stamp set and Prickley Pear Stamps Ham Camper stamp set, and Build an Owl stamp set
Ink: Memento Tuxedo Black ink; Nuvo alcohol markers- Rich Reds Collection, Irish Clover Collection, Woodland Greens Collection; Pentel Slicci Silver pen
Dies/Punches: Prickley Pear Stamps Ham Camper die set
Accessories: Tonic Studios 12″ Guillotine Paper Trimmer, Tombow Mono permanent adhesive, Bearly Art precision craft glue, MISTI stamp tool, Gemini Junior, Eyelet Outlet Grass Washi Tape, ScraPerfect red gold-rim flat-back pearls

I hope you’ve enjoyed today’s card and will link up a Christmas project with us this month! We can’t wait to see what you create! Thanks so much for stopping by today – we’ll see you again soon! ;)

Scrappy hugs,
lesliesig

Pinwheel Bouquet

11/30/21 November Rising Star at A Place To Start!
12/1/21 Top 5 Winner at Moving Along With The Times!
12/6/21 Top Sprout at A Place To Start!

Hi everyone! A very Happy Monday to you! I hope it’s not too awfully cold where you are! It has cooled off nicely here and we love it! Our new challenge is live over at Mix It Up Challenge Blog and I’m super stoked to share my DT inspiration project for MIUCB #55 – Anything Goes + 3-D Project! Our challenges are always ‘anything goes’ and we offer a technique twist each month to inspire our participants but the twist is not mandatory to play. This month the twist is to create a 3-D project – and I created a pinwheel bouquet! I thought it would be fun to make one for my studio and it sure brought back some childhood memories!

I painted the inside of a wide-mouth mason jar with Farmhouse paint and let it dry for several days. I made eight pinwheels in 4″, 5″, 6″ and 7″ sizes using the WRMK Pinwheel Punch Board and attached a jeweled embellishment in the center of each one with Ranger distress collage medium. I arranged them inside the mason jar with hot glue and floral foam. I wrapped ribbon around the jar lid and tied a bow, and attached a small button in the center.

And one more look… totally loving how this turned out! Definitely a fun project!

Sharing in the following challenges:
1. A Bit More Time To Craft Extra Challenge: November Anything Goes
2. A Perfect Time To Craft Challenge: #11 November – Anything Goes
3. A Place To Start: #11 – Craft A Favorite Memory (playing with pinwheels as a kid!)
4. Classic Design Challenge Blog: #11 November – Anything Goes
5. Moving Along With The Times: #136 – Anything But A Card
6. Your Scrapbook Place: November – Anything Goes

Products used:
Cardstock/Paper: Stampin’ Up Best Day Ever DSP
Dies/Punches: We R Memory Keepers Pinwheel Punch Board
Accessories: Tonic Studios 12″ Guillotine Paper Trimmer, Wide-mouth mason jar, White Ash Farmhouse paint, American Crafts Pinwheel Attachments, Ranger distress collage medium, Stampin’ Up Best Day Ever ribbon and button, Stampin’ Up Falling In Love Embellishments

I hope you’ve enjoyed today’s project and will link up either an ‘anything goes’ or 3-D project with us this month! We’d love to see what you create! Thanks so much for stopping by today – we’ll see you again soon! ;)

Scrappy hugs,
lesliesig

Give thanks

Hi friends! Happy Monday – I hope you had a great weekend! They sure do go by fast! Affiliate links are used in this post at no cost to you. I really appreciate your support! Our new challenge is live this morning over at Love To Craft Challenge Blog and I’m thrilled to share my DT inspiration project for LTCCB #64 – November Anything Goes! Fall is in full swing so here’s a pretty slimline chock full of Fall colors using Prickley Pear Stamps Oak & Maple Leaf stamp set and coordinating Prickley Pear Stamps Oak & Maple Leaf die set! OMGosh, they are gorgeous! Prickley Pear Stamps also carries Rinea Foiled Paper Autumn Variety Pack that I used for these leaves.

I cut a top-folding slimline card base measuring 9″ x 3-3/4″ from Neenah Classic Crest 110# Solar White cardstock. This is my go-to size because it fits perfectly in a #10 business size envelope which the slimline was designed to fit in, and still allows for some dimension. I cut layers from Stampin’ Up patterned paper, Darice textured brown cardstock and CutCardStock Camomile cardstock for the front, layered them together and adhered the panel to the front of the card base. I die cut three stitched circles from CutCardStock Camomile cardstock and three slightly larger stitched circles from the textured brown cardstock, layered them together in three sets, offsetting the yellow circles toward the top, and adhered them to the front panel. I adhered small foiled paper squares to white cardstock and die cut a variety of oak and maple leaves in different colors using the Prickley Pear Stamps Oak & Maple Leaf die set, and layered two on each set of circles. I added twine bows and flat-back pearls to each set of circles. I stamped a sentiment in brown ink on white cardstock, trimmed it and flagged one end, and adhered it to the front with foam pads.

I cut a panel for the inside from Neenah Classic Crest 80# Solar White cardstock and embellished it with leftover strips of patterned paper and the textured brown cardstock used on the front, stamped the sentiment in brown ink, and layered the panel on CutCardStock Camomile cardstock. I had a leftover die cut foiled maple leaf which I adhered to the bottom left corner of the panel.

And one more look… the colors in this angled shot show up much better than in any of the other photos I took. Very happy with how this turned out!

Sharing in the following challenges:
1. A Bit More Time To Craft Extra Challenge: November Anything Goes
2. A Perfect Time To Craft Challenge: #11 November – Anything Goes
3. Classic Design Challenge Blog: #11 November – Anything Goes
4. Jan’s Digi Stamps Challenges: November – Anything Goes
5. The Crafting Challenge: November – Stitching (Real or Faux) (stitched circle die cuts)
6. Your Scrapbook Place: November – Anything Goes

Products used:
Cardstock/Paper: Neenah Classic Crest 110# and 80# Solar White cardstock, CutCardStock Camomile cardstock, Darice textured brown cardstock, Rinea Foiled Paper Autumn Variety Pack, Stampin’ Up Color Me Autumn DSP
Stamps: Prickley Pear Stamps Oak & Maple Leaf stamp set
Ink: StazOn Jet Black ink, Ranger ground espresso archival ink
Dies/Punches: Prickley Pear Stamps Oak & Maple Leaf die set, Memory Box Stitched Circle Layers dies, EK Success 3/4″ square punch (to flag one end of the sentiment)
Accessories: Tonic Studios 12″ Guillotine Paper Trimmer, Tombow Mono permanent adhesive, Bearly Art precision craft glue, Gemini Junior, MISTI stamp tool, Studios Blackbird twine, Flourish With A Bling gold flat-back pearls

I hope you’ve enjoyed this project and will link up an ‘anything goes’ project with us this month! We’d love to see what you’re working on! Thanks so much for stopping by today – we’ll see you next time! ;)

Scrappy hugs,
lesliesig

Trick or Treat

Hi friends! I’m back on this fine Sunday evening to share the last of the Halloween cards I made this year. This one is, by far, the creepiest one, lol! But it was a fun one! Affiliate links are used in this post at no cost to you – I really appreciate your support! I used a couple Brutus Monroe products from my stash on this card – the teeth stamp set and the felt doily.

I cut a standard A2 top-folding card base from Neenah Classic Crest 110# Solar White cardstock along with layering panels from CutCardStock Basis Red cardstock and a patterned paper from the Halloween 6×6 paper pad which I adhered together and then to the card base. I stamped the teeth and sentiment in black ink and then again in Versamark, and heat embossed it with clear embossing powder. I cut it with a stitched mini scalloped circle die and layered it on a Brutus Monroe charcoal felt doily. I colored the upper and lower fangs with a red alcohol marker and added Glossy Accents to resemble blood. The finishing touch was the addition of red glitter gumdrops in the corners.

I cut the inside panel from Neenah Classic Crest 80# Solar White cardstock and embellished it with a leftover piece of the Halloween patterned paper and a strip of CutCardStock Basis Red cardstock. I added the die cut and stamped sentiment, and layered the panel on red cardstock.

And one more peek… such a fun and creepy card, lol! I love this stamp set!

Products used:
Cardstock/Paper: Neenah Classic Crest 110# and 80# Solar White cardstock, CutCardStock Basis Red cardstock, Halloween 6×6 paper pad
Stamps: Brutus Monroe False Teeth stamp set, Lawn Fawn Happy Happy Happy Add-On stamp set
Ink: Catherine Pooler Midnight ink; Arteza alcohol markers- R21/25; Memento Tuxedo Black marker, Versamark
Dies/Punches: My Favorite Things Stitched Mini Scallop Circle Die-namics, Lawn Fawn Happy Happy Happy Add-On die set
Accessories: Tonic Studios 12″ Guillotine Paper Trimmer, MISTI stamp tool, Big Shot, Ranger Distress Collage Medium, Bearly Art precision craft glue, Hero Arts clear embossing powder, Brutus Monroe Charcoal Felt Doilies, YNS Red Glitter Gumdrops, Ranger Glossy Accents

I hope you’ve enjoyed seeing this creepy Halloween card! Thanks so much for stopping by today – we’ll see you next time! ;)

Scrappy hugs,
lesliesig

Halloween Pinwheel Twist Card

Hi friends! Happy Halloween! I hope you’re having a wonderful weekend! I got just a tad bit of crafting in today but mostly I have been babysitting two kitties we acquired early last week. One of the cashiers at our local grocery store told Ed that somebody dropped two kittens off on her porch, and her dog and cats didn’t like them. They are about 8-10 weeks old, I’m guessing, and very friendly, so of course Ed said we’d take them. :| Our little feral/semi-feral family in our fenced back yard didn’t care much for them so Ed brought them inside this morning and they’ve been stuck to me like glue all day, lol! Affiliate links are used in this post at no cost to you. I really appreciate your support! I discovered a little while ago that I have two Halloween cards that I haven’t shared yet, so here’s one of them. This was the very first pinwheel twist card I made last month for my son and his wife. They are so much fun!

I cut the pinwheel twist card base from CutCardStock Basis Black cardstock and the panels for each side from Milachi Digitals Halloween papers, all on my Scan N Cut. I cut the haunted house element on my Scan N Cut from CutCardStock Basis White cardstock, CutCardStock Dolphin cardstock, CutCardStock Basis Gold cardstock, CutCardStock Curious Metallic Violette cardstock, CutCardStock Basis Orange and CutCardStock Curious Metallic Night cardstock. I stamped and die cut several other elements to decorate the sides.

And here’s a shot from overhead so you can see the pinwheel construction. Absolutely LOVE how this turned out! And my son and his wife loved it!

Products used:
Cardstock/Paper: CutCardStock Basis Black cardstock, CutCardStock Basis White cardstock, CutCardStock Dolphin cardstock, CutCardStock Basis Gold cardstock, CutCardStock Curious Metallic Violette cardstock, CutCardStock Basis Orange, CutCardStock Curious Metallic Night cardstock, Milachi Digitals Halloween papers
Stamps: Stampin’ Up Howl-o-ween Treat stamp set and Spooky Fun stamp set
Ink: Memento Grape Jelly, Morocco and Tuxedo Black ink; Sakura Clear Star Gelly Roll pen
Dies/Punches: My Scrap Chick Haunted House Pinwheel Twist Card cut file, My Favorite Things Essential Sentiment Fishtail Strips Die-namics, Stampin’ Up Boo To You Framelits and Halloween Scenes Edgelits
Accessories: Tonic Studios 12″ Guillotine Paper Trimmer, Brother Scan N Cut, Bearly Art precision craft glue, MISTI stamp tool, Big Shot, Nuvo Violet Galaxy Crystal Drops

I hope you’ve enjoyed seeing this Halloween card! I have one more to share later, so stay tuned! Thanks so much for stopping by today – we’ll see you next time! ;)

Scrappy hugs,
lesliesig

Summer Gnomies

Happy Halloween, everybody! Hope you are having a great day, and if you are entertaining kiddos this evening, have fun trick or treating! Affiliate links are used in this post at no cost to you – I really appreciate your support! I have an adorable Trinity Stamps Ambassador inspiration project to share this morning created with the super fun Wish You Were Here stamp set and coordinating Wish You Were Here die set! With Fall upon us (and in some cases Winter with snow, lol), I thought I could squeeze just one more Summer project in, and it’s a fun one! I absolutely love split panel cards and this one worked out great with the large gnomie image!

I cut a standard size A2 top-folding landscape card base from Neenah Classic Crest 110# Solar White cardstock along with layering panels from the Pebbles Inc. Basics 6×6 paper pad, cutting a portion out of the front flap. Using the Wish You Were Here stamp set, I did my old trick of stamping the image in black ink, stamping once more in Versamark over top the black ink and then heat embossing with clear embossing powder. I love coloring embossed images! I colored the image with alcohol markers and cut it with the coordinating Wish You Were Here die set and adhered it to the card base. I stamped the sentiment (from the same Wish You Were Here stamp set) in black ink on the front flap and added gemstones from the Trinity Stamps Amber Glow Embellishment Mix using the amazing Trinity Pick-Up Stick.

I embellished the inside with two coordinating prints and stamped the sentiment in black ink to complete the card.

And one more peek… I’m in love with this stamp set! Trinity Stamps has some of the cutest gnomes out there!

Trinity Stamps products used:
Wish You Were Here stamp set
Wish You Were Here die set
Trinity Stamps Amber Glow Embellishment Mix
Trinity Pick-Up Stick

Other products used:
Cardstock/Paper: Neenah Classic Crest 110# and 80# Solar White cardstock, Pebbles Inc. Basics 6×6 paper pad
Ink: Memento Tuxedo Black ink, Versamark; Arteza alcohol markers- Y22/24/31/39, B23/29, BR28, BK00, G22, R12/21/23, YR39; Sakura Clear Star Gelly Roll pen
Accessories: Tonic Studios 12″ Guillotine Paper Trimmer, Hero Arts clear embossing powder, Bearly Art precision craft glue

I hope you’ve enjoyed today’s project and you’re inspired to get those craft supplies out to play! Be sure to check out all the amazing stamps, dies and other goodies at Trinity Stamps! And head on over to the Trinity Stamps Facebook Page for loads of inspiration! And while you’re at it, join the Trinity Stamps Facebook community group to connect with other Trinity Stamps fans! Thanks so much for stopping by today – we’ll see you next time!

Scrappy hugs,
lesliesig