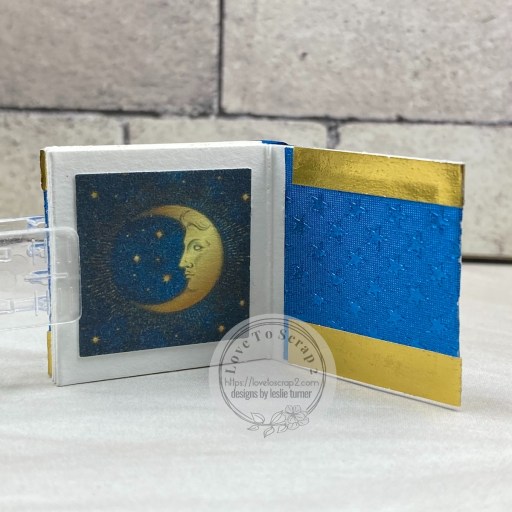
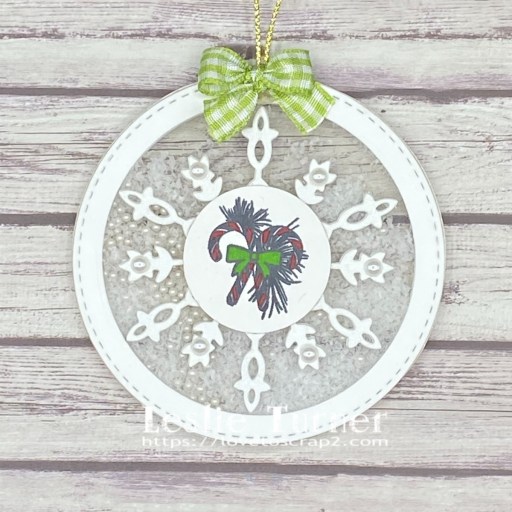
Hi friends! I hope you are having a fabulous weekend and your weather is wonderful! Our new challenge is live this morning over at Merry Little Christmas Challenge Blog and I’m super excited to share my DT inspiration project for MLCCB #58 – Anything Christmas Goes! I had fun making a see-through shaker ornament for this challenge featuring the oh-so-pretty Prickley Pear Stamps Snowflake Inserts stamp set and coordinating Snowflake Pendant die. I used Kat Scrappiness Artificial Snow and Pearl Glass Dots for the shaker mix and I love how it turned out!
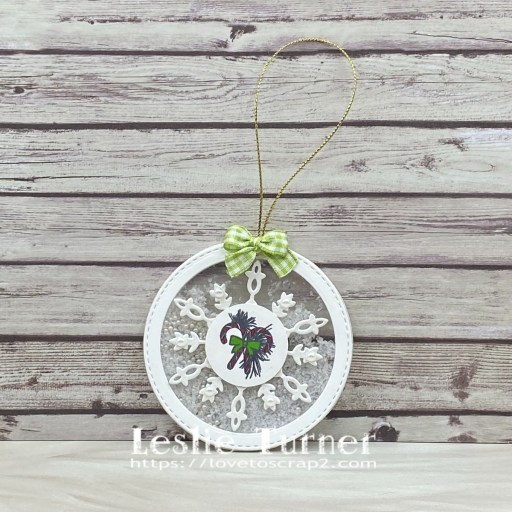
I started by die cutting two stitched circle frames from Neenah Classic Crest Solar White cardstock using the Keep It Simple Stitched Circles Nested dies along with two acetate circles using the larger of the two dies I used for the frame. Next, I die cut two snowflakes from CutCardStock Stardream Metallic Eris cardstock using the Prickley Pear Stamps Snowflake Pendant die. I stamped the candy cane image from the Prickley Pear Stamps Snowflake Inserts stamp set on CutCardStock Pop Tone Sweet Tooth cardstock, colored it with alcohol markers, and punched it with the Stampin’ Up 1-1/4″ circle punch.

I assembled each side of the ornament by adhering a frame and snowflake die cut on top of an acetate circle. I adhered the stamped image to the center of one of the snowflake die cuts and added Eyelet Outlet pearls to the snowflake – this would be the front of the ornament. I flipped the bottom layer of the ornament over to expose the acetate side and applied GKD shaker strips around the outside perimeter of the circle.
I added the Kat Scrappiness Artificial Snow and Pearl Glass Dots for the shaker mix and then closed up the shaker by adding the front layer and lining up the snowflake die cut. I adhered 1/8″ white ribbon between the front and bottom layers of the ornament to conceal the shaker strip foam. The final step was adhering a loop of GKD gold cording and a small green gingham bow (fashioned from Keep It Simple Back To Basics Jade Ribbon) with my cordless glue gun.
Affiliate links are used in this post at no cost to you – I really appreciate your support!
Products used:
CARDSTOCK/PAPER: Neenah Classic Crest 110# Solar White cardstock, CutCardStock Stardream Metallic Eris and Pop Tone Sweet Tooth cardstock
STAMPS: Prickley Pear Stamps Snowflake Inserts stamp set
INK: Memento Tuxedo Black ink; Arteza R31 and YG04 alcohol markers
DIES/PUNCHES: Keep It Simple Stitched Circles Nested Dies, Stampin’ Up 1-1/4″ Circle Punch
ACCESSORIES: Bearly Art precision craft glue, MISTI stamp tool, Big Shot, GKD Shaker Strips and Gold Cording, Grafix Crystal Clear Craft Plastic, Kat Scrappiness Artificial Snow and Pearl Glass Dots, 1/8″ red line tape, 1/8″ white ribbon from stash, Keep It Simple Back To Basics Jade Ribbon, cordless glue gun, Eyelet Outlet 4mm white pearls
I hope you’ve enjoyed seeing this project and will link up with us this time! Thanks so much for stopping by today – we’ll see you next time! ;)
Scrappy hugs,