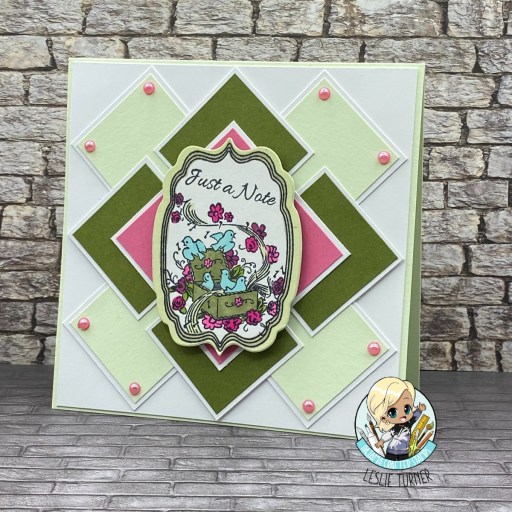
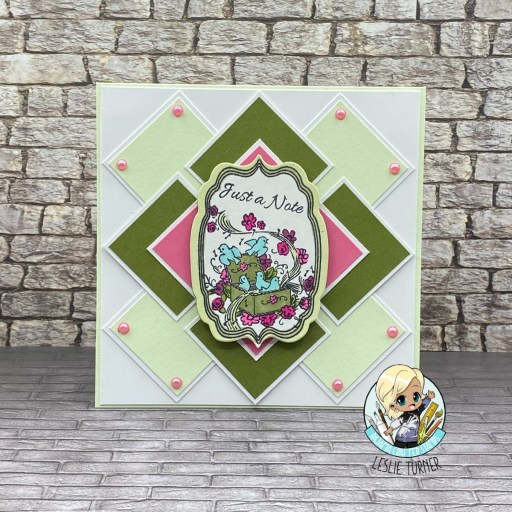
best day ever

Hi friends! I hope you are having the kind of beautiful weather we’re having out here in southwestern Colorado! I’m delighted to share that one of my projects was a top pick a few weeks ago over at Scrapping4fun Challenges. I was invited to guest design for an upcoming challenge, so here I am just in time for Challenge #235 – Wedding/Anniversary! I dug into my arsenal of SVG cut files and came up with this pretty church box card (cut file from SVG Cuts) to make for this challenge. I tailored it for a wedding by changing the wreath a bit, adding yellow vellum to the windows, and adding grass on the sides of the church. I love how it turned out!

Using my Cricut Explore Air 2 and the SVG Cuts Church Box Card cut file, I cut all the church pieces from CutCardStock Basis White cardstock and the wreath from 12×12 Cardstock Shop green and pink textured cardstock. I assembled the wreath, adding flower sequins and a white heart from the Keep It Simple Sprinkles Polymer Clay-Pink & White Hearts with Pearls mix.

Next, I die cut a grass border for each side of the church from the green textured cardstock using the Precious Marieke grass border die, and hand-cut small pieces of 12×12 Cardstock Shop yellow vellum for the front and side windows. The final touch on the front was adding a Tim Holtz idea-ology Small Talk sentiment sticker to the bottom steeple element.

For the back, I stamped a floral pattern on the frame using the Keep It Simple Simply Spring stamp set in Catherine Pooler Pink Champagne ink. I colored the florals with a few alcohol markers (to bring in the purple and pink in the iridescent flower sequins on the wreath) and added some Eyelet Outlet white glitter enamel dots. I stamped a tiny sentiment from the Trinity Stamps A Sentiment for (Almost) Everything stamp set in Memento Tuxedo Black ink on a Basis White scrap, trimmed it, and adhered it horizontally to the sentiment panel. The assembly is always the most fun, and I really enjoyed putting this one together. It was quite easy, actually!

Affiliate links are used in this post at no cost to you – I really appreciate your support! 

Products used:
CARDSTOCK/PAPER: CutCardStock Basis 80# 12×12 White cardstock, 12×12 Cardstock Shop Green Textured and Pink Textured cardstock and Yellow Translucent vellum
STAMPS: Keep It Simple Simply Spring stamp set, Trinity Stamps A Sentiment for (Almost) Everything stamp set
INK: Catherine Pooler Pink Champagne ink; Spectrum Noir Tri-Blends- MG1, DG1, LV1; Memento Tuxedo Black ink
DIES/PUNCHES: SVG Cuts Church Box Card SVG cut file, Precious Marieke Grass Border die
ACCESSORIES: Cricut Explore Air 2, Fiskars 12″ ProCision Rotary Bypass Paper Trimmer, Elmer’s Craft Bond Tape Runner, Bearly Art precision craft glue, MISTI stamp tool, Big Shot, Tim Holtz Alterations/Texture Fades Woodgrain embossing folder, Keep It Simple Sprinkles Polymer Clay-Pink & White Hearts with Pearls, Eyelet Outlet white glitter enamel dots, Tim Holtz idea-ology Small Talk sentiment stickers

I hope you’ve enjoyed seeing this project and will link up a wedding or anniversary project with us this time! Thanks so much for stopping by today – we’ll see you next time! ;)

Scrappy hugs,

We Still Do!

Hey everybody! Can you believe we’re near the end of April already?! I’m thoroughly enjoying sharing all these Pajama Crafter Stamps projects with y’all! I love to work ahead on my design teams and had created quite a few cards prior to stepping down from the Pajama Crafter Stamps DT at the end of February that had not been showcased on my blog or social media platforms. This side accordion panel card features the new Just Married stamp set which I paired with an older Stampin’ Up paper pad. I love the color palette and thought it was perfect for an anniversary card! I’ve seen this fun fold on Pinterest, Sharon Armstrong has a video on her blog, and Lisa Curcio has a version on her blog that she calls an expanding accordion fun fold. So there are a few resources (and different names) out there for this one.

Here are the mini instructions: Cut the 5-1/2″ x 11″ card base from CutCardStock Lessebo White cardstock, score at 1-3/4″, 3-1/2″, 5-1/4″ and 7″, and fold on all the score lines. Cut a smaller folded piece from White at 3″ x 6″ and score at 3″. From coordinating prints in the Stampin’ Up Stacked With Love designer series paper stack, cut three 1-1/2″ x 5-1/4″ panels for the left side, a 3-3/4″ x 5-1/4″ panel for the right side, and two 2-3/4″ square panels for the smaller folded piece. Cut one additional 2-3/4″ square panel from white cardstock for a sentiment. Embellish as desired.

I stamped the car from the Just Married stamp set in Memento Tuxedo Black ink on a light print in the paper stack, and colored the trunk release, bumper, license plate and tires with alcohol markers. I paper-pieced the back window with a white cardstock scrap and added Eyelet Outlet white glitter enamel dots to the back lights. I stamped sentiments from the same stamp set which completed the card.

Here’s an overhead shot so you can see the construction. Super easy fold that really packs a punch!

Affiliate links are used in this post at no cost to you – I really appreciate your support!

Pajama Crafter Stamps products used:
Just Married stamp set

Other products used:
CARDSTOCK/PAPER: CutCardStock Lessebo White cardstock, Stampin’ Up Stacked With Love designer series paper stack
INK: Memento Tuxedo Black ink (pad and marker); Spectrum Noir Tri-Blends- CR3/6/10; black Copic Sketch, Sakura Pigma 08 Micron pen
ACCESSORIES: Fiskars 12″ ProCision Rotary Bypass Paper Trimmer, Elmer’s Craft Bond Tape Runner, Bearly Art precision craft glue, MISTI stamp tool, Eyelet Outlet White Glitter Enamel Dots

I hope you’ve enjoyed this project! Be sure to check out all the awesome stamps, dies and other goodies at Pajama Crafter Stamps which is the new home of the Prickley Pear Stamps brand and the Pajama Crafter Stamps line! Keep up with news and sales by following Pajama Crafter Stamps on Facebook, Instagram and Pinterest, and join Pajama Crafter Stamps & Friends for lots of fun crafty ideas and to share your creativity! And finally, be sure to visit the Pajama Crafter Stamps blog and sign up for the newsletter to stay in touch! Thanks so much for stopping by today – we’ll see you next time! ;)

Scrappy hugs,

hello Spring

Hey everybody! Happy Sunday – I hope you’re having a great weekend! I have a fun shaker card to share for Keep It Simple this morning featuring our new Melody Stories alpha stamps and dies! Have you ever made a shaker card with alpha die cuts? Well, I haven’t either – until now! It’s made just like a regular shaker card but with a bunch of alpha die cuts (and a few floral die cut pieces) instead of shaker bits, and I thought it would be a fun and unique way to showcase our new alphas! We have several new sets of alpha stamps and dies in the store, so be sure to check them out! And if you make a purchase, remember to use my code LoveToScrap2 for 10% off your entire order!

I cut a standard A2 size top-folding landscape card base from CutCardStock Cougar Smooth 100# White cardstock and rounded the bottom right corner. I cut layering panels and a frame for the shaker (using a Back To Basics Stitched Rectangles Nested Die) from coordinating papers in the Simply Spring 6×9 Collection Pack. I die cut a bunch of alphas using the KIS Cuts Melody Stories Font for the inside of the shaker and threw in a few flowers from the Simply Spring Die Cut Pieces.

Using the KIS Alphabet Stamps Melody Stories Font, I stamped ‘SPRING’ in black ink and die cut the letters with the coordinating KIS Cuts Melody Stories Font and adhered them in the bottom right corner. I grabbed a butterfly (and scored the wings) and the word ‘hello’ from the Simply Spring Die Cut Pieces and adhered them to the front of the shaker.

I cut the inside panel from Cougar Smooth 80# White cardstock and embellished it with strips from the floral pattern and white cardstock used on the front and a die cut from the Simply Spring Die Cut Pieces.

Keep It Simple products used:
Simply Spring 6×9 Collection Pack
Simply Spring Die Cut Pieces
KIS Alphabet Stamps Melody Stories Font
KIS Cuts Melody Stories Font
Back To Basics Stitched Rectangles Nested Dies

Affiliate links are used in this post at no cost to you – I really appreciate your support!

Other products used:
CARDSTOCK/PAPER: Cougar Smooth 100# White cardstock, Cougar Smooth 80# White cardstock
INK: Memento Tuxedo Black ink
DIES/PUNCHES: Kadomaru Pro corner rounder
ACCESSORIES: Fiskars 12″ ProCision Rotary Bypass Paper Trimmer, Elmer’s Craft Bond Tape Runner, Bearly Art precision craft glue, MISTI stamp tool, Big Shot, Grafix Crystal Clear Craft Plastic, GKD Shaker Strips, Scrapbook Adhesives 3D Foam Squares (small white)

I hope you’ve loved seeing this project as much as I loved creating it and you’re inspired to get crafty! Be sure to check out ALL the fun goodies in the Keep It Simple online store! Save 10% on your entire order when you shop online using code LoveToScrap2 at checkout! There is no minimum purchase requirement and no usage limits, AND it combines with product, order, and shipping discounts! Is that cool, or what?! Be sure to Follow us on Facebook, Instagram, and Pinterest for lots of crafty inspiration! Thanks so much for stopping by today – we’ll see you next time!

Scrappy hugs,

Happy Mother’s Day

Hi friends! Happy Saturday – the weeks sure are flying by! Believe it or not, we got a little skiff of snow last night… just when we thought Mother Nature was over it. Bahahaha, I guess not! I’ve begun making Mother’s Day cards for our friend with the local ‘hardware + everything else under the sun’ store to sell. Her husband passed away several months ago and she’s struggling a bit, so this year I am donating as many Mother’s Day cards as I can make for her to sell and keep 100% of the proceeds. That’ll make my heart happy. There are three files in this bundle and I’m hoping to get the other two made this weekend. Fingers crossed!

For this card, I used my Cricut and the Juliet card cut file from the Le Chapeau SVG Bundle from Dreaming Tree. I cut the pieces from CutCardStock Lessebo Cement Gray, Lessebo Granite Gray, Basis Natural and Pop Tone Black Licorice, along with Hygloss Gold Foil and two coordinating papers from the Keep It Simple Ruby 12×12 Collection Pack. I added a ribbon bow fashioned with the cool little wooden bow maker my awesome friend Maureen gifted me this past Christmas. I also added a couple Wild Orchid Crafts pearl sprays along with a sentiment from the Pretty Pink Posh Mom stamp set, stamped in Memento Tuxedo Black ink on a Basis Natural scrap and cut with a My Favorite Things Essential Fishtail Sentiment Strips die.

For the inside, I stamped another sentiment from the Pretty Pink Posh Mom stamp set in black ink on a scrap piece of Basis Natural and cut it with a My Favorite Things Essential Fishtail Sentiment Strips die.

Affiliate links are used in this post at no cost to you – I really appreciate your support! 

Products used:
CARDSTOCK/PAPER: CutCardStock Lessebo Cement Gray, Lessebo Granite Gray, Basis Natural, Pop Tone Black Licorice; Hygloss Gold Foil, Keep It Simple Ruby 12×12 Collection Pack
STAMPS: Pretty Pink Posh Mom stamp set
INK: Memento Tuxedo Black ink
DIES/PUNCHES: My Favorite Things Essential Fishtail Sentiment Strips
ACCESSORIES: Cricut Explore Air 2, Elmer’s Craft Bond Tape Runner, Bearly Art precision craft glue, MISTI stamp tool, Big Shot, Really Reasonable Ribbon pink ribbon, small wooden bow maker, Wild Orchid Crafts Pearl Sprays

I hope you’ve enjoyed seeing this Mother’s Day card! Thanks so much for stopping by today – we’ll see you next time! ;)

Scrappy hugs,

You Are A T-Riffic Pal

Howdy peeps! It’s Friday and I hope your week has gone well! I have a super cute Pajama Crafter Stamps project to share today created with the adorable Prickley Pear Stamps Dinosaur Pals stamps and dies. This is another one of the (many) projects I created prior to leaving the design team at the end of February and hadn’t yet showcased. These stamps and dies are so stinkin’ cute I can’t even stand it, and add a wobble element and it becomes cuteness overload! This is a clean and simple design that would be easy to mass produce for party invites, and wouldn’t they be adorable?!

I cut the card base and layering panel from Neenah Classic Crest Solar White cardstock. I stamped the dinosaur, tree and bush from the Dinosaur Pals stamps in Memento Tuxedo Black ink on Solar White scraps, colored them with alcohol markers and cut them with the coordinating Dinosaur Pals dies. I added Eyelet Outlet grass washi tape to the bottom of the layering panel and stamped the sentiment in the top left corner.

I adhered the panel to the card base and added the dinosaur, tree and bush to complete the scene. Here’s that super cute dino on the wobble!

Affiliate links are used in this post at no cost to you – I really appreciate your support!

Pajama Crafter Stamps products used:
Prickley Pear Stamps Dinosaur Pals stamps
Prickley Pear Stamps Dinosaur Pals dies

Other products used:
Cardstock/Paper: Neenah Classic Crest 110# Solar White cardstock
Ink: Memento Tuxedo Black ink; Arteza alcohol markers- BR92, RP09, YG14/26/42
Accessories: Tonic Studios 12″ Guillotine Paper Trimmer, Art Glitter Dries Clear adhesive, MISTI stamp tool, Big Shot, Hampton Art Action Wobbles, Eyelet Outlet Grass Washi Tape

I hope you’ve enjoyed this project! Be sure to check out all the awesome stamps, dies and other goodies at Pajama Crafter Stamps which is the new home of the Prickley Pear Stamps brand and the Pajama Crafter Stamps line! Keep up with news and sales by following Pajama Crafter Stamps on Facebook, Instagram and Pinterest, and join Pajama Crafter Stamps & Friends for lots of fun crafty ideas and to share your creativity! And finally, be sure to visit the Pajama Crafter Stamps blog and sign up for the newsletter to stay in touch! Thanks so much for stopping by today – we’ll see you next time! ;)

Scrappy hugs,

chill brr-thday slimline shaker

Howdy peeps! I’m back on this fine Tuesday morning with another DT inspiration project! I created this fun slimline shaker for Keep It Simple with the new KIS Slimline Cuts Stitched Circles die; sequins and beads from the new Sprinkles line; and papers, stamps and dies from the adorable Penguin Party Collection! I know everybody is ready for the cold weather to be gone but I just couldn’t resist creating one more frosty brr-thday card with these cuties!

The 3-3/4″ x 9″ slimline card base was cut from CutCardStock Cougar Smooth 100# White cardstock. Layering panels were cut from CutCardStock Lessebo Aubergine cardstock and a purple polka dot paper in the KIS Penguin Party 6×9 Collection Pack. The front panel for the shaker was cut from a coordinating paper in the 6×9 Collection Pack using the KIS Slimline Cuts Stitched Circles die and backed with a piece of Grafix Crystal Clear Craft Plastic.

I stamped the penguins from the Penguins Collection Stamps in Memento Tuxedo Black, colored them with alcohol markers, and cut them with the coordinating Penguins Outline Dies. I stamped the sentiment (from the same stamp set) in Catherine Pooler Queen For A Day ink. I always LOVE adding the shaker mix – and I’m always tempted to add too much – but I did hold back somewhat, lol. This shaker mix consists of five types of sequins and beads from the new KIS Sprinkles line.

The inside panel was cut from Cougar Smooth 80# White cardstock and embellished with the polka dot paper and purple cardstock used on the front. I stamped a sentiment (from the same Penguins stamp set) in purple ink and layered the panel on the purple cardstock.

Keep It Simple products used:
KIS Slimline Cuts Stitched Circles
Penguin Party 6×9 Collection Pack
Penguin Party Penguins Collection Stamps
Penguin Party Penguins Outline Dies
KIS Sprinkles – Sequins-Shells, Tiny Stars & Rhinestones, Pearls
KIS Sprinkles – Sequins-Iridescent Snowflakes
KIS Sprinkles – Beads-2mm Matte White
KIS Sprinkles – Beads-2mm Caviar Glass Sapphire
KIS Sprinkles – Beads-2mm Caviar Glass Light Blue

Affiliate links are used in this post at no cost to you – I really appreciate your support!

Other products used:
CARDSTOCK/PAPER: CutCardStock Cougar Smooth 100# White, Cougar Smooth 80# White and Lessebo Aubergine cardstock
INK: Catherine Pooler Queen For A Day ink, Memento Tuxedo Black ink; Spectrum Noir Tri-Blends- IG6/8/9, OR1/2
ACCESSORIES: Fiskars 12″ ProCision Rotary Bypass Paper Trimmer, Elmer’s Craft Bond Tape Runner, Bearly Art precision craft glue, MISTI stamp tool, Big Shot, Grafix Crystal Clear Craft Plastic, 1/8″ and 1/2″ red line tape, GKD Shaker Strips, Scrapbook Adhesives 3D Foam Squares (small white)

I hope you’ve loved seeing this project as much as I loved creating it and you’re inspired to get crafty! Be sure to check out ALL the fun goodies in the Keep It Simple online store! Save 10% on your entire order when you shop online using code LoveToScrap2 at checkout! There is no minimum purchase requirement and no usage limits, AND it combines with product, order, and shipping discounts! Is that cool, or what?! Be sure to Follow us on Facebook, Instagram, and Pinterest for lots of crafty inspiration! Thanks so much for stopping by today – we’ll see you next time!

Scrappy hugs,

Paris in the Spring

Hey everybody! Happy Tuesday – I hope your week has started off nicely! I’ve popped in this morning with a Pajama Crafter Stamps project to share that I created with the beautiful Prickley Pear Stamps Flourished Oval Sentiments stamp set and Flourished Oval die. This is another one of the (many) projects I created prior to leaving the team at the end of February and hadn’t yet showcased. I had my eye on the Paris stamp in this stamp set and remembered an Eiffel Tower die in my stash so that’s the direction I went. I actually had the card base and layering panel already made on my desk that I had planned for another project but didn’t use, so using them for this card made it a snap to put together!

The card base and layering panel were cut from CutCardStock Cougar Smooth White cardstock and the upper left and lower right corners rounded. The patterned paper layers were cut from coordinating papers in the Asuka Studio Dusty Rose 6×6 paper pack and the corners rounded. I stamped the Paris image from the Prickley Pear Stamps Flourished Oval Sentiments stamps in Catherine Pooler Twilight ink, cut it with the coordinating Flourished Oval die and popped it up on foam strips on the card front. Using the Hero Arts Paper Layering Eiffel Tower die, I cut several towers from CutCardStock Basis Soft Pink, adhered them together for dimension and slid the piece under the left side of the focal image. The finishing touch was adding several Keep It Simple Back To Basics Rose Enamel Dots.

I cut the inside panel from Cougar Smooth White and rounded the upper left and lower right corners. I stamped a sentiment from the same Flourished Oval Sentiments stamp set in Catherine Pooler Twilight ink and layered the panel on Basis Soft Pink cardstock.

Affiliate links are used in this post at no cost to you – I really appreciate your support!

Pajama Crafter Stamps products used:
Prickley Pear Stamps Flourished Oval Sentiments
Prickley Pear Stamps Flourished Oval Die

Other products used:
CARDSTOCK/PAPER: CutCardStock Cougar Smooth 80# White and Basis Soft Pink, Asuka Studio Dusty Rose 6×6 paper pack
INK: Catherine Pooler Twilight ink
DIES/PUNCHES: Kadomaru Pro Corner Rounder, Hero Arts Paper Layering Eiffel Tower Die
ACCESSORIES: Fiskars 12″ ProCision Rotary Bypass Paper Trimmer, Elmer’s Craft Bond Tape Runner, Bearly Art precision craft glue, MISTI stamp tool, Big Shot, 1″ double-sided foam strips, Keep It Simple Back To Basics Rose Enamel Dots

I hope you’ve enjoyed this project! Be sure to check out all the awesome stamps, dies and other goodies at Pajama Crafter Stamps which is the new home of the Prickley Pear Stamps brand and the Pajama Crafter Stamps line! Keep up with news and sales by following Pajama Crafter Stamps on Facebook, Instagram and Pinterest, and join Pajama Crafter Stamps & Friends for lots of fun crafty ideas and to share your creativity! And finally, be sure to visit the Pajama Crafter Stamps blog and sign up for the newsletter to stay in touch! Thanks so much for stopping by today – we’ll see you next time! ;)

Scrappy hugs,

Earrings Galore!

Hey everybody – a very Happy Monday to you all! I made my daughter-in-law a bunch of dangle earrings back in February and wanted to share them. I made some of them from craft leather and some from cardstock, and some were cut with my Cricut and some were cut with dies. They all turned out pretty cool and she said she loved them! Oh, and I cut all the earring cards with my Cricut also, using a free earring card SVG cut file on Cricut Design Space and CutCardStock Twine cardstock. I tweaked the length and wideth to make the cards different sizes.

These four pairs were made from Taylored Expressions craft leather, CutCardStock Bright Gold Foil and Curious Metallic Gold Leaf cardstock, and several Designer Dangles die sets. The fringe earrings were embellished with Kat Scrappiness Silver Pearl Mix. TE no longer carries the craft leather or the Designer Dangle die sets; I’ve had mine for several years and I’m so glad I got them when I did!

These two pairs were cut with my Cricut Explore Air 2 from Taylored Expressions craft leather using the FREE Printable Cuttable Creatables Classic Earrings SVG cut file. A two-fer… the first pair features the outsides and the second pair features the insides! I almost threw the inside pieces away when I took them off my cutting mat and thought ‘No way – I’m gonna make another pair out of these!’

These two pairs were cut from cardstock using two sets of Taylored Expressions Designer Dangles. The blue ones were cut from CutCardStock Stardream Metallic Vista and Stardream Metallic Sapphire cardstock, embellished with gemstones from the Trinity Stamps Sparkling Sapphire Embellishment Mix. The green ones were cut from CutCardStock Stardream Metallic Fairway and Curious Metallic Aloe cardstock, embellished with Eyelet Outlet 3mm and 5mm green pearls. Gemstones and pearls were applied with my Trinity Stamps Pick Up Stick.

These four pairs were cut with my Cricut Explore Air 2 from cardstock using the FREE Printable Cuttable Creatables July 4th Earrings and Scroll Earrings SVG cut files. The three Americana pairs were cut from CutCardStock Stardream Metallic Jupiter, Stardream Metallic Pluto and Stardream Metallic Sapphire cardstock. The scroll earrings were cut from CutCardStock Stardream Metallic Vista cardstock and embellished with Eyelet Outlet 4mm blue pearls (applied with my Trinity Stamps Pick Up Stick).

Affiliate links are used in this post at no cost to you – I really appreciate your support! 

Products used:
CARDSTOCK/PAPER: CutCardStock Stardream Metallic Vista, Stardream Metallic Sapphire, Stardream Metallic Fairway, Stardream Metallic Jupiter, Stardream Metallic Pluto, Bright Gold Foil, Curious Metallic Gold Leaf, Curious Metallic Aloe and Twine cardstock
DIES/PUNCHES: Taylored Expressions Designer Dangles Drop-Ins, Designer Dangles Mixed Media, and Designer Dangles Fringe die sets; Printable Cuttable Creatables Classic Earrings, July 4th Earrings and Scroll Earrings SVG cut files (all freebies!)
ACCESSORIES: eeBeads earring wires and jump rings, Cricut Explore Air 2, Big Shot, Taylored Expressions craft leather assortment, Kat Scrappiness Silver Pearl Mix; Eyelet Outlet 5mm green pearls, 3mm green pearls, 4mm blue pearls; Trinity Stamps Sparkling Sapphire Embellishment Mix, Trinity Pick Up Stick

I hope you’ve enjoyed seeing this project and will link up with us this time! Thanks so much for stopping by today – we’ll see you next time! ;)

Scrappy hugs,

Love & Peace, Gnomie

Hey everybody! I hope you had a great weekend! I’m stoked to share a Keep It Simple DT inspiration project created with the awesome Peace Gnomie stamp set from the Bizzy Hands Collection! This dude is just too cool for words, lol! I’m a late 50s girl, having grown up in the 60s and 70s, so he’s right up my alley! I created a swivel top card to showcase him with some coordinating papers from the Pajama Party Collection Pack, and I love how this turned out! It’s a super easy design that I originally saw on Lisa Curcio’s blog.

I cut the flat card base panel and pull-out card from CutCardStock Lessebo White cardstock along with layering panels from Lessebo Amazon Dark Teal cardstock and coordinating papers from the KIS Pajama Party Collection Pack. I stamped the gnome from the Peace Gnomie stamp set set in Memento Tuxedo Black ink on Lessebo White, colored him with alcohol markers, and fussy cut him.

The front bottom panel was adhered to the flat card base with foam squares to give it just a tad bit of dimension for the swivel panel and pull-out card to move freely. I adhered the gnome to the bottom panel with foam squares and added a few Hello Adventure Enamel Dots to the swivel panel.

I stamped the first part of the sentiment (from the same stamp set) in Catherine Pooler It’s A Boy ink in the upper right corner of the swivel panel and the second part centered on the pull-out card. How stinkin’ cute is this?! I LOVE it!

Keep It Simple products used:
Bizzy Hands Peace Gnomie stamp set
Pajama Party 12×12 Collection Pack
Hello Adventure Enamel Dots

Affiliate links are used in this post at no cost to you – I really appreciate your support!

Other products used:
CARDSTOCK/PAPER: CutCardStock Lessebo White and Amazon Dark Teal cardstock
INK: Memento Tuxedo Black (pad and marker); Spectrum Noir Tri-Blends FS6/7/8, PP4/5/6, BG2/3/4, AB1/2/3, TN1/2/4, EB1/2/3
ACCESSORIES: Fiskars 12″ ProCision Rotary Bypass Paper Trimmer, Elmer’s Craft Bond Tape Runner, Bearly Art precision craft glue, MISTI stamp tool, Scrapbook Adhesives 3D Foam Squares (small white)

I hope you’ve loved seeing this project as much as I loved creating it and you’re inspired to get crafty! Be sure to check out ALL the fun goodies in the Keep It Simple online store! Save 10% on your entire order when you shop online using code LoveToScrap2 at checkout! There is no minimum purchase requirement and no usage limits, AND it combines with product, order, and shipping discounts! Is that cool, or what?! Be sure to Follow us on Facebook, Instagram, and Pinterest for lots of crafty inspiration! Thanks so much for stopping by today – we’ll see you next time!

Scrappy hugs,

One Nation Under God

Hi friends! I hope you’re having a fabulous weekend and the weather is warming up a bit where you are! I have a Pajama Crafter Stamps project to share with you today created with the beautiful Some Gave All stamp set. This is another one of the projects I created prior to leaving the PCS team at the end of February and hadn’t yet showcased. I’ve got a few more, lol, so stay tuned… I’m just getting started! This note card features the American flag on a hand-cut flag pole and a scored and inked background. It has been a while since I employed this wood-look technique and I like how it turned out!

I cut the note card base and a layering panel from CutCardStock Basis Natural cardstock. I scored the layering panel in even increments and swiped Catherine Pooler Sand Castle, Over Coffee, and Icing on the Cake inks across it. Finally, I lightly swiped some Ranger walnut stain distress ink across the panel and then inked the edges.

I stamped the flag from the Some Gave All stamp set in Memento Espresso Truffle ink on Basis Natural, colored it with alcohol markers, and fussy cut it. I hand-cut a flag pole from CutCardStock Stardream Metallic Silver cardstock and adhered the pole and flag to the layering panel and then to the card front. The finishing touch was stamping the sentiment (from the same stamp set) in Memento Espresso Truffle ink.

Affiliate links are used in this post at no cost to you – I really appreciate your support!

Pajama Crafter Stamps products used:
Some Gave All stamp set

Other products used:
CARDSTOCK/PAPER: CutCardStock Basis 80# Natural and Stardream Metallic Silver cardstock
INK: Catherine Pooler Sand Castle, Over Coffee, and Icing on the Cake inks; Ranger walnut stain distress ink, Memento Espresso Truffle ink; Spectrum Noir Tri-Blends- DR3/4, TB6, BG2
ACCESSORIES: Fiskars 12″ ProCision Rotary Bypass Paper Trimmer, Elmer’s Craft Bond Tape Runner, Bearly Art precision craft glue, MISTI stamp tool

I hope you’ve enjoyed this project! Be sure to check out all the awesome stamps, dies and other goodies at Pajama Crafter Stamps which is the new home of the Prickley Pear Stamps brand and the Pajama Crafter Stamps line! Keep up with news and sales by following Pajama Crafter Stamps on Facebook, Instagram and Pinterest, and join Pajama Crafter Stamps & Friends for lots of fun crafty ideas and to share your creativity! And finally, be sure to visit the Pajama Crafter Stamps blog and sign up for the newsletter to stay in touch! Thanks so much for stopping by today – we’ll see you next time! ;)

Scrappy hugs,