thanks!

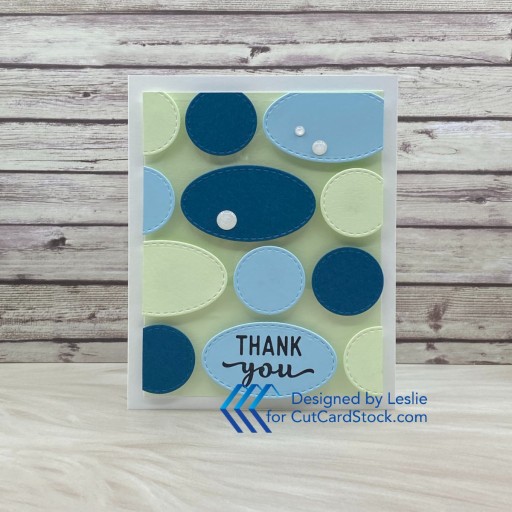
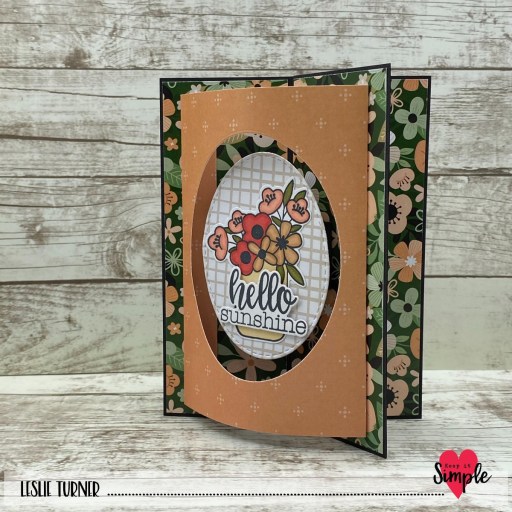
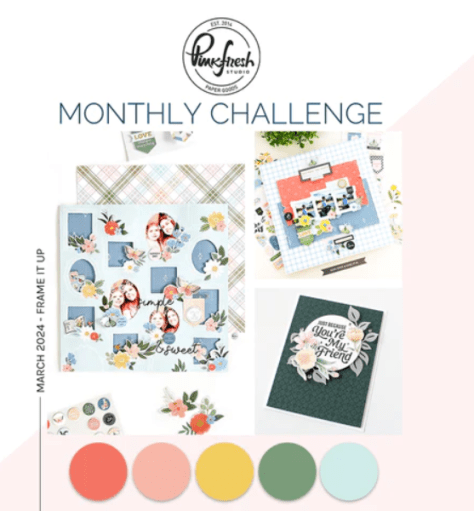
Hey everybody! Happy Saturday – I hope you have something fun planned this weekend! Is it warming up any where you are? Yesterday was absolutely delightful here. The sun was shining warmly although it was still a bit chilly in the shade, and all ten cats and the puppy were outside most of the day! Today I’m sharing my first-ever theater card to enter into the Pinkfresh Studio March Challenge – Frame It Up and I sure love how it turned out! In addition to using frames, the suggested colors are Pinkfresh Studio’s Mango Sorbet/Fruit Punch, Sunkissed, Sweet Mustard, Eucalyptus, and Ocean Breeze. Participants are invited to use just the frame, the colors, or both in their projects. I used both! ;)

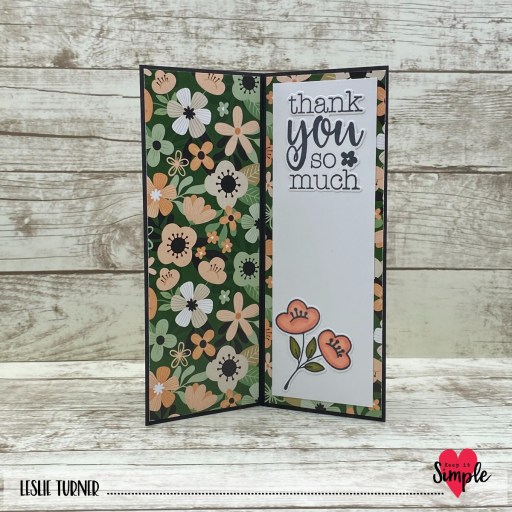
I have some pretty Echo Park patterned papers in my stash featuring these colors which I paired with the Pinkfresh Studio Just a Hello Floral stamps, coloring the blooms to match the colors in the papers and fussy cutting them. Then I used the coordinating Pinkfresh Studio Just a Hello Floral dies to cut the front and inside sentiments.

I ended up watching three or four video tutorials for this fold because the first one I watched included written instructions that had FOUR errors in her written measurements! Needless to say, I discarded those and went on to watch several more videos to be sure I was cutting the pieces correctly, lol! I don’t want to throw anyone under the bus so I’m not going to link to any specific video but if you search for ‘theater card’ online, you’ll come up with a bunch of resources.

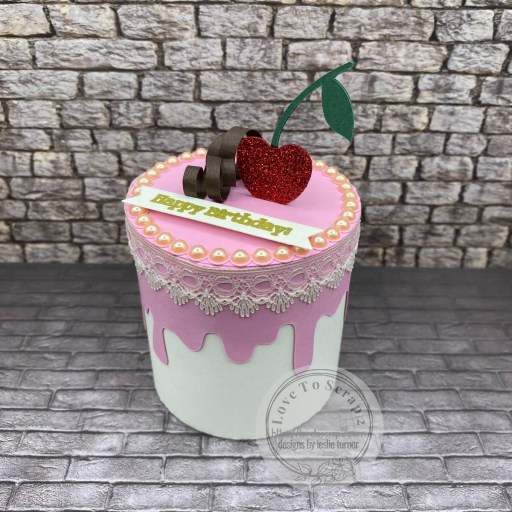
I cut the base and pieces from CutCardStock Basis 110# Natural cardstock and all the layering panels from Echo Park Farmhouse Kitchen Collection Kit. I used a die from the Keep It Simple Stitched Rectangles Nested Dies to die cut the frame on the front. Then I stamped the floral images from the Pinkfresh Studio Just a Hello Floral stamps, colored them with alcohol markers to match the suggested colors, and fussy cut them. I stamped the front and inside sentiments in Ranger Black Soot Distress Archival ink, then again in Versamark, and heat embossed them in Hero Arts clear embossing powder. I cut them with the coordinating Pinkfresh Studio Just a Hello Floral dies. I always say the most fun part of creating 3D projects like this is the assembly! Here are shots of the curtains opening and fully opened…

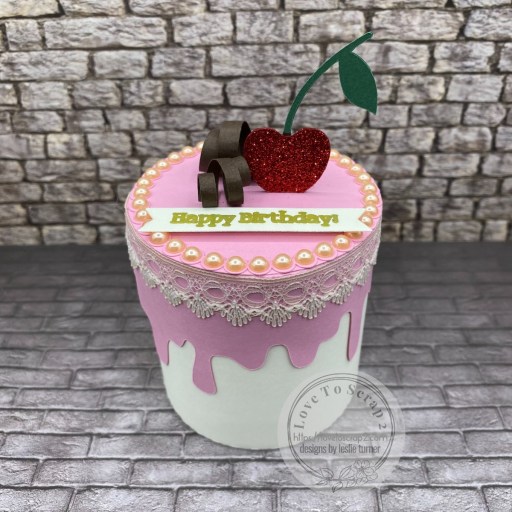
And here is close-up of the curtains fully open…

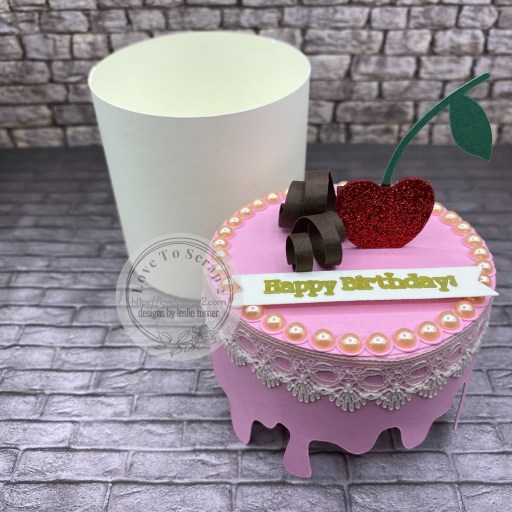
I wanted to include an overhead shot so you can see the construction. It really is a pretty cool fold and recipients always love an interactive card!

Sharing in these additional challenges:
1. https://barrelofmonkeyschallenges.blogspot.com/2024/03/march-barrel-of-monkeys-challenge-13.html (inspired by colors)
2. https://hereisaplacetostart.blogspot.com/2024/03/march-2024-anything-goes-woptional.html
3. https://craftycatzweeklychallenge.blogspot.com/2024/03/crafty-catz-challenge-668.html
4. https://secretstamper.com/2024/03/anything-goes-with-a-fun-fold-for-creative-creases-78/
5. https://lilredwagon.blogspot.com/2024/03/challenge-748-florals.html
6. https://mytimetocraftchallenge.blogspot.com/2024/03/mttc-530-theme-is-multi-colored-florals.html

Affiliate links are used in this post at no cost to you – I really appreciate your support! 

Products used:
CARDSTOCK/PAPER: CutCardStock Basis 110# Natural cardstock, Echo Park Farmhouse Kitchen Collection Kit
STAMPS: Pinkfresh Studio Just a Hello Floral stamps
INK: Ranger Black Soot Distress Archival ink, Spectrum Noir Tri-Blends- PP1/2, AB2/3, GY3/5, YG2/3, IG9; Versamark
DIES/PUNCHES: Keep It Simple Stitched Rectangles Nested Dies, Pinkfresh Studio Just a Hello Floral dies
ACCESSORIES: Fiskars 12″ ProCision Rotary Bypass Paper Trimmer, Elmer’s Craft Bond Tape Runner, Bearly Art precision craft glue, MISTI stamp tool, Big Shot, Stampin’ Up 1″ circle punch, Hero Arts clear embossing powder, Milwaukee heat tool, clear gemstones

I hope you’ve enjoyed seeing this fun theater card! Thanks so much for stopping by today – we’ll see you next time! ;)

Scrappy hugs,

Happy Birthday Cake Treat Box

Hi friends! Happy Friday! I hope you’ve had an awesome week and now it’s time for some fun this weekend, hopefully! I’m thrilled to share that I was a Top Cut recently over at Cut It Up Challenge Blog and was invited to guest in an upcoming challenge, so here I am just in time for Challenge #300 – Happy Birthday! A birthday cake treat box couldn’t be more appropriate to create to help them celebrate their birthday! I used an SVG cut file in my arsenal along with cardstock, pearls and lace from my stash. I dyed the white lace with antique linen distress ink and used the draw feature on my cutting machine for the tag. Saying I had ‘fun’ with this project would be an understatement… it was a blast and I love how it turned out!

Using the Dreaming Tree Petite Cake SVG cut file with my Cricut Explore Air 2, I cut the cake pieces with CutCardStock Lessebo Ivory, the icing pieces with CutCardStock Pop Tone Cotton Candy, the chocolate curls with CutCardStock Pop Tone Hot Fudge, and the cherry with Stampin’ Up Red Glimmer paper and CutCardStock Lessebo Hunter Green cardstock. I used the draw function and a Cricut 1.0 Gold Metallic Marker on my cutting machine for the tag which I cut with a My Favorite Things Essential Fish Tail Sentiment Strip.

The assembly is always the most fun. I embellished the top of the cake with Eyelet Outlet ivory pearls along with 3 Girl JAM lace which I dyed with Ranger antique linen distress ink and misted water in my Tim Holtz distress sprayer. I attached the tag with a Gina K Designs Shaker Strip to give it the same height as the pearls.

Here’s a shot with the lid removed. It’s actually a good-sized little box – big enough to hold a small gift or some candy. Totally fun! ;)

Sharing in the following challenges:
1. https://avenue613.blogspot.com/2024/03/march-2024-anything-goes-w-optional.html
2. https://aperfecttimetocraft.blogspot.com/2024/03/a-perfect-time-to-craft-open-challenge.html
3. https://classicdesignchallenge.blogspot.com/2024/03/classic-design-challenge-03-2024-marapr.html
4. https://craftycatzweeklychallenge.blogspot.com/2024/03/crafty-catz-challenge-668.html
5. https://dragonflydreamschallenges.blogspot.com/2024/03/march-challenge-circles.html
6. https://sparklesforumchallenges.blogspot.com/2024/03/174-sweet-treats.html

Affiliate links are used in this post at no cost to you – I really appreciate your support! 

Products used:
CARDSTOCK/PAPER: CutCardStock Lessebo Ivory, Lessebo Hunter Green, Pop Tone Cotton Candy and Pop Tone Hot Fudge cardstock; Stampin’ Up Red Glimmer paper
INK: Cricut 1.0 Gold Metallic Marker, Ranger antique linen distress ink
DIES/PUNCHES: Dreaming Tree Petite Cake SVG Cut File, My Favorite Things Essential Fish Tail Sentiment Strips
ACCESSORIES: Cricut Explore Air 2, Bearly Art precision craft glue, Big Shot, Eyelet Outlet 5mm ivory pearls, 3 Girl JAM lace, Tim Holtz distress sprayer, GKD Shaker Strips

I hope you’ve enjoyed seeing this project and will link up with us this time! Thanks so much for stopping by today – we’ll see you next time! ;)

Scrappy hugs,

Thank You with Floating Circles & Ovals

Hey everybody! Happy Hump Day! Can you believe we’re a little more than halfway through March already?! I’m up on the CutCardStock blog today with a tutorial for making a thank you card with floating circles and ovals. This card features more of our new Lessebo cardstock – White, Amazon Dark Teal, Arctic Blue and Sweet Mint. And, dang, don’t these colors look fabulous together?! I’ve made a few cards in the past with floating strips and floating tiles, and thought I would try something a little different this time with die cut shapes. I love how it turned out!

I cut a standard A2 side-folding card base from Lessebo White along with a layering panel from Lessebo Sweet Mint. Using Keep It Simple Stitched Circles and Stitched Ovals Nested Dies, I die cut a variety of circles and ovals from Lessebo Amazon Dark Teal, Lessebo Arctic Blue and Sweet Mint. I arranged them on a piece of Grafix Crystal Clear Craft Plastic, adhering them with Ranger Adhesive Strips.

I stamped the sentiment from the Stampin’ Up Charming Sentiment stamp set in Memento Tuxedo Black ink on the bottom middle oval. I added EK Tools 3D Dots to the back of the acetate (behind the die cut shapes), adhered the piece to the Sweet Mint panel, and then to the front of the card base. The finishing touch was adding a few Eyelet Outlet White Glitter Enamel Dots.

I embellished the inside Lessebo White panel with leftover strips of Lessebo Amazon Dark Teal, White and Arctic Blue and a leftover circle die cut, then stamped the sentiment (from the same Stampin’ Up stamp set) in black ink.

Sharing in the following challenges:
1. https://aperfecttimetocraft.blogspot.com/2024/03/a-perfect-time-to-craft-open-challenge.html
2. https://classicdesignchallenge.blogspot.com/2024/03/classic-design-challenge-03-2024-marapr.html
3. https://dragonflydreamschallenges.blogspot.com/2024/03/march-challenge-circles.html
4. https://giveacrafteracookie.blogspot.com/2024/03/cookie-challenge-190-march-thank-you.html
5. https://hereisaplacetostart.blogspot.com/2024/03/march-2024-anything-goes-woptional.html

Affiliate links are used in this post at no cost to you – I really appreciate your support!

CutCardStock products used:
Lessebo White cardstock
Lessebo Amazon Dark Teal cardstock
Lessebo Arctic Blue cardstock
Lessebo Sweet Mint cardstock

Other products used:
STAMPS: Stampin’ Up Charming Sentiments stamp set
INK: Memento Tuxedo Black ink
DIES/PUNCHES: Keep It Simple Stitched Circles and Stitched Ovals Nested Dies
ACCESSORIES: Fiskars 12″ ProCision Rotary Bypass Paper Trimmer, Elmer’s Craft Bond Tape Runner, Bearly Art precision craft glue, MISTI stamp tool, Big Shot, Grafix Crystal Clear Craft Plastic, Ranger Adhesive Strips, EK Tools 3D Dots, Eyelet Outlet White Glitter Enamel Dots

I hope you’ve enjoyed today’s project and you’re inspired to get crafty! Be sure to check out all the awesome cardstock and other goodies at CutCardStock (adhesives, labels, stickers, pens, watercolors and ribbon to name a few). And head on over to the CutCardStock Facebook Page and for more inspiration! Also, be sure to join our Creating with Card Stock Facebook Group for even more crafty inspiration! Thanks so much for stopping by today – we’ll see you next time!

Scrappy hugs,

fun fold thank you

Hey everybody! Happy Hump Day! We’re still waiting for some semblence of Spring here in southwestern Colorado… how about you?! I think we can safely say that ol’ Punxsutawney Phil was a little confused, lol! I have another awesome ScrapbookingStore DT inspiration project to share with you today created with the March 2024 Scrapbook Kit with Upgrades! This side accordion panel card is a great fun fold that really packs a punch. My inspiration for this one came from Pinterest, and I’ve watched videos on Lisa Curcio’s blog and Sharon Armstrong’s blog.

Here are the mini instructions: Cut the 5-1/2″ x 11″ card base from CutCardStock Lessebo Bubble Gum Pink cardstock, score at 1-3/4″, 3-1/2″, 5-1/4″ and 7″, and fold on all the score lines. Cut a smaller folded piece from Bubble Gum Pink at 3″ x 6″ and score at 3″. From coordinating prints in the Carta Bella Flora No. 6 Collection Kit, cut three 1-1/2″ x 5-1/4″ panels for the left side, a 3-3/4″ x 5-1/4″ panel for the right side, and two 2-3/4″ square panels for the smaller folded piece. Cut one additional 2-3/4″ square panel for a sentiment. Embellish as desired.

I embellished the front with elements from the Paige Evans Garden Shoppe Embellishments in the upgrades and a sentiment sticker from the sticker sheet which I popped up on dimensional foam squares. The inside sentiment is a trimmed journaling card from the collection.

Here’s a shot of the card folded flat for mailing. I totally love how this one turned out!

Sharing in the following challenges:
1. https://aperfecttimetocraft.blogspot.com/2024/03/a-perfect-time-to-craft-open-challenge.html
2. https://avenue613.blogspot.com/2024/03/march-2024-anything-goes-w-optional.html
3. https://barrelofmonkeyschallenges.blogspot.com/2024/03/march-barrel-of-monkeys-challenge-13.html
4. https://classicdesignchallenge.blogspot.com/2024/03/classic-design-challenge-03-2024-marapr.html
5. https://fabnfunkychallenges.blogspot.com/2024/03/challenge-591-spring.html
6. https://lilredwagon.blogspot.com/2024/03/challenge-748-florals.html

Affiliate links are used in this post at no cost to you – I really appreciate your support!

ScrapbookingStore products used:
March 2024 Scrapbook Kit with Upgrades:
Carta Bella Flora No. 6 12×12 Collection Kit with Element Sticker Sheet
Upgrades: Simple Stories St. Patrick’s Day Page Pieces
Pink Paislee 5th & Monaco Embellishments
Paige Evans Garden Shoppe Embellishments

Other products used:
CARDSTOCK/PAPER: CutCardStock Lessebo Bubble Gum Pink cardstock
ACCESSORIES: Fiskars 12″ ProCision Rotary Bypass Paper Trimmer, Elmer’s Craft Bond Tape Runner, Bearly Art precision craft glue, dimensional foam squares

I hope you’ve enjoyed today’s project and you’re thinking about all the fun you could have with this month’s kit… you really ought to think about joining the Subscription Club! Be sure to Follow us on Facebook, Instagram, Pinterest and YouTube for lots of crafty inspiration! And if you do decide to join the Subscription Club, join our ScrapbookingStore Club Member Group on Facebook for more inspiration and to share your projects! Thanks so much for stopping by today – we’ll see you next time!

Scrappy hugs,

for you.

Hey everybody! Happy Tuesday – I hope you are having a great week! I’m delighted to be back today with another amazing ScrapbookingStore DT inspiration project created with the March Scrapbook Kit with Upgrades! I’m totally smitten with all the patterned papers, stickers and floral-themed upgrades in this month’s kit AND I have quite a few purse SVG cut files in my arsenal, so it didn’t take me long to decide what one of my projects was going to be, lol! This is the first time I’ve used this particular cut file and I love how it turned out. This fun shaped card was easy to assemble, and I definitely see a few more of these in my future. ;)

Using my Cricut Explore Air 2 and the SVG Cuts Luxury Handbags SVG cut file (specifically the Purse Card file), I cut the card base and front flap layer from two coordinating papers in the Carta Bella Flora No. 6 Collection Kit. I cut the handles, front flap and envelope from American Crafts Blush cardstock. I assembled the card and added a sentiment sticker from the sticker sheet as well as a flower from the Pink Paislee 5th & Monaco Embellishments in the upgrades.

The inside panel was cut from CutCardStock Cougar Smooth 80# White cardstock which I embellished with sentiment and floral stickers from the sticker sheet. I cut the envelope from the Blush cardstock.

Sharing in the following challenges:
1. https://aperfecttimetocraft.blogspot.com/2024/03/a-perfect-time-to-craft-open-challenge.html
2. https://avenue613.blogspot.com/2024/03/march-2024-anything-goes-w-optional.html
3. https://classicdesignchallenge.blogspot.com/2024/03/classic-design-challenge-03-2024-marapr.html
4. https://fabnfunkychallenges.blogspot.com/2024/03/challenge-591-spring.html
5. https://mmmchallengeblog.blogspot.com/2024/03/221-spring-flowers-weather-etc.html
6. https://pennyschallenges.blogspot.com/2024/03/pennys-challenge-567.html
7. https://scrapping4funchallenges.blogspot.com/2024/03/march-easter-spring.html
8. https://cinspirations.blogspot.com/2024/03/march-challenge-anything-goes.html

Affiliate links are used in this post at no cost to you – I really appreciate your support!

ScrapbookingStore products used:
March 2024 Scrapbook Kit with Upgrades:
Carta Bella Flora No. 6 12×12 Collection Kit with Element Sticker Sheet
Upgrades: Simple Stories St. Patrick’s Day Page Pieces
Pink Paislee 5th & Monaco Embellishments
Paige Evans Garden Shoppe Embellishments

Other products used:
CARDSTOCK/PAPER: American Crafts Blush cardstock, CutCardStock Cougar Smooth 80# White cardstock
DIES/PUNCHES: SVG Cuts Luxury Handbags SVG Cut File (specifically the Purse Card file)
ACCESSORIES: Cricut Explore Air 2, Elmer’s Craft Bond Tape Runner, 1″ double-sided foam strip, 1/4″ Scor-Tape

I hope you’ve enjoyed today’s project and you’re thinking about all the fun you could have with this month’s kit… you really ought to think about joining the Subscription Club! Be sure to Follow us on Facebook, Instagram, Pinterest and YouTube for lots of crafty inspiration! And if you do decide to join the Subscription Club, join our ScrapbookingStore Club Member Group on Facebook for more inspiration and to share your projects! Thanks so much for stopping by today – we’ll see you next time!

Scrappy hugs,

Fa-la-la slimline

Howdy, peeps! I hope you’ll have an awesome Monday! I’m popping in this morning with a Keep It Simple DT inspiration project featuring one of the stamp sets in the new Bizzy Hands Collection just released a few weeks ago! OMGoodness, there are so many stamp sets in this collection to choose from – you’ll want them all! You undoubtedly know that I enjoy creating Christmas projects all year long so I chose the super adorable Christmas Gnomes for this slimline shaker. I also used the new Slimline Cuts Stitched Squares die and an assortment of our new polymer clay and sequins in the Sprinkles line. There’s nothing more fun than a trio of gnome dudes on a shaker! I just can’t get enough of these fun new products!

I cut my go-to slimline size card base (3-3/4″ x 9″) from CutCardStock 100# Cougar Smooth White cardstock along with a green layering panel from a paper in the Bunny Season 6×9 Collection Pack and two layering panels from papers in the Ruby 12×12 Collection Pack. I used the new Slimline Cuts Stitched Squares die to cut the shaker panel from one of the red layering panels. I stamped some musical notes from the Christmas Gnomes stamp set on the shaker panel in Memento Tuxedo Black ink and the gnomes in Memento Espresso Truffle ink on 80# Cougar Smooth White which I colored with alcohol markers and added some accents with a Sakura Clear Star Gelly Roll pen. I fussy cut the gnomes and edged them with a Memento Rich Cocoa marker.

I stamped two sentiments in Memento Tuxedo Black ink from the Christmas Gnomes stamp set on the back panel of the shaker. I used Grafix Crystal Clear Craft Plastic and 1/2″ double-sided foam strips to create the shaker. Then I added Polymer Clay-Candy Cane Red & White Christmas Mix, Polymer Clay-Mouse Christmas Mix and Sequins-Iridescent Snowflakes from the new Sprinkles line for the shaker bits! I adhered the stamped gnomes and added several Jade Enamel Dots.

I cut the inside panel from 80# Cougar Smooth White cardstock and embellished it with a wide strip of paper from the Ruby Collection Pack. I stamped a sentiment from the Scandinavian Christmas Gnomes stamps in Tuxedo Black ink and layered the panel on an additional paper from the Ruby Collection Pack.

Sharing in the following challenges:
1. https://aperfecttimetocraft.blogspot.com/2024/03/a-perfect-time-to-craft-open-challenge.html
2. https://hereisaplacetostart.blogspot.com/2024/03/march-2024-anything-goes-woptional.html
3. https://classicdesignchallenge.blogspot.com/2024/03/classic-design-challenge-03-2024-marapr.html
4. https://pennyschallenges.blogspot.com/2024/03/pennys-challenge-567.html
5. https://cinspirations.blogspot.com/2024/03/march-challenge-anything-goes.html

Keep It Simple products used:
Bizzy Hands Christmas Gnomes stamps
Slimline Cuts Stitched Squares die
Sprinkles Polymer Clay-Candy Cane Red & White Christmas Mix
Sprinkles Polymer Clay-Mouse Christmas Mix
Sequins-Iridescent Snowflakes
Back To Basics Ruby 12×12 Collection Pack
Bunny Season 6×9 Collection Pack
Scandinavian Christmas Gnomes stamps
Back To Basics Jade Enamel Dots

Affiliate links are used in this post at no cost to you – I really appreciate your support!

Other products used:
CARDSTOCK/PAPER: CutCardStock Cougar Smooth 100# White, Cougar Smooth 80# White
INK: Memento Espresso Truffle and Tuxedo Black inks; Spectrum Noir Tri-Blends- DR1/3/4/5/6/7, IG2/4/5, FS6/7/8, GB1/3/5, TB2/3/4, LY1/2/3, GY2/3/5, LG1/3/5, EB5/6/7; Sakura Clear Star Gelly Roll pen, Memento Rich Cocoa marker
ACCESSORIES: Fiskars 12″ ProCision Rotary Bypass Paper Trimmer, Elmer’s Craft Bond Tape Runner, Bearly Art precision craft glue, MISTI stamp tool, Big Shot, 1/2″ double-sided foam strips, Grafix Crystal Clear Craft Plastic, red liner tape

I hope you’ve loved seeing this project as much as I loved creating it and you’re inspired to get crafty! Be sure to check out ALL the fun goodies in the Keep It Simple online store! Save 10% on your entire order when you shop online using code LoveToScrap2 at checkout! There is no minimum purchase requirement and no usage limits, AND it combines with product, order, and shipping discounts! Is that cool, or what?! Be sure to Follow us on Facebook, Instagram, and Pinterest for lots of crafty inspiration! Thanks so much for stopping by today – we’ll see you next time!

Scrappy hugs,

in a field of roses

Hi friends! Happy Monday to everybody! I have another amazing ScrapbookingStore DT inspiration project to share with you today created with the gorgeous March 2024 Scrapbook Kit with Upgrades! I’m totally in love with all the florals in this month’s kit and have created a motivational side pop-up card using a set of Hot Off The Press dies in my stash. It never hurts to have a few cards handy to give to someone who needs a little lift, and florals are always the ticket!

Using the Hot Off The Press Side Pop-Up Card Dies, I cut the card base from CutCardStock Lessebo Dawn Maroon cardstock along with layering panels from a floral print in the Carta Bella Flora No. 6 Collection Kit. I cut a coordinating journaling card from the kit using a Keep It Simple Stitched Rectangles Nested Die to use as the focal image. I adhered an assortment of floral stickers from the sticker sheet to Solar White cardstock scraps, fussy cut them and adhered them to the tiers on the card base. The finishing touch was adding iridescent gemstones for a little bit of bling.

I added a Solar White panel to the back which I embellished with a leftover strip of the floral paper used on the front and a sentiment sticker from the sticker sheet. This was an easy one!

Sharing in the following challenges:
1. https://aperfecttimetocraft.blogspot.com/2024/03/a-perfect-time-to-craft-open-challenge.html
2. https://avenue613.blogspot.com/2024/03/march-2024-anything-goes-w-optional.html
3. https://classicdesignchallenge.blogspot.com/2024/03/classic-design-challenge-03-2024-marapr.html
4. https://cutitupchallenges.blogspot.com/2024/03/cut-it-up-challenge-299-colors-of-spring.html
5. https://fabnfunkychallenges.blogspot.com/2024/03/challenge-591-spring.html
6. https://mmmchallengeblog.blogspot.com/2024/03/221-spring-flowers-weather-etc.html
7. https://pennyschallenges.blogspot.com/2024/03/pennys-challenge-567.html
8. https://scrapping4funchallenges.blogspot.com/2024/03/march-easter-spring.html
9. https://cinspirations.blogspot.com/2024/03/march-challenge-anything-goes.html

Affiliate links are used in this post at no cost to you – I really appreciate your support!

ScrapbookingStore products used:
March 2024 Scrapbook Kit with Upgrades:
Carta Bella Flora No. 6 12×12 Collection Kit with Element Sticker Sheet
Upgrades: Simple Stories St. Patrick’s Day Page Pieces
Pink Paislee 5th & Monaco Embellishments
Paige Evans Garden Shoppe Embellishments

Other products used:
CARDSTOCK/PAPER: CutCardStock Lessebo Dawn Maroon cardstock, Neenah Classic Crest 80# Solar White cardstock
DIES/PUNCHES: Hot Off The Press Side Pop-Up Card Dies, Keep It Simple Stitched Rectangles Nested Dies
ACCESSORIES: Fiskars 12″ ProCision Rotary Bypass Paper Trimmer, Elmer’s Craft Bond Tape Runner, Bearly Art precision craft glue, Big Shot, iridescent gemstones

I hope you’ve enjoyed today’s project and you’re thinking about all the fun you could have with this month’s kit… you really ought to think about joining the Subscription Club! Be sure to Follow us on Facebook, Instagram, Pinterest and YouTube for lots of crafty inspiration! And if you do decide to join the Subscription Club, join our ScrapbookingStore Club Member Group on Facebook for more inspiration and to share your projects! Thanks so much for stopping by today – we’ll see you next time!

Scrappy hugs,

lucky, lucky me!

Hey everybody, Happy St. Patrick’s Day! Are you wearing green or do you want to be pinched?! Bahahaha! I have a fun ScrapbookingStore DT inspiration project to share with you today created with the awesome March 2024 Scrapbook Kit with Upgrades! I created a pocket front card and my inspiration came from THIS Splitcoast Stampers tutorial. I’ve had these instructions in my arsenal for a few years and had never made one, so I figured it was about time. Dina made hers with a gnome theme and it kind of grabbed my attention since I was looking for a fun design for a St. Patrick’s Day card!

I cut the card base from CutCardStock 100# Cougar Smooth White along with layering panels from a clover print in the Carta Bella Flora No. 6 Collection Kit as well as CutCardStock Scottish Highlands Green. I embellished the front with elements from the Simple Stories St. Patrick’s Day Page Pieces in the upgrades as well as a stamped gnome from the Stampingbella Gnomes Have Feelings Too stamp set which I colored with alcohol markers and fussy cut. I created a separate round card that I tucked into the pocket – it’s not a very big one but it does have room on the inside for a short message and signature. ;)

I added a large shamrock (also from the Simple Stories St. Patrick’s Day Page Pieces) to the inside of the card. This fun fold can be used for any occasion and I’m sure I’ll be making it again. Next time I think it would be fun to add a sentiment to the inside and tuck some fun tags and ephemera into the pocket on the front. The sky is the limit, as they say! ;)

Sharing in the following challenges:
1. https://aperfecttimetocraft.blogspot.com/2024/03/a-perfect-time-to-craft-open-challenge.html
2. https://hereisaplacetostart.blogspot.com/2024/03/march-2024-anything-goes-woptional.html
3. https://cardz4galz.blogspot.com/2024/03/220-use-some-green.html
4. https://classicdesignchallenge.blogspot.com/2024/03/classic-design-challenge-03-2024-marapr.html
5. https://craftygalscornerchallenges.blogspot.com/2024/03/challenge-253-anything-goes.html
6. https://secretstamper.com/2024/03/anything-goes-with-a-fun-fold-for-creative-creases-78/

Affiliate links are used in this post at no cost to you – I really appreciate your support!

ScrapbookingStore products used:
March 2024 Scrapbook Kit with Upgrades:
Carta Bella Flora No. 6 12×12 Collection Kit with Element Sticker Sheet
Upgrades: Simple Stories St. Patrick’s Day Page Pieces
Pink Paislee 5th & Monaco Embellishments
Paige Evans Garden Shoppe Embellishments

Other products used:
CARDSTOCK/PAPER: CutCardStock Cougar Smooth 100# White, Cougar Smooth 80# White and Scottish Highlands Green cardstock
STAMPS: Stampingbella Gnomes Have Feelings Too stamp set
INK: Memento Tuxedo Black ink; Spectrum Noir Tri-Blends- BG5/6/7, LG1/3/5, FS6/7/8
DIES/PUNCHES: Keep It Simple Stitched Circles Nested Dies
ACCESSORIES: Fiskars 12″ ProCision Rotary Bypass Paper Trimmer, Elmer’s Craft Bond Tape Runner, Bearly Art precision craft glue, MISTI stamp tool, Big Shot, Scrapbook Adhesives Foam Squares (small white), Keep It Simple Crafty Girls Buttons

I hope you’ve enjoyed today’s project and you’re thinking about all the fun you could have with this month’s kit… you really ought to think about joining the Subscription Club! Be sure to Follow us on Facebook, Instagram, Pinterest and YouTube for lots of crafty inspiration! And if you do decide to join the Subscription Club, join our ScrapbookingStore Club Member Group on Facebook for more inspiration and to share your projects! Thanks so much for stopping by today – we’ll see you next time!

Scrappy hugs,

hello sunshine

Hi friends, happy weekend! I’m delighted to share a Keep It Simple DT inspiration project with you today! Yesterday was launch day for our new Simply Spring Collection and OMGoodness it’s gorgeous! I’ve created a 3D window card showcasing several of the prints in the 12×12 Collection Pack along with the 6×8 Collection Stamps and coordinating Outline Dies. My inspiration for this awesome fold came from Lisa Curcio’s blog. This is the second one I’ve made and I definitely see more of them in my future – it’s so fun and really packs a punch with these pretty papers and stamps!

I cut the card base from CutCardStock Basis Black cardstock along with layering panels from prints in the Simply Spring 12×12 Collection Pack. I used the Back To Basics Stitched Ovals Nested Dies to cut the aperture into the curved panel on the front and a slightly smaller one to cut the oval inside the aperture. I stamped the image and sentiment on the oval using stamps in the Simply Spring 6×8 Collection Stamps, colored them with alcohol markers, and cut them with the coordinating Outline Dies.

I cut a back signature panel from CutCardStock Cougar Smooth White and added a signature and image (colored with alcohol markers) which I stamped from the 6×8 Collection Stamps and cut with the coordinating Outline Dies.

Sharing in the following challenges:
1. https://aperfecttimetocraft.blogspot.com/2024/03/a-perfect-time-to-craft-open-challenge.html
2. https://hereisaplacetostart.blogspot.com/2024/03/march-2024-anything-goes-woptional.html
3. https://classicdesignchallenge.blogspot.com/2024/03/classic-design-challenge-03-2024-marapr.html
4. https://craftycatzweeklychallenge.blogspot.com/2024/03/crafty-catz-667-anything-goes.html
5. https://craftygalscornerchallenges.blogspot.com/2024/03/challenge-253-anything-goes.html
6. https://secretstamper.com/2024/03/anything-goes-with-a-fun-fold-for-creative-creases-78/
7. https://cutitupchallenges.blogspot.com/2024/03/cut-it-up-challenge-299-colors-of-spring.html
8. https://giveacrafteracookie.blogspot.com/2024/03/cookie-challenge-190-reminder-march.html
9. https://mmmchallengeblog.blogspot.com/2024/03/221-spring-flowers-weather-etc.html

Keep It Simple products used:
Simply Spring 12×12 Collection Pack
Simply Spring 6×8 Collection Stamps
Simply Spring Outline Dies
Back To Basics Stitched Ovals Nested Dies

Affiliate links are used in this post at no cost to you – I really appreciate your support!

Other products used:
CARDSTOCK/PAPER: CutCardStock Basis Black and Cougar 80# Smooth White cardstock
INK: Memento Tuxedo Black ink; Spectrum Noir Tri-Blends- CR1/3/6/7/8/10, GB1/3/5, TN1/2/4, YG1/2/3
ACCESSORIES: Fiskars 12″ ProCision Rotary Bypass Paper Trimmer, Elmer’s Craft Bond Tape Runner, Bearly Art precision craft glue, MISTI stamp tool, Big Shot, 1-mm-thick foam squares, 1″ double-sided foam strip

I hope you’ve loved seeing this project as much as I loved creating it and you’re inspired to get crafty! Be sure to check out ALL the fun goodies in the Keep It Simple online store! Save 10% on your entire order when you shop online using code LoveToScrap2 at checkout! There is no minimum purchase requirement and no usage limits, AND it combines with product, order, and shipping discounts! Is that cool, or what?! Be sure to Follow us on Facebook, Instagram, and Pinterest for lots of crafty inspiration! Thanks so much for stopping by today – we’ll see you next time!

Scrappy hugs,

top o’ the mornin’ to ya!

Hey everybody, Happy Thursday! I hope your week is going well and you’re gearing up for a fun weekend! I’m delighted to share another Keep It Simple DT inspiration project today that I created with the new Lucky Day Collection released last month! This collection has some of THE best products for creating fun St. Patrick’s Day (or just plain good luck) projects! I’m sure by now you know how much I love me some gnomes so I decided on a wiper card to showcase a couple of them! I have an SVG cut file for a wiper card and I also have some handwritten instructions from Julie’s easy tutorial HERE which I used for this card. It’s a fun one! If you like the Keep It Simple products I’ve used and are inclined to go shopping, be sure to use my discount code LoveToScrap2 at checkout to save 10% on your entire order! There is no minimum purchase requirement and no usage limits, plus the code combines with product, order, and shipping discounts!

I cut the wiper card base from Neenah Classic Crest 110# Solar White cardstock along with layering panels from an assortment of patterned papers from the Lucky Day 12×12 Collection Pack. The gnomes, sentiments and other ephemera are from the Lucky Day and Lucky Phrases Die Cut Pieces, and some were popped up on 3D Foam Squares.

I cut the back panel from Neenah Classic Crest 80# Solar White cardstock and embellished it with strips of patterned paper from the 12×12 Collection Pack and a die cut star popped up on a 3D Foam Square. I stamped a sentiment from the Lucky Day 4×6 Collection Stamps in Catherine Pooler Twilight ink and layered the panel on another print from the Collection Pack.

Sharing in the following challenges:
1. https://aperfecttimetocraft.blogspot.com/2024/03/a-perfect-time-to-craft-open-challenge.html
2. https://hereisaplacetostart.blogspot.com/2024/03/march-2024-anything-goes-woptional.html
3. https://craftycatzweeklychallenge.blogspot.com/2024/03/crafty-catz-667-anything-goes.html
4. https://craftygalscornerchallenges.blogspot.com/2024/03/challenge-253-anything-goes.html

Keep It Simple products used:
Lucky Day 12×12 Collection Pack
Lucky Day Die Cut Pieces
Lucky Day Lucky Phrases Die Cut Pieces
Lucky Day 4×6 Collection Stamps

Affiliate links are used in this post at no cost to you – I really appreciate your support!

Other products used:
CARDSTOCK/PAPER: Neenah Classic Crest 110# and 80# Solar White cardstock
INK: Catherine Pooler Twilight ink
ACCESSORIES: Tonic Studios 12″ Guillotine Paper Trimmer, Bearly Art precision craft glue, MISTI stamp tool, Scrapbook Adhesives 3D Foam Squares (large and small white)

I hope you’ve loved seeing this project as much as I loved creating it and you’re inspired to get crafty! Be sure to check out ALL the fun goodies in the Keep It Simple online store! Save 10% on your entire order when you shop online using code LoveToScrap2 at checkout! There is no minimum purchase requirement and no usage limits, AND it combines with product, order, and shipping discounts! Is that cool, or what?! Be sure to Follow us on Facebook, Instagram, and Pinterest for lots of crafty inspiration! Thanks so much for stopping by today – we’ll see you next time!

Scrappy hugs,