Hey everybody – I hope you had a good weekend and you’re not planning to work too hard this week! I’m up on the CutCardStock blog today with a tutorial for making a fun alien ship box card. I used a variety of our cardstock which I have listed below. The cut file is from Cyndy G SVG which I paired with the Milky Way stamp set from The Project Bin, and I really love how this turned out! I did chuckle a tiny bit while assembling this! ;)
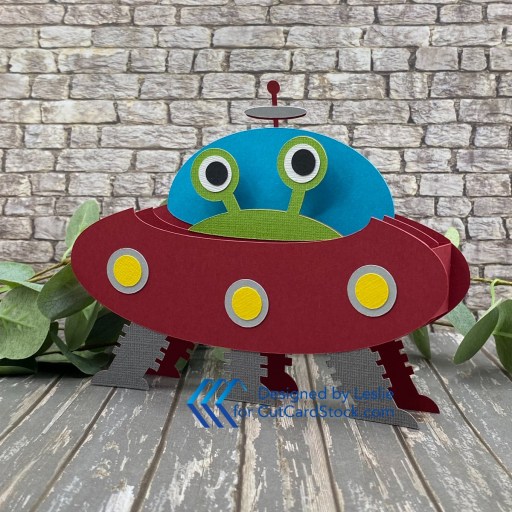
Using the Alien Ship Box Card SVG cut file from Cyndy G and my Cricut Explore Air 2, I cut all the pieces from Wedding Cake, Stardream Metallic Silver, Pop Tone Black Licorice, Lava Stone Gray, Rubber Ducky, Green Curry, Aqua, and Lessebo Dawn Maroon cardstock.
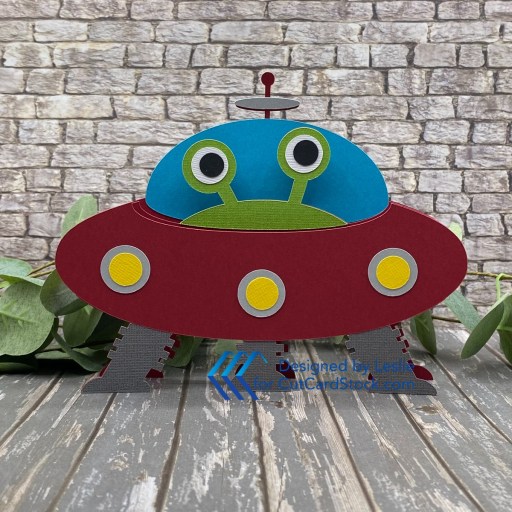
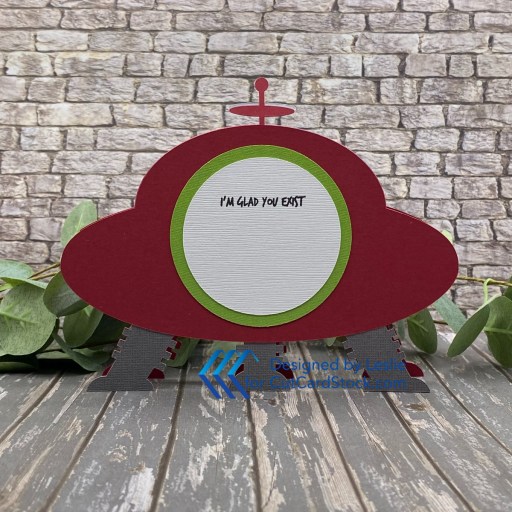
I assembled the box card and just prior to adhering the white circle on the back, I stamped a very appropriate sentiment from The Project Bin Milky Way stamp set in Versafine Onyx Black ink. Oh, this was such a fun one! Be sure to see my tutorial on the CutCardStock blog!
Sharing in the following challenges:
1. https://avenue613.blogspot.com/2026/01/january-2026-anything-goes-w-optional.html (no twist)
2. https://cardsgalorechallenges.blogspot.com/2026/01/january-2026-crafts-galore-encore.html (playing twist)
3. https://mixitupchallenge.blogspot.com/2026/01/muicb-81-anything-goes-optional-use.html (no twist)
Affiliate links are used in this post at no cost to you – I really appreciate your support!
CutCardStock products used:
Wedding Cake cardstock
Stardream Metallic Silver cardstock
Pop Tone Black Licorice cardstock
Lava Stone Gray cardstock
Rubber Ducky cardstock
Green Curry cardstock
Aqua cardstock
Lessebo Dawn Maroon cardstock
Other products used:
STAMPS: The Project Bin Milky Way stamp set
INK: Versafine Onyx Black ink
DIES/PUNCHES: Cyndy G SVG Alien Ship Box Card SVG cut file
ACCESSORIES: Cricut Explore Air 2, My Sweet Petunia Precision Glue Press, Bearly Art precision craft glue, MISTI stamp tool
I hope you’ve enjoyed today’s project and you’re inspired to get crafty! Be sure to check out all the awesome cardstock and other goodies at CutCardStock (adhesives, labels, stickers, pens, watercolors and ribbon to name a few). And head on over to the CutCardStock Facebook Page and for more inspiration! Also, be sure to join our Creating with CutCardStock Facebook Group for even more crafty inspiration! Thanks so much for stopping by today – we’ll see you next time!
Scrappy hugs,