hello sweet friend

Hey everybody, Happy Weekend! I hope you’re doing something fun and having some awesome Spring weather! Our weather this time of year is glorious… still a tad chilly overnight (but not bad) and warm and sunny during the day! I’m delighted to share a Keep It Simple DT inspiration project with you today. This pretty shaker card features our KIS Shaker Frames A2 Frames #7 which was released in February along with our Rainbow Builder dies and sentiment stamps. And of course, I just HAD to use a variety of our papers in all the rainbow colors and our 2mm and 3mm Sprinkles pearls! I sure do love me a shaker card, and I totally feel like this one would cheer up a friend!

I cut a top-folding card base and shaker frame (using the KIS Shaker Frames A2 Frames #7) from Neenah Classic Crest 110# Solar White cardstock. I pulled out the new Back to Basics Black & White 6×9 Collection Pack and cut the frame again so I could use the outer scalloped portion. Then the fun began… cutting the frame seven more times from papers in our Back To Basics Ruby, Mango, Lemon, Jade, Royal, Lilac and Rose 12×12 Collection Packs. This gave me lots of leftover pieces to build more rainbows!

I created the shaker with a panel of acetate and narrow strips of foam using our Back To Basics Shaker Basics-Foam Adhesive & Acetate Sheets, then filled it with our 2mm and 3mm Sprinkles Pearls. I stamped a sentiment from our Sunshine & Rainbows Sentiment Stamps in Catherine Pooler Twilight ink and cut it with a Back To Basics Stitched Oval Nested Die.

I grabbed the outer portion of the frame that I had cut previously from the Back To Basics Ruby 12×12 Collection Pack to use as the base of the inside panel. I added a rectangle cut from 80# Solar White using a Stitched Rectangle Nested Die and stamped an additional sentiment from the Sunshine & Rainbows Sentiment Stamps in the gray ink. Love, love, love!

Keep It Simple products used:
KIS Shaker Frames A2 Frames #7
Back To Basics Black & White 6×9 Collection Pack
Back To Basics Ruby 12×12 Collection Pack
Back To Basics Mango 12×12 Collection Pack
Back To Basics Lemon 12×12 Collection Pack
Back To Basics Jade 12×12 Collection Pack
Back To Basics Royal 12×12 Collection Pack
Back To Basics Lilac 12×12 Collection Pack
Back To Basics Rose 12×12 Collection Pack
Sprinkles- 2mm Pearls
Sprinkles- 3mm Pearls
Back To Basics Stitched Ovals Nested Dies
Back To Basics Stitched Rectangles Nested Dies
Sunshine & Rainbows Sentiment Stamps
Back To Basics Shaker Basics-Foam Adhesive & Acetate Sheets

Affiliate links are used in this post at no cost to you – I really appreciate your support!

Other products used:
CARDSTOCK/PAPER: Neenah Classic Crest 110# and 80# Solar White cardstock
INK: Catherine Pooler Twilight ink
ACCESSORIES: Fiskars 12″ ProCision Rotary Bypass Paper Trimmer, Bearly Art precision craft glue, My Sweet Petunia Precision Glue Press, Mini MISTI, Big Shot, Scor-Tape 1/8″, Scrapbook Adhesives Crafty Power Tape 54 ft, Scrapbook Adhesives Thin 3D Foam Squares

I hope you’ve loved seeing this project as much as I loved creating it and you’re inspired to get crafty! Be sure to check out ALL the fun goodies in the Keep It Simple online store! Save 10% on your entire order when you shop online using code LoveToScrap2 at checkout! There is no minimum purchase requirement and no usage limits, AND it combines with product, order, and shipping discounts! Is that cool, or what?! Be sure to Follow us on Facebook, Instagram, and Pinterest for lots of crafty inspiration! Thanks so much for stopping by today – we’ll see you next time!

Scrappy hugs,

Jelly Bean Shaker

Hi friends, Happy Tuesday! Are you gearing up for Easter – making any fun Easter crafts or planning to travel? We have no special plans (other than rejoicing in His resurrection) and I’ve made a few more whimsical Easter-themed cards that I’ll be sharing. This super cute jelly bean shaker that I created for Brutus Monroe features our amazing Jelly Bean stencil, Pink Flamingo Velveteen Glaze, Hip Hop Hooray stamps and chipboard, and our Occasional Greetings stamps. I also used a pre-scored card base and a variety of our cardstock to make the striped background. So much fun contained in one card, lol!

I started by creating an acetate panel of pink jelly beans using our Jelly Bean Mixed Media Stencil with Pink Flamingo Velveteen Glaze, a spatula and Deco Foil Stencil Pal on my 12″ Ranger-Wendy Vecchi Make Art Stay-tion. I let this dry overnight and then trimmed it to fit behind a frame cut from our Not Your Mamas cardstock using two Love From Lizi Stitched Rectangle Nested Cutting Dies. Next, I added a variety of different width strips of our Sea, Poison Apple, Aubergine and Rouge cardstock to a panel of Perfect Blend cardstock using an adhesive sheet, trimmed it down for the background panel, and adhered it to the front of a pre-scored card base.

The next step was adding the shaker mix created with several varieties of Keep It Simple Sprinkles. I always tend to over-stuff my shakers but I did a pretty good job on this one… leaving enough room to shake, shake, shake! I used the Hip Hop Hooray stamps and chipboard companion along with our Raven ink to create the adorable row of bunnies on the front which I colored with a variety of markers and attached with thin adhesive foam squares.

I cut the inside panel from Perfect Blend cardstock and embellished it with another frame cut from Sea cardstock. I stamped a sentiment from the Occasional Greetings stamp set in Raven ink, which completed the card. I totally love how this turned out!

Affiliate links are used in this post at no cost to you – I really appreciate your support!

Brutus Monroe products used:
BRU 3243 Jelly Bean Mixed Media Stencil
BRU 3641 Pink Flamingo Velveteen Glaze
BRU 3690 Heat Resistant Clear Acetate
BRU 8956 Hip Hop Hooray Stamp Set
BRU 9581 Hip Hop Hooray Chipboard Companions
BRU 5144 Pre-Scored A2 Card Bases
BRU 4013 Perfect Blend Cardstock
BRU 5529 Sea Cardstock
BRU 5505 Poison Apple Cardstock
BRU 5536 Aubergine Cardstock
BRU 6533 Rouge Cardstock
BRU 9494 Not Your Mamas Cardstock
BRU 2543 Raven Detail 2×2 Ink
BRU 9306 Occasional Greetings Stamp Set

Other products used:
INK: Copic Ciao alcohol marker- R000 Cherry White; Bic Mark-It fine point markers- Yellow Blaze Pink Flamingo, Fandango Pink, Sunset Orange, Blue Skies Blue and Tiki Hut Tan
DIES/PUNCHES: Love From Lizi Stitched Rectangle Nested Cutting Dies
ACCESSORIES: Fiskars 12″ ProCision Rotary Bypass Paper Trimmer, Bearly Art precision craft glue, My Sweet Petunia Precision Glue Press, MISTI stamp tool, Big Shot, spatula, Deco Foil Stencil Pal, Ranger-Wendy Vecchi 12″ Make Art Stay-tion, Scor-Tape 1/4″, Scrapbook Adhesives Adhesive Sheets, EK Tools Powder Tool, Scrapbook Adhesives 3D Foam Strips; Keep It Simple Paper Crafts Sprinkles- Beads-2mm Pearls, Polymer Clay-Light Green Sprinkles, Polymer Clay-Magenta Sprinkles, Polymer Clay-Eggplant Dots, Polymer Clay Spring Flower Mix, Beads-2mm Green Caviar Glass and Beads-2mm Purple Caviar Glass; Scrapbook Adhesives Thin 3D Foam Squares

I hope you’ve enjoyed seeing this project and you’re inspired to get your craft on! Be sure to check out all the amazing stamps and dies, pigments and mists, cardstock and tools (just to name a few) at Brutus Monroe! And if you happen to have a sweet tooth and like to munch while you craft (like I do, lol), check out Scoozie’s Confections & Curiosities! OMG, I’m hooked! ;) Follow us on Facebook, Instagram and YouTube for tons of crafty inspiration! And come on over and join our Fan Club Facebook Group to share your crafty makes using our products! Thanks so much for stopping by today – we’ll see you next time!

Scrappy hugs,

Hello Pumpkin

Hey everybody, happy Monday! I hope you had a great weekend! We had a nice relaxed weekend after taking our Loki to the vet Friday morning with a digestive issue. Knowing he’s on the mend and feeling so much better is a huge relief. We sure do love our feline (and canine) kids and hate seeing them sick. I’m delighted to share a Keep It Simple DT inspiration project with you today featuring one of our new Shaker Frames that were released in September. I used the A2 Shaker Frame #6 along with papers from the Autumn Charm collection and stamps from our Bizzy Hands Fall Gnome and Farmhouse Fall stamp sets. As much as I love me some gnomes, it’s hard to believe I used the Fall Gnome stamp set without the gnome, but yes I did. LOL! This card just needed the pumpkins!

I cut a standard A2 size top-folding card base from CutCardStock Basis Natural cardstock and rounded the corners. I die cut the frame components from prints in the Autumn Charm 6×9 Collection Pack using the KIS Shaker Frames A2 Frames #6. I used acetate and 2mm foam from the Back To Basics Shaker Basics Foam & Acetate Pack with five varieties of Sprinkles to make up the shaker mix. I stamped a sentiment and several images from the Bizzy Hands Fall Gnome stamp set in Memento Rich Cocoa ink, colored the images with alcohol markers, and fussy cut them to embellish the front.

I cut the inside panel from Basis Natural as well and embellished it with a leftover strip of paper from the Farmhouse Fall Collection Pack. I stamped a sentiment from the Farmhouse Fall stamp set in Rich Cocoa ink and layered the panel on another print from the Collection Pack.

Keep It Simple products used:
KIS Shaker Frames A2 Frames #6
Autumn Charm 6×9 Collection Pack
Bizzy Hands Fall Gnome Stamp Set
Farmhouse Fall Collection Stamps
Back To Basics Shaker Basics Foam & Acetate Pack
Sprinkles- Beads-2mm Matte Sunshine Yellow
Sprinkles- Beads-2mm Matte Orange
Sprinkles- Beads-2mm Matte Dark Orange
Sprinkles- Polymer Clay-Light Brown Pumpkins
Sprinkles- Sequins-Dandelion Hearts

Affiliate links are used in this post at no cost to you – I really appreciate your support!

Other products used:
CARDSTOCK/PAPER: CutCardStock Basis 80# Natural cardstock
INK: Catherine Pooler Over Coffee ink; Spectrum Noir Tri-Blends- GY2/3/5, RB2/3, DG1/2/3
DIES/PUNCHES: Kadomaru Pro Corner Rounder
ACCESSORIES: Fiskars 12″ ProCision Rotary Bypass Paper Trimmer, Bearly Art precision craft glue, MISTI stamp tool, Big Shot, Scrapbook.com 1/4″ Double-Sided Adhesive Roll, Scrapbook.com Double-Sided Adhesive Foam Squares

I hope you’ve loved seeing this project as much as I loved creating it and you’re inspired to get crafty! Be sure to check out ALL the fun goodies in the Keep It Simple online store! Save 10% on your entire order when you shop online using code LoveToScrap2 at checkout! There is no minimum purchase requirement and no usage limits, AND it combines with product, order, and shipping discounts! Is that cool, or what?! Be sure to Follow us on Facebook, Instagram, and Pinterest for lots of crafty inspiration! Thanks so much for stopping by today – we’ll see you next time!

Scrappy hugs,

thanks

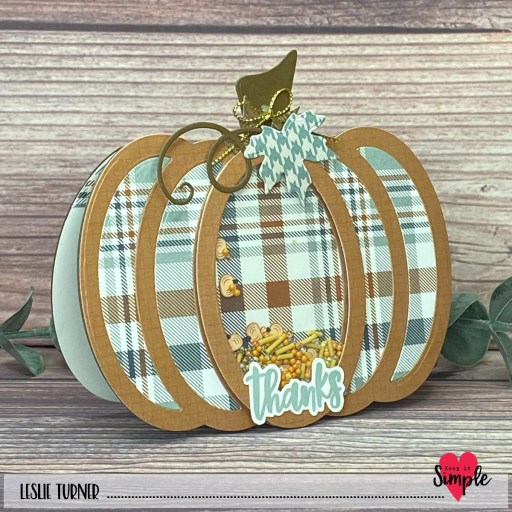
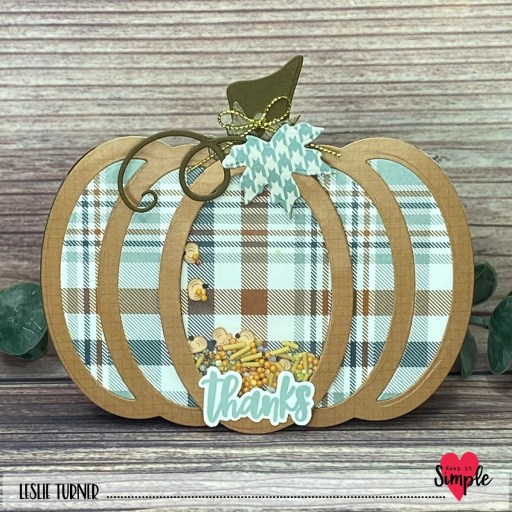
Hey everybody, Happy Tuesday! I’m stoked to share a Keep It Simple DT inspiration project with you today, created with our new KIS Cuts Pumpkin dies. This is THE most fun set of dies – I created a shaped card with a shaker in the middle portion, and I think it turned out so cute! Shaped cards are always a hit and the shaker portion just adds to the Fun Factor!

Using the KIS Cuts Pumpkin dies, I cut the pumpkin layers and leaves from coordinating prints in the Farmhouse Fall 6×9 Collection and Cardstock Packs, along with the card base, vine and stem from CutCardStock Lessebo Coffee Bean cardstock. I created a shaker in the center portion of the pumpkin using Polymer Clay Coffee Sprinkles, Polymer Clay Light Brown Pumpkins, 2mm Matte Orange Beads, and 2mm Caviar Glass Fall Change beads (all from the Sprinkles line). The Fall Change Caviar Glass beads haven’t hit the store yet, so stay tuned for those. I added a sentiment (from the Back To Basics Thank You Sentiments stamp set) stamped in Catherine Pooler Hot Tube ink which I fussy cut. The finishing touch on the front was adding a gold cord bow.

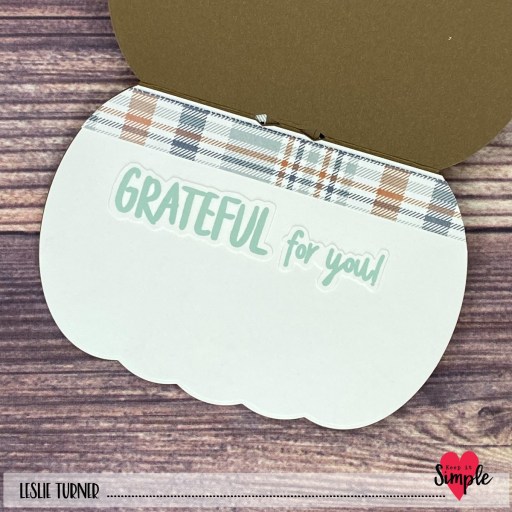
Using the same dies, I cut the inside panel from Solar White cardstock and embellished it with a scrap piece of the plaid paper used on the front. I stamped another sentiment from the same Thank You Sentiments stamp set in the Hot Tub ink, fussy cut it and added it to the inside.

Keep It Simple products used:
KIS Cuts Pumpkin dies
Farmhouse Fall 6×9 Collection Pack
Farmhouse Fall 6×9 Cardstock Pack
Back To Basics Thank You Sentiments stamp set
Back To Basics Shaker Basics – Foam and Acetate Pack
Sprinkles – Polymer Clay Coffee Sprinkles
Sprinkles – Polymer Clay Light Brown Pumpkins
Sprinkles – Beads 2mm Matte Orange
Sprinkles – Beads 2mm Caviar Glass Fall Change (coming soon)

Affiliate links are used in this post at no cost to you – I really appreciate your support!

Other products used:
CARDSTOCK/PAPER: CutCardStock Lessebo Coffee Bean cardstock, Neenah Classic Crest 80# Solar White cardstock
INK: Catherine Pooler Hot Tub ink
ACCESSORIES: Fiskars 12″ ProCision Rotary Bypass Paper Trimmer, My Sweet Petunia Precision Glue Press, Nuvo Deluxe Adhesive, MISTI stamp tool, Big Shot, 1/8″ red liner tape, GKD gold cording, small wooden bow maker, cordless glue gun

I hope you’ve loved seeing this project as much as I loved creating it and you’re inspired to get crafty! Be sure to check out ALL the fun goodies in the Keep It Simple online store! Save 10% on your entire order when you shop online using code LoveToScrap2 at checkout! There is no minimum purchase requirement and no usage limits, AND it combines with product, order, and shipping discounts! Is that cool, or what?! Be sure to Follow us on Facebook, Instagram, and Pinterest for lots of crafty inspiration! Thanks so much for stopping by today – we’ll see you next time!

Scrappy hugs,

Freshly Brewed shaker cards

Hey everybody! Happy Wednesday – I hope you’re having a great week! I have a super cute Keep It Simple DT inspiration project to share. You may remember that our new Shaker Kits debuted on the website back in early August. And as you know, this past Saturday was World Card Making Day and our design team organized a Facebook Live craft-along to demonstrate the assembly of our Life Is Sweet and Freshly Brewed kits. Barry and Maureen were phenomenal on the videos which you can watch HERE and HERE! Several weeks ago I shared two cards I made using the Life Is Sweet kit, and today I’m sharing the cards I made using the Freshly Brewed kit. These kits are fantastic because everything you need to create the cards is included except the adhesive. How cool is that?!

The card bases, adhesive foam, acetate, frames, ephemera, and shaker bits are all included in the kit. As with the other cards, I made mine a little different than the samples on the package. I totally love shaking things up! Here is my first card.

And here is my second card. I cut the cup sleeve on this one from a patterned paper in the Nuts About Fall 6×9 Collection Pack using the sleeve die in the KIS Cuts Freshly Brewed dies. It’s very cool that the dies are the same size and work with the items in this kit!

Keep It Simple products used:
Freshly Brewed Shaker Kit
KIS Cuts Freshly Brewed
Nuts About Fall 6×9 Collection Pack

Affiliate links are used in this post at no cost to you – I really appreciate your support!

Other products used:
CARDSTOCK/PAPER: Neenah Classic Crest 110# Solar White cardstock, Cougar Smooth 100# White cardstock, Cougar Smooth 80# White cardstock
ACCESSORIES: My Sweet Petunia Precision Glue Press, Nuvo Deluxe Adhesive, Scrapbook.com Double-Sided Adhesive foam Squares, red liner tape

I hope you’ve loved seeing this project as much as I loved creating it and you’re inspired to get crafty! Be sure to check out ALL the fun goodies in the Keep It Simple online store! Save 10% on your entire order when you shop online using code LoveToScrap2 at checkout! There is no minimum purchase requirement and no usage limits, AND it combines with product, order, and shipping discounts! Is that cool, or what?! Be sure to Follow us on Facebook, Instagram, and Pinterest for lots of crafty inspiration! Thanks so much for stopping by today – we’ll see you next time!

Scrappy hugs,

cozy vibes

Hey everybody! Happy Monday – I hope you had a great weekend! I’m thrilled to share a Keep It Simple DT inspiration project with you today created with our new Shaker Frames! We are still vibin’ over here in southwestern Colorado – we had Fall vibes going on last week and now we have some cozy vibes going on today with this fun Christmas card. I totally love shaker cards and Christmas is my favorite holiday so this was definitely a win-win! And you HAVE to check out our new Shaker Frames line – there are six different sets which means six different kinds of shaker fun! The Here Comes Santa Claus Collection used to make this card hasn’t hit the store yet so stay tuned and I will update this post when the collection is available. Update: The collection has hit the store so I’ve added the links to this post!

I cut the A2 size side-folding card base from Neenah Classic Crest 110# Solar White cardstock along with layering panels and the shaker frame pieces from coordinating papers in the soon-to-come Here Comes Santa Claus Collection. I used the adhesive foam from our new Back To Basics Shaker Basics under the shaker frame but used tulle for the shaker front rather than acetate. I filled the shaker areas with a variety of our new Sprinkles. I stamped the Santa from the Collection Stamps, colored him with a variety of markers, and cut him with the coordinating Outline Die. I cut the sentiment from the cut-apart sheet in the Collection Pack.

I cut the inside panel from 80# Solar White cardstock and embellished it with a border and sentiment from the cut-apart sheet in the Collection Pack.

Keep It Simple products used:
KIS Shaker Frames A2 Frames #3
Here Comes Santa Claus 6×9 Collection Pack
Here Comes Santa Claus 12×12 Collection Pack
Here Comes Santa Claus Collection Stamps
Here Comes Santa Claus Outline Dies
Back To Basics Shaker Basics Foam & Acetate
KIS Sprinkles Red Rhinestones
KIS Sprinkles Clear Rhinestones (coming soon)
KIS Sprinkles Matte Red Beads
KIS Sprinkles Matte Dark Green Beads
KIS Sprinkles Dandelion Hearts Glitter

Affiliate links are used in this post at no cost to you – I really appreciate your support!

Other products used:
CARDSTOCK/PAPER: Neenah Classic Crest 110# and 80# Solar White cardstock
INK: Memento Tuxedo Black ink; Bic Mark-It Fine Point markers- Rambunctious Red and Tuxedo Black; American Crafts Gold Metallic marker; Spectrum Noir Tri-Blends- FS6/7/8, IG2, AP2
ACCESSORIES: Fiskars 12″ ProCision Rotary Bypass Paper Trimmer, Bearly Art precision craft glue, MISTI stamp tool, Big Shot, white tulle

I hope you’ve loved seeing this project as much as I loved creating it and you’re inspired to get crafty! Be sure to check out ALL the fun goodies in the Keep It Simple online store! Save 10% on your entire order when you shop online using code LoveToScrap2 at checkout! There is no minimum purchase requirement and no usage limits, AND it combines with product, order, and shipping discounts! Is that cool, or what?! Be sure to Follow us on Facebook, Instagram, and Pinterest for lots of crafty inspiration! Thanks so much for stopping by today – we’ll see you next time!

Scrappy hugs,

Life Is Sweet shaker cards

Hey everybody, Happy Tuesday! I’m delighted to share an awesome Keep It Simple DT inspiration project with you today. You may remember that our new Shaker Kits debuted on the website back in early August. We have a Facebook Live craft-along planned for October 5th to celebrate World Cardmaking Day where several members of our design team will demo the Life Is Sweet and Freshly Brewed kits. These are available as a bundle to purchase prior to the FB Live if you’re interested in joining in! But in the meantime, I’m sharing two cards I made with the Life Is Sweet kit. I’ll share the other two cards I made with the Freshly Brewed kit on the day of the Live.

The card bases, adhesive foam, acetate, frames, ephemera, and shaker bits are all included in the kit. I made my cards a little different than the samples on the package. I added Back To Basics Mango and Rose Enamel Dots to the center of the flowers on the front of my first card.

And this is my second card. I have a confession to make… I messed up the scalloped frame included in the kit so I had to go to Plan B… I die cut another frame from a paper in the Back To Basics Mango Collection Pack using a die in the KIS Shaker Frames A2 Frames #3. I honestly don’t think anybody would ever notice but I wanted to share that the A2 Frames work with this kit! These cards turned out so cute and the only extra ingredient needed to make them is adhesive. I used two kinds of double-sided tape and some small foam pads for dimension. I love that everything else is included!

Keep It Simple products used:
Life Is Sweet Shaker Kit
Back To Basics Mango Enamel Dots
Back To Basics Rose Enamel Dots
Back To Basics Mango 12×12 Collection Pack
KIS Shaker Frames A2 Frames #3

Affiliate links are used in this post at no cost to you – I really appreciate your support!

Other products used:
ACCESSORIES: My Sweet Petunia Precision Glue Press, Nuvo Deluxe Adhesive, Scrapbook.com Double-Sided Adhesive Roll, red liner tape, Stampin’ Up Mini Dimensionals

I hope you’ve loved seeing this project as much as I loved creating it and you’re inspired to get crafty! Be sure to check out ALL the fun goodies in the Keep It Simple online store! Save 10% on your entire order when you shop online using code LoveToScrap2 at checkout! There is no minimum purchase requirement and no usage limits, AND it combines with product, order, and shipping discounts! Is that cool, or what?! Be sure to Follow us on Facebook, Instagram, and Pinterest for lots of crafty inspiration! Thanks so much for stopping by today – we’ll see you next time!

Scrappy hugs,

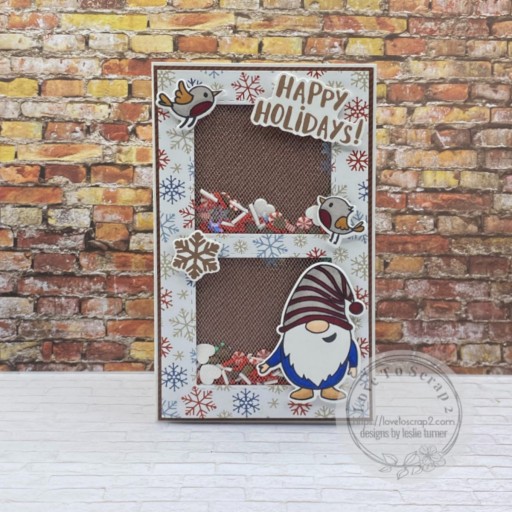
Happy Holidays shaker

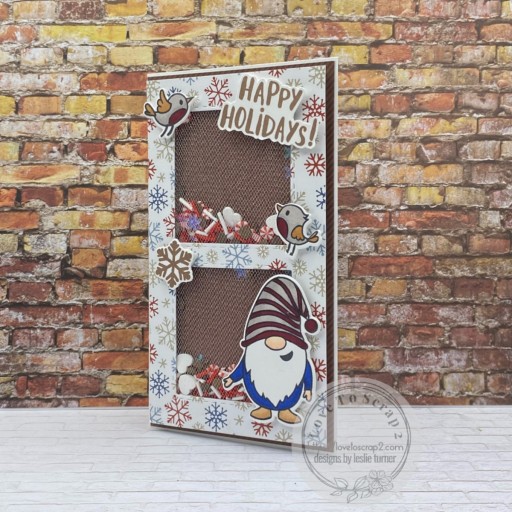
Hey everybody! I hope you’ve had a great week! It’s turning out to be a busy Friday morning on my blog! I have a super fun Keep It Simple DT inspiration project to share featuring our new line of Sprinkles. With this feature comes an awesome promo… buy three Sprinkles items and get one free! We have beads, polymer clay, crushes, glitter, rhinestones and sequins… choose from many styles and occasions! And remember to use my code LoveToScrap2 for 10% off your entire order! There is no minimum purchase requirement and no usage limits, AND it combines with product, order, and shipping discounts! Pop over to the Keep It Simple Instagram Page for a fun Hop and Giveaway!

I created an adorable mini slimline shaker card with papers, stamps and dies from our Scandinavian Christmas Collection as well as beads, polymer clay and sequins from our Sprinkles line! I used our new KIS Slimline Cuts Stitched Squares die to cut the shaker apertures. The colors in the Scandinavian Christmas Collection are non-traditional Christmas colors and I love that! I used tulle for the shaker this time rather than acetate. This was just a fun card all the way around!

The 3-1/2″ x 6″ mini slimline card base was cut from Neenah Classic Crest 110# Solar White cardstock along with layering panels from coordinating papers in the Scandinavian Christmas 12×12 Cardstock and Collection Packs. Using the KIS Slimline Cut Stitched Squares die, I cut two apertures in the snowflake patterned paper, adhered tulle on the back side, and added some GKD Shaker Strips.

I stamped the gnome and birds from the Gnomes Collection Stamps in Memento Tuxedo Black ink on 80# Solar White cardstock, colored them with alcohol markers, and cut them with the coordinating Gnomes Outline Dies. I then stamped the snowflake and sentiment in Catherine Pooler Over Coffee ink, cut the snowflake with the coordinating outline die and fussy cut the sentiment.

I added Iridescent Snowflake Sequins, Brown Polymer Clay Dots, White Polymer Clay Hearts, 2mm Matte Red Beads, Candy Cane Red & White Polymer Clay Christmas Mix and Red Peppermint & Chocolate Polymer Clay Mix – all from the new Sprinkles line. I sealed the shaker and adhered the elements to the card front.

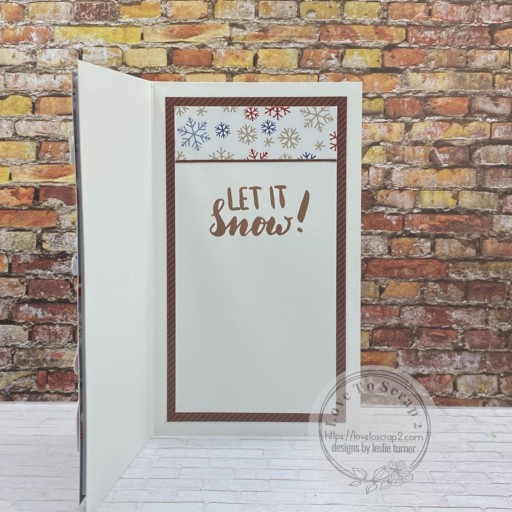
I cut the inside panel from 80# Solar White cardstock and embellished it with a leftover strip of the snowflake paper used on the front. I stamped an additional sentiment from the Gnomes Collection Stamps in the brown ink which completed the card.

Keep It Simple products used:
KIS Slimline Cuts Stitched Squares
Scandinavian Christmas 12×12 Cardstock Pack
Scandinavian Christmas 12×12 Collection Pack
Scandinavian Christmas Gnomes Collection Stamps
Scandinavian Christmas Gnomes Outline Dies
KIS Sprinkles Iridescent Snowflake Sequins
KIS Sprinkles Brown Polymer Clay Dots (coming soon)
KIS Sprinkles White Polymer Clay Hearts
KIS Sprinkles 2mm Matte Red Beads
KIS Sprinkles Candy Cane Red & White Polymer Clay Christmas Mix
KIS Sprinkles Red Peppermint & Chocolate Polymer Clay Mix

Affiliate links are used in this post at no cost to you – I really appreciate your support!

Other products used:
CARDSTOCK/PAPER: Neenah Classic Crest 110# Solar White cardstock
INK: Catherine Pooler Over Coffee ink; Spectrum Noir Tri-Blends- TB5/6/9, DR5/6/7, FS6/7/8, TN1/2/4, BG2/3/4; Memento Tuxedo Black ink
ACCESSORIES: Fiskars 12″ ProCision Rotary Bypass Paper Trimmer, Elmer’s Craft Bond Tape Runner, Bearly Art precision craft glue, MISTI stamp tool, Big Shot, ivory tulle, red liner tape, GKD Shaker Strips, Scrapbook Adhesives 3D Foam Squares (small white)

I hope you’ve loved seeing this project as much as I loved creating it and you’re inspired to get crafty! Be sure to check out ALL the fun goodies in the Keep It Simple online store! Be sure to Follow us on Facebook, Instagram, and Pinterest for lots of crafty inspiration! Thanks so much for stopping by today – we’ll see you next time!

Scrappy hugs,

hello Spring

Hey everybody! Happy Sunday – I hope you’re having a great weekend! I have a fun shaker card to share for Keep It Simple this morning featuring our new Melody Stories alpha stamps and dies! Have you ever made a shaker card with alpha die cuts? Well, I haven’t either – until now! It’s made just like a regular shaker card but with a bunch of alpha die cuts (and a few floral die cut pieces) instead of shaker bits, and I thought it would be a fun and unique way to showcase our new alphas! We have several new sets of alpha stamps and dies in the store, so be sure to check them out! And if you make a purchase, remember to use my code LoveToScrap2 for 10% off your entire order!

I cut a standard A2 size top-folding landscape card base from CutCardStock Cougar Smooth 100# White cardstock and rounded the bottom right corner. I cut layering panels and a frame for the shaker (using a Back To Basics Stitched Rectangles Nested Die) from coordinating papers in the Simply Spring 6×9 Collection Pack. I die cut a bunch of alphas using the KIS Cuts Melody Stories Font for the inside of the shaker and threw in a few flowers from the Simply Spring Die Cut Pieces.

Using the KIS Alphabet Stamps Melody Stories Font, I stamped ‘SPRING’ in black ink and die cut the letters with the coordinating KIS Cuts Melody Stories Font and adhered them in the bottom right corner. I grabbed a butterfly (and scored the wings) and the word ‘hello’ from the Simply Spring Die Cut Pieces and adhered them to the front of the shaker.

I cut the inside panel from Cougar Smooth 80# White cardstock and embellished it with strips from the floral pattern and white cardstock used on the front and a die cut from the Simply Spring Die Cut Pieces.

Keep It Simple products used:
Simply Spring 6×9 Collection Pack
Simply Spring Die Cut Pieces
KIS Alphabet Stamps Melody Stories Font
KIS Cuts Melody Stories Font
Back To Basics Stitched Rectangles Nested Dies

Affiliate links are used in this post at no cost to you – I really appreciate your support!

Other products used:
CARDSTOCK/PAPER: Cougar Smooth 100# White cardstock, Cougar Smooth 80# White cardstock
INK: Memento Tuxedo Black ink
DIES/PUNCHES: Kadomaru Pro corner rounder
ACCESSORIES: Fiskars 12″ ProCision Rotary Bypass Paper Trimmer, Elmer’s Craft Bond Tape Runner, Bearly Art precision craft glue, MISTI stamp tool, Big Shot, Grafix Crystal Clear Craft Plastic, GKD Shaker Strips, Scrapbook Adhesives 3D Foam Squares (small white)

I hope you’ve loved seeing this project as much as I loved creating it and you’re inspired to get crafty! Be sure to check out ALL the fun goodies in the Keep It Simple online store! Save 10% on your entire order when you shop online using code LoveToScrap2 at checkout! There is no minimum purchase requirement and no usage limits, AND it combines with product, order, and shipping discounts! Is that cool, or what?! Be sure to Follow us on Facebook, Instagram, and Pinterest for lots of crafty inspiration! Thanks so much for stopping by today – we’ll see you next time!

Scrappy hugs,

You Make Life Sweet

Hey everybody! Happy Saturday! I hope you have a fun weekend planned! I’m stoked to share a Keep It Simple DT inspiration project created with the NEW Mason Jar and Accessories that launched yesterday along with some of the new Sprinkles in the store! OMGoodness, cuteness overload and so much fun! For my shaker card, I used the entire suite of Mason Jar products consisting of KIS Cuts Mason Jar, KIS Stamps Mason Jar Labels, KIS Cuts Mason Jar Labels and KIS Stamps Mason Jar Sentiments.

I also used some Polymer Clay and Beads from the Sprinkles line to fill the shaker, and of course I reached for the Rose 12×12 Collection Pack to use for the card base along with some heavyweight white cardstock! If you like these Keep It Simple products I’ve used and are inclined to shop, remember to use my discount code LoveToScrap2 at checkout to save 10% on your entire order! There is no minimum purchase requirement and no usage limits, plus the code combines with product, order, and shipping discounts!

Using the KIS Cuts Mason Jar set, I cut a side-folding card base from CutCardStock Cougar Smooth White cardstock and all the mason jar layers from coordinating papers in the Back To Basics Rose 12×12 Collection Pack. As I always say, the assembly is the most fun, and Keep It Simple didn’t skimp on the details in this set! Just look at all those layers – it’s amazing!

I created a shaker mix from KIS Sprinkles Polymer Clay – Pink Strawberry & Jewels, KIS Sprinkles Beads – 2mm Matte Pale Pink, and KIS Sprinkles Beads – 2mm Caviar Glass Pale Pink. The final touch was adding a label stamped with KIS Stamps Mason Jar Sentiments and KIS Stamps Mason Jar Labels and then cut with KIS Cuts Mason Jar Labels.

I stamped another sentiment on the inside from the KIS Stamps Mason Jar Sentiments and embellished it with a die cut heart (die from the KIS Cuts Mason Jar Labels).

Sharing in the following challenges:
1. https://aperfecttimetocraft.blogspot.com/2024/03/a-perfect-time-to-craft-open-challenge.html

Keep It Simple products used:
Back To Basics Rose 12×12 Collection Pack
KIS Cuts Mason Jar
KIS Stamps Mason Jar Labels
KIS Cuts Mason Jar Labels
KIS Stamps Mason Jar Sentiments
KIS Sprinkles Polymer Clay – Pink Strawberry & Jewels
KIS Sprinkles Beads – 2mm Matte Pale Pink
KIS Sprinkles Beads – 2mm Caviar Glass Pale Pink

Affiliate links are used in this post at no cost to you – I really appreciate your support!

Other products used:
CARDSTOCK/PAPER: CutCardStock Cougar Smooth 100# White and Bright Gold Foil cardstock
INK: Memento Tuxedo Black ink
ACCESSORIES: Fiskars 12″ ProCision Rotary Bypass Paper Trimmer, Bearly Art precision craft glue, MISTI stamp tool, Big Shot, Grafix Crystal Clear Craft Plastic, red liner tape, GKD Shaker Strips

I hope you’ve loved seeing this project as much as I loved creating it and you’re inspired to get crafty! Be sure to check out ALL the fun goodies in the Keep It Simple online store! Save 10% on your entire order when you shop online using code LoveToScrap2 at checkout! There is no minimum purchase requirement and no usage limits, AND it combines with product, order, and shipping discounts! Is that cool, or what?! Be sure to Follow us on Facebook, Instagram, and Pinterest for lots of crafty inspiration! Thanks so much for stopping by today – we’ll see you next time!

Scrappy hugs,