Making Spirits Bright

4/16/22 Top Rocker at 613 Avenue Create!

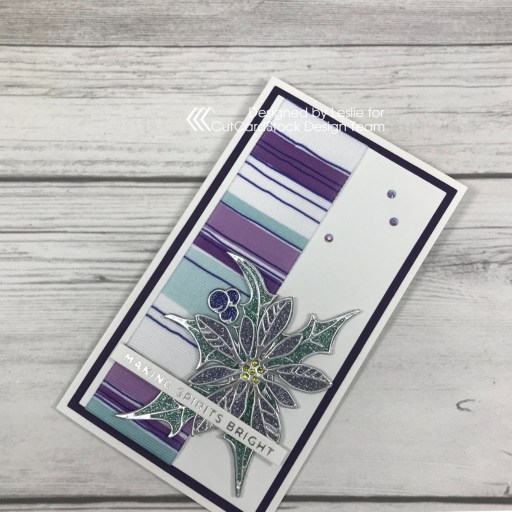
Hi everyone! Happy Saturday – I hope you had a fabulous week and you’re doing something fun this weekend! I have an awesome CutCardStock DT inspiration project to share with you today featuring our glitter cardstock that’s on sale this month. Our glitter cardstock is amazing because the glitter doesn’t rub off like some of the other brands out there. I created this mini slim Christmas card in non-traditional colors of purple and teal, and it features our Silver Glitter cardstock that I colored with alcohol markers and paired with our Bright Silver Foil cardstock. There’s nothing prettier to me than a Christmas card in colors other than the traditional red and green!

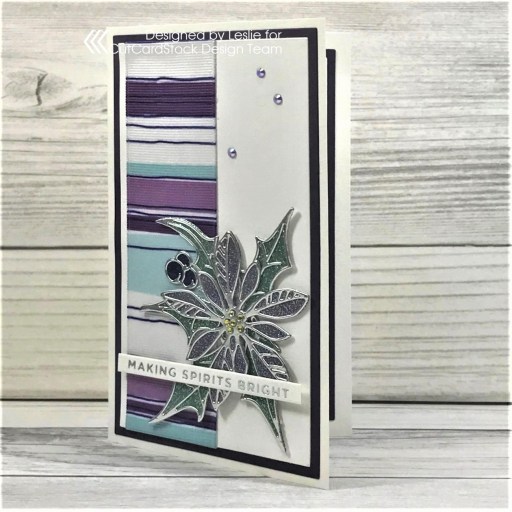
I cut a 3-1/2″ x 6″ mini slimline card base from Basis 110# White cardstock along with layering panels from Basis 80# White cardstock and Basis Dark Purple cardstock using the Waffle Flower Mini Slimline Layers Dies. I upcycled a pretty piece of wide teal, white and purple ribbon for this project that a stamp order was wrapped in a couple months ago. I adhered it to the left side of the white cardstock layering panel and then adhered the panel to the dark purple panel.

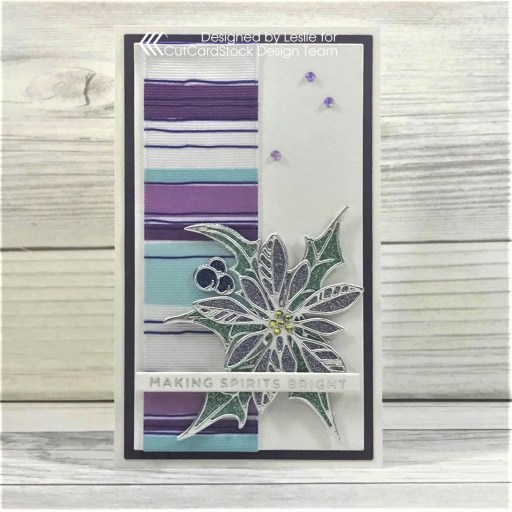
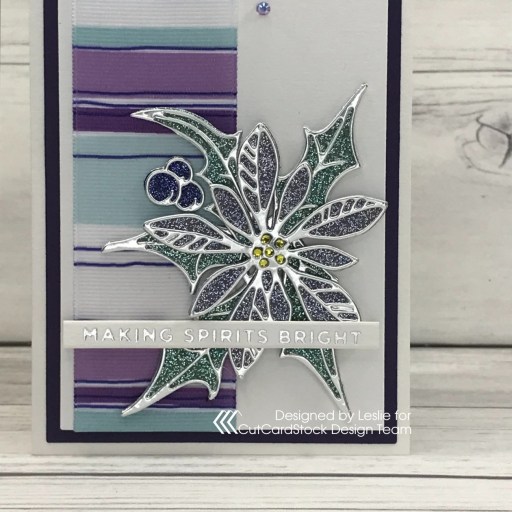
Using the Sizzix Seasonal Sketch Thinlits, I die cut the base flower petals, berries and leaves from Silver Glitter cardstock and colored them with purple and teal alcohol markers, and then die cut the outlines from Bright Silver Foil cardstock. I colored several tiny clear gemstones with a yellow alcohol marker and adhered them to the center of the flower. I adhered the flower to the card front and added a foiled sentiment that I created with the Spellbinders Glimmer Hot Foil System, Spellbinders Glimmer Silver Foil, and Spellbinders Glimmer Mini Christmas Sentiment Strips Hot Foil Plate & Die Set. The finishing touch was adding several gemstones from the Trinity Amethyst Accent Embellishment Mix with the Trinity Pick Up Stick.

I cut the inside panel from Basis 80# White cardstock and embellished it with a strip of Basis Dark Purple cardstock and Silver Glitter cardstock colored with the teal alcohol marker. I added another foiled sentiment created with the Spellbinders Glimmer Hot Foil System, Spellbinders Glimmer Silver Foil, and Spellbinders Glimmer Mini Christmas Sentiment Strips Hot Foil Plate & Die Set, and layered the panel on the dark purple cardstock.

And one more peek… totally loving how this turned out! This silver glitter and silver foil cardstock is ah-maazing and makes the most beautiful embellishments for cards! Who doesn’t love glitter and shine?!

Sharing in the following challenges:
1. 613 Avenue Create: #202204 – Anything Goes w/ optional April Showers (no twist)
2. A Perfect Time To Craft Open Challenge: #4-2022 – Anything Goes
3. A Place To Start: #042022 – Anything Goes w/ optional Key It Simple (no twist)
4. Christmas Craft Creations: Slimline

5. Classic Design Challenge: April #4 – Anything Goes
6. Crafting Happiness Challenges: #122 – Anything Goes Always
7. Crafty Catz: #590 – Anything Goes
8. Jan’s Digi Stamps Challenges: April 2022 – Always Anything Goes
9. Lil Patch of Crafty Friends: #179 – Anything Goes
10. Paperbabe Stamps: #165 – Anything Goes
11. QKR Stampede: #441 – Anything Goes

Affiliate links are used in this post at no cost to you – I really appreciate your support!

CutCardStock products used:
Basis 110# White cardstock
Basis 80# White cardstock
Basis Dark Purple cardstock
Silver Glitter cardstock
Bright Silver Foil cardstock

Other products used:
Ink: Arteza alcohol markers- BG57, PB06/23, YG35
Dies/Punches: Waffle Flower Mini Slimline Layers Dies, Sizzix Seasonal Sketch Thinlits
Accessories: We R Memory Keepers Large Guillotine Paper Trimmer, Bearly Art precision craft glue, MISTI stamp tool, Big Shot, Darice tiny clear gemstones, recycled ribbon scrap,  Spellbinders Glimmer Hot Foil System, Spellbinders Glimmer Silver Foil, Spellbinders Glimmer Mini Christmas Sentiment Strips Hot Foil Plate & Die Set, Trinity Amethyst Accent Embellishment Mix, Trinity Pick Up Stick

I hope you’ve enjoyed today’s project and you’re inspired to get crafty! Be sure to check out all the awesome cardstock and other goodies at CutCardStock (adhesives, labels, stickers, pens, watercolors and ribbon to name a few). And head on over to the CutCardStock Facebook Page for more inspiration! Thanks so much for stopping by today – we’ll see you next time!

Scrappy hugs,

Every PIZZA My Heart

4/30/22 Top Pick at Crafting Happiness Challenges!

Hey y’all! A very Happy Saturday to you – I hope you’ve had a great week! I’m stoked to be back on the Eyelet Outlet blog today with another awesome DT inspiration project! I created THE cutest ‘love you just because’ card featuring our new Pizza Flatback Resin along with our Plaid Heart Washi Tape, Red Jewel Bling and Pink Enamel Hearts! This was a fun one, for sure!

I cut a standard A2 size top-folding card base from 110# Solar White cardstock along with narrow panels from 80# Solar White cardstock and Basis Red cardstock. I covered the white cardstock panel with Plaid Heart Washi Tape and layered it on the red cardstock and then adhered it to the bottom of the card base. I created a pizza pan by cutting a stitched scallop circle from light brown cardstock, and added tiny dots of Dark Walnut Crystal Drops to the scallops around the edge. I adhered the pizza pan to the card front and then stamped the sentiment in light brown ink. I added the Pizza Flatback Resin along with an Enamel Heart. The finishing touch was adding some Red Jewel Bling.

I cut the inside panel from 80# Solar White cardstock and embellished it with a strip of the plaid heart washi tape and a narrow strip of light brown cardstock. I stamped the sentiment in light brown ink and layered the panel on brown cardstock.

And one more look… I’m so smitten! The pizza is so stinkin’ cute I can’t stand it! I just HAD to make a ‘pizza my heart’ card with it!

Sharing in the following challenges:
1. 613 Avenue Create: #202204 – Anything Goes w/ optional April Showers (no twist)
2. A Perfect Time To Craft Open Challenge: #4-2022 – Anything Goes
3. A Place To Start: #042022 – Anything Goes w/ optional Key It Simple (no twist)
4. Classic Design Challenge: April #4 – Anything Goes
5. Crafting Happiness Challenges: #122 – Anything Goes Always
6. Crafty Catz: #590 – Anything Goes
7. Jan’s Digi Stamps Challenges: April 2022 – Always Anything Goes
8. Paperbabe Stamps: #165 – Anything Goes

Eyelet Outlet products used:
Pizza Flatback Resin
Plaid Heart Washi Tape
Red Jewel Bling
Enamel Hearts

Affiliate links are used in this post at no cost to you – I really appreciate your support!

Other products used:
Cardstock/Paper: Neenah Classic Crest 110# and 80# Solar White cardstock, CutCardStock Basis Red cardstock, CutCardStock Twine cardstock
Stamps: My Favorite Things Pizza My Heart stamp set
Ink: Catherine Pooler Sand Castle ink
Dies/Punches: My Favorite Things Stitched Mini Scallop Circle STAX Die-namics
Accessories: We R Memory Keepers Large Guillotine Paper Trimmer, Bearly Art precision craft glue, MISTI stamp tool, Big Shot, Nuvo Dark Walnut Crystal Drops

I hope you’ve enjoyed today’s project! Be sure to check out all the fun goodies at Eyelet Outlet! I can already see you drooling, lol! Be sure to ‘like’ and ‘follow’ Eyelet Outlet Facebook Page to keep up with news and sales, and while you’re at it, join the Eyelet Outlet Fans Facebook group for lots of creative inspiration! Thanks so much for stopping by today – we’ll see you next time! ;)

Scrappy hugs,

Happy Birthday Grand Piano Easel Card

4/9/22 Top Rocker at 613 Avenue Create!
4/10/22 Rising Star at A Place To Start!
4/15/22 Top 5 at QKR Stampede!
4/30/22 Top Pick at Crafting Happiness Challenges!
5/1/22 Top Pick at Jan’s Digi Stamps Challenges!
5/28/22 2nd Prize Winner at A Perfect Time To Craft Open Challenge!

Hi friends! Happy Tuesday! I hope you’re having a most excellent week! I’ve popped in today to share an awesome Tape Runner DT inspiration project! I created a gorgeous birthday card featuring the gorgeous Pinkfresh Studio Anemone Magic washi tape and die, and all panels were adhered with Retractable Tape Runner! My inspiration came from the Grand Piano Card tutorial from Splitcoast Stampers HERE (with a printable piano template) that was showcased in one of their newsletters several months ago. You know me and fun folds – I’m always on the search to try new ones!

As mentioned above, all panels were adhered with Retractable Tape Runner. Foam pads and foam strips were used to adhere the smaller flowers, sentiment strip and piano keys section for dimension. I printed the piano template on Neenah Classic Crest 80# Solar White cardstock and cut out the piano and one set of piano keys. I traced the card base and easel panel onto CutCardStock Basis Black cardstock, punched a four-layer circle ‘stop’ for the easel, and assembled the card. I applied the Pinkfresh Studio Anemone Magic washi tape to 110# Solar White cardstock, cut the flowers with the Pinkfresh Studio Anemone Magic die, and adhered them to the top of the piano. The final step was adding a foiled sentiment created with the Spellbinders Glimmer Hot Foil System, Spellbinders Glimmer Gold Foil, Spellbinders Glimmer Hot Foil Mini Everyday Sentiments Plate and Die Set.

I cut a panel from 80# Solar White cardstock for the back of the card (not part of the tutorial) for a handwritten sentiment and signature.

Here’s a shot showing the easel tucked under the stop for display.

And one more peek… so loving how this turned out! I’m in love with this piano design and Pinkfresh Studio washi tape and die – and having awesome adhesive is for sure a win-win!

Sharing in the following challenges:
1. 613 Avenue Create: #202204 – Anything Goes w/ optional twist of April Showers (no twist)
2. A Perfect Time To Craft Open Challenge Blog: #4-April 2022
3. A Place To Start: #042022 – Anything Goes w/ optional Key It Simple (no twist)
4. Classic Design Challenge: April #4
5. Crafting Happiness Challenges: #122 – Anything Goes Always
6. Crafts Galore Encore Challenge Blog: #98 – April Anything Goes
7. Crafty Catz: #589 – Anything Goes w/ optional Lots of Layers
8. Jan’s Digi Stamp Challenges: April Anything Goes
9. Lil Patch of Crafty Friends: #179 – Anything Goes
10. Pinkfresh Studio Challenges: April Geometric Shapes (rectangular piano keys :)
11. QKR Stampede: #441 – Anything Goes
12. Your Scrapbook Place: April Anything Goes

Affiliate links are used in this post at no cost to you – I really appreciate your support! 

Tape Runner products used:
Retractable Tape Runner

Products used:
Cardstock/Paper: CutCardStock Basis Black cardstock, Neenah Classic Crest 110# and 80# Solar White cardstock
Dies/Punches/Templates: Pinkfresh Studio Anemone Magic die, Splitcoast Stampers Piano Card template, Stampin’ Up 3/4″ Circle Punch
Accessories: We R Memory Keepers Mini Guillotine Paper Trimmer, Bearly Art precision craft glue, Big Shot, Pinkfresh Studio Anemone Magic Washi Tape, Spellbinders Glimmer Hot Foil System, Spellbinders Glimmer Gold Foil, Spellbinders Glimmer Hot Foil Mini Everyday Sentiments Plate and Die Set, Stampin’ Dimensionals, Darice Double-Sided Adhesive Foam Strips

I hope you’ve enjoyed today’s project and you’re inspired to get your craft on! Be sure to check out the ah-mazing Tape Runner, Retractable Tape Runner and Highlight Tape Runner at TapeRunner.com! Be sure to Follow us on Facebook and Instagram! Thanks so much for stopping by today – we’ll see you next time!

Scrappy hugs,

Beach Vacation Frameable

4/10/22 Rising Star at A Place To Start!
4/17/22 Top 5 at Lil Patch of Crafty Friends Challenge Blog!
5/2/22 Top Sprout at A Place To Start!
5/21/22 Shoutout at River of Creativity!

Hey, everybody! I hope your weather is getting fabulous like ours and you aren’t planning to work too hard this coming week! I’m thrilled to be back on the Clear Scraps blog today with another awesome DT inspiration project! We have some new themed Word n Shape products in the store that coordinate with the Frameables bases and frames, and I’m thrilled to have been able to create with one of these new ones! This project features our Base with Square Frame and Word n Shape Vacation-Palm Tree. Who doesn’t love a vacation on the beach?!

I started by covering the small oval base piece with aqua cardstock and the large oval base piece with teal cardstock, and then adhered them together. I colored the palm tree and the Vacation word with alcohol markers. I left the frame untouched because I thought the raw wood color coordinated nicely with the beach scene. I printed the digital beach scene image on white cardstock, fussy cut the umbrella and trimmed the portion with the chairs which I sandwiched between the frame pieces. I adhered the umbrella on three layers of heavyweight cardstock and adhered it to the frame lining up the pole. I die cut letters from the aqua and teal cardstock and offset the teal ones beneath the aqua ones prior to adhering them to the top of the image. The finishing touches were adding the seashell brads (prongs removed) on the bottom right corner of the frame with collage medium and pearl bling strips around the larger oval portion of the base.

Here are a couple more angled shots. I really love how this turned out! The darker colors really pop on the lighter colors for some great contrast!

Sharing in the following challenges:
1. 613 Avenue Create: #202204 – Anything Goes w/ optional twist of April Showers (no twist)
2. A Perfect Time To Craft Open Challenge Blog: #4-April 2022
3. A Place To Start: #042022 – Anything Goes w/ optional Key It Simple (no twist)
4. Classic Design Challenge: April #4
5. Crafting Happiness Challenges: #122 – Anything Goes Always
6. Crafts Galore Encore Challenge Blog: #98 – April Anything Goes
7. Crafty Catz: #589 – Anything Goes w/ optional Lots of Layers
8. Jan’s Digi Stamp Challenges: April Anything Goes
9. Lil Patch of Crafty Friends: #179 – Anything Goes
10. QKR Stampede: #441 – Anything Goes
11. River of Creativity: #12 – Anything Goes w/ optional Spring (no twist)
12. Your Scrapbook Place: April Anything Goes

Clear Scraps products used:
Base with Square Frame
Word n Shape Vacation-Palm Tree

Other products used:
Cardstock/Paper: CutCardStock Basis Teal, Basis Aqua and Basis White cardstock
Stamps: The Curious Wonderland Sunny Days Beach Junk Journal Kit
Ink: Arteza alcohol markers- BG11/23, BR52/84, YG02
Dies/Punches: Waffle Flower Wide Alpha die set
Accessories: Bearly Art precision craft glue, brayer, Big Shot, Ranger Distress Collage Medium, Eyelet Outlet Seashore Brads and 5mm brown pearl strip

I hope you’ve enjoyed today’s project and you’re inspired to get those craft supplies out to play! Be sure to check out all the amazing acrylic, wood and chipboard goodies at Clear Scraps… OMGoodness, you won’t be disappointed! And head on over to the Clear Scraps Facebook Page for lots of inspiration! And while you’re at it, join the Clear Scraps Facebook Creative Group to connect with other Clear Scraps fans! Thanks so much for stopping by today – we’ll see you next time!

Scrappy hugs,

Thinking of You

Hi friends! I hope you’re having a wonderful weekend and either relaxing or doing something fun – whichever suits! I have a pretty CAS get well card to share this morning that I created for Prickley Pear Stamps which features the Flourish Border stamp set and Stitched Scallop Border die set. These stamp sets are so much fun with those little curves that really add some sassy pizzazz to this card! And I’m so in love with that sentiment font!

I cut a standard A2 size top-folding card base from 110# Solar White cardstock along with two narrow curved borders each from CutCardStock Basis Light Lime and CutCardStock Royal Sundance Linen Midnight Blue cardstock using the Stitched Scallop Border die set. I stamped a curved row of flowers from the Flourish Border stamp set in Catherine Pooler Midnight ink on a scrap piece of 80# Solar White cardstock, cut it with dies from the Stitched Scallop Border die set, and colored it with Karin Brushmarkers.

I adhered the stamped border and the narrow curved borders to the bottom front of the card base and stamped the sentiment (from the same stamp set) in Catherine Pooler Juniper ink. The finishing touch was adding gemstones from the Trinity Stamps Andradite Sparkle Embellishment Mix using the Trinity Pick Up Stick.

I cut the inside panel from 80# Solar White cardstock and embellished it with strips cut from CutCardStock Royal Sundance Linen Midnight Blue and CutCardStock Basis Light Lime cardstock. I stamped the sentiment in Catherine Pooler Juniper ink and layered the panel on the midnight blue cardstock.

And one more look… love how this card turned out! This is a great stamp set to use for creating cards for a variety of occasions. These flowers – and the sentiment font – just make me happy!

Sharing in the following challenges:
1. A Perfect Time To Craft Open Challenge Blog: #4-April 2022
2. Classic Design Challenge: April #4
3. Crafting Happiness Challenges: #122 – Anything Goes Always

Affiliate links are used in this post at no cost to you – I really appreciate your support! 

Prickley Pear Stamps products used:
Flourish Border stamp set
Stitched Scallop Border die set

Other products used:
Cardstock/Paper: Neenah Classic Crest 110# and 80# Solar White cardstock, CutCardStock Basis Light Lime cardstock, CutCardStock Royal Sundance Linen Midnight Blue cardstock
Ink: Catherine Pooler Midnight and Juniper Mist inks; Karin Brushmarkers- Sapphire blue, Apple, Canary
Accessories: Tonic Studios 12″ Guillotine Paper Trimmer, Bearly Art precision craft glue, MISTI stamp tool, Big Shot, Trinity Stamps Andradite Sparkle Embellishment Mix, Trinity Pick Up Stick

I hope you’ve enjoyed this project! Be sure to check out all the awesome stamps and dies at Prickley Pear Stamps! If you’d like to save 10% on anything on the site when you shop at Prickley Pear Stamps, use the coupon code LESLIE10 at checkout! And be sure to ‘like’ and ‘follow’ the Prickley Pear Stamps Facebook page to keep up with news and sales, and join Prickley Pear Pals (the fan group) for lots of fun crafty ideas and to share your creativity! And finally, we’d love to see you visit the Prickley Pear Stamps blog that’s in the process of being revived and become a Follower! Hope to see you there! Thanks so much for stopping by today – we’ll see you next time! ;)

Scrappy hugs,

Happy Father’s Day Lantern

4/20/22 Top 3 Winner at Fab ‘n’ Funky Challenges!
4/30/22 DT Favorite Winner at Classic Design Challenge Blog!

Hi everyone! A very Happy Saturday to you – I hope you’ve had a great week! I’m delighted to be back on the Eyelet Outlet blog today with another awesome DT inspiration project! I created a cool Father’s Day Lantern box card featuring our Deer Brads, Pine Tree Brads and Sun/Cloud Brads. Yep, you got it… I’ve been playing with my Scan N Cut! I have tons of cut files on my laptop and when I came across this one (looking for a different one, of course), the light bulb came on and I got to work!

I cut the main card base from CutCardStock Basis Red, and all the rest of the pieces from Papertrey Ink Spring Rain cardstock, 80# Solar White cardstock, CutCardStock Pop-Tone Gumdrop Green cardstock and CutCardStock Basis Light Brown cardstock. I stamped the sentiment from the Hero Arts Year Round Messages stamp set in Catherine Pooler Over Coffee ink, trimmed it and set it aside.

As I was assembling the layers for the background scene, I added Deer Brads, Pine Tree Brads and Sun/Cloud Brads, and then finished the assembly. I added a jute rope bow at the top and adhered the stamped sentiment at the bottom.

Here are a couple angled shots. The back has a plain panel to write a custom message (if desired) and sign. And of course, this is a box card and folds flat for mailing. ;)

Sharing in the following challenges:
1. A Perfect Time To Craft Open Challenge Blog: #4-April 2022
2. Classic Design Challenge: April #4
3. Crafting Happiness Challenges: #122 – Anything Goes Always
4. Crafts Galore Encore Challenge Blog: #98 – April Anything Goes
5. Crafty Calendar Challenge: April Anything But Square
6. Crafty Catz: #589 – Anything Goes w/optional Lots of Layers
7. Creative Creases Challenge: #29 – Anything Goes With a Fun Fold
8. Critter Crazy Challenges: #61 – Anything Goes With a Featured Critter
9. Fab ‘n’ Funky Challenges: #548 – Masculine
10. Sparkles Monthly Challenge Blog: #150 – For Men Only
11. Your Scrapbook Place: April Anything Goes

Eyelet Outlet products used:
Deer Brads
Pine Tree Brads
Sun/Cloud Brads

Affiliate links are used in this post at no cost to you – I really appreciate your support!

Other products used:
Cardstock/Paper: CutCardStock Basis Red, Papertrey Ink Spring Rain cardstock, CutCardStock Basis Light Brown, Neenah Classic Crest 80# Solar White cardstock, CutCardStock Pop-Tone Gumdrop Green cardstock
Stamps: Hero Arts Year Round Messages stamp set
Ink: Catherine Pooler Over Coffee ink
Dies/Punches/Cut Files: My Scrap Chick Lantern Box Card cut file, Stampin’ Up 3/4″ and 1/2″ Circle Punches
Accessories: Brother Scan N Cut, Bearly Art precision craft glue, MISTI stamp tool, Canvas Corp jute rope

I hope you’ve enjoyed today’s project! Be sure to check out all the fun goodies at Eyelet Outlet! I can already see you drooling, lol! Be sure to ‘like’ and ‘follow’ Eyelet Outlet Facebook Page to keep up with news and sales, and while you’re at it, join the Eyelet Outlet Fans Facebook group for lots of creative inspiration! Thanks so much for stopping by today – we’ll see you next time! ;)

Scrappy hugs,

live your dream shaker card

Hi friends! Happy Thursday! Is the weather still pretty chilly where you are or is it warming up any? We are seeing very gradual increases in our temps during the day although we did recently get more snow, and we sure need the moisture. Overall, though, our winter has been pretty mild so we’ll probably have a warm summer! I’m thrilled to be back on the Clear Scraps blog today with another awesome DT inspiration project! I created a pretty encouragement card in a green and pink color combo featuring our Mini Shaker Milk-Can and our 5×9 Circles Dots Stencil. Both products are new in the store and really fun to play with!

Let me start with an up-close shot of the Mini Shaker Milk-Can which I created first. Several of the embellishments are recycled from a tag my friend Ginny (from Polly’s Paper Studio) included in one of my orders a number of years back. The tag was super adorable so I kept it… but it got damaged while we were full-time RVers and I didn’t want to throw the entire thing away, so I salvaged the bow, the bird and the ticket. I adhered patterned paper to the chipboard back along with a small paper doily, a punched circle from another patterned paper, and the ticket. I adhered the next two chipboard forms, added white sequins, and adhered the acrylic divider (with the protective film removed) along with the remaining chipboard form. I adhered the bird on a die cut branch, three paper flowers, a charm, and the bow with hot glue.

I cut a mini slimline card base from 110# Solar White cardstock along with layering panels from 80# Solar White cardstock and patterned paper. Using the 5×9 Circles Dots Stencil with a dauber and green and pink distress inks, I stenciled the design on the white cardstock panel. I adhered the short patterned paper panel to the bottom, inked the edges, and adhered the panel to the card base. I die cut a shape from green cardstock using a labels die and adhered it to the card front. I adhered the finished shaker along with some iridescent gemstones which completed the front of the card.

I cut the inside panel from 80# Solar White cardstock and embellished it with the patterned paper used on the front and a narrow strip of green cardstock. I stamped the sentiment in green ink and layered the panel on green cardstock.

And one more peek… this shaker was super fun to create, along with the stenciled background, and I’m thrilled with how the card turned out!

Sharing in the following challenges:
1. International Art & Soul: #130 – Include A Circle (charm, sequins and gemstones :)
2. Make My Monday Challenge Blog: #171 – Use A Stencil
3. My Time To Craft Challenge Blog: #478 – Technique Formatting of 3 or More Layers
4. Through The Craft Room Door: March 29th Anything Goes

Clear Scraps products used:
Mini Shaker Milk-Can
5×9 Circles Dots Stencil

Other products used:
Cardstock/Paper: Neenah Classic Crest 110# and 80# Solar White cardstock, CutCardStock Basis Brown and Pop-Tone Gumdrop Green cardstock, Polly’s Paper Studio patterned papers
Stamps: Dare 2B Artzy Dream Big stamp set
Ink: Catherine Pooler Grass Skirt ink; Ranger mowed lawn and picked raspberry distress inks
Dies/Punches: Lawn Fawn Winter Sparrows branch die, Spellbinders Labels Twenty Five die
Accessories: We R Memory Keepers Large Guillotine Paper Trimmer; recycled bow, bird die cut and ticket ephemera; Doodlebug Design white sequins, Bearly Art precision craft glue, hot glue gun, Big Shot, small white paper doily from Janis, Funkie Junkie Boutique charm, Wild Orchid Crafts paper flowers, Darice iridescent gemstones

I hope you’ve enjoyed today’s project and you’re inspired to get those craft supplies out to play! Be sure to check out all the amazing acrylic, wood and chipboard goodies at Clear Scraps… OMGoodness, you won’t be disappointed! And head on over to the Clear Scraps Facebook Page for lots of inspiration! And while you’re at it, join the Clear Scraps Facebook Creative Group to connect with other Clear Scraps fans! Thanks so much for stopping by today – we’ll see you next time!

Scrappy hugs,

Cardinal Christmas Ornament

Hey everybody! Happy Hump Day! Sure is hard to believe tomorrow is the last day of March already! Dang… three months gone just like that! Affiliate links are used in this post at no cost to you – I really appreciate your support! I’ve popped in with my second post this morning to share a really cool shaker ornament I finished a couple days ago using an embroidery hoop, Hot Of The Press Cardinal Chipboard Ornament pieces, acetate, a ribbon scrap, and an assortment of sequins from my stash. I’m not only trying to use stamps and dies that have never seen the light of day… I’m also trying to use up other types of crafty stash. I’m also working on design team projects, reorganizing my books of dies, and de-stashing, so my days are really busy! As I’ve said a hundred times before – I don’t know how I managed to get everything done when I was younger, working outside the home and raising four kids!

This was definitely a labor of love, and I enjoyed every flippin’ minute of it! I started by picking out an embroidery hoop that matched the size of the chipboard cardinal ornament pieces. I cut the hanger off the top of the two ornament sides and colored the cardinals, pinecones and greenery with alcohol markers. There was one extra cardinal with pinecones and greenery that I also colored.

Using two Memory Box Stitched Circle Layers dies, I die cut two circular frames from CutCardStock Stardream Metallic Antique Gold cardstock and adhered them to two circular pieces of Grafix Craft Plastic. I adhered the two colored ornament sides beneath the acetate and then adhered the back one to the embroidery hoop. I placed a healthy pinch of sequin mix (from Stampin’ Up Snowflake Sequins, Pretty Pink Posh Marshmallow Seed Beads, Spiegelmom Scraps Snowy Fields Sequin Mix, and Neat & Tangled Sequins) inside and adhered the front ornament side to the embroidery hoop. I placed my weights on it for a few minutes to be sure they adhered well.

I adhered the extra cardinal with pinecones and greenery to the outside of the front of the ornament. I adhered 132 Taylored Expressions Gold Drip Drops (66 on each side) around the perimeter of the ornament. The finishing touch was adding a gold cord hanger and green/white gingham bow to the top.

Here’s a shot of the back.

And one more peek… really loving how this turned out! It’s definitely high on my list of all-time favorite projects! It took a bit of time but was well worth it!

Sharing in the following challenges:
1. International Art & Soul: #130 – Include a Circle
2. The Corrosive Challenges: #3 March 2022 – Anything Goes
3. Through The Craft Room Door: March 29th Anything Goes

Products used:
Cardstock/Paper: CutCardStock Stardream Metallic Antique Gold cardstock
Ink: Arteza alcohol markers- R31, BR51, BK00, YG00
Dies/Punches: Memory Box Stitched Circle Layers
Accessories: 3″ Bamboo Embroidery Hoop, Hot Off The Press Chipboard Cardinal Ornament kit, Bearly Art precision craft glue, Big Shot, Grafix Crystal Clear Craft Plastic, Stampin’ Up Snowflake Sequins, Pretty Pink Posh Marshmallow Seed Beads, Spiegelmom Scraps Snowy Fields Sequin Mix, Neat & Tangled Sequins, Taylored Expressions Gold Drip Drops, Really Reasonable Ribbon Gorgeously Green Collection, GKD Gold Cording

I hope you’ve enjoyed checking out this ornament as much as I enjoyed making it! Thanks so much for stopping by today – we’ll see you next time! ;)

Scrappy hugs,

Shine Bright

4/15/22 Winner at StarStampz Challenge Blog!

Hi everyone! It’s Wednesday and I hope you’re having a great week! The weeks sure do seem to go by faster and faster! ;) Affiliate links are used in this post at no cost to you – I really appreciate your support! I’ve popped in today to share an awesome Tape Runner DT inspiration project! I created a sweet mini slimline encouragement card featuring some STAMPlorations Rainbow Ephemera Tiles, a scalloped die cut, and a little bit o’ bling. And of course, all panels were adhered with Retractable Tape Runner! I love rainbows because they are a sign of hope and good things to come. I donated this card to the Bearly Arts Cards for Cubs project so the rainbow theme fit perfectly!

As mentioned above, all panels were adhered with Retractable Tape Runner. Wet glue was used only to adhere the narrow strips and bling. I cut a mini slim card base from Neenah Classic Crest Solar White 110# cardstock along with a layering panel from CutCardStock Basis Light Yellow cardstock which I adhered to the card base. I also cut a scalloped border and strip from CutCardStock Pop-Tone Blue Raspberry cardstock. I trimmed the STAMPlorations Rainbow Ephemera Tiles that I received in a Paper Goods sampler with one of my orders (aren’t they awesome?!) and adhered them to the card front with 1mm-thick double-sided adhesive foam squares. I adhered the scalloped border and strip, and stamped the sentiment from the Avery Elle Rainbow Builder stamp set in Catherine Pooler Fiesta Blue ink. I stamped the sentiment a second time in Versamark and added Judi-Kins Iridescent Sparkle embossing powder. I stamped the sentiment a third time in Versamark and added Hero Arts Clear Embossing Powder to ensure the iridescent sparkle wouldn’t flake off. I added Eyelet Outlet Clear Jewel Bling to the scalloped border to complete the card front.

I cut the inside panel from Neenah Classic Crest 80# Solar White cardstock and embellished it with a strip of CutCardStock Pop-Tone Blue Raspberry cardstock. I left the panel blank leaving plenty of room for a custom message, and layered it on CutCardStock Basis Light Yellow cardstock.

And one more peek… such an awesome card with a message of hope! And having great adhesive is definitely a plus! Win-win!

Sharing in the following challenges:
1. Crafty Catz: #588 – Anything Goes w/ optional Easter
2. Penny’s Paper-Crafty Challenge Blog: #518 – Anything Goes with paper
3. Star Stampz Challenge: #32 – Use elements starting with the first letter of your name (first name Leslie=light yellow cardstock)
4. The Corrosive Challenges: #3 March 2022 – Anything Goes
5. Through The Craft Room Door: March 29th Anything Goes

Tape Runner products used:
Retractable Tape Runner

Other products used:
Cardstock/Paper: Neenah Classic Crest 110# and 80# Solar White cardstock, CutCardStock Basis Light Yellow cardstock, CutCardStock Pop-Tone Blue Raspberry cardstock
Stamps: Avery Elle Rainbow Builder stamp set
Ink: CP Fiesta Blue ink, Versamark
Dies/Punches: Waffle Flower Mini Slimline Layers die set, Sizzix Borders
Accessories: We R Memory Keepers Mini Guillotine Paper Trimmer, Big Shot, MISTI stamping tool, 1mm-thick double-sided adhesive foam squares, Judi-Kins Iridescent Sparkle embossing powder, Hero Arts Clear Embossing Powder, Milwaukee heat tool, Bearly Art precision craft glue, STAMPlorations Rainbow Ephemera Tiles, Eyelet Outlet Clear Jewel Bling

I hope you’ve enjoyed today’s project and you’re inspired to get your craft on! Be sure to check out the ah-mazing Tape Runner, Retractable Tape Runner and Highlight Tape Runner at TapeRunner.com! Be sure to Follow us on Facebook and Instagram! Thanks so much for stopping by today – we’ll see you next time!

Scrappy hugs,

Celebrating You!

Hey everybody! Happy Tuesday – I hope your week is going well! Now that Spring is here, we are getting snowed on one last time! It started raining several hours ago which turned into snow. I need to get cat food and pick up a prescription today so I hope it doesn’t last long. Affiliate links are used in this post at no cost to you – I really appreciate your support! I’ve popped in to share a cute bi-level birthday card I created for Prickley Pear Stamps. I had the best time playing with the Flourish Border stamp set and coordinating Stitched Scallop Border die set. And you know me and pretty colors… I just couldn’t resist coloring these candles to coordinate with the striped patterned paper!

I cut a standard A2 size top-folding card base from Neenah Classic Crest Solar White 110# cardstock along with additional panels from Neenah Classic Crest 80# Solar White cardstock and The Paper Studio Four Seasons and Everything In Between -2- paper pad. Using dies from the Stitched Scallop Border die set, I cut off a diagonal portion of the front panel of the card base and the additional white cardstock panel to be used on the inside. I adhered the striped patterned paper to the inside of the card base and rounded the bottom right corner. Using the same die set, I cut a border element for the front of the card base from CutCardStock Stardream Metallic Lagoon cardstock. I stamped the candles and sentiment from the Flourish Border stamp set in black ink, colored the candles with alcohol markers and added detail with a Posca white paint pen. I colored the candle flames with a Sakura Clear Star Gelly Roll pen, and finished the front with gemstones from the Trinity Stamps Andradite Sparkle, Brilliant Citrine, Topaz Twinkle, Morganite Muse, Amethyst Accent and Aquamarine Ripple Embellishment Mixes applied with the Trinity Pick Up Stick.

I adhered the diagonally-cut white cardstock panel to the inside of the card base and stamped a sentiment from the Play Day on the Beach stamp set in black ink.

And one more look… I sure love how this turned out! These colors are awesome! This card was a booger to photograph – the front flap wouldn’t stay down and I had to lay my heavy metal pokey tool down on one side!

Sharing in the following challenges:
1. Crafty Catz: #588 – Anything Goes w/ optional Easter
2. Paperbabe Stamps: #164 – Anything Goes
3. The Corrosive Challenges: #3 March 2022 – Anything Goes
4. Through The Craft Room Door: March 29th Anything Goes

Prickley Pear Stamps products used:
Flourish Border stamp set
Stitched Scallop Border die set
Play Day on the Beach stamp set

Other products used:
Cardstock/Paper: Neenah Classic Crest 110# and 80# Solar White cardstock, CutCardStock Stardream Metallic Lagoon cardstock, The Paper Studio Four Seasons and Everything In Between -2- paper pad
Ink: Catherine Pooler Midnight ink; Arteza alcohol markers- Y02/36, P13, YR04, YG06, RP15, BG37/45; Posca white paint pen, Sakura Clear Star Gelly Roll pen
Dies/Punches: Kadomaru Pro corner rounder
Accessories: Tonic Studios 12″ Guillotine Paper Trimmer; Bearly Art precision craft glue, MISTI stamp tool, Big Shot, Trinity Stamps Andradite Sparkle, Brilliant Citrine, Topaz Twinkle, Morganite Muse, Amethyst Accent and Aquamarine Ripple Embellishment Mixes; Trinity Pick Up Stick

I hope you’ve enjoyed this project! Be sure to check out all the awesome stamps and dies at Prickley Pear Stamps! If you’d like to save 10% on anything on the site when you shop at Prickley Pear Stamps, use the coupon code LESLIE10 at checkout! And be sure to ‘like’ and ‘follow’ the Prickley Pear Stamps Facebook page to keep up with news and sales, and join Prickley Pear Pals (the fan group) for lots of fun crafty ideas and to share your creativity! And finally, we’d love to see you visit the Prickley Pear Stamps blog that’s in the process of being revived and become a Follower! Hope to see you there! Thanks so much for stopping by today – we’ll see you next time! ;)

Scrappy hugs,