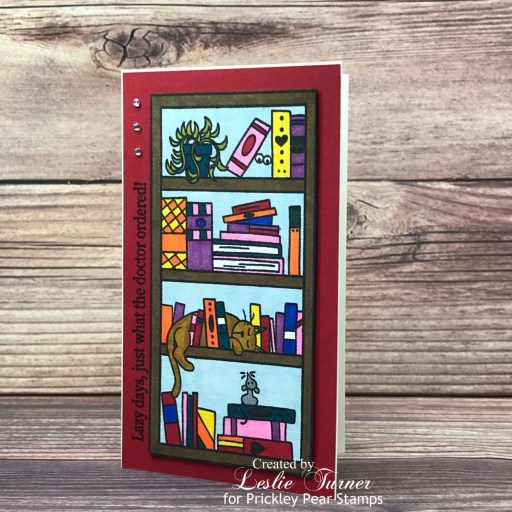
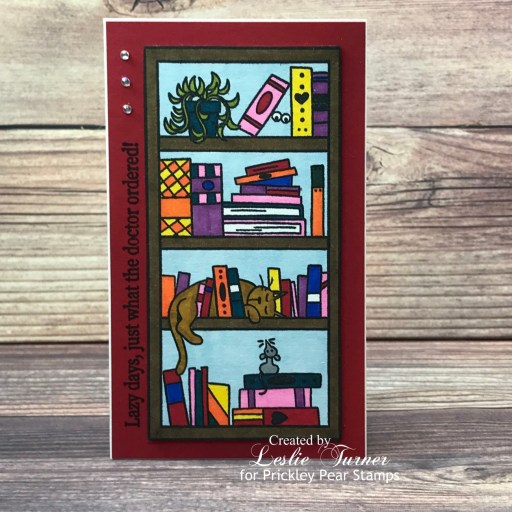
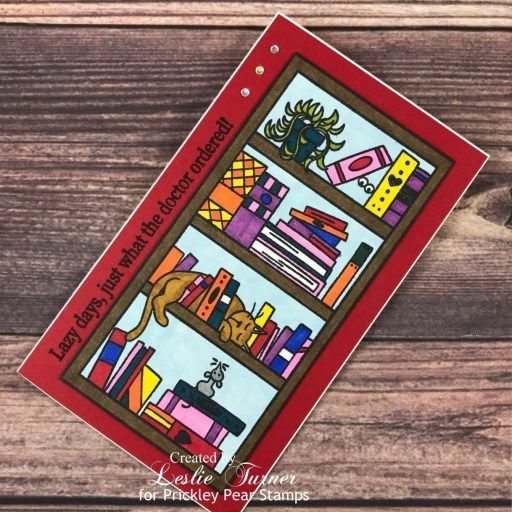
Hi friends! Happy Sunday and I hope you’re having a fabulous weekend! They sure do come and go quickly these days, lol! I have an adorable mini slimline get well card to share with you today created with the new Nap Time stamp set from Prickley Pear Stamps! The awesome release includes this library stamp set, several very cool chicken stamp sets, a woodgrain background stamp, and a chicken wire background stamp! You just can’t go wrong with these!
I cut a 3-1/2″ x 6″ mini slimline card base from CutCardStock Basis 110# White cardstock along with a layering panel from CutCardStock Pop-Tone Wild Cherry cardstock which I adhered to the card base. I stamped the image on Basis White cardstock, colored it with alcohol markers, and trimmed it. I stamped the sentiment in Memento Tuxedo Black ink in a vertical fashion, adhered the image to the card front, and finished it off with three Darice iridescent gemstones.
One more look… super happy with how this turned out! Since we are Crazy Cat People, I fell in love immediately with this stamp set! Gotta love that guy snoozing on the shelf!
I hope you’ve enjoyed this project! Be sure to check out all the awesome stamps and dies at Prickley Pear Stamps! If you’d like to save 10% on anything on the site when you shop at Prickley Pear Stamps, use the coupon code LESLIE10 at checkout! And be sure to ‘like’ and ‘follow’ the Prickley Pear Stamps Facebook page to keep up with news and sales, and join Prickley Pear Pals (the fan group) for lots of fun crafty ideas and to share your creativity! And finally, we’d love to see you visit the Prickley Pear Stamps blog that’s in the process of being revived and become a Follower! Hope to see you there! Thanks so much for stopping by today – we’ll see you next time! ;)
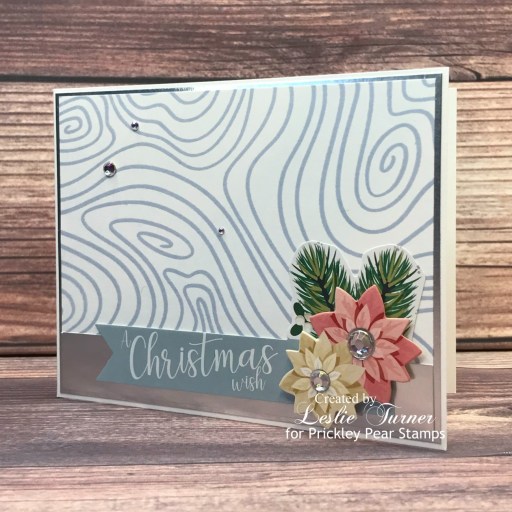
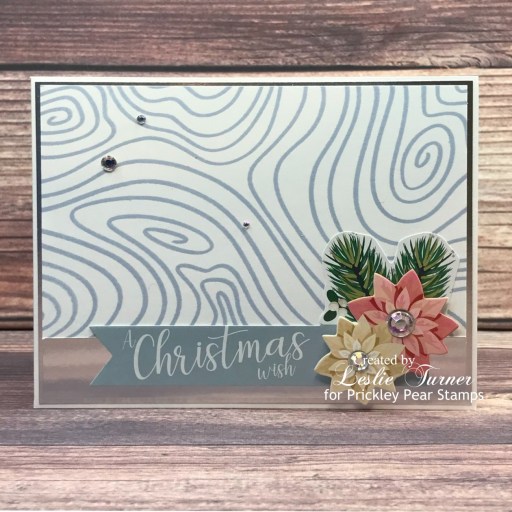
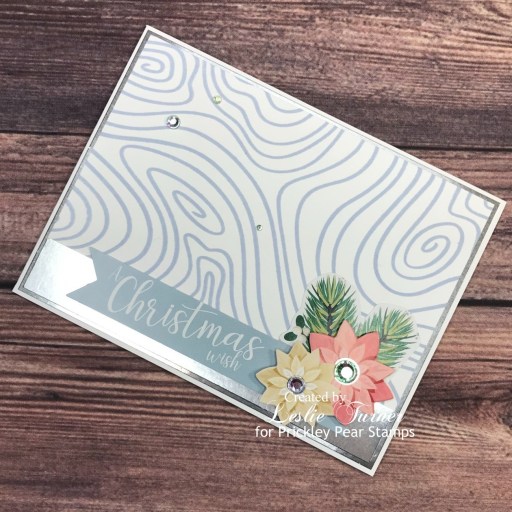
Hey everybody! I’m back with my second post this morning sharing a pretty Christmas card I created in non-traditional colors using the Slimline Woodgrain Background stamp from Prickley Pear Stamps, which is part of the new release featuring a super cute library stamp set, several very cool chicken stamp sets, and a chicken wire background stamp. I wanted to create something that’s not library- or chicken-related to show how versatile this woodgrain background is!
I cut a standard A2 size side-folding landscape card base from 110# Solar White cardstock along with a layering panel from 80# Solar White cardstock and a layering panel and 1-1/4″-ish strip from CutCardStock Bright Silver Foil cardstock. I started by stamping the Slimline Woodgrain Background stamp in Catherine Pooler Tranquil ink on the lighter weight Solar White panel which I layered on the Silver Foil cardstock panel and then adhered the Silver Foil strip across the bottom. I added a poinsettia element from the Spellbinders Sparkling Holidays Sticker Pack along with several Darice iridescent gemstones which completed the front.
And one more look… I always love a Christmas card in non-traditional colors and this one with the woodgrain background turned out so pretty!
I hope you’ve enjoyed this project! Be sure to check out all the awesome stamps and dies at Prickley Pear Stamps! If you’d like to save 10% on anything on the site when you shop at Prickley Pear Stamps, use the coupon code LESLIE10 at checkout! And be sure to ‘like’ and ‘follow’ the Prickley Pear Stamps Facebook page to keep up with news and sales, and join Prickley Pear Pals (the fan group) for lots of fun crafty ideas and to share your creativity! And finally, we’d love to see you visit the Prickley Pear Stamps blog that’s in the process of being revived and become a Follower! Hope to see you there! Thanks so much for stopping by today – we’ll see you next time! ;)
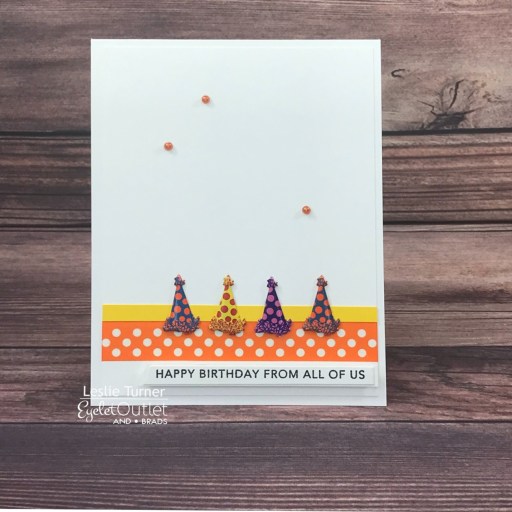
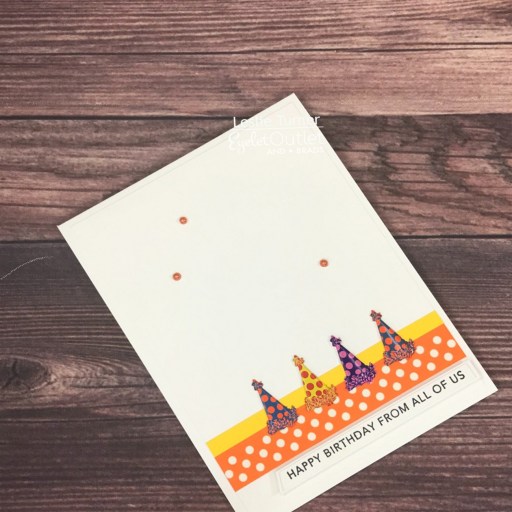
Hi everyone! A very Happy Saturday to you – I hope you’ve had a great week! I’m happy to be back on the Eyelet Outlet blog today with another awesome DT inspiration project! I created a fun and quirky CAS birthday card featuring our Party Hat Brads, Orange Dot Washi Tape and Orange Pearl Bling! These party hats are such a hoot and so much fun to play with!
I cut a standard A2 size top-folding card base from Basis 110# White cardstock along with a layering panel from Basis 80# White cardstock. I applied a single strip of Orange Dot Washi Tape and then adhered a narrow strip of Astrobrights Solar Yellow cardstock just above it. I added four Party Hat Brads in a row and adhered the panel to the card base. I stamped a Taylored Expressions Simple Strips – Birthday sentiment in Memento Tuxedo Black ink on a scrap of Neenah Classic Crest 110# cardstock, cut it with the coordinating Taylored Expressions Simple Strips – Asymmetrical Die, and layered it once more on another piece of the scrap cardstock before adhering it to the card front on a Darice Double-Sided Adhesive Foam Strip. The finishing touch was adding Orange Pearl Bling.
I cut the inside panel from Basis 80# White cardstock and embellished it with a strip of Orange Dot Washi Tape and a narrow strip of Astrobrights Solar Yellow cardstock. I stamped a fun sentiment from The Cat’s Pajamas Sassy Birthday stamp set in Memento Morocco ink and adhered the panel directly to the card base.
And one more look… super happy with how this card turned out! These brads, washi tape and bling make the perfect companions for a fun birthday card!
I hope you’ve enjoyed today’s project! Be sure to check out all the fun goodies at Eyelet Outlet! I can already see you drooling, lol! Be sure to ‘like’ and ‘follow’ Eyelet Outlet Facebook Page to keep up with news and sales, and while you’re at it, join the Eyelet Outlet Fans Facebook group for lots of creative inspiration! Thanks so much for stopping by today – we’ll see you next time! ;)
6/1/22 Top Pick at Ellibelle’s Crafty Wednesday Challenge!
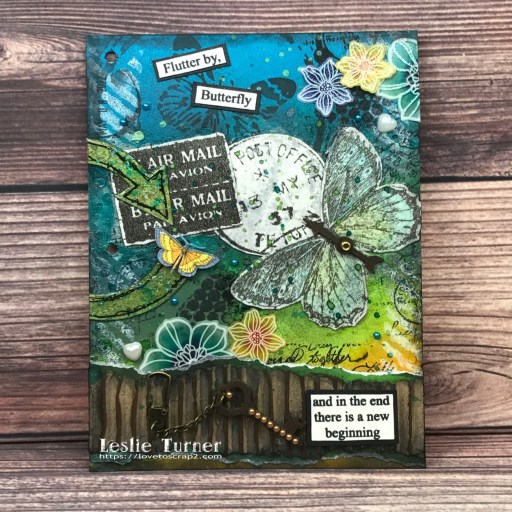
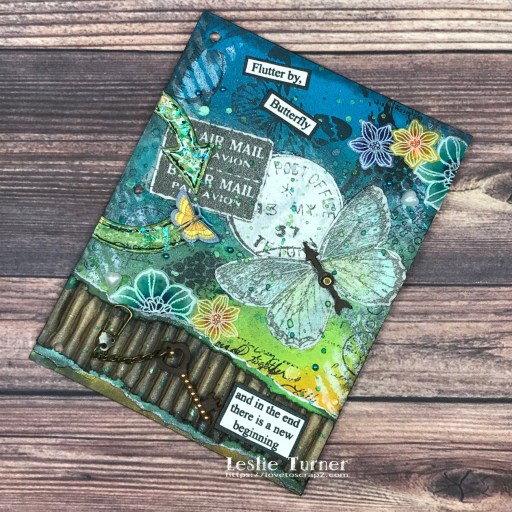
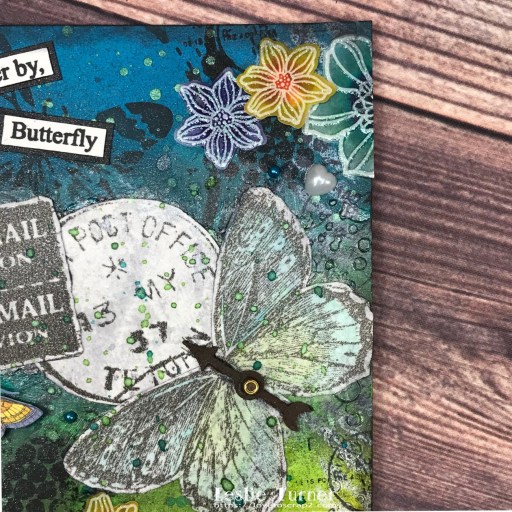
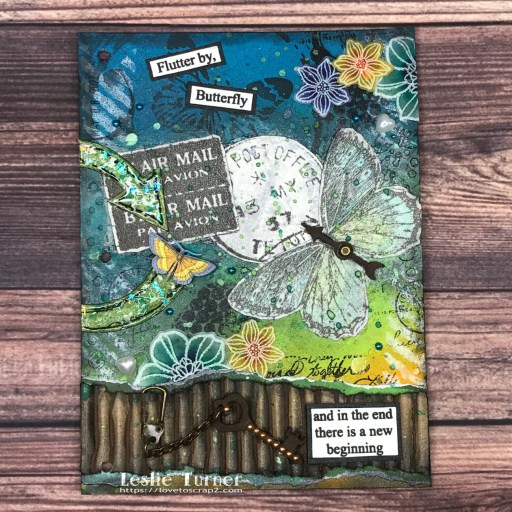
Hey everybody! I hope you’re having a great week and not working too hard! I’m back this morning with a new page in my new art journal that I finished on Mother’s Day. Even though it’s butterfly-themed, I’ve dedicated this page to our little seven-month-old kitten named Flutterby who was killed by a car speeding through our neighborhood three weeks ago. As most of you know, Ed and I rescue cats and kittens, and Flutterby was the last surviving kitten born to feral Mama last September so she had a special place in our hearts. It was hard. I can now talk about her without tearing up (most of the time) and this page makes me feel like she’s in a good place. :)
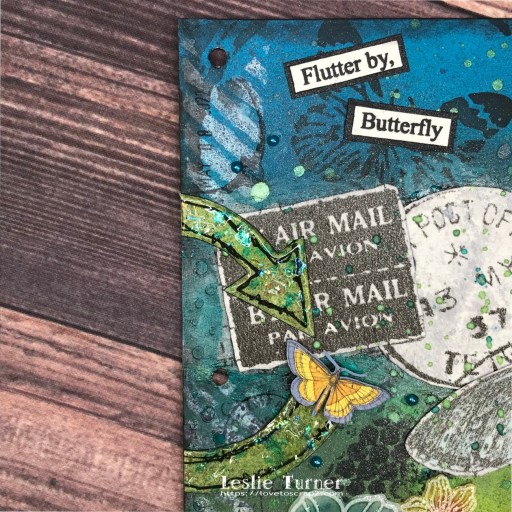
I started by inking a piece of Neenah Classic Crest 165# Solar White cardstock with mermaid lagoon, peacock feathers, twisted citron and fossilized amber distress inks using the direct-to-paper technique for good bold coverage. Using the Taylored Expressions Bubbly stencil and DreamWeaver Translucent Embossing Paste, I added some bubbles down both sides. Next, I added arrows on both sides using the TCW Susana’s Arrows stencil and Ranger picket fence distress stain, and then added several elements over the page using the TCW Mini Butterfly Collage stencil and Ranger black soot distress ink. Then I randomly stamped clusters of dots, postage stamps and text over the background using Paper Wings Productions Art Textures and Writing Backgrounds stamp sets.
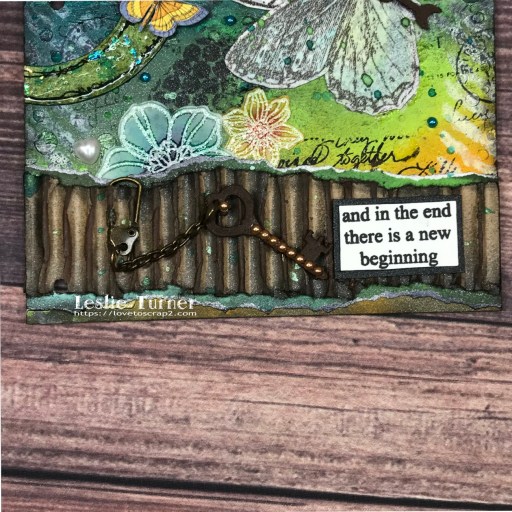
I tore a piece of kraft corrugated paper, inked the edges, and adhered it to a torn piece of Hot Off The Press Flowing Ink double-sided paper and then to the bottom of the page. I grabbed a Hobby Lobby Woodpile Key and coated it with Prima Finnabair Brown Rust Paste and Red Rust Paste to give it a rusted look, and embellished it with a piece of Eyelet Outlet Brown Pearl Bling Strip. I rubbed some of the brown rust paste onto the raised portions of the corrugated paper, then attached a Tim Holtz idea-ology Swivel Clasp to the key with his idea-ology Jump Rings, and attached it to the corrugated paper.
I created an arrow by tracing a curved arrow from the TCW Susana’s Arrows stencil onto a scrap of 110# Solar White cardstock which I fussy cut and then drew lines around the edges with a Sakura Pigma Micron 08 black pen. I sprayed it with Tattered Angels It’s Green and Dragonfly Glimmer Mists, applied Glossy Accents and sprinkled Brutus Monroe Blue Shimmer Flakes over it. I applied another light ‘bumpy’ coat of Glossy Accents for texture, covering and trapping the shimmer flakes. Once dry, I cut the curved arrow in half and adhered the two pieces to the left side of the page, and added a 49 and Market fussy cut and layered butterfly with Darice Double-Sided Adhesive Foam Circles.
I cut two postal pieces from a roll of Tim Holtz idea-ology Postale Tissue Wrap and a large butterfly from his idea-ology Melange Tissue Wrap, and adhered them to scrap pieces of 110# Solar White cardstock with Ranger Distress Collage Medium. Once dry, I fussy cut each one of them, watercolored the butterfly with Light Green, Turquoise Green, Persian Green and Gray Zig Clean Color Real Brush Markers and a Kuretake Watercolor Brush, and added a Tim Holtz idea-ology Gamer Spinner for the butterfly’s body. I adhered these pieces and lightly sprayed the page with Tattered Angels Tarnished Silver Glimmer Mist. I then splattered Tattered Angels It’s Green and Dragonfly Glimmer Mists by opening the bottle and flicking the bottom part of the spray apparatus over the page.
I stamped the sentiments from the STAMPlorations Layered Butterflies stamp set in Memento Tuxedo Black ink on scraps of 110# Solar White cardstock and trimmed them. I ran a Tuxedo Black marker around the outside edges of each portion, layered them on CutCardStock Curious Metallic Night cardstock and adhered them to the page. I added several vinyl glittered flower stickers from my stash along with some Eyelet Outlet blue pearls and white heart pearls. The final touch was inking the edges of the page with black soot distress ink. Seems I can never do a ‘simple’ mixed media project… I feel like I have to keep adding more and more. Even though this is quite busy, I’m pleased with the result!
5/31/22 Design Team Favorite at Crafts Galore Encore Challenge Blog!
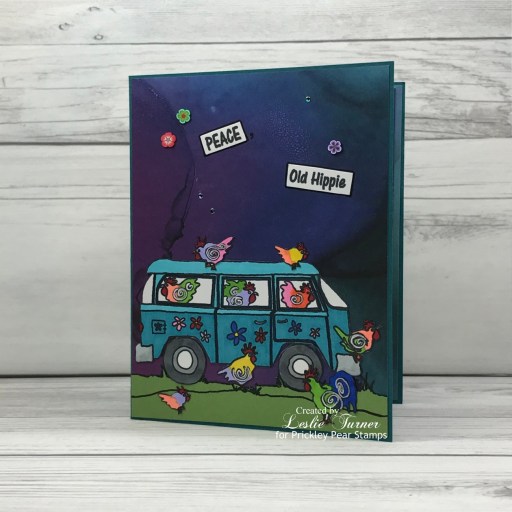
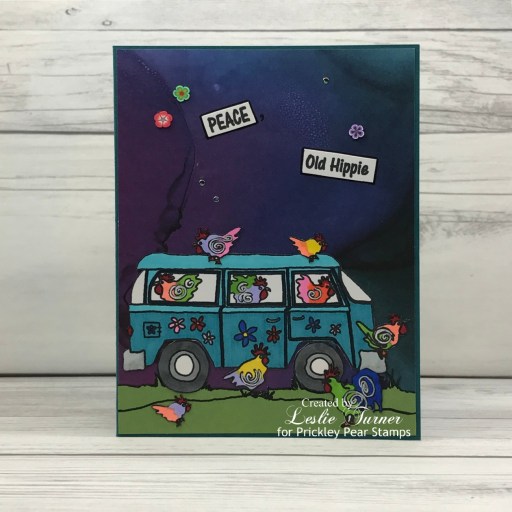
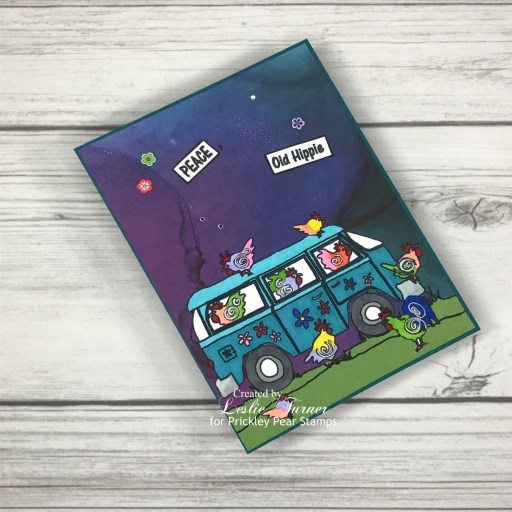
Hi friends! Happy Hump Day! I hope you’re having a great week! I have a fun birthday card to share with you today that I created with the new Prickley Pear Stamps Hippie Chickens stamp set! I also used the Blobby Flowers 2 stamp set for the flowers on the inside panels. You know how I love my fun folds, and this Inside Double Flap card was just the ticket! I am in love with this stamp set – I’m a child of the late 50s, 60s and early 70s, so this was an instant hit!
I cut a standard A2 size card base from CutCardStock Basis Teal with extra score lines to create an M (or W depending on how you look at it). I attached a panel cut from Hot Off The Press Flowing Ink 6×6 double-sided cardstock and then adhered paper-pieced grass, the hippie van and chickens, all from the Hippie Chickens stamp set and all colored with alcohol markers. I added the sentiment, some flower confetti and a few Dot Sparklers which completed the card front.
I adhered flaps cut from the Basis Teal cardstock along with several panels cut from the Flowing Ink cardstock, stamped flowers from the Blobby Flowers 2 stamp set on the narrower outermost panels, and added gemstones to the center of each flower. The final step was adhering sentiments along with fussy-cut chickens, flowers and spiral elements from the Hippie Chickens stamp set, as well as a few more Dot Sparklers, to the flaps.
And one more look… totally loving how this turned out! Such a fun, fun stamp set with so many possibilities!
I hope you’ve enjoyed this project! Be sure to check out all the awesome stamps and dies at Prickley Pear Stamps! If you’d like to save 10% on anything on the site when you shop at Prickley Pear Stamps, use the coupon code LESLIE10 at checkout! And be sure to ‘like’ and ‘follow’ the Prickley Pear Stamps Facebook page to keep up with news and sales, and join Prickley Pear Pals (the fan group) for lots of fun crafty ideas and to share your creativity! And finally, we’d love to see you visit the Prickley Pear Stamps blog that’s in the process of being revived and become a Follower! Hope to see you there! Thanks so much for stopping by today – we’ll see you next time! ;)
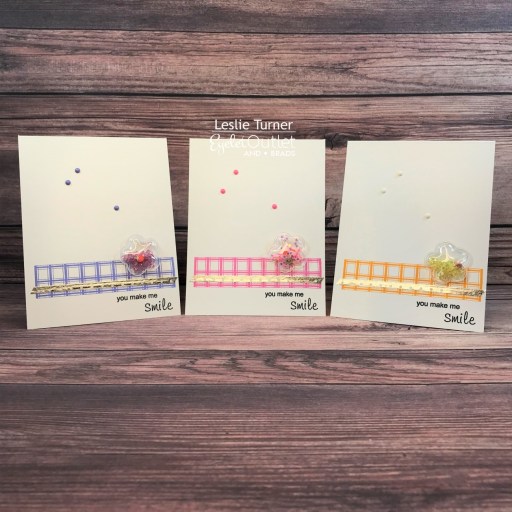
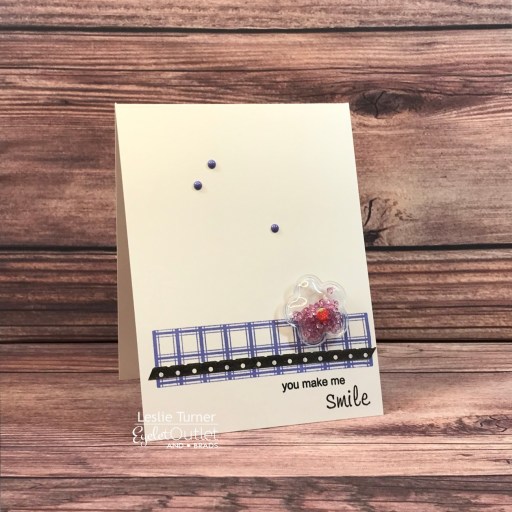
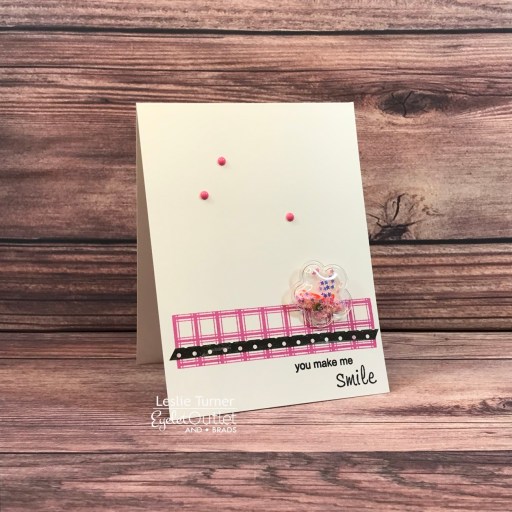
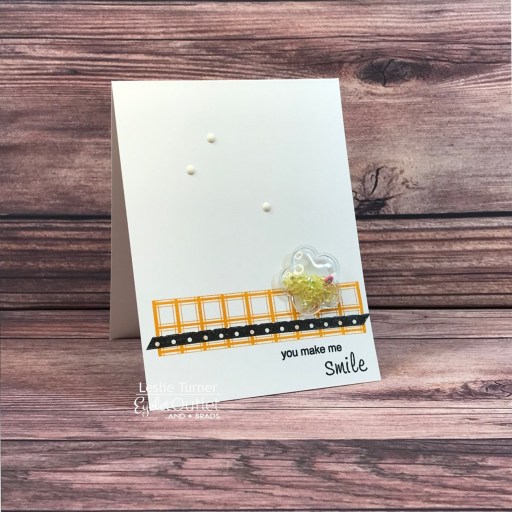
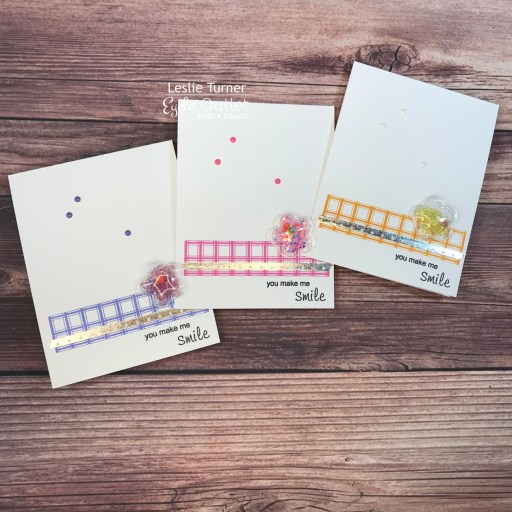
Hi everyone! A very Happy Saturday to you – I hope you’ve had a great week! I’m stoked to be back on the Eyelet Outlet blog today with another awesome DT inspiration project! I created an adorable set of three thank you cards featuring our new Flower Shakers along with Skinny Silver Dots Washi Tape and Purple Enamel Dots, Pink Enamel Dots and White Enamel Dots! I matched the ink and enamel dots with the colors in the shaker bits inside each flower. This is definitely a simple design that’s easy to mass-produce!
I cut three standard A2 size top-folding card bases from 110# Solar White cardstock. I put the grid block stamp from the Prickley Pear Stamps Blobby Flowers stamp set in my MISTI and stamped it in Catherine Pooler Serenade, Be Mine and Sauna inks on each card base. I added a strip of Skinny Silver Dots Washi Tape to each and stamped a sentiment from the Prickley Pear Stamps Blobby Flowers 2 stamp set in black ink in the lower right corner on each using the MISTI. I adhered a Flower Shaker to each card front, and the final touch was adding three Purple Enamel Dots, Pink Enamel Dots and White Enamel Dots to the card with the corresponding ink color.
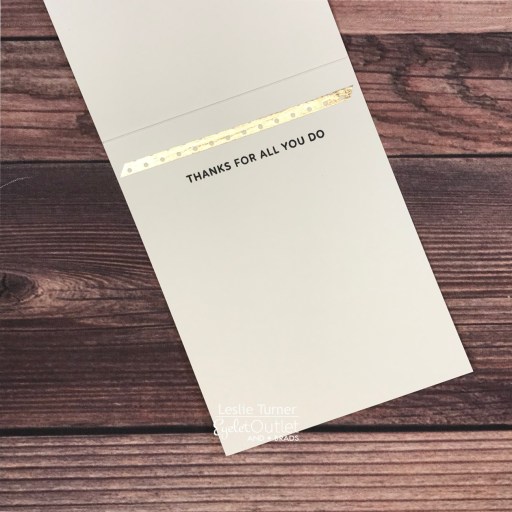
I applied a strip of Skinny Silver Dots Washi Tape to the inside of each card base and then stamped a sentiment from the Pretty Pink Posh Mom stamp set on each using the MISTI.
And one more look… so loving how these turned out! These flower shakers are so stinkin’ cute I can’t stand it! And as I mentioned above, this super simple design would be so easy to mass-produce!
I hope you’ve enjoyed today’s project! Be sure to check out all the fun goodies at Eyelet Outlet! I can already see you drooling, lol! Be sure to ‘like’ and ‘follow’ Eyelet Outlet Facebook Page to keep up with news and sales, and while you’re at it, join the Eyelet Outlet Fans Facebook group for lots of creative inspiration! Thanks so much for stopping by today – we’ll see you next time! ;)
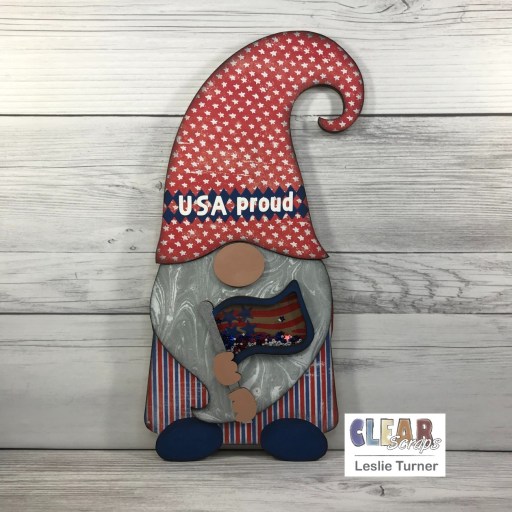
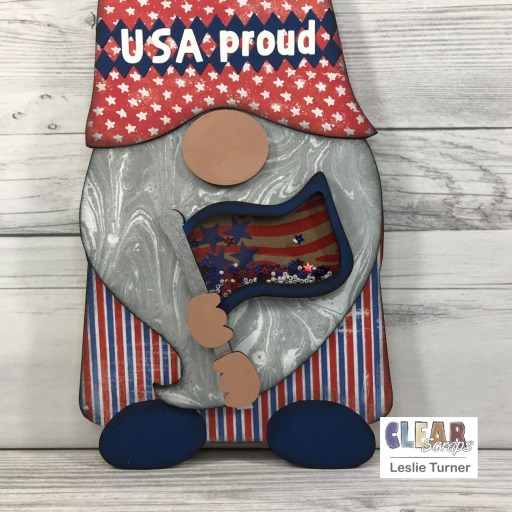
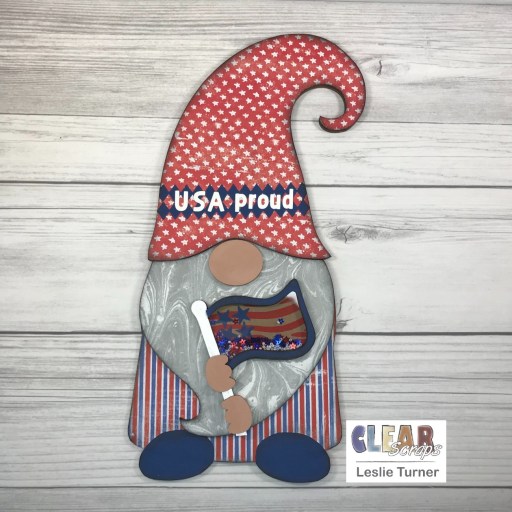
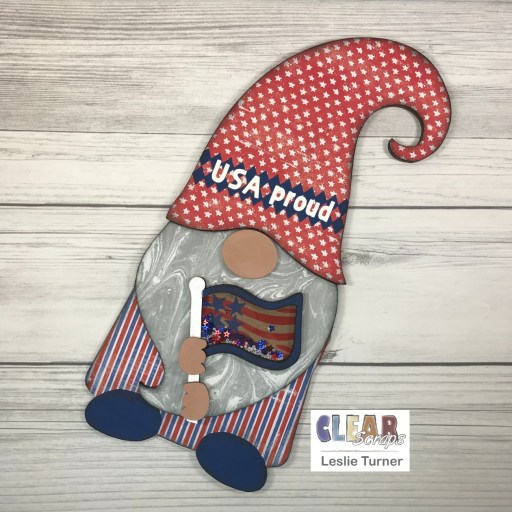
Hey, everybody! Happy Friday – I hope you have a most excellent weekend! I’m stoked to be back on the Clear Scraps blog today with another awesome DT inspiration project! I love anything Americana and I absolutely LOVE gnomes so that combination can only mean the coolest gnomie ever! This project features our Medium Gnome 1 holding a Mini Shaker Flag embellished with the 5×9 Wave Strips Stencil, and he’s all decked out in red, white and blue patterned papers with a gray marble patterned paper beard and blue cardstock shoes! ;) Oh, this was a fun one!
I covered all the wood Medium Gnome 1 pieces with patterned paper and cardstock, and inked the edges in black soot distress ink. The only painting I did on the gnome was his nose and little hands which called for a mixture of paints (Liquitex Raw Umber, Yellow Oxide and Titanium White) to achieve a flesh color. I embellished his hat with two border die cuts and upper/lowercase die cut alphas.
I painted the Mini Shaker Flag pole with a silver metallic paint pen, covered the front chipboard form with the same blue cardstock I used for his shoes, and inked the edges. I used the 5×9 Wave Strips Stencil, Liquitex Cadmium Red Medium Hue acrylic paint and a foam brush to stencil the design to resemble flag stripes on the chipboard back, and adhered four small punched stars. I adhered the next two chipboard forms onto the chipboard back, filled the shaker with red and blue stars and white seed beads, and adhered the acrylic divider (after removing the protective film) and then the front chipboard form. I adhered the flag to the front of the gnome and adhered his hands to appear as though he’s gripping the flag pole. ;)
And here’s one more peek… I’m so smitten with this little guy! LOVE how he turned out! Such a fun project!
Other products used: Cardstock/Paper: CutCardStock Basis Blue cardstock, CutCardStock Basis White cardstock, The Paper Studio Four Seasons and Everything In Between -2- paper pad, Stampin’ Up Perfectly Artistic DSP Ink/Paint: Ranger black soot distress ink, Marvy Uchida DecoColor Silver Metallic paint marker; Liquitex Raw Umber, Yellow Oxide, Titanium White, and Cadmium Red Medium Hue acrylic paints Dies/Punches: Sizzix Border die, Stampin’ Up Itty Bitty Star Punch, CUTplorations Uppercase and Lowercase Alphabet Plate dies Accessories: Bearly Art precision craft glue, Ranger Distress Collage Medium, Big Shot, Eyelet Outlet red and blue star sequins, Pretty Pink Posh Marshmallow seed beads
I hope you’ve enjoyed today’s project and you’re inspired to get those craft supplies out to play! Be sure to check out all the amazing acrylic, wood and chipboard goodies at Clear Scraps… OMGoodness, you won’t be disappointed! And head on over to the Clear Scraps Facebook Page for lots of inspiration! And while you’re at it, join the Clear Scraps Facebook Creative Group to connect with other Clear Scraps fans! Thanks so much for stopping by today – we’ll see you next time!
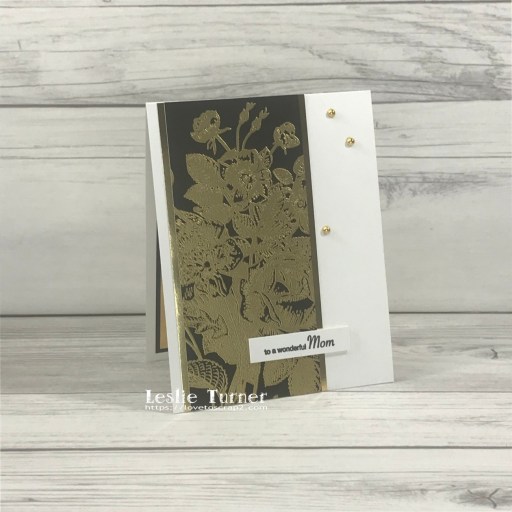
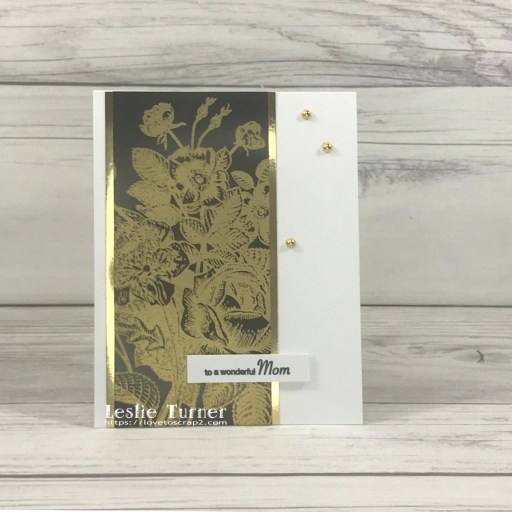
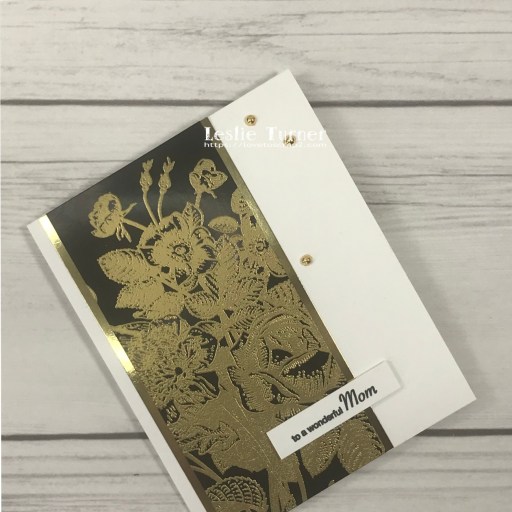
Hi everyone! Happy Thursday! I hope you’ve been having some fun this week and not working too hard! I’ve popped in this morning to share an awesome Tape Runner DT inspiration project! I’ve been making a few commissioned Mother’s Day cards, and this one is earmarked for my daughter-in-law so I hope she doesn’t see this post before the card arrives… it’ll be close so fingers crossed! Of course, all panels were adhered with Retractable Tape Runner. This card turned out so pretty with all the gold embossing which really pops on the glossy black cardstock.
As mentioned above, all panels were adhered with Tape Runner. I cut a standard A2 size top-folding card base from 110# Solar White cardstock along with a roughly two-thirds size panels from glossy black cardstock and gold metallic foil cardstock. I stamped the Brutus Monroe Botanical background stamp onto the glossy black cardstock in Versamark and heat embossed it with Ranger gold embossing powder. I adhered the panel to the gold metallic foil panel and then to the card base. I stamped the sentiment from the Prickley Pear Stamps Spring Scalloped Circles stamp set in Memento Tuxedo Black ink, trimmed it and adhered it to the card base on 1-mm thick foam squares. The finishing touch was adding several Taylored Expressions Gold Drip Drops.
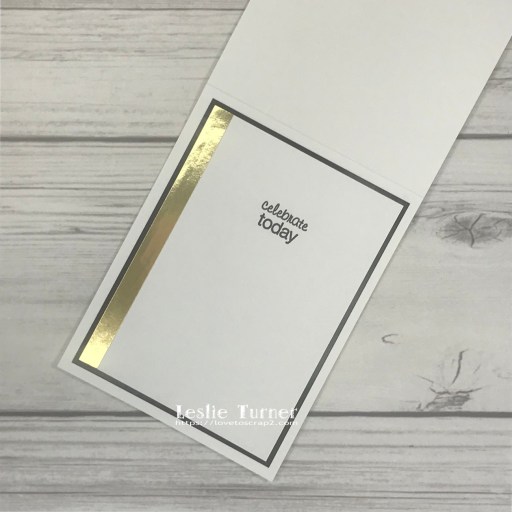
I cut the inside panel from 80# Solar White cardstock and embellished it with a strip of gold metallic foil cardstock. I stamped the sentiment from the same stamp set in black ink and layered the panel on glossy black cardstock.
And one more peek… really loving how this turned out and Tape Runner is definitely my favorite adhesive for getting panels to stick nicely. And I can’t believe the gold metallic foil actually looks gold and not black in these photos! Win-Win!
I hope you’ve enjoyed today’s project and you’re inspired to get your craft on! Be sure to check out the ah-mazing Tape Runner, Retractable Tape Runner and Highlight Tape Runner at TapeRunner.com! Be sure to Follow us on Facebook and Instagram! Thanks so much for stopping by today – we’ll see you next time!
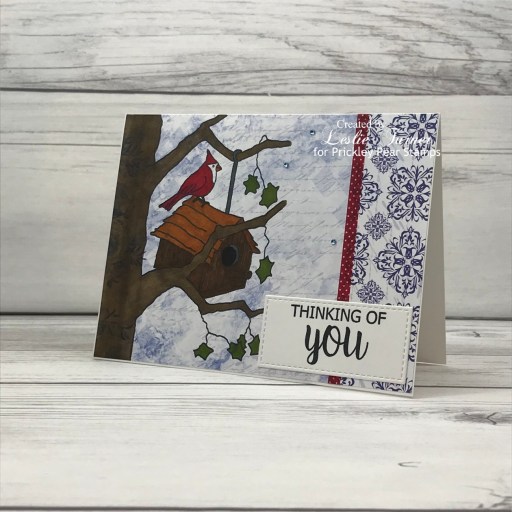
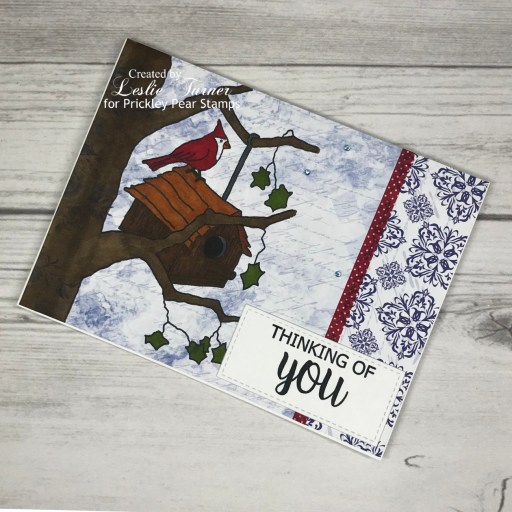
Hey everybody! It’s Hump Day and I hope you’re having a great week! I have another Prickley Pear Stamps sample to share with you this morning featuring the new All About You Cardinal stamp set! OMGoodness, I’m so in love with this stamp set! I absolutely love cardinals – there are a lot of people who believe that a loved one is watching over us if a cardinal appears, and that’s what I always think of when I see one. I have many loved ones in Heaven and I’m sure they’re watching over us until we see them again one day! <3
I cut a standard A2 size landscape top-folding card base from 110# Solar White cardstock along with two panels from Hot Off The Press Blue Persuasion patterned paper which I adhered together and applied a strip of skinny washi tape at the seam. I stamped the cardinal image directly on the patterned paper in Memento Tuxedo Black ink and colored it with alcohol markers, and then adhered the panel to the card base. I stamped the sentiment on a scrap piece of 80# Solar White cardstock and cut it with a My Favorite Things Stitched Rectangle STAX die. I adhered the sentiment to the bottom right corner and added a few tiny light blue gemstones which completed the front.
And another look… really happy with how this card turned out! Love, love, love this stamp set, and it’s so versatile with all the sentiments included!
I hope you’ve enjoyed this project! Be sure to check out all the awesome stamps and dies at Prickley Pear Stamps! If you’d like to save 10% on anything on the site when you shop at Prickley Pear Stamps, use the coupon code LESLIE10 at checkout! And be sure to ‘like’ and ‘follow’ the Prickley Pear Stamps Facebook page to keep up with news and sales, and join Prickley Pear Pals (the fan group) for lots of fun crafty ideas and to share your creativity! And finally, we’d love to see you visit the Prickley Pear Stamps blog that’s in the process of being revived and become a Follower! Hope to see you there! Thanks so much for stopping by today – we’ll see you next time! ;)
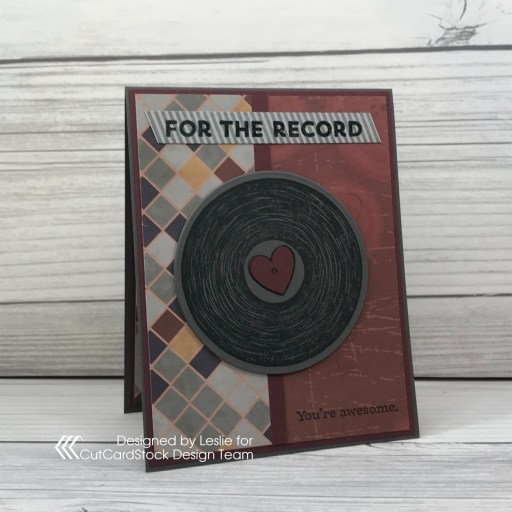
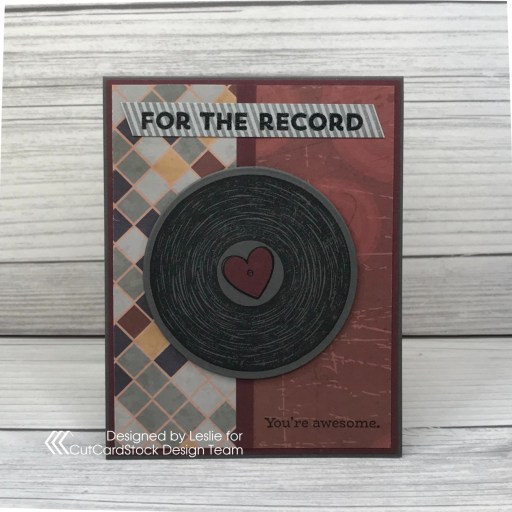
Hey everybody! I hope your week has started off nicely! Absolutely no complaints here… we are in our happy place doing what we love and we’re having some gorgeous weather! I have an awesome CutCardStock DT inspiration project to share with you today featuring our Basis cardstock that’s on sale this month. This line is one of my favorites so be sure to stock up while it’s on sale – there are some fantastic colors available! I’m in Father’s Day card mode right now (more commissioned by our little local hardware/everything else store) and this one is really cute!
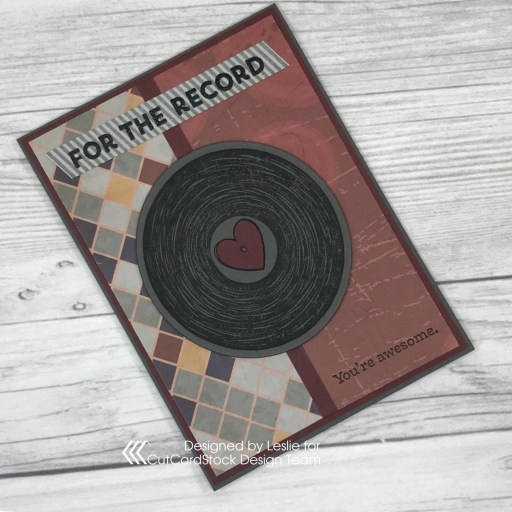
I cut a standard A2 size top-folding card base from our Basis Gray cardstock along with layering panels from Basis Burgundy cardstock and two coordinating patterned papers which I adhered together to create a nice masculine background. I stamped the record from the Stampin’ Up ‘For The Record’ stamp set in Memento Tuxedo Black ink and die cut it with a Spellbinders Standard Circle die, paper piecing the inside heart with the burgundy cardstock. I die cut several extra circles from the gray cardstock and layered them behind the stamped record for a little dimension. I stamped the diagonal stripes for the large sentiment on an 80# Basis White scrap in Catherine Pooler Twilight ink and embossed the sentiment in Hero Arts Clear Embossing Powder over Catherine Pooler Midnight ink. I stamped the small sentiment (from the same stamp set) in Tuxedo Black ink in the bottom right corner which completed the card front.
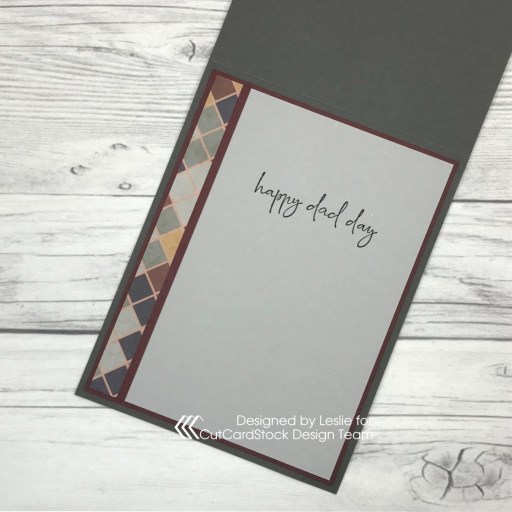
I cut the inside panel from Dolphin cardstock and embellished it with strips of the patterned paper and Basis Burgundy cardstock used on the front. I stamped the inside sentiment from the Stampin’ Up ‘Happy & Heartfelt’ stamp set in Tuxedo Black ink.
And one more peek… totally loving how this turned out! This Basis cardstock is so awesome and makes the nicest cards! My dad’s been gone since 1975 but I sure enjoy creating Father’s Day cards for other people! ;)
I hope you’ve enjoyed today’s project and you’re inspired to get crafty! Be sure to check out all the awesome cardstock and other goodies at CutCardStock (adhesives, labels, stickers, pens, watercolors and ribbon to name a few). And head on over to the CutCardStock Facebook Page for more inspiration! Thanks so much for stopping by today – we’ll see you next time!