hello Spring

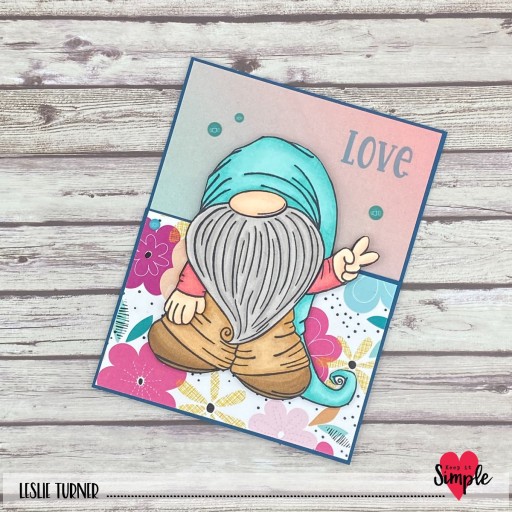
Hey everybody! Happy Sunday – I hope you’re having a great weekend! I have a fun shaker card to share for Keep It Simple this morning featuring our new Melody Stories alpha stamps and dies! Have you ever made a shaker card with alpha die cuts? Well, I haven’t either – until now! It’s made just like a regular shaker card but with a bunch of alpha die cuts (and a few floral die cut pieces) instead of shaker bits, and I thought it would be a fun and unique way to showcase our new alphas! We have several new sets of alpha stamps and dies in the store, so be sure to check them out! And if you make a purchase, remember to use my code LoveToScrap2 for 10% off your entire order!

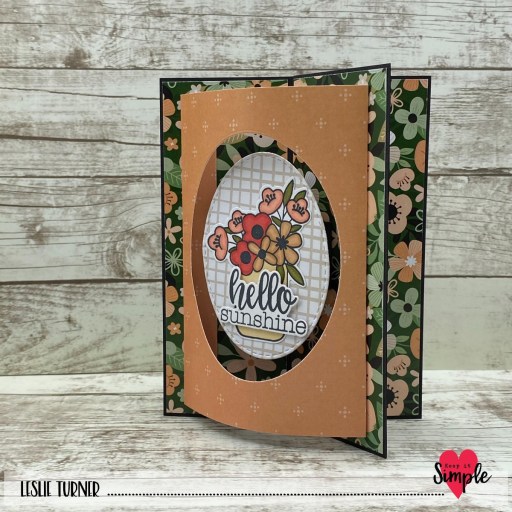
I cut a standard A2 size top-folding landscape card base from CutCardStock Cougar Smooth 100# White cardstock and rounded the bottom right corner. I cut layering panels and a frame for the shaker (using a Back To Basics Stitched Rectangles Nested Die) from coordinating papers in the Simply Spring 6×9 Collection Pack. I die cut a bunch of alphas using the KIS Cuts Melody Stories Font for the inside of the shaker and threw in a few flowers from the Simply Spring Die Cut Pieces.

Using the KIS Alphabet Stamps Melody Stories Font, I stamped ‘SPRING’ in black ink and die cut the letters with the coordinating KIS Cuts Melody Stories Font and adhered them in the bottom right corner. I grabbed a butterfly (and scored the wings) and the word ‘hello’ from the Simply Spring Die Cut Pieces and adhered them to the front of the shaker.

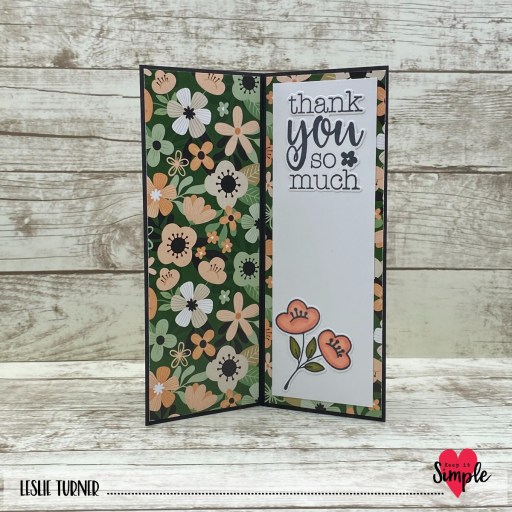
I cut the inside panel from Cougar Smooth 80# White cardstock and embellished it with strips from the floral pattern and white cardstock used on the front and a die cut from the Simply Spring Die Cut Pieces.

Keep It Simple products used:
Simply Spring 6×9 Collection Pack
Simply Spring Die Cut Pieces
KIS Alphabet Stamps Melody Stories Font
KIS Cuts Melody Stories Font
Back To Basics Stitched Rectangles Nested Dies

Affiliate links are used in this post at no cost to you – I really appreciate your support!

Other products used:
CARDSTOCK/PAPER: Cougar Smooth 100# White cardstock, Cougar Smooth 80# White cardstock
INK: Memento Tuxedo Black ink
DIES/PUNCHES: Kadomaru Pro corner rounder
ACCESSORIES: Fiskars 12″ ProCision Rotary Bypass Paper Trimmer, Elmer’s Craft Bond Tape Runner, Bearly Art precision craft glue, MISTI stamp tool, Big Shot, Grafix Crystal Clear Craft Plastic, GKD Shaker Strips, Scrapbook Adhesives 3D Foam Squares (small white)

I hope you’ve loved seeing this project as much as I loved creating it and you’re inspired to get crafty! Be sure to check out ALL the fun goodies in the Keep It Simple online store! Save 10% on your entire order when you shop online using code LoveToScrap2 at checkout! There is no minimum purchase requirement and no usage limits, AND it combines with product, order, and shipping discounts! Is that cool, or what?! Be sure to Follow us on Facebook, Instagram, and Pinterest for lots of crafty inspiration! Thanks so much for stopping by today – we’ll see you next time!

Scrappy hugs,

chill brr-thday slimline shaker

Howdy peeps! I’m back on this fine Tuesday morning with another DT inspiration project! I created this fun slimline shaker for Keep It Simple with the new KIS Slimline Cuts Stitched Circles die; sequins and beads from the new Sprinkles line; and papers, stamps and dies from the adorable Penguin Party Collection! I know everybody is ready for the cold weather to be gone but I just couldn’t resist creating one more frosty brr-thday card with these cuties!

The 3-3/4″ x 9″ slimline card base was cut from CutCardStock Cougar Smooth 100# White cardstock. Layering panels were cut from CutCardStock Lessebo Aubergine cardstock and a purple polka dot paper in the KIS Penguin Party 6×9 Collection Pack. The front panel for the shaker was cut from a coordinating paper in the 6×9 Collection Pack using the KIS Slimline Cuts Stitched Circles die and backed with a piece of Grafix Crystal Clear Craft Plastic.

I stamped the penguins from the Penguins Collection Stamps in Memento Tuxedo Black, colored them with alcohol markers, and cut them with the coordinating Penguins Outline Dies. I stamped the sentiment (from the same stamp set) in Catherine Pooler Queen For A Day ink. I always LOVE adding the shaker mix – and I’m always tempted to add too much – but I did hold back somewhat, lol. This shaker mix consists of five types of sequins and beads from the new KIS Sprinkles line.

The inside panel was cut from Cougar Smooth 80# White cardstock and embellished with the polka dot paper and purple cardstock used on the front. I stamped a sentiment (from the same Penguins stamp set) in purple ink and layered the panel on the purple cardstock.

Keep It Simple products used:
KIS Slimline Cuts Stitched Circles
Penguin Party 6×9 Collection Pack
Penguin Party Penguins Collection Stamps
Penguin Party Penguins Outline Dies
KIS Sprinkles – Sequins-Shells, Tiny Stars & Rhinestones, Pearls
KIS Sprinkles – Sequins-Iridescent Snowflakes
KIS Sprinkles – Beads-2mm Matte White
KIS Sprinkles – Beads-2mm Caviar Glass Sapphire
KIS Sprinkles – Beads-2mm Caviar Glass Light Blue

Affiliate links are used in this post at no cost to you – I really appreciate your support!

Other products used:
CARDSTOCK/PAPER: CutCardStock Cougar Smooth 100# White, Cougar Smooth 80# White and Lessebo Aubergine cardstock
INK: Catherine Pooler Queen For A Day ink, Memento Tuxedo Black ink; Spectrum Noir Tri-Blends- IG6/8/9, OR1/2
ACCESSORIES: Fiskars 12″ ProCision Rotary Bypass Paper Trimmer, Elmer’s Craft Bond Tape Runner, Bearly Art precision craft glue, MISTI stamp tool, Big Shot, Grafix Crystal Clear Craft Plastic, 1/8″ and 1/2″ red line tape, GKD Shaker Strips, Scrapbook Adhesives 3D Foam Squares (small white)

I hope you’ve loved seeing this project as much as I loved creating it and you’re inspired to get crafty! Be sure to check out ALL the fun goodies in the Keep It Simple online store! Save 10% on your entire order when you shop online using code LoveToScrap2 at checkout! There is no minimum purchase requirement and no usage limits, AND it combines with product, order, and shipping discounts! Is that cool, or what?! Be sure to Follow us on Facebook, Instagram, and Pinterest for lots of crafty inspiration! Thanks so much for stopping by today – we’ll see you next time!

Scrappy hugs,

Love & Peace, Gnomie

Hey everybody! I hope you had a great weekend! I’m stoked to share a Keep It Simple DT inspiration project created with the awesome Peace Gnomie stamp set from the Bizzy Hands Collection! This dude is just too cool for words, lol! I’m a late 50s girl, having grown up in the 60s and 70s, so he’s right up my alley! I created a swivel top card to showcase him with some coordinating papers from the Pajama Party Collection Pack, and I love how this turned out! It’s a super easy design that I originally saw on Lisa Curcio’s blog.

I cut the flat card base panel and pull-out card from CutCardStock Lessebo White cardstock along with layering panels from Lessebo Amazon Dark Teal cardstock and coordinating papers from the KIS Pajama Party Collection Pack. I stamped the gnome from the Peace Gnomie stamp set set in Memento Tuxedo Black ink on Lessebo White, colored him with alcohol markers, and fussy cut him.

The front bottom panel was adhered to the flat card base with foam squares to give it just a tad bit of dimension for the swivel panel and pull-out card to move freely. I adhered the gnome to the bottom panel with foam squares and added a few Hello Adventure Enamel Dots to the swivel panel.

I stamped the first part of the sentiment (from the same stamp set) in Catherine Pooler It’s A Boy ink in the upper right corner of the swivel panel and the second part centered on the pull-out card. How stinkin’ cute is this?! I LOVE it!

Keep It Simple products used:
Bizzy Hands Peace Gnomie stamp set
Pajama Party 12×12 Collection Pack
Hello Adventure Enamel Dots

Affiliate links are used in this post at no cost to you – I really appreciate your support!

Other products used:
CARDSTOCK/PAPER: CutCardStock Lessebo White and Amazon Dark Teal cardstock
INK: Memento Tuxedo Black (pad and marker); Spectrum Noir Tri-Blends FS6/7/8, PP4/5/6, BG2/3/4, AB1/2/3, TN1/2/4, EB1/2/3
ACCESSORIES: Fiskars 12″ ProCision Rotary Bypass Paper Trimmer, Elmer’s Craft Bond Tape Runner, Bearly Art precision craft glue, MISTI stamp tool, Scrapbook Adhesives 3D Foam Squares (small white)

I hope you’ve loved seeing this project as much as I loved creating it and you’re inspired to get crafty! Be sure to check out ALL the fun goodies in the Keep It Simple online store! Save 10% on your entire order when you shop online using code LoveToScrap2 at checkout! There is no minimum purchase requirement and no usage limits, AND it combines with product, order, and shipping discounts! Is that cool, or what?! Be sure to Follow us on Facebook, Instagram, and Pinterest for lots of crafty inspiration! Thanks so much for stopping by today – we’ll see you next time!

Scrappy hugs,

Living the fairy tale

Hey everybody, Happy Friday! It’s launch day at Keep It Simple and I’m absolutely delighted to share an inspiration project featuring items in our new Belle: Once Upon A Time Collection! I love the fairy tale theme and what little girl (and maybe some big girls) wouldn’t just swoon over this collection?! I used papers, stamps, dies and die cut pieces to create this awesome pop out z-fold. My inspiration came from a fun fold Lisa Curcio shared on her blog that she called a ‘pop up and pull out’ and features a cut and scored pop up mechanism. Soon after making this card, I made another one with a simple tube type pop up mechanism that I think is much simpler, and I’ll be sharing that one soon.

I cut the card base and layers from CutCardStock Basis Blue cardstock along with layering panels from several coordinating papers in the Belle 6×9 Collection Pack. I added the characters from the Die Cut Pieces, popping them up on double-sided foam strips.

I added the castle from the Die Cut Pieces to the inside along with a sentiment from the Collection Stamps which I stamped in Catherine Pooler Suede Shoes ink and cut the with the coordinating Outline Dies.

I cut the back panel from Neenah Classic Crest Solar White cardstock and embellished it with one of the prints used on the front. I added another sentiment from the Collection Stamps, also stamped in Catherine Pooler Suede Shoes ink, and cut with the coordinating Outline Dies.

Keep It Simple products used:
Belle: Once Upon A Time 6×9 Collection Pack
Belle: Once Upon A Time Collection Stamp
Belle: Once Upon A Time Outline Dies
Belle: Once Upon A Time Die Cut Pieces

Affiliate links are used in this post at no cost to you – I really appreciate your support!

Other products used:
CARDSTOCK/PAPER: CutCardStock Basis Blue cardstock, Neenah Classic Crest 80# Solar White cardstock
INK: Catherine Pooler Suede Shoes ink
ACCESSORIES: Fiskars 12″ ProCision Rotary Bypass Paper Trimmer, Elmer’s Craft Bond Tape Runner, Bearly Art precision craft glue, MISTI stamp tool, Big Shot, 1/2″ double-sided foam strips

I hope you’ve loved seeing this project as much as I loved creating it and you’re inspired to get crafty! Be sure to check out ALL the fun goodies in the Keep It Simple online store! Save 10% on your entire order when you shop online using code LoveToScrap2 at checkout! There is no minimum purchase requirement and no usage limits, AND it combines with product, order, and shipping discounts! Is that cool, or what?! Be sure to Follow us on Facebook, Instagram, and Pinterest for lots of crafty inspiration! Thanks so much for stopping by today – we’ll see you next time!

Scrappy hugs,

Precious Baby

Hey everybody, Happy Sunday – I hope you’re having a great weekend! I have THE most adorable inspiration project to share today for Keep It Simple! Our Romper Die and Floral Baby Collection debuted day before yesterday and talk about CUTE… I can’t even! There is a baby boy option for the romper along with papers in the collection that could easily be used for boy-themed projects, and I’ve whipped one up, so stay tuned! The Floral Baby Collection includes both Land Babies and Water Babies stamps, dies and die cut pieces, so be sure to check them all out. These are must-haves for your stash, for sure!

Using the KIS Cuts Baby Romper Card Dies, I cut the romper card base from CutCardStock Cougar 100# Smooth White cardstock along with layering panels from coordinating papers in the Floral Baby 12×12 Collection Pack. The most fun part of this kind of project is always the assembly… and this one has lots of fun details! I added a die cut flower just below the collar and hearts from the Die Cut Pieces to the pockets.

I stamped sentiments from both the Land Babies and Water Babies stamps which I cut with the coordinating outline dies, and added two Back To Basics Rose Enamel Dots to the bottom flap. To the inside, I added a die cut circle (using the Back To Basics Stitched Circles Nested Dies) embellished with a sentiment along with a heart and posies from the Die Cut Pieces.

Sharing in the following challenges:
1.https://aperfecttimetocraft.blogspot.com/2024/04/a-perfect-time-to-craft-open-challenge.html
2.https://avenue613.blogspot.com/2024/04/april-2024-anything-goes-w-optional.html
3.https://classicdesignchallenge.blogspot.com/2024/03/classic-design-challenge-03-2024-marapr.html
4.https://cardsgalorechallenges.blogspot.com/2024/04/april-2024-crafts-galore-encore.html
5.https://craftycatzweeklychallenge.blogspot.com/2024/04/crafty-catz-challenge-669-anything-goes.html
6.https://disdigidesignschallenge.blogspot.com/2024/03/lots-of-layers-challenge.html
7.https://dragonflydreamschallenges.blogspot.com/2024/04/april-challenge-use-die.html
8.https://hqcelebrationsoflovechallenges.blogspot.com/2024/04/hq-celebrations-of-love-4-main-themes.html
9.https://scrapping4funchallenges.blogspot.com/2024/04/april-234-anything-goes.html

Keep It Simple products used:
KIS Cuts Baby Romper Card Dies
Floral Baby 12×12 Collection Pack
Floral Baby Land Babies Collection Stamp
Floral Baby Land Babies Outline Dies
Floral Baby Water Babies Collection Stamp
Floral Baby Water Babies Outline Dies
Floral Baby Die Cut Pieces
Back To Basics Rose Enamel Dots
Back To Basics Stitched Circles Nested Dies

Affiliate links are used in this post at no cost to you – I really appreciate your support!

Other products used:
CARDSTOCK/PAPER: CutCardStock Cougar Smooth 100# White cardstock
INK: Memento Tuxedo Black ink; Spectrum Noir Tri-Blends- CR1/3/6
ACCESSORIES: Fiskars 12″ ProCision Rotary Bypass Paper Trimmer, Bearly Art precision craft glue, MISTI stamp tool, Big Shot

I hope you’ve loved seeing this project as much as I loved creating it and you’re inspired to get crafty! Be sure to check out ALL the fun goodies in the Keep It Simple online store! Save 10% on your entire order when you shop online using code LoveToScrap2 at checkout! There is no minimum purchase requirement and no usage limits, AND it combines with product, order, and shipping discounts! Is that cool, or what?! Be sure to Follow us on Facebook, Instagram, and Pinterest for lots of crafty inspiration! Thanks so much for stopping by today – we’ll see you next time!

Scrappy hugs,

party time!

Hi friends! Happy last Friday in March! Can you believe it?! I’m back this morning to share another Keep It Simple DT inspiration project made with our Penguin Party Collection which I totally love! The color palette is really wonderful and makes THE best Winter-themed cards! This version of the double flap fun fold is among my favorites so I’ve made another one to showcase these little cuties on this birthday card!

I cut the card base and panels from Neenah Classic Crest Solar White cardstock along with additional layering panels from coordinating papers in the Penguin Party 6×9 Collection Pack. I embellished all three layers with Penguins and Phrases Die Cut Pieces as well as an element from the Happy Birthday Page Title. The finishing touch was adding a bow fashioned from a light blue ribbon from the Back To Basics Royal Ribbon. This is an easy design that really packs a punch and delights the recipient!

Sharing in the following challenges:
1.https://classicdesignchallenge.blogspot.com/2024/03/classic-design-challenge-03-2024-marapr.html
2.https://craftycatzweeklychallenge.blogspot.com/2024/03/crafty-catz-challenge-668.html

Keep It Simple products used:
Penguin Party 6×9 Collection Pack
Penguin Party Penguins Die Cut Pieces
Penguin Party Phrases Die Cut Pieces
Penguin Party Happy Birthday Page Title
Back To Basics Royal Ribbon

Affiliate links are used in this post at no cost to you – I really appreciate your support!

Other products used:
CARDSTOCK/PAPER: Neenah Classic Crest 80# Solar White cardstock
ACCESSORIES: Tonic Studios 12″ Guillotine Paper Trimmer, Bearly Art precision craft glue, 1/2″ double-sided foam strip

I hope you’ve loved seeing this project as much as I loved creating it and you’re inspired to get crafty! Be sure to check out ALL the fun goodies in the Keep It Simple online store! Save 10% on your entire order when you shop online using code LoveToScrap2 at checkout! There is no minimum purchase requirement and no usage limits, AND it combines with product, order, and shipping discounts! Is that cool, or what?! Be sure to Follow us on Facebook, Instagram, and Pinterest for lots of crafty inspiration! Thanks so much for stopping by today – we’ll see you next time!

Scrappy hugs,

congrats on your new nest

Hi friends! Happy Sunday – I hope you’re having a fabulous weekend and it’s warming up a bit where you are! I’m thrilled to share another Keep It Simple DT inspiration project with you today. This fun new home mini slimline card features dies and stamps from our new Build-A-House Collection! I can’t stop raving about all the products in this collection – from the basic build-a-house dies to all the fun add-on birdhouse, cathouse and doghouse dies and stamps! So much fun! I also used the weathered brick background stamp and quite a variety of Back To Basics 6×9 Collection Packs to create the colorful birdhouse scene. The colors in these paper packs are so bold and inviting, and definite must-haves for your paper stash!

I cut my go-to size mini slimline card base (3-1/2″ x 6″) from Neenah Classic Crest 110# Solar White cardstock along with layering panels from 80# Solar White and a paper from the Rose 6×9 Collection Pack. I stamped the brick background on the 80# Solar white panel in Catherine Pooler Twilight ink using the Weathered Brick Background Stamp.

I used the KIS Cuts Build-A-House and KIS Cuts Build-A-Birdhouse to cut the birdhouse, birds, nest and flowers from all the different papers from the Rose, Royal, Jade, Lilac, Lemon and Mango 6×9 Collection Packs along with the Farmhouse 6×9 Collection Pack, Neenah Classic Crest Solar White and CutCardStock Silk Glitter Opulent Opal.

As I always say about projects like these – the assembly is the most fun! The finishing touch on the front was adding a sentiment stamped in Memento Tuxedo Black ink from the KIS Stamps Build-A-Birdhouse which I cut into a flag.

I cut the inside panel from 80# Solar White and embellished it with a leftover strip of the stamped brick background on the front. I stamped another sentiment from the KIS Stamps Build-A-Birdhouse in black ink and layered the panel on another paper from the Rose 6×9 Collection Pack.

Sharing in the following challenges:
1.https://classicdesignchallenge.blogspot.com/2024/03/classic-design-challenge-03-2024-marapr.html
2.https://craftycatzweeklychallenge.blogspot.com/2024/03/crafty-catz-challenge-668.html
3.https://mytimetocraftchallenge.blogspot.com/2024/03/mttc-530-theme-is-multi-colored-florals.html

Keep It Simple products used:
KIS Cuts Build-A-House
KIS Cuts Build-A-Birdhouse
KIS Stamps Build-A-Birdhouse
Weathered Brick 6×6 Background Stamp
Back To Basics Rose 6×9 Collection Pack
Back To Basics Royal 6×9 Collection Pack
Back To Basics Jade 6×9 Collection Pack
Back To Basics Lilac 6×9 Collection Pack
Back To Basics Lemon 6×9 Collection Pack
Back To Basics Mango 6×9 Collection Pack
Farmhouse Fall 6×9 Collection Pack
Back To Basics Stitched Circles Nested Dies

Affiliate links are used in this post at no cost to you – I really appreciate your support!

Other products used:
CARDSTOCK/PAPER: Neenah Classic Crest 110# and 80# Solar White cardstock, CutCardStock Silk Glitter Opulent Opal 12×12 cardstock
INK: Memento Tuxedo Black ink, Catherine Pooler Twilight ink
ACCESSORIES: Tonic Studios 12″ Guillotine Paper Trimmer, Tombow Mono Dots Adhesive, Bearly Art precision craft glue, MISTI stamp tool, Big Shot, 1/4″ double-sided foam strip

I hope you’ve loved seeing this project as much as I loved creating it and you’re inspired to get crafty! Be sure to check out ALL the fun goodies in the Keep It Simple online store! Save 10% on your entire order when you shop online using code LoveToScrap2 at checkout! There is no minimum purchase requirement and no usage limits, AND it combines with product, order, and shipping discounts! Is that cool, or what?! Be sure to Follow us on Facebook, Instagram, and Pinterest for lots of crafty inspiration! Thanks so much for stopping by today – we’ll see you next time!

Scrappy hugs,

Fa-la-la slimline

Howdy, peeps! I hope you’ll have an awesome Monday! I’m popping in this morning with a Keep It Simple DT inspiration project featuring one of the stamp sets in the new Bizzy Hands Collection just released a few weeks ago! OMGoodness, there are so many stamp sets in this collection to choose from – you’ll want them all! You undoubtedly know that I enjoy creating Christmas projects all year long so I chose the super adorable Christmas Gnomes for this slimline shaker. I also used the new Slimline Cuts Stitched Squares die and an assortment of our new polymer clay and sequins in the Sprinkles line. There’s nothing more fun than a trio of gnome dudes on a shaker! I just can’t get enough of these fun new products!

I cut my go-to slimline size card base (3-3/4″ x 9″) from CutCardStock 100# Cougar Smooth White cardstock along with a green layering panel from a paper in the Bunny Season 6×9 Collection Pack and two layering panels from papers in the Ruby 12×12 Collection Pack. I used the new Slimline Cuts Stitched Squares die to cut the shaker panel from one of the red layering panels. I stamped some musical notes from the Christmas Gnomes stamp set on the shaker panel in Memento Tuxedo Black ink and the gnomes in Memento Espresso Truffle ink on 80# Cougar Smooth White which I colored with alcohol markers and added some accents with a Sakura Clear Star Gelly Roll pen. I fussy cut the gnomes and edged them with a Memento Rich Cocoa marker.

I stamped two sentiments in Memento Tuxedo Black ink from the Christmas Gnomes stamp set on the back panel of the shaker. I used Grafix Crystal Clear Craft Plastic and 1/2″ double-sided foam strips to create the shaker. Then I added Polymer Clay-Candy Cane Red & White Christmas Mix, Polymer Clay-Mouse Christmas Mix and Sequins-Iridescent Snowflakes from the new Sprinkles line for the shaker bits! I adhered the stamped gnomes and added several Jade Enamel Dots.

I cut the inside panel from 80# Cougar Smooth White cardstock and embellished it with a wide strip of paper from the Ruby Collection Pack. I stamped a sentiment from the Scandinavian Christmas Gnomes stamps in Tuxedo Black ink and layered the panel on an additional paper from the Ruby Collection Pack.

Sharing in the following challenges:
1. https://aperfecttimetocraft.blogspot.com/2024/03/a-perfect-time-to-craft-open-challenge.html
2. https://hereisaplacetostart.blogspot.com/2024/03/march-2024-anything-goes-woptional.html
3. https://classicdesignchallenge.blogspot.com/2024/03/classic-design-challenge-03-2024-marapr.html
4. https://pennyschallenges.blogspot.com/2024/03/pennys-challenge-567.html
5. https://cinspirations.blogspot.com/2024/03/march-challenge-anything-goes.html

Keep It Simple products used:
Bizzy Hands Christmas Gnomes stamps
Slimline Cuts Stitched Squares die
Sprinkles Polymer Clay-Candy Cane Red & White Christmas Mix
Sprinkles Polymer Clay-Mouse Christmas Mix
Sequins-Iridescent Snowflakes
Back To Basics Ruby 12×12 Collection Pack
Bunny Season 6×9 Collection Pack
Scandinavian Christmas Gnomes stamps
Back To Basics Jade Enamel Dots

Affiliate links are used in this post at no cost to you – I really appreciate your support!

Other products used:
CARDSTOCK/PAPER: CutCardStock Cougar Smooth 100# White, Cougar Smooth 80# White
INK: Memento Espresso Truffle and Tuxedo Black inks; Spectrum Noir Tri-Blends- DR1/3/4/5/6/7, IG2/4/5, FS6/7/8, GB1/3/5, TB2/3/4, LY1/2/3, GY2/3/5, LG1/3/5, EB5/6/7; Sakura Clear Star Gelly Roll pen, Memento Rich Cocoa marker
ACCESSORIES: Fiskars 12″ ProCision Rotary Bypass Paper Trimmer, Elmer’s Craft Bond Tape Runner, Bearly Art precision craft glue, MISTI stamp tool, Big Shot, 1/2″ double-sided foam strips, Grafix Crystal Clear Craft Plastic, red liner tape

I hope you’ve loved seeing this project as much as I loved creating it and you’re inspired to get crafty! Be sure to check out ALL the fun goodies in the Keep It Simple online store! Save 10% on your entire order when you shop online using code LoveToScrap2 at checkout! There is no minimum purchase requirement and no usage limits, AND it combines with product, order, and shipping discounts! Is that cool, or what?! Be sure to Follow us on Facebook, Instagram, and Pinterest for lots of crafty inspiration! Thanks so much for stopping by today – we’ll see you next time!

Scrappy hugs,

hello sunshine

Hi friends, happy weekend! I’m delighted to share a Keep It Simple DT inspiration project with you today! Yesterday was launch day for our new Simply Spring Collection and OMGoodness it’s gorgeous! I’ve created a 3D window card showcasing several of the prints in the 12×12 Collection Pack along with the 6×8 Collection Stamps and coordinating Outline Dies. My inspiration for this awesome fold came from Lisa Curcio’s blog. This is the second one I’ve made and I definitely see more of them in my future – it’s so fun and really packs a punch with these pretty papers and stamps!

I cut the card base from CutCardStock Basis Black cardstock along with layering panels from prints in the Simply Spring 12×12 Collection Pack. I used the Back To Basics Stitched Ovals Nested Dies to cut the aperture into the curved panel on the front and a slightly smaller one to cut the oval inside the aperture. I stamped the image and sentiment on the oval using stamps in the Simply Spring 6×8 Collection Stamps, colored them with alcohol markers, and cut them with the coordinating Outline Dies.

I cut a back signature panel from CutCardStock Cougar Smooth White and added a signature and image (colored with alcohol markers) which I stamped from the 6×8 Collection Stamps and cut with the coordinating Outline Dies.

Sharing in the following challenges:
1. https://aperfecttimetocraft.blogspot.com/2024/03/a-perfect-time-to-craft-open-challenge.html
2. https://hereisaplacetostart.blogspot.com/2024/03/march-2024-anything-goes-woptional.html
3. https://classicdesignchallenge.blogspot.com/2024/03/classic-design-challenge-03-2024-marapr.html
4. https://craftycatzweeklychallenge.blogspot.com/2024/03/crafty-catz-667-anything-goes.html
5. https://craftygalscornerchallenges.blogspot.com/2024/03/challenge-253-anything-goes.html
6. https://secretstamper.com/2024/03/anything-goes-with-a-fun-fold-for-creative-creases-78/
7. https://cutitupchallenges.blogspot.com/2024/03/cut-it-up-challenge-299-colors-of-spring.html
8. https://giveacrafteracookie.blogspot.com/2024/03/cookie-challenge-190-reminder-march.html
9. https://mmmchallengeblog.blogspot.com/2024/03/221-spring-flowers-weather-etc.html

Keep It Simple products used:
Simply Spring 12×12 Collection Pack
Simply Spring 6×8 Collection Stamps
Simply Spring Outline Dies
Back To Basics Stitched Ovals Nested Dies

Affiliate links are used in this post at no cost to you – I really appreciate your support!

Other products used:
CARDSTOCK/PAPER: CutCardStock Basis Black and Cougar 80# Smooth White cardstock
INK: Memento Tuxedo Black ink; Spectrum Noir Tri-Blends- CR1/3/6/7/8/10, GB1/3/5, TN1/2/4, YG1/2/3
ACCESSORIES: Fiskars 12″ ProCision Rotary Bypass Paper Trimmer, Elmer’s Craft Bond Tape Runner, Bearly Art precision craft glue, MISTI stamp tool, Big Shot, 1-mm-thick foam squares, 1″ double-sided foam strip

I hope you’ve loved seeing this project as much as I loved creating it and you’re inspired to get crafty! Be sure to check out ALL the fun goodies in the Keep It Simple online store! Save 10% on your entire order when you shop online using code LoveToScrap2 at checkout! There is no minimum purchase requirement and no usage limits, AND it combines with product, order, and shipping discounts! Is that cool, or what?! Be sure to Follow us on Facebook, Instagram, and Pinterest for lots of crafty inspiration! Thanks so much for stopping by today – we’ll see you next time!

Scrappy hugs,

top o’ the mornin’ to ya!

Hey everybody, Happy Thursday! I hope your week is going well and you’re gearing up for a fun weekend! I’m delighted to share another Keep It Simple DT inspiration project today that I created with the new Lucky Day Collection released last month! This collection has some of THE best products for creating fun St. Patrick’s Day (or just plain good luck) projects! I’m sure by now you know how much I love me some gnomes so I decided on a wiper card to showcase a couple of them! I have an SVG cut file for a wiper card and I also have some handwritten instructions from Julie’s easy tutorial HERE which I used for this card. It’s a fun one! If you like the Keep It Simple products I’ve used and are inclined to go shopping, be sure to use my discount code LoveToScrap2 at checkout to save 10% on your entire order! There is no minimum purchase requirement and no usage limits, plus the code combines with product, order, and shipping discounts!

I cut the wiper card base from Neenah Classic Crest 110# Solar White cardstock along with layering panels from an assortment of patterned papers from the Lucky Day 12×12 Collection Pack. The gnomes, sentiments and other ephemera are from the Lucky Day and Lucky Phrases Die Cut Pieces, and some were popped up on 3D Foam Squares.

I cut the back panel from Neenah Classic Crest 80# Solar White cardstock and embellished it with strips of patterned paper from the 12×12 Collection Pack and a die cut star popped up on a 3D Foam Square. I stamped a sentiment from the Lucky Day 4×6 Collection Stamps in Catherine Pooler Twilight ink and layered the panel on another print from the Collection Pack.

Sharing in the following challenges:
1. https://aperfecttimetocraft.blogspot.com/2024/03/a-perfect-time-to-craft-open-challenge.html
2. https://hereisaplacetostart.blogspot.com/2024/03/march-2024-anything-goes-woptional.html
3. https://craftycatzweeklychallenge.blogspot.com/2024/03/crafty-catz-667-anything-goes.html
4. https://craftygalscornerchallenges.blogspot.com/2024/03/challenge-253-anything-goes.html

Keep It Simple products used:
Lucky Day 12×12 Collection Pack
Lucky Day Die Cut Pieces
Lucky Day Lucky Phrases Die Cut Pieces
Lucky Day 4×6 Collection Stamps

Affiliate links are used in this post at no cost to you – I really appreciate your support!

Other products used:
CARDSTOCK/PAPER: Neenah Classic Crest 110# and 80# Solar White cardstock
INK: Catherine Pooler Twilight ink
ACCESSORIES: Tonic Studios 12″ Guillotine Paper Trimmer, Bearly Art precision craft glue, MISTI stamp tool, Scrapbook Adhesives 3D Foam Squares (large and small white)

I hope you’ve loved seeing this project as much as I loved creating it and you’re inspired to get crafty! Be sure to check out ALL the fun goodies in the Keep It Simple online store! Save 10% on your entire order when you shop online using code LoveToScrap2 at checkout! There is no minimum purchase requirement and no usage limits, AND it combines with product, order, and shipping discounts! Is that cool, or what?! Be sure to Follow us on Facebook, Instagram, and Pinterest for lots of crafty inspiration! Thanks so much for stopping by today – we’ll see you next time!

Scrappy hugs,