Painted Poppies Boxed Set

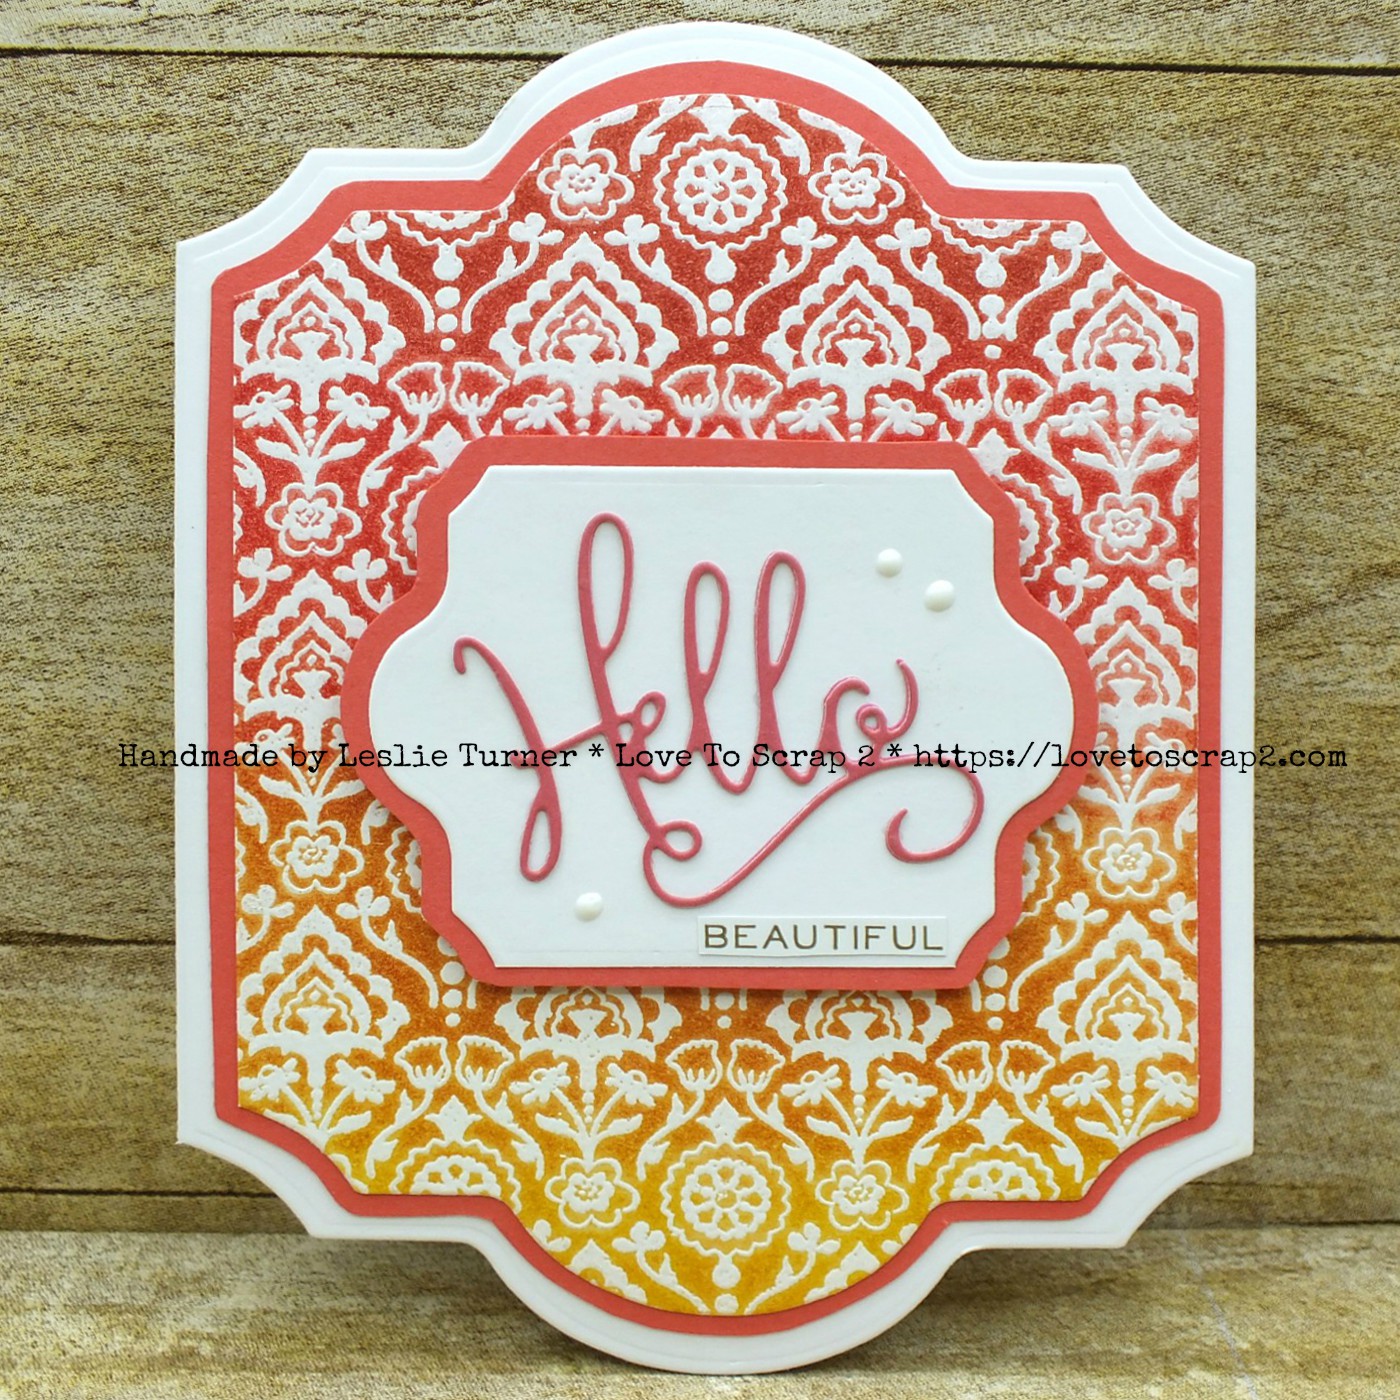
Hello, my crafty friends! I hope you’re having a good Hump Day! I’m excited to share my Ephemoire inspiration project with you this morning. If you haven’t already done so, be sure to head over to the Ephemoire Etsy Shop to check out all the amazing digital printables… there are collage sheets, digital papers, journal kits, clip art and mixed media printables, and the print quality is awesome!

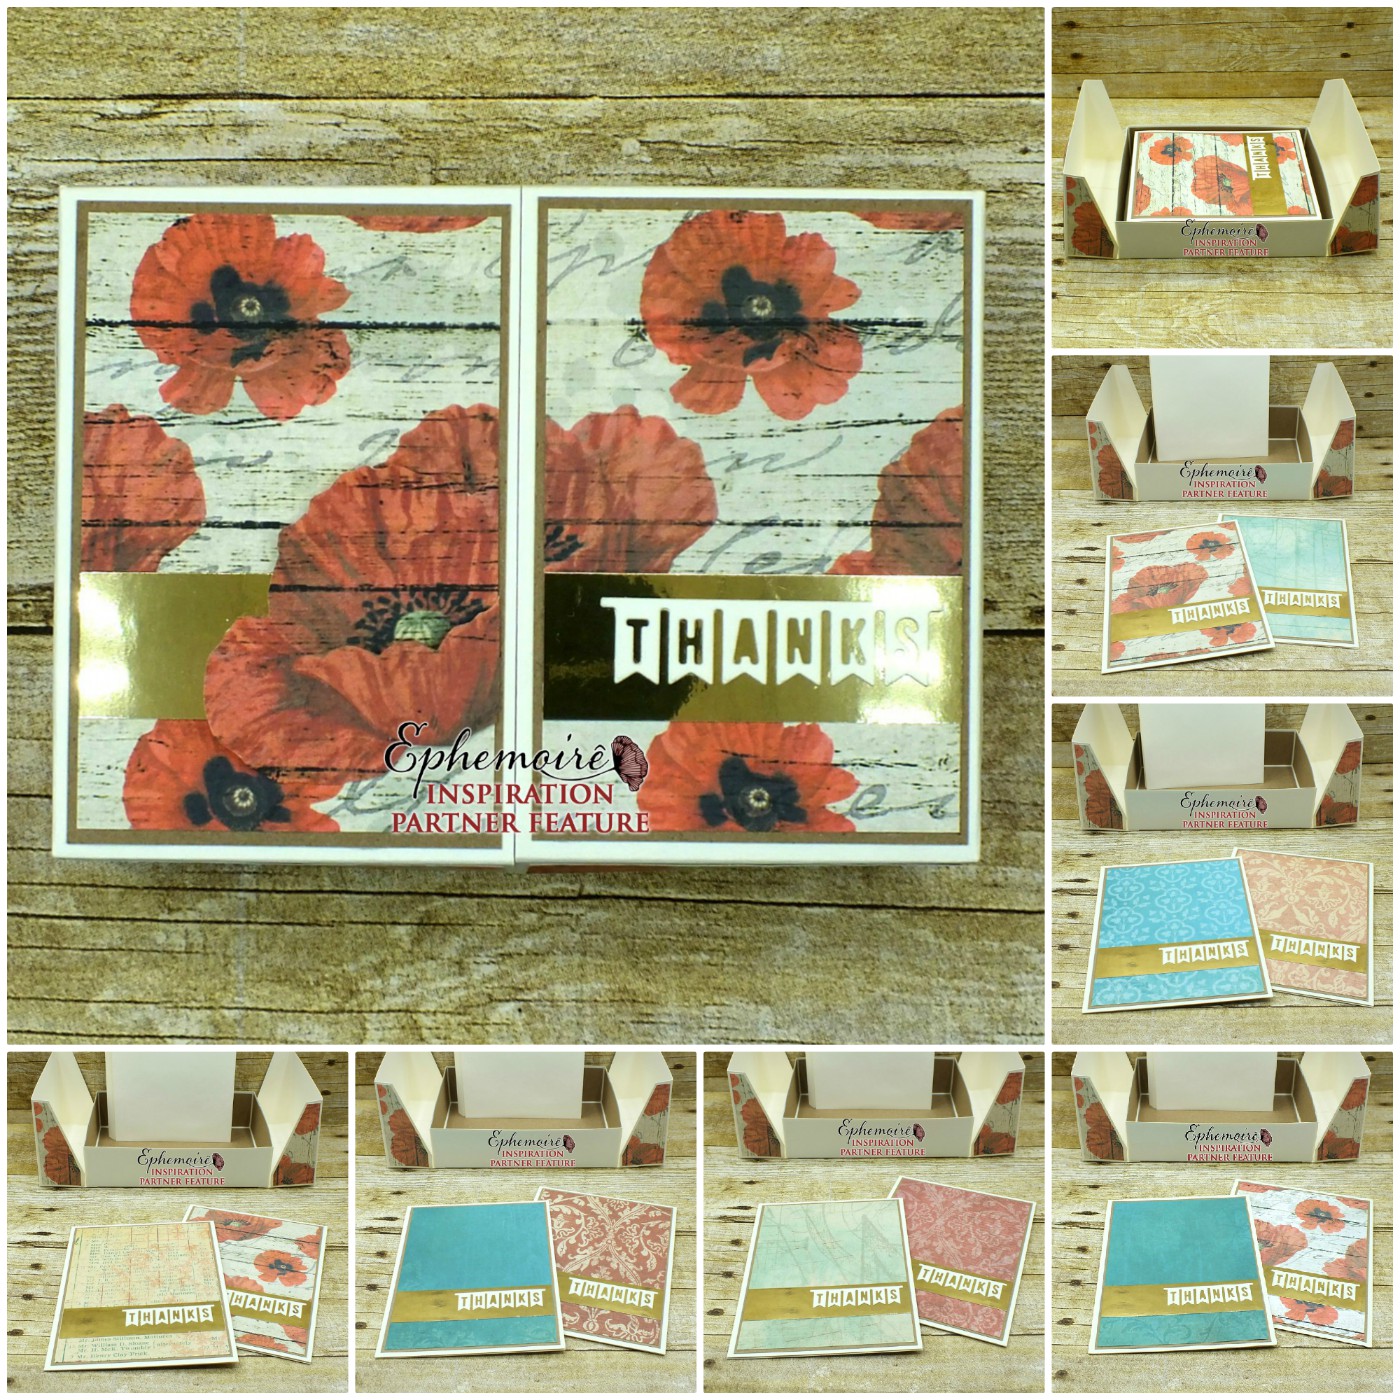
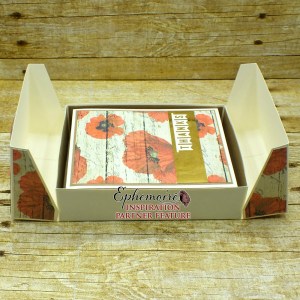
I was provided Painted Poppies #1, Painted Poppies #2 and Painted Poppies #3 letter size digital papers to create with this month, and created a pretty boxed set of 12 thank you cards. A friend and former co-worker reached out to request a dozen thank you cards, and I had already had my eye on these papers so I knew exactly what I wanted to do. ;)

2020_01110019a

Before I get into the details of my project, I have to share my latest light box visitor… Tigger! I was busy taking photos of the cards and before I knew it, Tigger jumped in and tried to get into that little card box. Oh yes he did, lol! Luckily I was able to get the box (and cards) out of the light box before he crushed it, and snapped a photo of him with his tongue out! Bahahaha, that’s our boy! ** I’ve updated this post with a couple more pics of Tigger without his tongue out so you can see how handsome he really is! ;) **

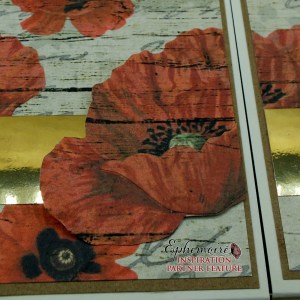
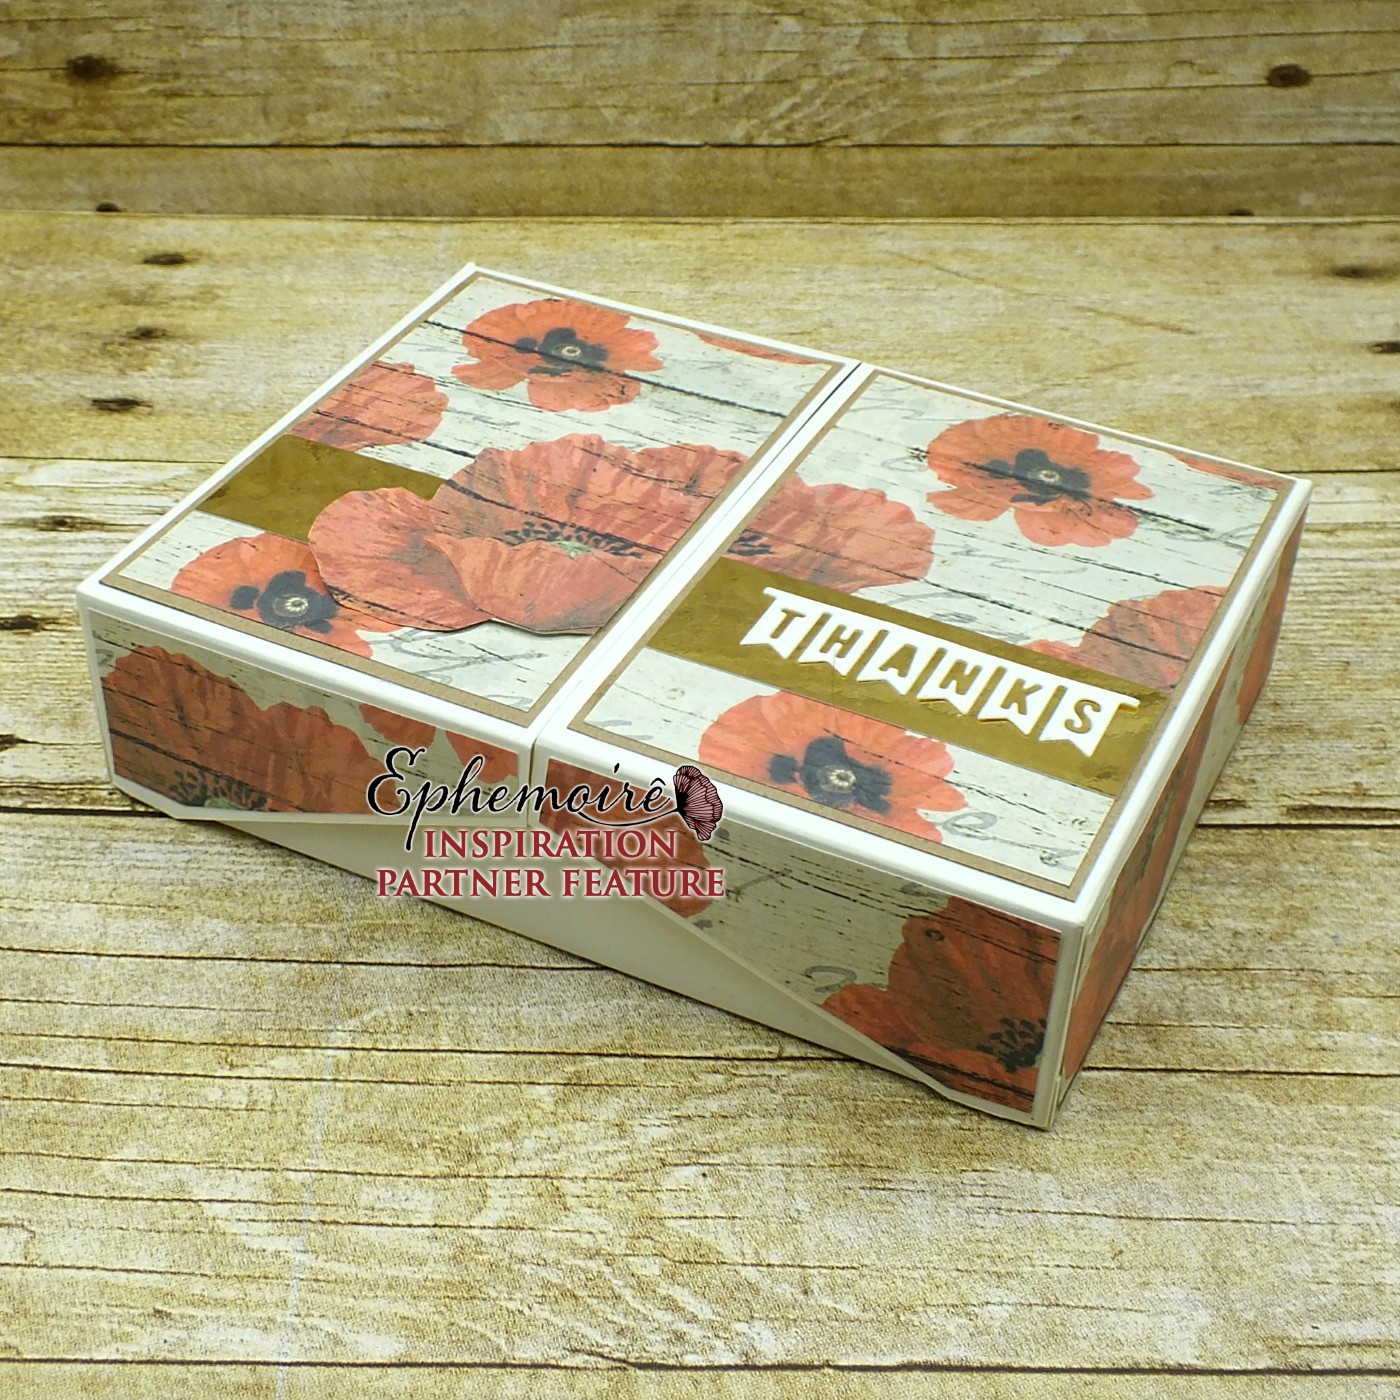
Okay, let me get back on track here… I created a flip-top box that coordinates with the set of cards. I fussy cut a couple pieces of a poppy and made it dimensional with foam pads and added it to the left side of the lid over top of the gold mirror cardstock strip. All the card fronts are layered on brown bag kraft, so I layered the box lid panels on brown bag as well and I covered the inside of the box with the brown bag.

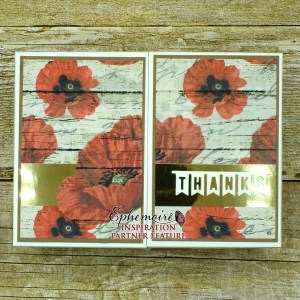
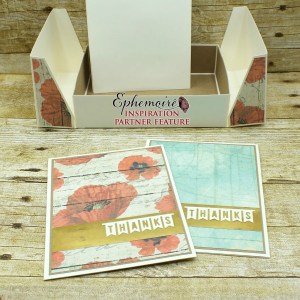
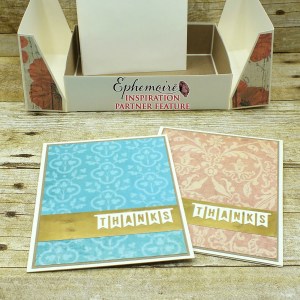
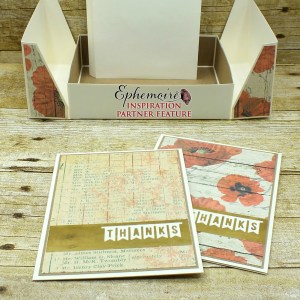
And here are shots of all the cards in pairs. These papers are literally breath-taking and I used almost all of them. A while back I found the perfect 60# Hammermill copy paper to print on which really ramps up these digital prints. ;)

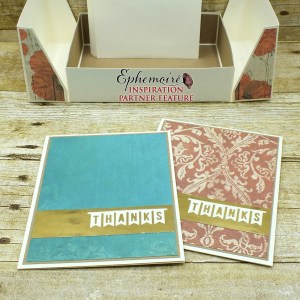
And one more look at the closed box. The strip of gold mirror cardstock makes them look so elegant and I know my friend is going to love them as much as I do!

2020_01110018a

Products used:
Cardstock/Paper: The Paper Studio Cream cardstock, Marco’s Gold Mirror cardstock, Marco’s Brown Bag Kraft, Ephemoire Painted Poppies #1, Painted Poppies #2 and Painted Poppies #3 letter size digital papers
Stamps: WPlus9 Hand-Lettered Thanks stamp set
Ink: Memento Rich Cocoa ink
Dies/Punches: Taylored Expressions Thanks die
Accessories: ScraPerfect Best Glue Ever, Gemini Junior die cutting machine, MISTI stamp tool

I hope you’ve enjoyed today’s project! Be sure to check out all the awesome printables at the Ephemoire Etsy Shop, and while you’re at it, head on over to the Ephemoire Facebook Page for tons of inspiration! Thanks so much for stopping by today – we’ll see you next time!

Scrappy hugs,
lesliesig

i love us

Hi everyone! Oh my gosh, time just needs to slow down – we CAN’T be approaching the end of January already! I’m not posting on the Simply Crafty SVGs Blog today but have popped in this morning to share an extra DT inspiration project with you, a sweet Valentine created with the free (yep, free…) Simply Crafty SVGs Flowers For Mom Card cut file. I was really thinking outside the box on this one when I decided on a Valentine.

2019_09040011a

I added some Dandelion Yellow Crystal Drops to the centers of the flowers for a little texture, and placed the sentiment on the bottom of the flower pot.

2019_09040012a

I really love this design – the large flower there in the center pops up when the card is opened. Super cute!

2019_09040013a

And here’s a look from overhead so you can see the cool design on this!

2019_09040014a

And one final look… folded flat and ready to be put in an envelope for mailing. So awesome!

2019_09040015a

Products used:
Cardstock/Paper: American Crafts black cardstock; Canvas Corp Brands Sending Love Words on White paper, GKD Black Onyx, Wild Dandelion, Fresh Asparagus and Cherry Red cardstock
Dies/Punches: Simply Crafty SVGs Flowers For Mom Card cut file
Accessories:  Tim Holtz Small Talk sentiment sticker, Nuvo Dandelion Yellow Crystal Drops, Darice iridescent gemstones

I hope you’ve enjoyed today’s project! Be sure to check out all the fun cut files in the Simply Crafty SVGs store – you’ll have so much fun! And there are tons of freebies to get started! Thanks so much for stopping by today – we’ll see you next time! ;)

Scrappy hugs,
lesliesig

Happy Anniversary

Hi everyone! Happy Monday! Our new sketch challenges this month are live over at Stick It Down and I’ve popped in this morning to share my Card Team inspiration project! Scrappin’ Happy Studio is our sponsor this month so come on over and play for the chance to win a prize! The card team is showcasing projects today on the blog and this is our super awesome card sketch this month, created by none other than yours truly! ;)

Stick-It-Down-Jan2020-Card-Sketch


I challenged myself and created my first-ever card sketches for the first six card challenges this year at Stick It Down, and I’m pretty proud of how they turned out! ;) Using this month’s sketch, I created a pretty anniversary card in a striking silver and blue color combo. The papers are some of Lozzy’s digital papers that I won a while back in one of her challenges. :)

2019_1204005a

I layered the papers on a lighter blue cardstock and then adhered them to the dark blue card base. I added two layered stitched star die cuts, a stamped sentiment and a few drops of Liquid Mercury Crystal Drops.

2019_1204006a

I embellished the inside panel with leftover paper and cardstock strips used on the front, and stamped the sentiment in blue ink. I won the sentiments stamp set in another challenge a while back. I don’t win tangible prizes very often but I did have a winning streak a few months ago! ;)

2019_1204007a

Here’s one more look… I’m really loving how this turned out!

2019_1204008a

Products used:
Cardstock/Paper: Marco’s Persian Blue cardstock, GKD Little Boy Blue cardstock, Marco’s Venicelux Silver Metallic cardstock, Cardstock Warehouse pure white cardstock
Stamps: The Cat’s Pajamas Simply Stacked Sentiments stamp set
Ink: Ranger Blueprint Sketch distress ink
Dies/Punches: Memory Box Stitched Star Layers dies
Accessories:  ScraPerfect Best Glue Ever, MISTI stamp tool, Gemini Junior die cutting machine, Nuvo Liquid Mercury Crystal Drops

I hope you’ve enjoyed today’s project and will link up with us! Feel free to play along with the double page or single page sketch if you’re a scrapbook layout designer, or the card sketch if you’re a card maker! You have until the end of the month to play and we’d love to see what you create! Be sure to check out all the fun goodies at Scrappin’ Happy Studio! Thanks so much for stopping by today – we’ll see you next time! ;)

Scrappy hugs,
lesliesig

Happy Easter

Hi friends! Happy Saturday – hope you have a wonderful weekend planned! I have a fun project to share – an adorable Easter shaker card! I absolutely love shaker cards and it’s been a while since I created one so I figured it was about time. ;)

2020_0101008

The background panel is silver foil cardstock. I adhered a stitched rectangle die cut on top of that with a layered horizontal strip. I used a super cute Polkadoodles digital image along with a couple of my favorite stitched oval dies to cut the image and create the frame. I used acetate and shaker filler from my stash to complete the shaker.

2020_0101009

I kept the inside fairly simple with a layered Polkadoodles digital sentiment cut with stitched rectangle dies.

2020_0101011

And one more peek… totally loving how this turned out!

2020_0101012

Products used:
Cardstock/Paper: Stampin’ Up thick and regular Whisper White cardstock, Stampin’ Up Silver Foil Sheet, GKD Bubblegum Pink cardstock, Doodlebug Design gingham-linen and dot-grid-daisy-stripe rainbow petite prints
Stamps: Polkadoodles Bunnita Carrot Cake – Fuzzypuffs digital image, Winnie Sugar Sprinkles Sentiments – Quotes Bundle
Dies/Punches: My Favorite Things Stitched Rectangle STAX die, Memory Box Stitched Oval Layers die, Memory Box Stitched Rectangle Layers dies
Accessories:  ScraPerfect Best Glue Ever, Perfect Crafting Pouch, Gorgeous Glitter and Embellie Gellie; Doodlebug Design Cupcake Assortment Jewels

I hope you’ve enjoyed this project! Thanks so much for stopping by today – we’ll see you next time! ;)

Scrappy hugs,
lesliesig

Hello

Hello, my crafty peeps! Happy Hump Day! I’m sharing a super cute ‘just because’ card I created to enter into the January Outlawz Freebie/Progressive Challenge. As a perk for joining the challenge, participants receive a free sponsor digi to create with each month. Bugaboo Digi Stamps is our sponsor this month and I received Chibi Flowerpot Peeker – how stinkin’ cute is she?! You ought to check out The Outlawz Challenges – lots of challenges to enter and lots of fun going on!

2020_0108009a

I colored the image with my Bic Mark-It markers, cut it with a stitched circle die and layered it on a die cut doily. I cut the ‘Hello’ sentiment three times and layered them for a little dimension. I created some triangle corners and added some gemstones around the doily to finish the front.

2020_01080010a

I embellished the inside panel with leftover strips of paper and cardstock used on the front, and added a layered digital sentiment.

2020_01080011a

And one more peek… love how this turned out! I’m such a sucker for Bugaboo images!

2020_01080012a

Products used:
Cardstock/Paper: GKD White and Tomato Soup cardstock, American Crafts Charcoal cardstock, Simple Stories Wood & Gingham Basics
Stamps: Bugaboo Digi Stamps Chibi Flowerpot Peeker, Polkadoodles Winnie Celebrations 2 Sentiments
Ink: Bic Mark-It markers- Key Lime, Summer Melon, Yellow Blaze, Tiki Hut Tan, Peach Parfait, Rambunctious Red, Margarita Green, Sunset Orange, Fandango Pink, Woodsy Brown, Honey Brown, Cloud Nine Grey, Blue Skies Blue
Dies/Punches: Memory Box Stitched Circle Layers die, Crafter’s Companion Opulent Swirls die set, Cheery Lynn Designs English Tea Party die
Accessories:  ScraPerfect Best Glue Ever, ScraPerfect Embellie Gellie, Gemini Junior die cutting machine, Darice orange gemstones

I hope you’ve enjoyed this sweet card and will consider joining the fun at The Outlawz Challenges – a fun time is guaranteed! And be sure to check out all the fun digital stamps at Bugaboo Digi Stamps! Thanks so much for stopping by today – we’ll see you next time! ;)

Scrappy hugs,
lesliesig

Hello Beautiful

Hello, my crafty friends! Hope you’re having a good week! This month’s Anything Goes with Dies Challenge is live over at Happy Little Stampers and I’m thrilled to share my DT inspiration project with you today!

I created a pretty mixed media friendship card featuring the emboss resist technique with white heat embossing and inked background on the front and stamping on the inside.

2019_0925001a

I cut the card base with the largest die in the set. Then I stamped the background in Versamark and heat embossed it in white. Then the emboss resist fun began. I inked the background in graduating colors of distress inks, starting with the darkest at the top, and overlapping each color slightly as I went down the panel. I cut the panel with the second largest die in the set and traced around the outside of it on the back of a piece of coordinating cardstock (which I fussy cut) to get a slightly larger layer. I did the same technique for the sentiment layer and turned it sideways on the front of the panel. I cut the sentiment from shimmer cardstock and added a Tim Holtz metallic sentiment sticker. The final touch was a few drops of Crystal Drops.

2019_0925002a

After cutting the inside panel, I used the same technique of tracing around the second largest die in the set on the back of a piece of coordinating cardstock (which I fussy cut) to get a slightly larger layer. Then I stamped the sentiment from Clarity Stamp.

2019_0925003a

One more peek… I really love how this card turned out!

2019_0925004a

Products used:
Cardstock/Paper: Strathmore Bristol Smooth cardstock, DCWV Shimmer cardstock stack, The Paper Studio White cardstock, Stampin’ Up Watermelon Wonder cardstock
Stamps: Hero Arts Spice Market Deco background stamp, Clarity Stamp Line Writing Sentiments stamp set
Ink: Versamark; Ranger fired brick, barn door, rusty hinge fossilized amber distress inks; Stampin’ Up Watermelon Wonder ink
Dies/Punches: Crafter’s Companion Die’sire Ruth Create-A-Card die set, Crafter’s Companion Gemini Opulent Swirls die
Accessories:  Gemini Junior die cutting machine, Hero Arts White Embossing Powder, Tim Holtz stamp platform, Tim Holtz Quotations Metallic Stickers, Nuvo Gloss White Crystal Drops

I hope you’ve enjoyed today’s project and will link an anything goes project with us this month using dies! We’d love to see what you create! Thanks so much for stopping by today – we’ll see you next time! ;)

Scrappy hugs,
lesliesig

coffee & friends

Hi everyone! It’s Hump Day… what the camel says, lol! Today is my post day on the Simply Crafty SVGs Blog and I’m happy to share my DT inspiration project with you, an awesome coffee card created with the Simply Crafty SVGs Latte Box Card cut file. What a fun and super easy card to put together! I stamped a sentiment on the small layered panel on the front. And I love that Sandy threw in an envelope which I cut with matching paper I used on the cup for a coordinated look!

2019_087008a

Here’s a shot of the back of the cup which features a plain panel for writing a custom message and signature.

2019_087009a

And one more look, flattened and ready to pop into the envelope! I’m absolutely loving how this one turned out! Would be so easy to mass produce this to give several in different colors as a set! Love, love, love!

2019_0870010a

Products used:
Cardstock/Paper: American Crafts vanilla, caramel, chocolate and coffee cardstock; The Paper Studio Tattered and Worn paper stack
Stamps: Dare 2B Artzy Perfect Blend stamp set
Ink: Stampin’ Up Early Espresso ink
Dies/Punches: Simply Crafty SVGs Latte Box Card cut file
Accessories:  Tim Holtz stamp platform, Scotch 3M foam tape, 1/4″ Scor-Tape

I hope you’ve enjoyed today’s project! Be sure to check out all the fun cut files in the Simply Crafty SVGs store – you’ll have so much fun! And there are tons of freebies to get started! Thanks so much for stopping by today – we’ll see you next time! ;)

Scrappy hugs,
lesliesig

dude

Hello, my friends! Hope you’re having a good week! This month’s ATC Challenge is live over at Happy Little Stampers! I’m excited to share my DT inspiration project with you today! The theme for our January ATC Challenge is Masculine and we’d love to see what you create for our challenge this month!

january 2020 atc


I created a fun ‘dude’ coin using Deep Red Gears Background stamp that I heat embossed in black and then colored with Bic Mark-It markers.

2019_1210018a

I originally planned to just stamp the gears in black and color them, and then after I stamped them, I changed my other mind and decided that I wanted them heat embossed. So I stamped Versamark over top the black ink, applied clear embossing powder, and voila! I had black heat embossed gears!

2019_1210019a

And here’s one more look… I’m really diggin’ how this turned out! And it was so easy! ;)

2019_1210020a

Products used:
Cardstock/Paper: Stampin’ Up thick Very Vanilla cardstock
Stamps: Deep Red Gears Background, Paper Smooches Word Salad stamp set
Ink: Memento Espresso Truffle and Tuxedo Black ink, Versamark; Bic Mark-It markers- Woodsy Brown, Honey Brown, Tuxedo Black
Dies/Punches: 2-1/2″ Fiskars circle punch
Accessories:  ScraPerfect Best Glue Ever, Hero Arts clear embossing powder, MISTI stamp tool

I hope you’ve enjoyed today’s project and will link up an ATC with us this month! Feel free to create either a card or a coin… or both (wink-wink)! Thanks so much for stopping by today – we’ll see you next time! ;)

Scrappy hugs,
lesliesig

Ornament Box Card

Hi everyone! Happy Hump Day and January 1st! The first challenge of the year is live over at Merry Little Christmas Challenge Blog and I’m excited to share my DT inspiration project for MLCCB #18 – January Anything Christmas Goes! You know me and fancy folds… I’m always on the search for new ones to try! I’ve been making box cards for years but found a different kind of box card in the tutorial section at Splitcoast Stampers HERE. Love, love, love!

2019_0925021a

I dug into my stash of Christmas paper and settled on this Stampin’ Up paper pack which is a favorite and one of my go-to’s. The tutorial author mentioned that lighter weight paper works best for this project to get good crisp folds, so this paper definitely fits the bill. Using more Stampin’ Up supplies, I stamped and die cut a Christmas ornament to decorate the belly band.

2019_0925022a

Here you see the opened card revealing the box feature. I placed a stamped sentiment card inside the box which is removable to make it easy to sign. ;)

2019_0925023a

I added red Stampendous Dot Sparklers to the sentiment card, ornament and belly band.

2019_0925024a

One final look… this folds flat and fits nicely into a standard envelope. Love how this turned out!

2019_0925025a

Products used:
Cardstock/Paper: Stampin’ Up Very Vanilla and Cherry Cobbler cardstock, Stampin’ Up This Christmas Specialty DSP, Stampin’ Up Gold Foil Sheet
Stamps: Stampin’ Up Embellished Ornaments stamp set, Stampin’ Up Cozy Christmas stamp set
Ink: Stampin’ Up Cherry Cobbler ink
Dies/Punches: Stampin’ Up Delicate Ornaments Thinlits, Stampin’ Up Finishing Touches Edgelits
Accessories:  ScraPerfect Best Glue Ever, Gemini Junior die cutting machine, MISTI stamp tool, Red Stampendous Dot Sparklers

I hope you’ve enjoyed this box card and will link up a Christmas project with us this month! It’s never too early to get started on that Christmas stash and we can’t wait to see what you create! Thanks so much for stopping by today and we’ll see you again soon! ;)

Scrappy hugs,
lesliesig

Floral Perpetual Calendar

Hi everyone! Welcome to 2020 – sure seems like it got here F-A-S-T! It’s time for another fun challenge over at Love To Scrap Challenge Blog and I’m stoked to share my first project of the new year with you for LTSCB #129 – Anything Goes! I created a pretty floral perpetual calendar for my studio using the Sizzix Calendar Months die set and my Zutter Bind It All which I bought 5-6 years ago. It’s amazing what you find when you move, lol! It’s been so long since I used it, I had to use the instruction book!

This project was a lot of fun and I’m proud to say it’s my own design. Yep, out came the ruler with lots of measuring and a little planning! The calendar background is a beautiful floral paper with panels showing the days of the week, the months, the numeral date, and a graphic for that month’s holiday.

I covered the back of the base with solid color cardstock.

I created the days of the week on the computer because I don’t own any days of the week stamps or dies (insert sad face). The numbers (bottom right pic) were cut with dies in the Calendar Months die set.

The names of the months were all cut with dies in the set as well. I love the different fonts – no two are alike! I wrapped twine around the bottom of the base and tied a pretty little bow with a pink Dot Sparkler in the center.

The most fun part of this calendar are the holiday graphics. These were all in the die set too! The pic in the center is a side view of the calendar. It’s very sturdy and I’m sure will hold up for many years. I’m really loving how this turned out and can’t wait to start using it!

Products used:
Cardstock/Paper: Cardstock Warehouse Brown Box kraft cardstock; GKD Black Onyx, Red Hot, Wild Dandelion, Grass Green, Sweet Mango, White, Wild Lilac, Wild Orchid, Dark Chocolate, Bubblegum Pink and Tan Leather cardstock; American Crafts black cardstock; Stampin’ Up Mint Macaron, Tranquil Tide, Night of Navy and Smoky Slate cardstock; The Paper Studio cream cardstock, Stampin’ Up Share What You Love specialty DSP
Ink: Sakura white Gelly Roll pen, black Copic multiliner pen
Dies/Punches: Sizzix Calendar Months die set, Gemini Junior die cutting machine, Kadomaru Pro corner rounder
Accessories:  Canvas Corp Brands jute cord; red, violet, turquoise, blue, green and pink Stampendous Dot Sparklers

I hope you’ve enjoyed today’s project and will link up with us this month! We know you love the ‘anything goes’ theme! Thanks so much for stopping by today – we’ll see you soon! ;)

Scrappy hugs,
lesliesig