Happy Tuesday and once again, Happy New Year, everybody! I have some exciting news to share! The new DT for the new Pajama Crafter Stamps brand has been announced and I’m stoked to be on the new release team!
A HUGE congrats to Joy and Shawn, who have introduced this new brand which will be the new home of the well-established Prickley Pear Stamps! As you already know, I’ve been on the Prickley Pear Stamps team for almost four years now and have thoroughly enjoyed myself! Looking forward to what’s to come!
Be sure to check out the new Pajama Crafter Stamps where you’ll find both brands (Pajama Crafter Stamps and Prickley Pear Stamps) under one roof!
Thanks for stopping by – we’ll see you agian soon!
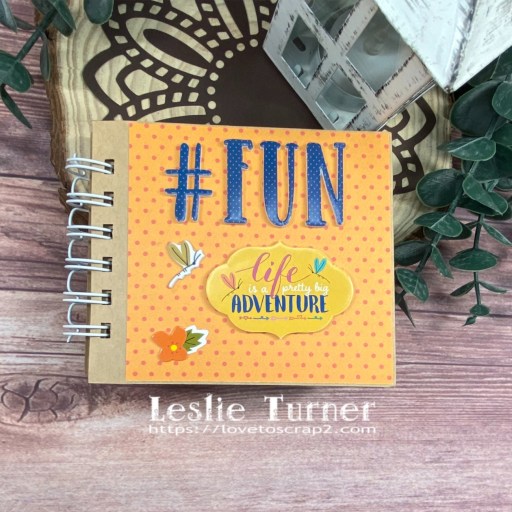
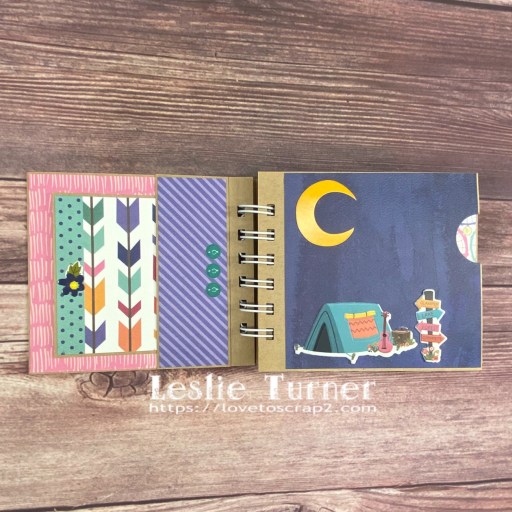
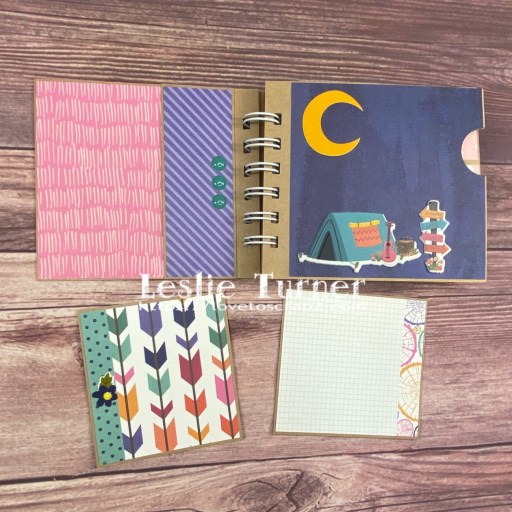
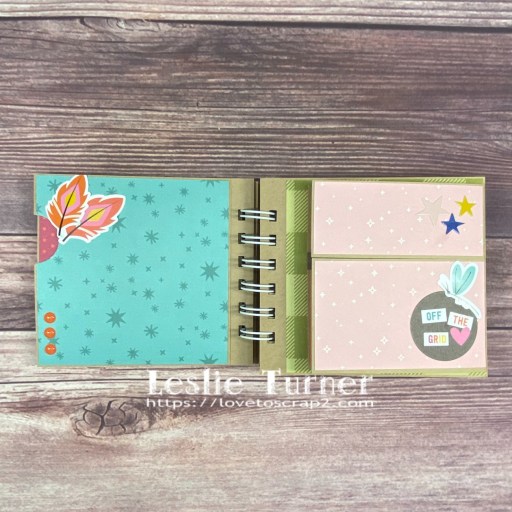
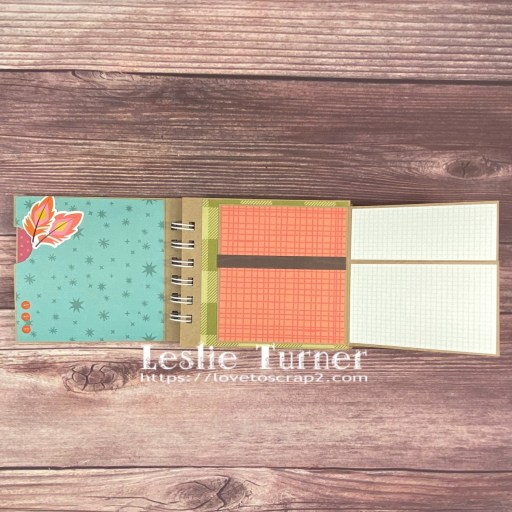
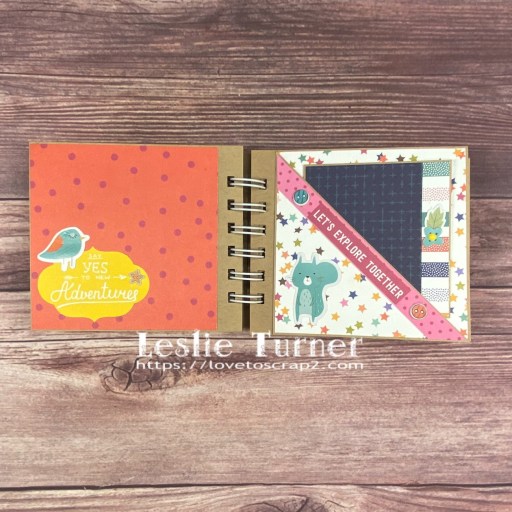
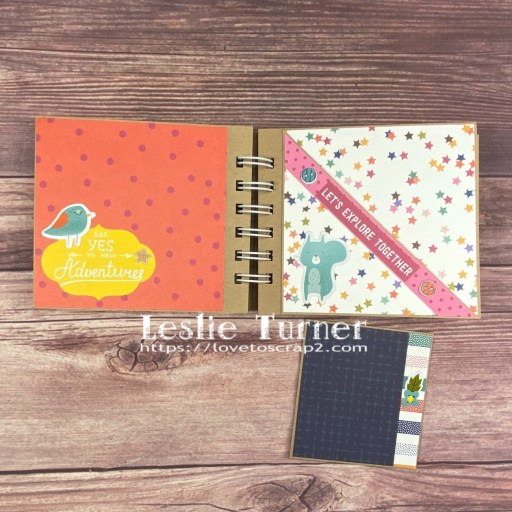
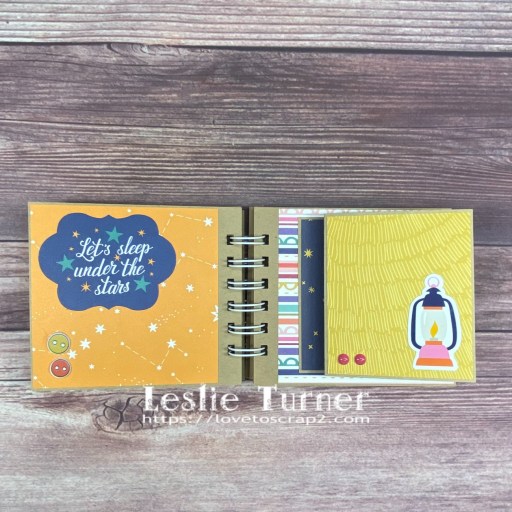
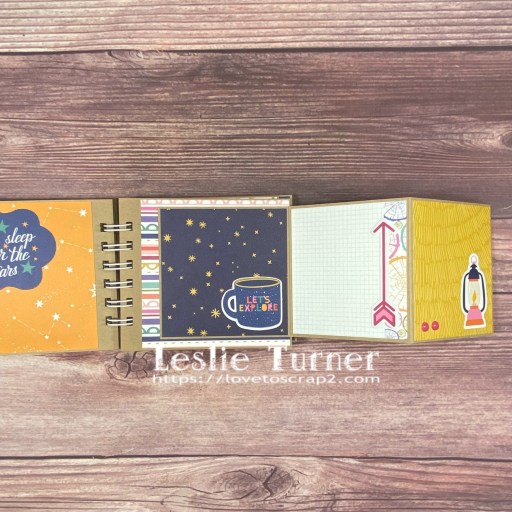
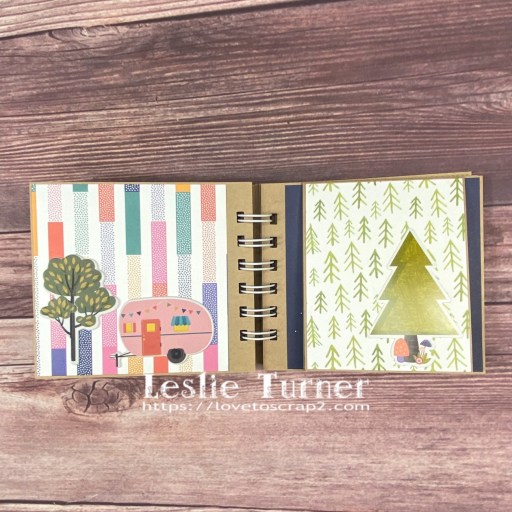
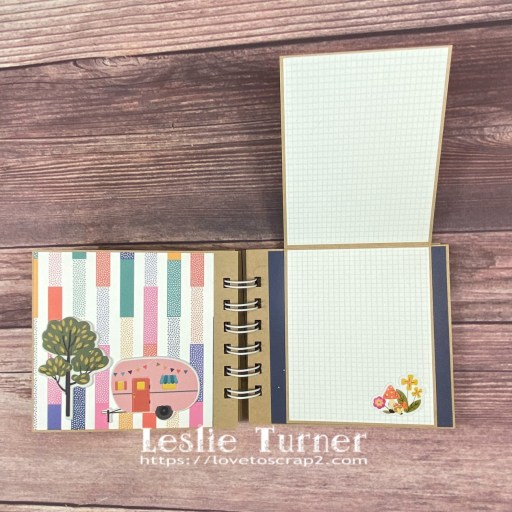
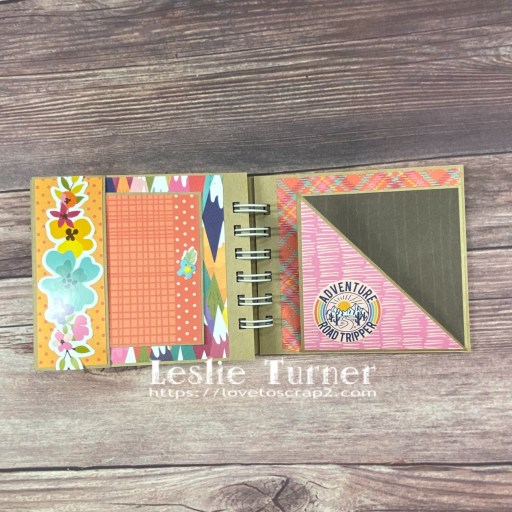
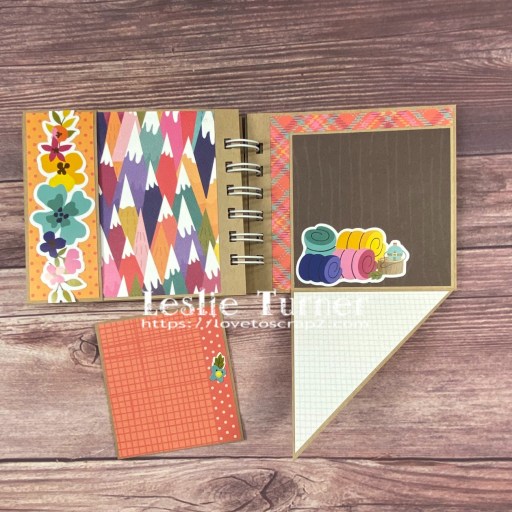
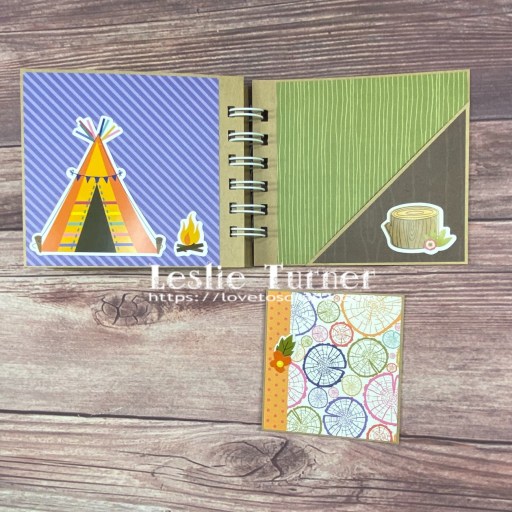
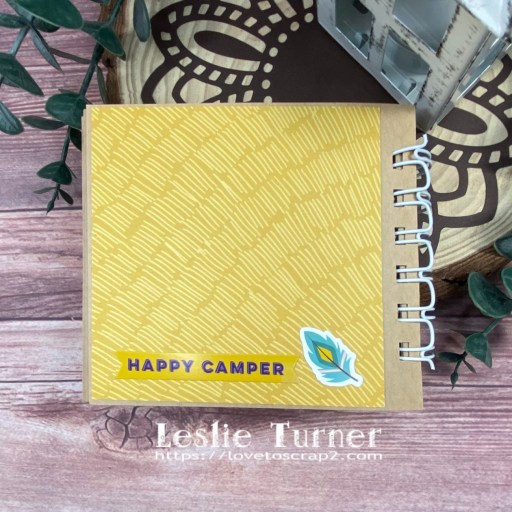
Hey everybody! I hope your New Year has started off with a bang – it’s mind-blowing that it’s here already! Our new challenge is live this morning over at Mini Album Mania and I’m thrilled to share my DT inspiration project for MAM #3 – Any Type of Mini Album Goes! My mini is chock full of papers, ephemera, stickers, foam alphas, puffy buttons, puffy stickers and enamel dots from the Keep It Simple Hello Adventure Collection! I believe the Hello Adventure Collection is on clearance and has been deeply discounted. If you are inclined to go shopping, be sure to use my discount code LoveToScrap2 at checkout to save 10% on your entire order! There is no minimum purchase requirement and no usage limits, plus the code combines with product, order, and shipping discounts!
I really had a good time with this! I used CutCardStock Twine cardstock for the album base and bound the pages with my Zutter Bind-It-All and 3/4″ white Zutter wire. There are pockets with inserts, fold-outs, fold-ups, pull-outs and pull-downs, with plenty of room for photos and journaling. I used lots of coordinating papers and embellished the pages with ephemera, stickers, foam alphas, puffy buttons, puffy stickers and enamel dots.
Affiliate links are used in this post at no cost to you – I really appreciate your support!
Products used: CARDSTOCK/PAPER: CutCardStock Twine 12×12 cardstock; Keep It Simple Hello Adventure Flip Sides Pack and Collection Pack (paper and ephemera) DIES/PUNCHES: Stampin’ Up 1″ Circle Punch ACCESSORIES: Tonic Studios 12″ Guillotine Paper Trimmer, Tombow Mono Dots adhesive, Bearly Art precision craft glue; Keep It Simple Hello Adventure Sticker Sheet, Foam Alpha Bits, Puffy Buttons, Puffy Stickers and Enamel Dots; Zutter Bind-It-All and 3/4″ white Zutter wire
I hope you’ve enjoyed seeing this project and will link up with us this time! If you like the Keep It Simple products I used, you can save 10% on your entire order when you shop online using code LoveToScrap2 at checkout! There is no minimum purchase requirement and no usage limits, AND it combines with product, order, and shipping discounts! Thanks so much for stopping by today – we’ll see you next time! ;)
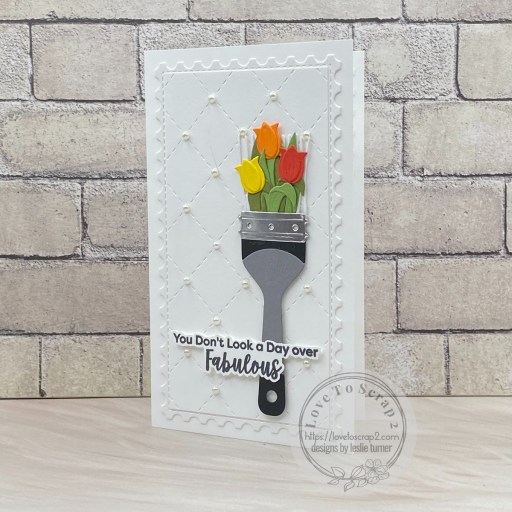
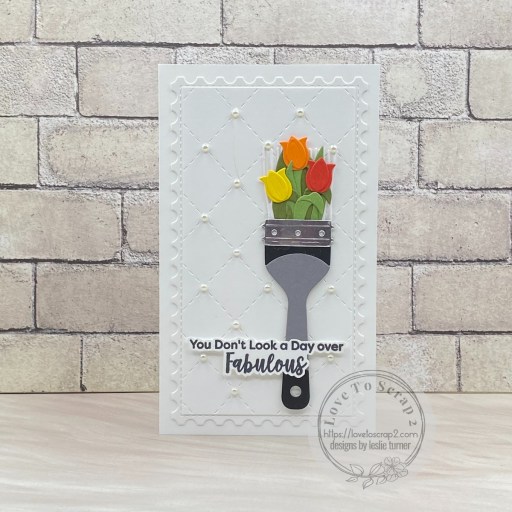
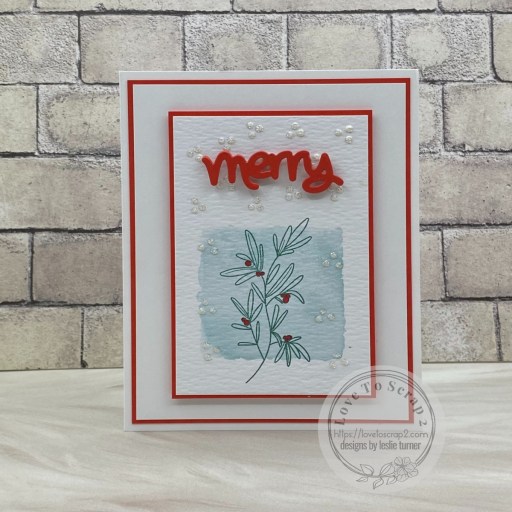
Hi friends! I hope you had a fabulous New Year’s Eve and you’re ready to embrace 2024! Our new challenge is live this morning over at the newly restructured and renamed Christmas [or not] BINGO Challenges formerly known as Christmas BINGO Challenges. We’re no longer strictly a Christmas challenge… we’ve opened up our challenges to ALL occasions which means you are welcome to create a project for ANY holiday, season or occasion using the featured BINGO card. I’m thrilled to share my inspiration project for ConBC #5 – Anything Goes with Featured BINGO Card – I went with Column O this time and featured layers, stitching and rectangle on this birthday card. I used a variety of dies for a tone-on-tone look with a splash of color, and I love how it turned out!
The 3-1/2″ x 6″ mini slimline card base and two mini slimline layers (using the Kat Scrappiness Mini Slimline Postage Stamp Edge Dies and Mini Slimline Quilted Backdrop Die) were cut from Neenah Classic Crest 80# Solar White cardstock. I also stamped the sentiment from the My Favorite Things Sassy Pants Birthday Greetings 3 stamp set on Solar White, fussy cut it and set it aside. I used the Spellbinders Artful Tulip die set and a variety of CutCardStock Lessebo, Pop Tone and foil cardstock to create the focal image on this card. The finishing touch was adding Want2Scrap white pearls to the background.
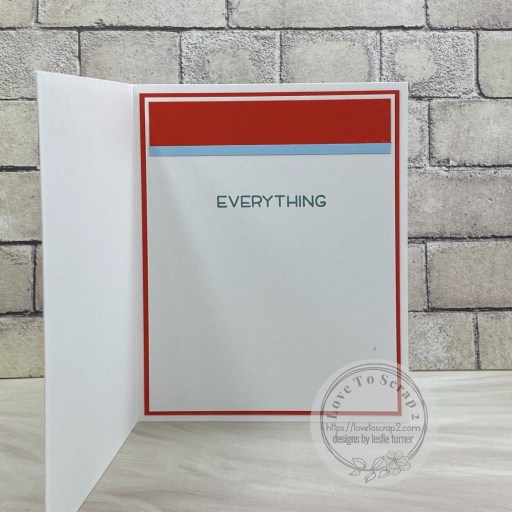
The inside panel was cut from Solar White cardstock using a Mini Slimline Postage Stamp Edge Die. I stamped another sentiment from the My Favorite Things Sassy Pants Birthday Greetings 3 stamp set, and added a leftover tulip from the focal image on the front.
I hope you’ve enjoyed seeing this project and will link up with us this time! Remember, we’ve opened up our challenges to all occasions using the featured BINGO card, so come on over and play! Thanks so much for stopping by today – we’ll see you next time! ;)
2/29/24 Design Team Favorite at A Perfect Time To Craft Open Challenge!
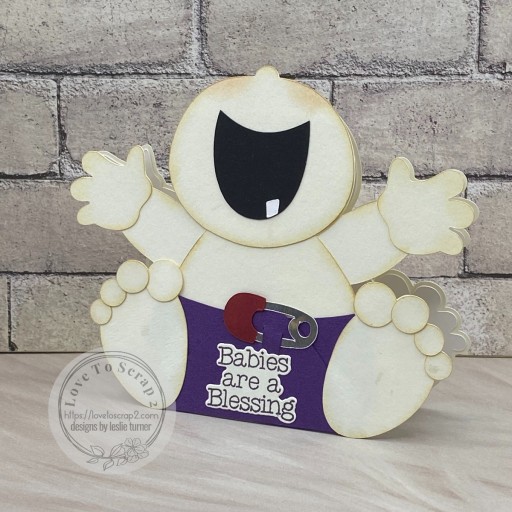
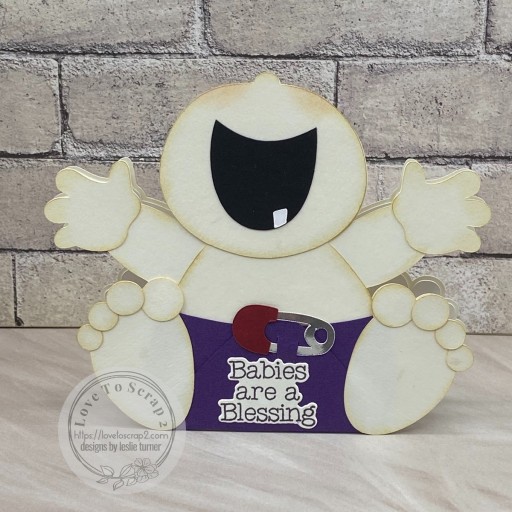
Hey everybody! How’s the weather where you are on this awesome first day of January?! It’s pretty darn chilly here but us ‘chill mongers’ don’t mind! Our new challenge is live this morning over at Birthstone Challenges and I’m delighted to share my DT inspiration project for BSC #7 – Anything Goes with Garnet & Amethyst + optional NEW BEGINNINGS (new job, new home, new baby, etc.) First up is some news about our challenges – we’ve been playing straight anything goes with the featured birthstone colors since we started this new challenge in January 2023, so we’re adding an optional theme to each challenge this year for a little interest. Just remember, the themes are optional and not required to play. Participants are more than welcome to continue playing ‘anything goes’ but we’d love to see some creativity with the themes!
I opted for a new baby theme and created an adorable baby card using my Cricut Explore Air 2 and the Baby Belly Card SVG cut file from My Scrap Chick. I’ve made a couple of these cards previously and I love this cut file so much that I just had to make another one!
I used a variety of cardstock from CutCardStock – Basis Natural for the baby’s body and front sentiment, Curious Metallic Violette for the diaper, Astrobrights Eclipse Black for the baby’s mouth, Basis Dark Red and Bright Silver Foil for the diaper pin, and Cougar Smooth White for the baby’s tooth. Prior to assembling the card, I inked the edges of the pieces with Ranger antique linen distress ink for some definition and then used tattered rose distress ink for the cheeks. I stamped the sentiment from the Stampin’ Up Charming Sentiments stamp set in Memento Elderberry ink and cut it with the coordinating Stampin’ Up Sentiment Silhouettes die set.
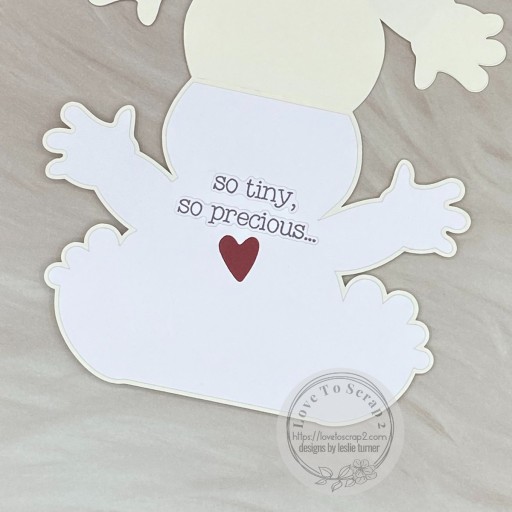
I cut the inside layer from Cougar Smooth White. The inside sentiment is also from the Stampin’ Up Charming Sentiments stamp set, stamped in Memento Elderberry ink and cut with the coordinating Stampin’ Up Sentiment Silhouettes die set. I added a heart that I die cut from Basis Dark Red (using a die in the same set).
Hey everybody! Wishing you a truly Magical Monday! I always love January 1st because it represents everything new – new year, new beginnings, new challenges! Our new challenge is live this morning over at Merry Little Christmas Challenge Blog and I’m delighted to share my DT inspiration project for MLCCB #54 – Anything Christmas Goes! We’d love to see your first Christmas project of the year! I used a couple older Stampin’ Up sets for this adorable clean and simple card along with some fun buttons!
I cut a standard A2 size top-folding landscape card base and layering panel from CutCardStock Twine cardstock and rounded the bottom right corner. I added strips of Eyelet Outlet red dotted and skinny gold washi tape across the bottom of the layering panel and stamped a sentiment from the Stampin’ Up Cookie Cutter Christmas stamp set in Memento Rich Cocoa ink. The final touch was adding a sweet Christmas bear button from the Buttons Galore & More Santa’s Grab Bag along with three tiny buttons from their Christmas Tiny Buttons pack.
I cut the inside panel from CutCardStock Twine cardstock, embellished it with strips of Eyelet Outlet red dotted and skinny gold washi tape, and stamped a sentiment from the Stampin’ Up Peaceful Pines stamp set in Memento Rich Cocoa ink.
Affiliate links are used in this post at no cost to you – I really appreciate your support!
Products used: CARDSTOCK/PAPER: CutCardStock Twine cardstock STAMPS: Stampin’ Up Cookie Cutter Christmas and Peaceful Pines stamp sets INK: Memento Rich Cocoa ink DIES/PUNCHES: Kadomaru Pro corner rounder ACCESSORIES: Tonic Studios 12″ Guillotine Paper Trimmer, Tombow Mono permanent adhesive, Art Glitter Dries Clear adhesive, MISTI stamping tool, Buttons Galore & More Santa’s Grab Bag and Christmas Tiny Buttons, Eyelet Outlet red dotted and skinny gold washi tape
I hope you’ve enjoyed seeing this project and will link up with us this time! We’d love to see what you create! Thanks so much for stopping by today – we’ll see you next time! ;)
1/6/24 Weekly Favorite (twice) at Splitcoast Stampers! 1/6/24 CAS Favorite at Splitcoast Stampers! 1/29/24 Design Team Favorite at Crafts Galore Encore Challenge Blog!
Hey everybody! I know, I know, it’s super busy this morning on my blog! Happy New Year! Our new challenge is live this morning over at Mix It Up Challenge Blog and I’m super excited to share my DT inspiration project for MIUCB #69 – Anything Goes + optional Mixed Media! If you decide to play the twist, we’d love to see your mixed media project using more than one medium.
To create the focal panel, I did some acrylic block stamping using Ranger speckled egg distress ink spritzed with water on a 2″ acrylic block. I stamped a floral image from the My Favorite Things Pretty Poinsettias stamp set in Catherine Pooler Skylight ink and colored the berries with a red Bic Mark-It ultra fine point marker. I added random dots of Nuvo Ivory Seashell Crystal Drops and added Stampin’ Up Dazzling Diamonds Glitter. Both panels on the front were layered on CutCardStock Lessebo Cherry Red cardstock. The sentiment was die cut from the Cherry Red cardstock using the Lawn Fawn Happy Happy Happy Add-On Dies.
I embellished the inside panel with a leftover strip of the Cherry Red cardstock and stamped the sentiment from the Lawn Fawn Happy Happy Happy stamp set.
Hi friends! I’m having a really hard time wrapping my head around how fast 2023 went! Wishing all my online friends a happy and prosperous 2024! Our new challenge is live this morning over at Love To Craft Challenge Blog and I’m delighted to share my DT inspiration project for LTCCB #78 – Anything Goes! I’ve made several of these chocolate bar cards and I always love how they turn out! I used a brown paper in the Keep It Simple Farmhouse Fall Collection because it was the perfect shade of brown for the chocolate bar. I also used a plaid paper and stickers from the Keep It Simple Boys Boys Boys Collection. This collection is on clearance and has been deeply discounted. If you are inclined to go shopping, be sure to use my discount code LoveToScrap2 at checkout to save 10% on your entire order! There is no minimum purchase requirement and no usage limits, plus the code combines with product, order, and shipping discounts!
The 3-1/2″ x 6″ mini slimline card base was cut from Neenah Classic Crest 80# Solar White cardstock. The chocolate bar was created using square punches and a brown print in the Keep It Simple Farmhouse Fall Collection. I ran a BR52 alcohol marker around the edge of each of the chocolate bar squares. The plaid layering panel and stickers are from the Keep It Simple Boys Boys Boys Collection and I used CutCardStock Bright Gold Foil cardstock for the wrapper under the plaid.
The inside panel was cut from Solar White and embellished with a leftover strip of the plaid paper used on the front. I stamped the sentiment from the Keep It Simple Birthday Sentiments stamp set in Memento Rich Cocoa ink and layered the panel on the brown paper used for the chocolate bar.
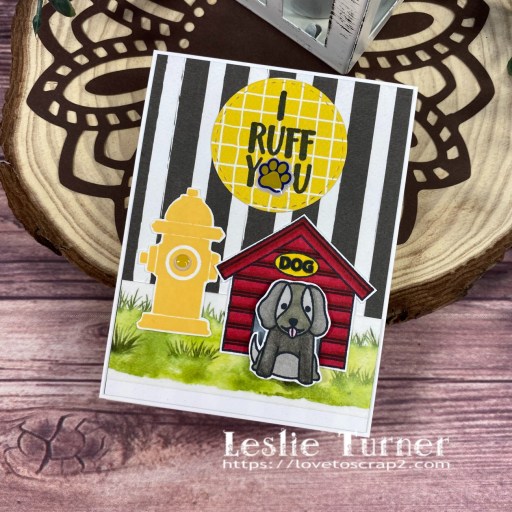
Hi friends! Happy New Year! I hope you have a wonderful and relaxing day! Our new challenge is live this morning over at Love To Scrap Challenge Blog and I’m super stoked to share my DT inspiration project for LTSCB #165 – Anything Goes! I created a pup-themed post-it note easel using items in the Keep It Simple Max and Daisy Collection. This project is both adorable AND practical! I love it when that happens! The Max and Daisy Collection is on clearance and has been deeply discounted. If you are inclined to go shopping, be sure to use my discount code LoveToScrap2 at checkout to save 10% on your entire order! There is no minimum purchase requirement and no usage limits, plus the code combines with product, order, and shipping discounts!
I cut the easel base from Neenah Classic Crest 110# Solar White cardstock along with layering panels from a striped print in the Keep It Simple Max and Daisy Flip Sides Pack. I added Eyelet Outlet grass washi tape to the bottom of the easel panel. I stamped the pup, house and hydrant from the Puppy Stamps in Memento Tuxedo Black ink on Solar White cardstock. I colored the pup and house with alcohol markers, and then fussy cut all three images. I stamped the sentiment on a coordinating print in the Flip Sides Pack, cut it with a Keep It Simple Stitched Circles Nested Die, and added a paw print enamel sticker.
Here’s a shot of the easel folded flat for mailing.
Affiliate links are used in this post at no cost to you – I really appreciate your support!
Products used: CARDSTOCK/PAPER: Neenah Classic Crest 110# Solar White cardstock, Keep It Simple Max and Daisy Flip Sides Pack STAMPS: Keep It Simple Max and Daisy Puppy Stamps INK: Memento Tuxedo Black ink; Arteza alcohol markers- NG06/08, R21/43, GS04/05/07, RP09, BR28/29; Sharpie Ultra Fine Point blue marker, Catherine Pooler Tiara ink DIES/PUNCHES: Keep It Simple Stitched Circles Nested Dies ACCESSORIES: Tonic Studios 12″ Guillotine Paper Trimmer, Tombow Mono Dots adhesive, Bearly Art precision craft glue, MISTI stamp tool, Big Shot, Eyelet Outlet Grass Washi Tape, Keep It Simple Max and Daisy Printed Enamel Stickers, 1″ double-sided foam strip
I hope you’ve enjoyed seeing this project and will link up with us this time! Thanks so much for stopping by today – we’ll see you next time! ;)
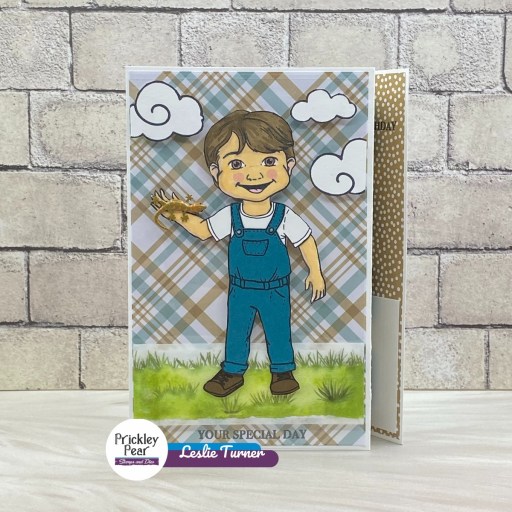
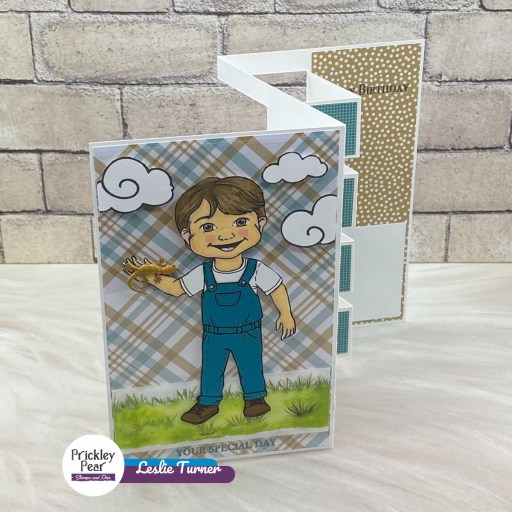
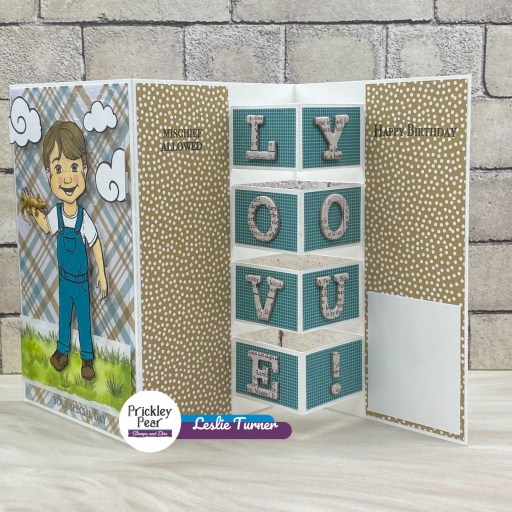
Hey everybody! I’m back for a second time on this fine last Sunday of 2023 with one more inspiration project for Prickley Pear Stamps! This building block card features the super adorable Hello Jack stamps along with the Kokopelli – Happy Birthday stamps and the Rainbow Dreams stamps. My inspiration for this fun fold came from an older Splitcoast Stampers tutorial HERE. Another one I’ve had in my arsenal for a while and I’m not sure why I haven’t tried it until now, lol! Oh, and don’t forget the Hello Lily and Hello Jack stamps and dies are on sale at Prickley Pear Stamps (up to 50% off) and the sale has been extended through January 1st at 11:59 PM! Get ’em while you can!
I used Neenah Classic Crest Solar White cardstock for the card base and several coordinating prints from an oldie-but-goodie Recollections Bold Basics paper pad for the layering panels. I used the Rainbow Dreams stamp set for the clouds, and all three sentiments are from the Kokopelli – Happy Birthday stamp set. The clouds, Jack and the grass washi tape are adhered to an acetate panel which I popped up on foam strips for a little interest.
I used American Crafts Newsprint Thickers alphas for the LOVE YOU! sentiment on the building blocks, and stamped the other sentiments on the left and right sides. I really love how this turned out!
Other products used: CARDSTOCK/PAPER: Neenah Classic Crest 80# Solar White cardstock, CutCardStock Basis Teal cardstock, Recollections Bold Basics paper pad INK: Catherine Pooler Midnight ink, Memento Tuxedo Black ink (pad and marker); Arteza alcohol markers- BR08/28/58/82/95, RP09; Marvy Uchida DecoColor Liquid Silver paint marker ACCESSORIES: Fiskars 12″ SureCut paper trimmer, Tonic Studios 12″ Guillotine Paper Trimmer, Elmer’s Craft Bond Tape Runner, Bearly Art precision craft glue, MISTI stamp tool, Grafix Crystal Clear Craft Plastic, 1/4″ red liner tape, 1″ double-sided foam strip, American Crafts Newsprint Thickers alphas, Eyelet Outlet Reptile Brads
I hope you’ve enjoyed this project! Be sure to check out all the awesome stamps and dies at Prickley Pear Stamps! Save 10% on anything on the site when you shop at Prickley Pear Stamps by using coupon code LESLIE10 at checkout! And be sure to ‘like’ and ‘follow’ the Prickley Pear Stamps Facebook page to keep up with news and sales, and join Prickley Pear Pals (the fan group) for lots of fun crafty ideas and to share your creativity! And finally, we’d love to see you visit the Prickley Pear Stamps blog and become a Follower! Hope to see you there! Thanks so much for stopping by today – we’ll see you next time! ;)
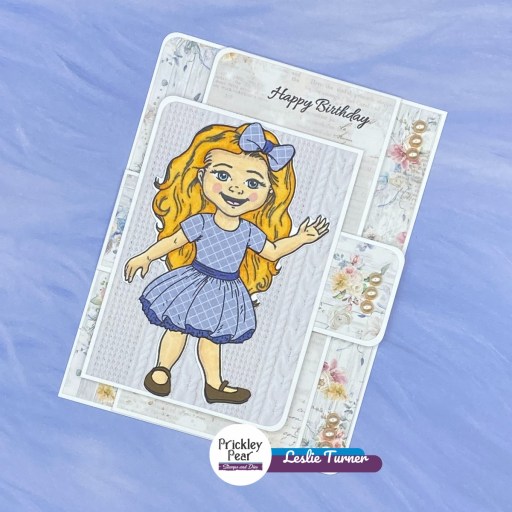
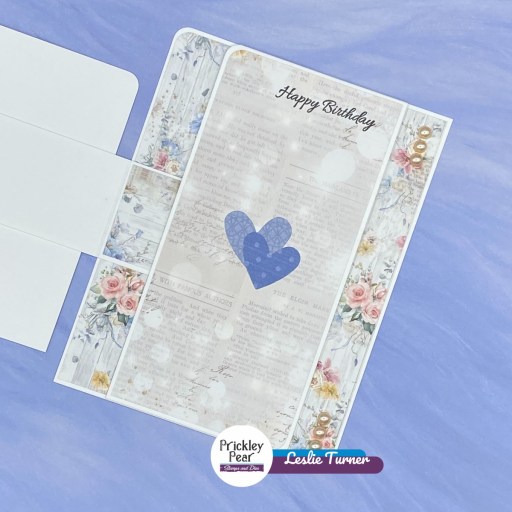
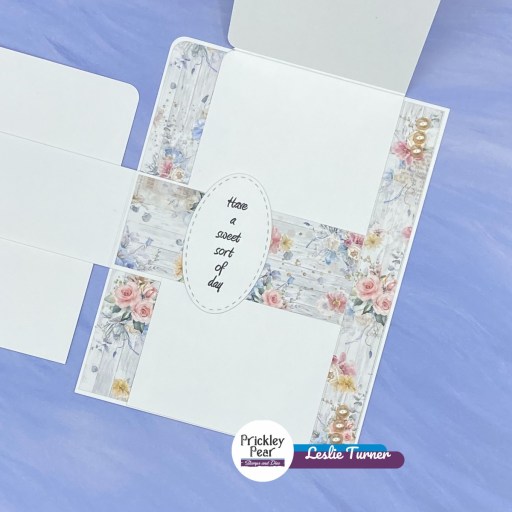
Hey everybody! I hope you’re having a GREAT last weekend of 2023! Are you going to stay up to see the ball drop at midnight?! We haven’t seen that ball in several years, lol! I’ve popped in this morning with a DT inspiration project for Prickley Pear Stamps featuring the super adorable Hello Lily stamps and dies! I also used sentiments from the Flourished Oval – Spring stamps. You know me and fun folds… this version of the double flap fun fold is one of my favorites! The Hello Lily and Hello Jack stamps and dies are on sale at Prickley Pear Stamps (up to 50% off) and the sale has been extended through January 1st at 11:59 PM! Get ’em while you can!
I used Neenah Classic Crest Solar White for the card base layers, Lily and the inside sentiment. The pretty patterned papers are from the Asuka Studio 6×6 Dusty Rose Collection Pack. Lily’s dress and hair bow were stamped on a paper in the Keep It Simple Royal 12×12 Collection Pack and I used two ephemera hearts (from the same Royal Collection) on the second flap. The finishing touch on the front was adding several Eyelet Outlet ivory pearls.
The sentiments on the second flap and inside are from the Flourished Oval – Spring stamps. The inside sentiment was cut with a Keep It Simple Stitched Ovals Nested Die.
Other products used: CARDSTOCK/PAPER: Neenah Classic Crest 110# and 80# Solar White cardstock, Keep It Simple Royal 12×12 Collection Pack (paper and ephemera), Asuka Studio 6×6 Dusty Rose Collection Pack INK: Catherine Pooler Midnight ink; Arteza alcohol markers- BR08/28, B18, RP09, YR14/17, PB25; Memento Tuxedo Black marker DIES/PUNCHES: Kadomaru Pro Corner Rounder, Keep It Simple Stitched Ovals Nested Dies ACCESSORIES: Tonic Studios 12″ Guillotine Paper Trimmer, Scotch Advanced Tape Glider, Bearly Art precision craft glue, MISTI stamp tool, Big Shot, Eyelet Outlet 5mm ivory pearls
I hope you’ve enjoyed this project! Be sure to check out all the awesome stamps and dies at Prickley Pear Stamps! Save 10% on anything on the site when you shop at Prickley Pear Stamps by using coupon code LESLIE10 at checkout! And be sure to ‘like’ and ‘follow’ the Prickley Pear Stamps Facebook page to keep up with news and sales, and join Prickley Pear Pals (the fan group) for lots of fun crafty ideas and to share your creativity! And finally, we’d love to see you visit the Prickley Pear Stamps blog and become a Follower! Hope to see you there! Thanks so much for stopping by today – we’ll see you next time! ;)