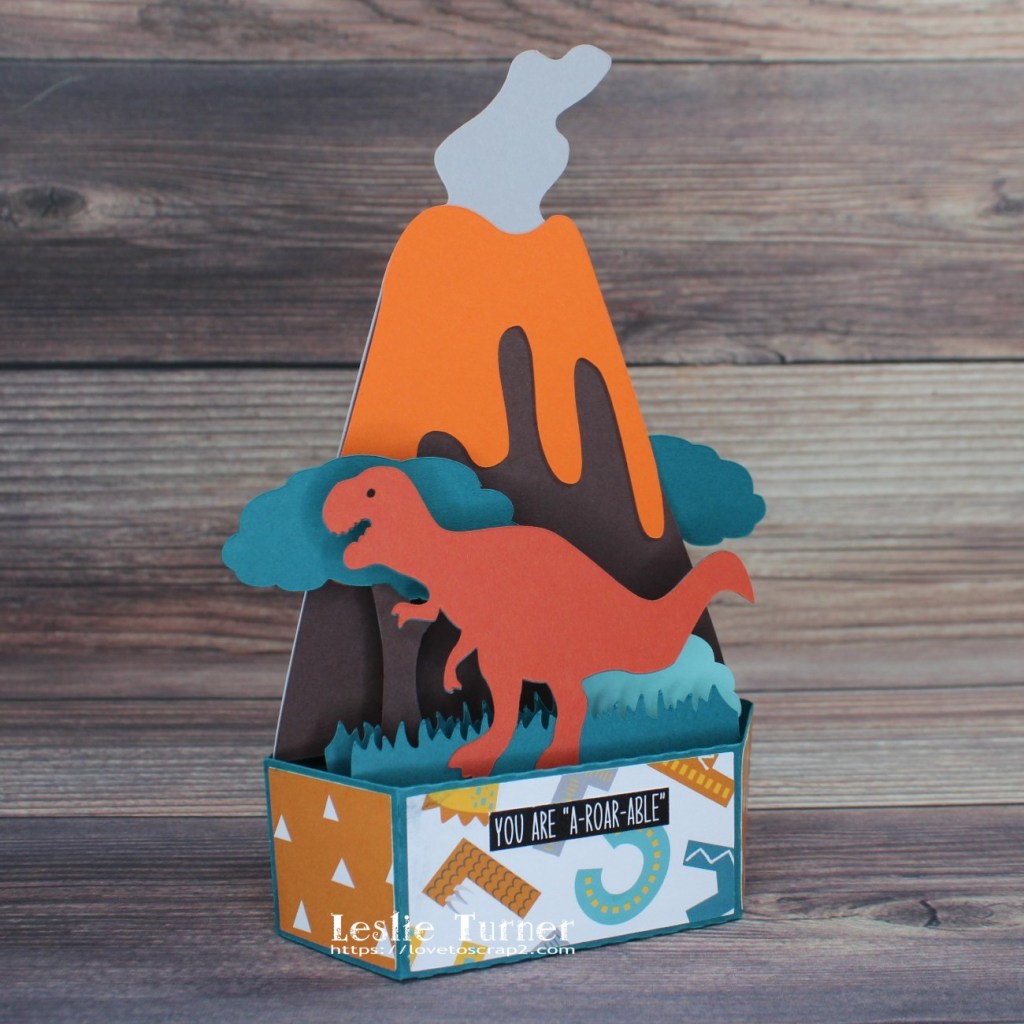
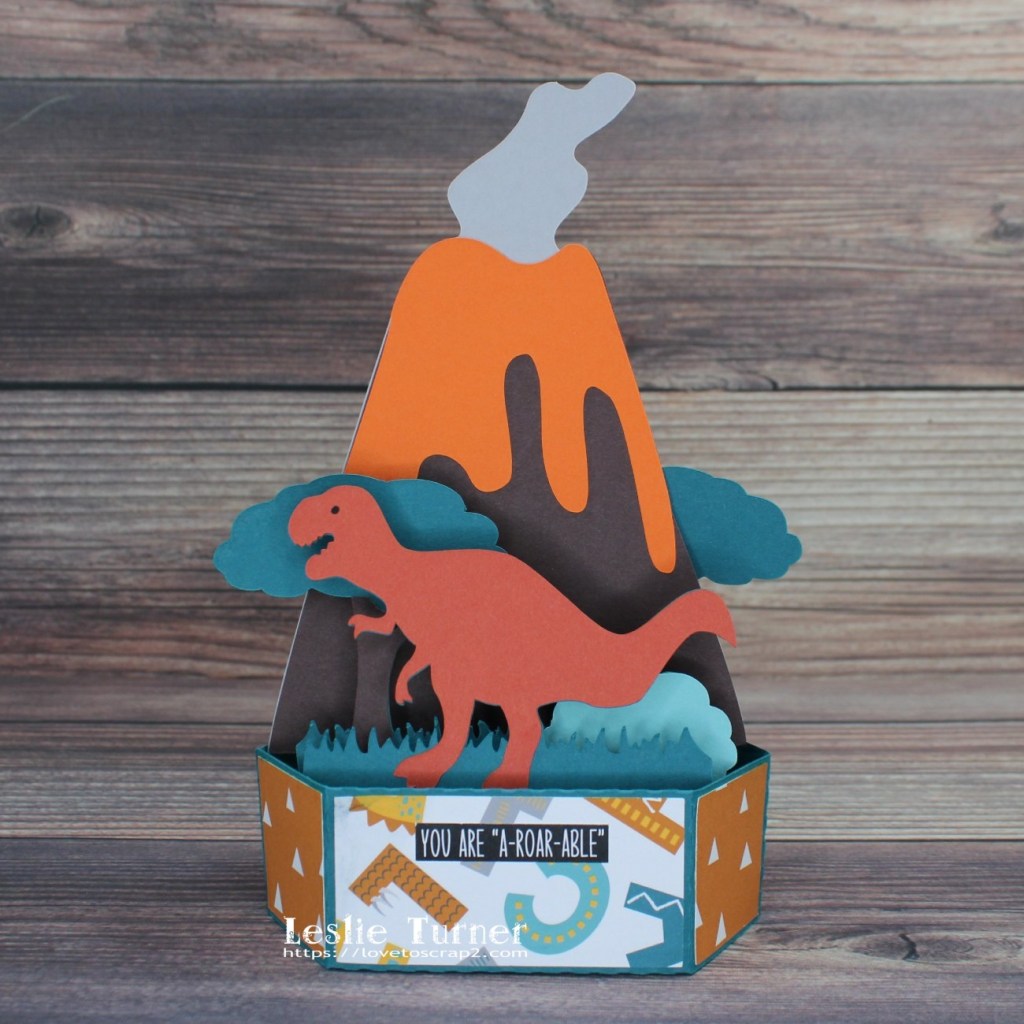
Hi everybody! Wishing you all a terrific Tuesday! Only four more sleeps… and yes, you know what I’m talking about, lol! Affiliate links are used in this post at no cost to you – I really appreciate your support! I’ve stopped in today to share a T-Rex pop-up card that I created for our youngest grandboy a couple months ago. But first of all, I’m sure you’ve noticed that my blog looks a little different this morning! I love change (which is in direct contradiction to my Libra personality) and have been eyeballing a different WordPress theme for a couple months now and decided that this morning was launch time! I love it because it’s so clean and crisp! Okay, back to this adorable card that I created with a cut file from My Scrap Chick. I know I’ve mentioned before how fun it is assembling 3-D projects and watching them come to life!
I cut all the pieces from CutCardStock Basis Teal, Basis Aqua, Basis Orange, Basis Brown, Dolphin, and Pop-Tone Tangy Orange cardstock. I had no dinosaur patterned paper so I found the Design Bundles Digital Dinosaur Friends Pattern Pack online which I cut the layering panels from. I assembled the card and added the sentiment from Brutus Monroe Conversation Clippings Prehistoric Party.
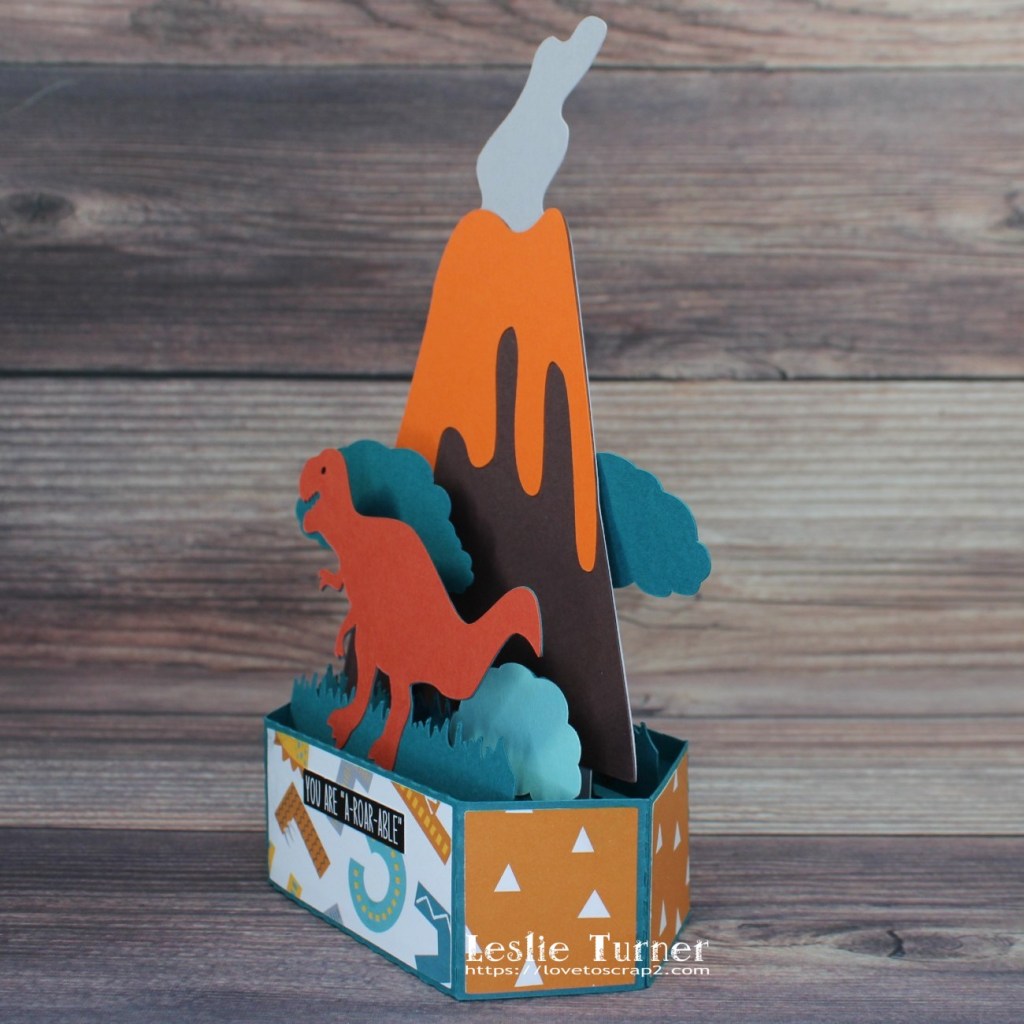
Here’s an angled shot.
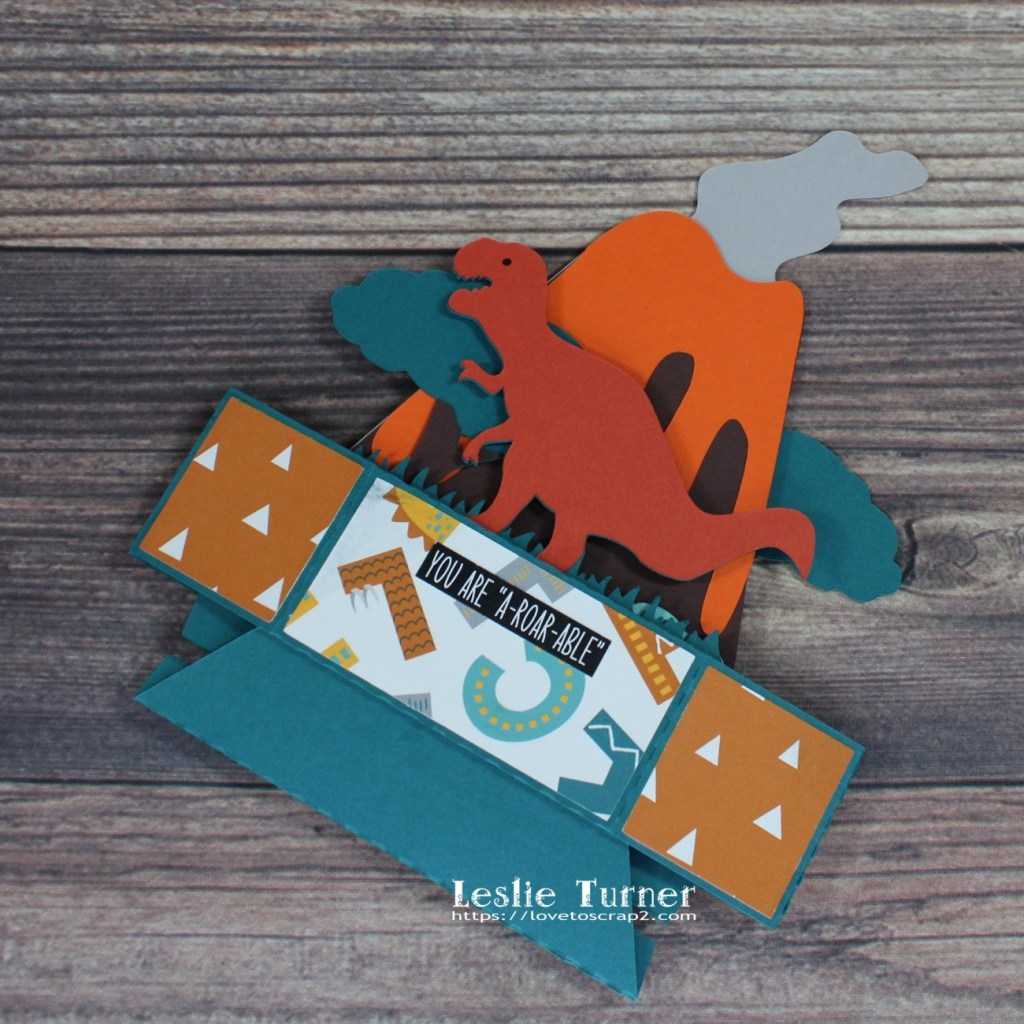
And one more peek… folded flat for mailing. I absolutely love how this turned out!
12/21/21 Featured Project at Little Red Wagon! 12/27/21 Featured Creation at Scrapping4fun Challenges! 12/28/21 Top Rocker at 613 Avenue Create! 1/2/22 Winner at 613 Avenue Create! 1/4/22 Top Pick at Jan’s Digi Stamps Challenges! 1/13/22 Shoutout at River of Creativity! 1/14/22 Best Technique Winner at World Wide Open Design Team Monthly Challenge!
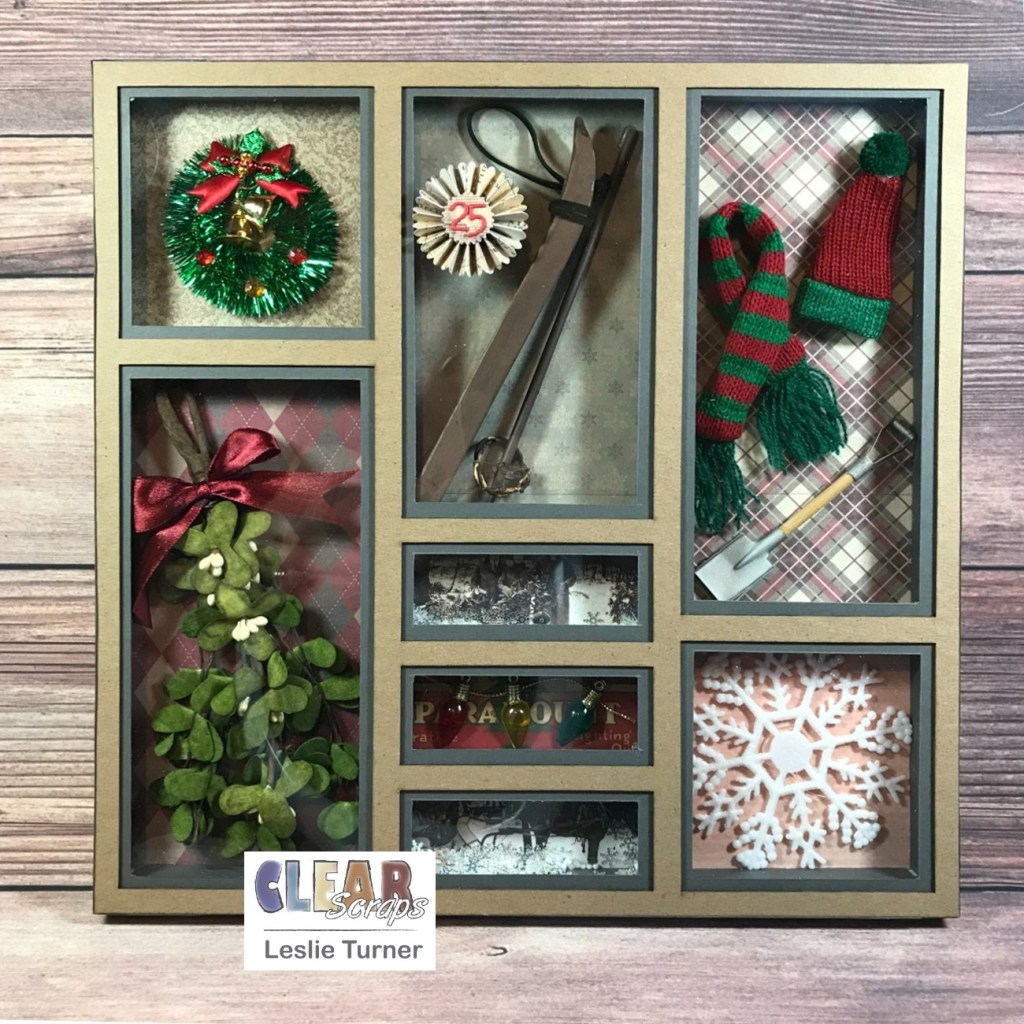
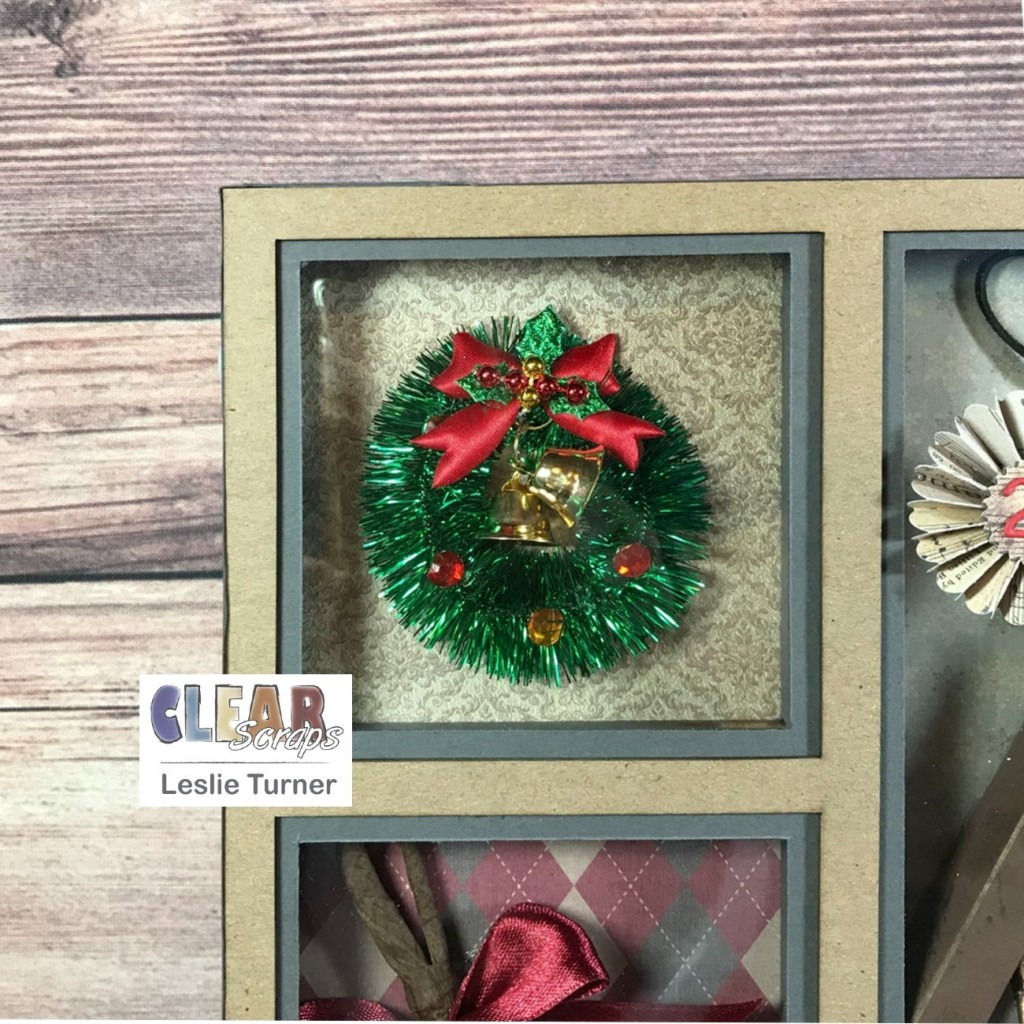
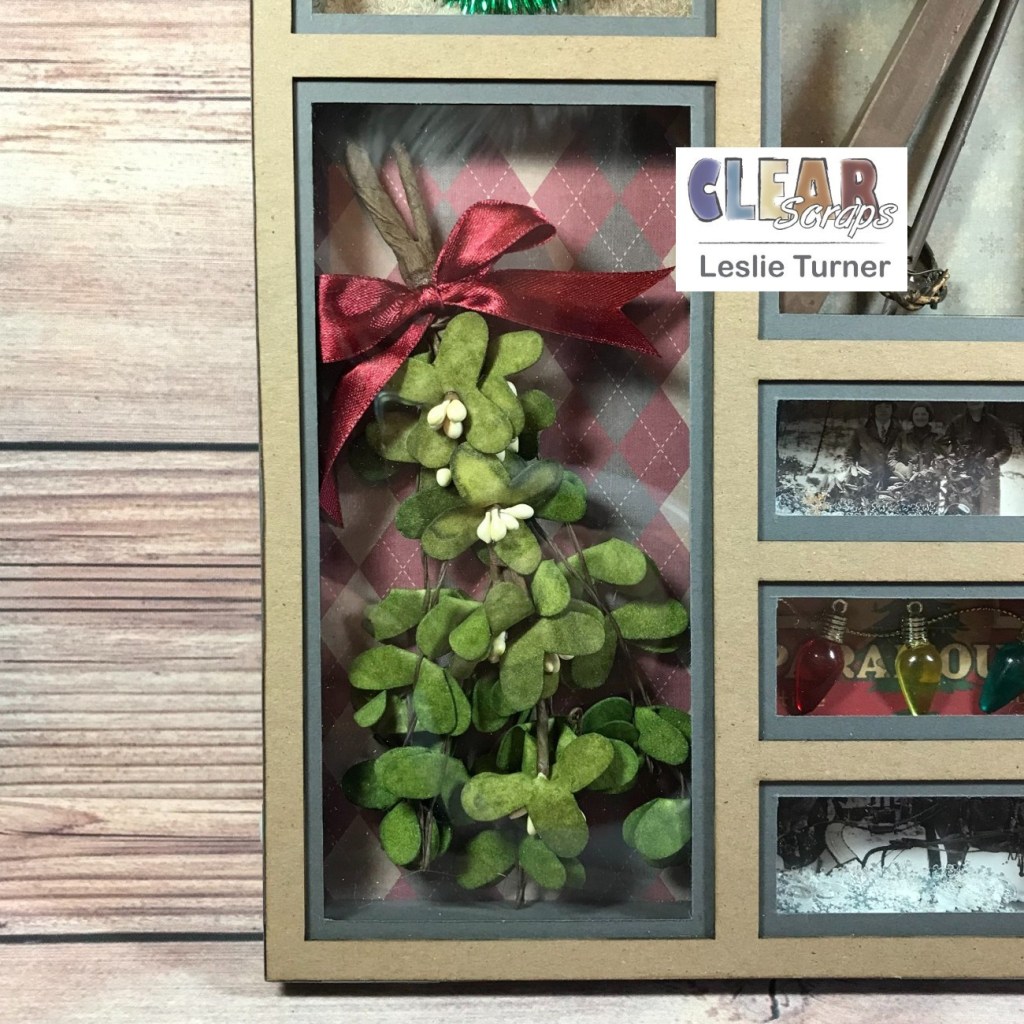
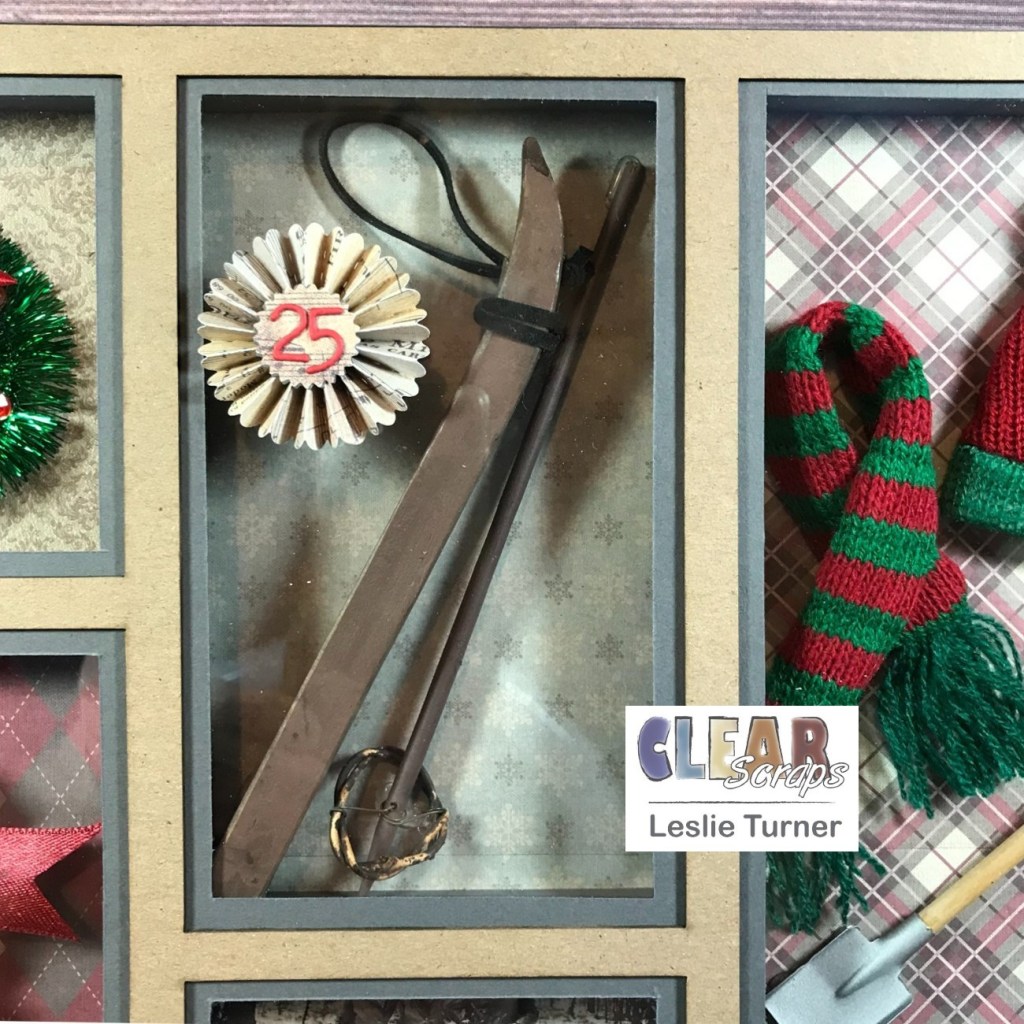
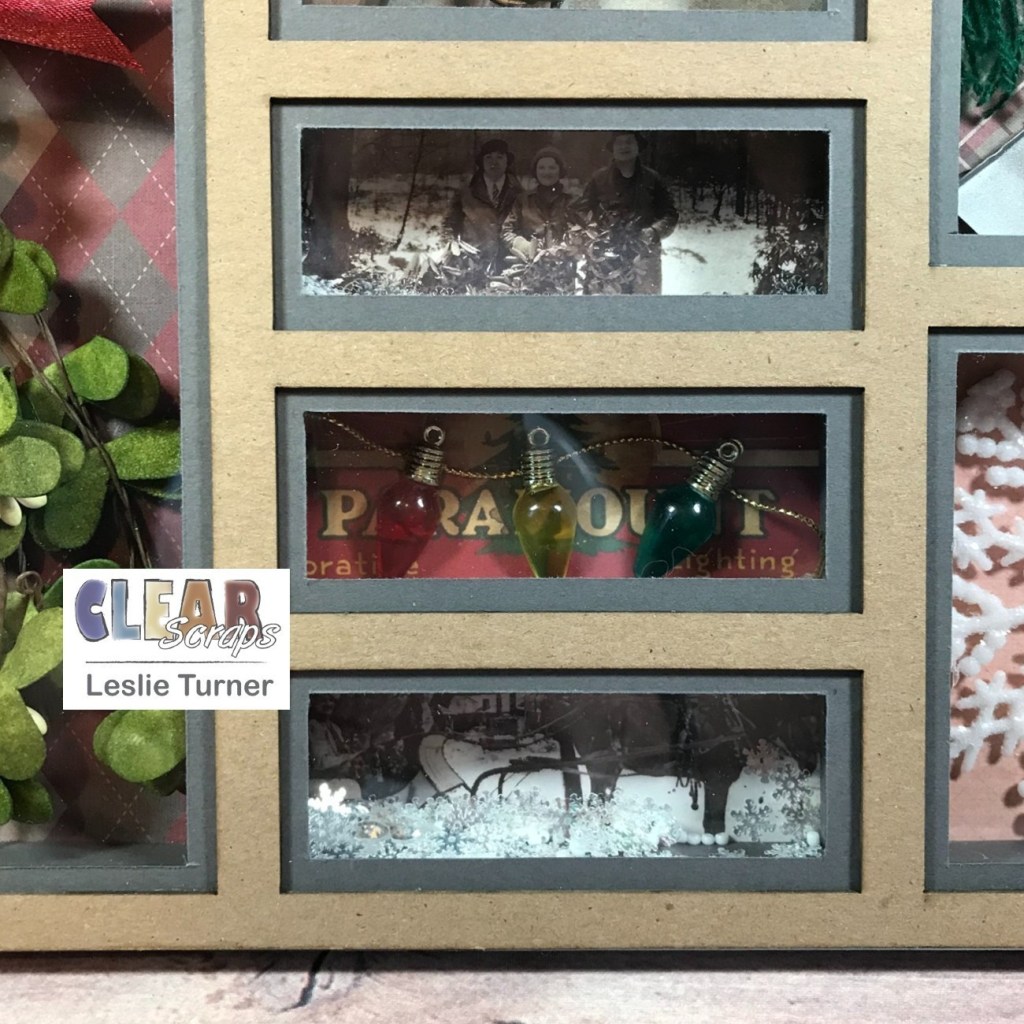
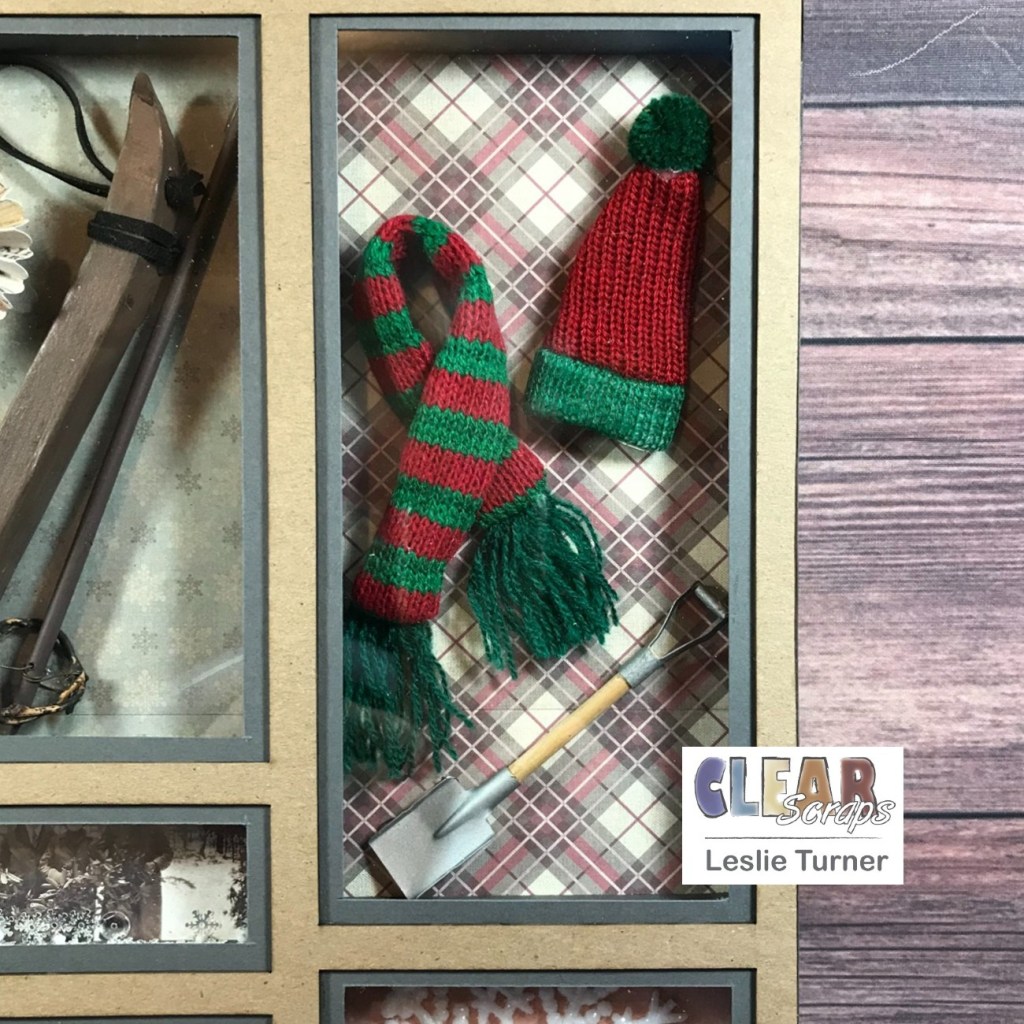
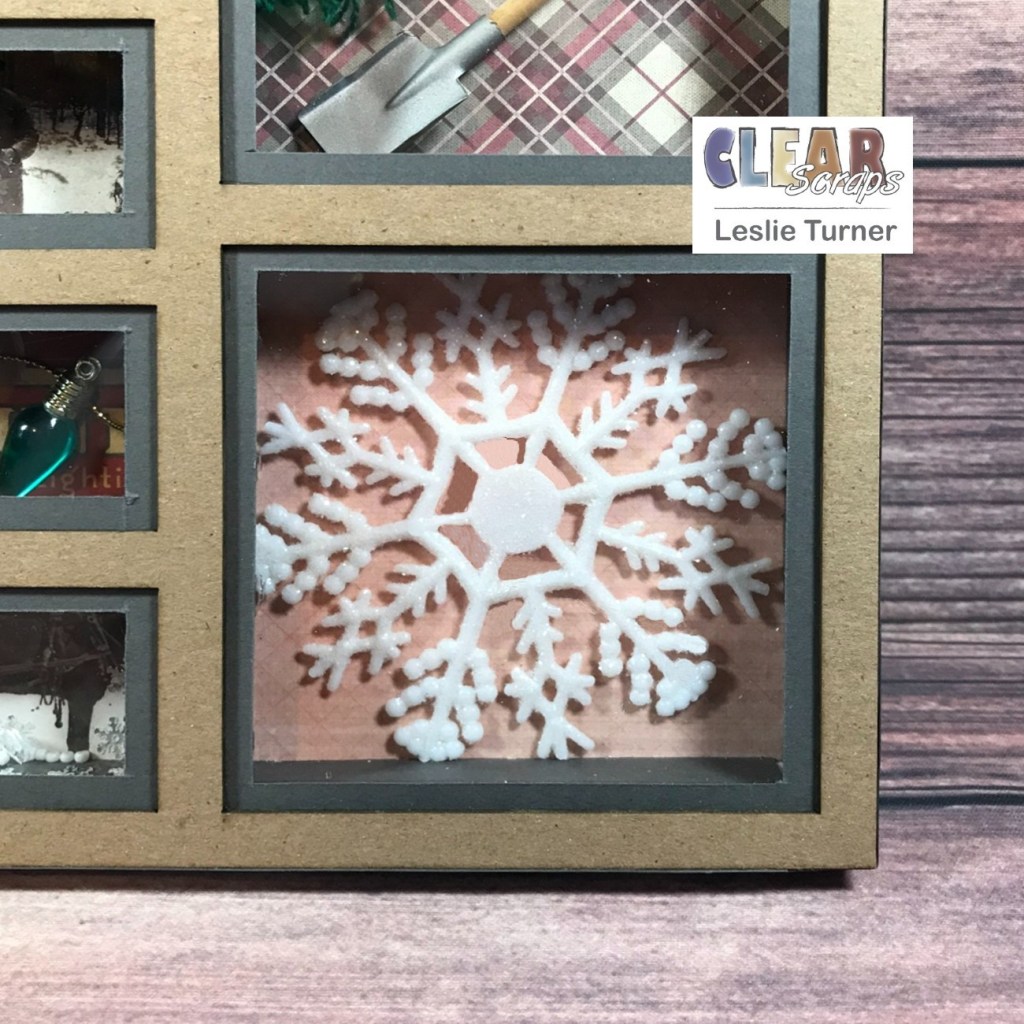
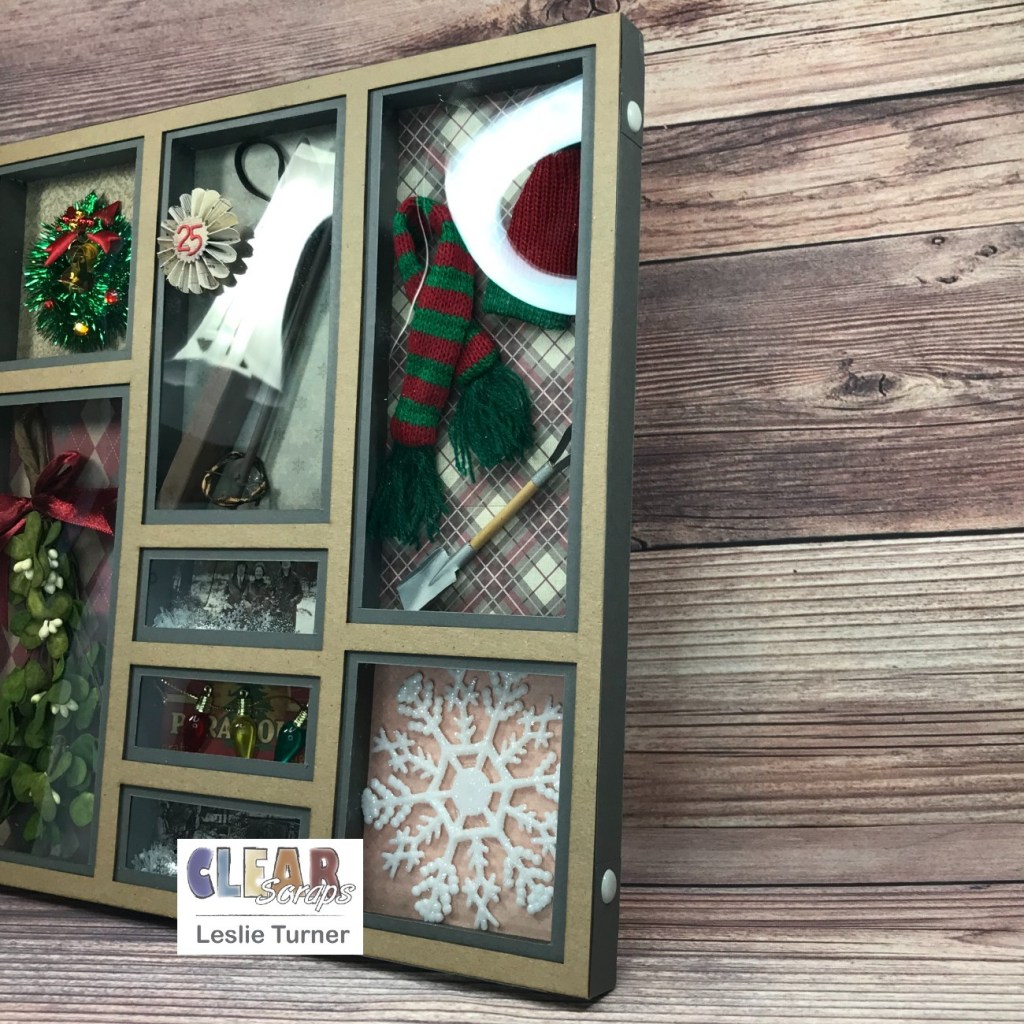
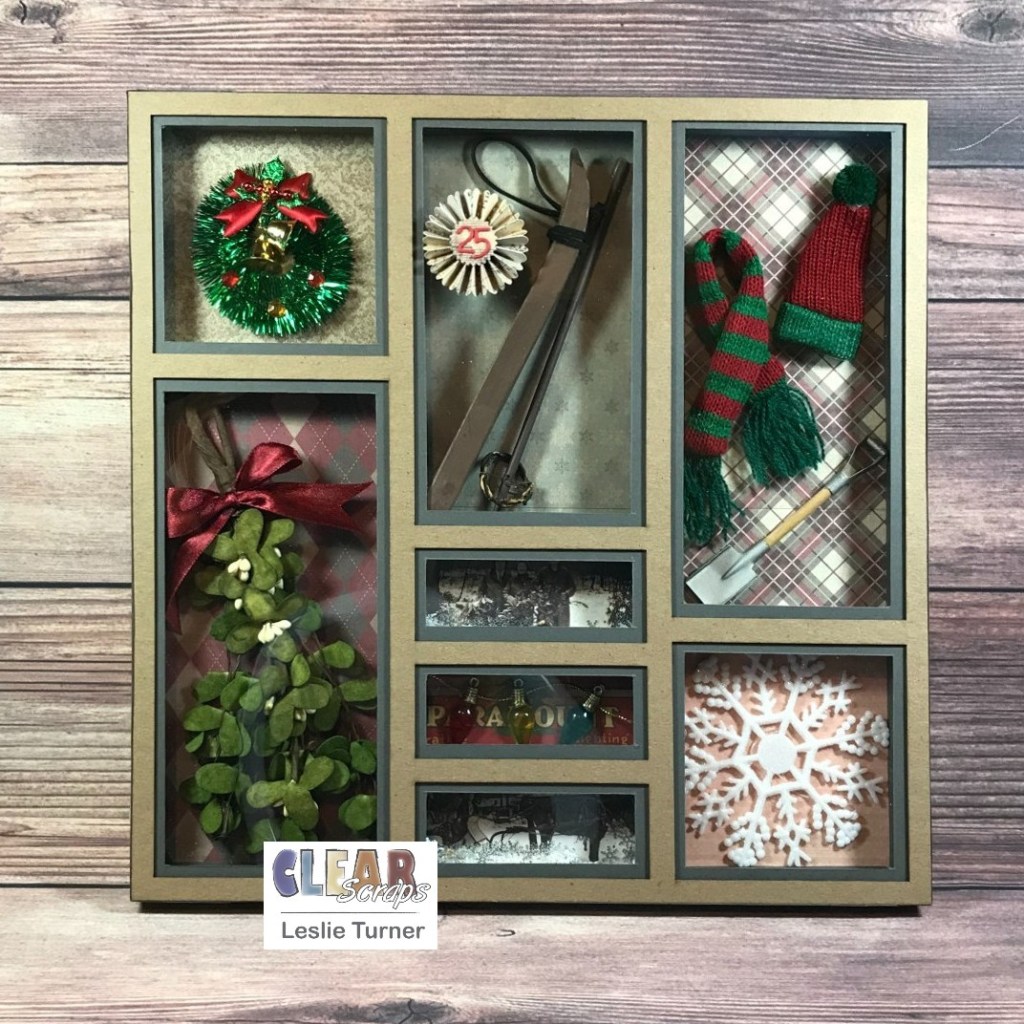
Hey, everybody! Welcome to another Monday closer to Christmas… it’s almost here! I hope you have all your Christmas crafting done or at least close to being done! I’m stoked to be back on the Clear Scraps blog today with another awesome DT inspiration project! I created a shadowbox from our Small Rectangle Printer Tray Frame, and I can’t tell you how much fun this was! I added several strips of double-sided adhesive foam tape between each of the chipboard layers so the compartments were deep enough to accommodate the vintage Christmas elements. I bought all of these fun vintage items (wreath, mistletoe, wood ski and pole, Christmas lights, scarf and hat, shovel, and snowflake) several years ago along with a different kind of shadowbox, and the shadowbox turned out to be too small, so everything just sat in my stash… until now!
Using one of the chipboard layers as a template, I adhered different colors and patterns of vintage Christmas paper, a couple vintage photos and a piece of ephemera to the chipboard back, to be seen through the apertures from each compartment. I then separated the compartments by adding several strips of foam tape down and across the interior sections and around the outside edges, added a chipboard layer, and then added several more foam tape strips to the interior sections and around the outside edges. I repeated the process with the second chipboard layer and more foam tape strips.
I adhered strips of gray cardstock around the inside perimeter of each compartment for a clean finished look, and then adhered the vintage Christmas elements into the compartments with a hot glue gun, adding sequins and seed beads to the two compartments containing the vintage photos. I adhered the acrylic divider to the front after removing the protective film from the underside, and then turned my attention to the third chipboard layer.
I cut a frame for each aperture on the third chipboard layer so that about 1/8″ of gray cardstock shows around the opening and adhered them to the back side of the chipboard layer, and then adhered it to the front after removing the protective film from the front side of the acrylic divider. I adhered strips of gray cardstock with gray enamel dots around the outside edge to conceal the foam tape strips, chipboard layers and acrylic divider. To finish the shadowbox, I adhered a rosette to the front that I die cut from patterned paper and embellished with die cut numbers. Here are close-ups of each compartment:
And one more peek… I’m absolutely in love with this project! SO happy with how it turned out! These printer tray frames are so versatile and the sky is the limit with what you can create with them! <3
Other products used: Cardstock/Paper: CutCardStock Basis Gray cardstock, CutCardStock Basis Red cardstock, Crafter’s Companion Vintage Christmas Collection paper pad Dies/Punches: Sizzix Alphanumeric Tiny Type Lower Thinlits, Sizzix/Tim Holtz Alterations Mini Paper Rosette strip die Accessories: Tonic Studios 12″ Guillotine Paper Trimmer, Fiskars 12″ SureCut Paper Trimmer, Scotch 3M foam tape, Bearly Art precision craft glue, vintage Christmas items from stash (wreath, mistletoe, wood ski and pole, Christmas lights, scarf and hat, shovel, and snowflake), Tim Holtz Festive Ephemera Pack, GKD gold cord, Eyelet Outlet Snowflake Sequins, Eyelet Outlet Gray Enamel Dots, Neat & Tangled Sequins, Pretty Pink Posh Marshmallow Seed Beads, hot glue gun
I hope you’ve enjoyed today’s project and you’re inspired to get those craft supplies out to play! Be sure to check out all the amazing acrylic, wood and chipboard goodies at Clear Scraps… OMGoodness, you won’t be disappointed! And head on over to the Clear Scraps Facebook Page for lots of inspiration! And while you’re at it, join the Clear Scraps Facebook Creative Group to connect with other Clear Scraps fans! Thanks so much for stopping by today – we’ll see you next time!
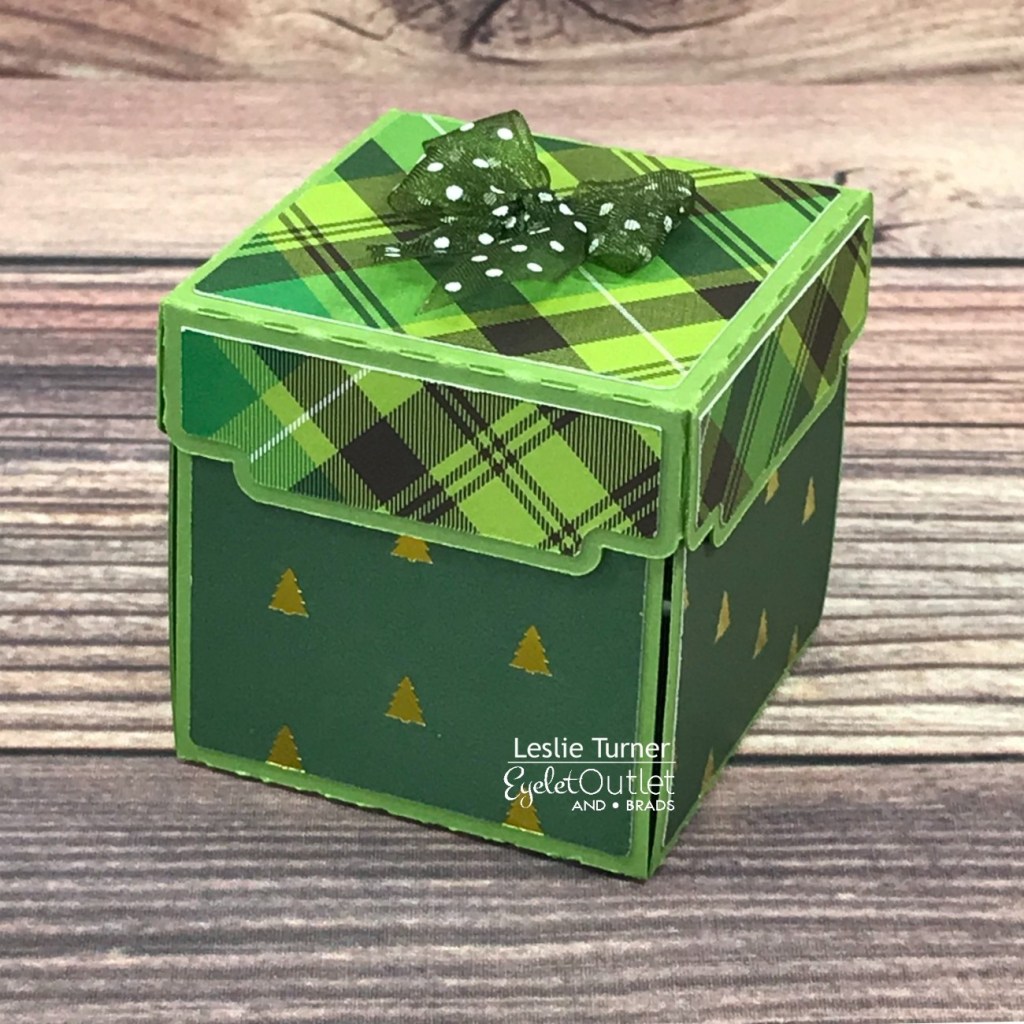
Hi everyone! A very Happy Saturday to you – I hope you’ve had a great week! Affiliate links are used in this post at no cost to you – I really appreciate your support! I’m stoked to be back on the Eyelet Outlet blog today with another awesome DT inspiration project! I created a fun mini Christmas explosion box to hold some yummy chocolates! I love all kinds of explosion boxes, especially those with three or four layers inside to embellish, but when I saw this mini, I just HAD to make one because it’s the perfect size to decorate inside with our brads! Although I used my Scan N Cut, this could easily be hand-cut and scored at 2″ intervals.
I cut the explosion box base from CutCardStock Stardream Metallic Fairway cardstock, the inside panels from the Christmas Holiday Print 6×6 Cardstock Pad, and the outside panels from the Christmas Print 6×6 Cardstock Pad and Christmas Holiday Print 6×6 Cardstock Pad. Keeping it very simple, I used a Candy Cane Brad, a Gingerbread Brad, Santa from the Santa & Mrs. Claus Brads, and a Snowman Brad to embellish the panels, and then stamped a sentiment in red ink on the center panel cut from Neenah Classic Crest 80# Solar White cardstock. I finished the box with a tiny bow fashioned from green and white dotted ribbon using my Zutter Bow-It-All v2.0 which I unearthed a few months ago while looking for something else in my studio, lol. This handy tool was a staple in my studio back in 2015 when I was on a ribbon design team. ;)
Here’s a shot with the chocolates (Ghirardelli Dark Chocolate with Sea Salt snowman and two Hershey Kiss Santa hats – two of my favorites) which fit perfectly in this box!
And one more look… so stinkin’ cute I can’t stand it! The brads are THE perfect embellishment for the inside of this little explosion box!
I hope you’ve enjoyed today’s project! Be sure to check out all the fun goodies at Eyelet Outlet! I can already see you drooling, lol! Be sure to ‘like’ and ‘follow’ Eyelet Outlet Facebook Page to keep up with news and sales, and while you’re at it, join the Eyelet Outlet Fans Facebook group for lots of creative inspiration! Thanks so much for stopping by today – we’ll see you next time! ;)
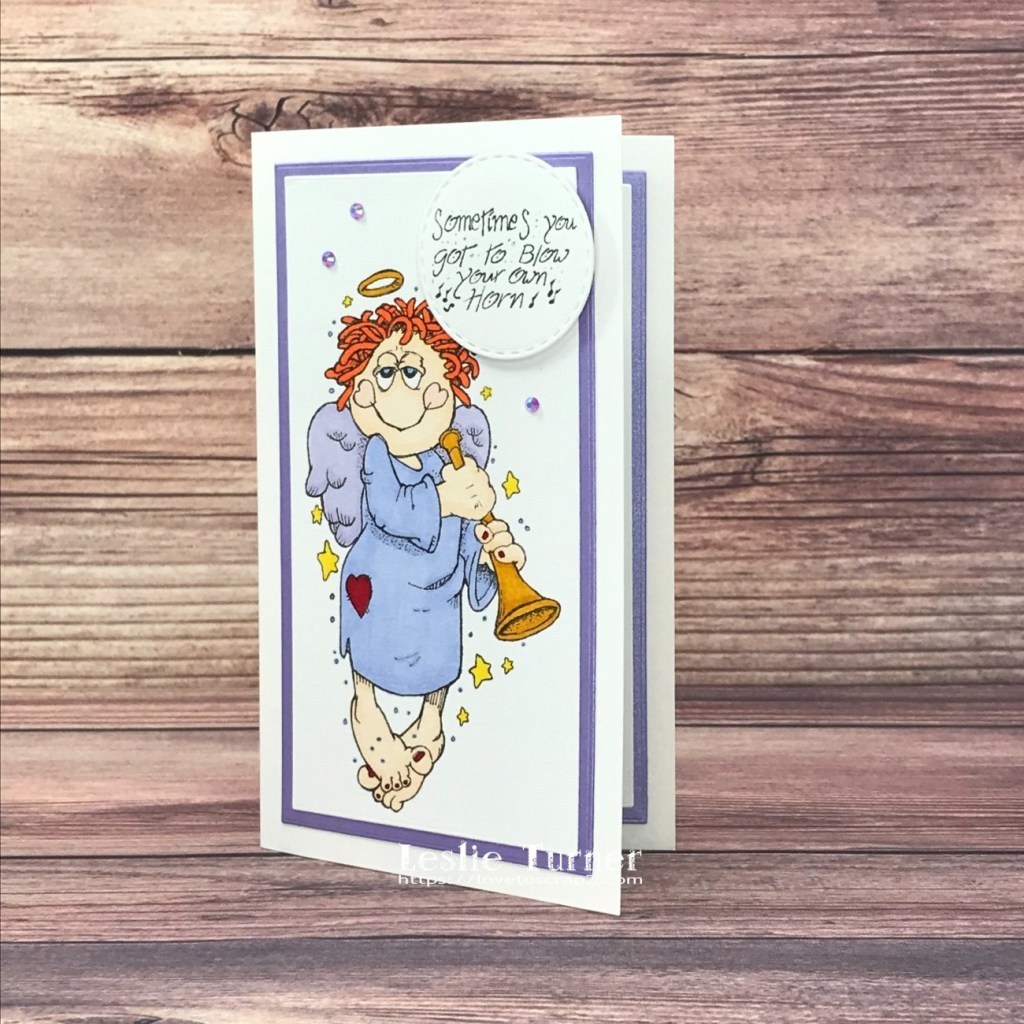
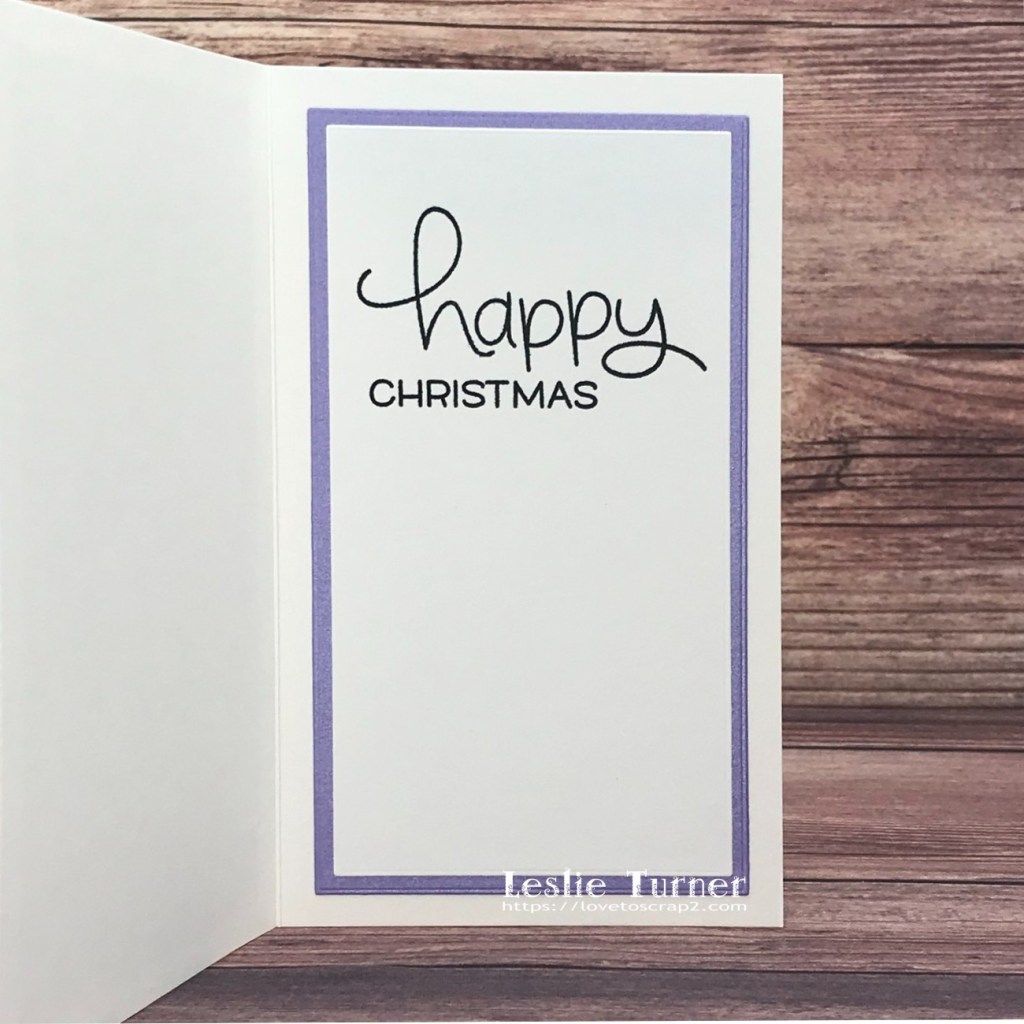
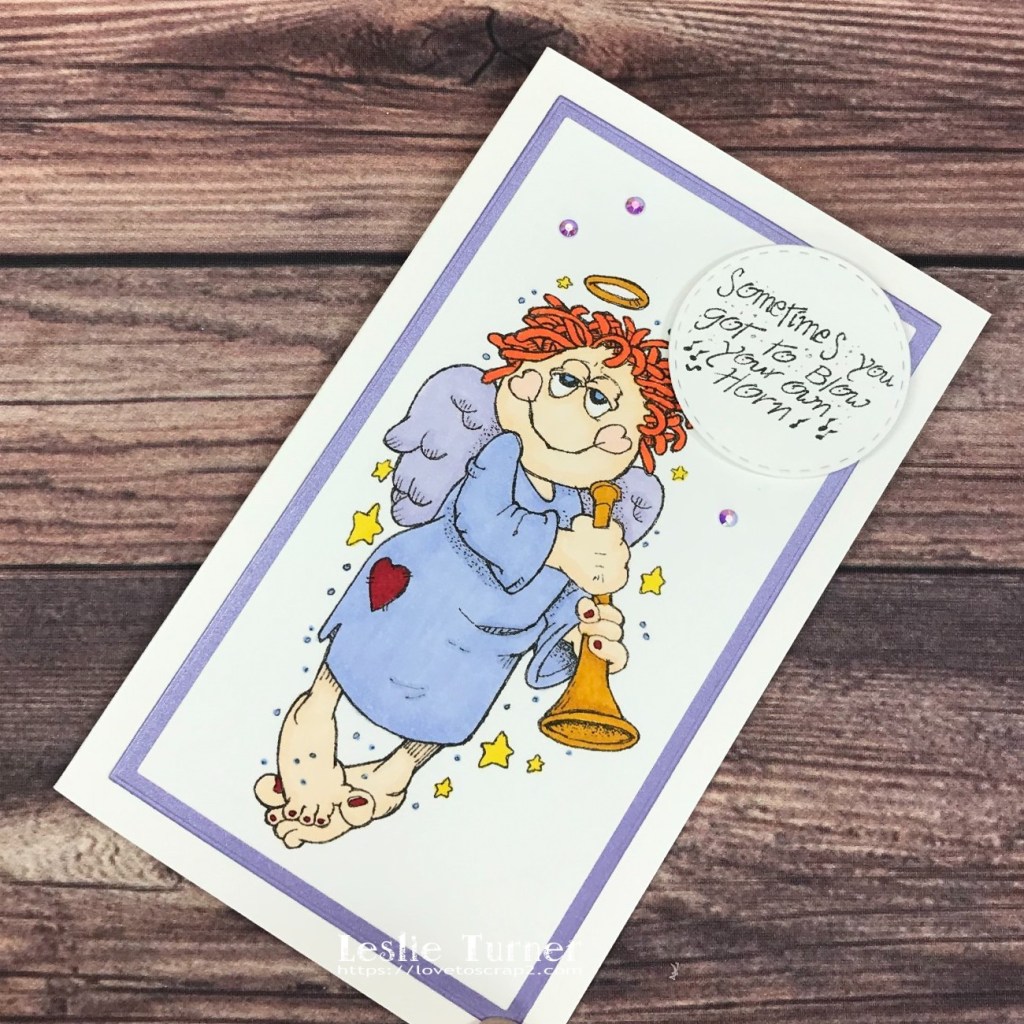
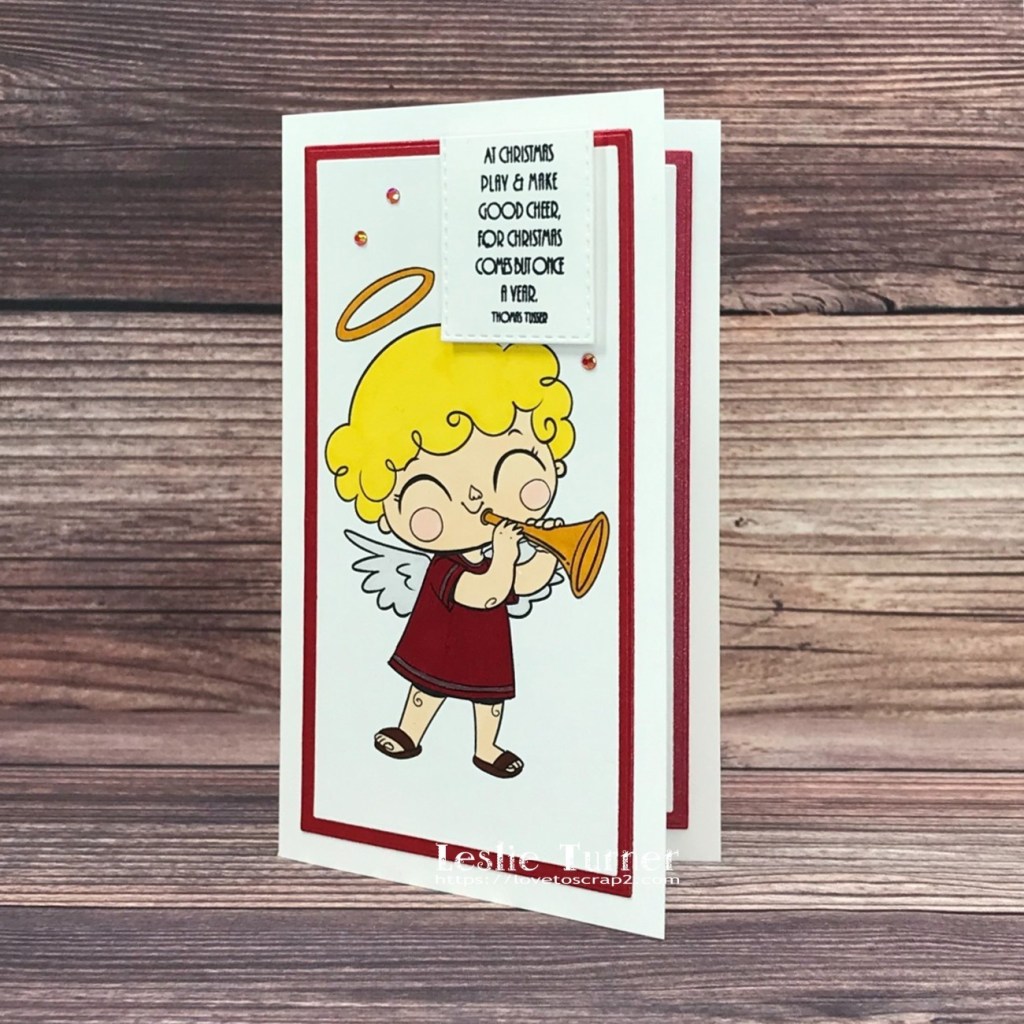
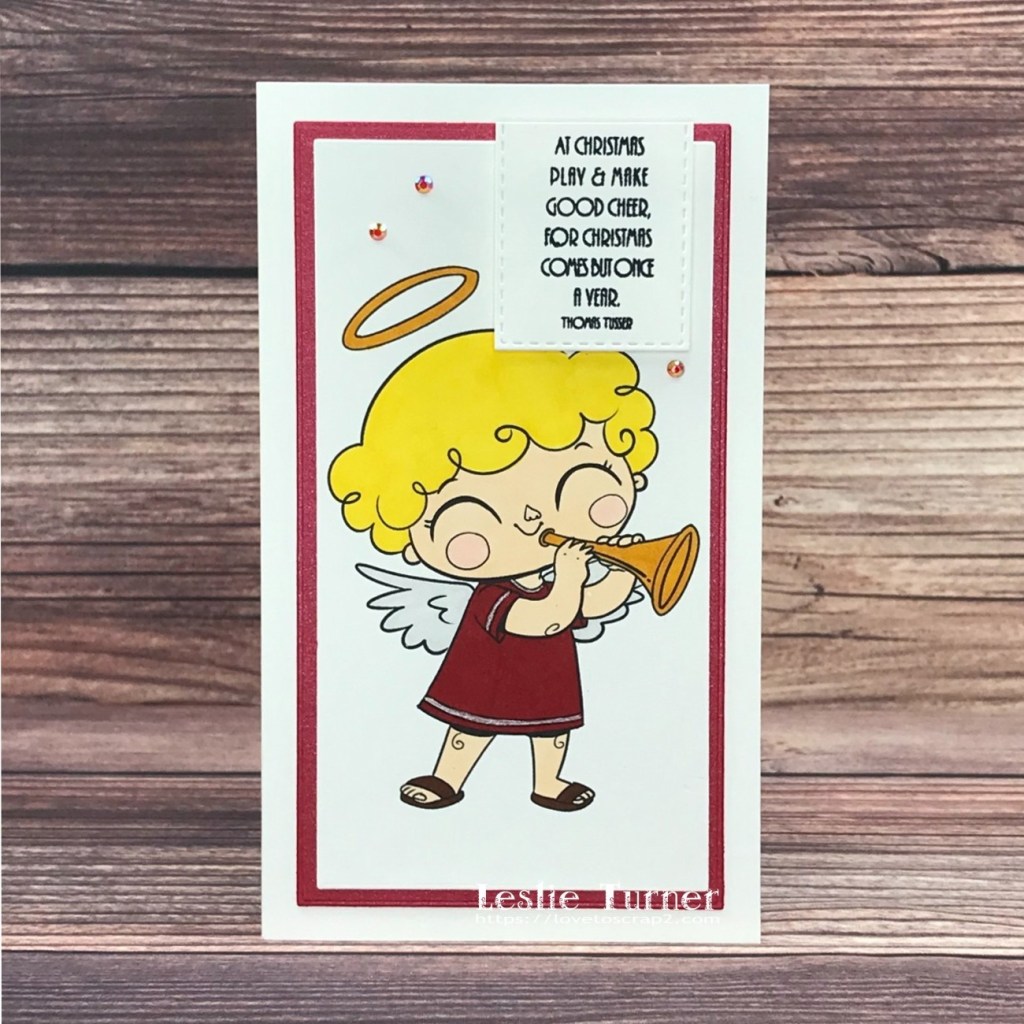
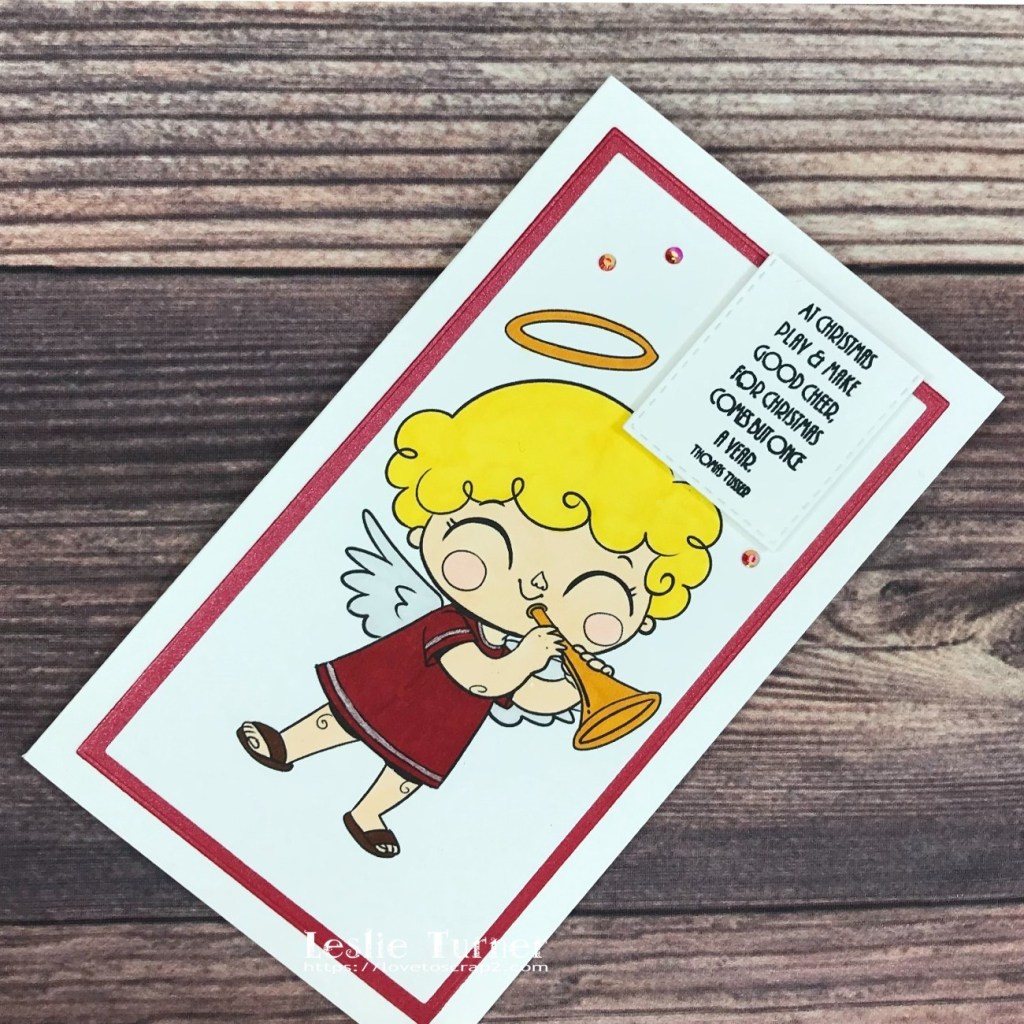
Hi friends! Well, another Hump Day has rolled around and we got more snow last night so we’re happy campers! We’re hoping for a White Christmas this year! Affiliate links are used in this post at no cost to you – I really appreciate your support! I’ve been on a mini slimline kick over the last several weeks and I created this one specifically to enter into the QKR Stampede Challenge #434 – Anything Goes this time! I won this ‘Tooting Angel’ digital image and ‘Blow Your Horn’ digital sentiment from QKR Stampede a while back and decided it was time to use them! So I created this Christmas card in non-traditional colors for a good friend of ours who I know will appreciate it! What a hoot!
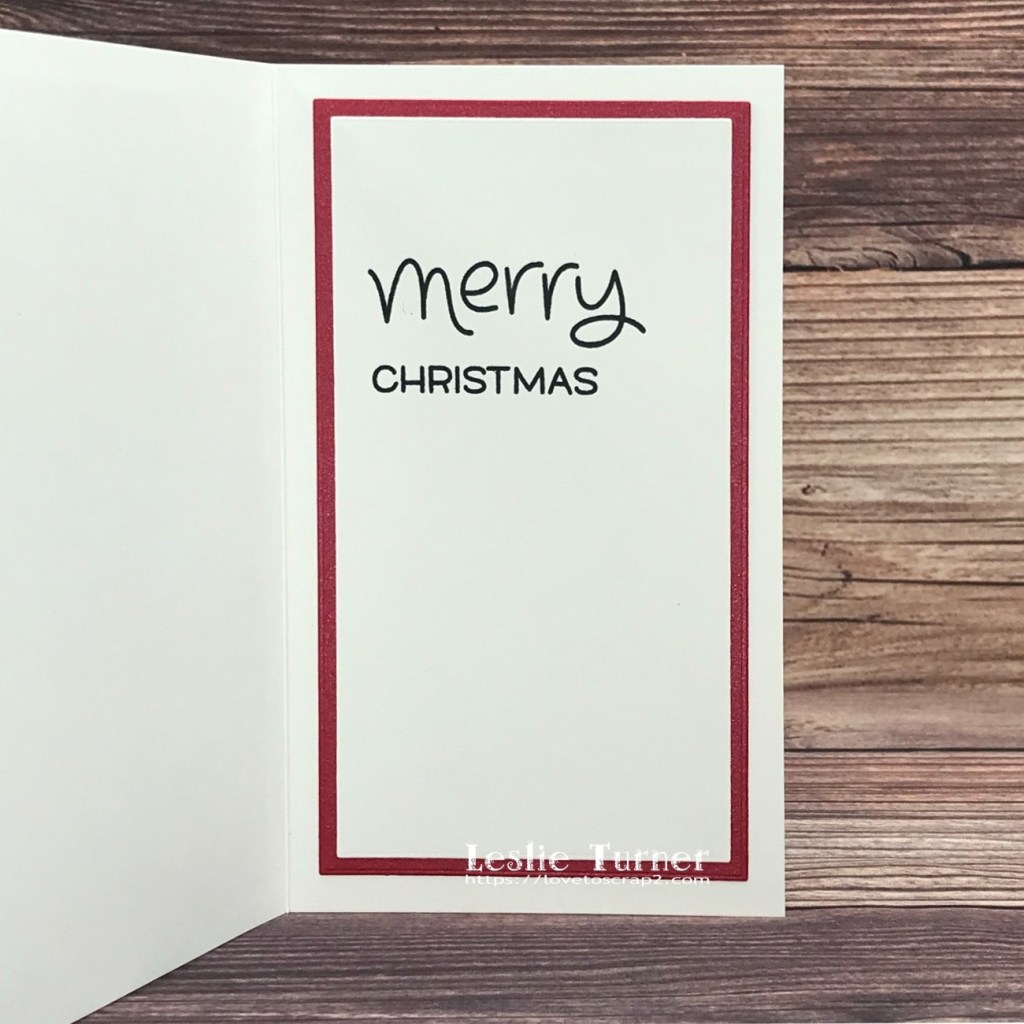
I hope you’ve enjoyed this super cute mini slim Christmas card in non-traditional colors! Thanks so much for stopping by today – we’ll see you next time! ;)
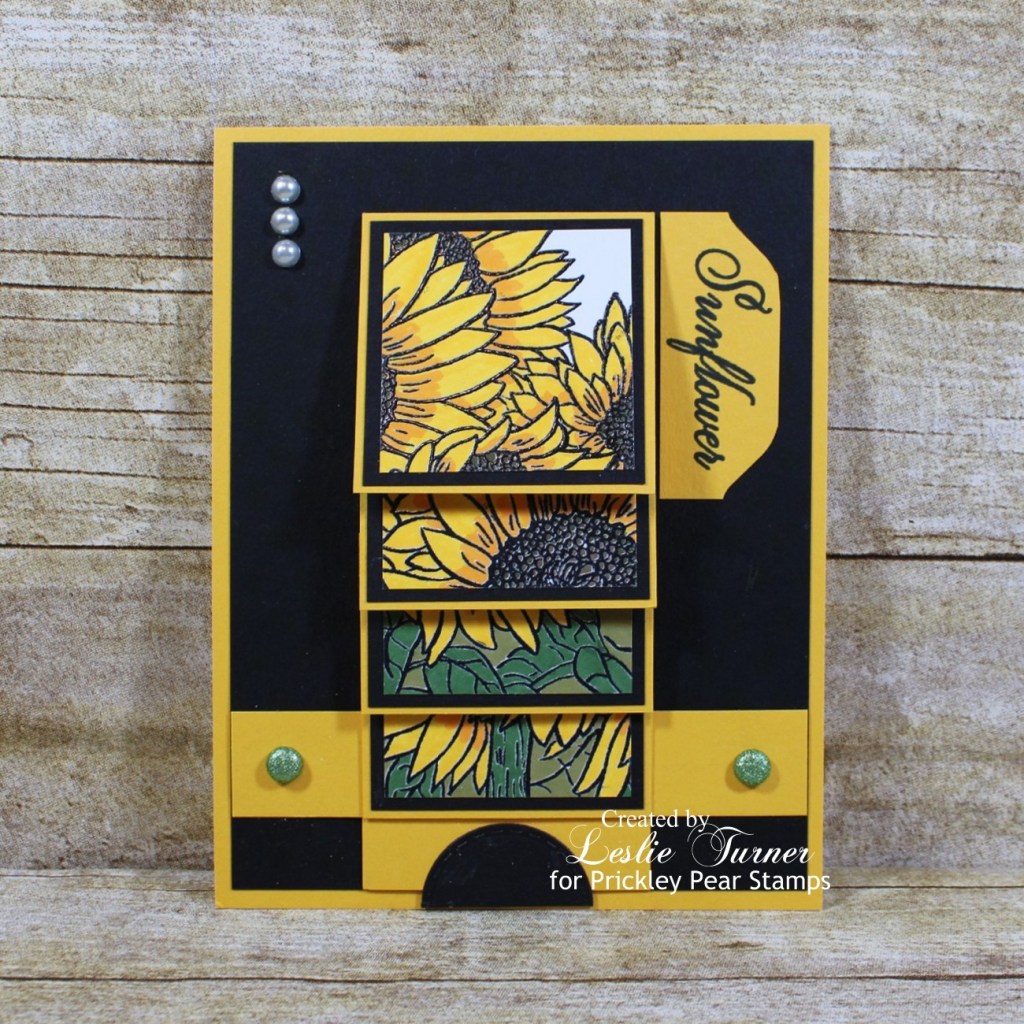
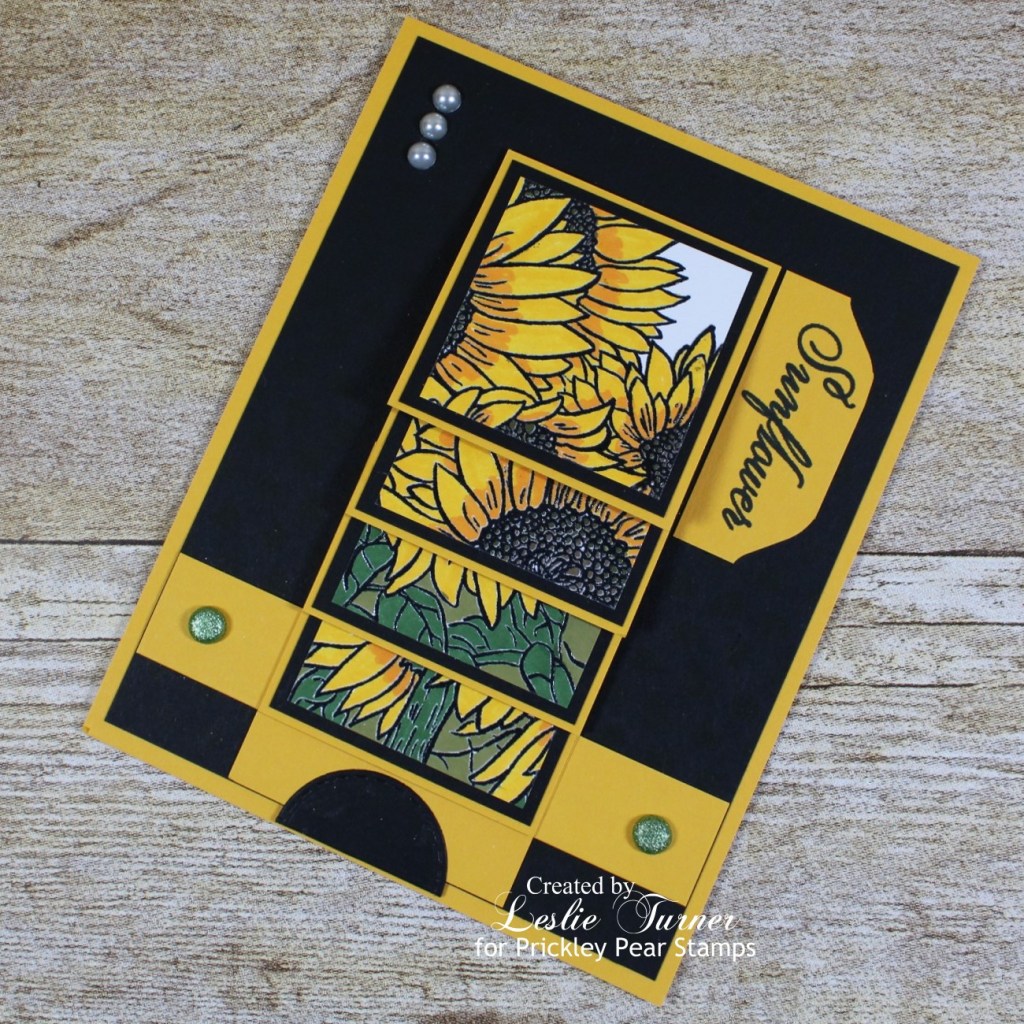
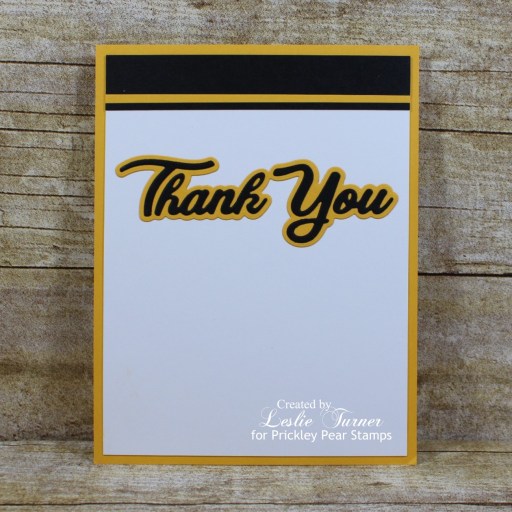
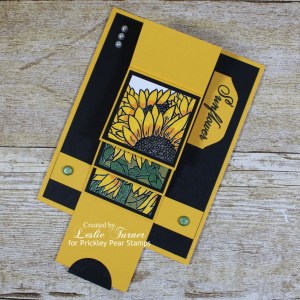
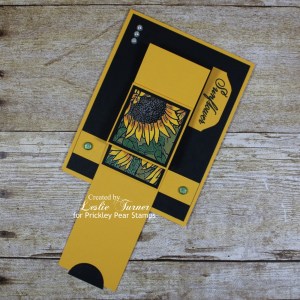
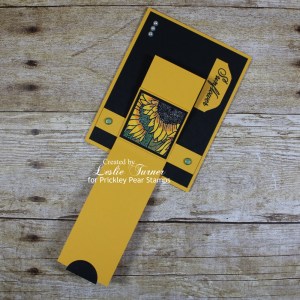
Hi everybody! Is it cold where you are?! We’re having a heat wave here this morning – it’s up to 37 degrees from 13 and 22 degrees the last couple mornings, lol! We got a few inches of snow several days ago and some of it is still on the ground, and we sure do love it! Affiliate links are used in this post at no cost to you – I really appreciate your support! I discovered that I still have a few card samples I created for Prickley Pear Stamps to share using stamp sets in their Sketched Florals line. This pretty waterfall card (only the second one of these I’ve ever made) features the Sketched Florals Sunflower stamp set along with their Shadow Words Thank You die which I absolutely love.
And one more look at each waterfall panel as they come down. Waterfall cards are so much fun and I can’t believe I’ve only ever made two of these in all the years I’ve been crafting! And the sunflower is my favorite flower, so you can only imagine how much I love this Sketched Florals Sunflower stamp set!
I hope you’ve enjoyed this project! Be sure to check out all the awesome stamps and dies at Prickley Pear Stamps! If you’d like to save 10% on anything on the site when you shop at Prickley Pear Stamps, use the coupon code LESLIE10 at checkout! And be sure to ‘like’ and ‘follow’ the Prickley Pear Stamps Facebook page to keep up with news and sales, and join Prickley Pear Pals (the fan group) for lots of fun crafty ideas and to share your creativity! And finally, we’d love to see you visit the Prickley Pear Stamps blog that’s in the process of being revived and become a Follower! Hope to see you there! Thanks so much for stopping by today – we’ll see you next time! ;)
12/18/21 Top Rocker at 613 Avenue Create! 1/1/22 Favorite at {PIN}spirational Challenges! 1/13/22 Shoutout at River of Creativity!
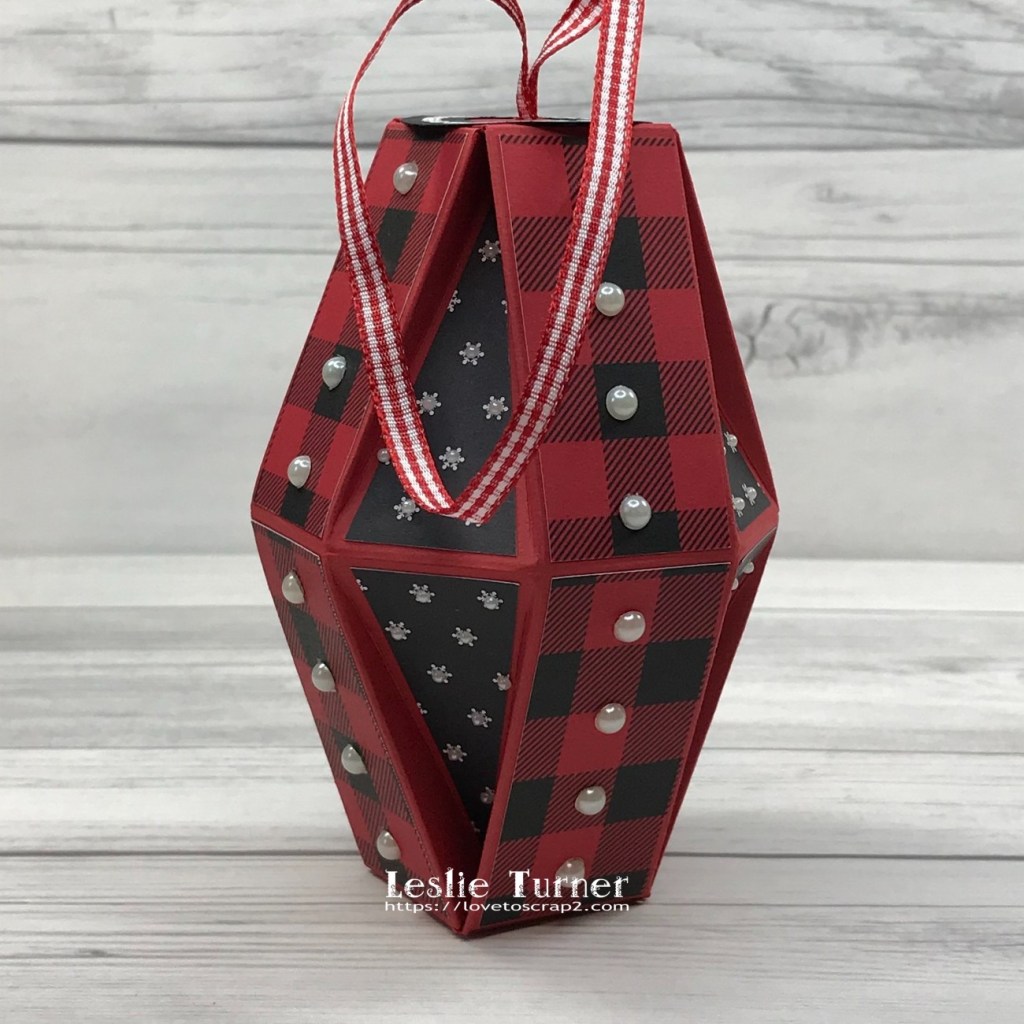
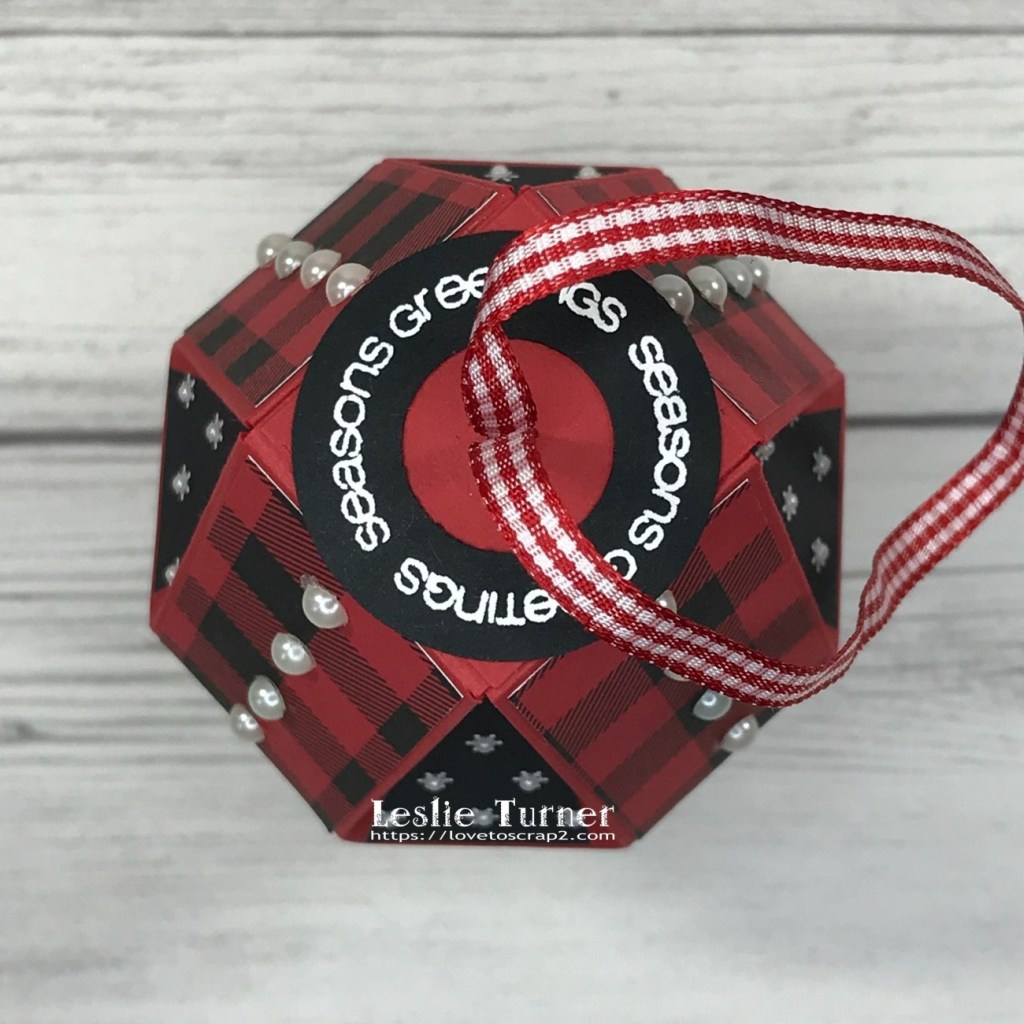
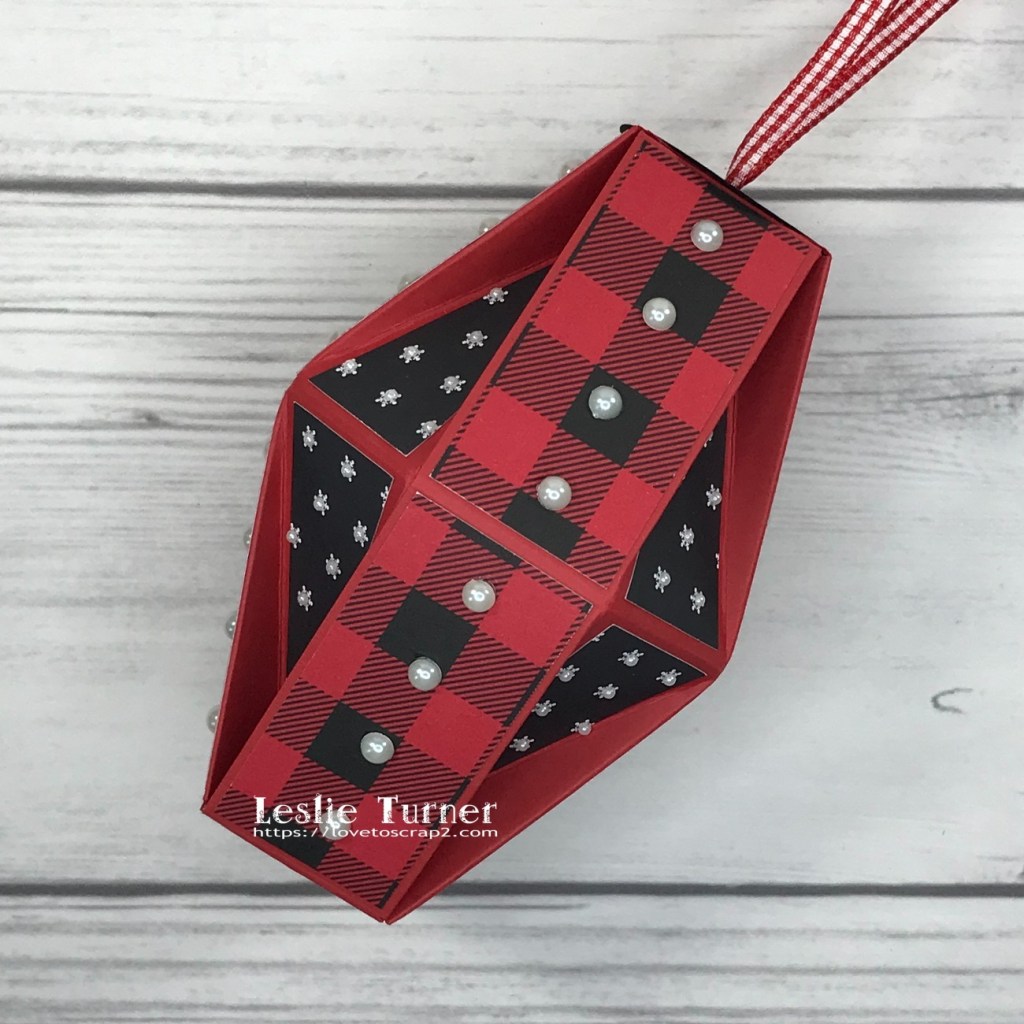
Hi friends! A very Happy Tuesday to you all! I hope you’re having a stellar week so far! Affiliate links are used in this post at no cost to you – I really appreciate your support! I participated in the Bearly Arts ‘Merry Craftmas’ Ornament Exchange this year and wanted to share the long faceted Christmas ornament I made for my exchange partner, Cat, in Florida! I made several long and short faceted Christmas ornaments several years ago HERE and thought this style ornament in a country plaid theme would go over well! She has received it and loved it, so now I can post it!
I cut the ornament base from CutCardStock Basis Red cardstock along with panels from patterned cardstock from the Christmas Holiday Print and Christmas Print cardstock pads. I constructed the ornament, and adhered the panels and lots of pearl bling.
I used some red and white checked ribbon from my stash for the hanger, and added a circular sentiment stamped from the CAS-ual Fridays Stamps Snowflake Greetings stamp set and heat embossed in Hero Arts White Embossing Powder, then punched with a Stampin’ Up 3/4″ circle punch and a Fiskars 1-1/2″ circle punch, which I adhered to the top.
And one more peek… so loving how this turned out! I’m delighted that Cat loved it and am super proud to have made a new friend in the process! Definitely looking forward to participating in the ornament exchange again next year!
I hope you’ve enjoyed seeing this ornament and you’ll consider joining in the fun next year! Be sure to sign up for Bearly Arts emails and watch for the invite to participate in November! Thanks so much for stopping by today – we’ll see you next time! ;)
12/18/21 Top Rocker at 613 Avenue Create! 12/31/21 Best Technique Winner at Classic Design Challenge Blog!
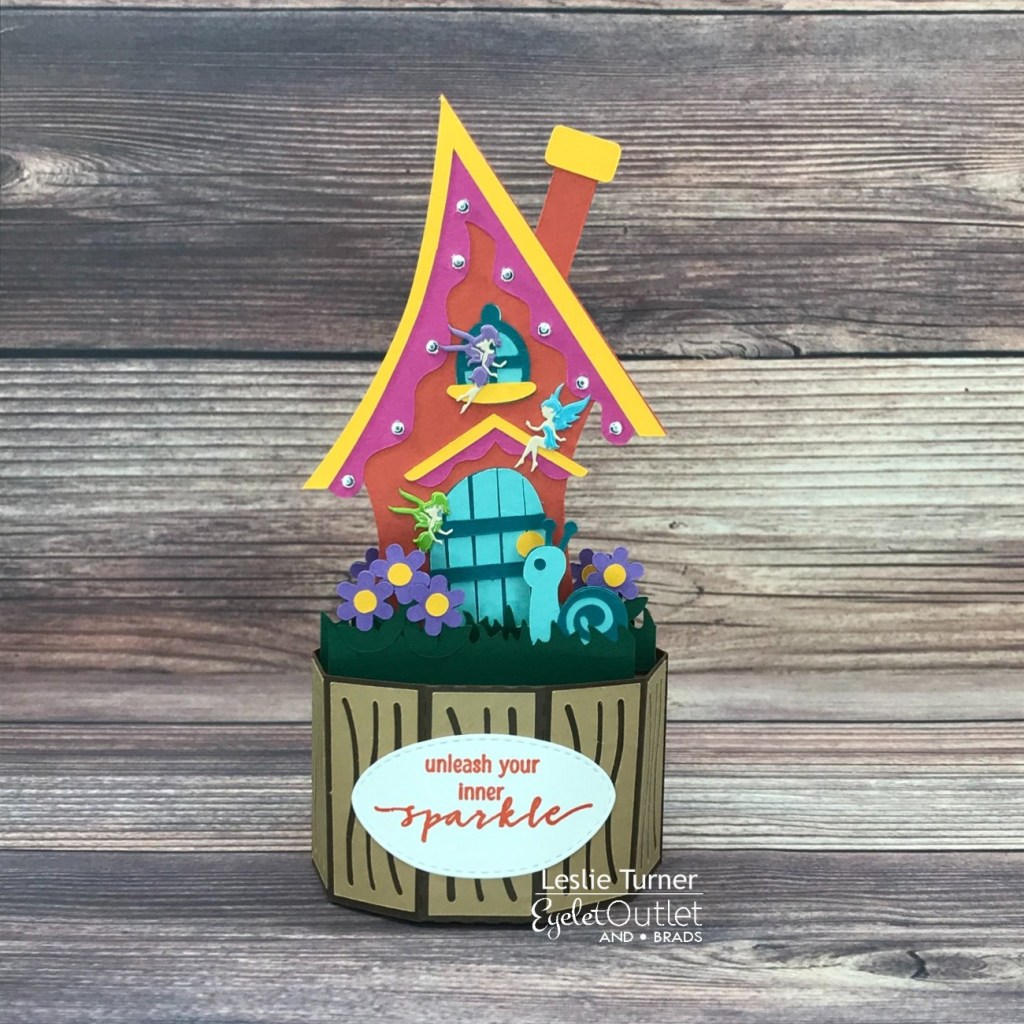
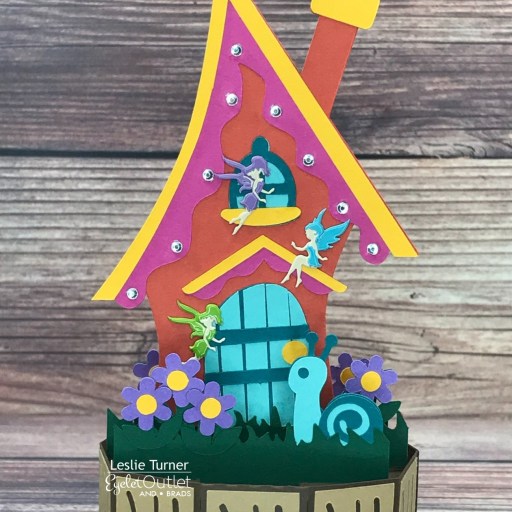
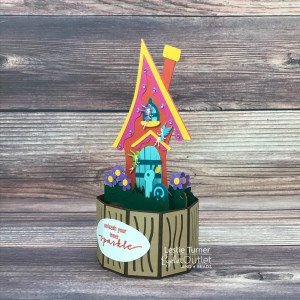
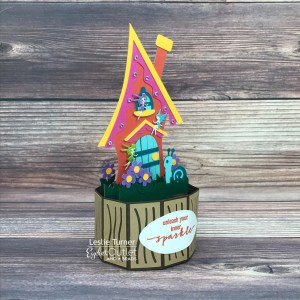
Hey peeps! A very Happy Saturday to you – I hope you’ve had a great week! They seem to be flying by at a wicked fast rate of speed! Affiliate links are used in this post at no cost to you – I really appreciate your support! I’m stoked to be back on the Eyelet Outlet blog today with another awesome DT inspiration project! I created the cutest-ever fairy house 3-D project featuring our Fairy Brads and clear gemstones from our Clear Jewel Bling Strips! I actually made two of these fairy houses with very subtle differences between the two – one had pink flowers and two fairies (which I sent to my granddaughter) and this one has purple flowers and and three fairies.
I sure do enjoy my Scan N Cut, and whenever I get it out for a crafty spin, I cut multiple projects to work on between design team projects that keep me busy for the weeks to come. There’s nothing more fun than watching a 3-D project come to life! Going back 12 years, I’ve owned a personal size Cricut, a Cricut Expression and a Silhouette Cameo prior to buying my first Scan N Cut six years ago.
I upgraded to an SDX125 a little while back and I’m in love. It came with three extra design collections when I bought it (plus it already has 600+ built-in designs) and the cutting blade has an auto-sensor that tells the machine how thick the paper, cardstock, leather, foam, acetate, fabric, etc. is that you’re cutting, so no more adjusting the cutting blade depth. If you’re in the market for a die cutting machine (or an upgrade), the SDX125 is the way to go! ;)
I stamped the sentiment on Neenah Classic Crest 80# Solar White cardstock in orange ink, cut it with a stitched oval die, and adhered it to the front of the tree stump. Here are a couple angled shots:
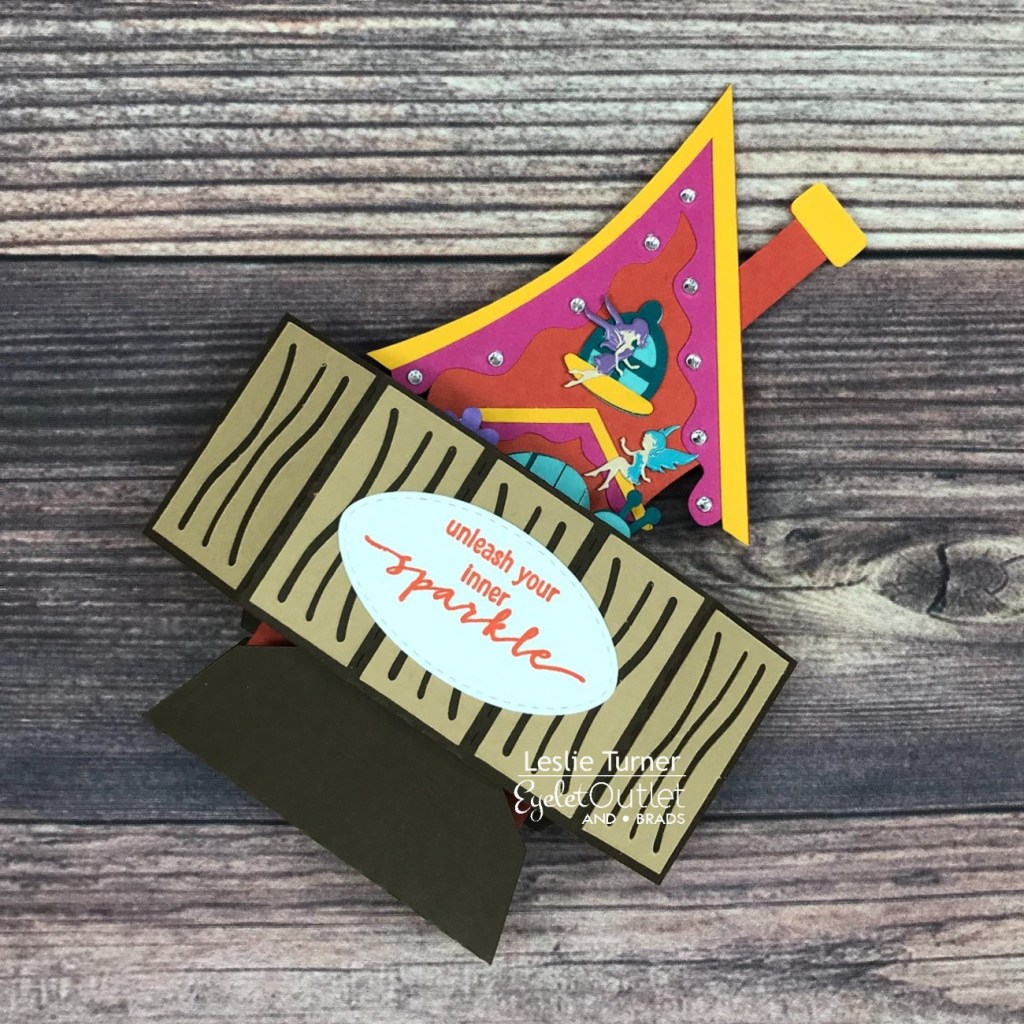
And one more look folded flat for mailing! So stinkin’ cute I can’t stand it!
I hope you’ve enjoyed today’s project! Be sure to check out all the fun goodies at Eyelet Outlet! I can already see you drooling, lol! Be sure to ‘like’ and ‘follow’ Eyelet Outlet Facebook Page to keep up with news and sales, and while you’re at it, join the Eyelet Outlet Fans Facebook group for lots of creative inspiration! Thanks so much for stopping by today – we’ll see you next time! ;)
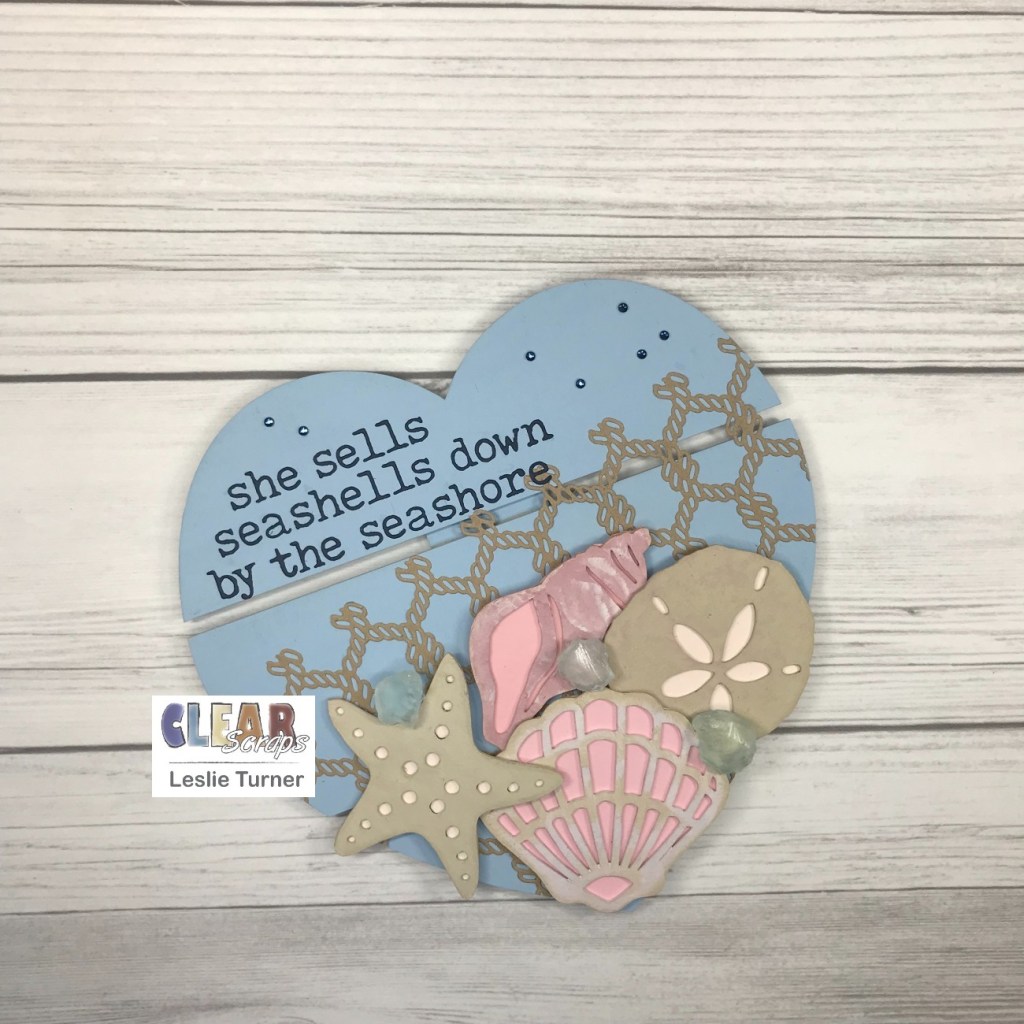
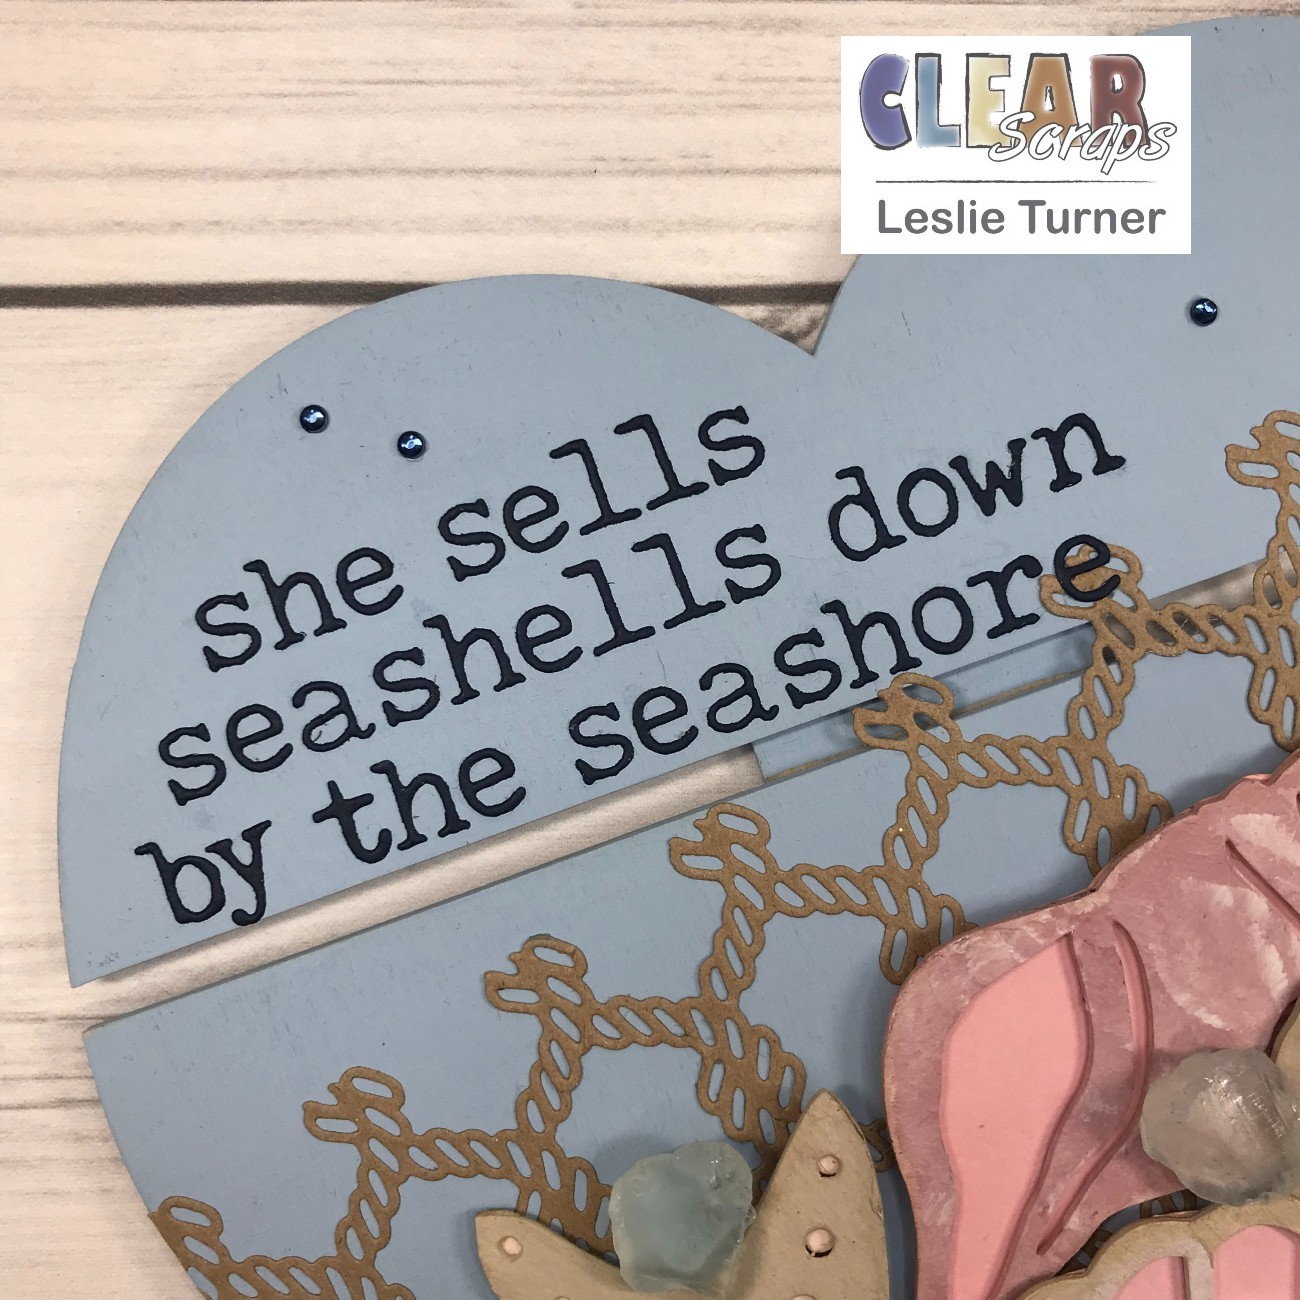
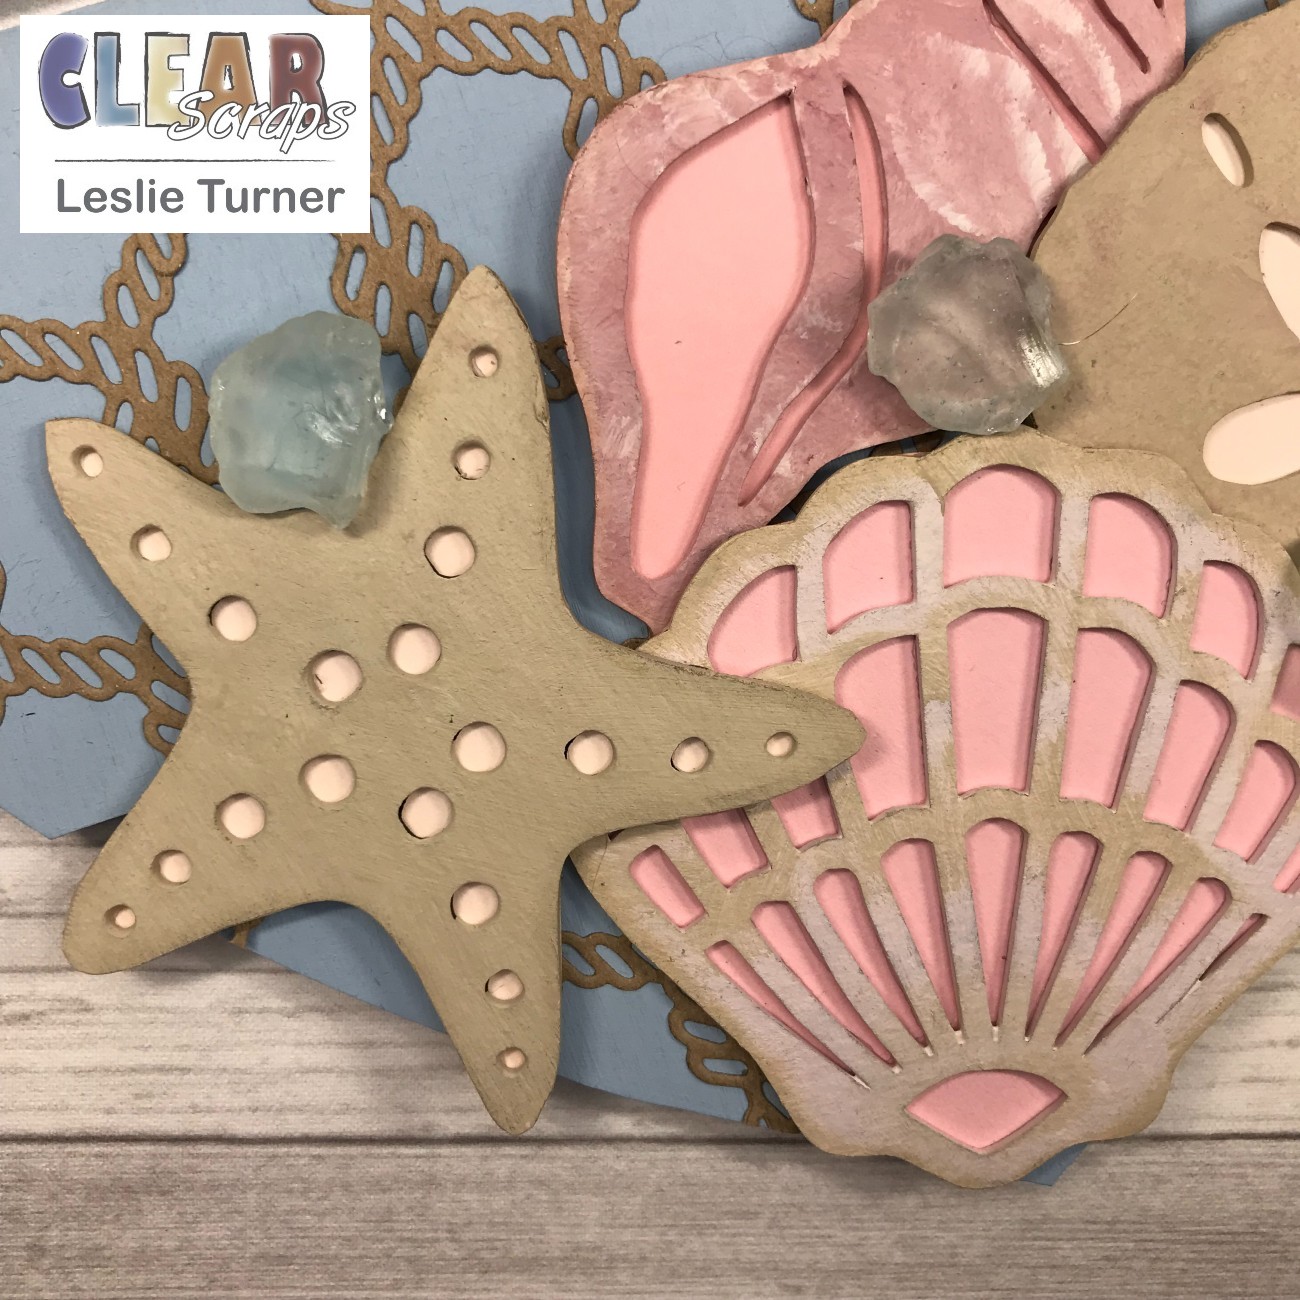
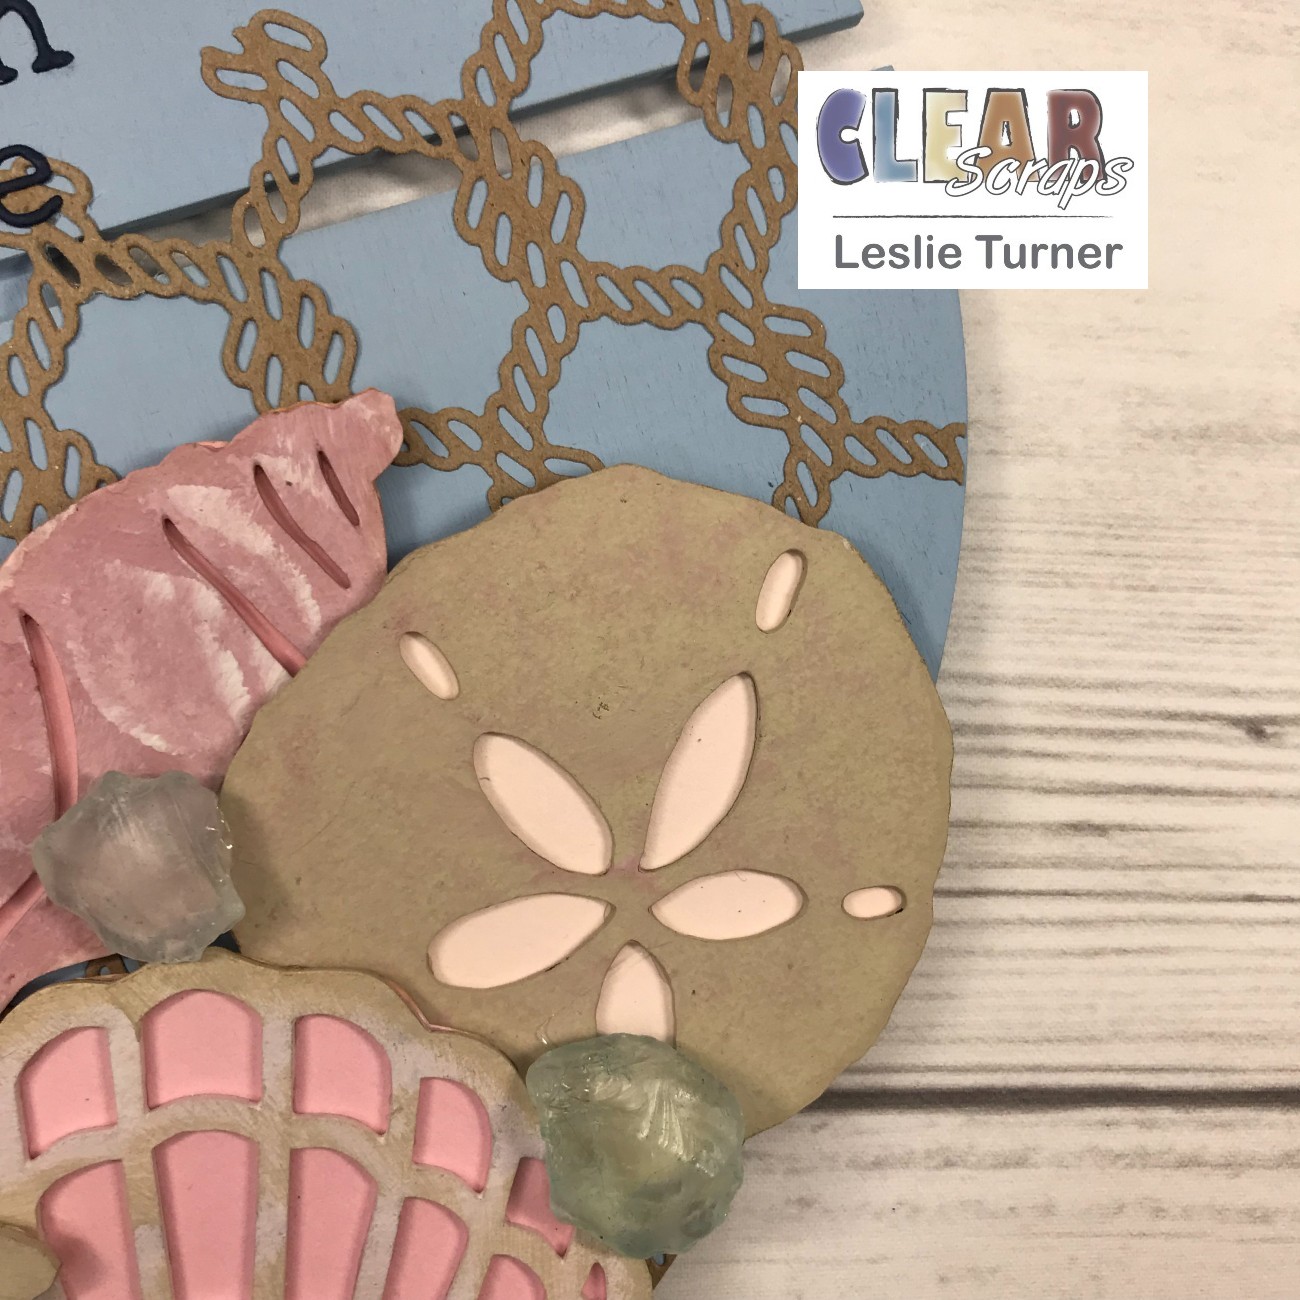
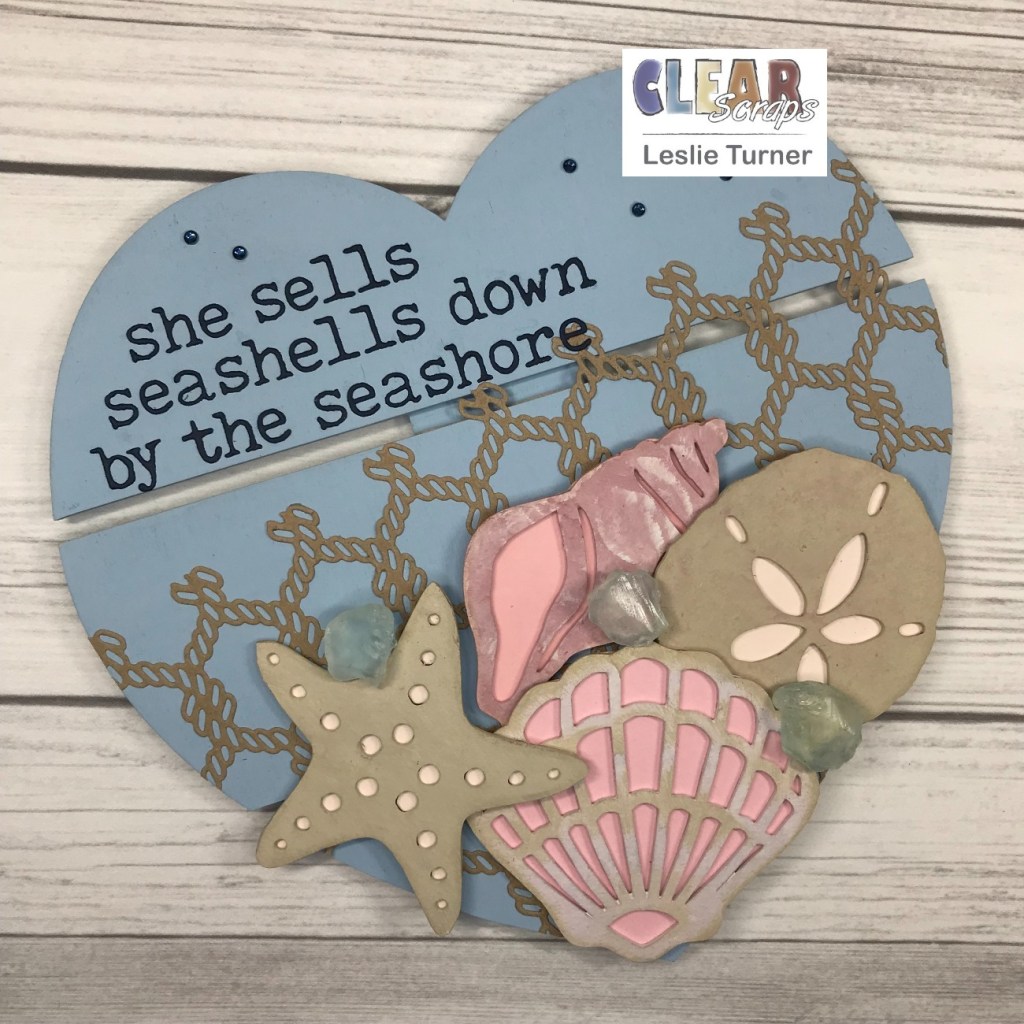
Hey, everybody! So hard to believe that we’re a little over a week into December already! This year has literally flown by and it won’t be too much longer before the jolly round man will make his appearance! I’m thrilled to be back on the Clear Scraps blog today with another awesome DT inspiration project! Even though we’re almost officially into Winter, I’m squeezing in one more Summer-themed project! This home decor piece features our Medium Heart DIY Pallet Shape embellished with our Sand Dollar Chipboard Embellishments and Fan Shells Chipboard Embellishments along with a few other supplies! Can’t tell you how much I enjoyed creating this! ;)
I started by painting the front and back of the Medium Heart DIY Pallet Shape with Glacier chalk paint. Then I moved on to the Sand Dollar Chipboard Embellishments and Fan Shells Chipboard Embellishments, and painted them with Prominent Pink, Tuscan Red and Oatmeal chalk paint, all mixed separately with Farmhouse White Ash paint to get the desired colors for the individual shells. Then I adhered various shades of pink cardstock behind the shells and inked the edges with antique linen distress ink. I die cut the twisted rope background and adhered it at an angle to the heart pallet. I attached the shells, one by one, to the heart pallet and then added three pieces of sea glass (not sure if it’s real or faux but it works!) that I inked with tumbled glass distress ink. I die cut the letters needed for the sentiment, adhered them in the upper left corner, and then added dark blue gemstones to finish the piece.
And one more look… super happy with how this turned out and I can’t wait to share it! I absolutely LOVE it when a project turns out exactly the way I envisioned it! ;)
Other products used: Cardstock/Paper: CutCardStock Brown Bag Kraft Paper, CutCardStock Pop-Tone Bubblegum cardstock, CutCardStock Basis Pink cardstock, CutCardStock Basis Soft Pink cardstock, CutCardStock Basis Navy cardstock Ink: Ranger Antique Linen and Tumbled Glass Distress Inks Dies/Punches: Tutti Designs Twisted Rope Background die, Sizzix Alphanumeric Tiny Type Lower Thinlits Accessories: Farmhouse white Ash paint; Folkart Chalk Paint- Prominent Pink, Tuscan Red, Oatmeal and Glacier; sea glass, hot glue gun, Eyelet Outlet Dark Blue Jewel Bling
I hope you’ve enjoyed today’s project and you’re inspired to get those craft supplies out to play! Be sure to check out all the amazing acrylic, wood and chipboard goodies at Clear Scraps… OMGoodness, you won’t be disappointed! And head on over to the Clear Scraps Facebook Page for lots of inspiration! And while you’re at it, join the Clear Scraps FacebookCreative Group to connect with other Clear Scraps fans! Thanks so much for stopping by today – we’ll see you next time!
Hi friends! Happy Thursday – I hope you’re having a great week! Seems we stay pretty busy but I always find time to craft in my happy place – that’s what keeps me sane, lol! Affiliate links are used in this post at no cost to you – I really appreciate your support! I have a super adorable mini slimline Christmas card to share this morning that I created for The Outlawz December Freebie/Progressive Challenge using the ‘Angel’ digital image gifted to us by the sponsor this month, MMedel Illustrations. If you haven’t joined The Outlawz Challenges yet, you ought to – there are always challenges going on and prizes to be won! And I know I’ve mentioned before that the perk for regularly participating in the Freebie/Progressive Challenge is a free digital image to create with! I am a clear/rubber stamp girl and don’t use many digis anymore but I have to admit that I enjoy participating in this challenge each month.
I hope you’ve enjoyed this project and will come over and join in all the fun at The Outlawz Challenges! Lots of fun going on! Thanks so much for stopping by today – we’ll see you next time! ;)
12/11/21 Top Rocker at 613 Avenue Create! 1/4/22 Top 3 at Wednesday’s Creative Inspirations!
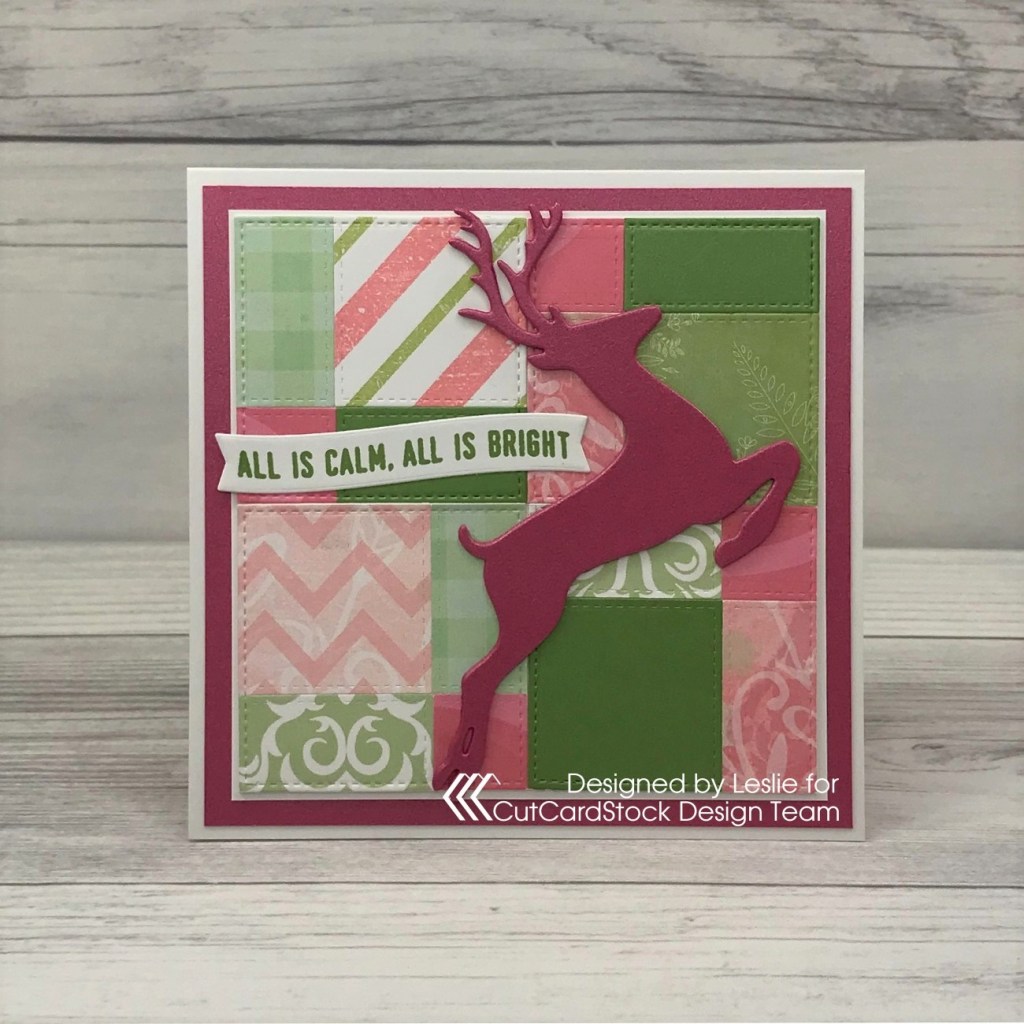
Hi everyone! I hope your week has started off rather nicely! It’s so amazing to me how quickly the weeks go by, and then weekends go by even faster! Affiliate links are used in this post at no cost to you – I really appreciate your support! I’m stoked to be back on the CutCardStock blog today with an awesome DT inspiration project featuring our Stardream Metallic cardstock that’s on sale this month so be sure to stock up! Several weeks ago I posted my first ‘disappearing nine patch card’ which was showcased in a recent Splitcoast Stampers newsletter HERE. I enjoyed it so much that I created another one with one small variation – the use of stitched square dies! I LOVE Christmas cards in non-traditional colors, and the pink and green color combo has always been one of my favs!
I hope you’ve enjoyed today’s project and you’re inspired to get crafty! Be sure to check out all the awesome cardstock and other goodies at CutCardStock (adhesives, labels, stickers, pens, watercolors and ribbon to name a few). And head on over to the CutCardStock Facebook Page for more inspiration! Thanks so much for stopping by today – we’ll see you next time!